If you know how to install macOS onto an external hard drive, you may try out everything new in macOS Monterey/Ventura or others without risking your present system. Suppose you find that the latest macOS is unreliable, incompatible, or unpleasant in any way.
In that case, you may easily reformat the external hard drive and use it for other uses, such as archival storage. Let's find out how to install macOS on an external hard drive.
Get The Drive Ready For Installation
You may install macOS Monterey or the newest macOS by following these steps. However, the procedure may be tweaked depending on whether you use an internal or external disk.
To use the external drive with your Mac, you must first connect it.
Use the shortcut Cmd + space to open the Spotlight search and then begin typing Disk Utility to open it.
If you're using High Sierra or later, you'll need to choose View from the menu that appears just below the close and minimize buttons before continuing. Simply choose the option to show all devices. Now, the external volume may be seen beside the root disk.
Ensure the External drive is selected in the sidebar (the following step won't work if you merely choose the volume; in the aforementioned example, you would choose the SanDisk rather than the NO NAME).
Choose the Erase option. To successfully reformat the disk, you must first delete all data.
Naming your drive "macOS Big Sur" or "USB" is a good way to keep track of it.
Format your document as Mac OS Extended (Journaled).
Set the Scheme to GUID Partition Map.
![Install macOS to An External Hard Drive]()
Click Erase.
Wait as Disk Utility sets up the disk and creates the partition (this can take a few minutes).
If you're finished, choose the Done button.
Your external storage has been changed to the name you specified and is now prepped for the installation of macOS, but there is one more step you must do before proceeding.
Obtain The Mac OS Installation Files
You must first decide whether you wish to use a beta version of macOS, a fully released version of macOS, or an earlier version of macOS. As the installation for macOS Monterey is available for direct download from the App Store, this is the simplest of the steps.
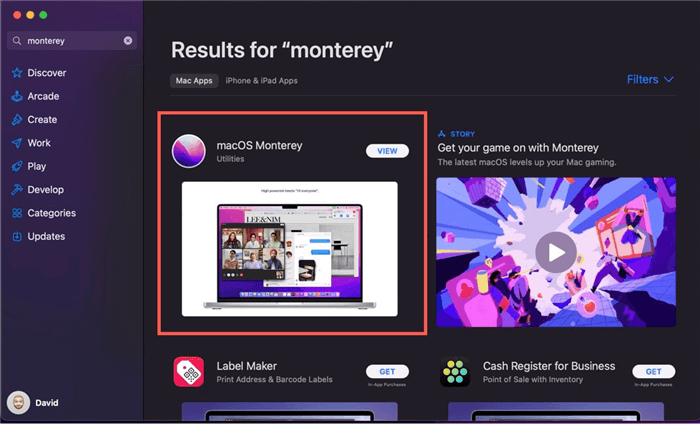
On your Mac, open the App Store.
To find "macOS Monterey," just use the search box and click the Return key.
Click on the result labeled "macOS Monterey."
To begin downloading the installation for macOS Monterey, choose the Get button.
![Install macOS to An External Hard Drive]()
The downloaded installer may be located in the Applications folder, just like any other software obtained from the App Store. The app is called "Install macOS Monterey."
Install macOS On The External Disk
Install the beta or other Mac operating systems now on your external storage.
To install Catalina, Big Sur, or any other version of macOS, launch the Finder, go to the Applications folder, and double-click the installer's icon. Additionally, Spotlight may be used to locate it (press Command and Space and type the name of the OS).
To launch the installer, click here.
A window should be opened (check the Dock if not). You'll be prompted to continue setting up macOS Monterey (or whatever) after clicking Continue.
Accept the terms of the software license contract.
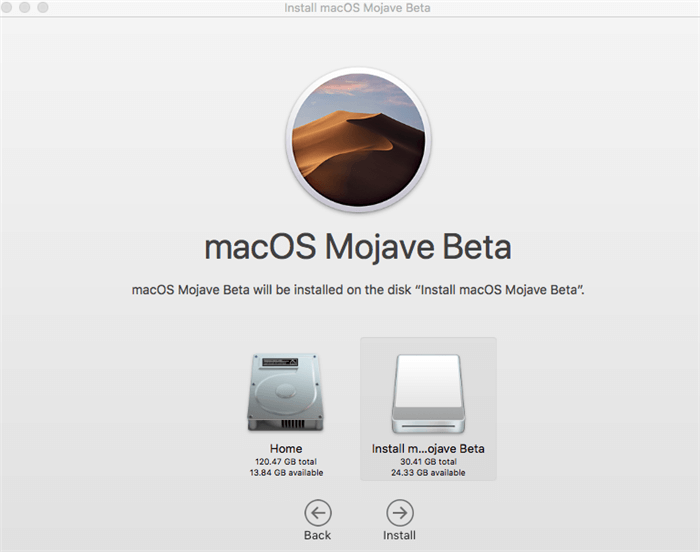
Click Show All Disks after that—this is crucial. If you don't wish to install it on your primary hard disk, do not choose "Home."
Select the external drive.
![Install macOS to An External Hard Drive]()
Hit the Install button.
Please be patient as the drive's new version of macOS is installed. Be patient; if the program says it will only take 10 minutes, it's probably not telling the truth.
Warning: If your external drive wasn't formatted as a GUID Partition following the instructions above, you might encounter problems.
Use The External Disk To Run macOS.
Your external disk may be used in one of two ways to run a version of macOS:
Either:
- Proceed to Startup Disk in System Preferences.
- Click Restart after choosing the external disk you want to use to boot the Mac.
Or:
- On an Intel-based Mac, press and hold Option/Alt during startup to access the boot menu, whereas on an M1/M2/M3/M4 Mac, pressing and holding the button will bring up the boot menu.
- Choose the drive you want to use to boot the Mac.
Once the desired version of macOS has been installed on the disk, additional updates may be installed with a few clicks in System Preferences.
Clone macOS to an external hard drive using disk cloning Application
When you want to clone your macOS to an external hard drive, the disk cloning application is a good help. Donemax Disk Clone for Mac is a powerful disk cloning application, it can help you securely clone Mac's startup disk to an external hard drive and make it be bootable.
Donemax Disk Clone for Mac
- Clone HDD, SSD, and external storage device on Mac.
- Create a bootable clone backup for macOS.
- Create disk image backup for Mac.
Now, follow the steps below to clone macOS to an external hard drive:
Step 1. Open Donemax Disk Clone for Mac on your Mac and connect the external hard drive to your Mac. Just choose disk cloning mode - OS Clone.
![Clone macOS to an external hard drive]()
Step 2. Select the external hard drive as the destination drive, click on Clone Now button to securely clone all data from your Mac startup disk to the external hard drive.
![Clone macOS to an external hard drive]()
Step 3. All data including macOS data, settings, apps, files will be cloned to the external hard drive. Once the process gets finished, you can use the external hard drive as a bootable disk.
![Clone macOS to an external hard drive]()
Conclusion
Anyone may learn how to install macOS onto an external hard drive by following the steps outlined in this article. Once you've mastered this ability, you'll be better prepared to update your primary Mac system without worrying about occasional problems.


