Written byChristinaUpdated on Apr 07, 2025
[6 Fixes] Fix Macintosh HD Greyed Out in Disk Utility: Step-by-Step Guide
Approved byGerhard Chou
PAGE CONTENT:
Encountering a greyed-out Macintosh HD in Disk Utility can be frustrating, especially when you need to access your files or repair your macOS system. This issue often indicates disk corruption, mounting failures, or hardware problems, preventing your Mac from booting or functioning correctly.
In this comprehensive article, we will explore the common causes of a greyed-out Macintosh HD, step-by-step troubleshooting methods, and solutions ranging from simple fixes to advanced recovery options. By the end, you'll know exactly how to get your Mac back up and running.
Causes of Macintosh HD Being Greyed Out in Disk Utility
Before jumping into solutions, it's crucial to understand why Macintosh HD appears greyed out. Some of the most common causes include:
1. File System Corruption
If your Mac's file system gets corrupted due to improper shutdowns, power failures, or software bugs, the disk might not mount properly, causing it to appear greyed out in Disk Utility.
2. Mac in Safe Mode or Recovery Mode
In Safe Mode or macOS Recovery Mode, certain disks might appear greyed out because the system is running in a limited state. This is usually a temporary issue.
3. Disk Encryption Issues (FileVault)
If FileVault encryption is enabled and macOS encounters an issue decrypting the disk, it may show the drive as unmounted or greyed out.
4. APFS Container Corruption
Macs running macOS High Sierra or later use Apple File System (APFS). If the APFS container structure gets damaged, it may prevent the disk from being properly recognized.
5. Hardware Issues
If the internal SSD or HDD is physically damaged or failing, your Mac might not be able to mount the drive, resulting in a greyed-out Macintosh HD.
6 Methods to Fix Macintosh HD Greyed Out in Disk Utility
Now that we understand the causes, let's go through step-by-step solutions to fix this issue.
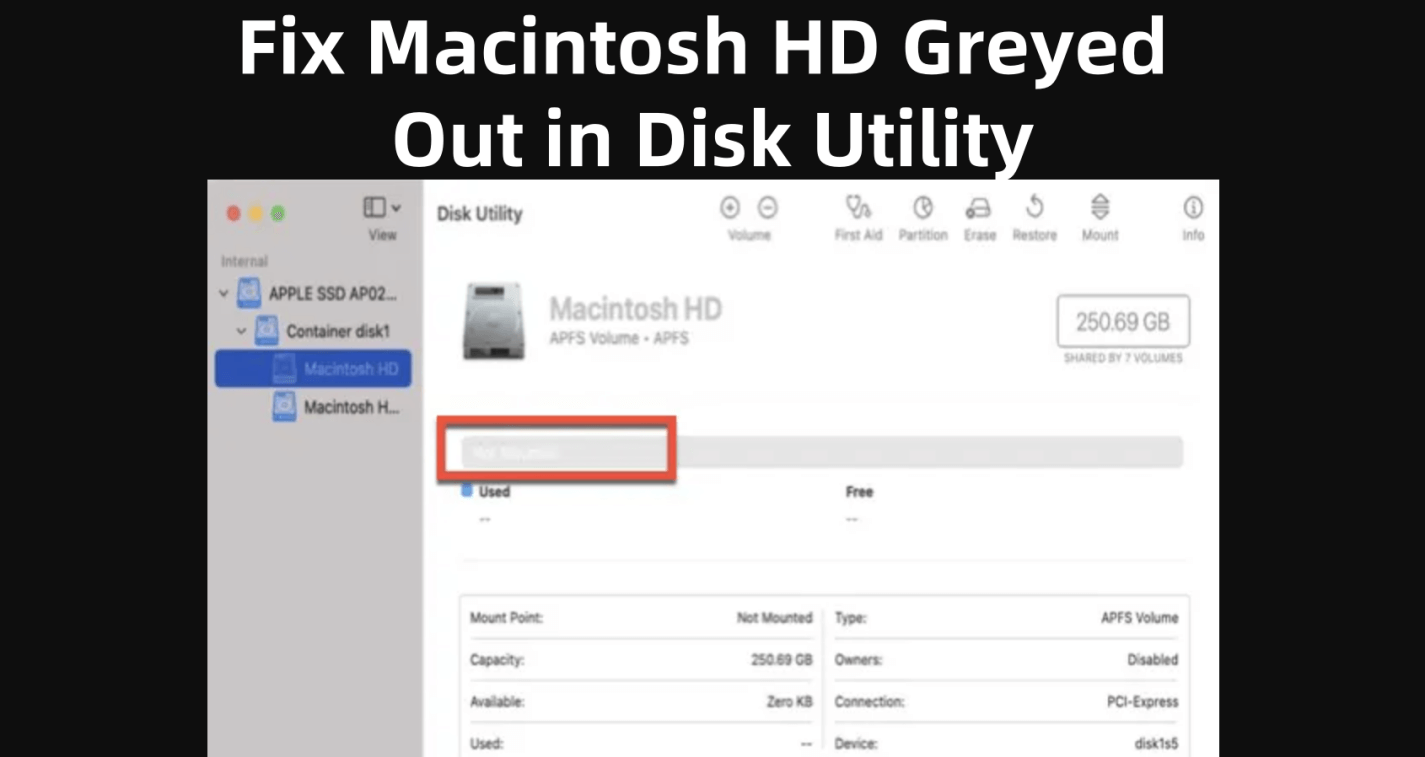
Fix 1. Restart Your Mac and Try Again
A simple restart can sometimes refresh system processes and fix temporary issues.
Steps:
- Select Restart by clicking on the Apple menu.
![Fix Macintosh HD Greyed Out in Disk Utility]()
- Wait for your Mac to reboot and check if the disk is now accessible.
- If the issue persists, try booting into Safe Mode:
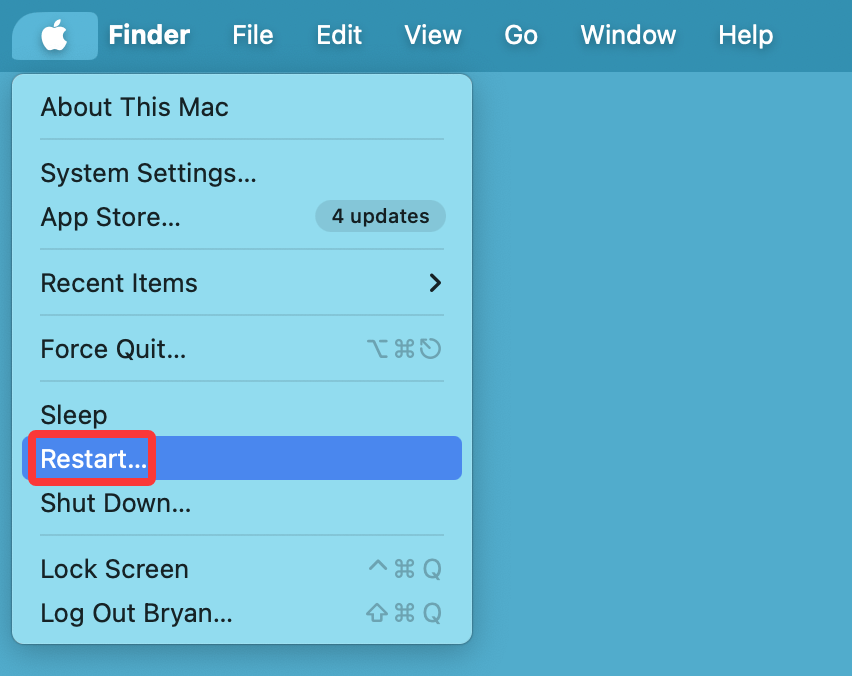
For Intel-based Mac:
- Turn off your Mac.
- Switch it back on, then hit and hold Shift to bring up the login screen.
- Check if the Macintosh HD is accessible in Disk Utility.
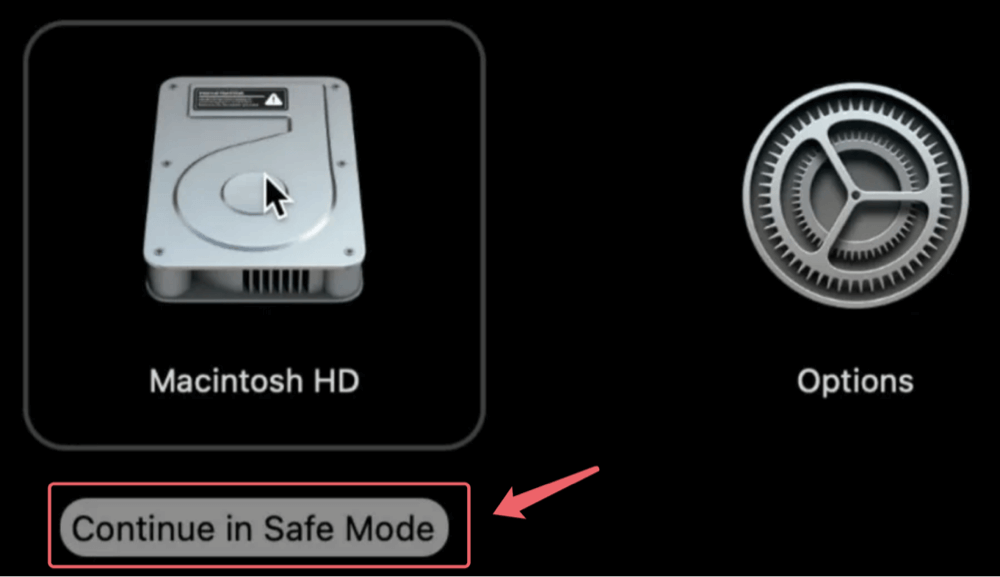
For Apple silicon Mac:
- Shut down the Mac, then press and hold Power button until you see Loading startup options.
- Select Macintosh HD, press Shift key, then choose Continue in Safe Mode.
![Fix Macintosh HD Greyed Out in Disk Utility]()
If restarting doesn't work, proceed to the next step.
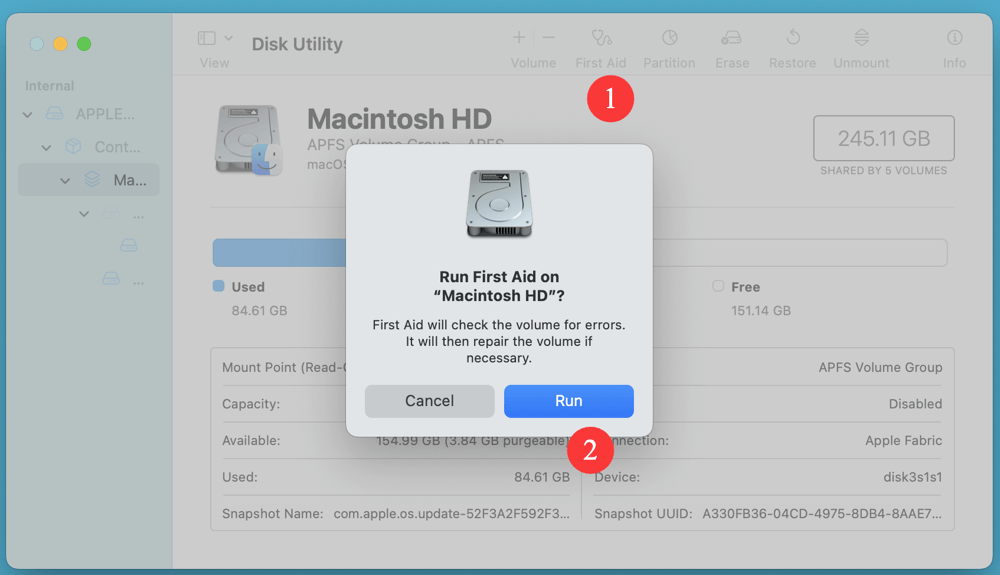
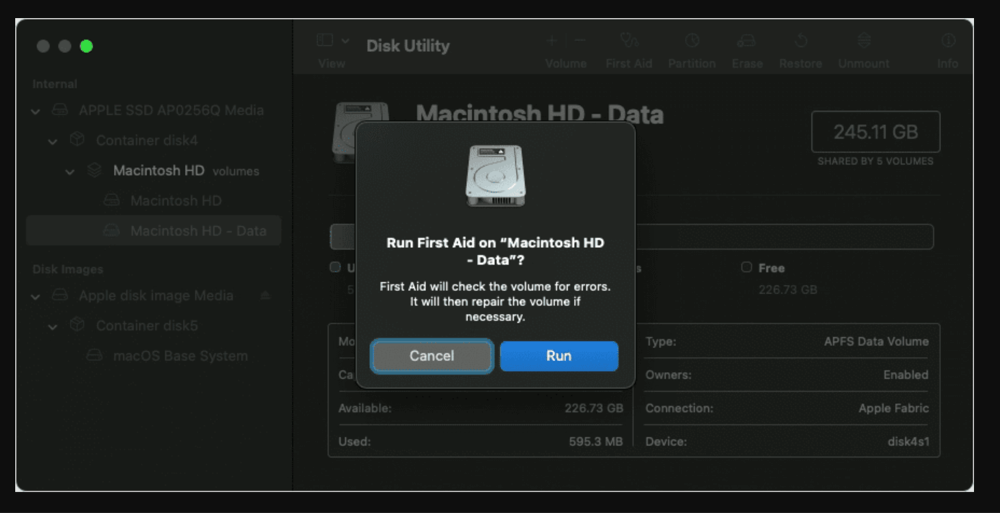
Fix 2. Use First Aid in Disk Utility to Repair Damaged Macintosh HD
First Aid is a built-in macOS tool that scans and repairs disk errors.
Steps to Run First Aid:
- Open Disk Utility from Utilities via Applications.
- Select Macintosh HD (even if it’s greyed out).
- Click First Aid > Run.
![Fix Macintosh HD Greyed Out in Disk Utility]()
- Wait for the process to complete and check if the issue is resolved.
If First Aid fails, it may indicate serious corruption. Move on to the next solution.
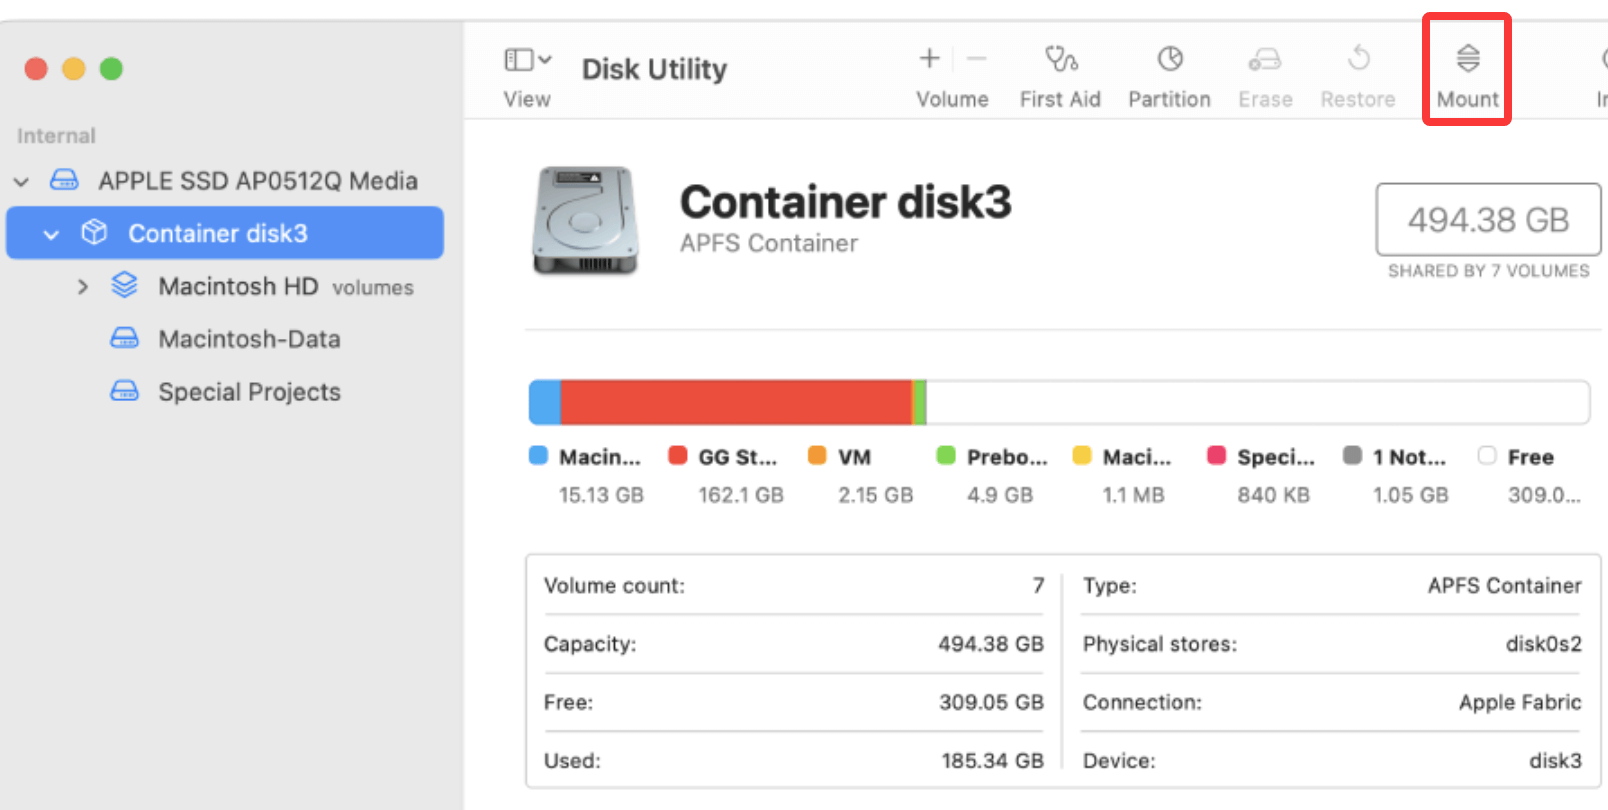
Fix 3. Mount the Macintosh HD Manually
Sometimes, the disk is not mounted automatically. You can manually mount it using Disk Utility or Terminal.
Mount via Disk Utility:
- Open Disk Utility.
- Select Macintosh HD (if visible).
- Click the Mount button.
![Fix Macintosh HD Greyed Out in Disk Utility]()
Mount via Terminal:
If Disk Utility fails, try using Terminal:
- Open Terminal from Utilities via Applications.
- Type the below command and press Enter:
diskutil mount /dev/disk1
![Fix Macintosh HD Greyed Out in Disk Utility]()
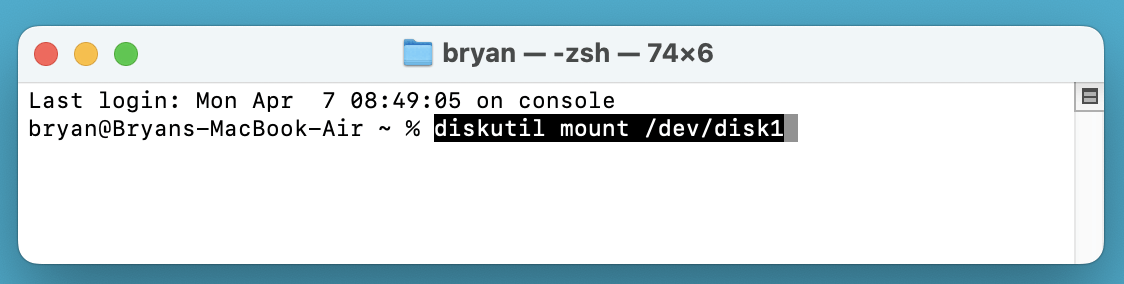
(Replace disk1 with the correct disk identifier. Use diskutil list to find it.)
If mounting fails, the disk may need repair. Continue to the next step.
Fix 4. Check and Repair Disk in macOS Recovery Mode
If Macintosh HD remains greyed out, try repairing it from macOS Recovery Mode.
Steps to Enter macOS Recovery Mode:
- Turn Off your Mac completely.
- After turning it back on, hit and hold Command (⌘) + R (for Intel-based Mac) or Power button (for Apple silicon Mac) right away.
- When you see a spinning globe or the Apple logo, let go of the keys.
- In macOS Utilities, select Disk Utility and try running First Aid again.
![Fix Macintosh HD Greyed Out in Disk Utility]()
Run FSCK (File System Consistency Check) in Terminal:
If First Aid fails, use the fsck command:
- Open Terminal in Recovery Mode.
- Type:
fsck -fy /
- Wait for the process to complete. If errors are found and fixed, restart your Mac.
If Macintosh HD is still greyed out, consider reinstalling macOS.
Fix 5. Reinstall macOS Without Data Loss
If all previous troubleshooting steps fail to fix the greyed-out Macintosh HD, reinstalling macOS without erasing your data might be the best solution. This process reinstalls the operating system while keeping your personal files and apps intact. It effectively replaces any corrupted system files that may be causing the issue without requiring a full format of your drive.
When Should You Reinstall macOS?
Reinstalling macOS can help if:
- Your Macintosh HD is greyed out in Disk Utility due to software corruption.
- The operating system fails to boot properly despite multiple restart attempts.
- First Aid in Disk Utility fails to repair the disk.
- You experience frequent system crashes, freezes, or unexpected reboots.
- macOS updates fail to install, leaving your system in an unstable state.
💡 Note: Before proceeding, ensure you have a backup of your important files using Time Machine or external storage.
Step-by-Step Guide to Reinstalling macOS Without Losing Data
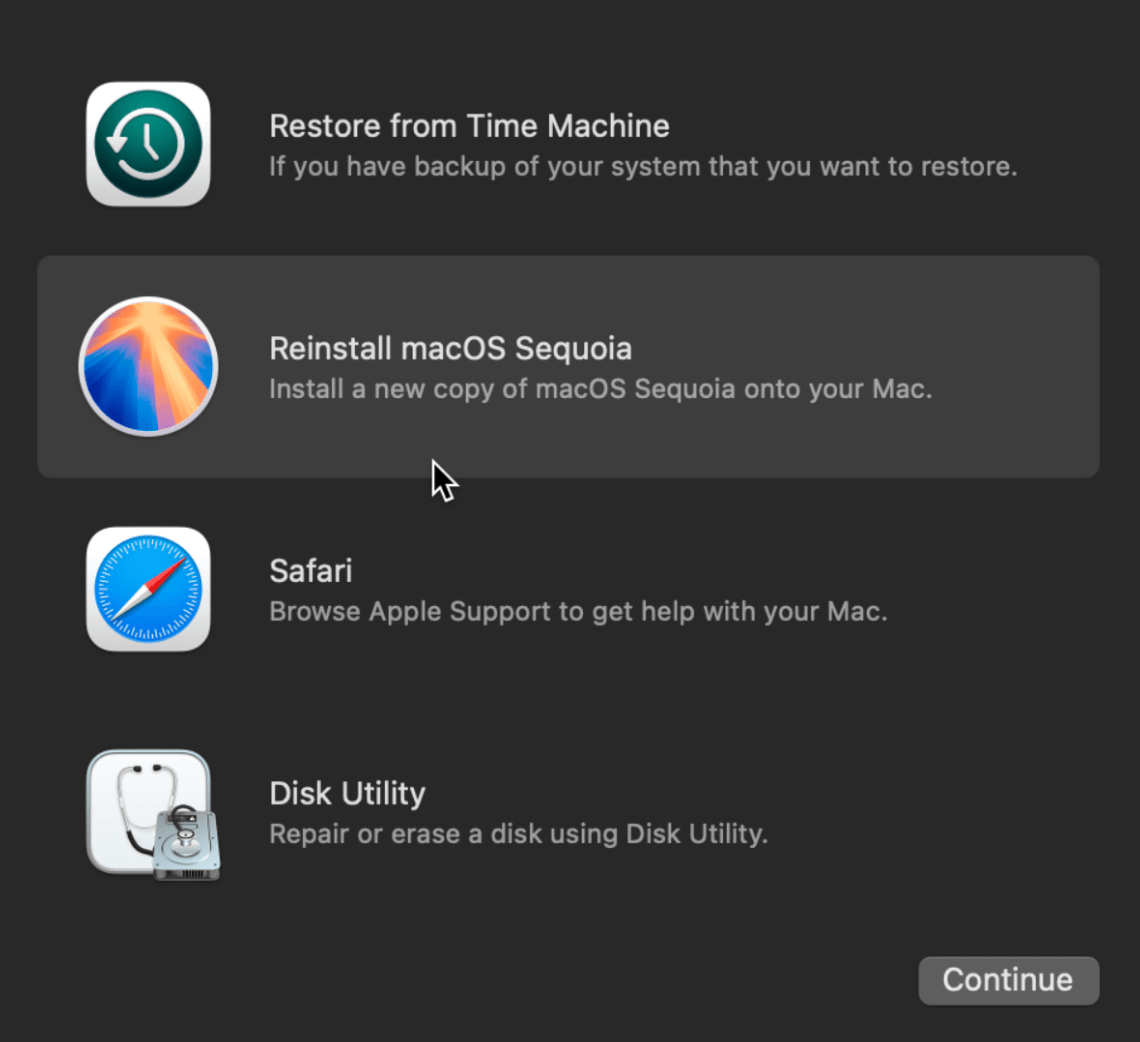
Step 1: Boot Into macOS Recovery Mode
- Turn Off your Mac completely.
- After turning it back on, press and hold Command (⌘) + R or Power button until the spinning globe or Apple logo appears.
- macOS Utilities will be displayed. Choose Reinstall macOS here, then click Proceed or Continue.
![Fix Macintosh HD Greyed Out in Disk Utility]()
If Command (⌘) + R does not work, try the following alternate recovery mode options:
- Option 1: Internet Recovery Mode: Press Option + Command + R to download the latest compatible version of macOS.
- Option 2: Boot from an External macOS Installer: If Recovery Mode fails, you can create a bootable USB drive with macOS and use it to reinstall the OS.
Step 2: Select the Macintosh HD Drive
- After clicking Reinstall macOS, the system will display the available disks.
- If Macintosh HD is greyed out, try selecting it and clicking Mount (if available).
- Choose Macintosh HD as the installation destination and proceed.
Step 3: Follow the Installation Process
- The macOS installer will now begin downloading the necessary system files.
- Depending on your internet speed, this can take 30 minutes to several hours.
- Your Mac will automatically restart multiple times during the installation process.
💡 Tip: If your Mac is using an M chip, ensure you are connected to Wi-Fi because macOS may need to authenticate with Apple servers before installation.
Step 4: Complete Setup and Verify Data
- Once the installation is complete, your Mac will reboot and display the macOS Welcome Screen or your regular login screen.
- Log in and check if all your personal files, applications, and settings are intact.
- Open Disk Utility to confirm that Macintosh HD is no longer greyed out.
What If Reinstallation Doesn't Work?
If your Macintosh HD is still greyed out after reinstalling macOS, you may need to take more drastic actions:
- Boot into macOS Recovery again and try running First Aid in Disk Utility once more.
- Erase and reformat the disk as APFS or Mac OS Extended (Journaled) (see the next section).
Check for hardware issues by running Apple Diagnostics:
- Turn Off your Mac.
- After turning it on, press and hold D to launch the diagnostic tool.
- Follow on-screen instructions to check for hardware failures.
If you suspect hardware failure, consider visiting an Apple Authorized Service Provider for further diagnosis.
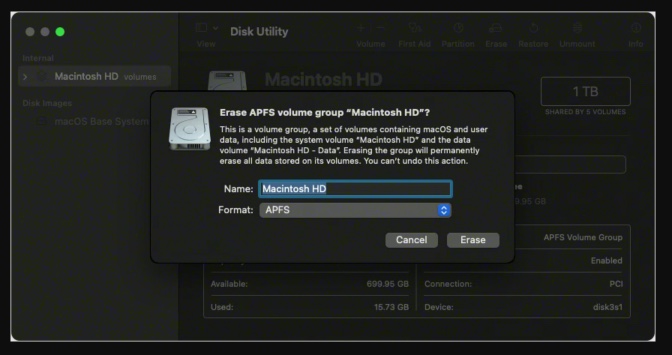
Fix 6. Erase and Reformat the Macintosh HD (Last Resort)
⚠️ Warning: This will delete all data on the drive. Only proceed if you have a backup or data recovery is not a concern.
Steps to Erase and Reformat:
- Boot into macOS Recovery Mode.
- Open Disk Utility and select Macintosh HD.
- Click Erase and choose:
- Format: APFS (for macOS High Sierra or later) or Mac OS Extended (Journaled) (for older macOS versions).
- Scheme: GUID Partition Map.
- Click Erase, then Reinstall macOS from Recovery Mode.
![Fix Macintosh HD Greyed Out in Disk Utility]()
After installation, restore your data from a Time Machine backup if available.
Prevent Future Macintosh HD Issues
To avoid facing this issue again, follow these best practices:
- Regular Backups: Use Time Machine or cloud storage to back up important data.
- Avoid Forced Shutdowns: Sudden shutdowns can cause file system corruption.
- Keep macOS Updated: Always install the latest macOS updates for security and performance improvements.
- Run Regular Disk Checks: Use First Aid in Disk Utility periodically.
- Monitor Storage Health: Check SSD/HDD health using System Information or third-party tools like DriveDx.
How to Recover Lost Data from Macintosh HD?
To fix Macintosh HD greyed out in Disk Utility issue, you may need to reinstall macOS or erase the drive which erases data from the Macintosh HD. If you don't have a backup to restore the personal files, you can use Mac data recovery software - such as Donemax Data Recovery for Mac to recover erased or lost files.
Step 1. Download and install Donemax Data Recovery for Mac on your Mac.
Step 2. Open Donemax Data Recovery for Mac, select Macintosh HD to start scan.

Step 3. Click on Scan button to deeply scan the internal disk and find all deleted/erased/lost files.

Step 4. Once the scan is completed, you can preview all recoverable files. Then select the documents, images, videos or other files you want to recover, click on Recover button to save them.

Conclusion
A greyed-out Macintosh HD in Disk Utility can be caused by file system corruption, mounting failures, encryption issues, or hardware problems. Fortunately, the solutions range from simple restarts and disk repairs to reinstalling macOS or reformatting the disk.
If you're still facing issues after trying all these steps, it may indicate a hardware failure, and you should contact Apple Support or visit an Apple Authorized Service Provider.
By following this guide, you can troubleshoot and resolve the problem effectively, ensuring your Mac remains in top condition. If you have lost data due to fix this issue, you can use Mac data recovery software - such as Donemax Data Recovery for Mac to completely recover erased or lost files.
Donemax Data Recovery for Mac
Donemax Data Recovery for Mac is one of the best Mac data recovery software. It is easy-to-use and can help in recovering deleted, formatted, inaccessible or lost data from Mac HDD/SSD, external disk, USB drive, SD card, camera or other storage devices.
Related Articles
- Oct 16, 2024Can't Open Trash on Mac? Here's How to Fix It
- Oct 14, 2024Fix Error Code 100006 on Mac: A Complete Guide to Solving the Issue
- Apr 07, 2025Troubleshoot The Volume is Not Compatible with This Update on Mac [7 Fixes]
- Jan 04, 2025How to fix fsck_msdos on Mac without Data Loss?
- Nov 20, 2024How to Make a Bootable USB Installer for macOS Big Sur?
- Jul 20, 2024How to Repair Unreadable USB Flash Drive on Mac Without Losing Data?

Contributing Writer
Christina
Christina is the senior editor of Donemax software who has worked in the company for 4+ years. She mainly writes the guides and solutions about data erasure, data transferring, data recovery and disk cloning to help users get the most out of their Windows and Mac. She likes to travel, enjoy country music and play games in her spare time.

Editor in chief
Gerhard Chou
In order to effectively solve the problems for our customers, every article and troubleshooting solution published on our website has been strictly tested and practiced. Our editors love researching and using computers and testing software, and are willing to help computer users with their problems