PAGE CONTENT:
The Trash on macOS serves as a vital safety net for users, providing a temporary location for deleted files before they are permanently removed. However, encountering an issue where you cannot open the Trash on your Mac can be frustrating. Whether you're trying to recover a deleted file or clean up your storage, an unresponsive Trash can hinder productivity.
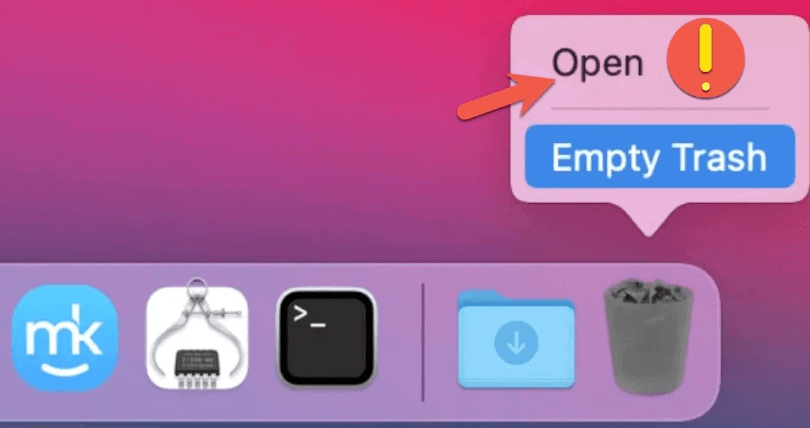
In this guide, we will dive into the possible causes of this problem and provide step-by-step instructions to help you troubleshoot and resolve the issue. We'll also offer preventative tips to ensure your Trash works smoothly in the future.
Can't Open Trash on Mac? Why?
The Trash feature in macOS allows users to move unwanted files for deletion. But what happens when you can't open the Trash? For many, this can be a source of anxiety, especially if they need to recover files. Whether you're facing a spinning beach ball of doom or the Trash simply doesn't respond, this article will provide multiple solutions.
The issue can arise from a variety of factors, including system bugs, corruption of macOS settings, insufficient storage, or even more complex issues like file system problems. While the problem can be frustrating, the good news is that there are several ways to troubleshoot and fix it.
🔖Possible Causes for the Trash Issue:
Prior exploring different solutions, it is important to understand the root cause of the problem. Identifying the root cause can help you apply the most appropriate fix.
⚫ System Glitches
macOS, like any operating system, can experience temporary glitches. These could result from running multiple applications simultaneously, causing the system to slow down or become unresponsive. Sometimes, a simple restart is all that's needed to reset the system and get the Trash working again.
⚫ Corrupt Preferences or Cache Files
Over time, macOS creates and stores preferences and cache files for applications to function efficiently. However, these files can sometimes become corrupt, leading to issues such as the inability to open Trash.
⚫ Storage Space Problems
When your Mac's storage space is running low, it may affect the performance of certain system features, including Trash. macOS requires adequate disk space to function properly, and if it's limited, various operations may become sluggish or stop working entirely.
⚫ File System Issues
Problems with the macOS file system, particularly on machines using HFS+ or APFS (Apple File System), can also lead to issues. If the disk's file structure is damaged or corrupted, the Trash may not work as expected.
How to Fix Cannot Open Trash on Mac?
🔖Basic Troubleshooting Steps:
🔹Restart Your Mac
Restarting is often the simplest solution to fix many macOS issues, including problems with the Trash. This action clears temporary system files and allows your Mac to refresh its processes.
How to Restart:
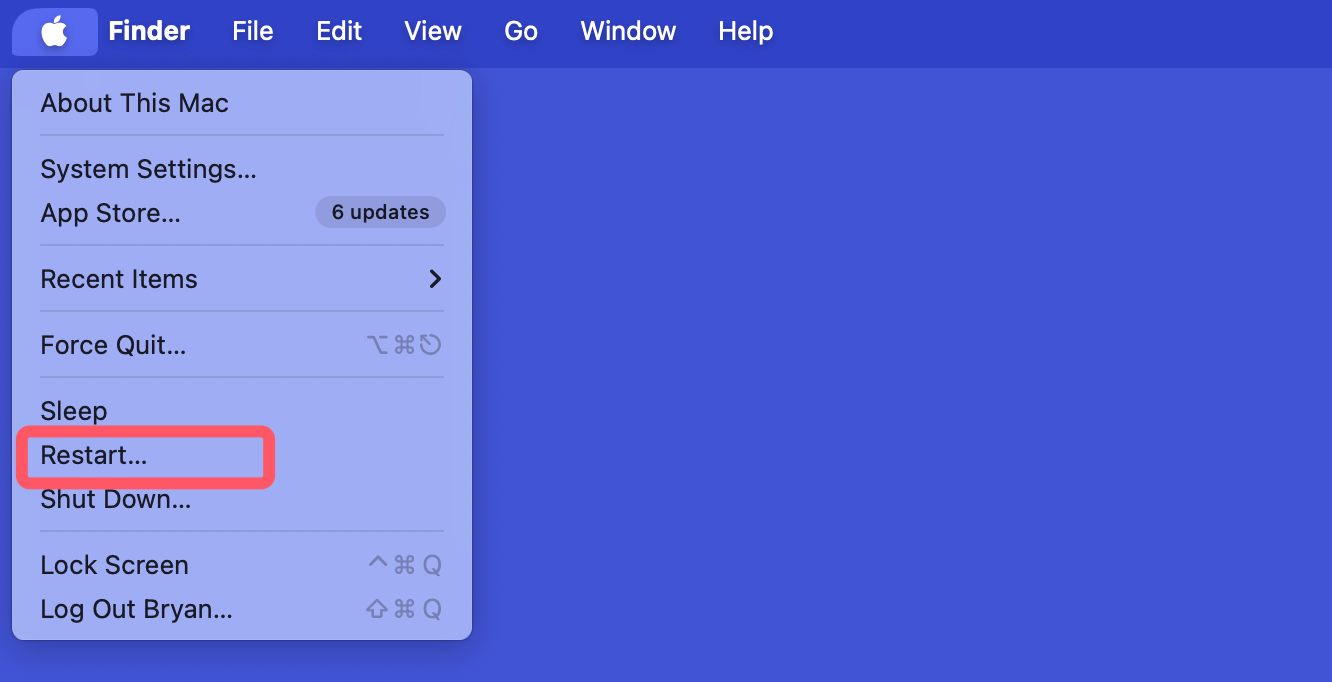
- In the upper-left corner of your screen, click the Apple logo.
- Choose "Restart" from the option that drops down.
![Restart Your Mac]()
- Wait for your Mac to restart and try opening the Trash again.
🔹Force Quit Finder
Since Finder manages the Trash, restarting Finder can sometimes resolve the issue.
How to Force Quit Finder:
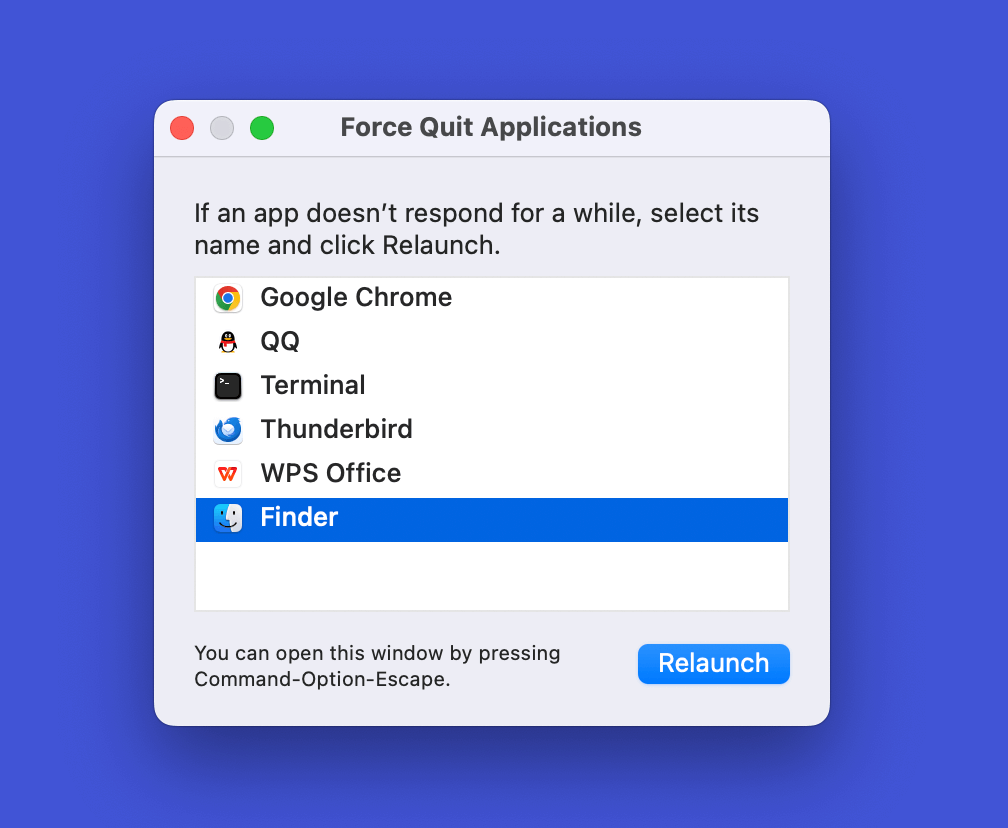
- The Force Quit Applications box will appear when you press Command + Option + esc.
- Pick "Finder" from the drop-down menu.
- Click "Relaunch."
![How to Force Quit Finder]()
This will restart Finder and could restore access to the Trash.
🔹Check for Updates
Occasionally, Apple releases updates that address bugs and performance issues. Ensuring your system is up-to-date may resolve the problem.
How to Check for macOS Updates:
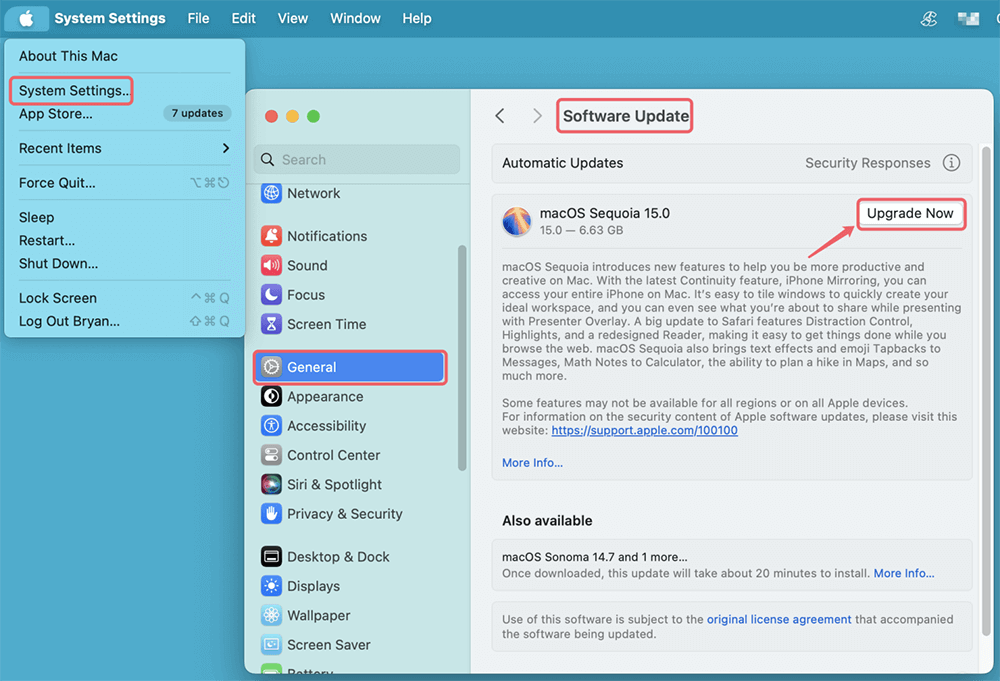
- Click the Apple logo and select "System Settings" (or "System Preferences" on older versions).
- Choose General > Software Update.
- If an update is available, click "Upgrade Now."
![How to Check for macOS Updates]()
🔹Check for Third-Party Interference
Third-party apps designed to manage or manipulate files, such as antivirus software or system cleaners, can sometimes interfere with Trash's functionality. If you've recently installed any such app, try temporarily disabling or uninstalling it to see if that resolves the issue.
To uninstall an app, follow these steps:
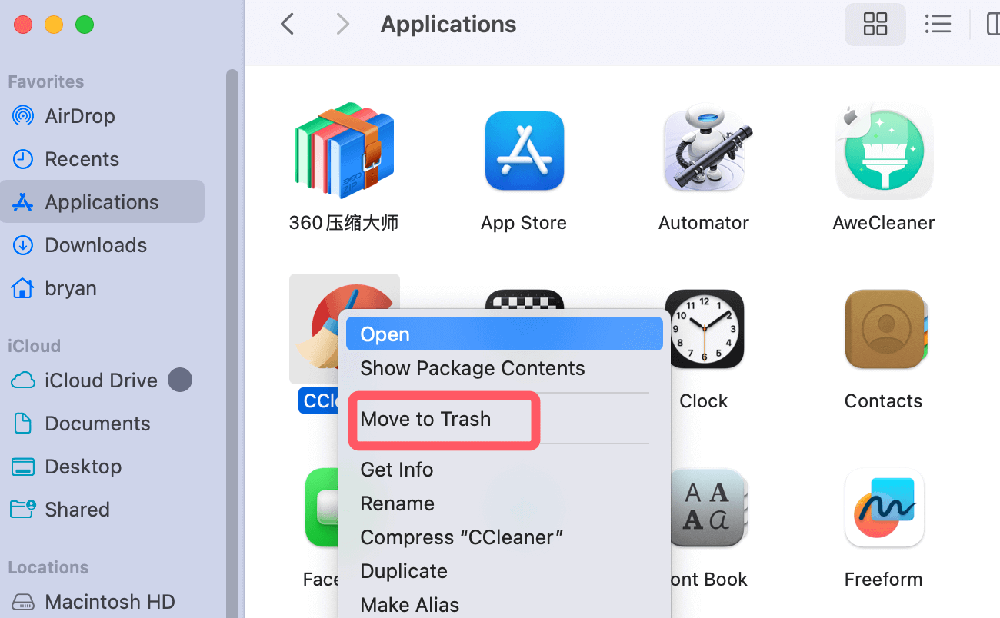
- Go to the Applications folder.
- Locate the app you want to remove.
- Drag the application to the Trash or use the right-click menu to choose Move to Trash.
![Drag the application to the Trash]()
Afterward, restart your Mac and check if you can now access the Trash.
🔖Advanced Solutions:
You might need to utilize more sophisticated techniques if the issue hasn't been fixed by following the basic troubleshooting procedures.
🔹Use Terminal to Force Open the Trash
Terminal is a powerful tool in macOS that allows you to run commands that directly affect system files. If Finder and other fixes don't work, you can try force-opening the Trash using Terminal.
How to Use Terminal to Open Trash:
- Open Terminal (Applications > Utilities > Terminal).
- Type the following command and press Enter:
sudo rm -rf ~/.Trash/*
- Enter your administrator password when prompted. This command forces the deletion of files within the Trash, which may be blocking it from opening.
🔹Reset NVRAM/PRAM and SMC
NVRAM (non-volatile random-access memory) and SMC (System Management Controller) store settings that macOS uses to manage hardware. Resetting these can fix various issues, including problems with the Trash.
How to Reset NVRAM/PRAM:
- Turn off your Mac.
- Switch it back on and hit the Option, Command, P, and R keys at once.
- Hold the keys for about 20 seconds, then release them.
How to Reset SMC:
- Turn off your Mac.
- For ten seconds, press and hold the power button as well as Shift + Control + Option on laptops without detachable batteries.
- Let go of all keys and restart your Mac.
To restart a desktop Mac, just disconnect the power cable, wait 15 seconds, then plug it back in.
🔹Delete Trash Preferences Manually
If the Trash preferences file becomes corrupt, manually deleting it can solve the issue. This forces macOS to create a new, uncorrupted preferences file.
How to Delete Trash Preferences:
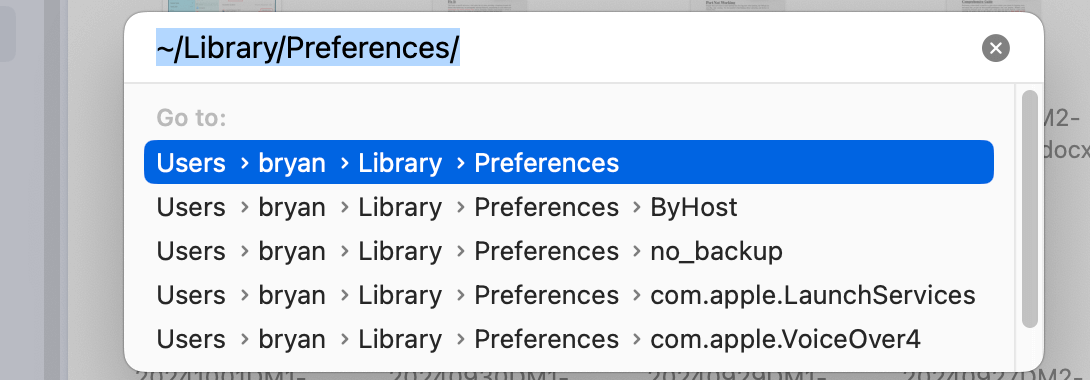
- Open Finder and press Command + Shift + G to bring up the "Go to Folder" window.
- Type ~/Library/Preferences/ and press Enter.
![How to Delete Trash Preferences]()
- Locate the file named com.apple.finder.plist and move it to the Trash.
- Restart your Mac, and Finder will recreate a fresh preferences file.
🔖What to Do If Files in Trash Won't Open
Sometimes, you can open the Trash, but individual files within it won't respond. If that's the case, try the following steps.
🔹Repair Disk Permissions Using Disk Utility
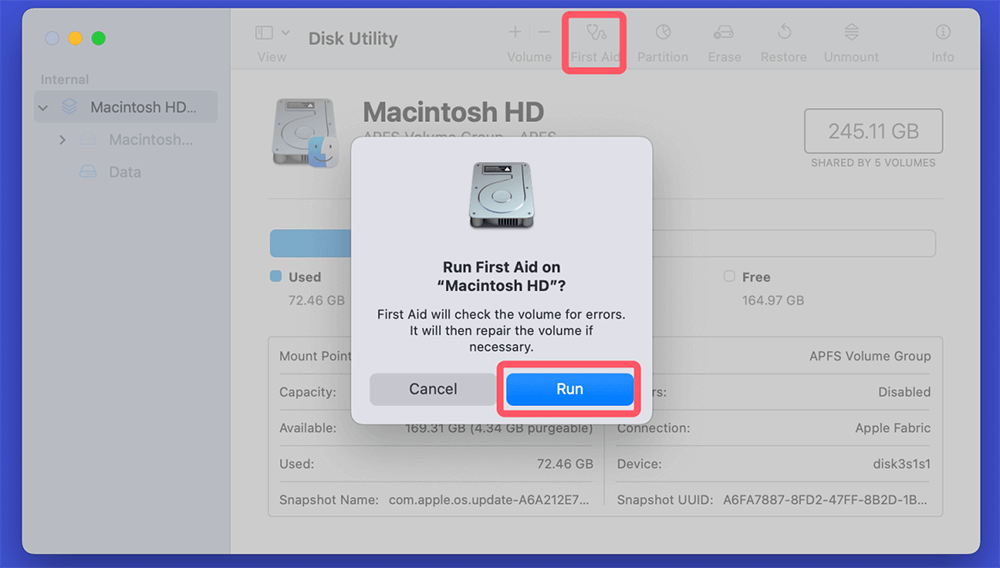
Disk Utility is a built-in macOS tool that can help repair disk permissions, which may be causing the Trash to malfunction.
How to Use Disk Utility:
- Go to Disk Utilities via Utilities in the Applications
- Select your Mac's startup disk.
- Click "First Aid" and follow the on-screen instructions to repair the disk.
![How to Use Disk Utility]()
🔹Boot in Safe Mode
Safe Mode disables non-essential services and can help diagnose whether third-party software is interfering with the Trash.
How to Boot in Safe Mode:
For Intel-based Mac:
- Turn off your Mac.
- Switch it on and hit and hold the Shift key right away.
- When you see the login box, let go of the Shift key.
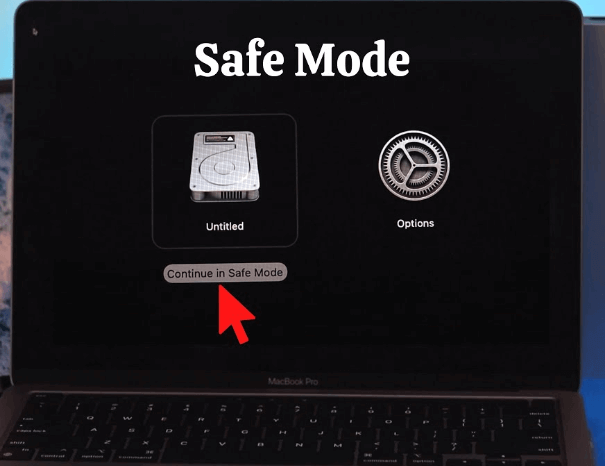
For Apple silicon Mac:
- Shut down the Mac.
- Press and hold the Power button on your Mac until "Loading startup options" appears.
- Select the startup disk.
- Press and hold the Shift key, then click Continue in Safe Mode.
![How to Boot in Safe Mode]()
Try opening the Trash in Safe Mode. If it works, the issue may be caused by third-party applications or extensions.
🔹Restore Files Using Time Machine
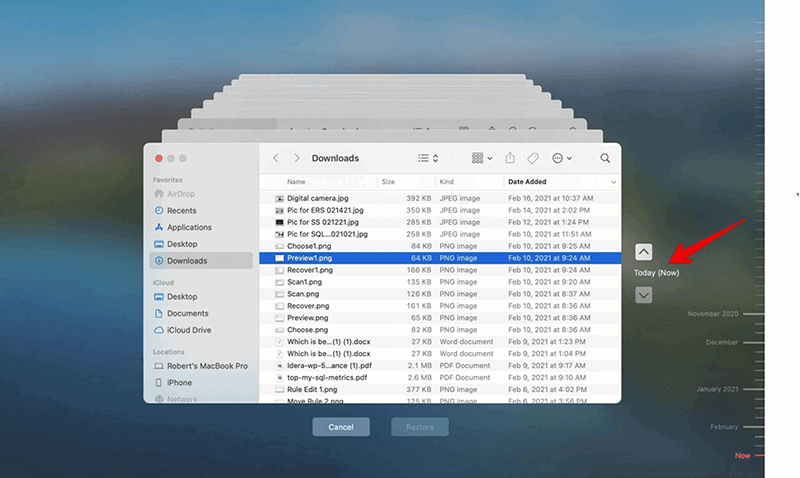
If you’re unable to recover specific files from the Trash, you can restore them using Time Machine, provided you have a backup.
How to Restore Files with Time Machine:
- Connect your Time Machine backup drive.
- Open the folder where the file was located before it was moved to the Trash.
- Open Time Machine from the menu bar.
- Navigate to the backup version of the file you want to restore.
- Click "Restore" to return the file to its original location.
![How to Restore Files with Time Machine]()
🔹Rebuild the Trash Database
If none of the above methods work, you may need to rebuild the Trash database on your Mac. You can do this through Terminal by following these steps:
- Open Terminal.
- Type the following command:
rm -rf ~/.Trash
- After running this command, restart your Mac.
When your Mac restarts, a new Trash database will be created, and you should now be able to open Trash without any problems.
Note: If you can't restore files from trash or backups, you can use Mac data recovery software to recover lost files on Mac.
Preventing Future Mac Trash Issues
Preventative maintenance can go a long way in ensuring you don't run into Trash issues again. Here are some tips to keep your Mac's Trash functioning smoothly.
🔹Regular System Maintenance
Performing regular maintenance on your Mac helps keep it running efficiently. Make it a habit to:
- Clear system caches.
- Remove temporary files.
- Empty the Trash regularly.
- Keep track of available storage space.
🔹Use Third-Party Tools
There are several third-party apps designed to keep your Mac optimized, such as DMmenu for Mac, CleanMyMac. These tools can automate tasks like cleaning up junk files, clearing caches, and removing unneeded system files.
Popular Tools:
- DMmenu for Mac
- CleanMyMac X
- AweCleaner for Mac
- OnyX
Always research any third-party tool before installation to ensure it's trustworthy.
🔹Back Up Important Files
Use Time Machine, disk cloning software or a cloud backup service to regularly back up your important files. This way, if anything goes wrong, you can always restore your data.
Step 1. Download and install the reliable Mac disk cloning software - Donemax Disk Clone for Mac.
Step 2. Open Donemax Disk Clone for Mac and connect an external hard drive to the Mac as the backup disk.
Step 3. Choose OS Clone mode, select the external hard drive as the destination drive. Click on Clone Now button.

Step 4. Clone all data including macOS, apps, settings, user data from the Mac's internal disk to the external hard drive, making a full bootable clone backup.
Conclusion
An unresponsive Trash can be frustrating, but there are numerous ways to address the issue. From basic solutions like restarting your Mac to advanced techniques like using Terminal or resetting system controllers, these methods can help restore functionality to the Trash.
To prevent future problems, keep your system updated, perform regular maintenance, and always have a backup strategy in place. If none of these solutions work, contacting Apple Support may be the next step. Remember, taking care of your Mac will minimize the chances of encountering such issues in the future.
Related Articles
- Jan 01, 1970Right-Click on Mac: How to Use and Customize Right-Clicking on Mac?
- Mar 21, 2025How to Use a Western Digital External Hard Drive on a Mac?
- Jun 19, 2025How to Use External Hard Drive on Mac?
- Aug 10, 2025What to Do After Getting a Secondhand Mac: Full Setup & Safety Guide
- Oct 21, 2024macOS Sequoia Not Recognizing USB Flash Drives, 9 Methods to Fix It
- Sep 29, 2025How to Install macOS Tahoe on Unsupported Macs?

Steven
Steven has been a senior writer & editor of Donemax software since 2020. He's a super nerd and can't imagine the life without a computer. Over 6 years of experience of writing technical solutions and software tesing, he is passionate about providing solutions and tips for Windows and Mac users.

Gerhard Chou
In order to effectively solve the problems for our customers, every article and troubleshooting solution published on our website has been strictly tested and practiced. Our editors love researching and using computers and testing software, and are willing to help computer users with their problems
