USB drives are versatile tools for transferring and storing data. However, to ensure compatibility across different devices and operating systems, proper formatting is essential. FAT32 is a widely supported file system, making it an ideal choice for users who need their USB drive to work seamlessly on Windows, Mac, gaming consoles, and even smart TVs. In this guide, we'll walk you through the process of formatting a USB drive to FAT32 on a Mac, covering everything you need to know.
PAGE CONTENT:
Why Format a USB Drive to FAT32?
Formatting a USB drive serves several purposes. Primarily, it prepares the drive to store files in a specific structure, ensuring compatibility with different devices. FAT32 stands out as one of the most universally accepted file systems. Here are some scenarios where FAT32 is the preferred choice:
- Cross-Platform Compatibility: FAT32 works on almost all operating systems, including Windows, macOS, Linux, and older versions of Android.
- Device Support: Many devices, like gaming consoles, cameras, and media players, only recognize FAT32.
- Legacy Device Use: If you're using older hardware, FAT32 is likely the only compatible file system.
However, FAT32 has limitations:
- It cannot store individual files larger than 4GB.
- It struggles with drives larger than 2TB due to its partitioning scheme.
For users who require a simple solution for smaller files and wide compatibility, FAT32 remains a practical choice.
What You'll Need:
Before starting to format a USB drive to FAT32 on Mac, ensure you have the following:
- A Mac computer with macOS installed.
- The USB drive you want to format.
- Administrative privileges on your Mac.
- Backup copies of any important files on the USB drive, as formatting will erase all existing data.
Step-by-Step Guide to Formatting USB Drive to FAT32 on Mac
Let's break down the process into simple, manageable steps.
Step 1: Connect and Prepare Your USB Drive
Start by plugging the USB drive into your Mac. Ensure the device is recognized, which you can confirm by opening Finder and locating the USB drive under the Devices or Locations section. Before proceeding, back up any important files from the USB drive to avoid losing data during formatting.
Step 2: Open Disk Utility
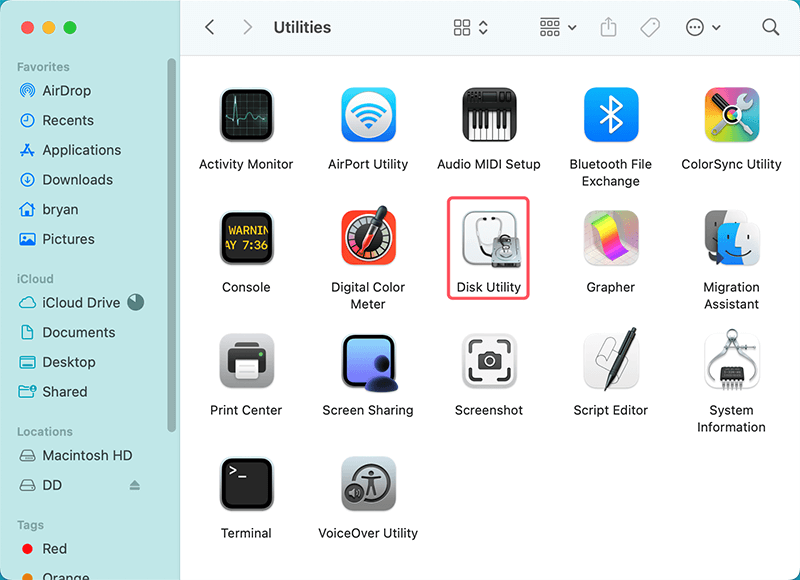
Disk Utility is the built-in macOS tool for managing drives. Here's how to access it:
- Press Command + Space to open Spotlight search.
- Type Disk Utility and hit Enter.
- Alternatively, navigate to Applications > Utilities > Disk Utility.
![Open Disk Utility]()
Once Disk Utility is open, you’ll see a list of all connected drives and partitions.
Step 3: Select the USB Drive
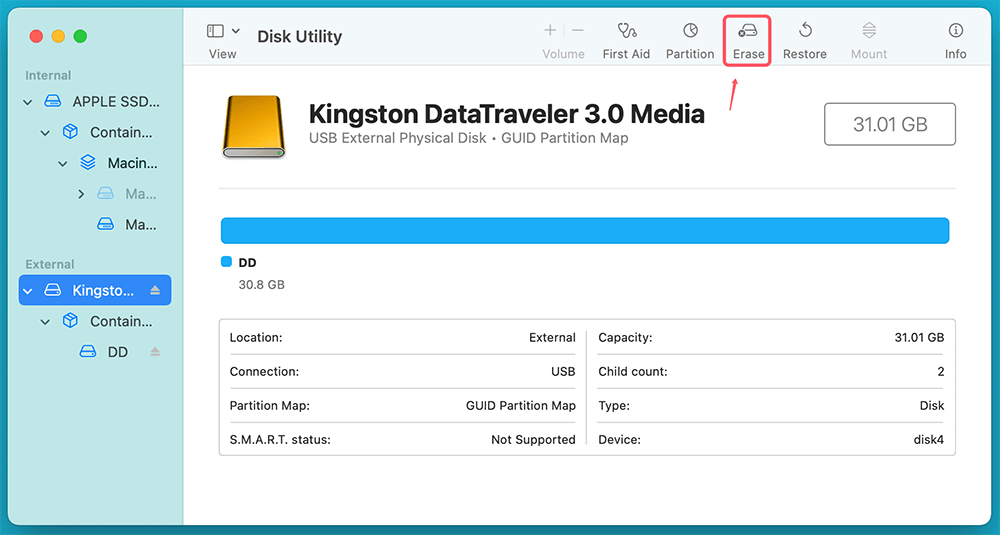
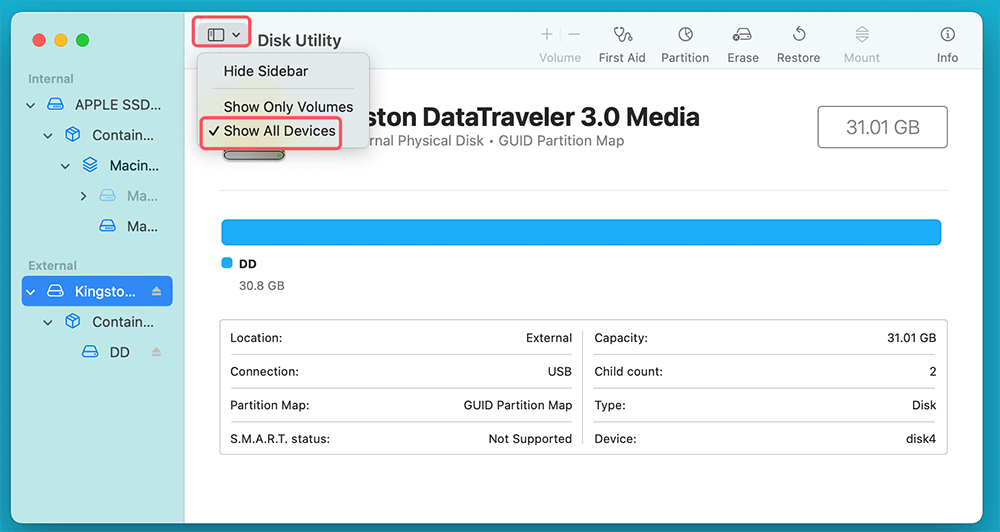
From the left-hand sidebar in Disk Utility, locate your USB drive. Be cautious here: select the correct drive to avoid accidentally erasing data from another storage device.
Tip: If you don't see your USB drive, click "View" in the menu bar and select "Show All Devices." This ensures that all connected drives, including hidden ones, are visible.
Step 4: Erase the USB Drive
Now that your USB drive is selected:
- Click the "Erase" button at the top of the Disk Utility window.
![Erase the USB Drive]()
- A pop-up window will appear, prompting you to configure formatting options.
Step 5: Choose the FAT32 Format
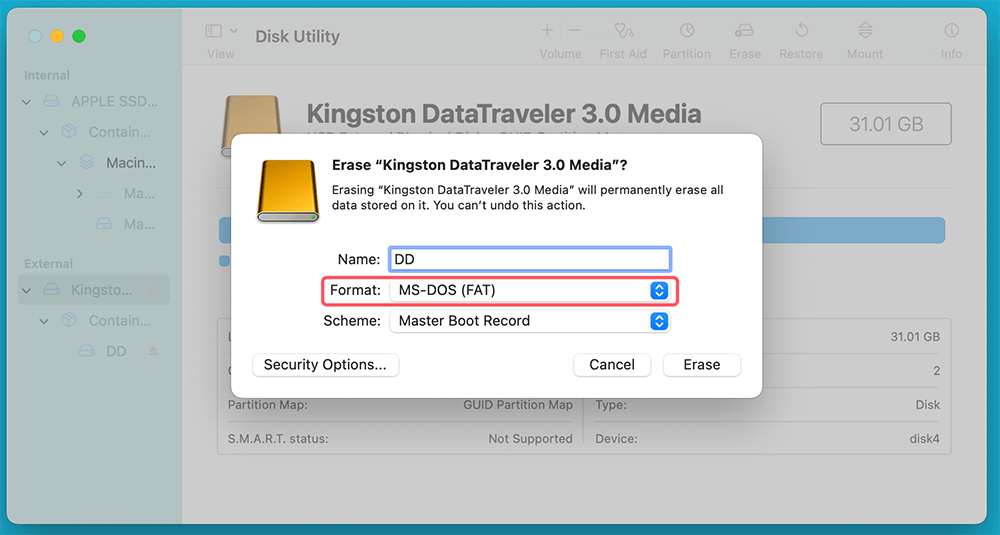
In the "Erase" dialog box:
- Name: Assign a name to your USB drive. This is optional but helps identify the drive easily.
- Format: From the drop-down menu, choose "MS-DOS (FAT)." This option corresponds to the FAT32 file system.
- Scheme: Select "Master Boot Record (MBR)" for maximum compatibility with various devices.
![Choose the FAT32 Format]()
Once these options are set, click "Erase." The process may take a few seconds to complete.
Step 6: Verify the Format
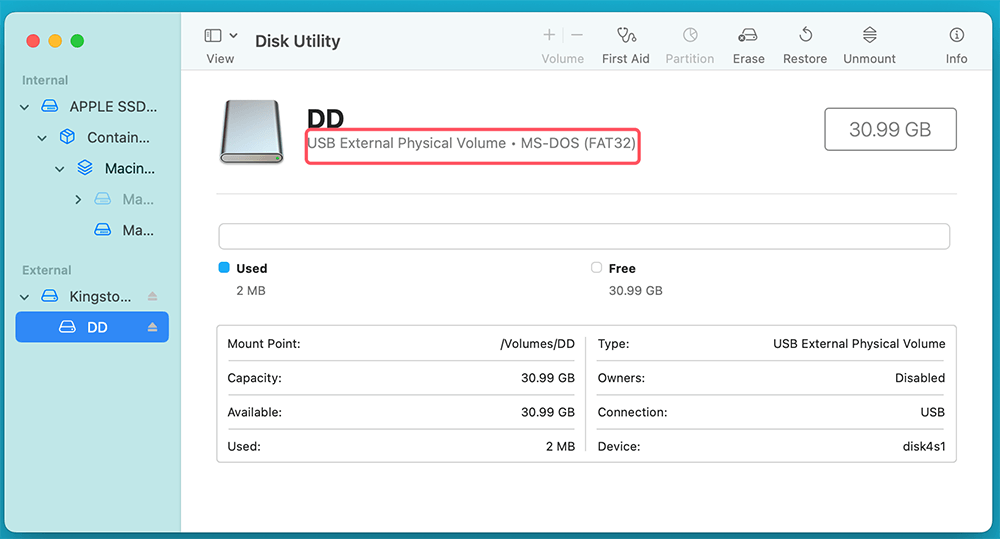
After the formatting process finishes, click "Done" to close the dialog box. To confirm that your USB drive is formatted as FAT32:
- Select the USB drive in Disk Utility.
- Check the file system type displayed under the drive details.
![Verify the Format]()
Alternatively, you can verify the format in Finder by right-clicking the USB drive, selecting "Get Info," and checking the file system.
Recover Lost Data After Formatting the USB Drive to FAT32
Mac data recovery software can help you unformat the USB drive and get all lost data back:
Step 1. Download and install the best USB data recovery software - Donemax Data Recovery for Mac.
Step 2. Open Donemax Data Recovery for Mac, select the formatted USB drive to start data recovery.

Step 3. Click on Scan button to deeply scan the formatted USB drive and find all deleted/erased files.

Step 4. Once the scan is completed, you can preview all recoverable files. Then select the wanted files, click on Recover button.

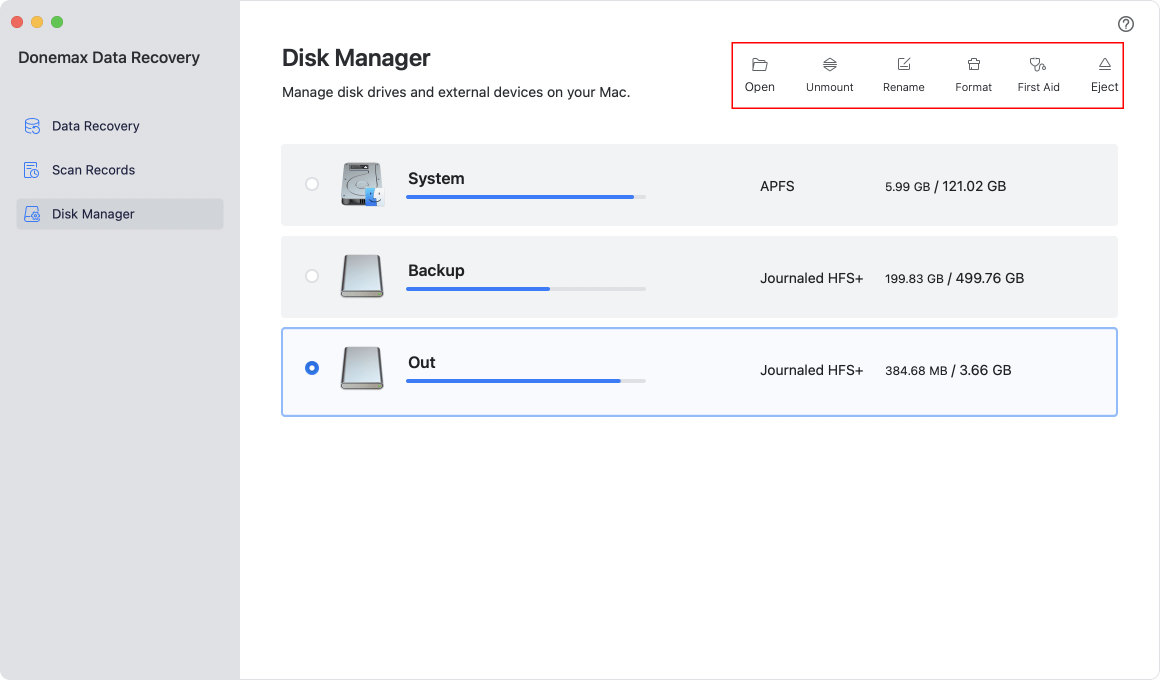
Donemax Data Recovery for Mac also can help you format the USB drive to FAT32, mount USB drive on Mac, fix corrupted USB drive, etc.
Troubleshooting Common Issues
While formatting a USB drive to FAT32 is usually straightforward, you may encounter issues. Here are some common problems and how to resolve them.
1. FAT32 Not Available as an Option
If the "MS-DOS (FAT)" option is missing, it could be due to:
- The USB drive being larger than 2TB.
- macOS defaulting to other file systems for certain drives.
Solution:
Partition the drive into smaller sections using Disk Utility. FAT32 works best with partitions under 2TB.
- In Disk Utility, select the USB drive and click "Partition."
- Divide the drive into smaller partitions, ensuring each is less than 2TB.
- Format each partition to FAT32 individually.
2. Errors During Formatting
Occasionally, formatting may fail with errors like "Erase process has failed." This can happen if:
- The USB drive is write-protected.
- The drive has existing corruption.
Solution:
- Remove write protection by checking the physical lock switch on the USB drive (if applicable).
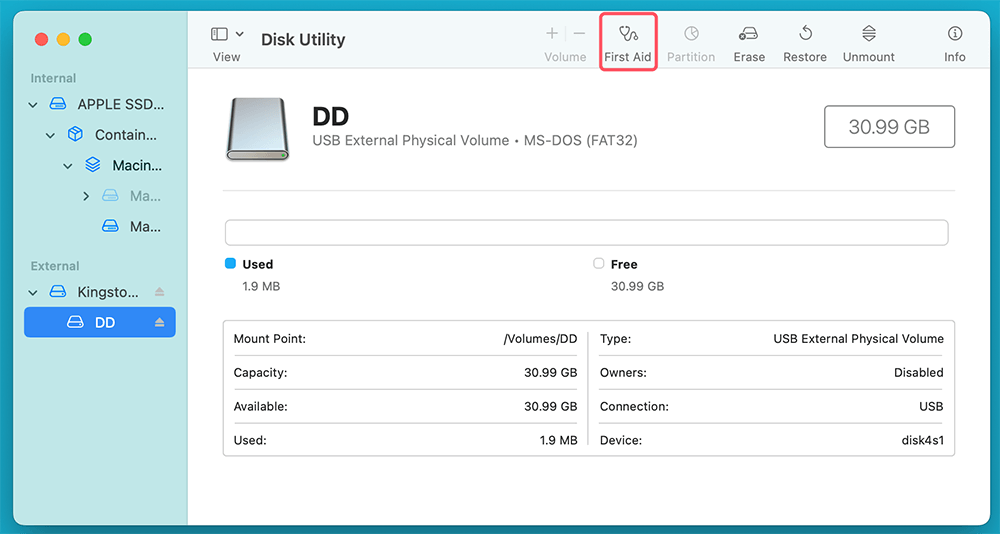
- Use Disk Utility's "First Aid" feature to repair the drive:
- Select the USB drive in Disk Utility.
- Click "First Aid" and follow the prompts.
![Click First Aid and follow the prompts]()
If these steps don't work, try formatting using Terminal (see below).
3. Using Terminal for Advanced Users
For advanced users, macOS's Terminal provides a powerful way to format drives. Here's how to format your USB drive to FAT32 using Terminal:
- Open Terminal (Applications > Utilities > Terminal).
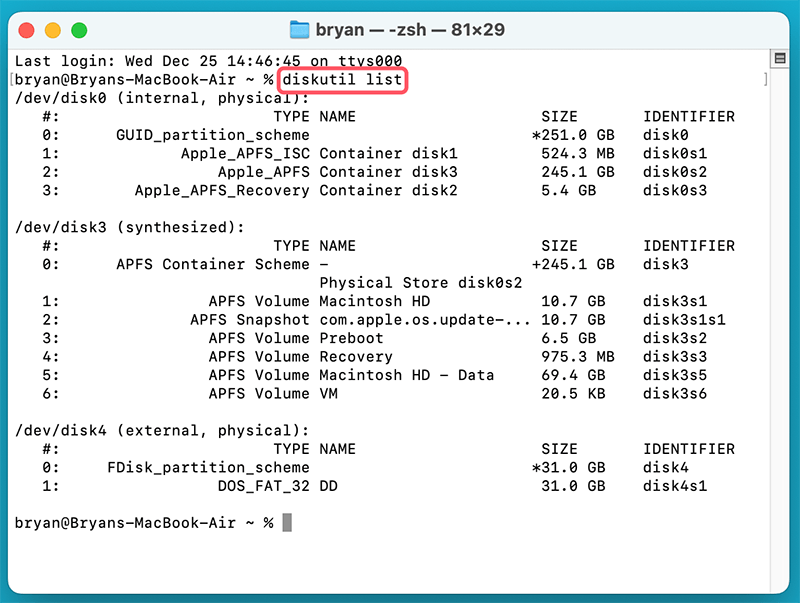
- Type the following command to list all connected drives:
diskutil list
- Identify your USB drive from the list (e.g., /dev/disk4).
![Using Terminal for Advanced Users]()
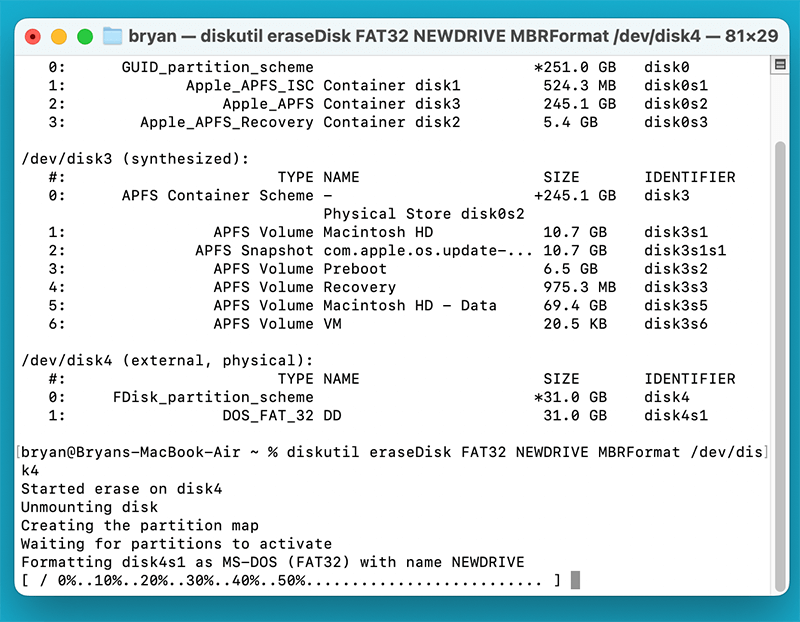
- Format the drive to FAT32 with this command:
diskutil eraseDisk FAT32 NAME MBRFormat /dev/diskX
Replace NAME with the desired drive name and /dev/diskX with the correct identifier for your USB drive.
![Using Terminal for Advanced Users]()
Limitations of FAT32
While FAT32 is versatile, it's not without its shortcomings. Users should be aware of these before committing to this file system.
1. File Size Restriction
The most significant limitation of FAT32 is its inability to handle individual files larger than 4GB. This restriction stems from the file system's 32-bit architecture, which caps the maximum file size at 232−12^{32}-1232−1 bytes (approximately 4GB). In practical terms, this means you cannot store a single large file, such as a high-definition movie, large software installation package, or detailed 4K video recording, on a FAT32-formatted drive.
Examples of Affected Use Cases:
- Video editors may struggle to transfer raw video files, which often exceed 4GB.
- Gamers using FAT32 USB drives for large game installations may encounter limitations when trying to transfer or save data.
- Photographers working with high-resolution images or RAW files could hit this ceiling when backing up collections.
Workarounds for the File Size Limit:
If you need to work with files larger than 4GB, there are several strategies you can use:
- Split the File: Use file compression or archiving tools (e.g., WinRAR, 7-Zip) to split the file into smaller chunks that fit within the 4GB limit. This method is particularly useful for transferring files temporarily but requires recombining the parts later.
- Use an Alternative File System: Consider formatting your drive with ExFAT, which supports files of virtually any size. Most modern devices that support FAT32 also recognize ExFAT, making it a practical alternative.
- Cloud Storage: For files too large for FAT32, upload them to cloud storage services like Google Drive, OneDrive, or Dropbox. This eliminates the need for physical storage altogether and allows for easy sharing and access from any device.
2. Partition Size Restrictions
Another limitation of FAT32 is its inefficiency with very large drives. While FAT32 can theoretically support partitions up to 16TB, many operating systems and tools, including macOS’s Disk Utility, impose a practical limit of 2TB for individual partitions when using FAT32. This restriction can make it difficult to format larger drives entirely as FAT32 without dividing them into smaller partitions.
Impact on Larger Drives:
- Drives exceeding 2TB often default to newer file systems like exFAT or NTFS for practical use.
- If you attempt to format a drive larger than 2TB as FAT32, macOS might either limit the usable space to 2TB or prevent the process altogether.
3. Performance and Efficiency
FAT32 is not the most efficient file system when dealing with large numbers of small files or very large drives. Its allocation table system can lead to wasted space, especially on larger drives with larger cluster sizes. Additionally, FAT32 lacks modern features such as journaling, which helps recover data in case of system crashes or power failures.
Security Concerns: Unlike NTFS or APFS, FAT32 does not support built-in encryption or advanced permissions. This can be a drawback when using FAT32 drives for sensitive data.
4. When FAT32 Still Shines
Despite its limitations, FAT32 remains a solid choice for several scenarios:
- Legacy Device Support: Many older devices only support FAT32, making it the go-to choice for compatibility.
- Wide Adoption: From game consoles to digital cameras, FAT32 is recognized almost universally.
- Simplicity: For users transferring small files between devices, FAT32 provides an easy and reliable solution without compatibility issues.
Understanding these constraints will help you make an informed decision when choosing FAT32 over other file systems. If FAT32's limitations don't align with your needs, you can explore alternatives like ExFAT, which offers the same wide compatibility but without the restrictions on file and partition sizes.
Conclusion
Formatting a USB drive to FAT32 on a Mac is a straightforward process with the right tools and guidance. By following this step-by-step guide, you can prepare your USB drive for optimal compatibility across devices and operating systems.
However, remember that FAT32 is best suited for smaller drives and files. For larger files or more modern workflows, consider ExFAT or NTFS. Always back up your data before formatting, and ensure the chosen file system aligns with your device requirements.
With this knowledge, you're ready to format your USB drive to FAT32 and enjoy seamless cross-platform file sharing. Happy formatting!
FAQs About Formatting a USB Drive to FAT32 on Mac
1. How to format a USB drive to FAT32 on Mac?
Disk Utility can help you quickly format a USB drive to FAT32 on Mac:
- Go to Launchpad > Other > Disk Utility, open Disk Utility.
- Select the USB drive, click Erase.
- Select MS-DOS (FAT) as the Format.
- Click Erase again.
2. Can I recover lost data after formatting a USB drive to FAT32 on Mac?
Yes, formatting a USB drive to FAT32 will delete everything from the USB drive. But the lost data still can be recovered by data recovery software:
- Download and install Donemax Data Recovery for Mac.
- Open this Mac data recovery software, select the formatted USB drive.
- Click on Scan button.
- Preview and recover lost files after scanning.
3. Which tool can help in formatting a USB drive to FAT32 on Mac?
Here is list of top 5 FAT32 formatters for Mac:
- Disk Utility
- Terminal
- Donemax Data Recovery for Mac
- Donemax NTFS for Mac
- Donemax Data Eraser for Mac
4. How to format a USB drive to FAT32 and wipe everything permanently?
Before you sell or donate your old USB drive, you should wipe everything from it so that no data is recoverable.
- Download and install the reliable Mac disk wipe software - Donemax Data Eraser for Mac.
- Open Donemax Data Eraser for Mac, choose Erase Hard Drive mode.
- Select the USB drive, click on Erase Now button.
- This data erasure program will format and wipe the USB drive. All data stored on the USB drive will be erased permanently.


Donemax Data Eraser for Mac
100% safe and powerful Mac data erasure program. It offers certified data erasure standards including U.S. Army AR380-19, DoD 5220.22-M ECE to help in securely and permanently erase data from Mac HDD/SSD and external storage device, making data recovery be impossible.
Related Articles
- Mar 22, 2024What Is SMC? How to Reset SMC on Mac?
- Mar 27, 2025How to Use BitLocker on Windows 11?
- Feb 11, 2025Fix SanDisk Memory Card Not Working Without Losing Data
- Nov 20, 2024How to Clean Install macOS Catalina?
- Feb 24, 2025How to Show Hidden Files on SD Card: A Comprehensive Guide
- Nov 25, 2024How to Clean Install macOS Monterey [Step-by-step Guide]

Coco Lin
Coco has been a writer and a chief programmer at Donemax software since 2018. Over 10 years of experience of writing troubleshooting articles in the software industry, she is passionate about programming and loves to providing solutions to Windows and Mac users. Also she enjoys music and palying tennis in her free time.

Gerhard Chou
In order to effectively solve the problems for our customers, every article and troubleshooting solution published on our website has been strictly tested and practiced. Our editors love researching and using computers and testing software, and are willing to help computer users with their problems
