Before we start: Before clean install of macOS Catalina, you should make a backup of your important data. You can use Donemax Disk Clone for Mac to clone all data from your Mac to an external hard drive, making a full bootable clone backup.
PAGE CONTENT:
- Why Need Clean Installation of macOS Catalina?
- Preparing for the Clean Install
- Create Bootable UBS Installer for macOS Catalina
- Clean Install macOS Catalina with Bootable USB Installer
- Troubleshooting During Installation
- Post-Installation Setup
- Recover Lost Data After Clean Install macOS Catalina
- Conclusion
macOS Catalina, Apple's operating system released in October 2019, introduced a host of new features, including improved performance, increased security, and applications like Sidecar, which allows an iPad to function as a second display. However, over time, some users may experience sluggish performance, unexpected glitches, or simply want a fresh start. A clean installation of macOS Catalina can be the answer. In this guide, we will explore the process, step by step, ensuring a smooth and hassle-free clean installation.
Why Need Clean Installation of macOS Catalina?
A clean install involves erasing your Mac's current operating system and all its data, then installing macOS Catalina from scratch. This method differs from an upgrade, which simply replaces the old OS with the new one, retaining your files, apps, and settings. While upgrades are convenient, they can sometimes lead to software conflicts or carry over unnecessary system files that slow down your Mac.
Opting for a clean install provides several advantages:
- Performance Boost: Starting fresh eliminates clutter, unused files, and software remnants.
- Bug Fixes: Resolves glitches and issues carried over from previous installations.
- Customization: Allows you to selectively reinstall apps and set up your Mac exactly as you like.
Preparing for the Clean Install
Before diving into the clean installation process, preparation is crucial. This step ensures that your data is safe, your system is ready, and you have everything you need for a smooth installation.
1. Check System Requirements
Before installing macOS Catalina, confirm that your Mac is compatible. Here are the minimum system requirements:
- Supported Devices: Major MacBooks after 2015.
- Storage: At least 20 GB of free space.
- RAM: 4 GB or more (although 8 GB is recommended for better performance).
You can verify your Mac's specifications by clicking the Apple logo in the top-left corner of your screen and selecting About This Mac.
2. Back Up Your Data
A clean install erases everything on your Mac, so backing up your data is essential. There are several ways to create a backup:
- Time Machine:
- Time Machine is Apple’s built-in backup solution. To use it:
- Connect an external drive.
- Open System Preferences > Time Machine and select the drive.
- Click Back Up Now to create a full backup.
- Cloud Backup:
Save important files to cloud services like iCloud, Google Drive, or Dropbox for added security.
- Disk Clone:
Clone everything from your Mac to an external hard drive, making a full backup for your Mac.
- Manual Backup:
Copy critical files to an external hard drive if you don't need a full system backup.
After completing your backup, verify that all your important files are stored safely and accessible.
Create Bootable UBS Installer for macOS Catalina
Step 1: Download macOS Catalina Installer
To perform a clean install, you'll need the macOS Catalina installer:
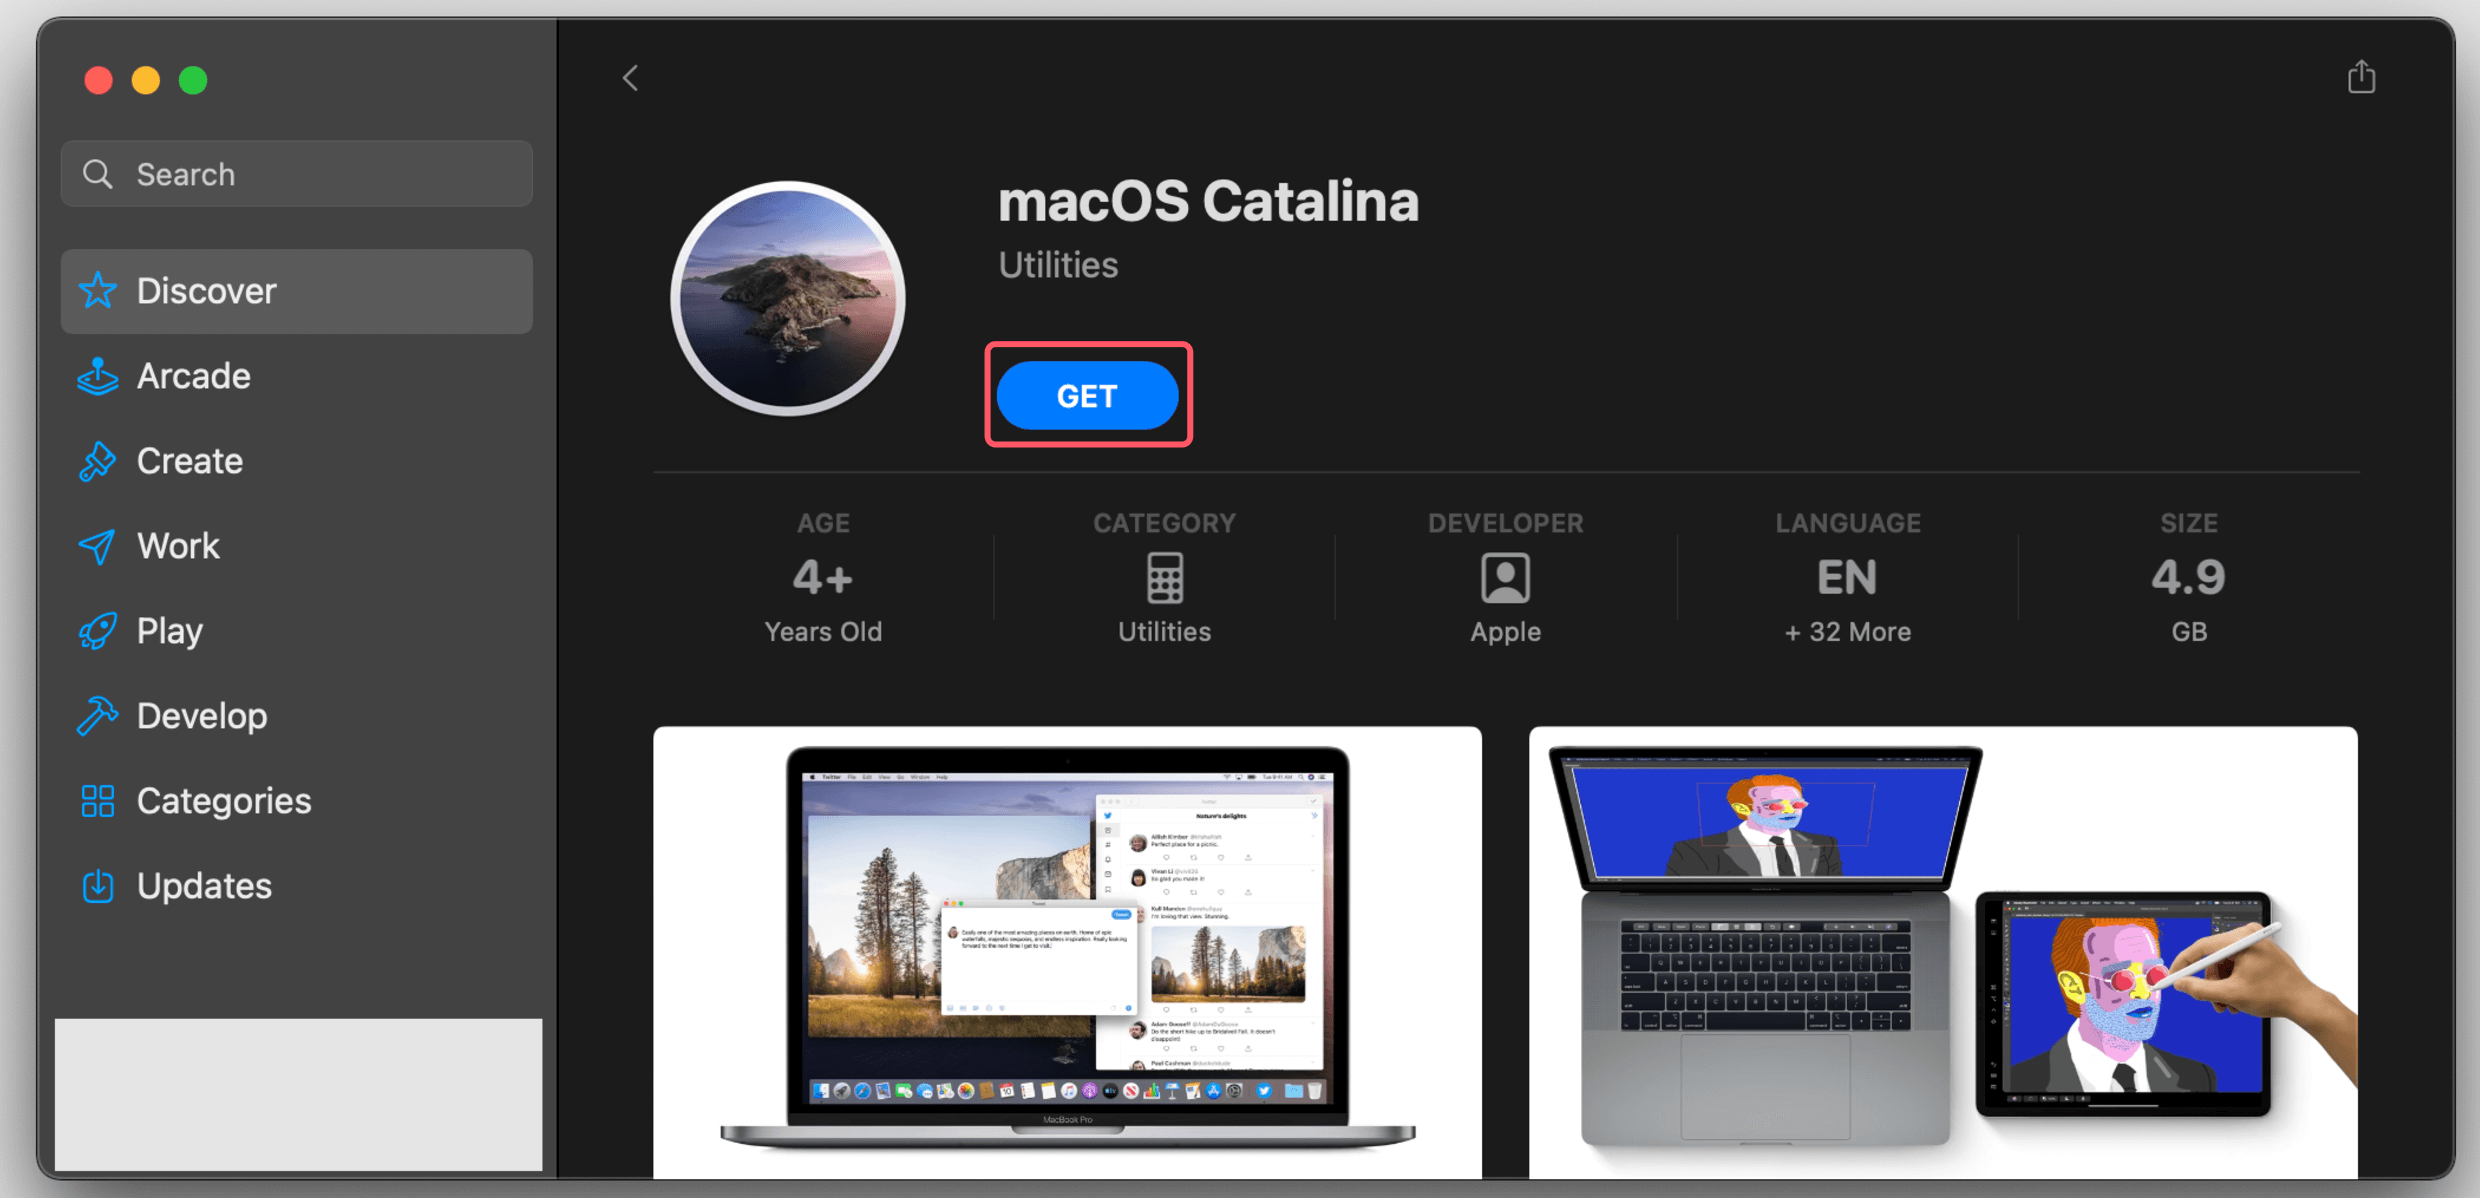
- Open the App Store and search for "macOS Catalina."
- Click Get to download the installer.
![clean installation of macOS Catalina]()
- Once downloaded, the installer will automatically open. Close it for now, as you'll need it later.
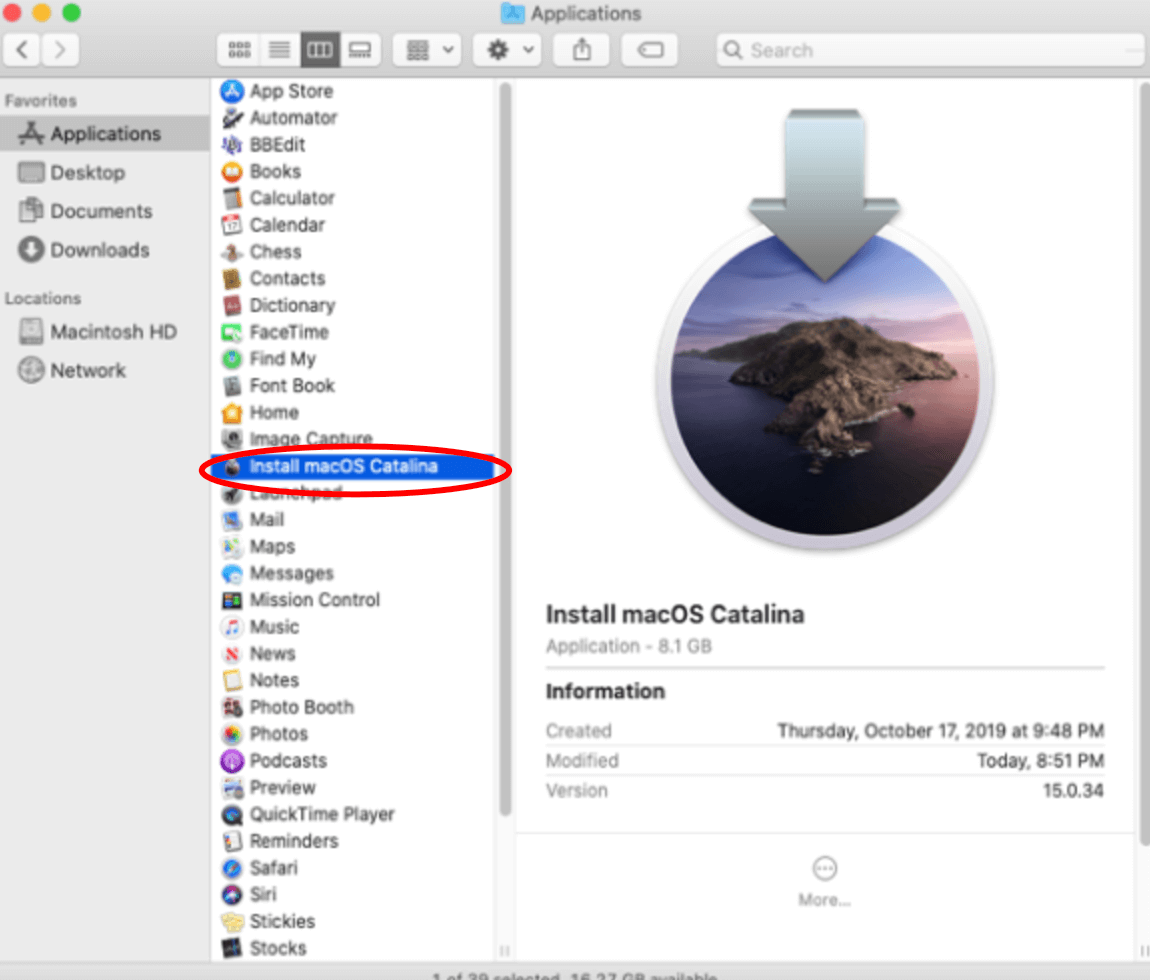
Ensure the installer (usually named Install macOS Catalina.app) is saved in the Applications folder, as this is required for creating a bootable drive.
Step 2: Create a Bootable macOS Catalina Installer
A bootable installer is a USB drive or external storage device that contains the macOS Catalina installation files. This tool allows you to install the operating system even if your Mac's internal drive has been erased.
1. Necessary Tools
To create a bootable installer, you'll need:
- A USB drive or external drive with at least 16 GB of storage.
- Administrator access to your Mac.
2. Format the USB Drive
Before using your USB drive, format it to ensure compatibility:
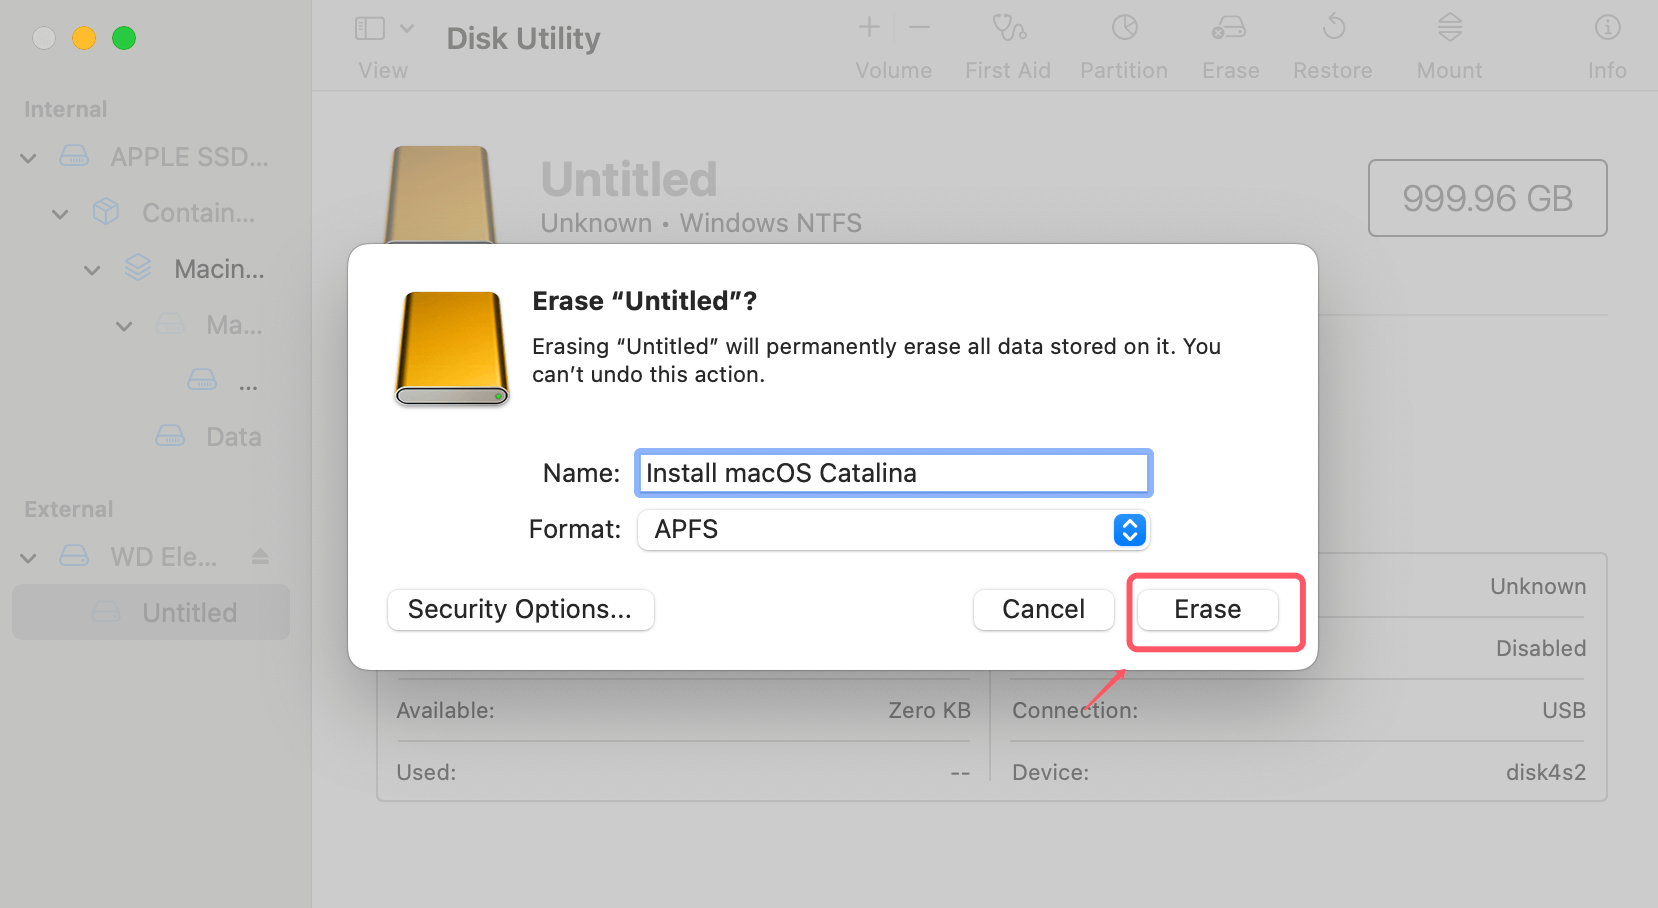
- Open Disk Utility in Utilities section via Applications folder.
- Select your USB drive from the list of drives.
- Click Erase and choose the following settings:
- Format: APFS or macOS Extended (Journaled).
- Scheme: GUID Partition Map.
- Click Erase to complete the process.
![clean installation of macOS Catalina]()
3. Use Terminal to Create the Installer
Now that your USB drive is formatted, create the bootable installer:
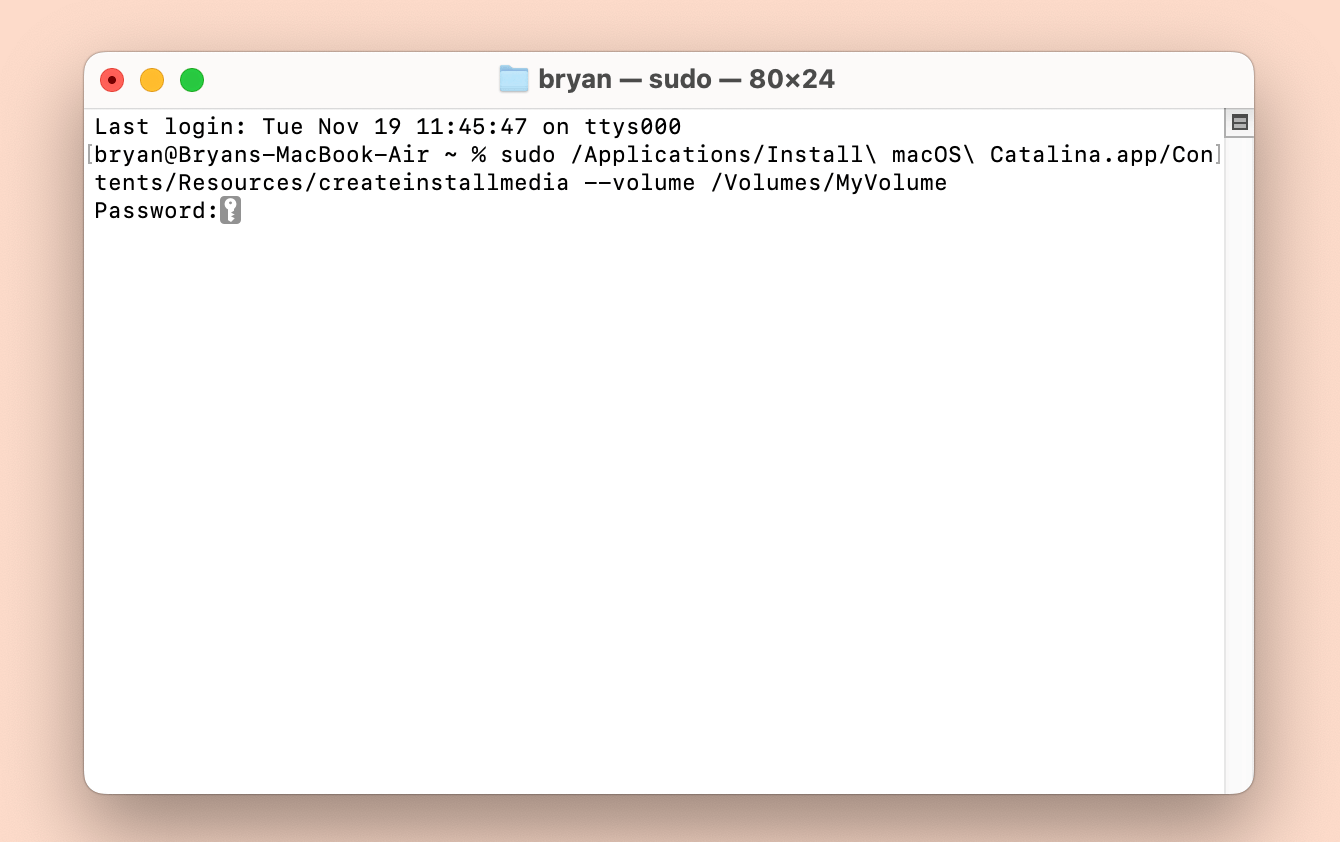
- Open Terminal in Utilities section via Applications folder.
- Type the following command, replacing MyVolume with the name of your USB drive:
sudo /Applications/Install\ macOS\ Catalina.app/Contents/Resources/createinstallmedia --volume /Volumes/MyVolume
![clean installation of macOS Catalina]()
- Press Enter and follow the on-screen prompts.
- Once complete, your USB drive will contain the macOS Catalina installer.
Label the drive for easy identification during installation.
Clean Install macOS Catalina with Bootable USB Installer
With your bootable installer ready, it's time to erase your Mac’s internal drive and install macOS Catalina. This is the most crucial step in the process, so take it slow and follow each instruction carefully. A clean installation ensures that you're starting fresh without any remnants of the old system or data, providing a stable foundation for your Mac.
1. Boot from the USB Installer
The first step is to boot your Mac from the USB drive you prepared earlier. This allows you to access the macOS Utilities menu, where you’ll perform the clean install. Here's how to do it:
- Connect your Mac to the bootable USB installer.
- Give your Mac a restart. During the reboot, press and hold the Option key on your keyboard.
- Holding down the key will cause the Startup Manager screen to show.
- From the list of available drives, select the USB installer (it will usually display the name you assigned during the creation process).
- Press Enter, and your Mac will boot into the macOS Utilities interface.
If you encounter any issues during this step, such as the USB installer not appearing, ensure the drive is properly connected and formatted as described earlier. For Macs with T2 security chips, you might need to adjust startup security settings in Recovery Mode to allow booting from external drives.
2. Erase the Startup Disk
Erasing your Mac's internal storage is a significant step. It completely removes all data, including the previous operating system, applications, and files, ensuring that your new installation starts on a clean slate.
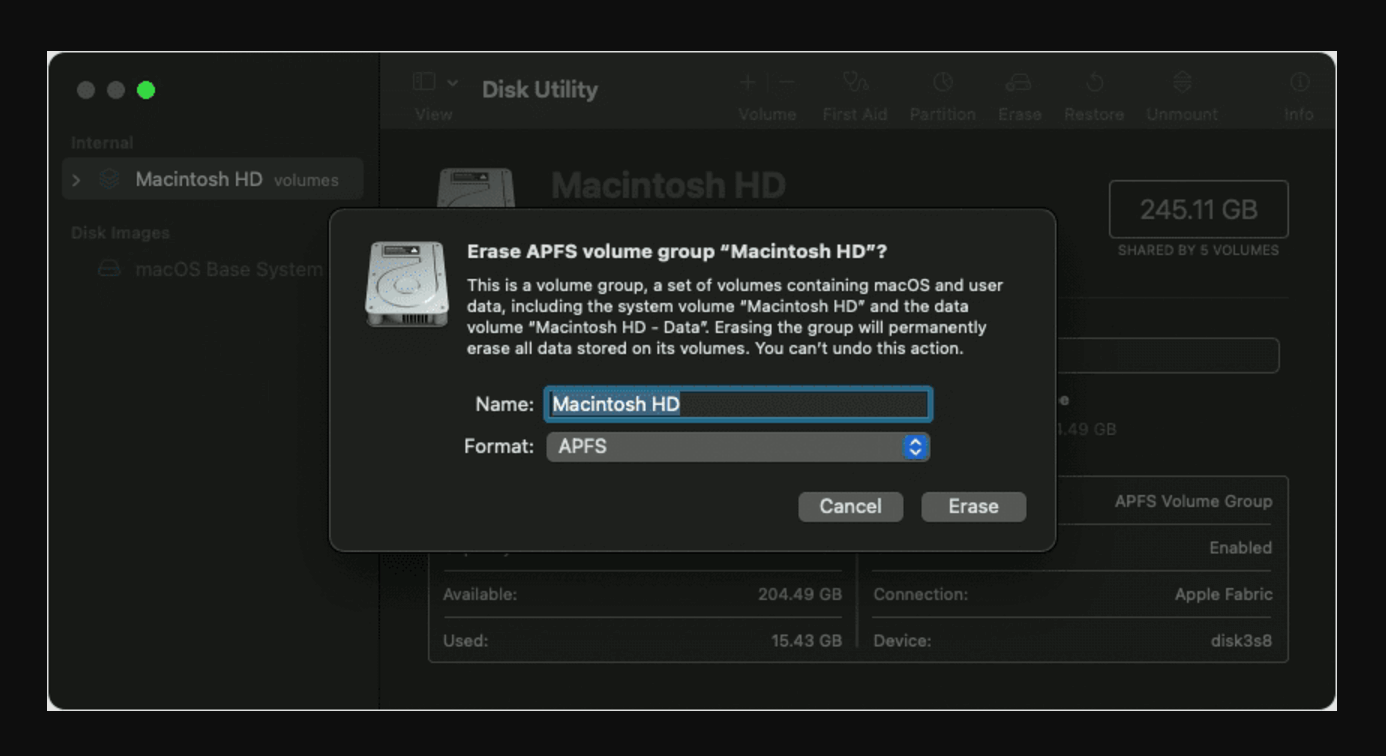
- Choose Disk Utility from the macOS Utilities menu, then click Continue.
- In Disk Utility, locate your internal drive on the left-hand side. It’s typically named Macintosh HD, but it may vary depending on your previous setup.
- Click on your internal drive, then select Erase at the top of the Disk Utility window.
- Configure the following settings:
- Name: Macintosh HD (or a name of your choice).
- Format: Choose APFS if your Mac has an SSD or Mac OS Extended (Journaled) for older Macs with traditional hard drives.
- Scheme: Always select GUID Partition Map.
- Click Erase to confirm. The process will take a few moments. Once completed, your internal drive will be blank and ready for the clean installation.
![clean installation of macOS Catalina]()
After erasing the drive, close Disk Utility to return to the macOS Utilities menu. This step is irreversible, so double-check that your backup is secure before proceeding.
3. Install macOS Catalina
Now that your internal drive is wiped clean, it’s time to install macOS Catalina:
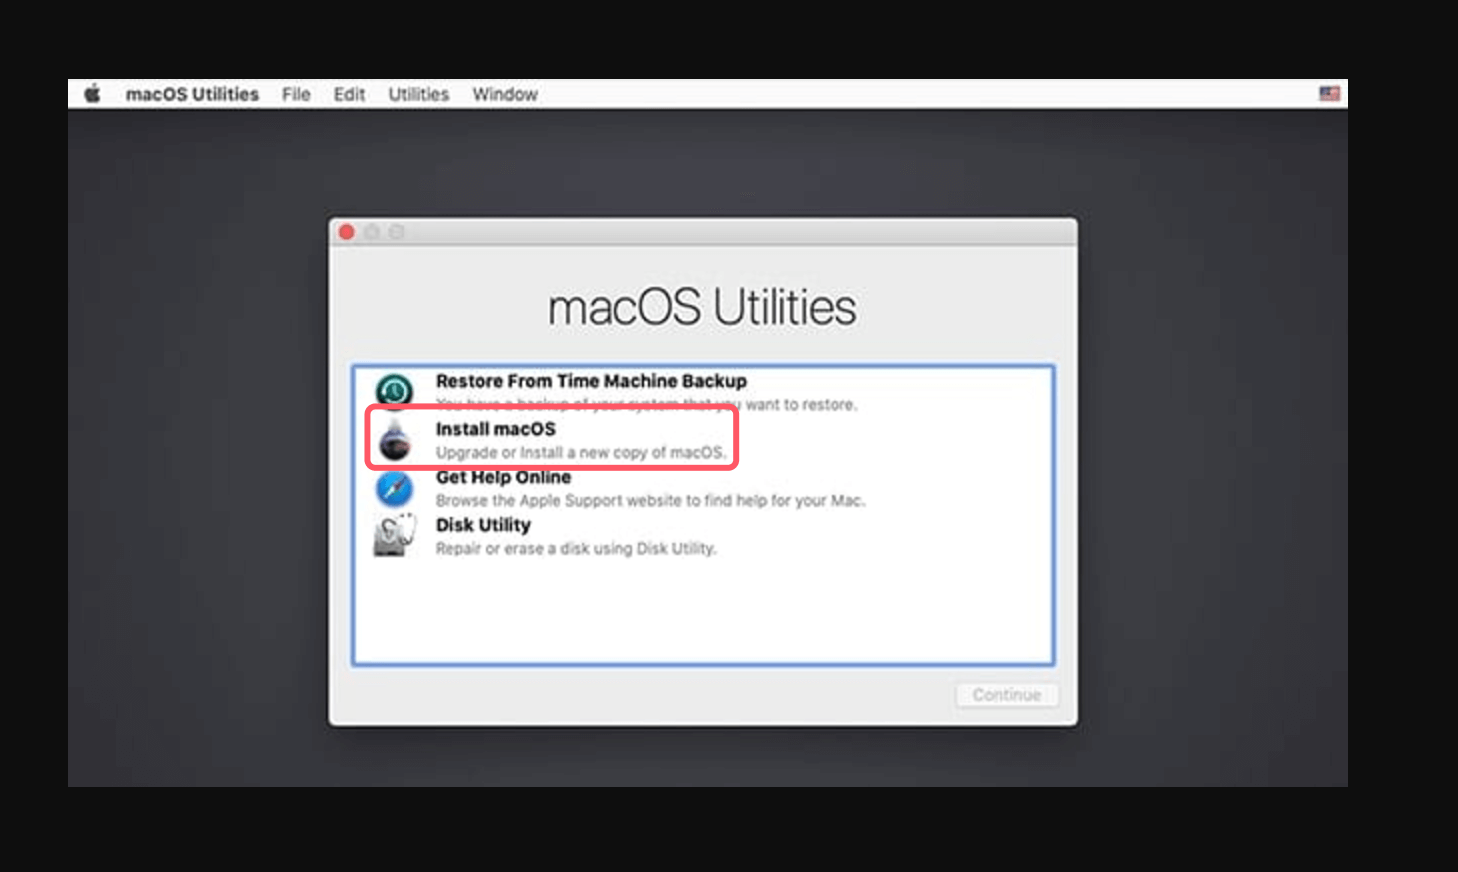
- Click Continue after choosing Install macOS from the macOS Utilities menu.
![clean installation of macOS Catalina]()
- Adhere the instruction on your screen until you reach the disk selection screen.
- Choose the freshly erased internal drive (e.g., Macintosh HD) as the installation destination.
- Click Install, and the process will begin.
The installation process typically takes 20~30 minutes, depending on your Mac's speed and the drive type. During this time, your Mac will restart several times. Avoid interrupting the process or turning off your Mac.
Once the installation is complete, your Mac will reboot and display the macOS setup assistant. This signals that the clean installation was successful, and you’re ready to configure your system.
Troubleshooting During Installation
If you encounter errors, such as the installer failing to complete or not recognizing your internal drive, try the following:
- Ensure your USB drive is correctly formatted and contains a valid installer.
- Reset your Mac's NVRAM/PRAM by restarting and holding Option + Command + P + R during boot.
- Use First Aid in Disk Utility to check your internal drive for errors before erasing it again.
Performing a clean install may seem daunting, but patience and attention to detail will ensure a successful outcome.
Post-Installation Setup
After successfully installing macOS Catalina, you'll need to configure your Mac and restore your files and apps. This stage ensures a smooth transition back to productivity.
1. Initial Setup
- Follow the setup assistant to configure basic settings such as language, Wi-Fi network, and Apple ID.
- Agree to the terms and conditions and set up your user account.
- If you use iCloud, sign in to sync your data and preferences.
2. Update macOS and Reinstall Apps
- Open System Preferences > Software Update to ensure your installation is up to date.
- Reinstall essential apps manually or from the Mac App Store.
- Verify that your favorite apps are compatible with macOS Catalina.
3. Restore Files from Backup
Depending on your preference, you can restore files selectively:
- Using Time Machine: Connect your backup drive and open Migration Assistant to restore specific files or folders.
- Manually: Copy necessary files from your backup drive or cloud storage.
Maintaining Your Fresh Installation:
Now that your Mac is running a clean installation of macOS Catalina, it's essential to maintain its performance. Here are some tips:
- Regularly back up your data using Time Machine or cloud services.
- Keep macOS updated to the latest version.
- Avoid installing unnecessary apps or extensions that may clutter your system.
- Periodically clean your disk using macOS's built-in storage management tools.
Recover Lost Data After Clean Install macOS Catalina
If you have lost data due to clean install macOS Catalina on your Mac and don't have a backup, you can use Mac data recovery software to get the lost data back.
Step 1. Download and install Donemax Data Recovery for Mac on your Mac.
Step 2. Open Donemax Data Recovery, select Macintosh HD to start data recovery.

Step 3. Click on Scan button to deeply scan the drive and find all deleted/erased files.

Step 4. Once the scan is completed, you can preview all recoverable files. Then select the wanted files, click on Recover button to save them.

Conclusion
A clean installation of macOS Catalina is a powerful way to rejuvenate your Mac, eliminate persistent issues, and enjoy a fresh start. While the process may seem complex, following these detailed steps ensures that you can complete it confidently and efficiently. Whether you're solving technical problems or simply seeking a decluttered system, the benefits of a clean install are well worth the effort.
Take the time to explore the new features of macOS Catalina, such as Sidecar, improved security, and enhanced app performance, and enjoy your refreshed Mac. Regular maintenance and backups will help you make the most of your clean installation, keeping your Mac running smoothly for years to come.
Before or after clean install of macOS Catalina on your Mac, you can use Mac disk cloning software - such as Donemax Disk Clone for Mac to help create a full bootable clone backup for your Mac.

Donemax Disk Clone for Mac
An award-winning disk cloning program to help Mac users clone HDD/SSD/external device. It also can create full bootable clone backup for Macs.
Related Articles
- Sep 22, 2025How to Reinstall macOS Tahoe – Complete Guide 2025
- Oct 10, 2023How to Reinstall macOS Sonoma?
- Sep 17, 2025Solution to Bypass BitLocker Recovery Blue Screen?
- Feb 21, 2024How to Remove Stubborn Files from PC?
- Feb 11, 2025How to Show Hidden Files on a USB Flash Drive?
- Mar 17, 2025Should I Install Windows 11 24H2? How to Install Windows 11 24H2

Christina
Christina is the senior editor of Donemax software who has worked in the company for 4+ years. She mainly writes the guides and solutions about data erasure, data transferring, data recovery and disk cloning to help users get the most out of their Windows and Mac. She likes to travel, enjoy country music and play games in her spare time.

Gerhard Chou
In order to effectively solve the problems for our customers, every article and troubleshooting solution published on our website has been strictly tested and practiced. Our editors love researching and using computers and testing software, and are willing to help computer users with their problems

