Written byCoco LinUpdated on Feb 11, 2025
How to Show Hidden Files on a USB Flash Drive?
Approved byGerhard Chou
Tip: If the files disappeared from your USB flash drive, you can use data recovery tool - such as Donemax Data Recovery to recover the hidden or lost files from the USB flash drive.
PAGE CONTENT:
USB flash drives are among the most convenient tools for storing and transferring data. However, they are not immune to issues like files going missing or becoming hidden. This article explores detailed methods to identify and recover hidden files on USB drives, ensuring that your valuable data is never out of reach.
Why Are Files Hidden on a USB Drive?
Hidden files on USB drives can occur due to various reasons, including:
1. Accidental Hiding
It is possible to inadvertently hide files by misusing the file properties or changing settings in the operating system. For example, enabling "hidden" attributes while organizing files could make them disappear from plain view.
2. Malware or Viruses
Malicious software often alters file attributes, marking them as "hidden" or "system" files. Some malware even replaces your original files with shortcuts, making it seem as though the data is lost.
3. File System Errors
File system corruption, caused by improper ejection or sudden power loss, can hide files. When the USB drive develops errors, files may not display correctly or at all.
4. System-Specific Hidden Files
Operating systems like Windows, macOS, and Linux hide certain files by default to prevent accidental modification. These may include configuration files, logs, or temporary data.
Understanding the root cause helps determine the appropriate method for revealing your files.
How to Show Hidden Files on USB Flash Drive in Windows?
Windows provides multiple methods to display hidden files, catering to users of different technical expertise levels. Below are three ways to achieve this:
1. Use File Explorer to Unhide USB Flash Drive Files
File Explorer is the most straightforward tool for displaying hidden files, suitable for all users. Here's a detailed step-by-step guide:
- Connect Your USB Drive:
Put the USB drive into a USB port that is open on your Windows computer. Press Windows + E to launch File Explorer after the drive has been recognized.
- Navigate to Your USB Drive:
In File Explorer, locate your USB drive under This PC or Devices and Drives. Click on the drive to open it.
- Enable Hidden Items:
- In the top menu, click on the View tab.
- Choose Show > Hidden items.
![Enable Hidden Items]()
- Any hidden files or folders on your USB drive will now appear. These will be semi-transparent, distinguishing them from visible files.
- Advanced Settings (Optional)
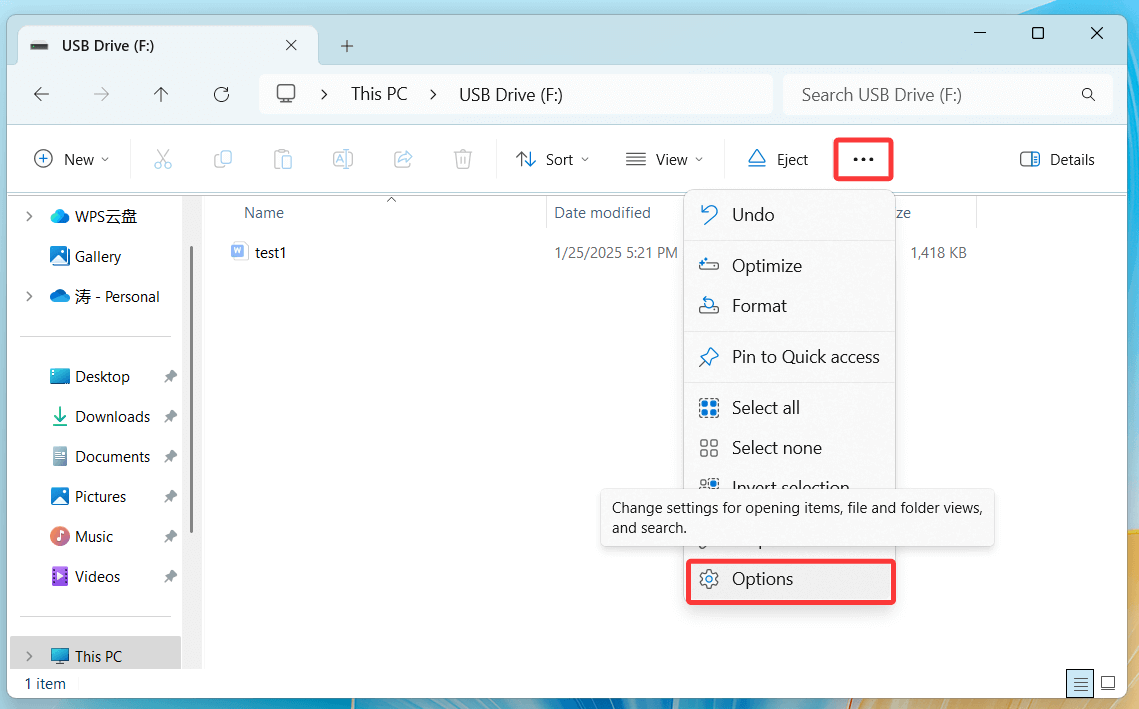
If the hidden files do not show up after enabling Hidden items:
- Click ... on the far-right of the View tab, then choose Options.
![Click ... on the far-right of the View tab then choose Options]()
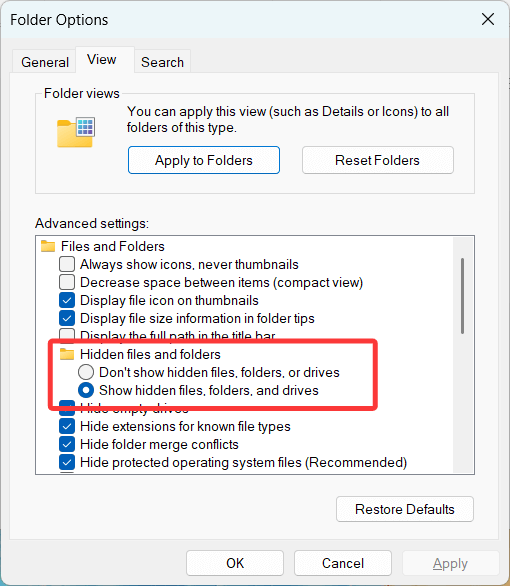
- Navigate to the View tab in the Folder Options box.
![Navigate to the View tab in the Folder Options box]()
- Choose Show hidden files, folders, and drives from the Advanced settings.
- Disable the "Hide protected operating system files" option (Suggested). A warning message will appear; click Yes to confirm. This step uncovers system-level hidden files but should be used cautiously, as modifying these files can affect system performance.
- Click ... on the far-right of the View tab, then choose Options.

2. Use Command Prompt to Force Unhide Files on USB Flash Drive
Command Prompt is a command-line interface that allows users to perform tasks without a graphical interface. It’s particularly effective for revealing files hidden due to viruses or malware.
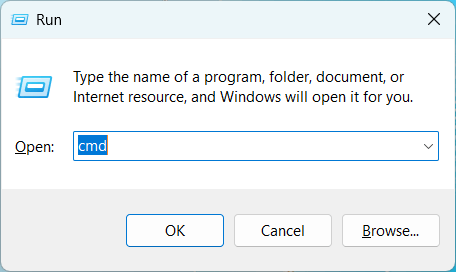
- Open Command Prompt:
- Press Windows + R, type cmd, and hit Enter.
![Press Windows + R, type cmd, and hit Enter.]()
- Alternatively, search for "Command Prompt" in the Start menu and select Run as Administrator for elevated privileges.
- Press Windows + R, type cmd, and hit Enter.
- Locate Your USB Drive:
Determine the drive letter assigned to your USB drive (e.g., F:). You can find this in File Explorer under This PC.
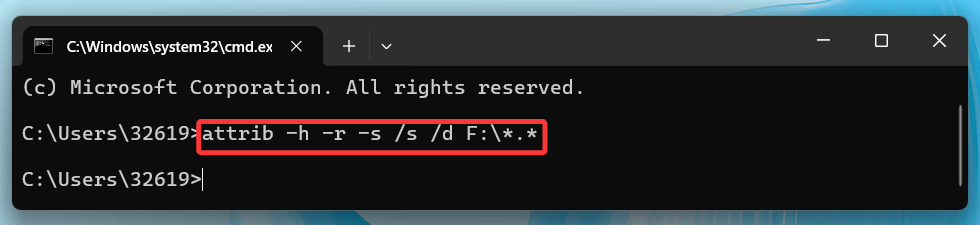
- Execute the attrib Command:
In the Command Prompt, type the following command and press Enter:
attrib -h -r -s /s /d F:\*.*
![Execute the attrib Command]()
Replace E: with the letter of your USB drive.
- -h removes the hidden attribute, making the file visible.
- -r removes the read-only attribute, allowing modifications.
- -s removes the system file attribute.
- /s applies these changes to all files in the current directory and its subdirectories.
- /d applies changes to directories as well as files.
- Wait for the Process to Complete
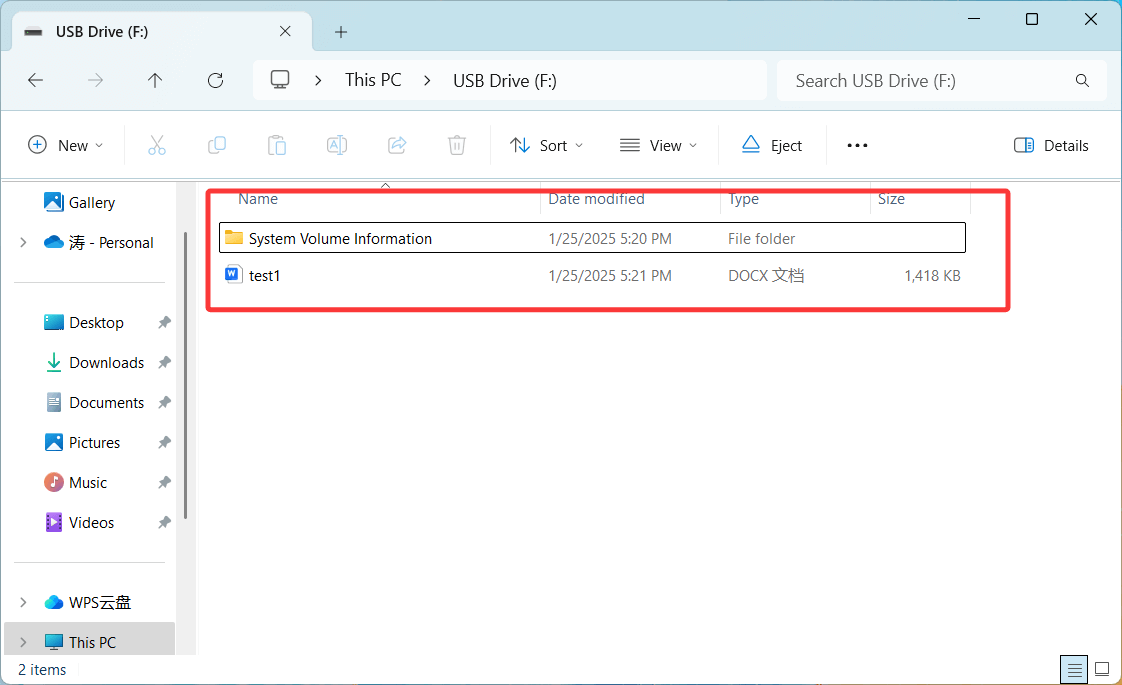
Depending on the number of files, the process may take some time. Once complete, check your USB drive in File Explorer. Hidden files should now be visible.
![Wait for the Process to Complete]()
3. Recover Hidden or Missing Files from USB Flash Drive
If the above methods don't work or if you're dealing with malware-damaged files, third-party tools can help recover your hidden data. Donemax Data Recovery is a powerful data recovery program for both Windows and macOS. It can help you completely recover hidden files or missing files from your USB flash drive.
Step 1. Connect the USB flash drive to your computer and download & install Donemax Data Recovery on your computer.
Step 2. Open Donemax Data Recovery, select the USB flash drive to start data recovery.

Step 3. Click on Scan button to deeply scan the USB flash drive and find all recoverable files including existing files, hidden files, inaccessible files, deleted/formatted and lost files, etc.
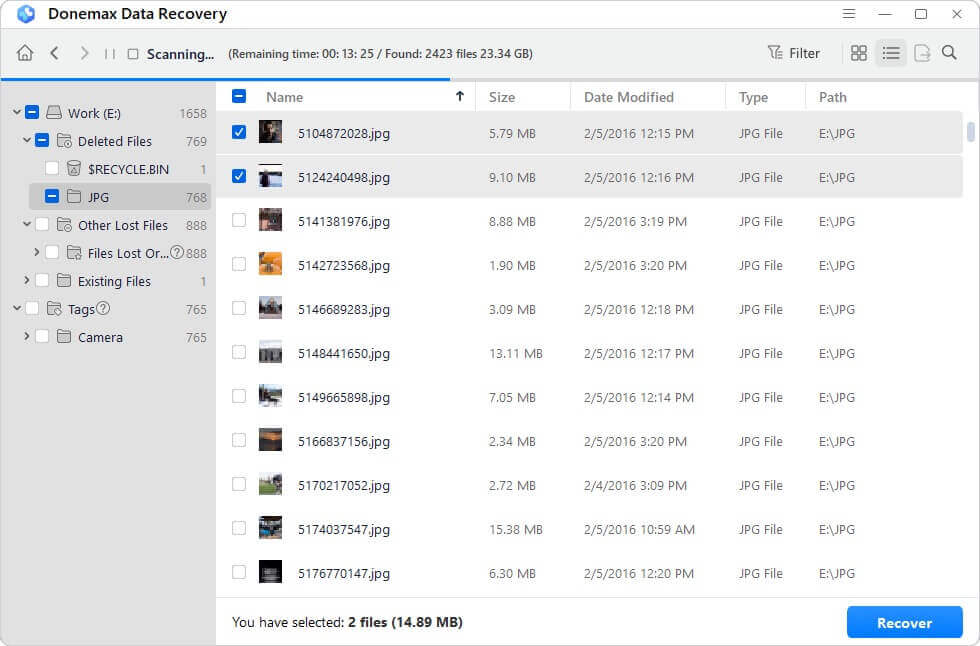
Step 4. Once the scan is completed, you can preview all found files. Then select the wanted files, click on Recover button to save them. Note: Don't save the files to the USB flash drive, save the files to another drive.

If malware is suspected to have hidden your files, use tools like Malwarebytes or Kaspersky Virus Removal Tool to scan and remove threats. After removing the malware, follow the File Explorer or Command Prompt methods to reveal your files.
Pro Tips for Windows Users:
- Double-Check Drive Letter: Always verify the correct drive letter before using the attrib command in Command Prompt. Using the wrong drive can lead to unintended changes.
- Be Cautious with System Files: When enabling the option to show protected operating system files, avoid deleting or modifying these files unless you're sure they are unnecessary.
- Scan for Malware: If your files remain hidden after following these steps, run a full system scan using reliable antivirus software. Hidden files caused by malware often require additional cleanup steps.
How to Show Hidden Files Stored on USB Flash Drive in macOS?
Mac users can also easily reveal hidden files using Finder or Terminal:
1. Use Finder to Unhide Files on USB Flash Drive
- Open Finder and navigate to the USB drive.
- Press Command + Shift + . (period) simultaneously. Hidden files will immediately appear in the directory as grayed-out items.
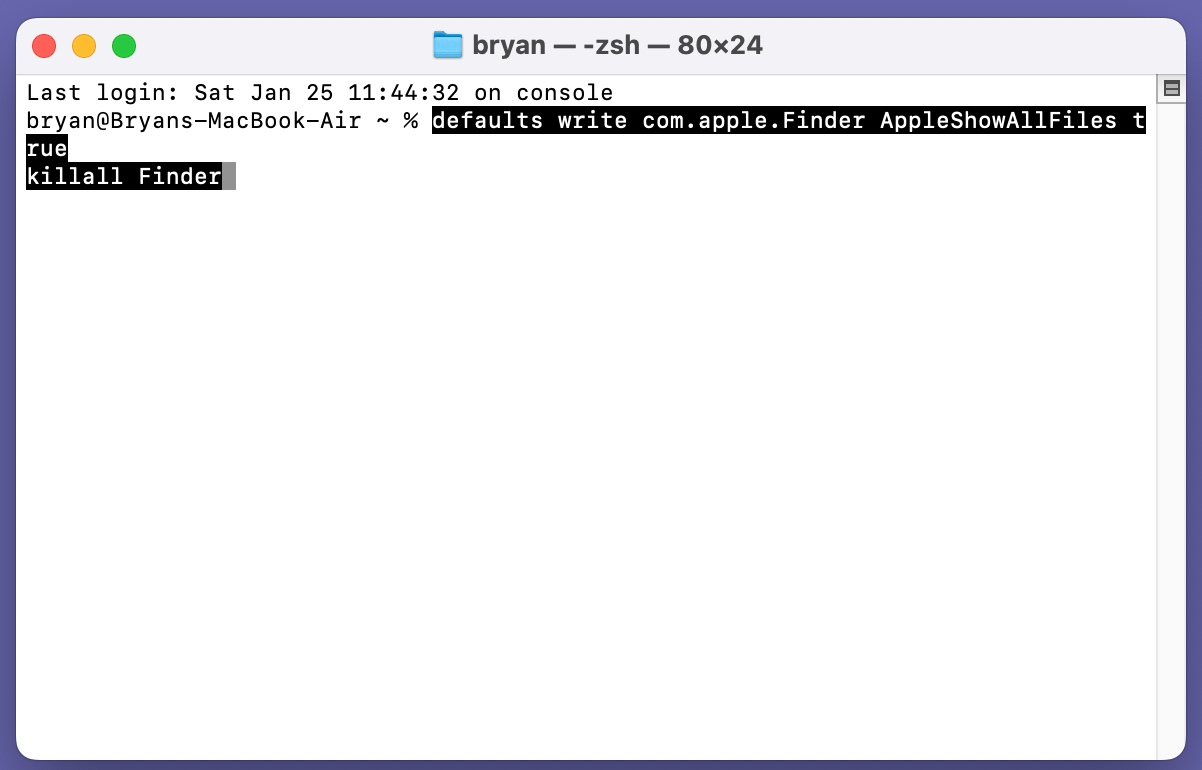
2. Use Terminal to Show Hidden Files on USB Flash Drive
For advanced users, Terminal provides a more direct method:
- Open Terminal from the Utilities folder via Applications.
- Type the following command and press Enter:
defaults write com.apple.Finder AppleShowAllFiles true
killall Finder
![Use Terminal to Show Hidden Files on USB Flash Drive]()
- The first command modifies Finder settings to display all hidden files.
- The second command restarts Finder to apply the changes.
- To hide files again after completing your work, use:
defaults write com.apple.Finder AppleShowAllFiles false
killall Finder
3. Unhide Files on USB Flash Drive on Mac with DMmenu
Applications like Donemax DMmenu for Mac offer additional features such as unhiding files on Mac including attached devices.
Step 1. Download and install Donemax DMmenu for Mac, then run it from Launchpad.
Step 2. Ensure your USB flash drive is connected to your Mac and open DMmenu for Mac. Choose Switch Manager, turn on Display Hidden Files. Then you can see all hidden files on the Mac and the connected USB flash drive.
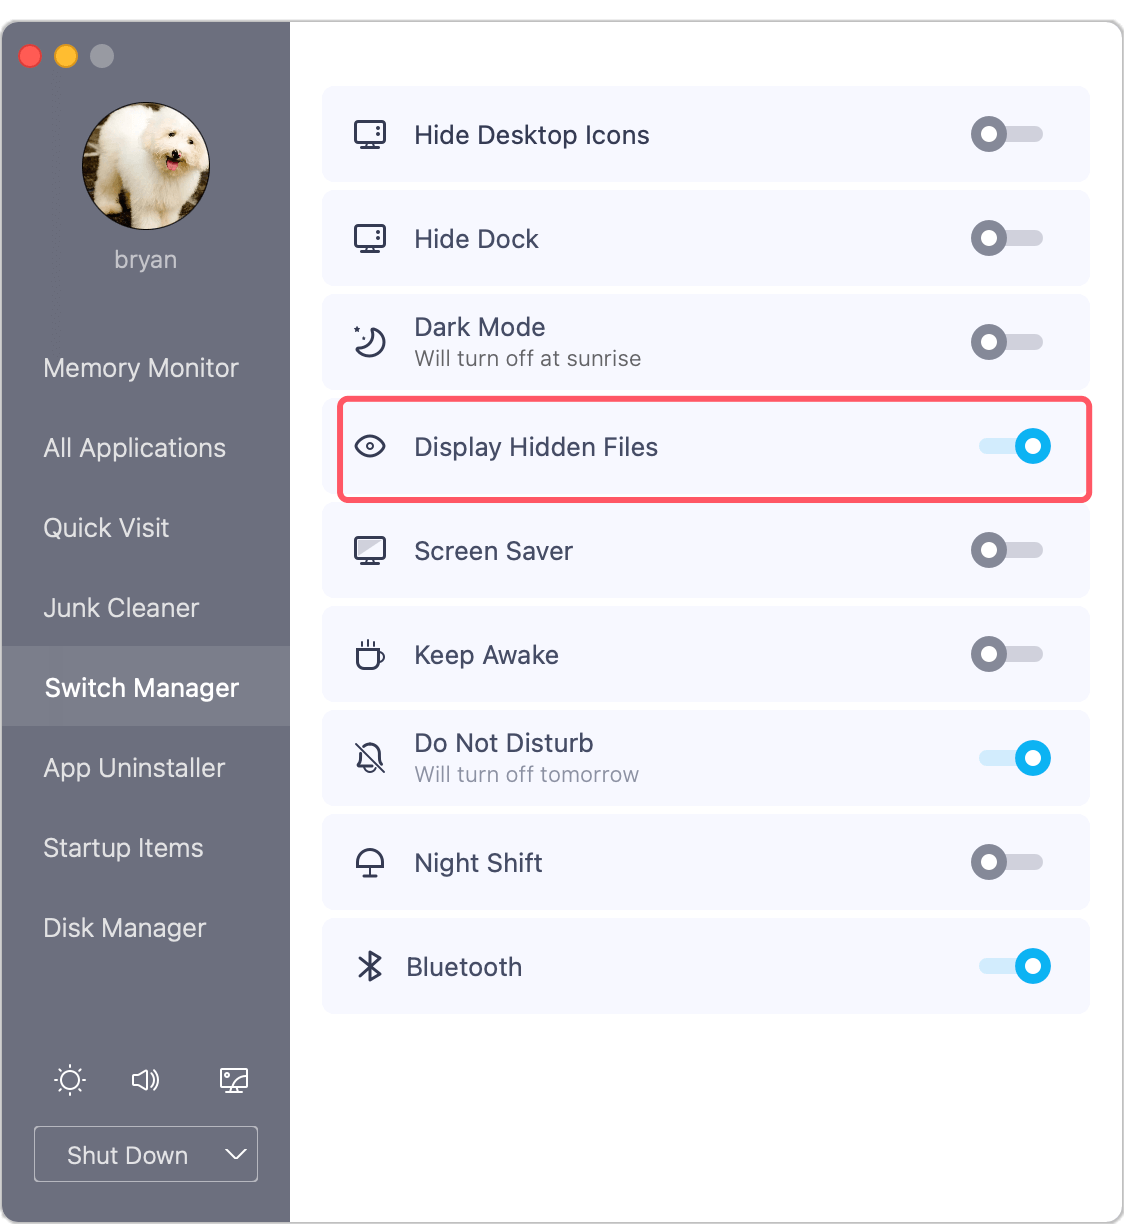
If you don't want to see the hidden files, just turn Display Hidden Files off.
Prevent USB Hidden File Issues in the Future
Taking proactive measures can help prevent files on your USB drive from being hidden in the first place:
1. Regular Virus Scans
Install and regularly update antivirus software to scan your USB drive. This helps detect and remove malware before it can modify your files.
2. Proper Ejecting Methods
Always eject your USB drive safely. On Windows, right-click the USB drive in File Explorer and choose Eject. On macOS, drag the USB drive icon to the Trash.
3. Maintain Backups
Make regular backups of your files to a safe place, like the cloud or an external hard drive. This guarantees that even in the event of a USB drive failure, your data will still be accessible.
4. Avoid Untrusted Devices
Using your USB drive on unfamiliar or unprotected computers increases the risk of malware infections. Always scan your drive after using it on such devices.
Troubleshooting Common Problems
Despite following these methods, you may encounter challenges while attempting to reveal hidden files. Here are some solutions:
1. Files Still Not Visible
If hidden files remain inaccessible:
- Check for file system corruption by running a repair tool:
- On Windows, use CHKDSK:
chkdsk E: /f
Replace E: with your USB drive's letter.
- On macOS, use Disk Utility to verify and repair the drive.
- On Windows, use CHKDSK:
- Format the USB drive as a last resort (after backing up recoverable data). This removes any residual corruption.
2. Corrupted Files
If files appear but are corrupted:
- Use file repair tools like Stellar File Repair or Repair Toolbox.
- Professional data recovery services may be required for critical files.
Conclusion
Hidden files on USB drives are a common yet solvable problem. Whether caused by accidental settings changes, malware, or file system issues, the solutions outlined above provide a reliable way to recover your data. By taking preventative measures like regular virus scans, proper ejection practices, and maintaining backups, you can minimize the risk of future issues.
Donemax Data Recovery can help you completely recover hidden or inaccessible or lost files from your USB flash drive. After export all your files to another location, you can format the USB flash drive to fix most of errors.
Donemax Data Recovery
Donemax Data Recovery is one of the best data recovery software. It is easy-to-use and can help in recovering deleted, formatted, inaccessible or lost data from HDD/SSD, external disk, USB drive, SD card, camera or other storage devices.
Related Articles
- Dec 28, 2024How to Format a USB Drive to FAT32 on Mac?
- Nov 25, 2024How to Clean Install macOS Monterey [Step-by-step Guide]
- Mar 19, 2025How to Use Seagate Game Drive PS5 SSD?
- Jul 27, 2025Best 8 Fixes for USB Drive Not Detected on Mac
- Mar 25, 2025How to Restart or Force Restart A Windows PC?
- Mar 17, 2025Should I Install Windows 11 24H2? How to Install Windows 11 24H2

Contributing Writer
Coco Lin
Coco has been a writer and a chief programmer at Donemax software since 2018. Over 10 years of experience of writing troubleshooting articles in the software industry, she is passionate about programming and loves to providing solutions to Windows and Mac users. Also she enjoys music and palying tennis in her free time.

Editor in chief
Gerhard Chou
In order to effectively solve the problems for our customers, every article and troubleshooting solution published on our website has been strictly tested and practiced. Our editors love researching and using computers and testing software, and are willing to help computer users with their problems