Before we start: If the USB drive is a NTFS drive, you can use NTFS for Mac tool - such as Donemax NTFS for Mac to fix USB drive read-only issue. It can quickly enable writable for NTFS drives, then you can read-write the NTFS USB drive without any limitation.
PAGE CONTENT:
Dealing with a USB drive that's read-only on your Mac can be frustrating, especially when you need to edit, delete, or add files to it. A read-only USB drive is one that can only be read but not written to, making it virtually useless for tasks like saving documents or transferring files. There are several reasons why this may happen, including issues with the file system, disk permissions, or even physical damage to the drive.
In this article, we will explore the common causes of read-only issues on USB drives on a Mac, provide step-by-step instructions to fix them, and discuss preventive measures to ensure this problem doesn't occur again in the future.
Common Causes of Read-Only USB Drives on Mac
Before diving into the solutions, it's essential to understand why your USB drive might have become read-only. Here are the most common causes:
1. File System Incompatibility
One of the most frequent reasons for a USB drive being read-only on a Mac is file system incompatibility. Macs natively support file systems like APFS and HFS+, but when you plug in a USB drive formatted with a different file system, such as NTFS (used by Windows), you may encounter limitations.
macOS only supports NTFS in read-only mode, meaning you can view and copy files, but you can't write or modify them. This behavior can be inconvenient, especially if you intend to transfer or edit files directly on the drive.
2. Disk Corruption or Errors
Another possible cause of read-only USB drives is disk corruption. This can happen if the drive was improperly ejected, if there are bad sectors, or if the file system becomes damaged over time. When the Mac detects disk corruption, it may automatically set the drive to read-only mode to prevent further damage or data loss.
3. Security Settings or Permission Restrictions
Your Mac's security settings or file permissions could also be preventing you from writing to the USB drive. File permissions are often set to restrict who can read, write, or execute files on a disk. If the permissions on your USB drive are set to "read-only" for your user account, you won't be able to modify the contents.
4. USB Drive's Physical Write Protection
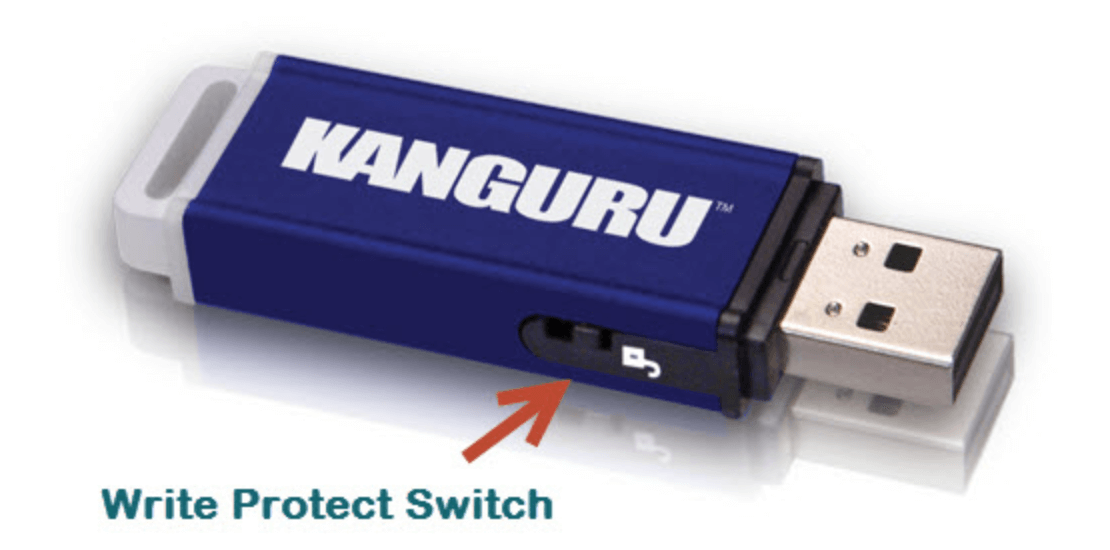
Some USB drives have a physical write protection switch that prevents data from being written to them. This switch is often located on the side of the drive and can be easily overlooked. If the switch is in the locked position, the drive will be read-only.
5. Mac OS X Software Issues
Sometimes, macOS itself may be at fault. Operating system bugs, incomplete updates, or conflicts with system processes can cause drives to be mounted in read-only mode. These issues can be resolved through software updates or by troubleshooting macOS settings.
How to Fix a USB Drive Read-Only on Mac? 8 Solutions
Now that we understand the causes, let's explore various methods to resolve the read-only issue.
1. Check and Change the USB Drive Format
The most straightforward way to fix a read-only USB drive is to check its format and reformat it to a macOS-compatible file system.
Step-by-Step Guide:
- Attach your Mac to the USB disk.
- Launch Disk Utility: Locate Disk Utility by selecting Applications, then Utilities.
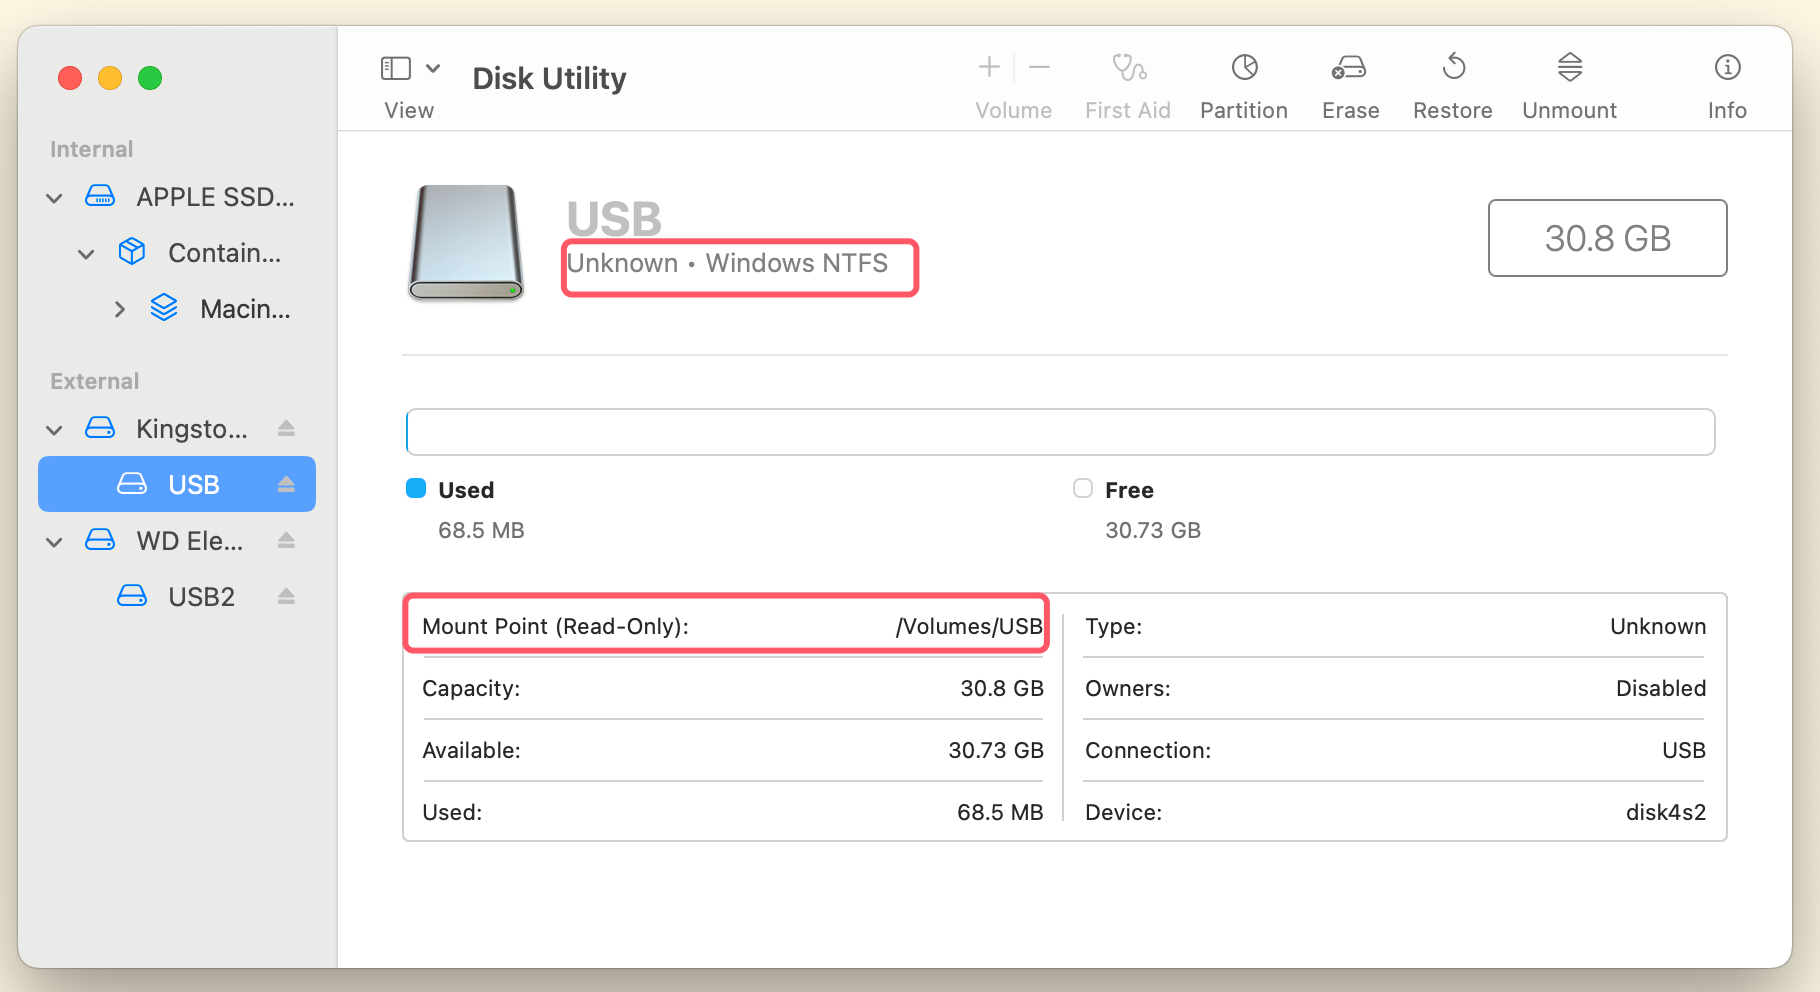
- From the list on the left side of the Disk Utility window, choose the USB device.
- Check the format: Under the Info section, you will see the file system format of the drive. If the file system is NTFS, it's the likely cause of the read-only problem.
![USB drive that's read-only on your Mac]()
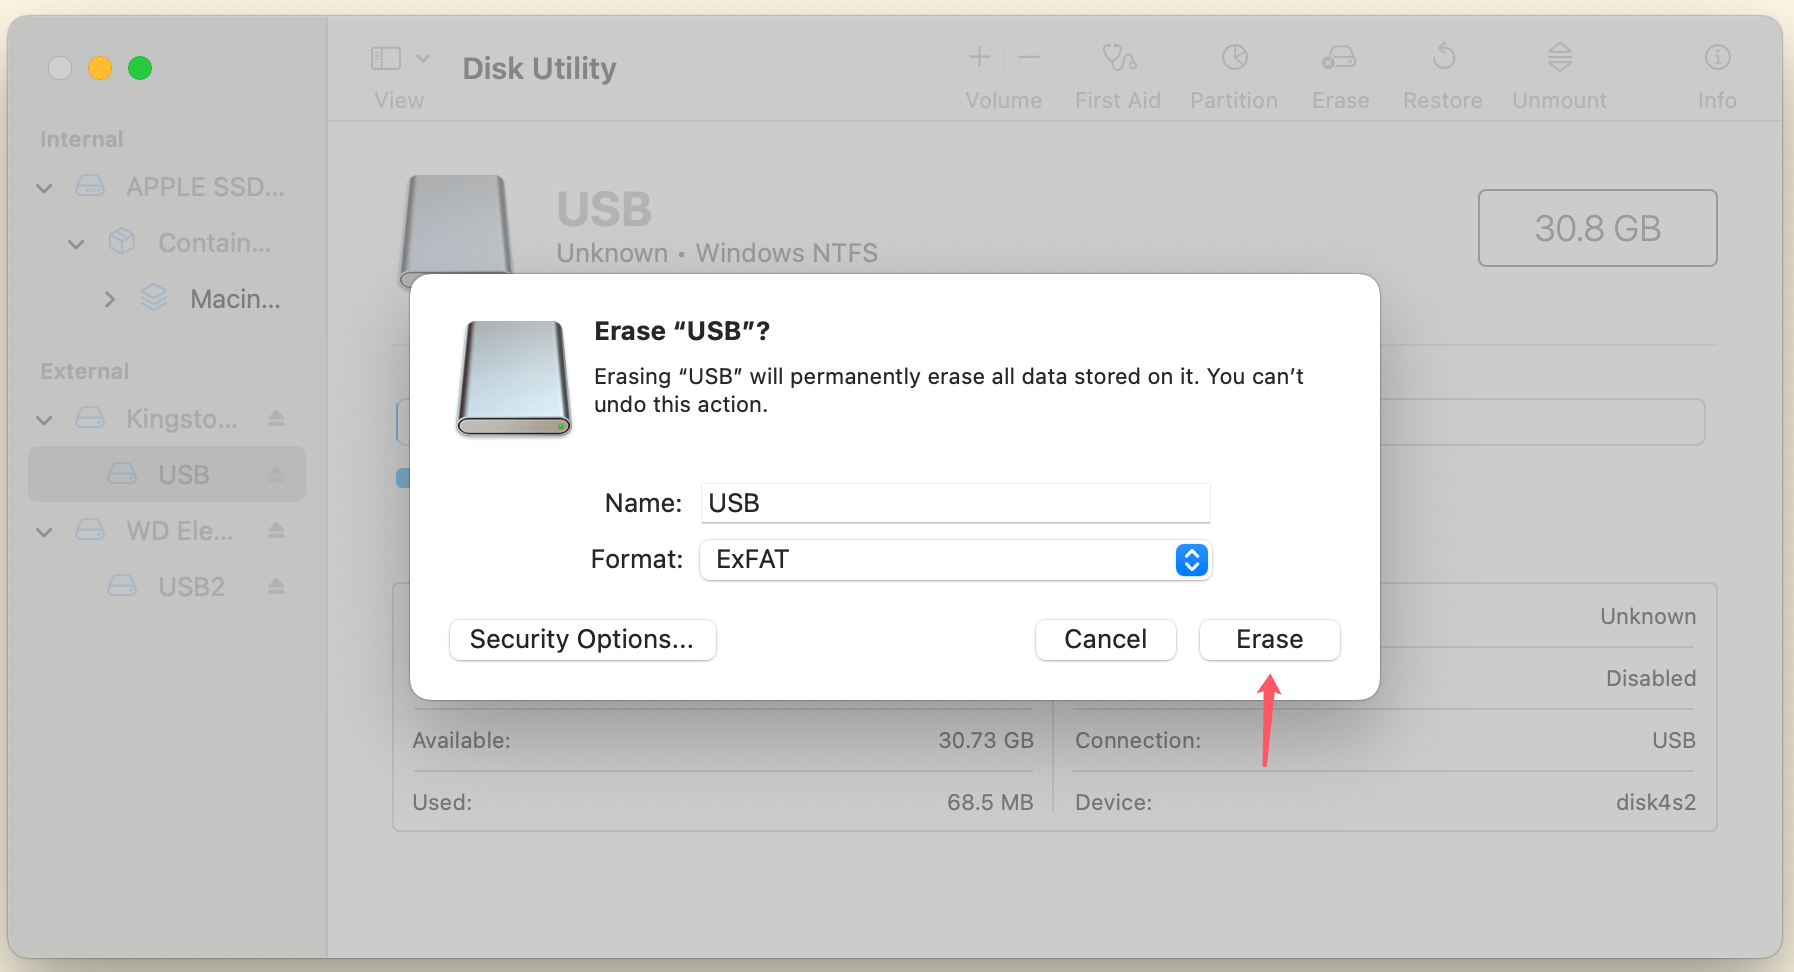
- Reformat the USB drive: To reformat the drive, click on the Erase button in Disk Utility.
- Choose a format compatible with macOS, such as ExFAT or FAT32 (if you plan to use the drive on both Macs and Windows).
- Give the drive a name and click Erase. This will remove all files from the USB drive, so make sure to back up any important data before proceeding.
![USB drive that's read-only on your Mac]()
- Recheck the drive: After the reformatting is complete, the drive should be writable.
💡 Important Note: If you plan to use the USB drive on both Mac and Windows computers, ExFAT is the best choice, as it's compatible with both operating systems and allows for large file transfers.
2. Use NTFS for Mac Tool
NTFS for Mac tool can grant full read-write access to NTFS drives on Mac. If you don't want to reformat your NTFS USB drive, you can use NTFS for Mac tool to enable writable for it.
Step 1. Download and install the best NTFS driver - Donemax NTFS for Mac on your Mac.
Step 2. Open Donemax NTFS for Mac, select the NTFS USB drive, click on Enable Writable button.

3. Fix Permissions on the USB Drive
If your USB drive is formatted correctly but still read-only, the issue could lie with the permissions. macOS may be blocking your access to write to the drive due to permission settings.
Step-by-Step Guide:
- Right-click on the USB disk in Finder.
- From the context menu, choose Get Info.
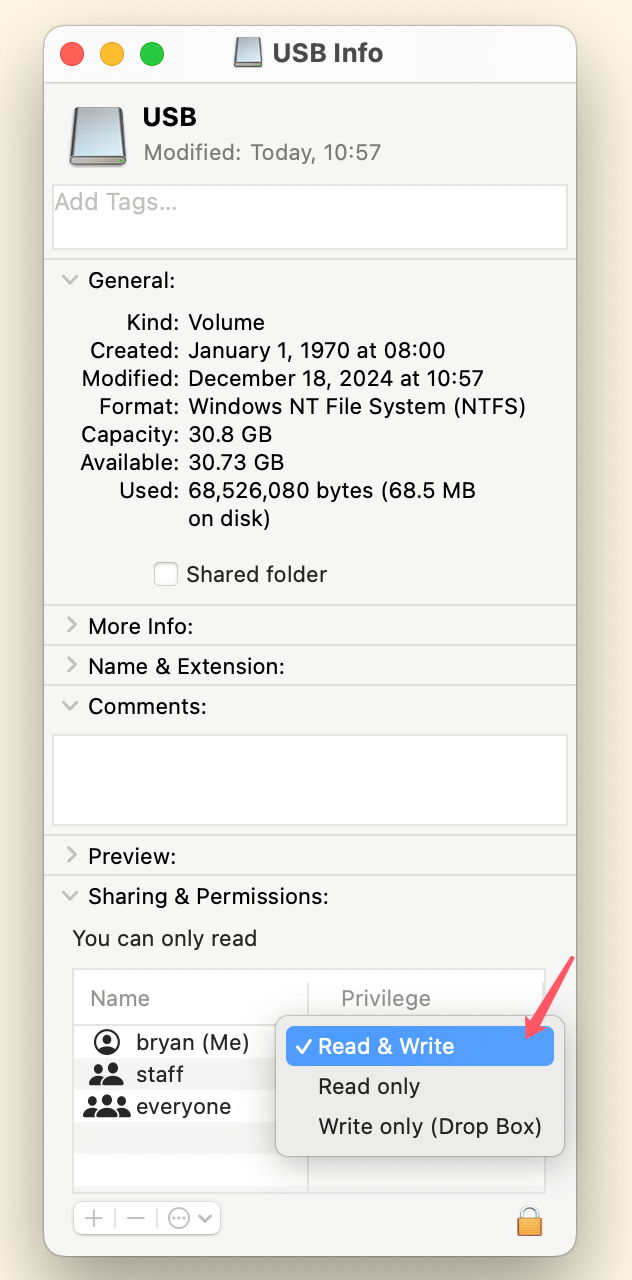
- At the bottom of the info window, look for the Sharing & Permissions section.
- Check the permissions for your user account. If the privileges are set to Read Only, click the lock icon at the bottom right of the window to unlock the settings.
- Change the permission to Read & Write by selecting your account and adjusting the privileges.
![USB drive that's read-only on your Mac]()
- Close the window and try writing to the drive again.
4. Repair the Disk Using Disk Utility
If the USB drive remains read-only, it could be due to disk corruption. macOS offers a built-in tool called Disk Utility, which can repair many disk-related issues. Using the First Aid feature in Disk Utility can help detect and fix errors, restoring the drive's full functionality.
Step-by-Step Guide:
- Open Disk Utility: Open the Disk utility from Utilities folder via Applications.
- From the list, pick the USB drive.
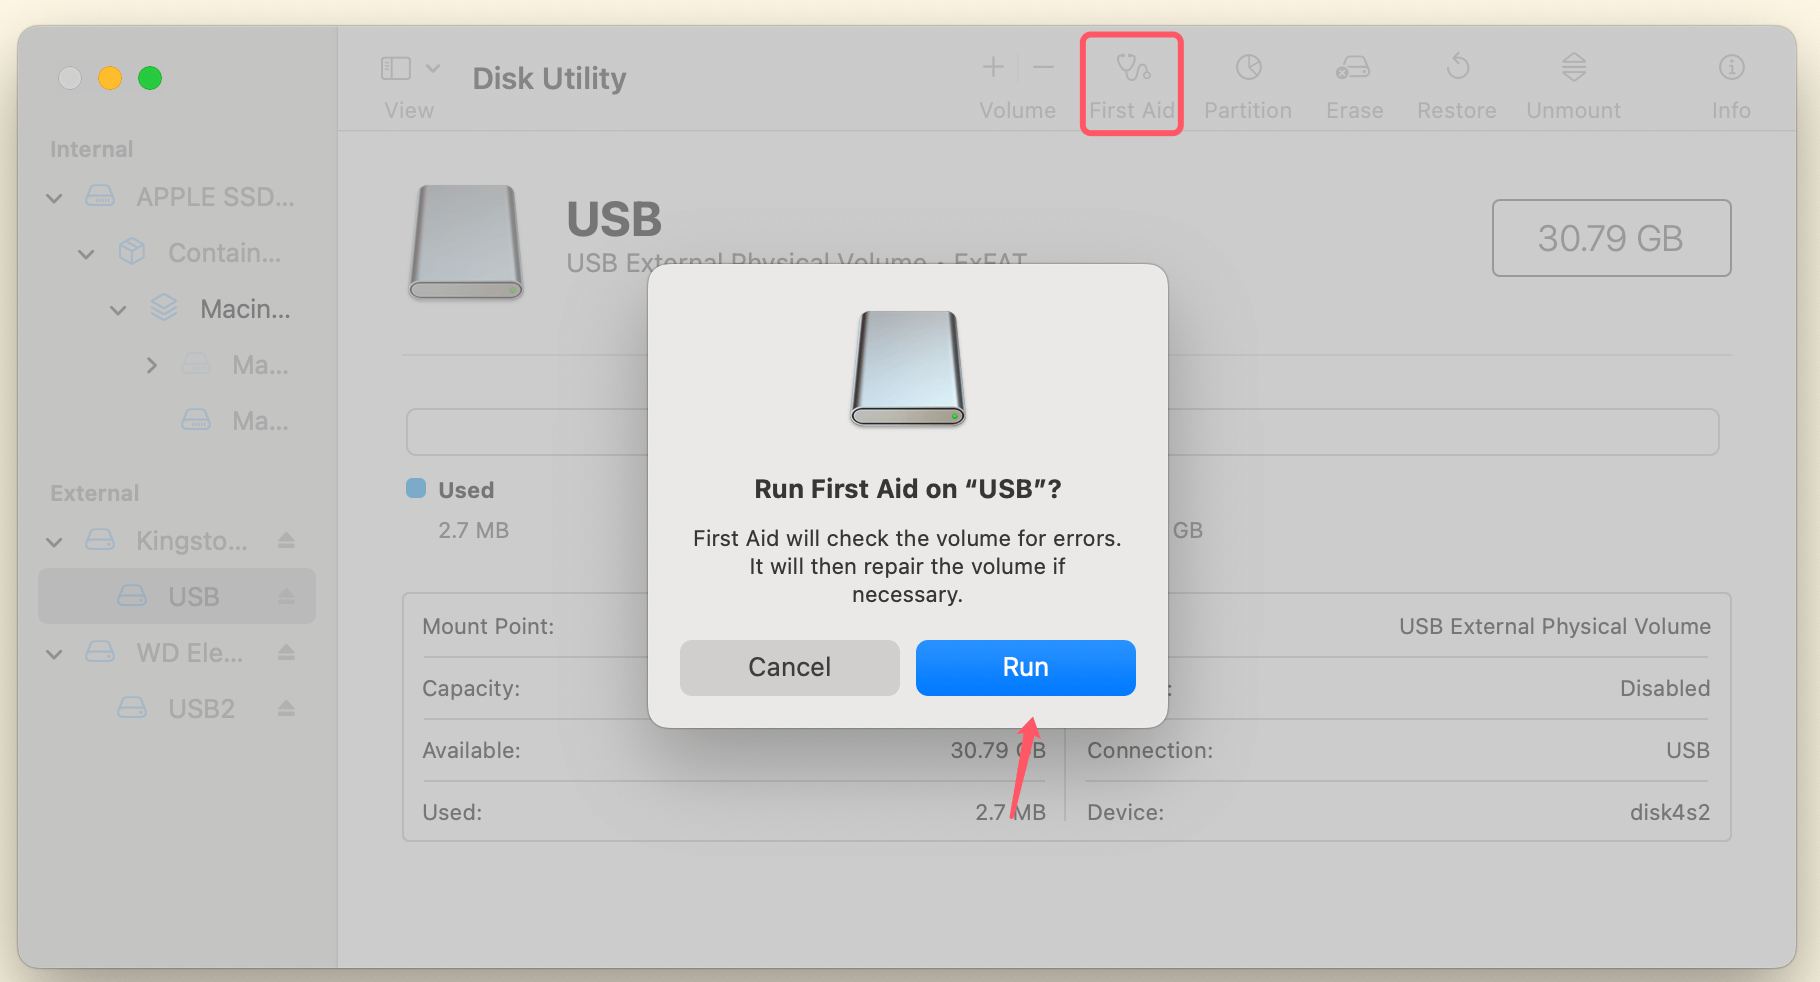
- Press the First Aid icon.
![USB drive that's read-only on your Mac]()
- Disk Utility will check the disk for errors and attempt to repair them. If any issues are found, the tool will automatically fix them.
- Once the process is complete, try accessing the drive again.
5. Remove Read-Only Attribute Using Terminal [for old OS X version]
If the previous methods didn't resolve the issue, you can try using the Terminal application to remove the read-only attribute from the USB drive.
Step-by-Step Guide:
- Open Terminal: Go to Terminal from Utilities via Applications
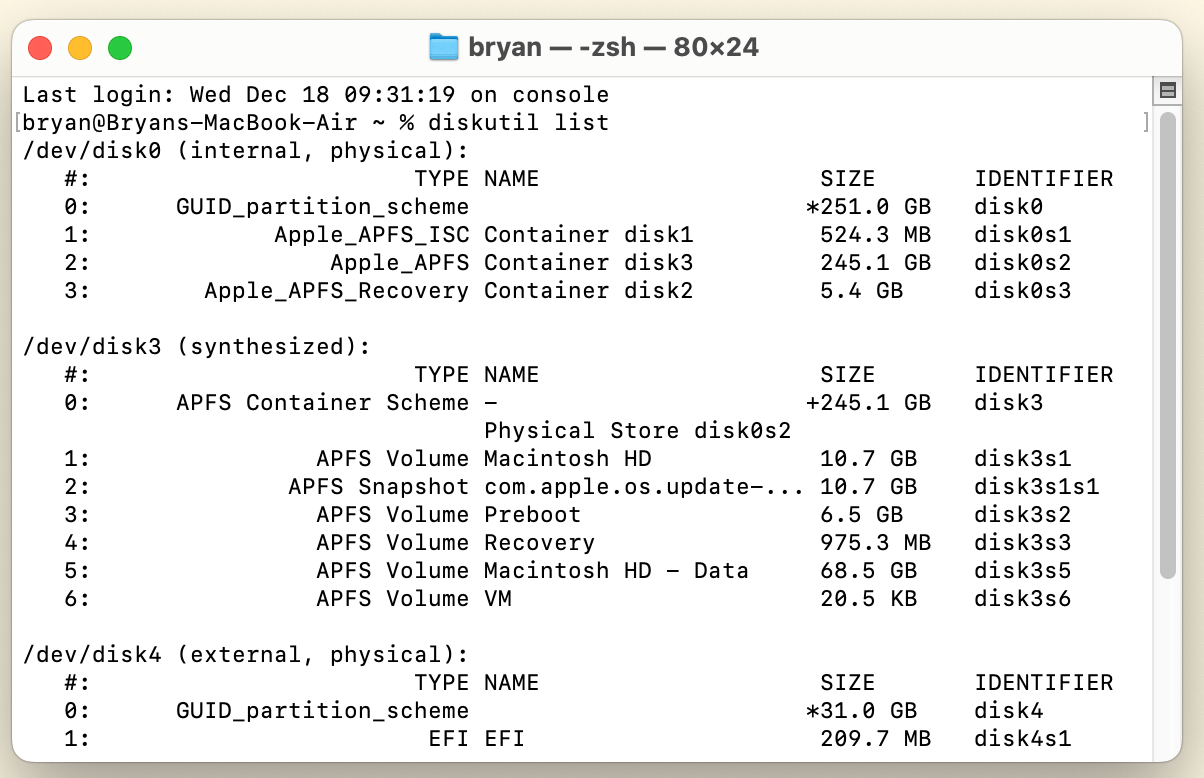
- Type the following command to identify the disk:
diskutil list
This will display a list of all connected drives. Note the identifier of your USB drive (e.g., /dev/disk4).
![USB drive that's read-only on your Mac]()
- To remove the read-only flag, type the following command (replace disk4 with your disk identifier):
sudo mount -o rw,remount /dev/disk4
You’ll be prompted to enter your admin password.
- After executing the command, the drive should be writable again.
6. Check for Disk Errors or Corruption
If you still encounter issues, it's worth checking for underlying disk corruption. You can do this by running the fsck command in Single User Mode or by using third-party disk repair tools.
Step-by-Step Guide for Using fsck:
- Restart your Mac and hold down Command + S to enter Single User Mode.
- Once the system has loaded, type the following command:
fsck -fy
- Wait for the system to check and repair the disk. If errors are found, they will be fixed automatically.
7. Third-Party Tools and Software Solutions
If you're unable to fix the issue using the built-in tools, there are several third-party utilities designed for disk repair and management. Some popular options include:
- Donemax Data Recovery for Mac: A comprehensive tool for repairing damaged disks and recovering lost data.
- TechTool Pro: A utility that checks for disk errors, repairs file systems, and optimizes drive performance.
- Drive Genius: A tool that can repair, optimize, and protect your drives.
These third-party tools can help resolve more complex disk issues that might not be fixed by Disk Utility or Terminal.
8. Check for Physical Write Protection
Before attempting any software solutions, make sure that the USB drive itself doesn't have a physical write protection switch. Some USB drives come with a small switch on the side that can lock the drive into read-only mode. If the switch is set to the "lock" position, simply slide it to "unlock."
Preventive Measures
To prevent the read-only issue from recurring, consider the following preventive measures:
- Always Eject the Drive Properly: Avoid simply unplugging the USB drive from your Mac. Always eject it properly by dragging the drive to the trash or right-clicking and selecting Eject.
- Backup Your Data Regularly: Corruption and hardware failures can happen unexpectedly. Regularly back up your files to another drive or cloud storage to avoid data loss.
- Keep Your Mac and Software Updated: Ensure that macOS is updated to the latest version to avoid bugs that may affect disk functionality.
Conclusion
A read-only USB drive on a Mac can be caused by various factors, including file system incompatibility, permission issues, disk errors, or physical write protection. By following the steps outlined above, you can quickly resolve the issue and get back to using your USB drive normally. Regular maintenance, such as checking permissions, running disk repairs, and avoiding improper ejection, can help prevent similar issues in the future.
If all else fails, third-party tools offer additional solutions for fixing more complex disk problems. Remember to back up your data regularly to avoid potential data loss.

Donemax NTFS for Mac
An easy-to-use NTFS for Mac tool to help you enable writable for NTFS drives on Mac so that you can read-write NTFS drives on Mac without any limitation. It also can help you mount, format, repair, rename, open drive on your Mac.
Related Articles
- Nov 29, 2024Disk Utility Partition Tab Greyed Out: Fix It Now
- Feb 11, 2025How to Repair an xD Card: A Comprehensive Guide
- Jan 05, 2025Error! Could Not Find APFS System Volume Handle, How to Fix It?
- Jun 06, 2024Lenovo Computer Not Booting Up, Fix It Now
- May 28, 2025[9 Fixes] Fix External Hard Drive Not Accessible on Windows 10
- Feb 11, 2025How to Fix SD Card Not Showing Up in File Explorer?

Christina
Christina is the senior editor of Donemax software who has worked in the company for 4+ years. She mainly writes the guides and solutions about data erasure, data transferring, data recovery and disk cloning to help users get the most out of their Windows and Mac. She likes to travel, enjoy country music and play games in her spare time.

Gerhard Chou
In order to effectively solve the problems for our customers, every article and troubleshooting solution published on our website has been strictly tested and practiced. Our editors love researching and using computers and testing software, and are willing to help computer users with their problems
Hot Donemax Products

Clone hard drive with advanced clone technology or create bootable clone for Windows/Mac OS.

Completely and easily recover deleted, formatted, hidden or lost files from hard drive and external storage device.

Certified data erasure software - permanently erase data before selling or donating your disk or any digital device.

