PAGE CONTENT:
The Seagate Backup Plus is a popular external hard drive, widely used for its reliability and high storage capacity. Mac users, in particular, rely on external drives like the Seagate Backup Plus for backups, file storage, and transferring large amounts of data. However, one frustrating issue many Mac users face is the drive not mounting when connected. When this happens, your Mac won't recognize the drive, and you can't access any of your files. This article will guide you through troubleshooting and fixing the "unable to mount Seagate Backup Plus" issue on your Mac.
Reasons Why Seagate Backup Plus May Not Mount on Mac
There are several potential reasons why your Seagate Backup Plus drive might not mount on your Mac. Understanding the underlying causes will help you diagnose and fix the issue effectively.
1. Connection Issues
- One of the most common causes is a faulty connection between your Mac and the Seagate drive. This could be due to a damaged USB cable or a faulty USB port.
- If the cable is damaged or the port is loose, your Mac might not recognize the drive properly. Ensuring that you are using the correct cable and port can sometimes resolve the issue.
2. File System Incompatibility
- Many external drives, including the Seagate Backup Plus, come pre-formatted with the NTFS file system, which is not natively supported by macOS for writing. macOS can read NTFS disks, but it needs special software to write to them.
- If your Seagate drive is formatted as NTFS, your Mac may not mount it unless you have installed third-party drivers that allow macOS to read and write to NTFS volumes.
3. Software Conflicts
- Sometimes, third-party software, extensions, or even security settings can conflict with external drives, preventing them from being mounted.
- This may include outdated Seagate drivers or security software that interferes with external device connections.
4. Corrupted File System
- A corrupted file system can prevent your Mac from mounting the drive. This might happen due to improper ejection, sudden power loss, or physical damage to the drive.
- In some cases, even bad sectors on the drive can prevent it from being detected or mounted.
5. macOS Updates
- After a macOS update, your system might experience compatibility issues with external drives. Sometimes, the updated macOS version is not fully compatible with older drivers or file systems, leading to mounting issues.
Preliminary Checks:
Before diving into more complex fixes, it's important to perform some basic troubleshooting steps. These checks will help determine whether the issue is hardware-related or software-related.
1. Check Cable and Ports
- The simplest fix can often be checking whether the USB cable or port is functioning correctly. Try using a different cable or plugging the drive into another USB port on your Mac.
- If your Seagate Backup Plus uses USB-C, ensure you're using the correct adapter or cable to connect it to your Mac.
2. Test on Another Mac or Device
- If possible, connect the Seagate Backup Plus to another Mac or even a Windows PC to check if it mounts there. If it works on another device, the issue might be with your Mac rather than the drive itself.
3. Check Disk Utility
- Open Disk Utility on your Mac (Finder > Applications > Utilities > Disk Utility) to see if the drive appears in the sidebar.
- If it shows up but is not mounted, there could be a file system issue. If the drive does not appear at all, there may be a hardware issue.
Solutions to Fix Seagate Backup Plus Portable Hard Drive Not Mounting on Mac
Fix 1: Force Mount the Drive via Disk Utility
If your Seagate Backup Plus shows up in Disk Utility but is not mounted, you can try manually mounting it.
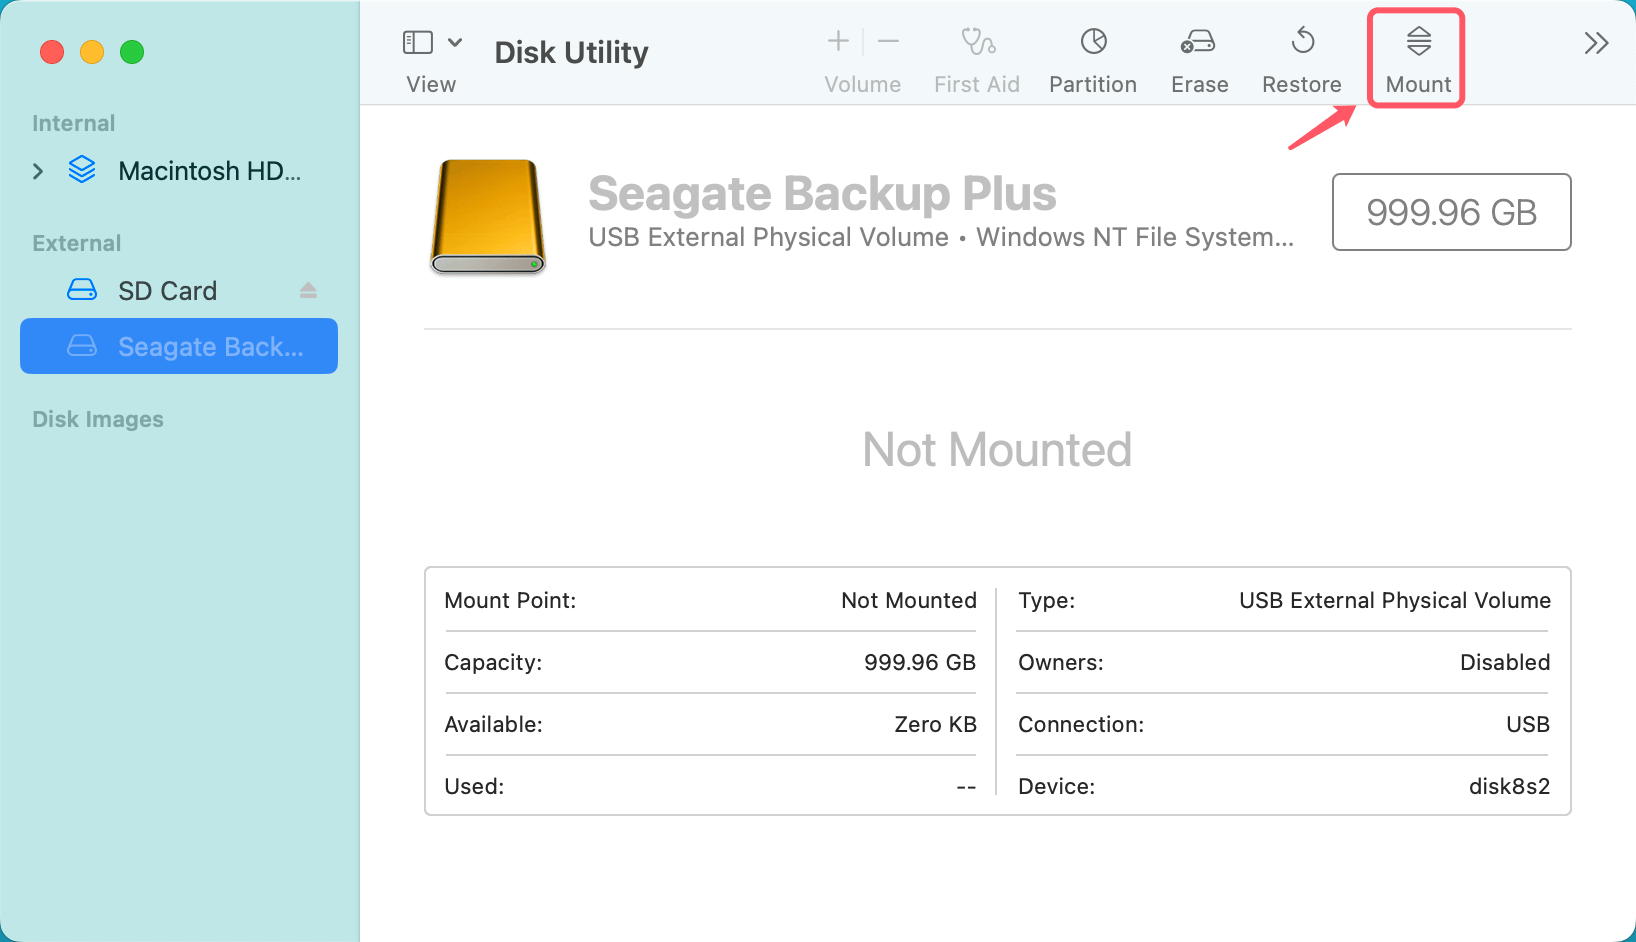
- Open Disk Utility from Utilities via Applications.
- Locate your Seagate Backup Plus in the sidebar. If it appears but isn't mounted, the Mount button will be clickable.
- Click Mount and see if your drive appears on the desktop or in Finder.
![Force Mount the Drive via Disk Utility]()
If the Mount button is greyed out, proceed to the next fix, as this indicates a potential issue with the drive's file system.
Fix 2: Repair the Drive Using First Aid in Disk Utility
The First Aid tool in Disk Utility can help identify and repair issues with your drive's file system, such as corruption or bad sectors.
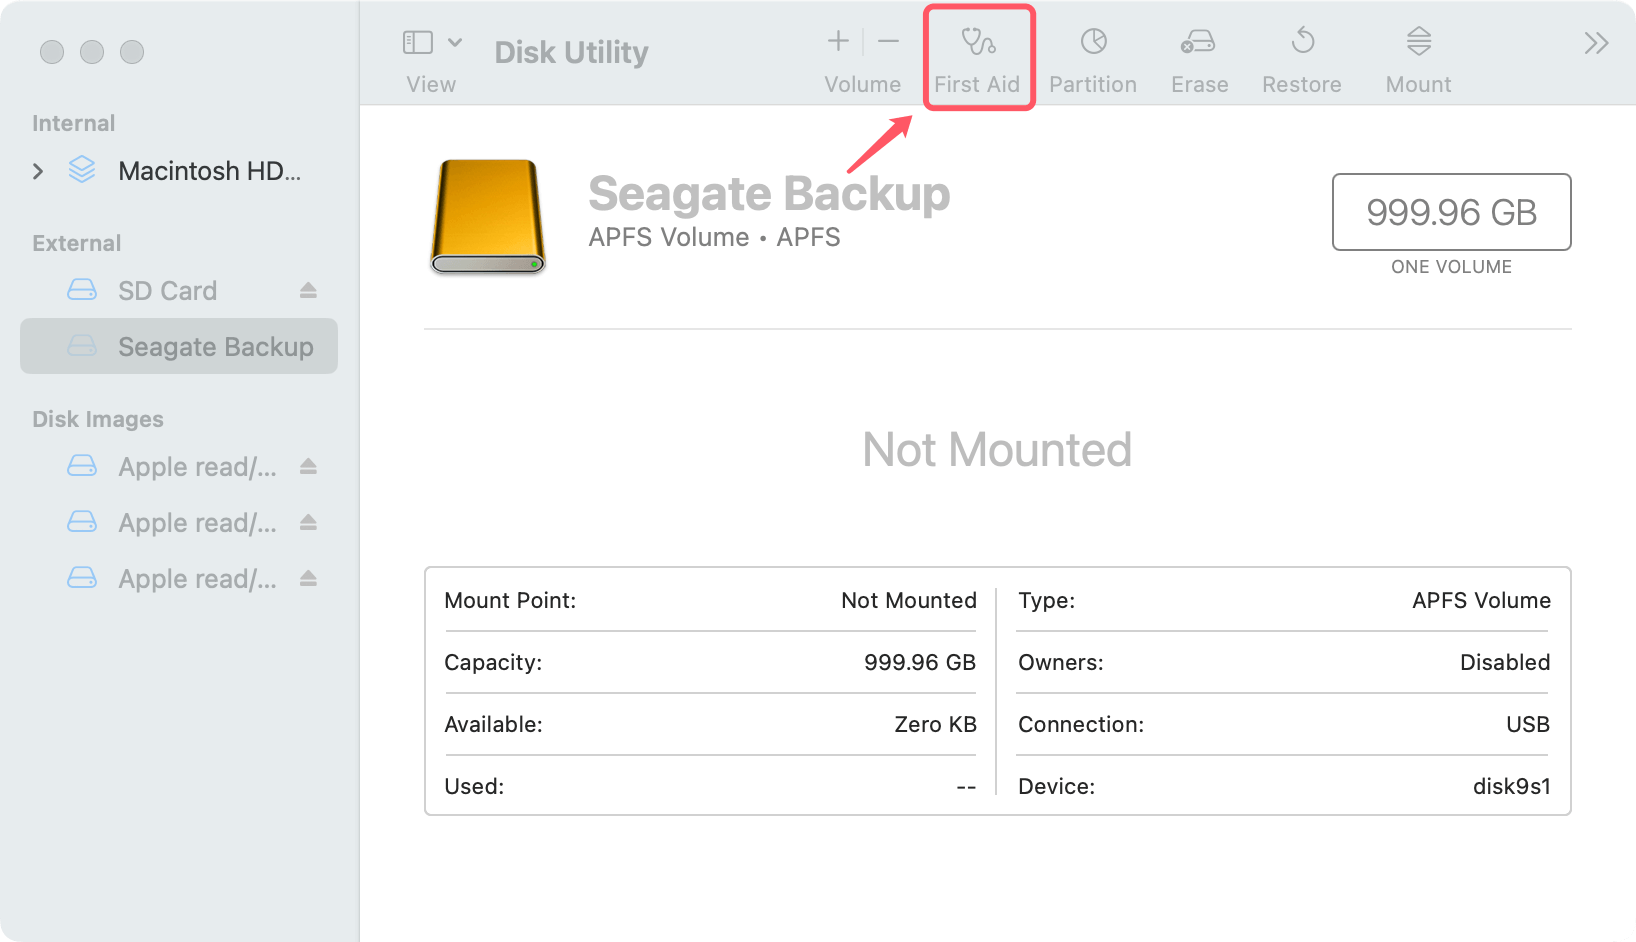
- Open Disk Utility and select your Seagate Backup Plus from the sidebar.
- Click the First Aid button at the top of the window.
![Repair the Drive Using First Aid in Disk Utility]()
- Confirm the action and let Disk Utility check the drive for errors. If any errors are found, it will attempt to repair them.
This process may take a few minutes. If Disk Utility successfully repairs the drive, it should mount automatically. If it doesn't, try force mounting it again using the steps mentioned earlier.
Fix 3: Install NTFS Driver for Mac (If Needed)
If your Seagate Backup Plus is formatted with the NTFS file system, macOS may not fully support it. In such cases, installing a third-party NTFS driver can help.
Step 1. Download and install the best NTFS for Mac tool - Donemax NTFS for Mac on your Mac and run it from Launchpad.
Step 2. Connect the Seagate Backup Plus to your Mac, then open Donemax NTFS for Mac, find and select your drive. If it is not mounted, click on Mount button.

Step 3. Click on Enable Writable button so that your Mac can read-write the NTFS Seagate Backup Plus drive on your Mac.

By enabling macOS to access NTFS-formatted drives, you can often resolve mounting issues related to file system compatibility.
If you don't want to use NTFS for Mac tool, you can use Disk Utility to erase the NTFS drive to APFS, ExFAT or Mac OS Extended.
Fix 4: Force Mount Seagate Backup Plus Using Terminal
Terminal is a built-in commands tool which can help you mount Seagate Backup Plus drive on Mac:
- Go to Applications > Utilities > Terminal, open Terminal.
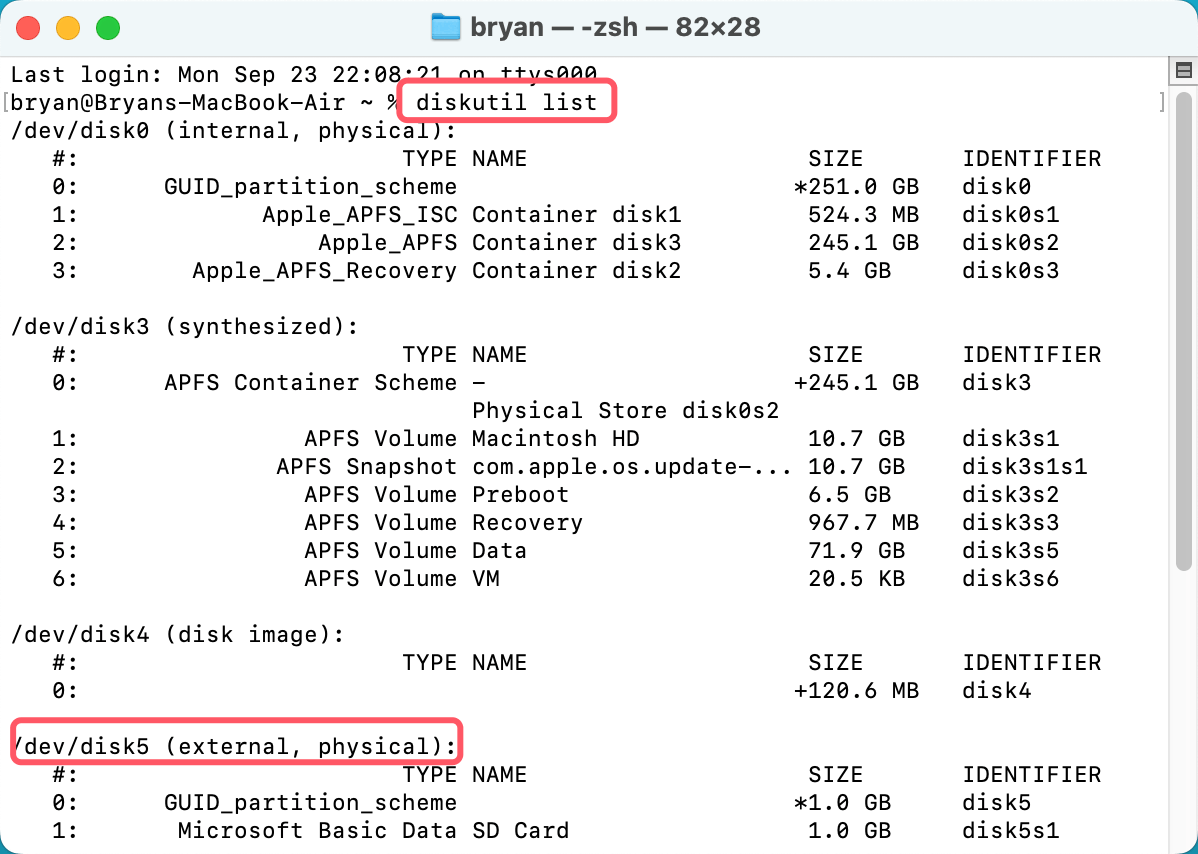
- Type diskutil list, press Enter and find the Seagate Backup Plus drive.
![Type diskutil list and find the Seagate Backup Plus]()
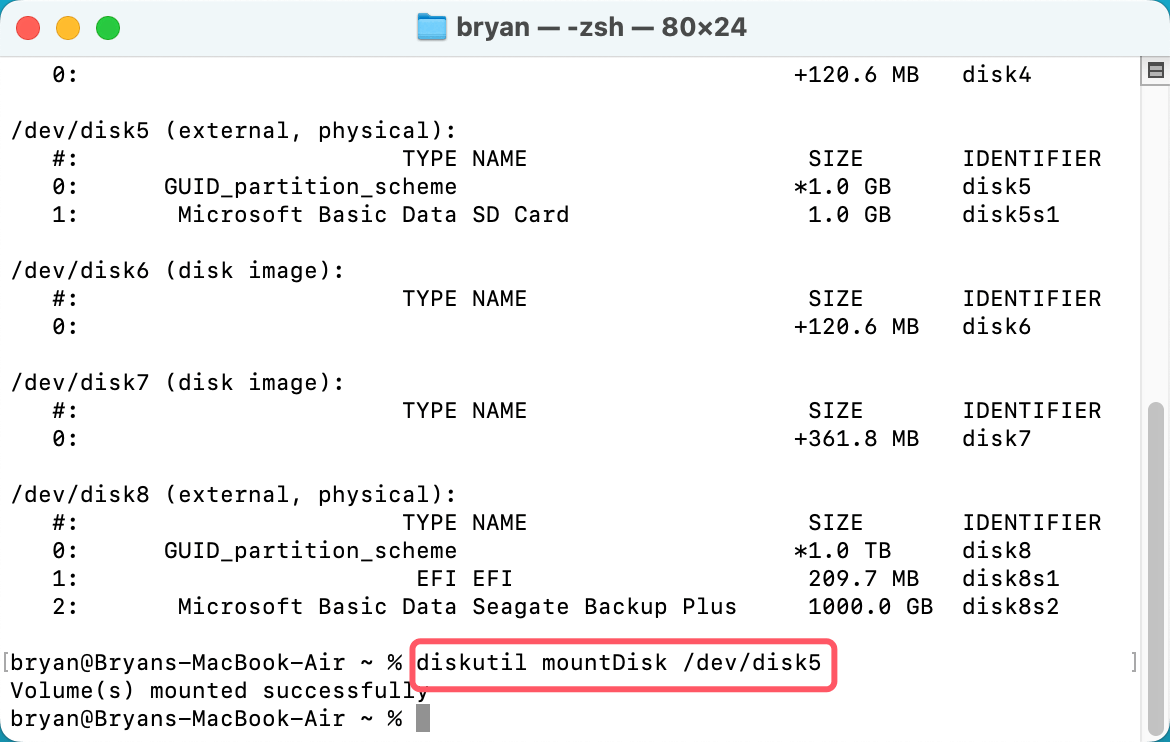
- Type diskutil mountDisk /dev/disk5, press enter to mount the Seagate Backup Plus.
![Type diskutil mountDisk to mount the Seagate Backup Plus]()
Fix 5: Reset NVRAM and SMC on Mac
Resetting your Mac's NVRAM (non-volatile random-access memory) and SMC (system management controller) can sometimes fix mounting issues related to external drives.
To reset NVRAM:
- Turn Off your Mac.
- After turning it back on, press and hold Option, Command, P, and R for roughly 20 seconds.
- Let the Mac restart after releasing the keys.
To reset the SMC (for Macs with a T2 chip):
- Turn Off your Mac.
- After holding down the Power button for ten seconds, let go of it.
- After a little pause, switch the Mac back on.
Resetting these components can resolve low-level system issues that may prevent your drive from mounting.
Fix 6: Check for macOS and Driver Updates
Sometimes, macOS updates can cause compatibility issues with external drives. Ensuring that both your macOS and Seagate drivers are up to date can help resolve mounting problems.
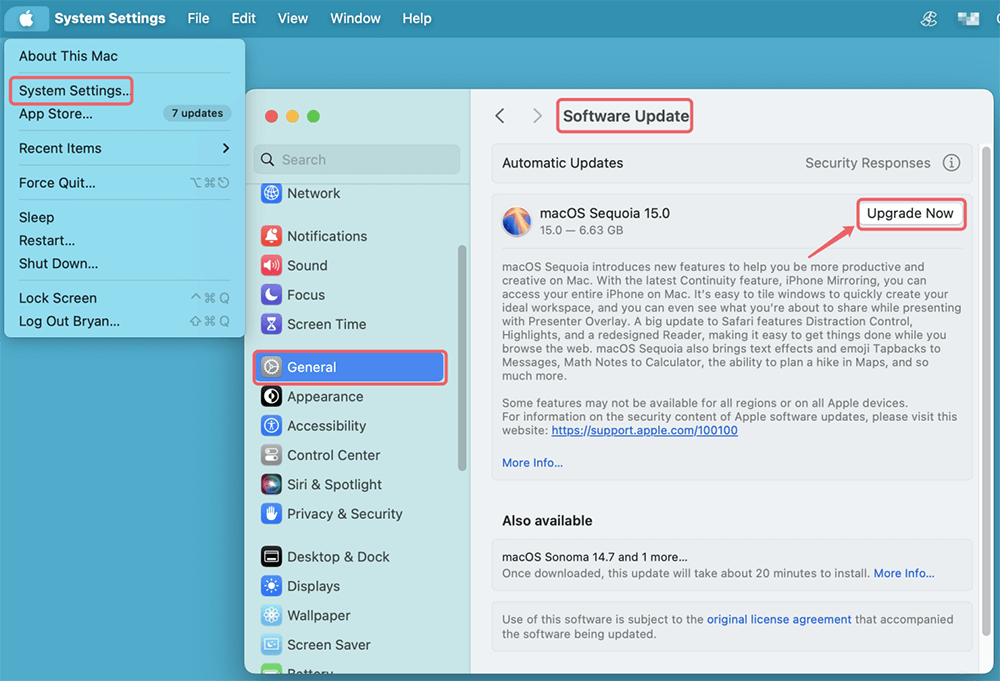
- Go to System Preferences > Software Update or System Settings > General > Software Update and install any available updates.
![Check for macOS and Driver Updates]()
- Visit the Seagate website to download the latest firmware or drivers for your Backup Plus drive.
- After updating both macOS and the Seagate software, restart your Mac and check if the drive mounts.
Staying updated is essential, as manufacturers often release patches to address such compatibility issues.
Fix 7: Format the Drive (As a Last Resort)
If none of the previous fixes work, the last option is to format the drive. Warning: Formatting the drive will erase all data on it, so proceed with caution. Back up your data if possible before formatting.
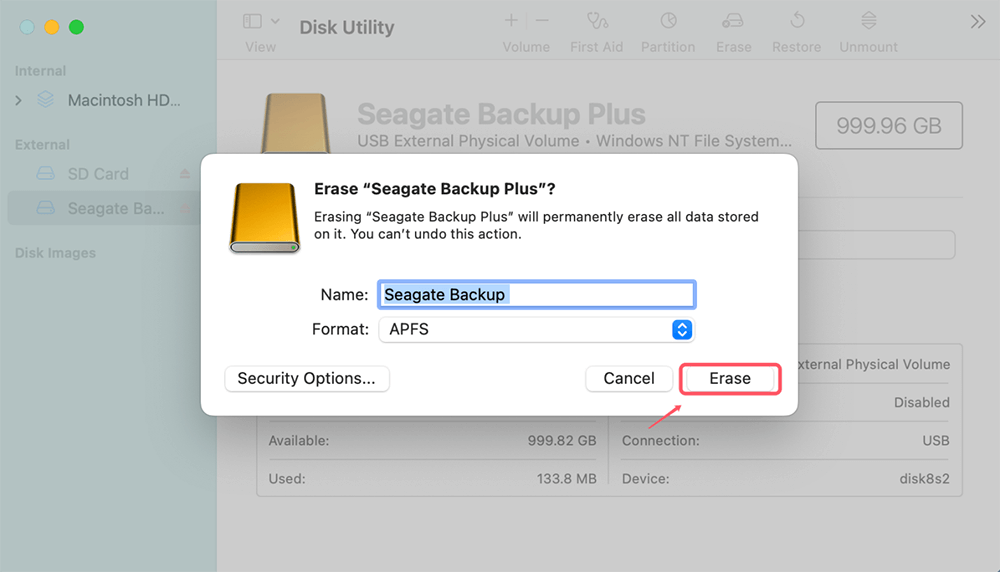
- Open Disk Utility and select your Seagate Backup Plus from the sidebar.
- Click Erase at the top of the window.
- Choose a new file system (APFS, ExFAT, or Mac OS Extended, depending on your needs).
![Format the Drive]()
- Click Erase to begin the formatting process.
Once the drive is formatted, it should mount on your Mac, and you can start using it again. If you need to use the drive on both Mac and Windows, ExFAT is a good option since it is compatible with both systems.
Seek Expert Advice:
If none of the methods outlined above work, the problem might be with the drive's hardware. In this case, seeking help from a expert data recovery service or contacting Seagate support is recommended, especially if you have important data stored on the drive that you cannot afford to lose.
Data Recovery: Recover Lost Data from Unmounted Seagate Backup Plus
If you are unable to mount the drive and have important data on it, you might want to consider data recovery options before formatting the drive.
Step 1. Download and install Donemax Data Recovery for Mac. This Mac data recovery software is able to completely recover lost data from an unmounted or erased Seagate Backup Plus drive on Mac.
Step 2. Open Donemax Data Recovery for Mac, then select the Seagate Backup Plus drive to start data recovery.

Step 3. Click on Scan button to deeply scan the Seagate Backup Plus drive and find all existing files, deleted files and erased files.

Step 4. Once the scan is completed, you can preview all recoverable files. Then select the wanted files, click on Recover button to save them.

Data recovery software can be a lifesaver in situations where the drive's file system is corrupted but the physical drive is still functional.
Conclusion
Facing an unmountable Seagate Backup Plus on a Mac can be frustrating, especially if you rely on it for backups or important files. However, with the right steps, you can often resolve the issue without losing any data. Start with the basic troubleshooting steps like checking cables, ports, and Disk Utility. If that doesn't work, move on to more advanced fixes like repairing the disk, resetting system components, or installing NTFS drivers.
If the problem persists, consider formatting the drive as a last resort. Before taking that step, use data recovery software to safeguard any critical data. Once resolved, regularly update your macOS and Seagate drivers to prevent future issues.
Related Articles
- Feb 11, 2025Fix RAW SD Card: A Complete Guide to Repair & Recover Data
- Dec 23, 20248 Solutions to Fix the 'com.apple.diskmanagement.disenter error 53249' on Mac
- Jan 12, 20255 Fixes for Fixing Partition Map Error on Mac
- Dec 18, 2024How to Fix a USB Drive Read-Only on Mac? [8 Solutions]
- Jul 11, 2024WD External Hard Drive Has No Drive Letter? Fix It Now
- Jan 21, 2025SD Card Suddenly Stopped Working? Fix It

Christina
Christina is the senior editor of Donemax software who has worked in the company for 4+ years. She mainly writes the guides and solutions about data erasure, data transferring, data recovery and disk cloning to help users get the most out of their Windows and Mac. She likes to travel, enjoy country music and play games in her spare time.

Gerhard Chou
In order to effectively solve the problems for our customers, every article and troubleshooting solution published on our website has been strictly tested and practiced. Our editors love researching and using computers and testing software, and are willing to help computer users with their problems
Hot Donemax Products

Clone hard drive with advanced clone technology or create bootable clone for Windows/Mac OS.

Completely and easily recover deleted, formatted, hidden or lost files from hard drive and external storage device.

Certified data erasure software - permanently erase data before selling or donating your disk or any digital device.
