Before we start: Donemax NTFS for Mac is an easy-to-use and 100% safe NTFS for Mac tool. It grants full read-write access to NTFS drives on Mac so that Mac users can write data to any NTFS drive without limitation. It also can mount NTFS drives on Mac, reformat or repair APFS/NTFS/HFS/ExFAT/FAT32 drives on Mac.
PAGE CONTENT:
The NTFS (New Technology File System) is one of the most popular file systems developed by Microsoft for Windows operating systems. Its robustness and compatibility make it a preferred choice for hard drives, flash drives, and external storage devices. However, macOS, the operating system used by Apple computers, has limited support for NTFS, restricting users to read-only access. This limitation can pose challenges for users who need to edit or transfer files to an NTFS drive.
In this comprehensive guide, we'll explore various ways to grant full read-write access to NTFS drives on Mac. Whether you prefer built-in macOS options, third-party applications, or open-source solutions, there's a method for everyone.
Understand NTFS on macOS: What Can macOS Do on NTFS Drives?
The NTFS file system is optimized for Windows, providing features like encryption, compression, disk quotas, and journaling that make it robust and secure. However, these same advanced features contribute to its complexity and pose challenges for cross-platform compatibility. On macOS, users often face a bottleneck due to the system's lack of full native support for NTFS write operations.
Why macOS Limits NTFS Write Support:
The technical and legal challenges surrounding NTFS integration into macOS are worth exploring:
1.Technical Challenges:
- NTFS uses a complex metadata structure, requiring a file journal that tracks all changes made to the drive. To implement write support effectively, macOS would need to understand and modify this journal without errors. Any failure could corrupt the drive, making it unusable or leading to data loss.
- Advanced NTFS features such as Access Control Lists (ACLs) and file permissions designed for Windows systems don't translate well to macOS. These differences make seamless interoperability between the two systems challenging.
2. Licensing and Business Strategy:
- Microsoft retains tight control over NTFS, and licensing it for use in other operating systems can be costly. Apple has chosen not to license full NTFS capabilities, likely because it prefers to focus on its ecosystem, encouraging users to use APFS or HFS+.
- Apple's APFS is optimized for SSDs and macOS features such as snapshots, encryption, and cloning, making it the preferred file system for Mac users. By keeping NTFS write support minimal, Apple steers users towards its native file systems for better performance and compatibility.
Impact of NTFS Limitations:
For many users, the read-only limitation can be a frustrating obstacle. Consider these scenarios where full NTFS write support is essential:
- Professional Use: A photographer or video editor often uses large external drives formatted with NTFS to share files between Windows and macOS systems. Without write support, editing files directly on the drive becomes impossible.
- Data Migration: A user switching from a Windows PC to a Mac might find their external hard drives or USB sticks formatted with NTFS, requiring full write access to manage or move their files.
- Collaboration: In office environments, where Windows systems dominate, NTFS drives are standard for shared storage. macOS users must often write to these drives during collaborative projects, making NTFS support critical.
The Need for Workarounds:
Given these limitations, Mac users frequently turn to third-party or open-source tools to unlock the full potential of NTFS drives. These solutions provide a bridge between macOS and NTFS, enabling seamless collaboration, data transfer, and file editing. While these methods introduce extra steps, they offer a practical workaround until native support improves (if ever).
This understanding sets the stage for exploring solutions that empower Mac users to overcome these limitations efficiently and securely. Each solution - whether built-in, third-party, or open-source - comes with its own benefits and trade-offs, which we will delve into further.
Methods to Grant Full Read-write Access to NTFS Drives on Mac
1. Use Built-in macOS Tools (for macOS 10.12 or earlier versions)
macOS includes a hidden and experimental option to enable NTFS write support. However, this method is not officially supported, and its functionality can be unpredictable. Moreover, there is a risk of data corruption if not executed carefully.
Steps to Enable NTFS Write Support via Terminal:
- Attach your Mac's NTFS drive.
- Launch the Terminal software.
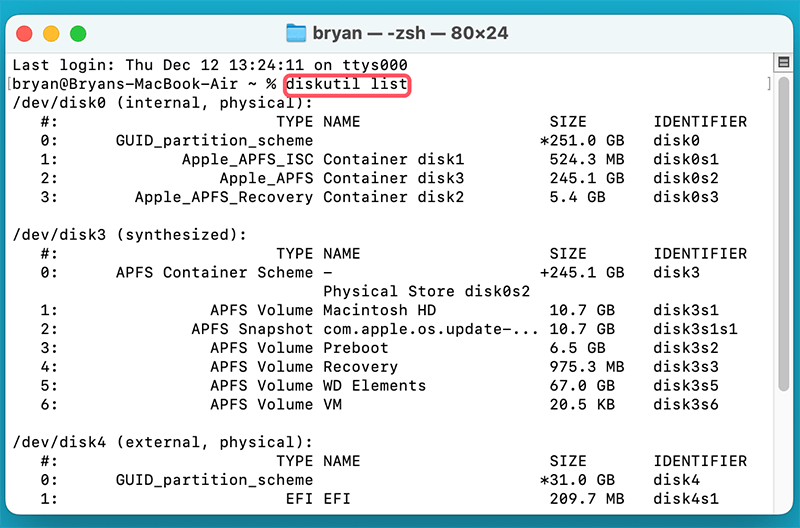
- To determine the drive, execute the subsequent command:
diskutil list
![Steps to Enable NTFS Write Support via Terminal]()
- Locate the NTFS partition from the list (e.g., /dev/disk2s1).
- Create a mount point for the NTFS drive:
sudo mkdir /Volumes/NTFSDrive
- Mount the NTFS drive manually with write access:
sudo mount -t ntfs -o rw,auto,nobrowse /dev/disk2s1 /Volumes/NTFSDrive
- Access the mounted drive at /Volumes/NTFSDrive.
Limitations:
- Not applied to new macOS versions.
- This method is not user-friendly.
- Requires executing commands each time the drive is connected.
- High risk of data loss or corruption.
2. Use Third-party NTFS for Mac Tool
Third-party software provides a reliable and user-friendly way to enable full read-write access to NTFS drives on Mac. These tools are designed to work seamlessly with macOS, offering additional features such as automatic mounting and high-speed file transfers.
Donemax NTFS for Mac is one of the best NTFS for Mac tools. It can quickly grant full read-write access to NTFS drives on Mac.
Step 1. Download and install Donemax NTFS for Mac. Just click Download button below to download Donemax NTFS for Mac, then click the .dmg file to install this NTFS for Mac tool on your Mac.
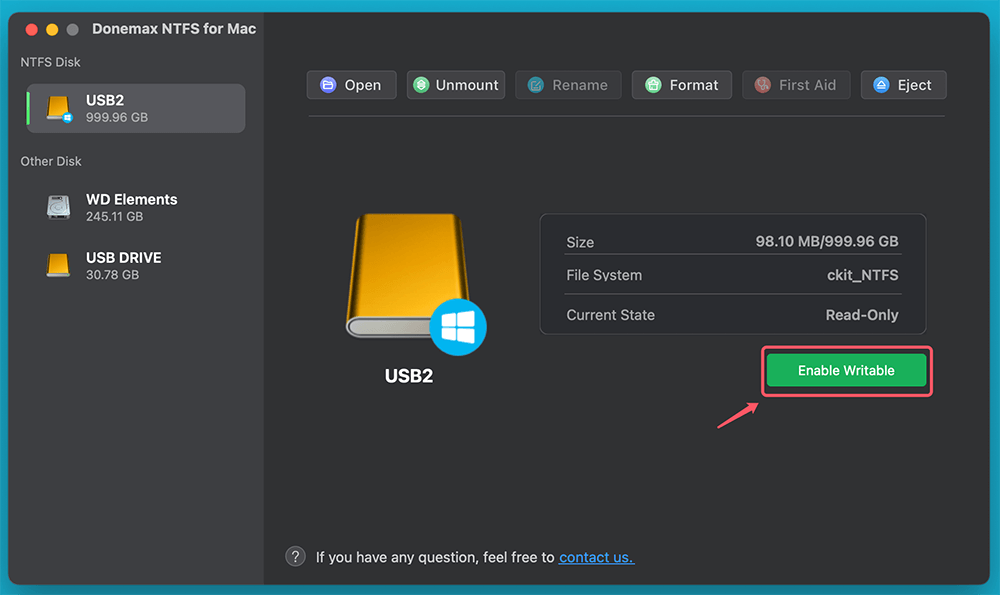
Step 2. Open Donemax NTFS for Mac. Ensure the NTFS drive is connected to your Mac, then select the NTFS drive, click on Enable Writable button.
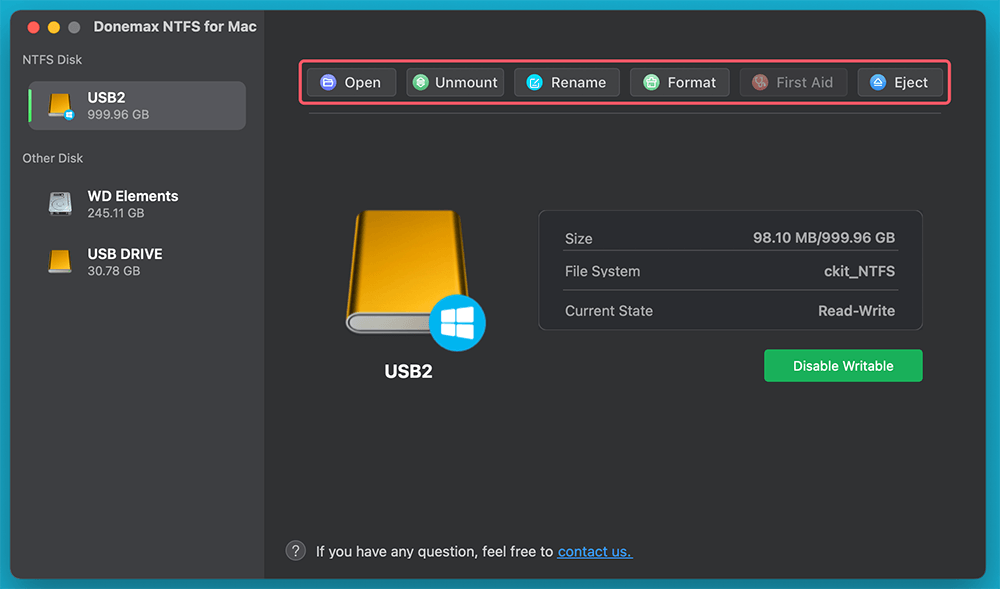
This tool also can help you mount or unmount NTFS drive, reformat external device, etc.
More NTFS drivers for Mac:
Paragon NTFS for Mac
- One of the most widely used solutions.
- Features automatic mounting and high-speed performance.
- Offers a simple interface for accessing NTFS drives.
Setup Steps:
- Download and install Paragon NTFS for Mac from the official website.
- Restart your Mac to activate the software.
- Connect your NTFS drive, which will now have full read-write functionality.
Pros
- Easy to use.
- Reliable and stable.
- Regular updates and support.
Cons
- Paid software (trial available).
Tuxera NTFS for Mac
- Another popular option with robust support for NTFS drives.
- Includes additional features such as disk checking and repair tools.
Setup Steps:
- Download and install Tuxera NTFS for Mac.
- Follow the on-screen instructions to set up the software.
- After installation, connect your NTFS drive for full access.
Pros
- Reliable and efficient.
- Includes advanced utilities.
Cons
- Paid software.
Mounty for NTFS
- Free and lightweight solution for NTFS write support.
- Utilizes macOS's native capabilities for minimal installation requirements.
Setup Steps:
- Download Mounty for NTFS from the official website.
- Open the application and connect your NTFS drive.
- Mounty will remount the drive with write access.
Pros
- Free to use.
- Simple interface.
Cons
- Limited features.
- Slower performance compared to paid tools.
Using Open-Source Solutions
Open-source tools like NTFS-3G, combined with macFUSE, provide an alternative to third-party commercial software. This method is ideal for advanced users who are comfortable with command-line operations.
Steps to Install and Configure NTFS-3G:
- Install macFUSE:
- Download macFUSE from its official website.
- Install it on your Mac following the on-screen instructions.
- Install Homebrew:
- To install Homebrew, launch Terminal and type the following command:
/bin/bash -c "$(curl -fsSL https://raw.githubusercontent.com/Homebrew/install/HEAD/install.sh)"
- To install Homebrew, launch Terminal and type the following command:
- Install NTFS-3G:
- Use Homebrew to install NTFS-3G:
brew install ntfs-3g
- Use Homebrew to install NTFS-3G:
- Replace Default NTFS Mounting Tool:
- Create symbolic links to replace the default NTFS driver:
sudo mv /sbin/mount_ntfs /sbin/mount_ntfs.original
sudo ln -s /usr/local/bin/ntfs-3g /sbin/mount_ntfs
- Create symbolic links to replace the default NTFS driver:
- Restart Your Mac:
- After installation, restart your Mac for the changes to take effect.
- Connect NTFS Drive:
- Once your NTFS drive is connected, it will have full read-write access.
Pros
- Free and open-source.
- Highly customizable.
Cons
- Complex setup process.
- Potential compatibility issues with future macOS updates.
Format NTFS Drive to Mac-compatible File System on Mac
If you don't want to install NTFS driver on your Mac, you can reformat the NTFS drive to Mac-compatible file system such as APFS, Mac OS Extended, ExFAT.
Step 1. Make a backup of your data stored on the NTFS drive. If the NTFS drive is unmounted, you can use Mac data recovery software to scan the NTFS drive. Then export all data from the NTFS drive to your Mac.
Step 2. Go to Launchpad > Other > Disk Utility to open Disk Utility.
Step 3. Select the NTFS drive, click Erase.
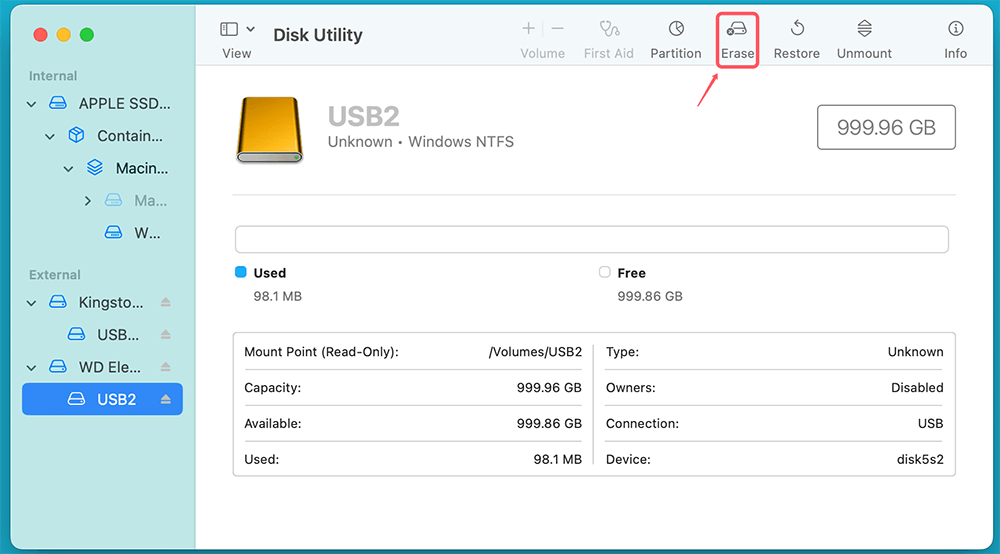
Step 4. Select a file system: APFS for macOS 10.13 or later, Mac OS Extended for older Mac systems, ExFAT for both Windows and macOS.
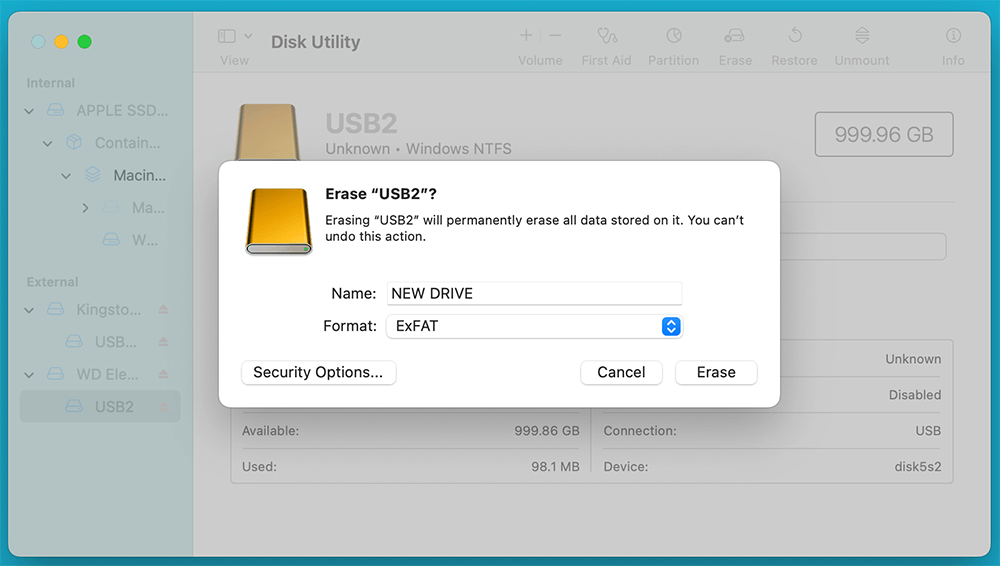
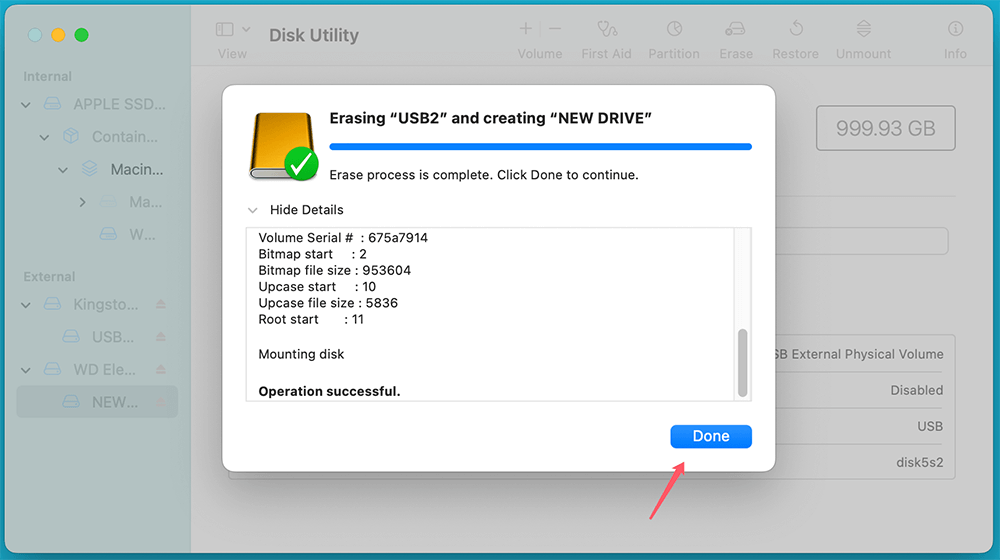
Step 5. Click Erase again. When the process gets finished, click Done.
Common Issues and Troubleshooting
Even with proper setup, users may encounter challenges. Below are some common issues and solutions:
- Drive Not Recognized:
- Ensure the drive is correctly connected.
- Check for physical damage or use a different USB port.
- Permission Errors:
- Verify that the NTFS driver or software is installed and running.
- Reinstall the software if necessary.
- Slow Performance:
- Use a high-quality third-party tool like Donemax NTFS for Mac for better performance.
- Avoid using outdated or unsupported solutions.
- Data Corruption:
- Always eject the NTFS drive safely before disconnecting it.
- Regularly back up important data.
Best Practices:
To ensure a smooth experience while using NTFS drives on macOS, follow these best practices:
- Safely Eject Drives: Always eject drives using the Finder or Disk Utility to avoid corruption.
- Backup Data: Regularly back up files to prevent data loss.
- Keep Software Updated: Ensure third-party tools are updated to remain compatible with the latest macOS versions.
- Choose Reliable Solutions: Opt for trusted software to minimize risks.
Conclusion
Granting full read-write access to NTFS drives on Mac can seem daunting at first, but with the right tools and methods, it becomes a manageable task. From using built-in macOS options to leveraging third-party applications or open-source solutions, there is a method suited to every user's needs and technical expertise.
For those seeking simplicity and reliability, paid tools like Donemax NTFS for Mac, Paragon NTFS for Mac or Tuxera NTFS offer excellent functionality. Advanced users may prefer the flexibility of open-source solutions like NTFS-3G with macFUSE. Whichever method you choose, ensure that you follow best practices to maintain data integrity and enjoy seamless file transfers between macOS and NTFS drives.

Donemax NTFS for Mac
An easy-to-use NTFS for Mac tool to help you enable writable for NTFS drives on Mac so that you can read-write NTFS drives on Mac without any limitation. It also can help you mount, format, repair, rename, open drive on your Mac.
Related Articles
- May 13, 2025NTFS Driver for M2 Chip Mac – Guide 2025
- May 30, 2025Can I Install Windows NTFS Driver on Mac?
- May 19, 2025Fix External Hard Drive Read-Only on M1 Chip Mac
- Jun 23, 2025What Is NTFS for Mac? How to Use NTFS for Mac?
- Dec 17, 2024Fix NTFS Drive is Not Recognized or Not Detected by Mac
- Dec 05, 2024Force Mount NTFS Drive on Mac: A Comprehensive Guide

Maria
Maria is one of the senior writers & editors of Donemax who lives and works in Sydney, Australia. She loves PC, Mac and Internet Technology. She has 6 years of writing articles about data recovery on PC/Mac, disk cloning solution, data eraser and computer OS optimization, etc. She is also interested in testing various software and digital products.

Gerhard Chou
In order to effectively solve the problems for our customers, every article and troubleshooting solution published on our website has been strictly tested and practiced. Our editors love researching and using computers and testing software, and are willing to help computer users with their problems

