PAGE CONTENT:
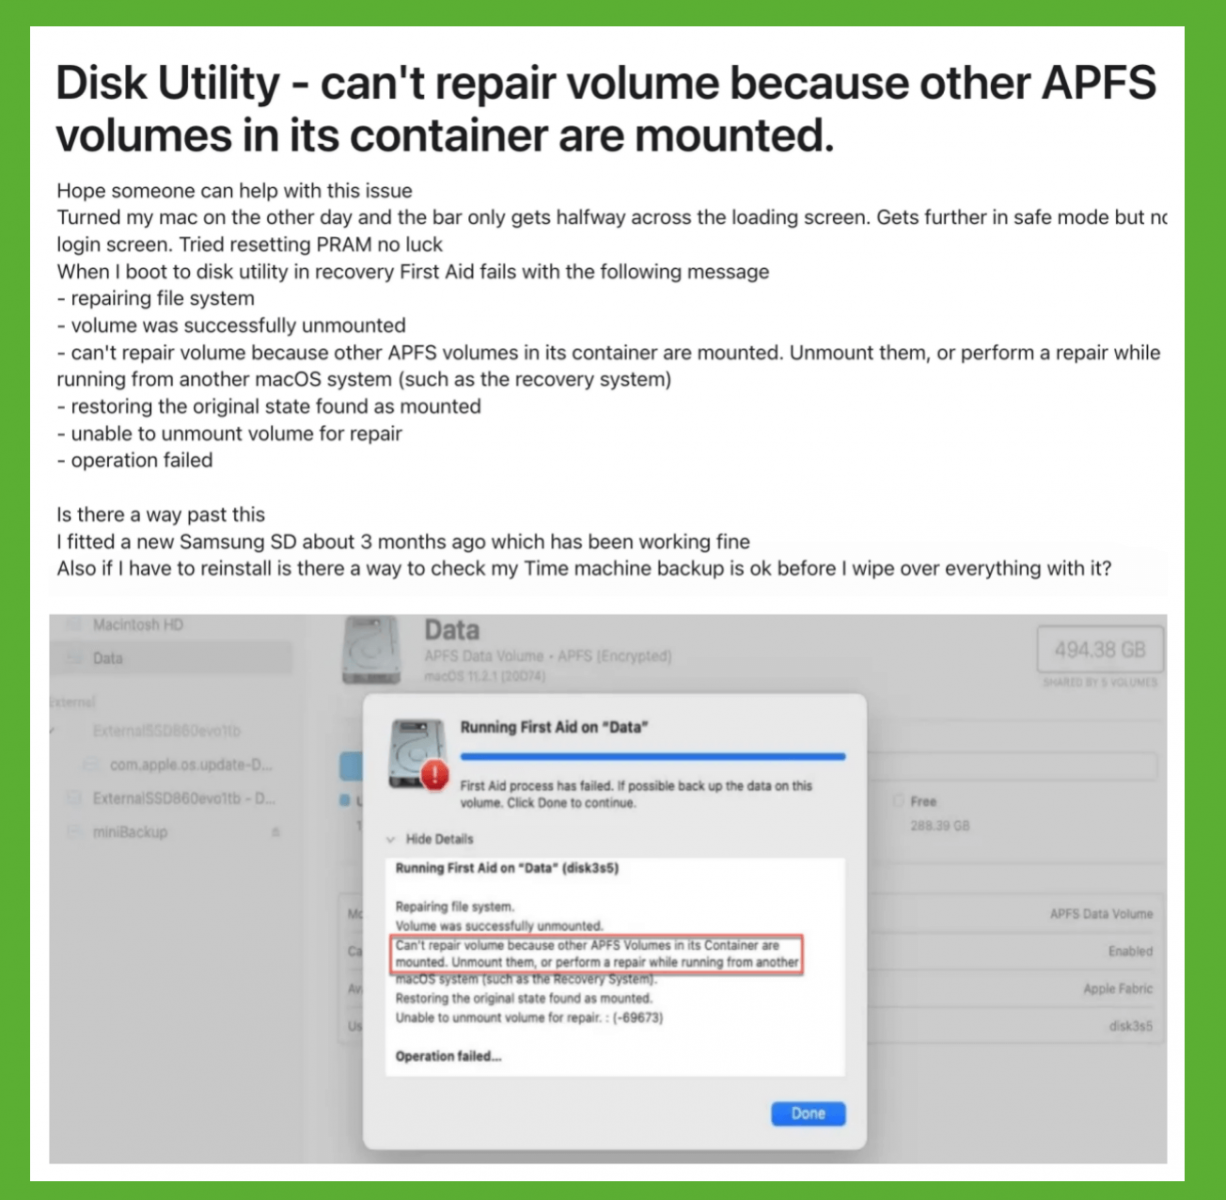
If you've ever encountered the frustrating error message "Can't repair volume because other APFS volumes in its container are mounted," you're not alone. This issue often arises when you're trying to repair a problematic APFS (Apple File System) volume, but other volumes within the same container are mounted and actively in use. While this can be frustrating, the good news is that it's usually fixable without risking any data loss, as long as you approach the solution cautiously and follow the right steps. This article will guide you through understanding the root cause of the error and provide step-by-step instructions to resolve it, ensuring that you don't lose any critical data in the process.
Understanding APFS (Apple File System) and Volume Containers
Before learning how to fix the issue, it's important to understand what APFS and volume containers are, and why the error occurs in the first place. Apple introduced APFS with macOS High Sierra in 2017 to replace HFS+, and it has become the default file system for macOS devices, offering several advantages such as enhanced security, performance improvements, and better support for SSDs.
In APFS, storage is organized into containers, which are logical volumes that can hold one or more APFS volumes. Each APFS container behaves like a virtual disk and can have multiple volumes inside it. These volumes can share storage space dynamically, meaning the storage capacity is allocated as needed rather than being fixed upfront. This flexible approach provides significant advantages for macOS systems with multiple partitions or volumes, but it also introduces potential complications when trying to perform repairs on an individual volume.
When an APFS volume is being used (mounted) by the system, it's essentially in an active state, and macOS can access and modify the files on that volume. If you attempt to repair the volume while it's still mounted, macOS will likely refuse to do so because repairing a volume while it's in use can lead to data corruption. This is where the error message arises: "Can’t repair volume because other APFS volumes in its container are mounted."
To repair the volume successfully, the other volumes in the same container need to be unmounted first.
Common Causes of the "Can't Repair Volume" Error
This issue can arise for several reasons. The primary cause is when other volumes within the same APFS container are mounted, meaning they are actively being accessed by macOS. If any of these volumes are in use, Disk Utility (or any other repair tool) won't be able to repair the targeted volume.
The error can also occur if the volume is associated with system or recovery partitions that are often mounted automatically by macOS. In these cases, the volume you're trying to repair may be linked to a system partition or a hidden partition necessary for macOS to operate correctly, making it tricky to unmount the volume safely.
Additionally, sometimes the volume may appear to be unmounted in Disk Utility, but macOS has processes in the background that are still using it, such as system indexing or applications that were left open. Therefore, ensuring that no other volume is mounted and no processes are using the targeted volume is crucial for a successful repair.
How to Safely Unmount Volumes for Repair?
The first step in resolving this issue is unmounting the other volumes within the same APFS container. You can do this via macOS's built-in tools, such as Disk Utility and Terminal. Let’s look at both methods.
#1 Using Disk Utility
Disk Utility is the most user-friendly method for unmounting volumes. Follow these steps:
- Open Disk Utility: You can find this by searching for it in Spotlight or navigating to Applications > Utilities > Disk Utility.
- Select the Volume: In the left sidebar, select the volume you want to repair. Be sure you're selecting the volume itself and not the container.
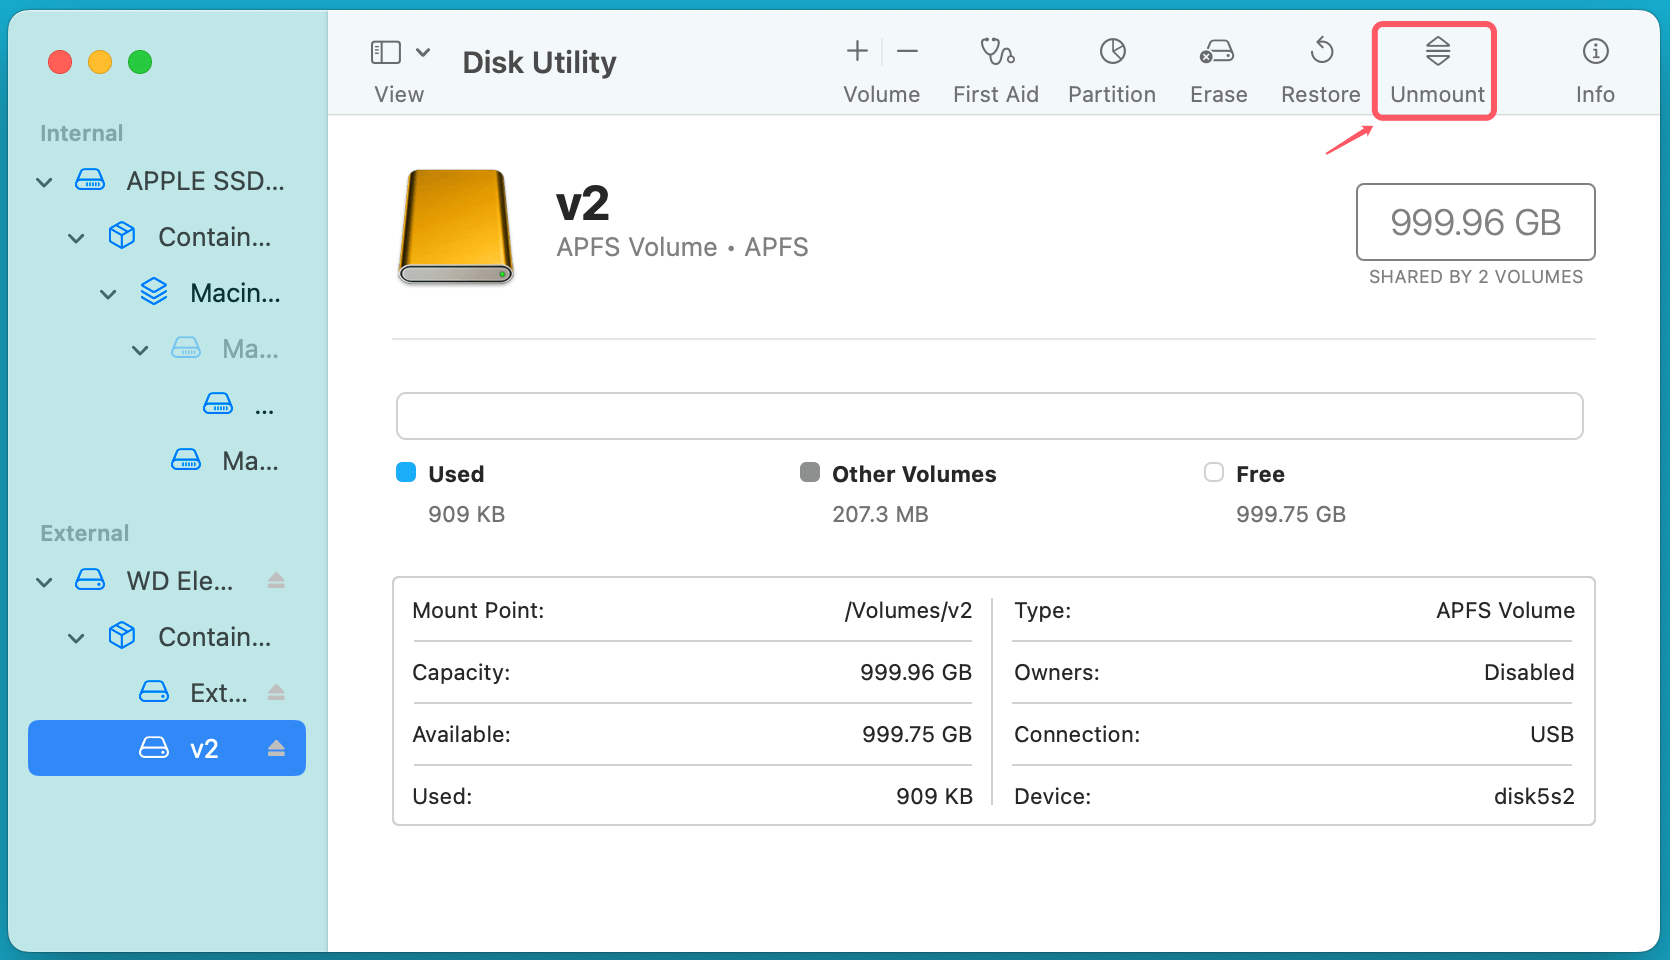
- Unmount the Volume: With the volume selected, click the Unmount button at the top of the Disk Utility window. If you can't unmount the volume, it means that some system processes are using it, and you'll need to address that.
![Can't repair volume because other APFS volumes in its container are mounted]()
- Unmount Other Volumes: If there are other volumes in the container, repeat the unmount process for them. Once all volumes within the container are unmounted, you can proceed with the repair process.
#2 Using Terminal Commands
For a more hands-on approach, you can use macOS's Terminal application to unmount volumes manually. Follow these steps:
- Open Terminal: You can find it in Applications > Utilities > Terminal.
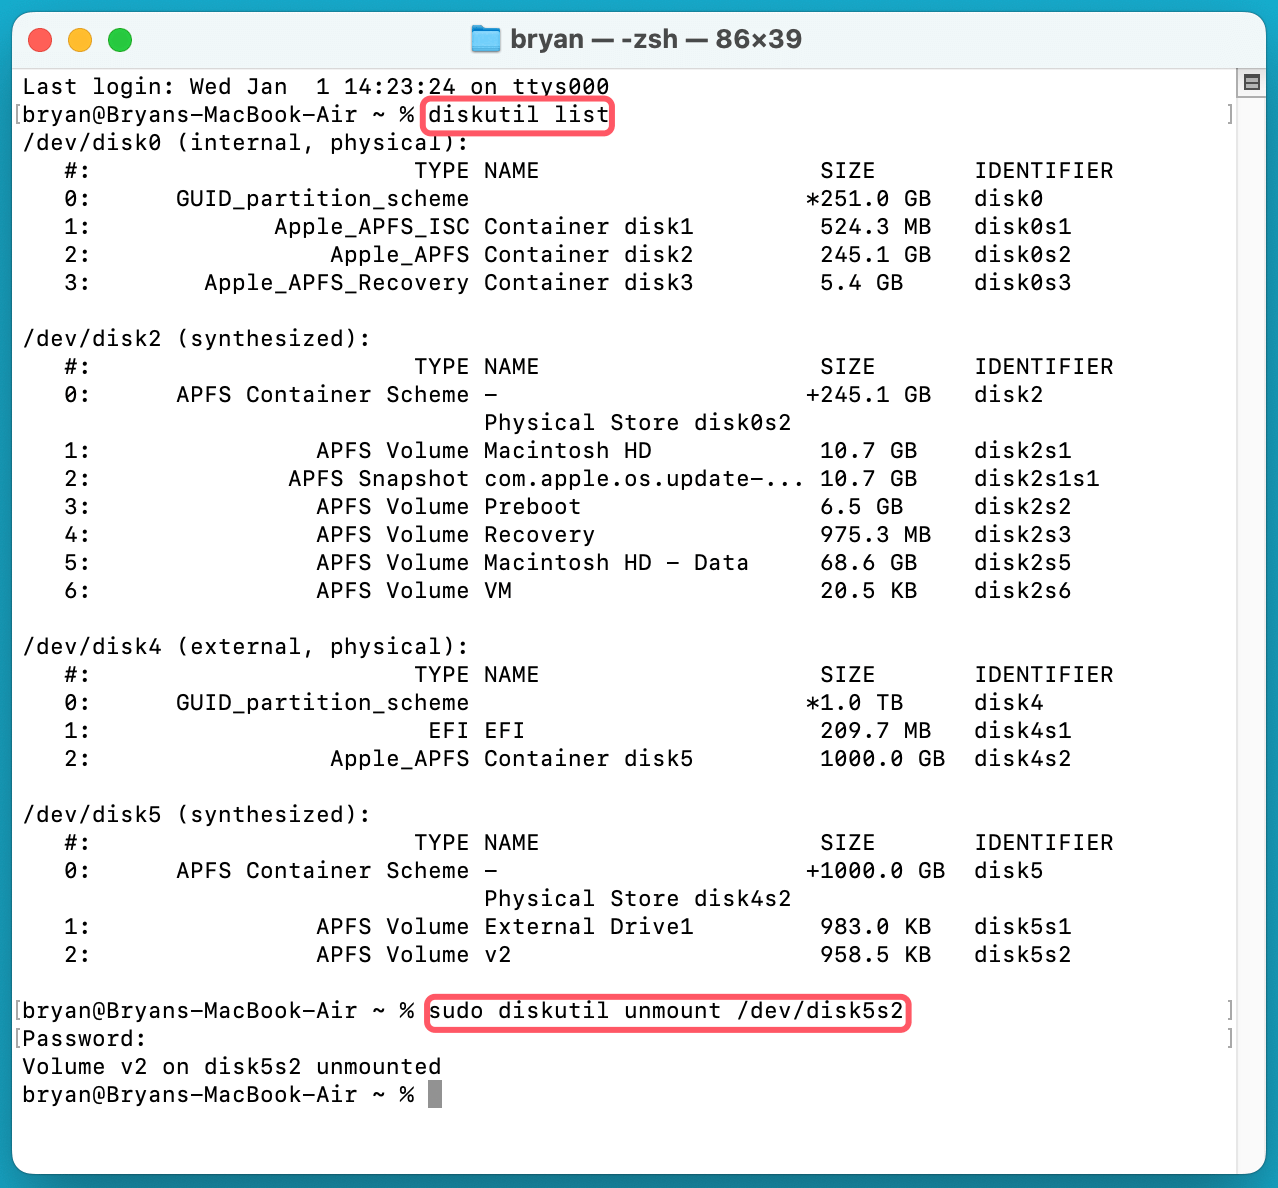
- List All Volumes: To see all the mounted volumes, type the following command and press Enter:
diskutil list
This will display a list of all volumes and disks. Identify the volume(s) you need to unmount by their names or identifiers.
- Unmount the Volume: To unmount a specific volume, use the following command:
sudo diskutil unmount /dev/diskXsY
Replace X and Y with the correct disk identifier from the diskutil list output.
![Can't repair volume because other APFS volumes in its container are mounted]()
- Unmount All Volumes in the Container: If necessary, you can unmount the entire APFS container using:
sudo diskutil unmountDisk /dev/diskX
Again, replace X with the appropriate disk identifier.
Once all volumes are unmounted, you can proceed to repair the targeted volume.
#3 Steps to Repair the APFS Volume
Now that the volumes are unmounted, you can attempt to repair the APFS volume. You have two main methods for this: using Disk Utility or Terminal.
Using Disk Utility:
- Select the Volume: In Disk Utility, select the volume you want to repair from the sidebar.
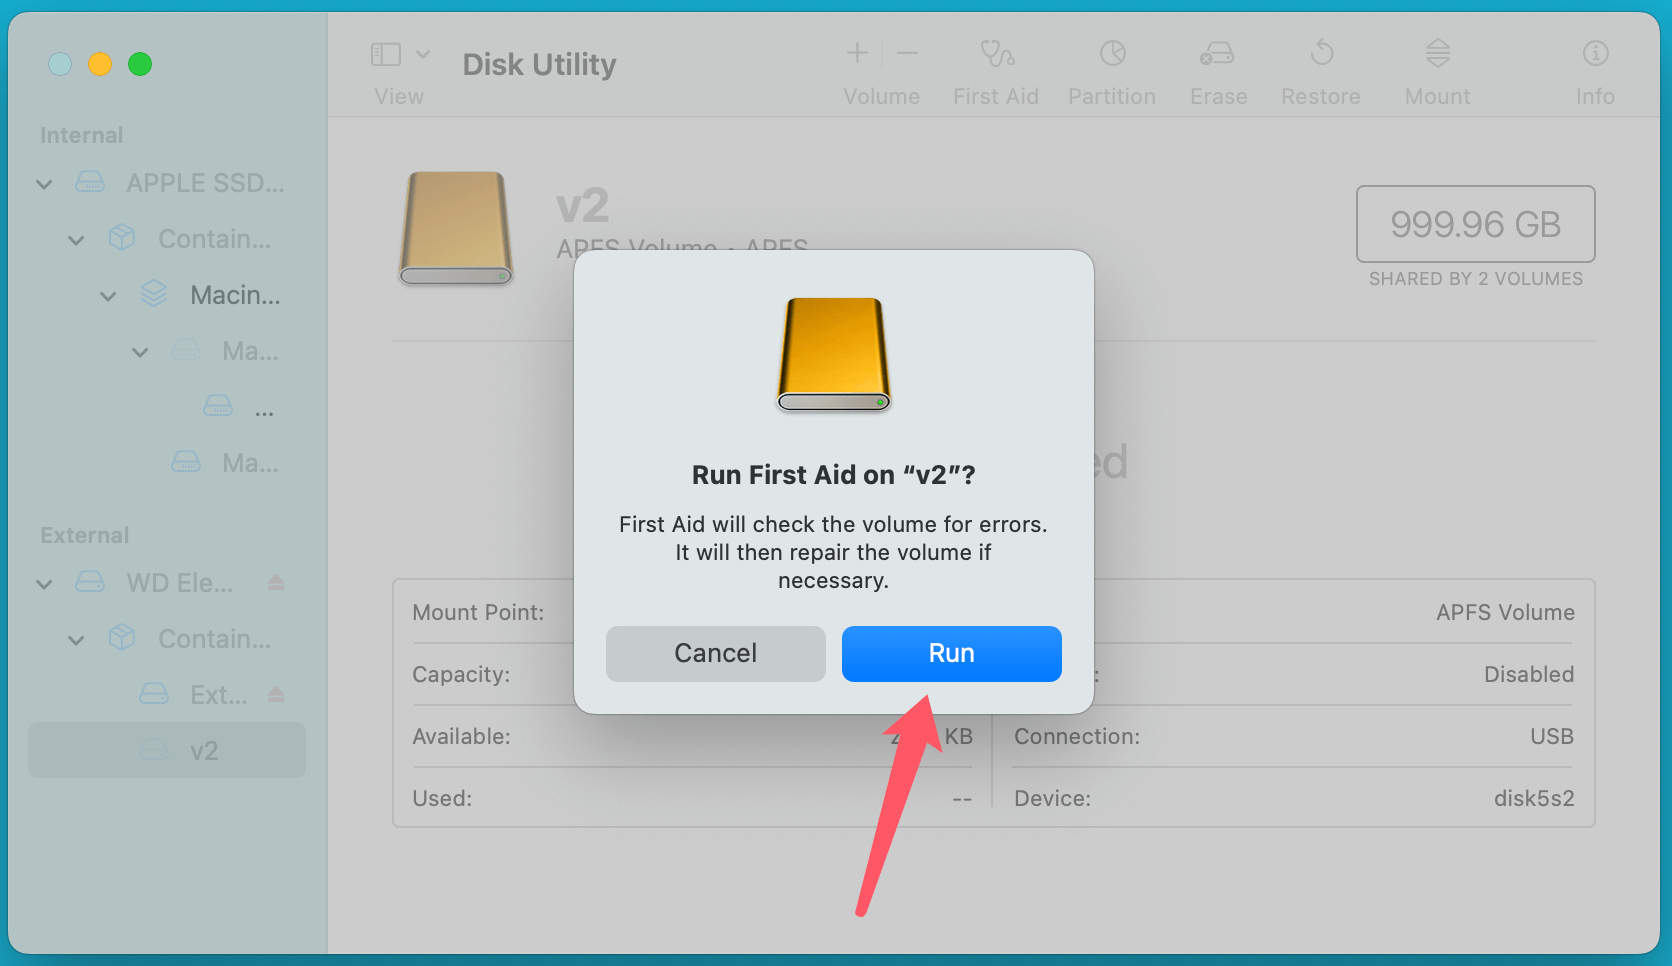
- Click on "First Aid": Click the First Aid button at the top of the Disk Utility window. This will initiate the repair process.
![Can't repair volume because other APFS volumes in its container are mounted]()
- Wait for the Repair Process to Complete: Disk Utility will check for errors and attempt to repair the volume. Depending on the severity of the issue, this could take some time. Once completed, you’ll see a message indicating whether the repair was successful.
Using Terminal:
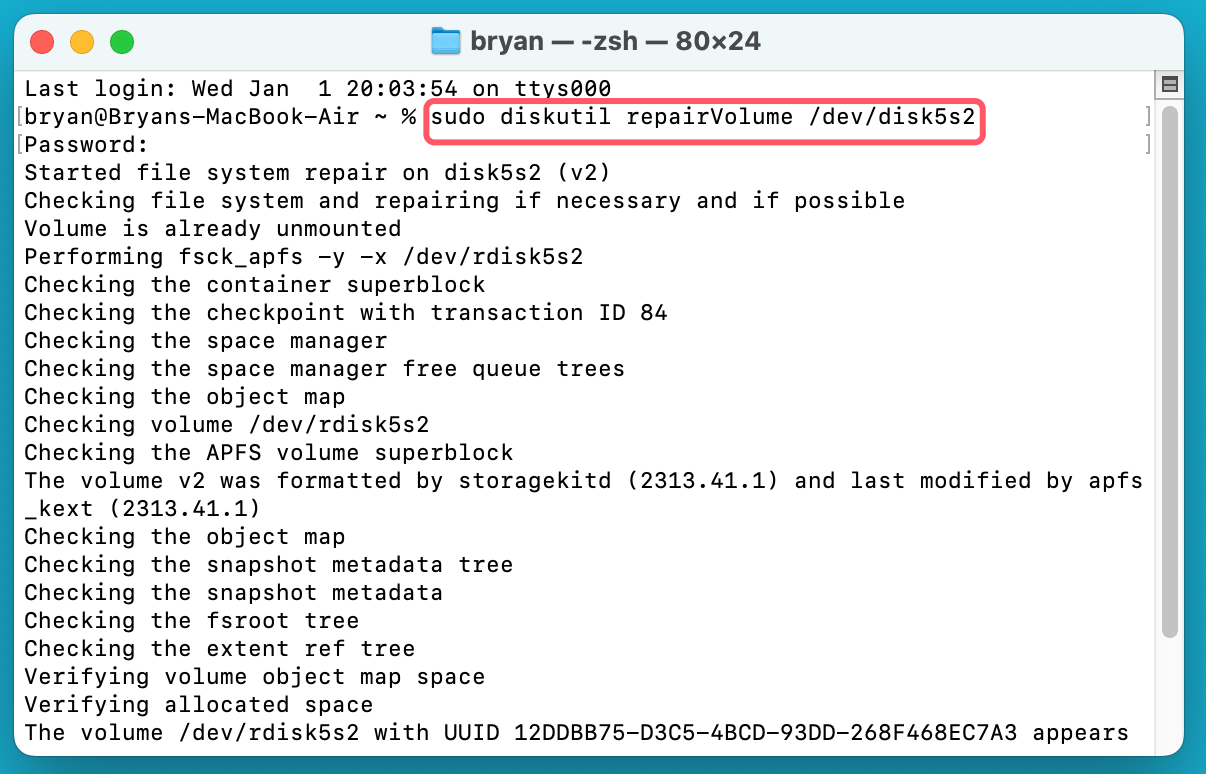
- Run the Repair Command: Open Terminal and type the following command to repair the selected volume:p
sudo diskutil repairVolume /dev/diskXsY
Replace X and Y with the appropriate disk identifier for the volume.
![Can't repair volume because other APFS volumes in its container are mounted]()
- Monitor the Repair Process: Terminal will display the progress of the repair. If any issues are found, it will attempt to fix them automatically.
Once the repair is completed, you can remount the volume by either clicking the Mount button in Disk Utility or using the following Terminal command:
sudo diskutil mount /dev/diskXsY
![Can't repair volume because other APFS volumes in its container are mounted]()
What to Do if You Can't Unmount Volumes?
In some cases, you may find that the volume won't unmount, even after trying the above methods. There are several potential reasons for this, such as system processes using the volume or issues with locked or system volumes. Here's what you can do:
- Identify Locked or System Volumes: Some volumes, such as the macOS system volume or the recovery partition, cannot be unmounted without causing system instability. These volumes are required for macOS to function properly.
- Use macOS Recovery Mode: If you cannot unmount the volume normally, booting into macOS Recovery Mode can help. Here's how:
- Restart your Mac and hold Command + R (for Intel-based mac) or Power button (for Apple silicon Mac) during startup.
- In the macOS Recovery environment, open Disk Utility and attempt the repair process from there. Since Recovery Mode is a minimal system environment, it may allow you to unmount and repair the volume more easily.
- Use Target Disk Mode: If all else fails, you can use Target Disk Mode to access the affected Mac's storage from another Mac. This allows you to treat the affected Mac's drive like an external drive and perform the necessary repairs.
Recovering Lost Data from APFS Drive on Mac
If you have lost data from your APFS drive, you can use Mac data recovery software - such as Donemax Data Recovery for Mac to help you get the lost data back.
Step 1. Download and install Donemax Data Recovery for Mac on the Mac.
Step 2. Open Donemax Data Recovery for Mac, select the APFS drive to start data recovery.

Step 3. Click on Scan button to deeply scan the APFS drive and find all existing files, deleted/erased files, etc.

Step 4. Once the scan is completed, you can preview all recoverable files. Then select the wanted files, click on Recover button to save them.

Preventing Future Issues
While the steps above should help resolve the issue, it's always best to be proactive in preventing similar problems in the future. Here are some tips:
- Regular Backups: Always keep regular backups of your data. Time Machine is a great tool for automatic backups, but you can also use third-party backup solutions for added security. A backup ensures that even if something goes wrong, your data is safe.
- Avoid Excessive Volume Changes: Try not to make frequent changes to your APFS containers or volumes unless absolutely necessary. This can reduce the chances of corruption or errors.
- Routine Disk Maintenance: Occasionally run Disk Utility's First Aid tool to check for disk errors before they become problematic. Regular checks help identify issues early on, before they escalate into more serious problems.
Conclusion
Encountering the "Can't repair volume because other APFS volumes in its container are mounted" error can be a stressful experience, especially when you're concerned about potential data loss. However, by following the right steps - unmounting volumes, using Disk Utility or Terminal for repairs, and ensuring that no other processes are using the volume - you can usually resolve the issue without any data loss. Additionally, by practicing good maintenance habits, such as regular backups and disk checks, you can minimize the risk of similar issues occurring in the future.
If you have lost data on the APFS volume, you can use Mac data recovery software, such as Donemax Data Recovery for Mac, to get the lost data back.


Donemax Data Recovery for Mac
Donemax Data Recovery for Mac is one of the best Mac data recovery software. It is easy-to-use and can help in recovering deleted, formatted, inaccessible or lost data from Mac HDD/SSD, external disk, USB drive, SD card, camera or other storage devices.
Related Articles
- Apr 21, 2025External Hard Drive Keeps Disconnecting and Reconnecting on Windows, Fix It
- Dec 09, 20248 Solutions to Fix Can't Rename an External Hard Drive or USB Drive on Mac
- Dec 19, 20249 Solutions to Fix WD My Passport Not Showing Up on Mac
- Jan 06, 2025How to Quickly Fix RAW External Hard Drive without Losing Data?
- Feb 18, 2025Fix You Must Initialize a Disk Before Logical Disk Manager Can Access It [5 Solutions]
- Jan 12, 20256 Solutions to Fix Error Code 50 on Mac: A Comprehensive Guide

Christina
Christina is the senior editor of Donemax software who has worked in the company for 4+ years. She mainly writes the guides and solutions about data erasure, data transferring, data recovery and disk cloning to help users get the most out of their Windows and Mac. She likes to travel, enjoy country music and play games in her spare time.

Gerhard Chou
In order to effectively solve the problems for our customers, every article and troubleshooting solution published on our website has been strictly tested and practiced. Our editors love researching and using computers and testing software, and are willing to help computer users with their problems
Hot Donemax Products

Clone hard drive with advanced clone technology or create bootable clone for Windows/Mac OS.

Completely and easily recover deleted, formatted, hidden or lost files from hard drive and external storage device.

Certified data erasure software - permanently erase data before selling or donating your disk or any digital device.

