PAGE CONTENT:
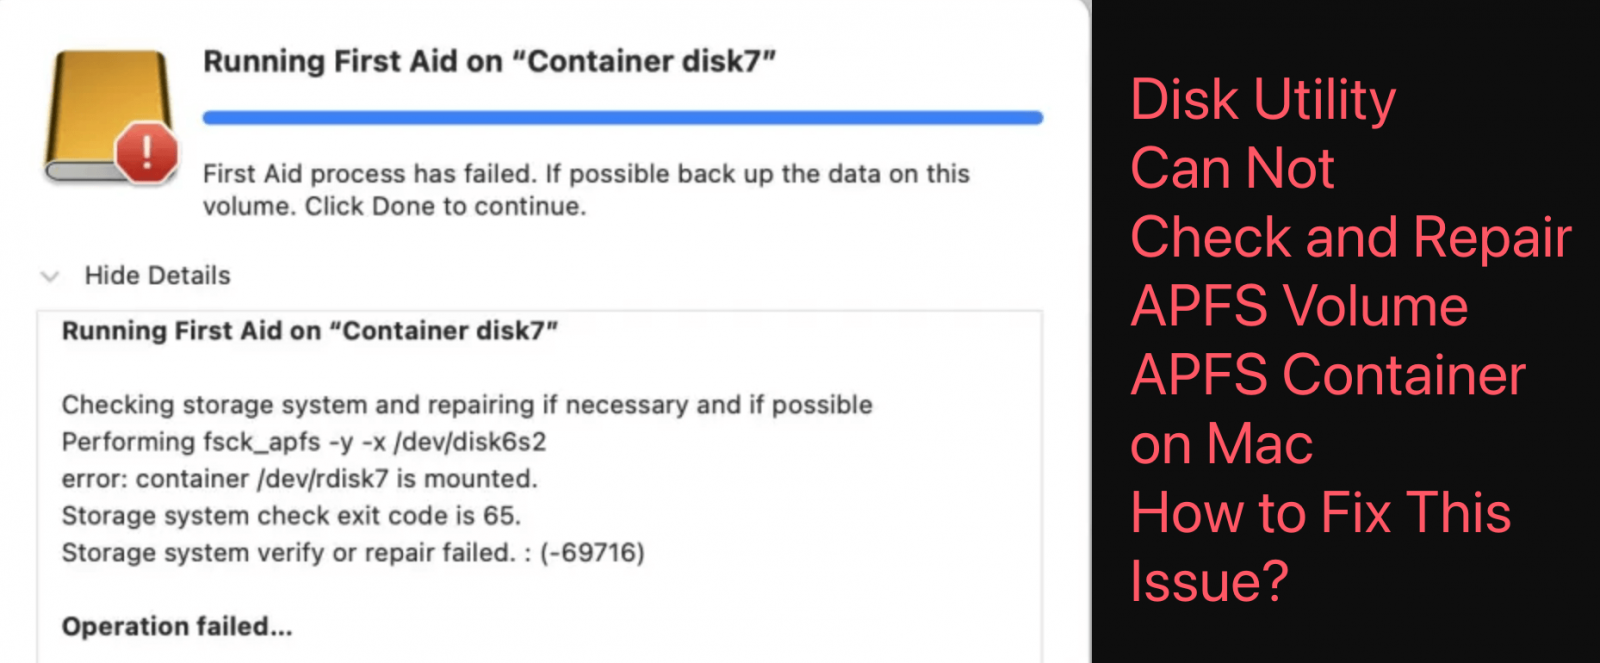
Maintaining your Mac's health is crucial for seamless performance, and Disk Utility plays a significant role in this process. Disk Utility is Apple's go-to tool for managing and repairing storage drives. However, sometimes users encounter the frustrating issue where Disk Utility cannot check or repair APFS (Apple File System) volumes or containers. This can be alarming, as APFS is the backbone of modern macOS storage management, and its failure can lead to data loss or degraded system performance.
In this comprehensive guide, we'll delve into the reasons behind this issue and provide actionable solutions to get your APFS volumes back on track.
Understanding APFS and Disk Utility
What is APFS?
The Apple File System (APFS) is Apple's modern storage solution introduced with macOS High Sierra. It was designed to optimize performance on SSDs and support advanced features like snapshots, encryption, and efficient file duplication. APFS is resilient, faster, and better at handling metadata compared to its predecessor, HFS+.
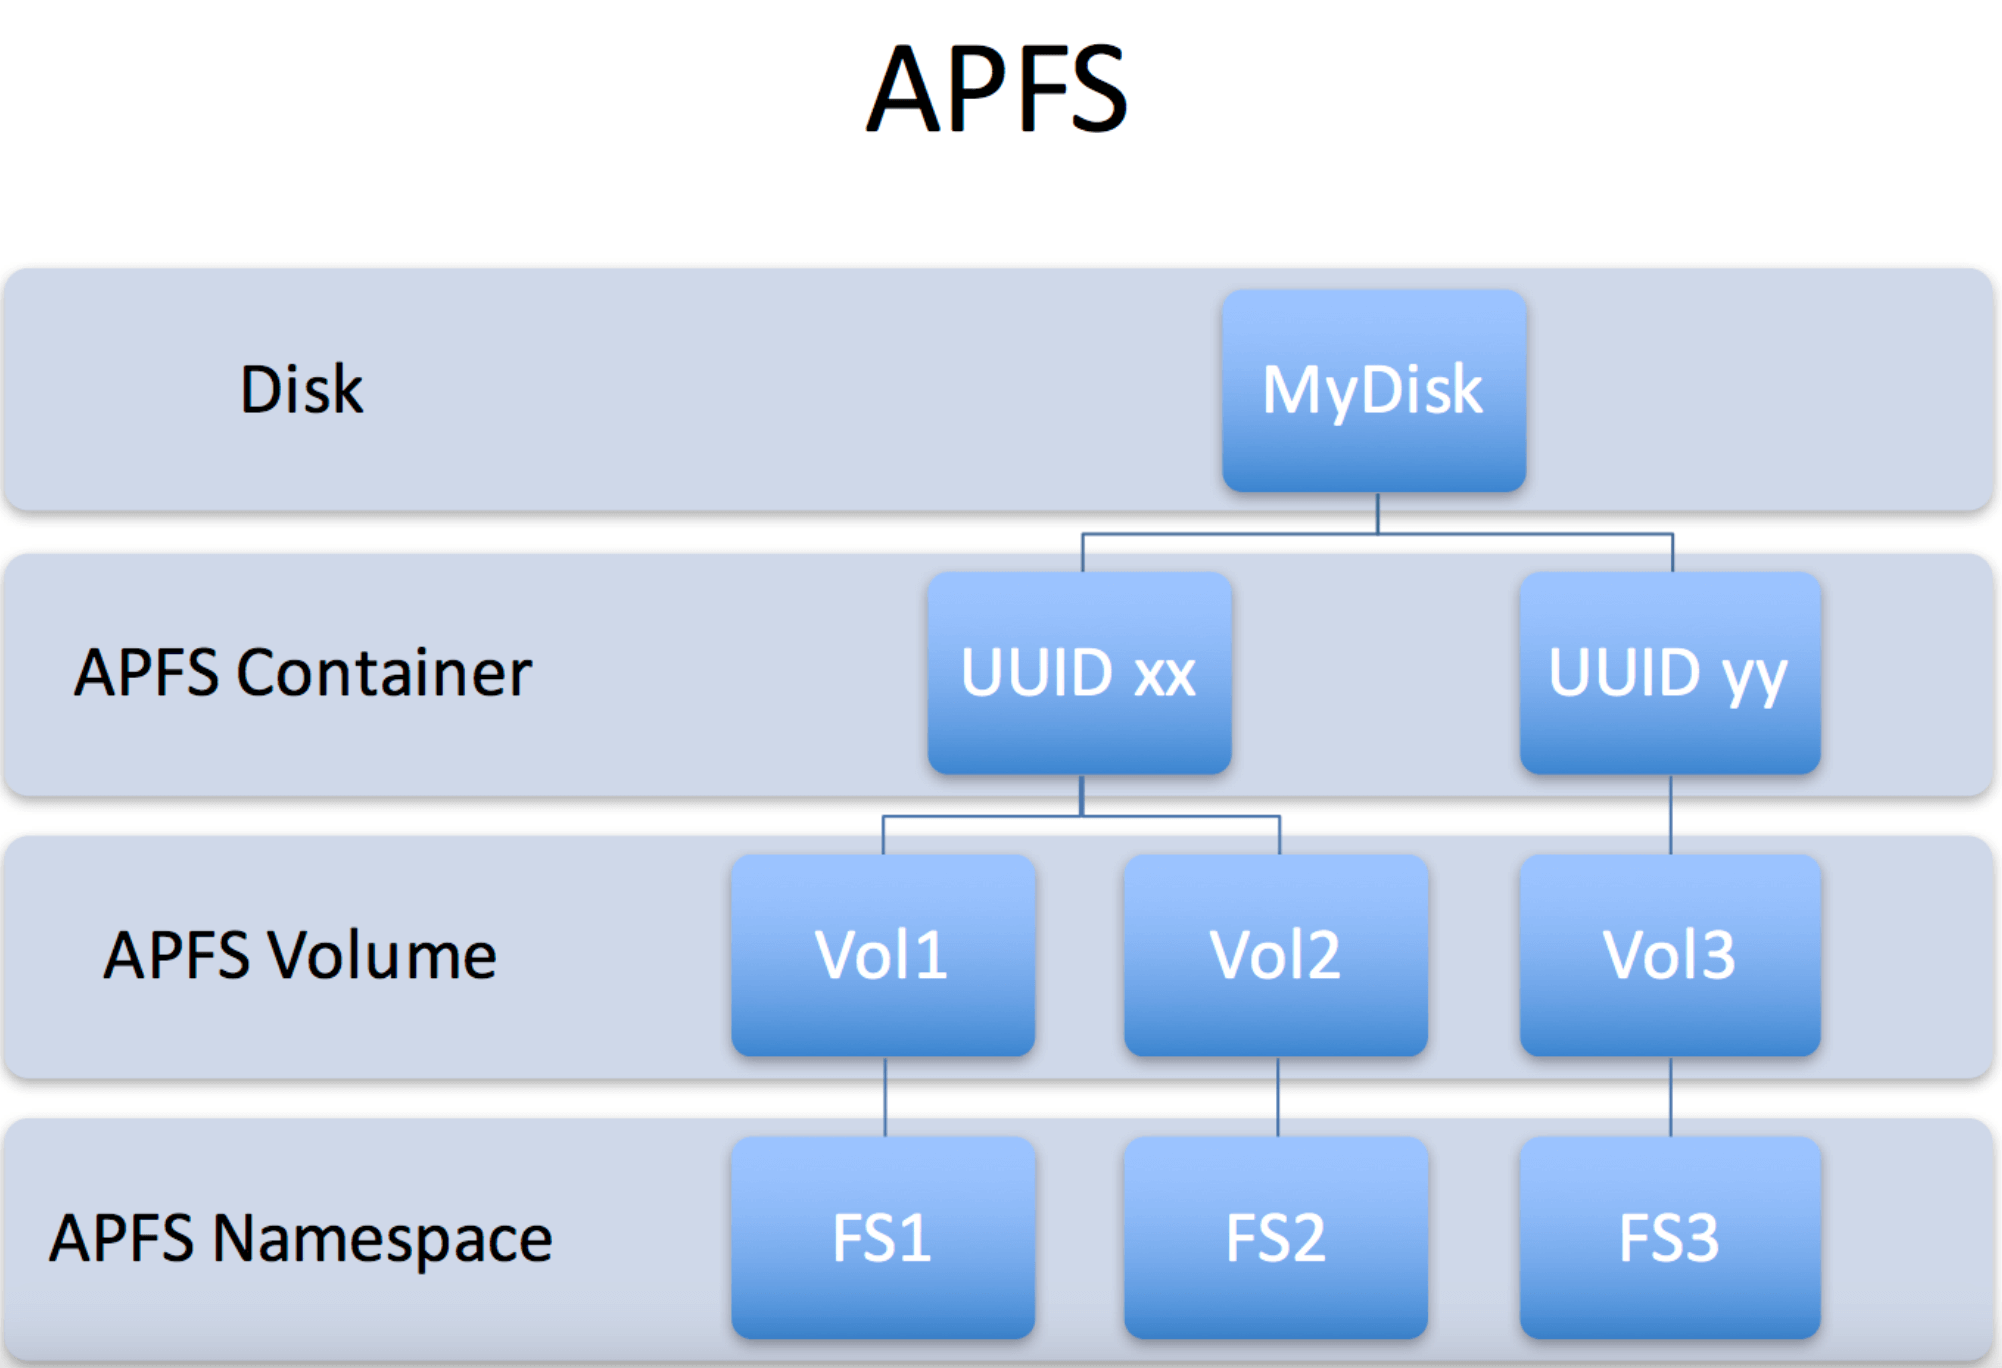
Some key advantages of APFS include:
- Crash Protection: Ensures data integrity in case of unexpected shutdowns.
- Cloning: Efficiently duplicates files and directories without consuming additional space.
- Encryption: Supports full-disk encryption with minimal performance impact.
- Snapshots: Allows you to freeze a state of your filesystem, enabling recovery to a specific point in time.
What is Disk Utility?
Disk Utility is a built-in macOS tool used for managing disks and volumes. It allows you to partition, format, and repair storage devices. Its "First Aid" feature is particularly helpful in diagnosing and fixing disk-related issues. First Aid checks for errors in the file system structure and attempts to repair them.

Why Disk Utility Fails to Repair APFS Volumes/Containers?
● System-Level Restrictions
APFS is deeply integrated into macOS, which means certain repairs require system-level privileges that Disk Utility doesn't have in a normal boot environment.
● Corrupted APFS Structures
Corruption in the APFS file system can occur due to various reasons, such as power outages, sudden restarts, or failing storage hardware. This corruption might be too severe for Disk Utility to fix.
● Disk Utility's Limitations
While Disk Utility is powerful, it has its limits. For advanced disk repairs, it may not be sufficient, especially if the volume structure is severely damaged or if certain system processes are using the volume during repairs.
Methods to Fix "Disk Utility Cannot Repair APFS Volumes/Containers"
1. Perform Preliminary Checks
Before diving into complex solutions, start with basic troubleshooting:
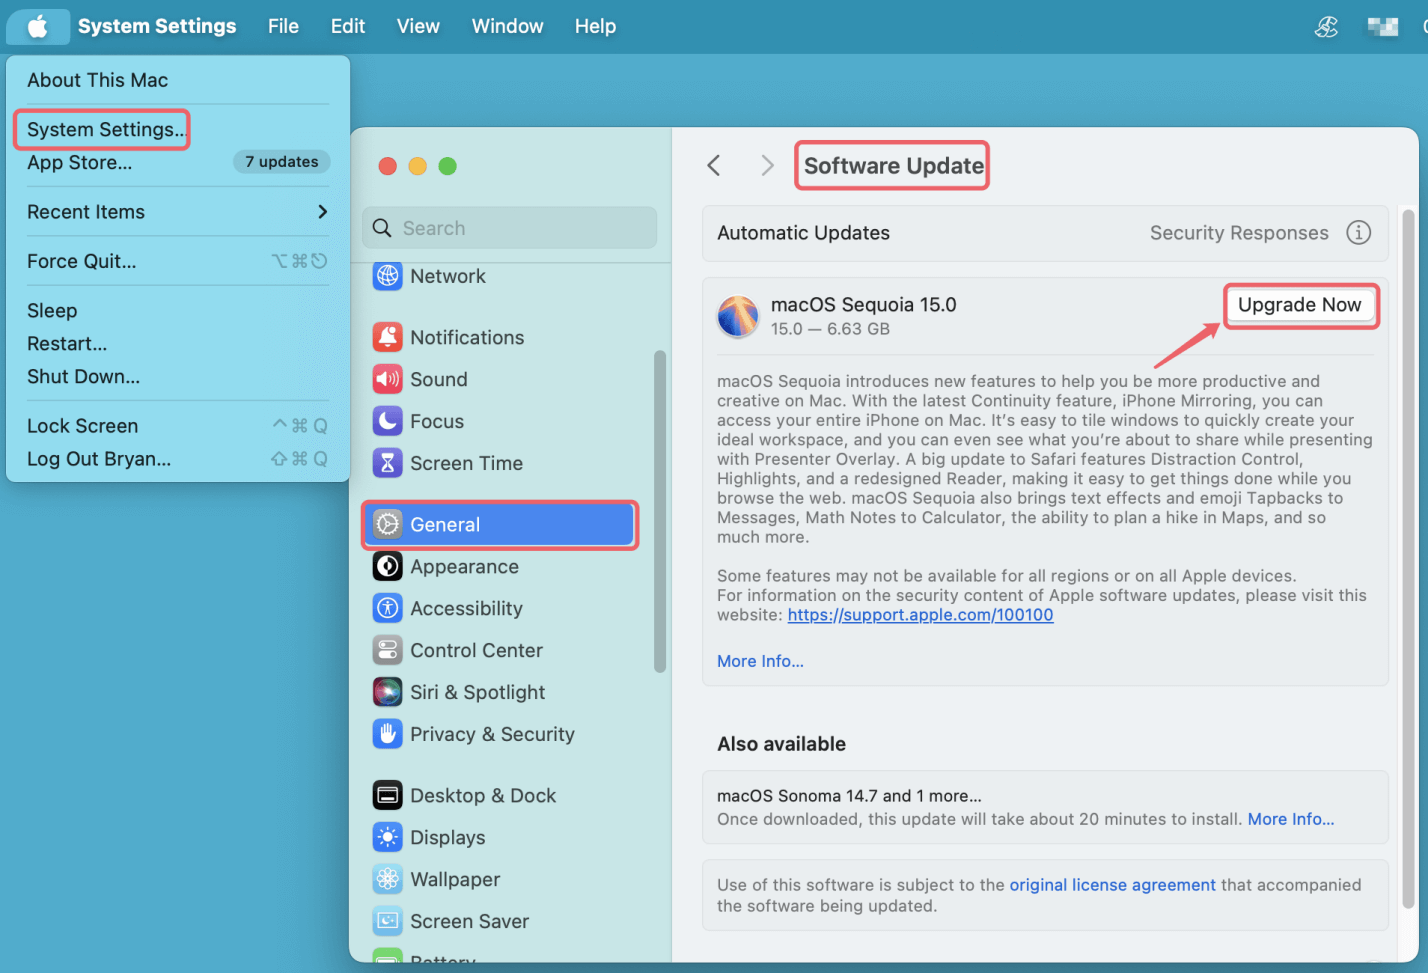
- Ensure macOS is Up-to-Date: Apple frequently releases updates to improve macOS's stability and fix known bugs. Go to System Settings > General > Software Update and ensure your system is running the latest version.
![Disk Utility Can't Check and Repair APFS Volume or APFS Container]()
- Back Up Your Data: Before attempting any repair, create a backup using Time Machine or another reliable backup tool.
2. Run Disk Utility in Safe Mode
Safe Mode loads only essential system processes, potentially resolving minor issues that interfere with Disk Utility.
Steps:
- Shut down your Mac.
- Boot into Safe Mode:
- For Intel-based Mac: Turn it on and immediately hold the Shift key. Release it when the login screen appears.
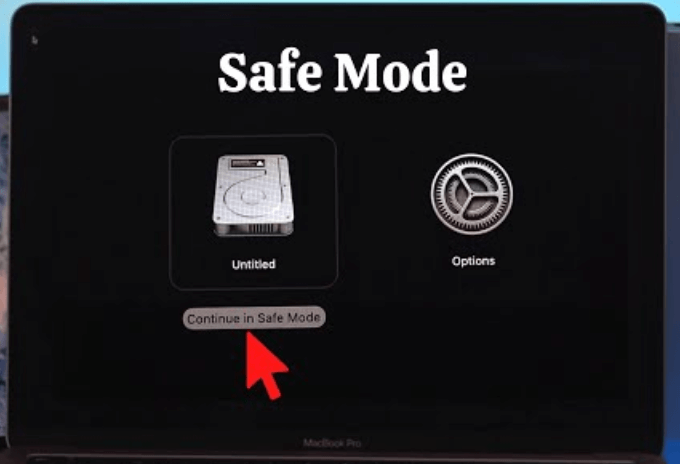
- For Apple silicon Mac: Press and hold Power button until it enters into macOS Recovery mode. Select Macintosh HD, press and hold Option key, click Continue in Safe Mode.
![Disk Utility Can't Check and Repair APFS Volume or APFS Container]()
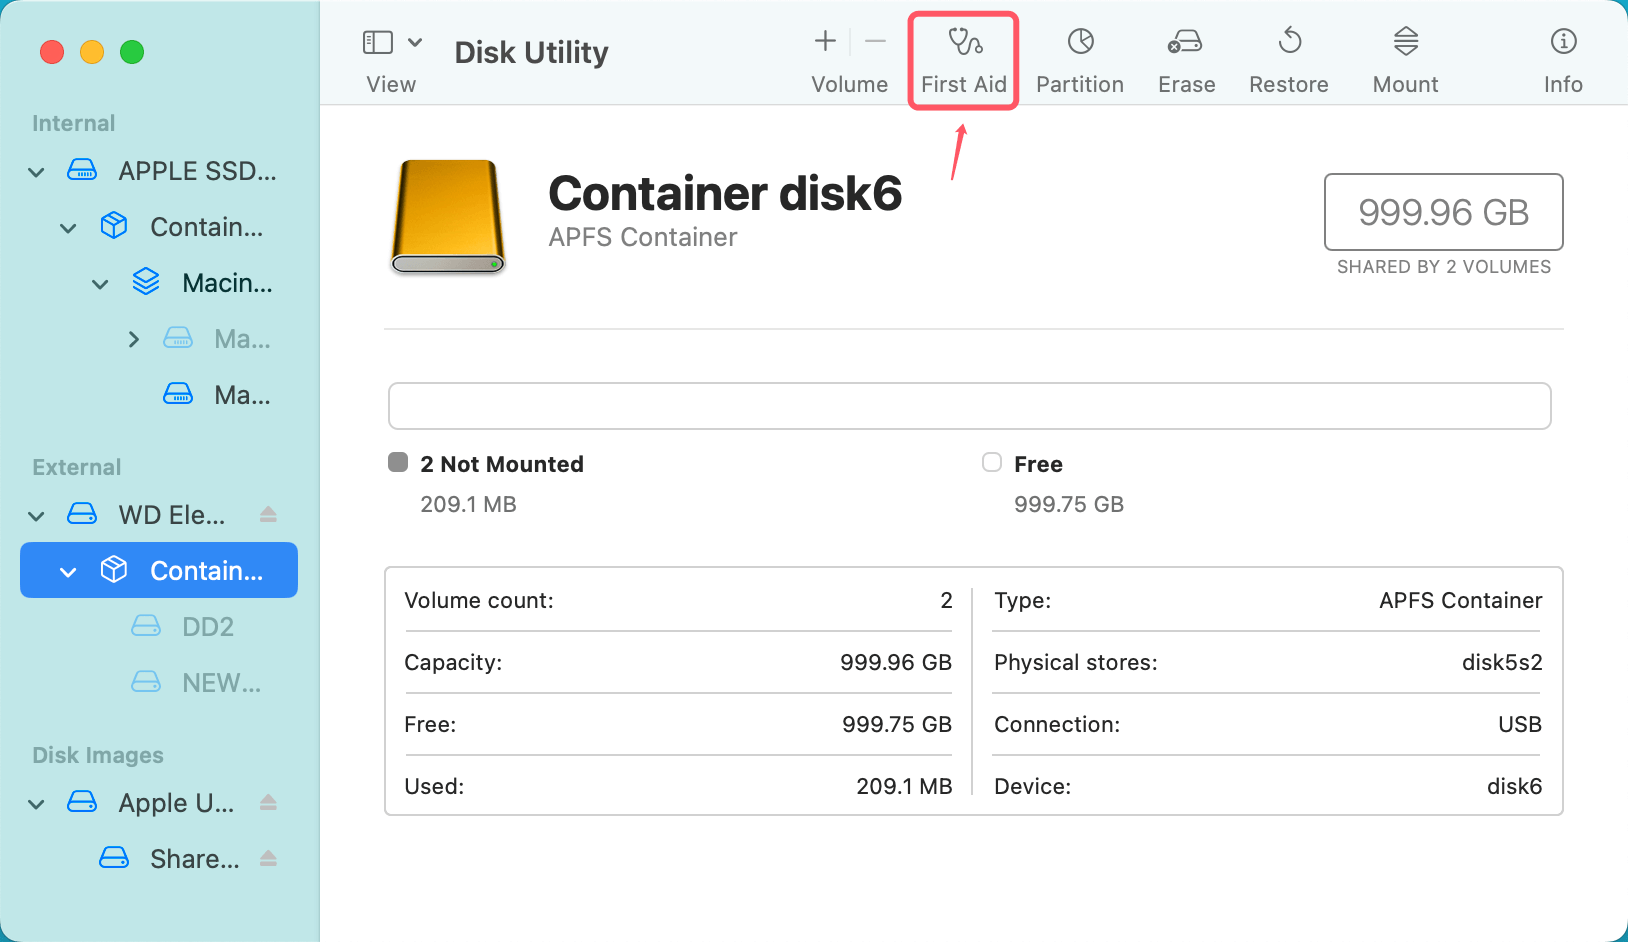
- Open Disk Utility and run First Aid on the problematic APFS volume/container.
![Disk Utility Can't Check and Repair APFS Volume or APFS Container]()
If Disk Utility works in Safe Mode, the issue might be caused by a third-party process interfering in normal mode.
3. Use Recovery Mode
If Safe Mode doesn't work, try repairing the disk in macOS Recovery Mode, a dedicated environment for troubleshooting.
Steps:
- Restart your Mac and hold Command (⌘) + R (for Intel-based Mac) or Power button (for Apple silicon Mac) until the Apple logo appears.
- Select Disk Utility from the macOS Utilities window.
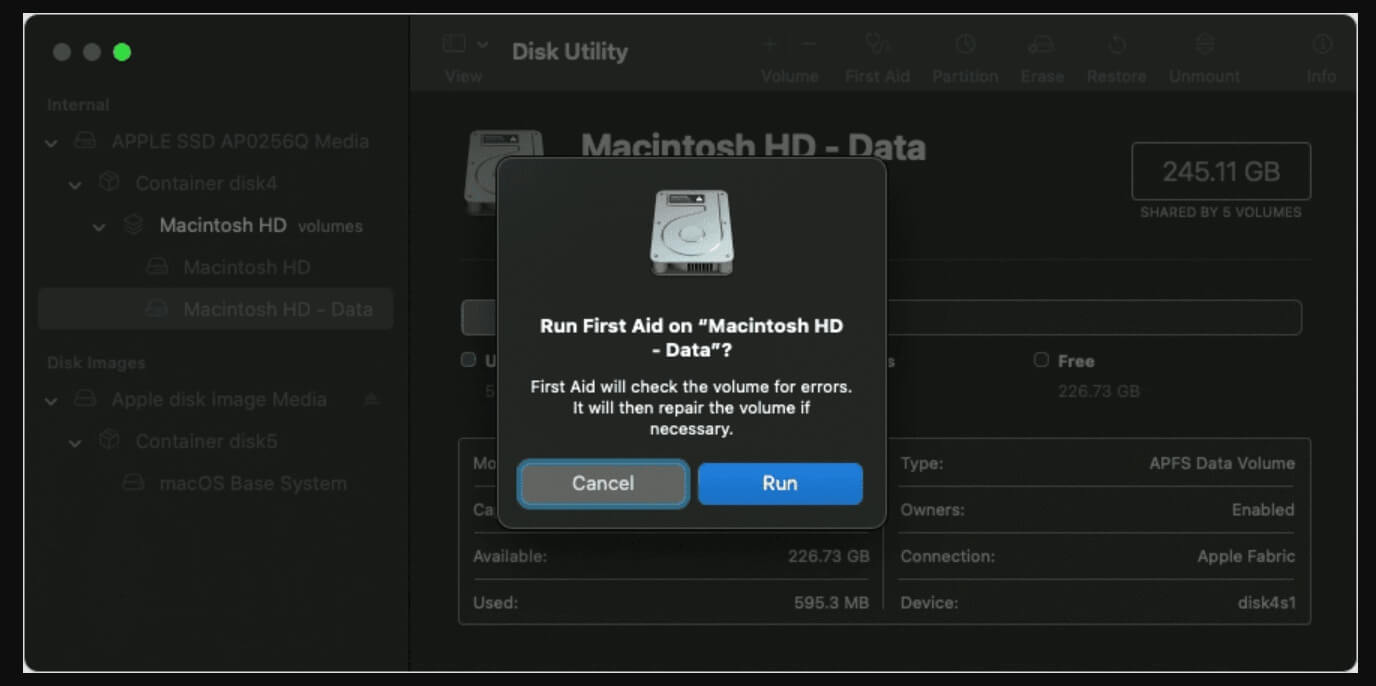
- Choose the APFS volume and click First Aid.
![Disk Utility Can't Check and Repair APFS Volume or APFS Container]()
Recovery Mode runs outside of macOS, increasing the chances of successful repairs.
4. Use Terminal for Advanced Repairs
When Disk Utility fails to repair an APFS volume, using Terminal can be a powerful alternative. Terminal provides direct access to macOS's core repair tools, enabling deeper interaction with your storage devices. While these commands might seem intimidating, they are straightforward when executed carefully.
Using the diskutil Command:
The diskutil command-line utility is a versatile tool for managing disks and volumes in macOS. Its repair options can often address issues that the graphical Disk Utility cannot handle.
Steps to Repair with diskutil:
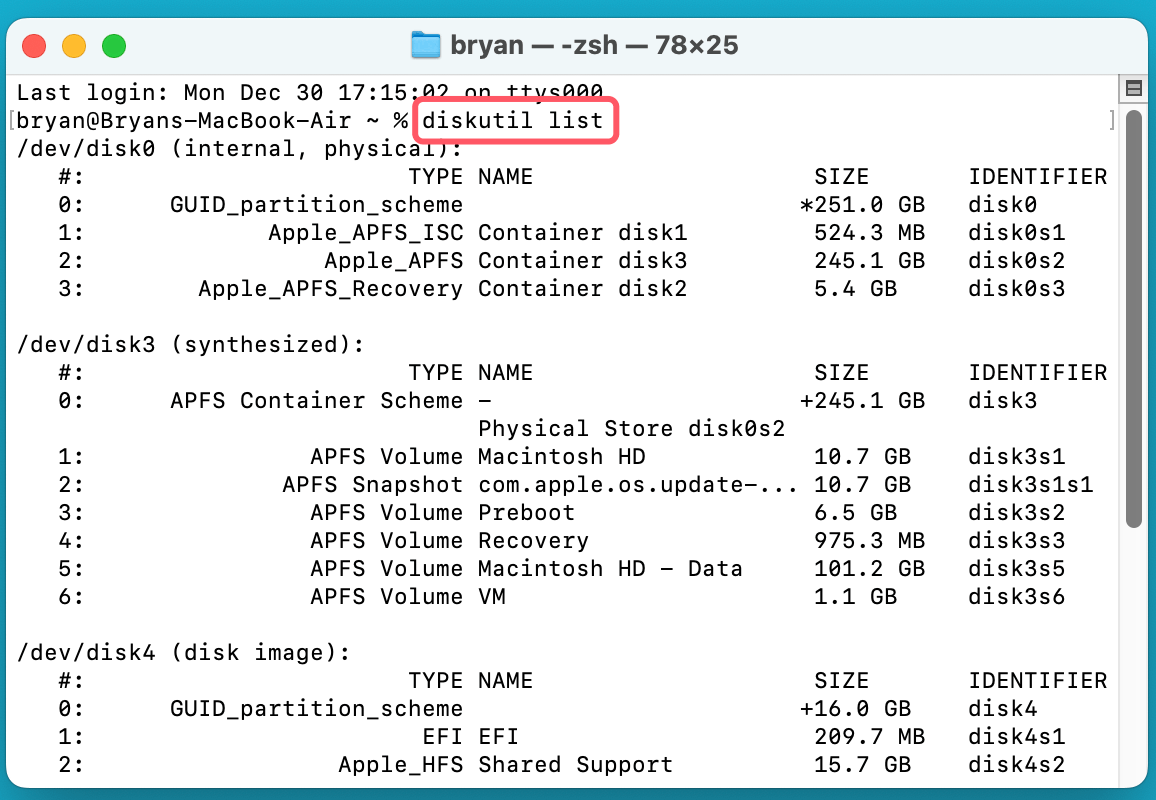
- Identify the Problematic Volume: Open Terminal (from Applications > Utilities or by searching Spotlight). Type the following command to list all connected disks and their partitions:
diskutil list
![Disk Utility Can't Check and Repair APFS Volume or APFS Container]()
Look for the APFS container or volume in the output. Note the device identifier, which will look like /dev/disk6s1 or similar.
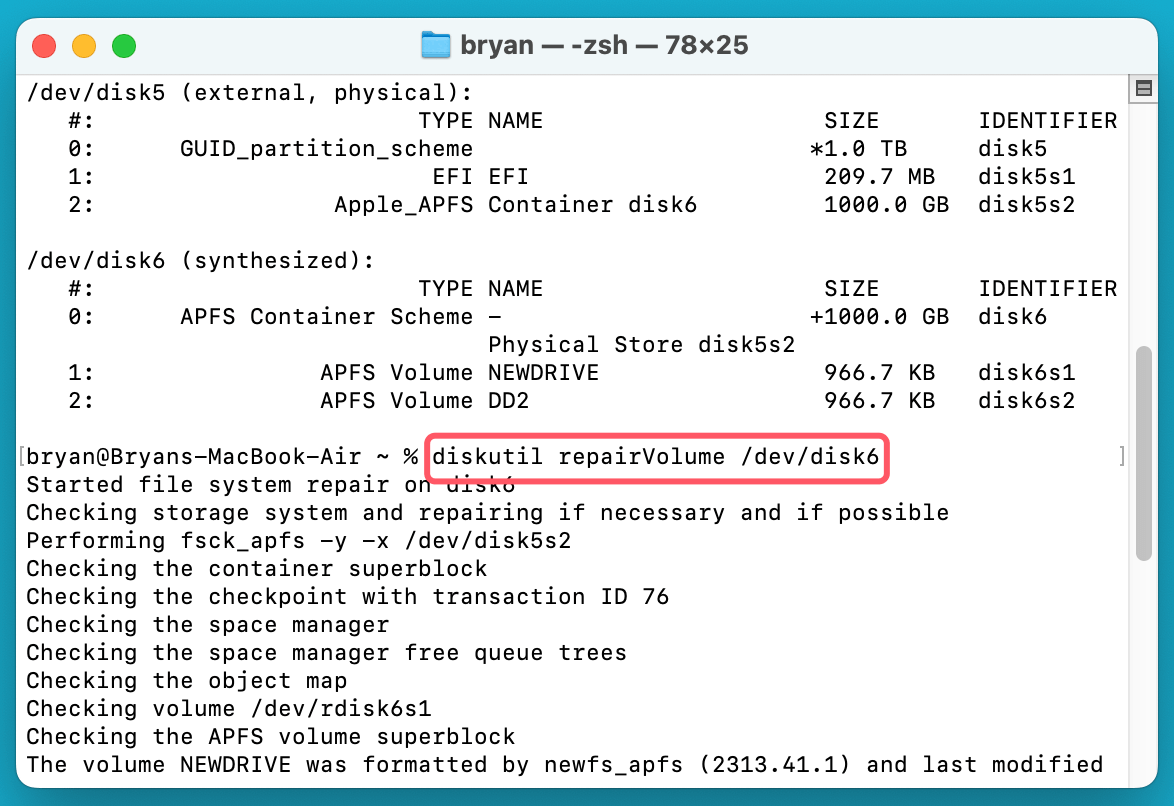
- Run the Repair Command: Once you've identified the correct volume, use the repairVolume subcommand to attempt a repair. Replace /dev/diskX with the appropriate device identifier:
diskutil repairVolume /dev/diskX
![Disk Utility Can't Check and Repair APFS Volume or APFS Container]()
Example output might show details of the repair process. If errors are fixed, you’re good to go; if not, proceed to a more advanced tool.
Using the fsck_apfs Command:
The fsck_apfs (File System Consistency Check for APFS) command performs a thorough analysis and repair of APFS volumes. Unlike Disk Utility, fsck_apfs dives into the intricate structures of the file system.
Steps to Use fsck_apfs:
- Boot into macOS Recovery Mode: Since APFS volumes are often mounted and active during normal operation, repairing them in Recovery Mode avoids potential conflicts. Restart your Mac, holding Command (⌘) + R or Power button (for Apple silicon Mac) until the Apple logo or Loading Startup Options appears.
- Launch Terminal: In the macOS Utilities window, select Utilities > Terminal.
- Unmount the Volume: To ensure the repair process works smoothly, unmount the problematic APFS volume:
diskutil unmount /dev/diskX
![Disk Utility Can't Check and Repair APFS Volume or APFS Container]()
- Run fsck_apfs: With the volume unmounted, execute the repair command:
fsck_apfs -y /dev/diskX
![Disk Utility Can't Check and Repair APFS Volume or APFS Container]()
The -y flag automatically answers "yes" to any prompts, allowing the repair process to proceed without interruptions.
What to Expect:
The fsck_apfs command will analyze the file system's metadata, check for inconsistencies, and attempt repairs. The process might take several minutes, depending on the disk size and the extent of the damage.
- If Repairs Succeed: Reboot your Mac and verify that the volume is accessible.
- If Repairs Fail: The corruption might be too severe for software tools to resolve. You may need to proceed to a backup-and-erase solution.
Best Practices When Using Terminal Commands:
- Double-Check Volume Identifiers: Incorrectly selecting a volume can lead to data loss on the wrong disk. Always confirm the identifier before executing commands.
- Avoid Interrupting the Process: Terminal commands like fsck_apfs perform intricate repairs. Interruptions can worsen the damage.
- Backup Before Proceeding: Although repair commands typically preserve your data, there is always a risk of unexpected failures. Having a backup ensures you're covered.
By using Terminal commands, you leverage macOS's underlying power to tackle disk issues. This approach can often succeed where Disk Utility alone falls short, making it an invaluable tool for advanced users.
5. Third-Party Disk Repair Tools
Sometimes, third-party tools are better equipped to handle complex APFS issues. Trusted options include:
- Donemax Data Recovery for Mac: Known for its data recovery and repair capabilities.
- TechTool Pro: A comprehensive tool for diagnosing and repairing disks.
Considerations:
- Choose reputable software from trusted developers.
- Ensure you download these tools from official websites to avoid malware.
Check how to recover lost data from unmounted APFS volumes/containers >>
6. Erase and Reformat the Disk
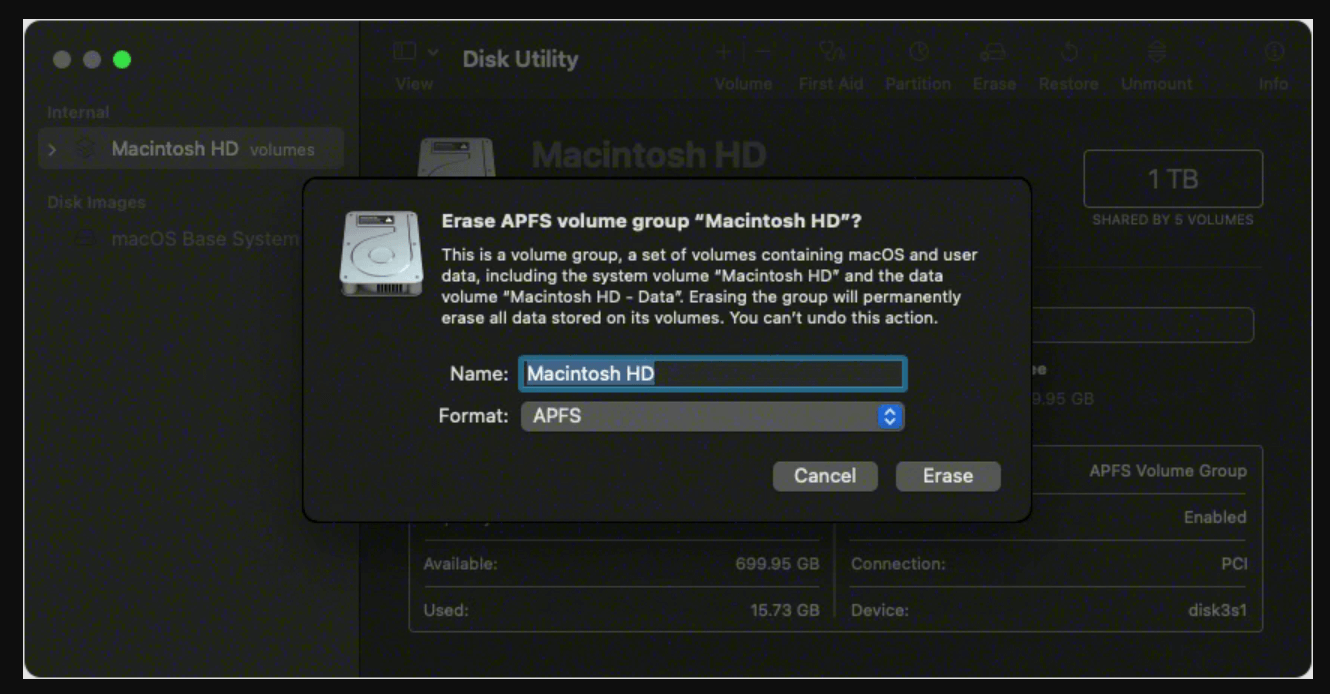
If all else fails, erasing and reformatting the disk is a last resort. This process deletes all data, so ensure you've backed up everything important.
Steps:
- Boot into Recovery Mode (Command + R or Power button).
- Open Disk Utility.
- Select the APFS container and click Erase.
- Choose APFS as the format and proceed.
![Disk Utility Can't Check and Repair APFS Volume or APFS Container]()
- Reinstall macOS and restore data from your backup.
Recovering Lost Data from APFS Volumes or Containers
If you have lost data from your APFS volumes or containers, you can use Mac data recovery software - such as Donemax Data Recovery for Mac to get the lost data back.
Step 1. Download and install Donemax Data Recovery for Mac on your Mac.
Step 2. Open Donemax Data Recovery for Mac, select the APFS drive to start data recovery.

Step 3. Click on Scan button to deeply scan the APFS drive and find all recoverable files.

Step 4. Once the scan is completed, you can preview all recoverable files. Then select the wanted files, click on Recover button to save them.

Preventing Future Issues
1. Regular Maintenance
- Periodically check your disk health using Disk Utility or third-party tools.
- Keep macOS updated to benefit from the latest system improvements.
2. Use Reliable Storage Devices
- Invest in high-quality SSDs or external drives.
- Avoid using aging hardware, as it increases the risk of disk corruption.
3. Back Up Frequently
Regular backups ensure you can recover your data even if a disk becomes irreparable. Use Time Machine or cloud-based solutions for redundancy.
Conclusion
Disk Utility is a powerful tool for managing macOS storage, but it isn't infallible. When it struggles with checking or repairing APFS volumes, knowing alternative solutions can save you time, frustration, and potentially your data.
By following the steps outlined above, you can diagnose and fix the issue effectively, whether it's a simple Safe Mode reboot or an advanced Terminal command. Most importantly, adopt proactive habits like regular backups and updates to prevent future disk-related problems.
If you found this guide helpful or have additional tips to share, feel free to leave a comment below. Together, we can demystify disk management and keep our Macs running smoothly!


Donemax Data Recovery for Mac
Donemax Data Recovery for Mac is one of the best Mac data recovery software. It is easy-to-use and can help in recovering deleted, formatted, inaccessible or lost data from Mac HDD/SSD, external disk, USB drive, SD card, camera or other storage devices.
Related Articles
- Apr 29, 2025Fix ADATA External Hard Drive Not Detected/Not Recognized/Not Showing Up
- Dec 23, 20248 Solutions to Fix the 'com.apple.diskmanagement.disenter error 53249' on Mac
- Jun 25, 2025Deleted App Still Shows Up on Mac? Here's How to Fix It
- Feb 07, 2025SD Card Not Showing Up in Mac Finder? Fix It Now [7 Solutions]
- May 20, 2024Seagate Backup Plus External Hard Drive Not Showing Up on Mac, Fix It
- Nov 18, 2024Mac Not Charging, Fix It Now

Charles
Charles, who lives in Sydney, Australia, is an editor & writer of Donemax Team. He is good at writing articles related with Apple Mac computers, Windows operating systems, data recovery, data erasure, disk clone and data backup, etc. He loves reading and playing tennis in his spare time and is interested in testing new digital devices such as mobile phones, Macs, HDDs, SSDs, digital cameras, etc.

Gerhard Chou
In order to effectively solve the problems for our customers, every article and troubleshooting solution published on our website has been strictly tested and practiced. Our editors love researching and using computers and testing software, and are willing to help computer users with their problems
Hot Donemax Products

Clone hard drive with advanced clone technology or create bootable clone for Windows/Mac OS.

Completely and easily recover deleted, formatted, hidden or lost files from hard drive and external storage device.

Certified data erasure software - permanently erase data before selling or donating your disk or any digital device.
