Before we start: Donemax Data Eraser is one of the best disk wipe programs. It can securely and permanently erase data from internal drives or external storage devices on ASUS laptop. Once the data is erased, it is lost for good, cannot be recovered by any method.
PAGE CONTENT:
Wiping a hard drive is a critical step when selling, recycling, or troubleshooting your ASUS laptop. Whether you're ensuring that sensitive data is unrecoverable or performing a system reset, understanding the methods and tools to properly wipe your hard drive is crucial. This guide provides detailed steps for securely erasing data from your ASUS laptop, ensuring your personal information is safe and the device is ready for its next use.

Preparation Before Wiping Hard Drive on ASUS Laptop
Before you start wiping your ASUS laptop's hard drive, it's important to prepare adequately to avoid losing valuable data or facing issues during the process.
◾Backup Important Data
Make sure you backup all of your crucial files to a cloud storage account, external hard drive, or another secure location. Once the drive is wiped, recovering data is often impossible without professional tools. Disk cloning software can help you create full bootable clone backup for ASUS laptop.
◾Ensure Power Supply
Wiping a hard drive can be a time-consuming process. Connect your laptop to a power source to prevent interruptions.
◾Identify the Type of Drive
Check whether your ASUS laptop has a traditional HDD or an SSD. The type of drive influences the method used for wiping, as SSDs have different wiping requirements to avoid damaging the drive.
◾Choose the Wiping Method
Decide whether you want to:
- Perform a factory reset using built-in tools.
- Use a Windows feature like "Reset This PC" or Disk Management.
- Opt for third-party disk wipe software for a thorough wipe.
Methods to Wipe a Hard Drive on an ASUS Laptop
There are several methods available to wipe a hard drive, depending on your needs and technical comfort level. Here's a breakdown of the most common approaches.
Method 1. Factory Reset via ASUS Built-in Tools
Most ASUS laptops come with built-in tools to restore the system to factory settings. This method is straightforward and ideal for users who want to quickly wipe their drives and restore the laptop to its original state.
Steps to Perform a Factory Reset:
- Access Recovery Mode:
- Restart your ASUS laptop.
- Press and hold the F9 key or the relevant recovery key for your model during startup.
- Select the Windows Recovery Environment or similar option.
- Choose Factory Reset:
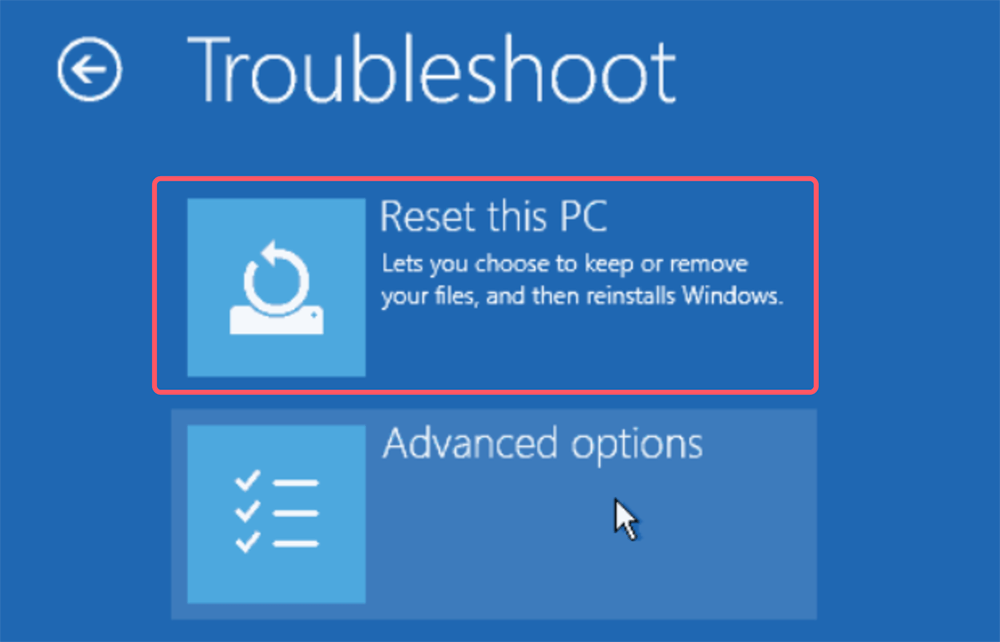
- Select Troubleshoot > Reset this PC.
![Choose Factory Reset]()
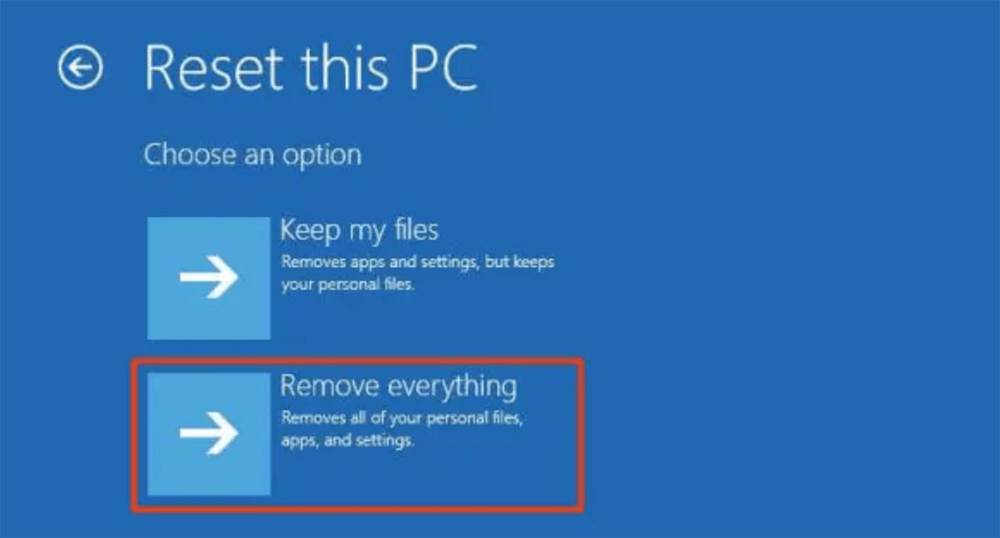
- Opt for either Keep my files (partial wipe) or Remove everything (complete wipe).
![Choose Factory Reset]()
- Select Troubleshoot > Reset this PC.
- Confirm and Start:
- Follow the on-screen prompts to initiate the reset process.
- Wait for the process to complete; this could take 30 minutes to several hours, depending on the size of the drive.
This method is convenient but doesn’t guarantee a secure data wipe, as some files may still be recoverable using advanced tools.
Method 2. Use Windows Built-in Features
Windows offers built-in tools for wiping hard drives, which are particularly useful for ASUS laptops running Windows 10 or 11.
1. Reset This PC Feature: This feature allows you to reset your laptop and erase all data.
Steps:
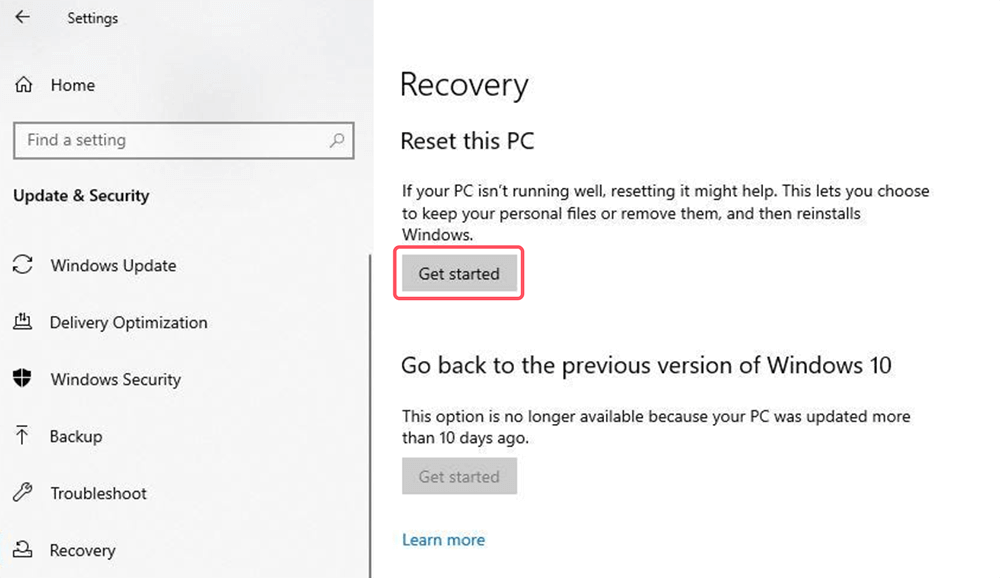
- Select Recovery under Settings > Update & Security.
- Select "Get started" under "Reset this PC."
![Reset This PC Feature]()
- Choose to delete everything.
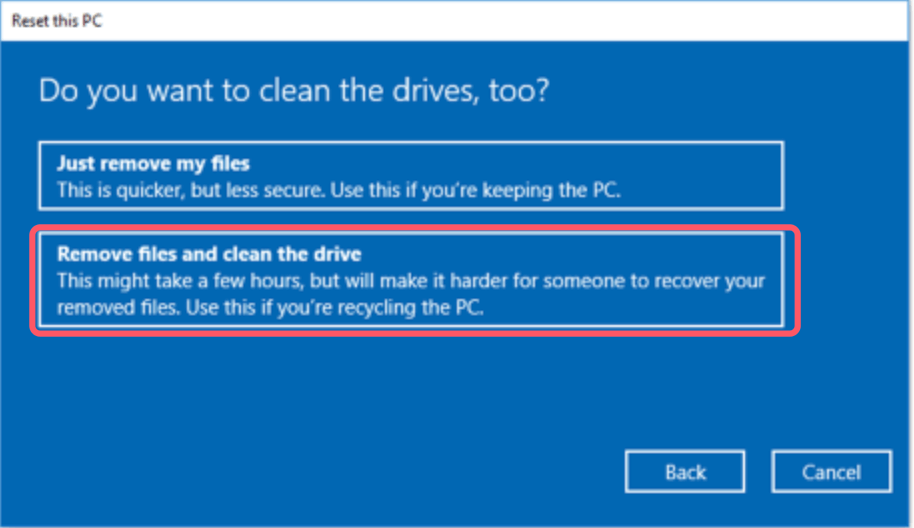
- Choose Remove files and clean the drive for a secure wipe.
![Choose Remove files and clean the drive]()
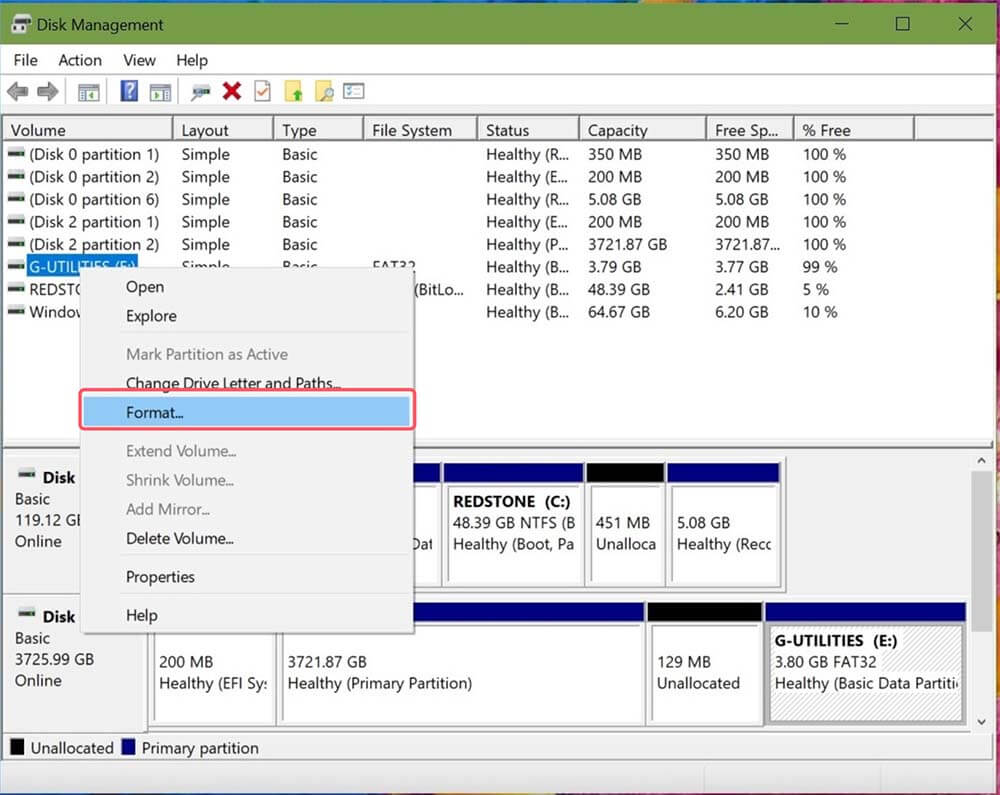
2. Disk Management: For advanced users, formatting the drive through Disk Management is an option.
Steps:
- Choose Disk Management by performing a right-click on the Start Menu.
- Find the drive that needs to be erased.
- Select Format with a right-click on the drive.
![Disk Management]()
- Check the box labeled "Perform a quick format" and choose either NTFS or exFAT as the file system.
3. Using BitLocker (for encrypted drives): If your laptop has BitLocker encryption enabled:
- Decrypt the drive first using the BitLocker settings.
- Proceed with a reset or format as described above.
While these methods are user-friendly, they might not securely erase all data from the drive.
Note: The formatted data or lost data is not lost for good and can be recovered by data recovery software. To permanently erase data from your ASUS laptop, just try disk wipe software.
Method 3. Using Third-Party Software
When you need a thorough wipe that guarantees no residual data is recoverable, third-party software offers a robust solution. These tools are especially effective when selling or donating your ASUS laptop and need an added layer of security. Unlike built-in tools, third-party options often provide additional features, like multiple overwrites or tailored methods for SSDs and HDDs.
Why Use Third-Party Disk Wipe Software?
Built-in tools like factory reset or Windows features are convenient but may not fully erase sensitive data. Even after resetting, skilled professionals or hackers could use recovery software to retrieve deleted files. Third-party software addresses this issue by:
- Overwriting the entire disk multiple times (in some cases, using Department of Defense (DoD) standards).
- Ensuring SSDs are securely wiped without causing wear damage, thanks to TRIM and secure erase commands.
- Providing visual reports confirming the success of the wiping process.
Recommended Software Options:
1.Donemax Data Eraser
It is one of the best disk wiping programs which offers certified data erasure standards including U.S. Army AR380-19, DoD 5220.22-M ECE, NIST, etc. It can securely wipe hard drive on ASUS laptop and permanently erase all data from the drive, beyond the scope of data recovery.
Step 1. Download and install Donemax Data Eraser on your ASUS laptop.
Step 2. Open Donemax Data Eraser, choose Erase Hard Drive mode, then select the target hard drive, click on Erase Now button.
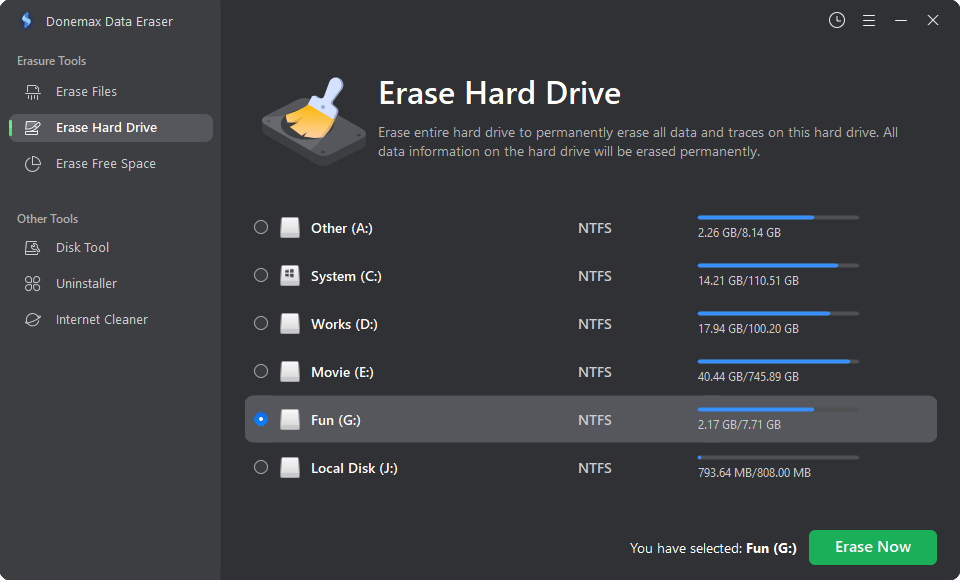
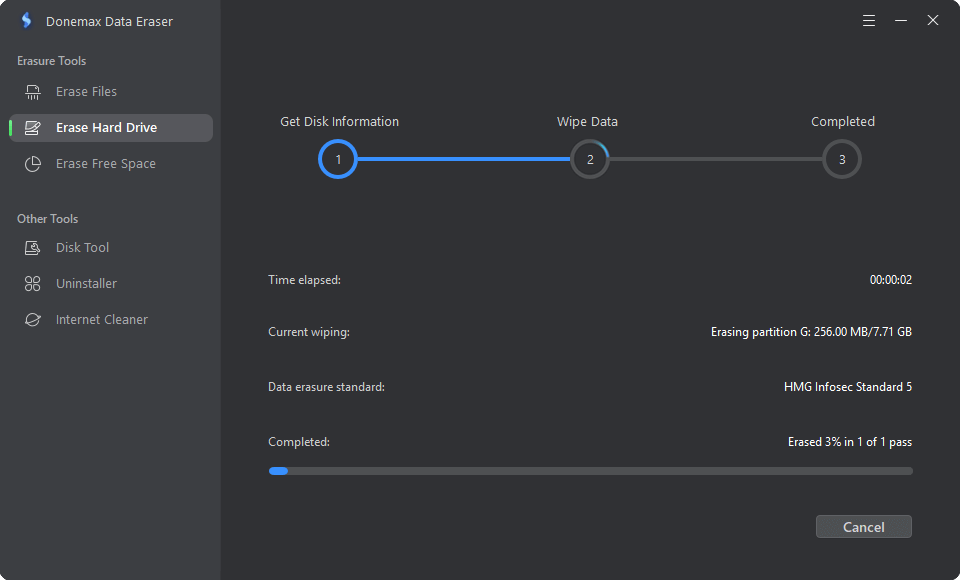
Step 3. It will securely and permanently erase all data from the hard drive, no data is recoverable.
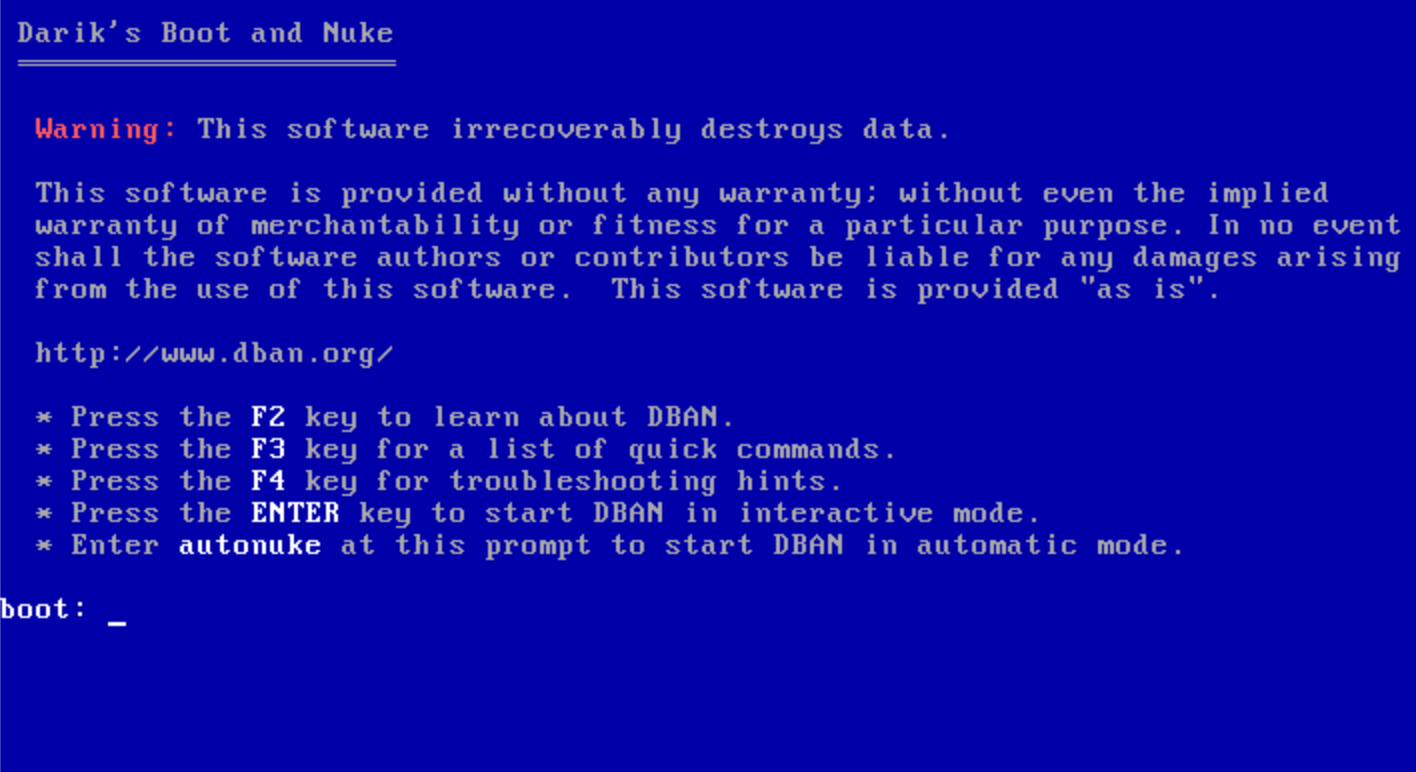
2.DBAN (Darik's Boot and Nuke)
Best for: HDDs requiring complete erasure with military-grade standards.
Features:
- Free and open-source.
- Multiple overwriting algorithms (e.g., Gutmann, DoD Short).
Steps to Use DBAN:
- Download the DBAN ISO file from its official website.
- Create a bootable USB drive using Rufus or similar tools.
- Restart your ASUS laptop and enter BIOS/UEFI by pressing F2 or DEL during boot.
- Set the USB drive as the primary boot option.
- Follow DBAN’s text-based interface to select the drive and wipe it securely.
![Steps to Use DBAN]()
- Wait for the process to finish and verify the report generated by DBAN.
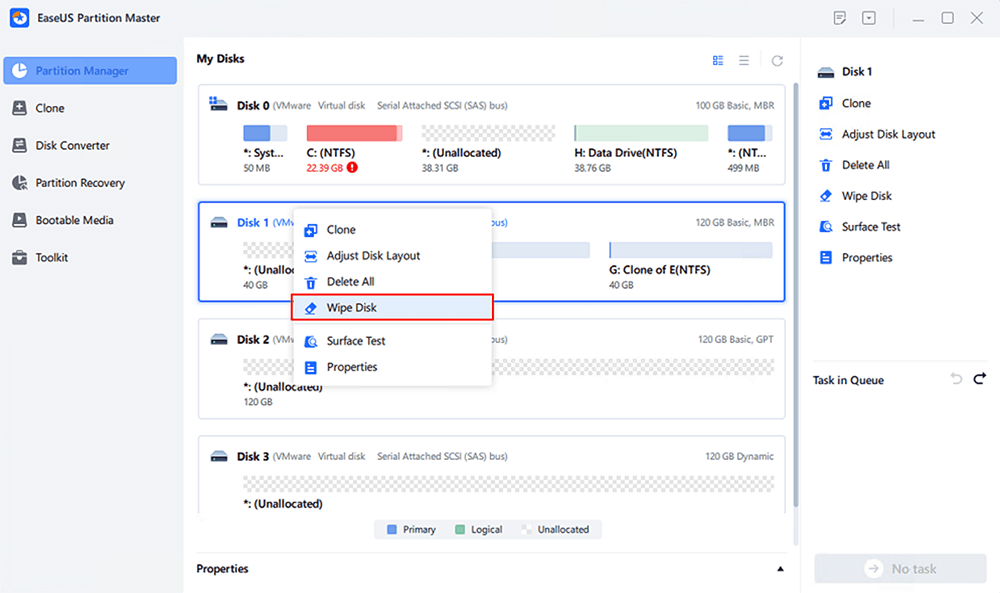
3.EaseUS Partition Master
Best for: Both HDD and SSD users who need an intuitive interface.
Features:
- Paid and free versions available.
- Partition management and advanced secure erase tools.
Steps to Use EaseUS Partition Master:
- Download and install EaseUS Partition Master on your ASUS laptop.
- Launch the application and select the hard drive you wish to wipe.
- Use the Wipe Disk option and choose the number of passes (the more passes, the more secure).
![Steps to Use EaseUS Partition Master]()
- Start the process and monitor the progress.
- Once complete, use the included verification tools to confirm a successful wipe.
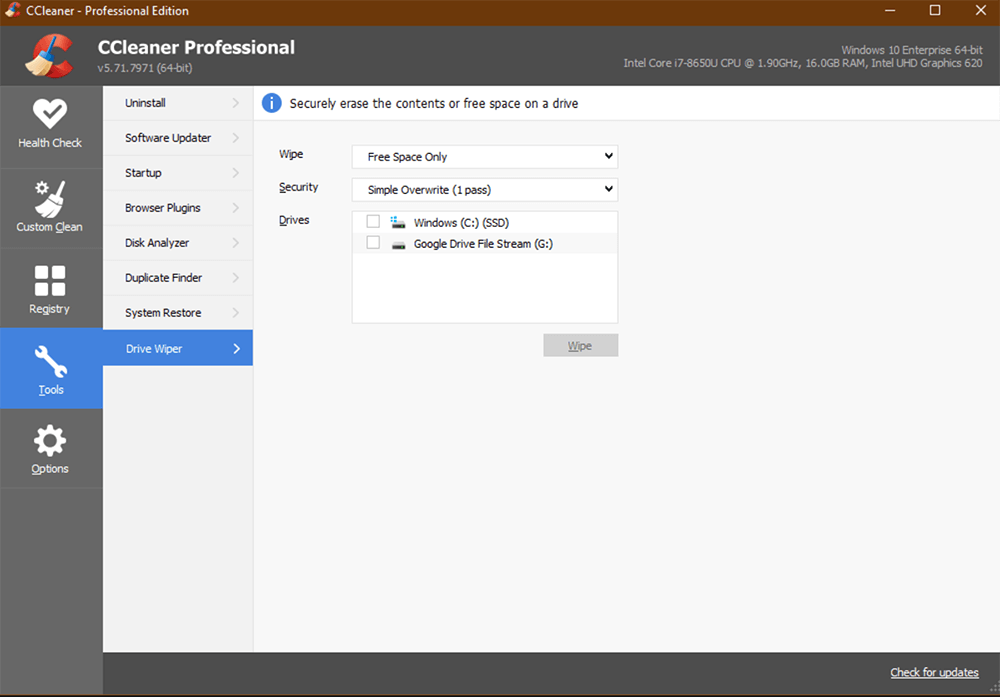
4.CCleaner Drive Wipe
Best for: Basic users seeking quick and straightforward disk erasure.
Features:
- Built-in free space wiping option to remove traces from deleted files.
- Customizable data overwrite levels (e.g., 1, 3, or 7 passes).
Steps to Use CCleaner Drive Wipe:
- Download and install CCleaner on your ASUS laptop.
- Go to the Tools section and select Drive Wiper.
![Steps to Use CCleaner Drive Wipe]()
- Choose Entire Drive for a full wipe.
- Select the overwrite level (1-pass is quicker but less secure; 7-pass ensures maximum security).
- Start the process and wait for CCleaner to complete.
Special Considerations for SSDs:
SSDs require special attention during the wiping process because of their architecture. Unlike HDDs, SSDs use flash memory and a process called wear leveling, which distributes data across memory cells. Overwriting SSDs repeatedly can reduce their lifespan.
To securely erase an SSD:
- Use the SSD manufacturer's software, such as:
- Samsung Magician for Samsung drives.
- Crucial Storage Executive for Crucial SSDs.
- Intel SSD Toolbox for Intel drives.
- Donemax Data Eraser for all SSDs.
- Enable the Secure Erase or Sanitize function in the software. This method uses commands like TRIM, which ensures all data is erased at the block level without excessive wear.
- Verify that the SSD supports hardware encryption. If so, resetting the encryption key renders all existing data irretrievable without physically overwriting the drive.
Choosing the Right Tool for Your Needs:
- For basic users: Start with tools like Donemax Data Eraser, CCleaner Drive Wipe or EaseUS Partition Master, which offer user-friendly interfaces.
- For advanced users: DBAN provides powerful, detailed options for secure erasure, but its interface might be intimidating for beginners.
- For SSD owners: Stick to manufacturer-recommended tools or software with SSD-specific wiping support (such as Donemax Data Eraser) to avoid damage.
Tips for Effective Use:
- Double-check the drive: Ensure you're wiping the correct drive to avoid accidentally erasing a secondary or external drive.
- Follow up with verification: Use recovery tools like Donemax Data Recovery to ensure no data remains recoverable after the wipe.
- Monitor the process: Don't interrupt the wiping process, as this can lead to incomplete erasure or drive corruption.
By using third-party software, you can achieve a more thorough and secure data wipe, ensuring your sensitive information stays safe from recovery attempts.
Wiping and Reinstalling the Operating System
After wiping your hard drive, you might want to reinstall the operating system to make the laptop functional again.
Creating a Bootable USB Drive:
To reinstall Windows or another OS:
- Download the installation file (ISO) from the official website (e.g., Microsoft for Windows).
- Make a bootable USB drive with a program like Rufus.
- Insert the USB into your ASUS laptop and boot from it.
Installing the Operating System:
- Follow the on-screen instructions to install the OS.
- Partition the hard drive as needed during installation.
- Complete the setup and install necessary drivers for optimal performance.
Troubleshooting Common Issues
Sometimes, you may encounter issues during the wiping process. Here are some common problems and their solutions:
Hard Drive Not Detected:
- Check the BIOS/UEFI settings to ensure the drive is recognized.
- Confirm that the drive is properly connected (if accessible).
BIOS/UEFI Configuration Problems:
- Reset BIOS to default settings if you face boot issues.
- Update the BIOS firmware from ASUS's official website if needed.
Incomplete Wipe:
- Use advanced third-party disk wipe software to overwrite the drive multiple times, ensuring no data remnants remain.
Best Practices for Data Security
When wiping a hard drive, it's essential to ensure the process is secure to prevent data recovery by malicious actors.
Verify a Secure Wipe:
Use tools like Donemax Data Recovery or Disk Drill to check if any data is recoverable after wiping. If files are still present, repeat the process using a more secure method.
Proper Disposal of Drives:
If you're not planning to reuse the drive, consider physically destroying it or sending it to a certified recycling center.
Conclusion
Wiping the hard drive of your ASUS laptop is an essential step to secure your data before selling, recycling, or repurposing the device. Whether you choose the built-in tools, Windows features, or advanced third-party disk wipe software (such as Donemax Data Eraser), understanding the process ensures you select the right method for your needs.
By following the steps outlined in this guide and adhering to best practices for data security, you can confidently wipe your ASUS laptop's hard drive, knowing your personal information is safe. Remember, data security starts with careful preparation and the right tools.


Donemax Data Eraser
One of the best data erasure programs for permanently erase data from PC, Mac, HDD, SSD, USB drive, digital camera and other devices. Once the data is erased, it is lost for good, cannot be recovered by any method.
Related Articles
- Jan 08, 2024What Is Drive Eraser or Drive Wiper for Windows?
- Mar 04, 2024Blancco Drive Eraser Review: Pros, Cons, Alternatives, How To Use It
- May 26, 2024Wipe Old Hard Drive After Cloning It to SSD
- Dec 13, 20242025 Comprehensive Guide: Introduction to Data Erasure Standards
- Apr 09, 2024Why Can't Erase DVD/CD?
- Jun 25, 2023What to do before selling old hard drive on Windows or Mac

Steven
Steven has been a senior writer & editor of Donemax software since 2020. He's a super nerd and can't imagine the life without a computer. Over 6 years of experience of writing technical solutions and software tesing, he is passionate about providing solutions and tips for Windows and Mac users.

Gerhard Chou
In order to effectively solve the problems for our customers, every article and troubleshooting solution published on our website has been strictly tested and practiced. Our editors love researching and using computers and testing software, and are willing to help computer users with their problems
