PAGE CONTENT:
Apple File System (APFS) is a modern file system introduced by Apple in 2017 with macOS High Sierra, replacing the aging HFS+ format. APFS offers several advantages such as better space management, improved data integrity, faster file access, and support for larger drives. One of the key features of APFS is its ability to manage multiple volumes within the same container, offering seamless data sharing without requiring separate partitions. Adding an APFS volume on Mac is an efficient way to allocate space for different tasks, software, or operating systems without the hassle of creating new partitions.
In this guide, we will take you step by step through the process of adding an APFS volume on a Mac, explain why you might want to do so, and provide best practices to optimize your experience with the file system.
What is APFS and Why Use It?
Before diving into the technical steps, it's essential to understand the reasons behind using APFS volumes. APFS is optimized for solid-state drives (SSDs) and flash memory, but it also works on traditional hard drives. It offers:
- Space efficiency: APFS dynamically allocates storage space between volumes as needed. Unlike traditional partitions where you manually allocate space, APFS allows multiple volumes to share the free space within a container. This means you don't have to worry about running out of space in one volume while having extra space in another.
- Improved data integrity: APFS uses strong encryption and copy-on-write metadata, which helps protect your data during crashes or power outages.
- Snapshots: You can create snapshots of your entire system at different times, making it easier to restore your system to a previous state without needing a full backup.
- File cloning and fast directory sizing: APFS allows for almost instantaneous file duplication by merely pointing to the same data blocks until changes are made. It also calculates directory sizes more efficiently than HFS+.
Given these benefits, many users opt to create multiple APFS volumes within the same APFS container for different purposes. For example, you can create a separate volume for a macOS beta installation, a dedicated volume for work, or one for personal files and applications.
Differences Between APFS Containers and Volumes
Before proceeding, it's crucial to differentiate between APFS containers and volumes. An APFS container is the main storage area, essentially a partition in macOS's Disk Utility that houses one or more volumes. On the other hand, an APFS volume is a virtual disk inside the container, sharing the container's storage space with other volumes.
For instance, you can think of an APFS container as a large hard drive, and the volumes inside it as different folders or virtual drives that pull from the total available storage.
The beauty of APFS is that each volume doesn't need a fixed amount of space; instead, they share the storage dynamically. As one volume requires more space, it can take from the shared pool, provided another volume isn't using it.
Now that we understand the foundation, let's move on to the steps to add an APFS volume on your Mac.
Step-by-Step Guide to Adding an APFS Volume
Adding an APFS volume is a simple process using macOS's built-in Disk Utility tool. The steps below will guide you through the process, whether you are using macOS High Sierra or a newer version.
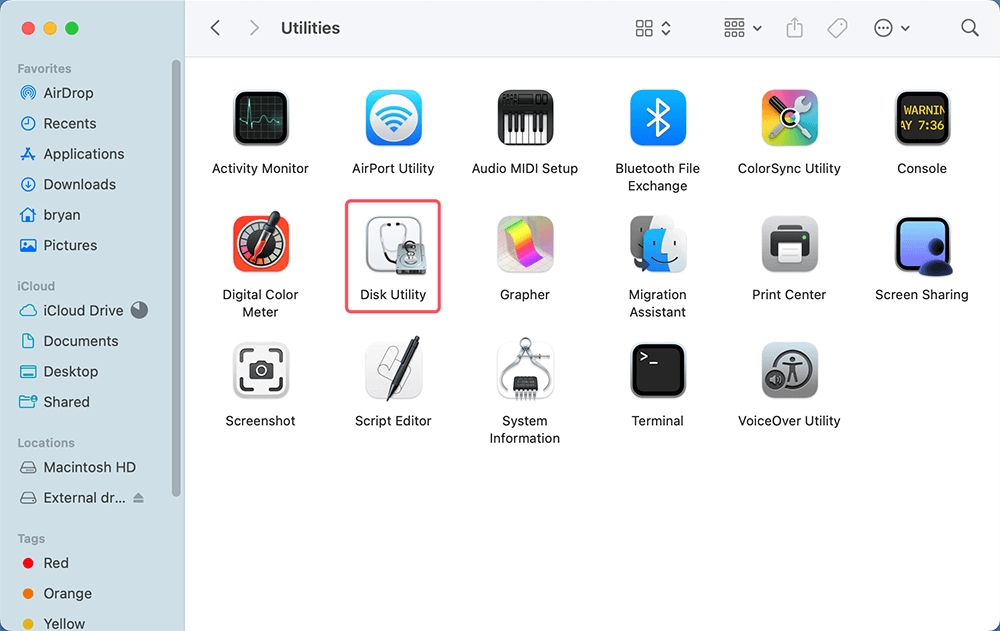
Step 1: Open Disk Utility
Start by launching Disk Utility. You can find this app by either:
- Typing “Disk Utility” into Spotlight (press Command + Space).
- Going to Utilities via Applications.
![Open Disk Utility]()
Once the app is open, you'll see a list of all your connected drives and partitions on the left-hand side.
Step 2: Select Your APFS Container
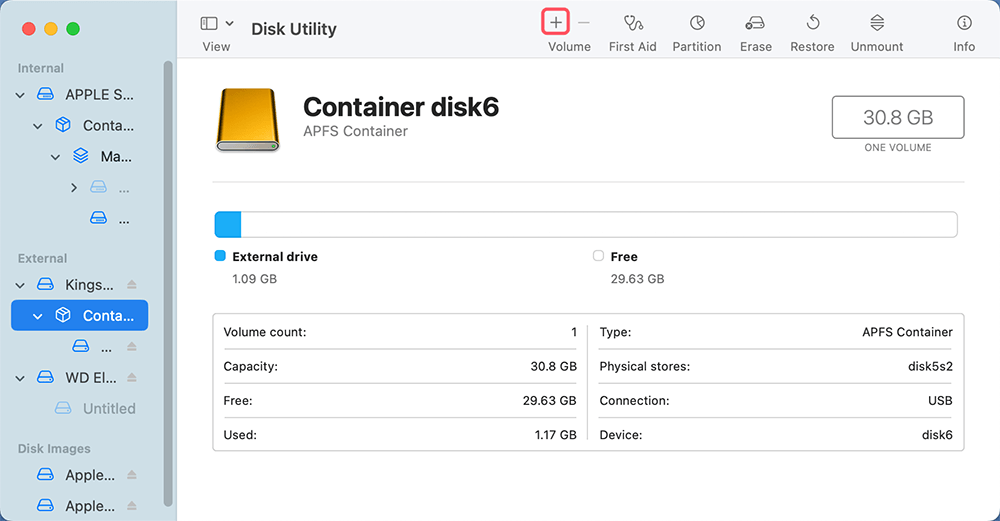
In the Disk Utility sidebar, locate and select the APFS container in which you want to add the new volume. If you already have an APFS volume created on your internal drive, the container should be labeled as something like "Apple SSD," followed by its name. You also can add a new APFS volume on external storage devices.
You'll notice that underneath the container, your existing APFS volumes will be displayed.
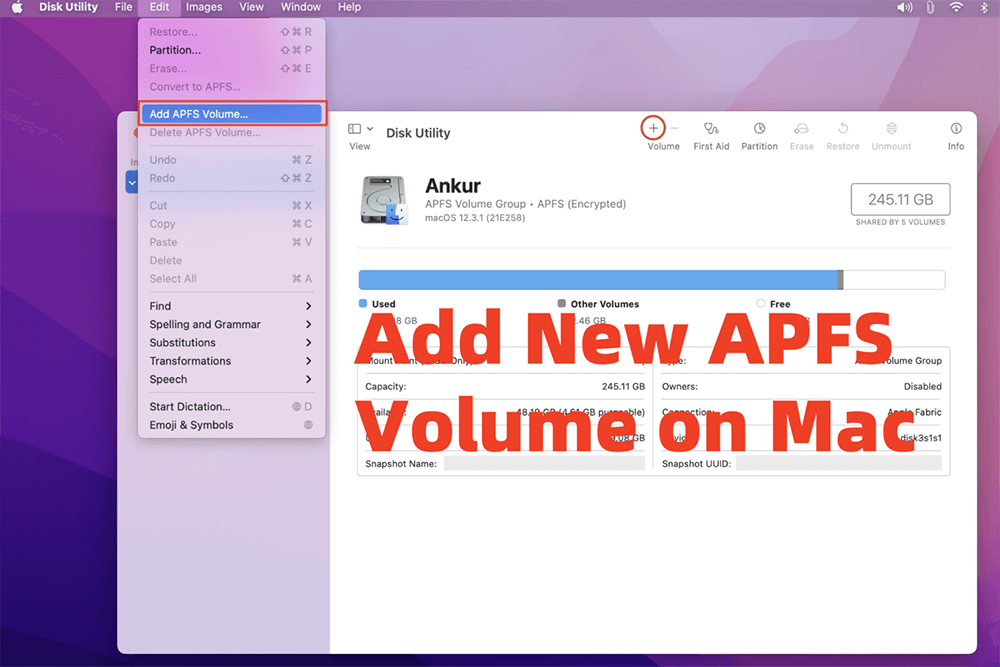
Step 3: Add a New APFS Volume
After selecting the container, click on the “+” icon, or the "Add Volume" button, located in the toolbar at the top of Disk Utility. This opens a window prompting you to name your new volume and select the format.
Step 4: Name and Format the Volume
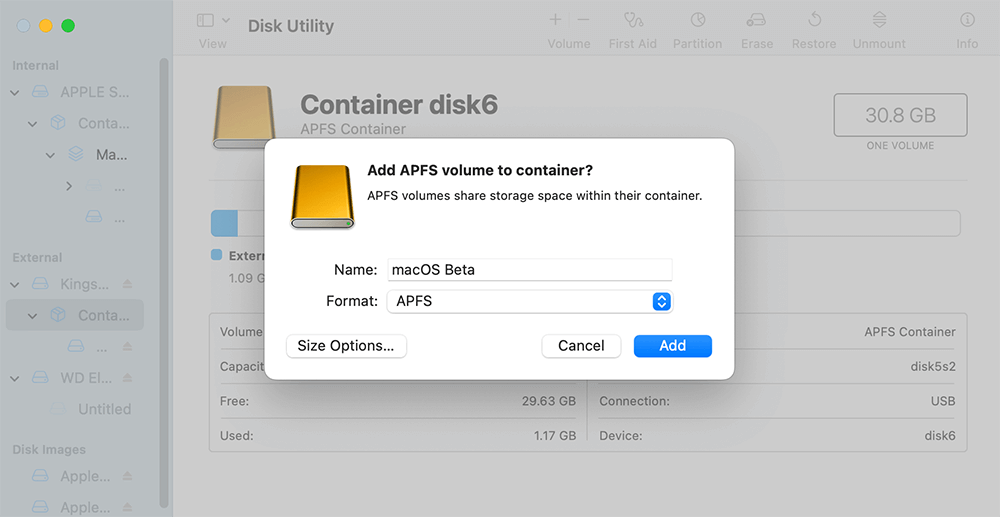
- Naming: In the dialogue box that appears, type in a name for your volume. Choose something that makes it easy to identify. For example, if you are creating a new volume to install a macOS beta version, you can name it "macOS Beta".
- Format: Ensure that the format is set to APFS. There are a few different options under the APFS format that you may encounter:
- APFS: The standard option suitable for most users.
- APFS (Encrypted): If you want to encrypt the volume for added security, select this option. You'll be prompted to enter a password.
- APFS (Case-sensitive): Choose this if you want the volume to distinguish between files with the same name but different letter cases (e.g., “file” and “File” would be considered different).
- APFS (Case-sensitive, Encrypted): This combines both encryption and case-sensitivity.
Choose the format that best suits your needs.
Step 5: Adjust the Quota (Optional)
APFS allows you to set a quota for your volume if desired. While APFS volumes dynamically share space, you can limit the maximum space a volume can use by setting a Quota. This can be useful if you want to reserve specific amounts of space for other volumes or ensure that one volume doesn't consume all available storage.
Step 6: Create the Volume
Once you've filled out the necessary details, click Add. The new volume will appear in Disk Utility under the APFS container. It's now ready to be used.

You can start copying files to the volume or use it for specific applications like a macOS beta installation or other tasks that require separate storage space.
Managing APFS Volumes
Resizing APFS Volumes
One of the primary benefits of APFS volumes is their dynamic resizing ability. Volumes within an APFS container share storage space, which eliminates the need to manually resize volumes. However, there are scenarios where you may need to adjust the storage behavior of a particular volume.
If you wish to adjust the space between volumes manually, you can:
- Go to Disk Utility and select the volume you want to modify.
- Right-click and choose Get Info to see how much space each volume is using and how much remains in the container.
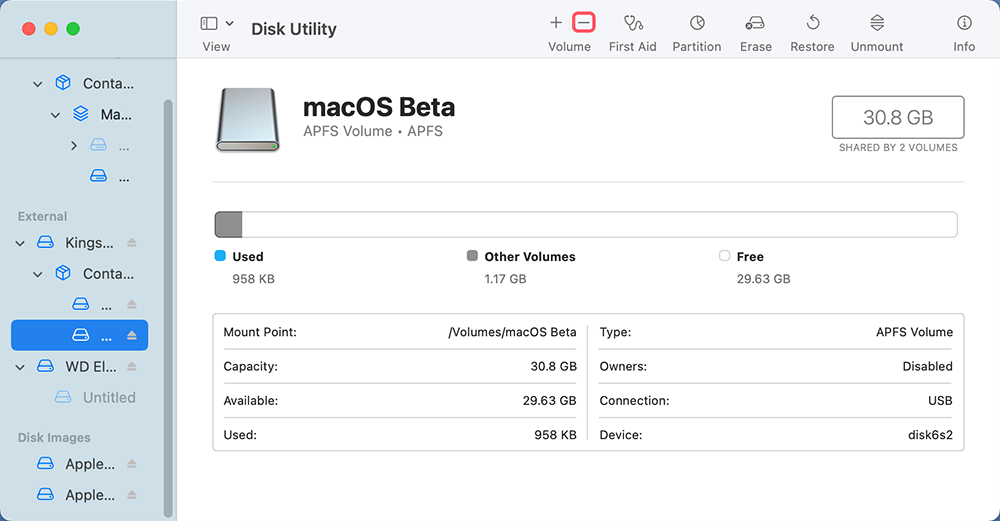
- If needed, delete unneeded volumes by selecting them and clicking the “-” icon.
![Resizing APFS Volumes]()
Deleting an APFS Volume
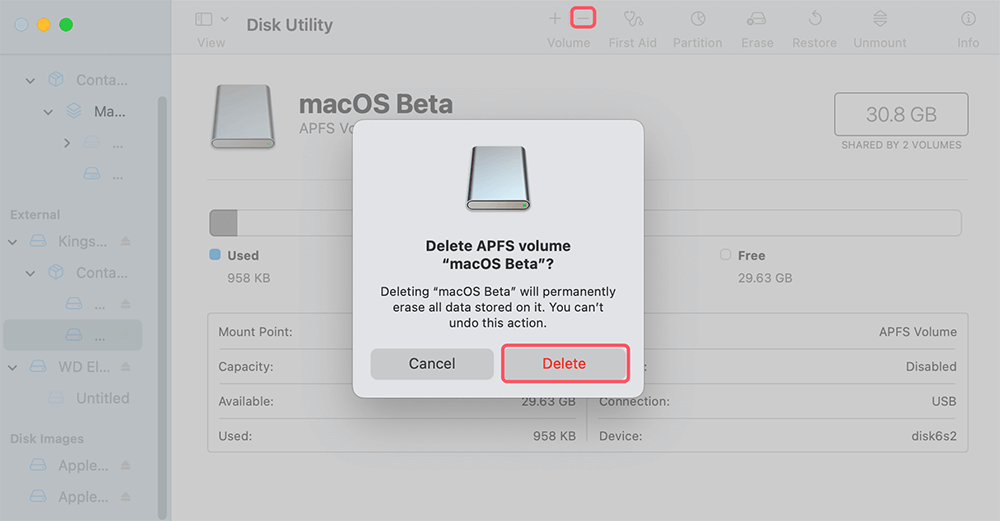
To delete an APFS volume, follow these steps:
- Select the volume in Disk Utility.
- Click the "-" button in the toolbar.
![Deleting an APFS Volume]()
- Confirm that you want to delete the volume. Be careful - this will permanently erase all data on the volume.
Renaming an APFS Volume
If you want to change the name of your APFS volume after creation, you can do so without affecting any data:
- Open Disk Utility and select the volume from the list.
- Right-click the volume and select Rename.
![Renaming an APFS Volume]()
- Type the new name and press Enter.
Note: If you lost data due to erasing or deleting APFS volumes on your Mac, just use Mac data recovery software to scan the original disk and get the lost data back.
Common Use Cases for Adding APFS Volumes
The flexibility of APFS volumes makes them perfect for a variety of scenarios. Here are a few common use cases where adding an APFS volume can be highly beneficial:
1. Installing a macOS Beta Version
If you want to try out the latest macOS beta, adding a new APFS volume allows you to install and test the new operating system without interfering with your primary setup. This way, you can switch between the stable macOS version and the beta seamlessly.
2. Separating Personal and Work Data
If you use your Mac for both personal and work purposes, you might prefer to keep your files, applications, and settings separate. Creating two APFS volumes - one for work and one for personal use - ensures better organization and separation of data without needing external drives.
3. Testing New Software or Features
Adding an APFS volume can be useful if you're a developer or tech enthusiast who needs a separate environment to test software. You can keep your main volume unaffected while having a dedicated space for experiments or development.
4. Organizing Large Media Libraries
For those who manage extensive photo, video, or music libraries, having separate APFS volumes for different types of content can help with organization. You can allocate a separate volume for your photo library, video editing projects, or music collection, ensuring that these files don't overwhelm your main system volume.
Troubleshooting Tips
Sometimes, issues may arise while working with APFS volumes. Here are a few common problems and how to fix them:
1. APFS Volume Doesn't Appear
If your new volume doesn't appear in Finder, ensure that you've selected Show All Devices in Disk Utility. This will display all containers and volumes in the left-hand panel.

2. Running Out of Space
If one volume is running low on space, check other volumes within the same container to see if they're using up more than needed. You can manually remove unnecessary files or adjust volume quotas.
3. Encryption Issues
If you've encrypted a volume and forgotten the password, there's unfortunately no way to recover it without erasing the volume. Make sure to store your encryption password securely when creating an encrypted APFS volume.
Conclusion
Adding an APFS volume on a Mac is a straightforward process that allows you to better manage your storage and organize your files. Whether you're installing a macOS beta, testing software, or separating work and personal data, the dynamic storage-sharing feature of APFS makes it easier than ever to create and manage multiple volumes within the same container. By following the steps outlined in this guide, you'll be able to add and manage APFS volumes efficiently and optimize your Mac's storage system.
Whether you're a seasoned Mac user or a beginner, learning how to work with APFS volumes will undoubtedly enhance your productivity and organization on macOS.


Donemax Data Recovery for Mac
Donemax Data Recovery for Mac is one of the best Mac data recovery software. It is easy-to-use and can help in recovering deleted, formatted, inaccessible or lost data from Mac HDD/SSD, external disk, USB drive, SD card, camera or other storage devices.
Related Articles
- Jan 14, 2025Convert GPM (GUID Partition Map, GPT) Disk to MBR (Master Boot Record) on Mac
- Nov 18, 2025How to Format an External Hard Drive Using CMD (Command Prompt)?
- Oct 09, 2025External Hard Drive/USB Drive Not Readable on macOS Tahoe, Fix It
- Jun 18, 20253 Methods to Format ExFAT to NTFS?
- Jul 10, 2025Convert RAW Drive to ExFAT or FAT32 Without Losing Data
- Jun 25, 2024Fix LaCie Hard Drive Not Mounting on Mac

Lucien
Lucien is a writer and a chief programmer of Donemax software who has worked in the company for 5+ years. He has written much of the content on the site and devotes to providing troubleshooting and solution for Windows and Mac users including disk cloning, data recovery, migration, eraser, error fixes.

Gerhard Chou
In order to effectively solve the problems for our customers, every article and troubleshooting solution published on our website has been strictly tested and practiced. Our editors love researching and using computers and testing software, and are willing to help computer users with their problems
