Written byChristinaUpdated on Jun 25, 2024
Fix LaCie Hard Drive Not Mounting on Mac
Approved byGerhard Chou
PAGE CONTENT:
LaCie hard drives are popular with Mac users because they work well, have a lot of space, and look good. But having problems with a LaCie drive not sticking on a Mac can be annoying and scary, especially if it has important data. If a drive fails to connect, it can't be accessed, which can mess up work and cause data loss. The goal of this guide is to give you a complete set of steps to fix LaCie Drive Not Mounting on Mac problem.
We cover everything, from simple things like making sure the physical connections are correct and trying with different ports to more complex issues that involve Disk Utility, Terminal commands, and data recovery choices. By doing these steps, you can figure out what's wrong and fix it, giving you back access to your important files and ensuring everything works fine.
LaCie External HDD/SSD Not Mounting on Mac?
If a LaCie hard drive doesn't mount on your Mac, it doesn't appear in Finder. You can't use the drive to move files or make backups. Several things, such as physical damage, program conflicts, or damaged file systems, can lead to this problem.
👉Preliminary Checks
Check the Physical Connections
The first thing you should do to fix the problem is ensure that the connections between your LaCie hard drive and your Mac are safe.
- USB/Thunderbolt Cable: Ensure the cord is securely attached to the drive and your Mac. A loose connection can sometimes make it impossible to place the drive.
- Power Supply: If your LaCie drive needs an external power source, ensure it is connected correctly and the power light is on.
Try a Different USB/Thunderbolt Port
The problem might be with the port you are using sometimes. To rule out problems with the port, connect your LaCie hard drive to a different USB or Thunderbolt port on your Mac.
Test with Another Computer
Connect the drive to a different computer to see if the issue is only with your Mac or the LaCie drive. A problem with your Mac is most likely to blame if it mounts right on another computer.
Fix LaCie Drive Not Mounting on Mac
👉#1 Check Disk Utility
Mac OS has a Disk Utility tool to help you control your drives and fix problems.
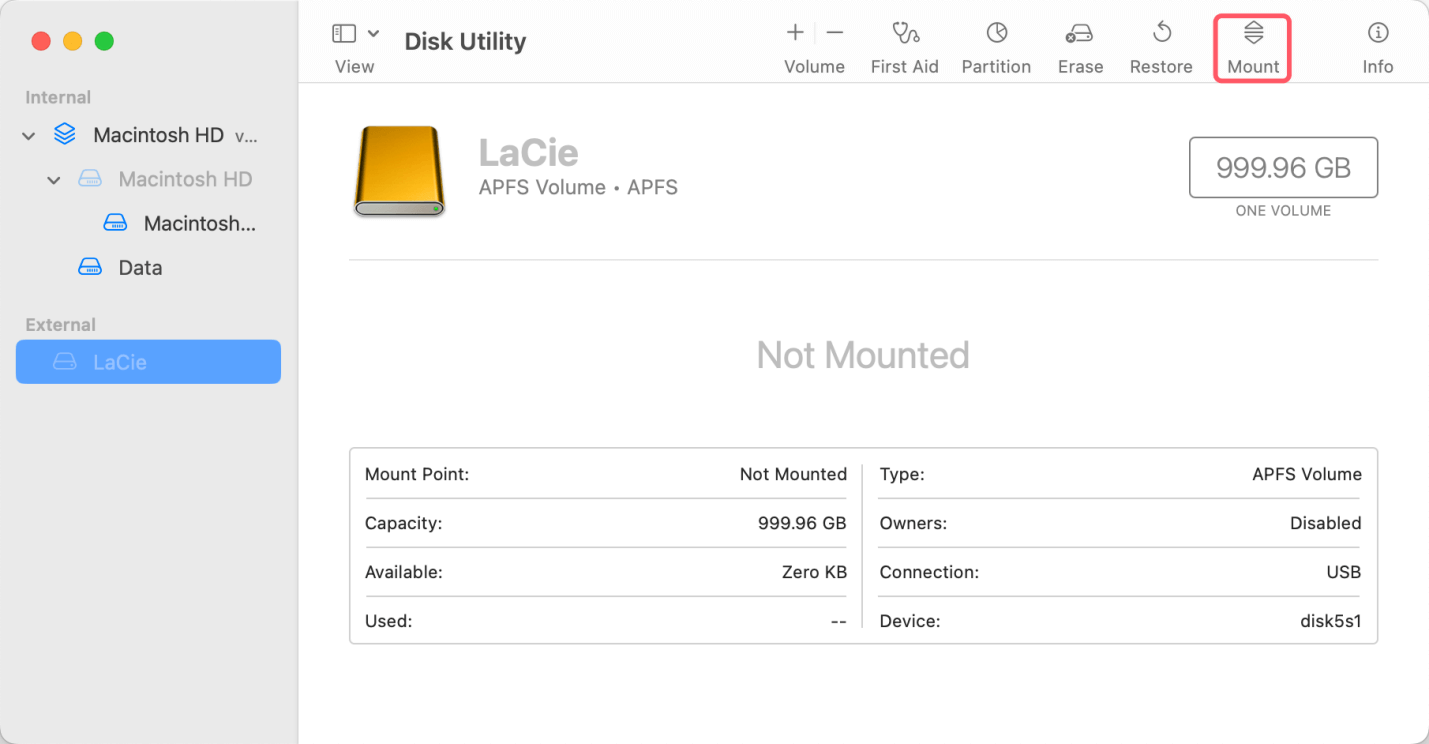
- Open Disk Utility: Disk Utility is in the "Apps > Utilities folder."
- Locate Your Drive: Find your LaCie drive in the list on the left. If it shows up but isn't mounted, you can try to mount it by hand by choosing the drive and hitting the "Mount" button.
![Check Disk Utility]()
👉#2 Run First Aid in Disk Utility
If you can see your LaCie drive in Disk Utility, but it still won't mount, running First Aid might help fix the problem.
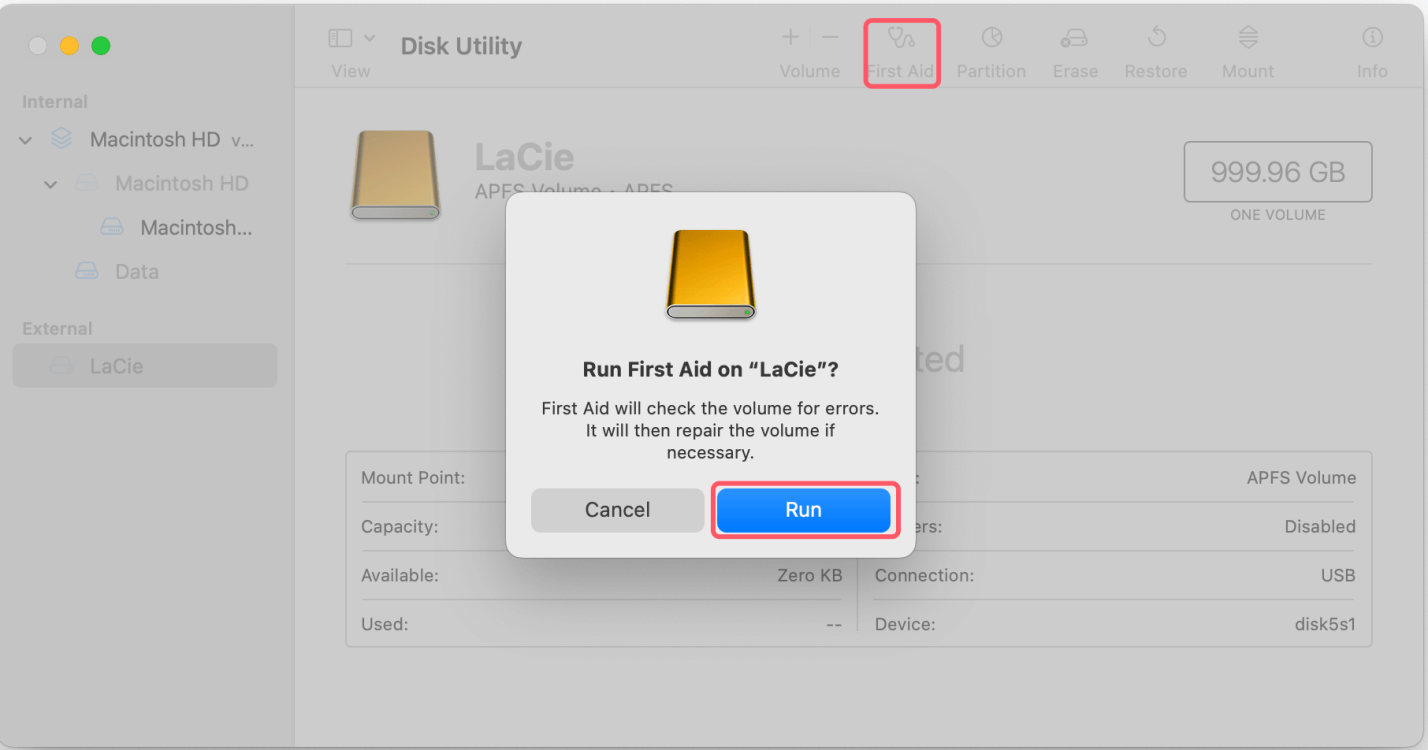
- Select the Drive: You can find your LaCie drive in Disk Utility.
- Run First Aid: Select the "First Aid" button and click "Run." This process will look for disk problems and try to fix them.
![Run First Aid in Disk Utility]()
👉#3 Reset NVRAM/PRAM/SMC
NVRAM or PRAM (Parameter RAM) is a type of memory that doesn't lose its data when you turn off your Mac. Sometimes, mounting problems can be fixed by resetting it.
- Turn Off Your Mac: Completely shut down your Mac.
- Press and hold the keys to turn it on: As soon as your Mac turns on, hold down the Command, Option, P, and R keys.
- Release the Keys: Press and hold the keys for 20 seconds, then let go. Your Mac will start up again.
The System Management Controller (SMC) controls your Mac's hardware. Resetting it might help if the hardware is having problems.
- Turn Off Your Mac: Shut down your Mac.
- Unplug and Reconnect Power: Take the power charger out of your MacBook and then plug it back in. Take the power cord from your desktop Mac and plug it back in.
- Reset SMC: For MacBooks with batteries that can't be taken out.
- Hold down the power button and the Shift, Control, and Option keys on the left side of the computer at the same time for 10 seconds. Then let go.
- For Desktop Macs: Remove the power line, wait 15 seconds, then put it back in and wait 5 seconds more. Then, turn it on.
👉#4 Change macOS Drive Finder Settings
Users of macOS can choose to show or hide external devices on the desktop and in the Finder menu. Disk Utility may show that your drive is mounted, which could be the problem. To get to these choices, follow these steps:
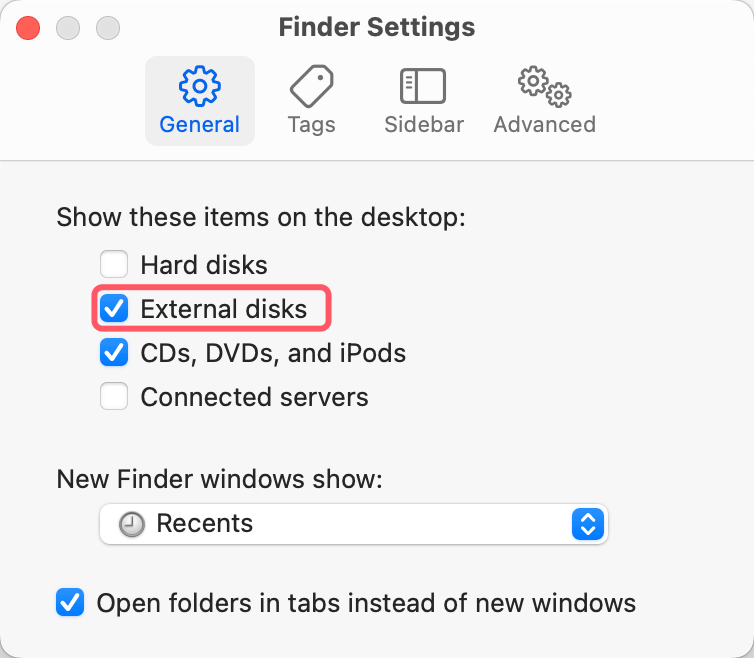
Step 1: Startup Finder. Select Finder > Settings from the Apple menu bar.
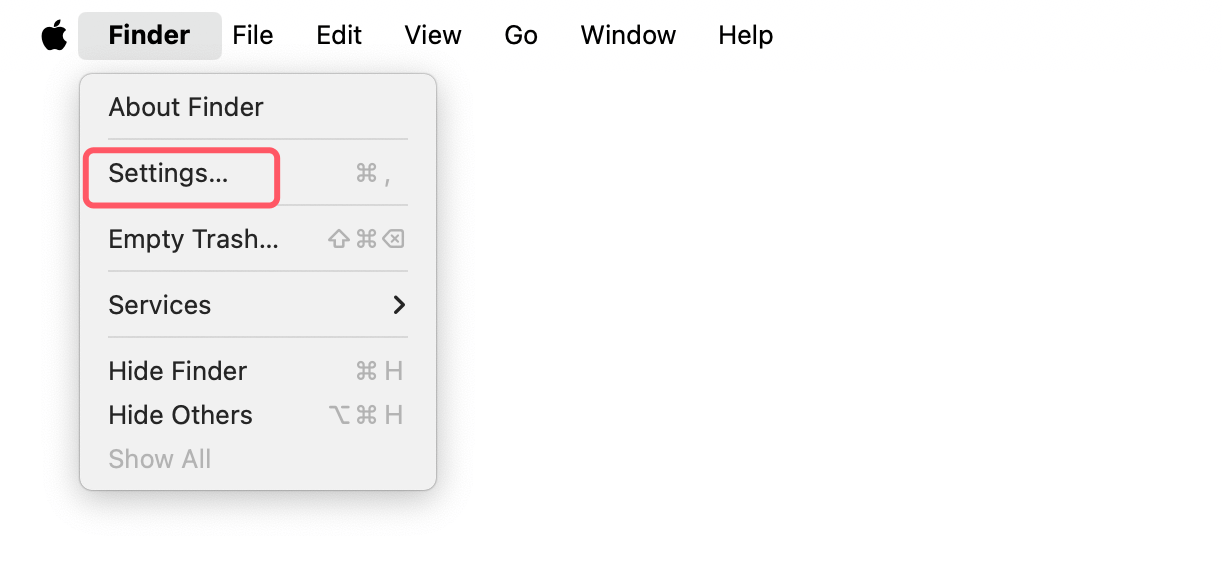
Step 2: Check the box next to "External disks" on the "General" tab.
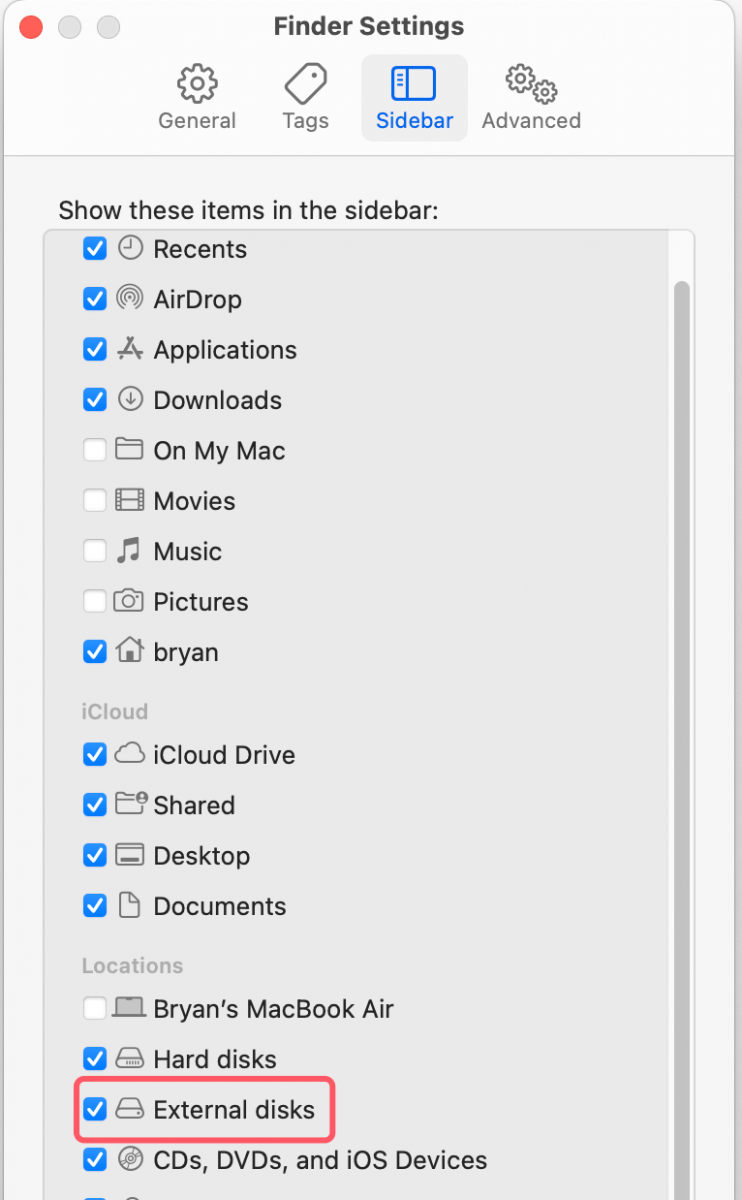
Step 3: On the "Sidebar" tab, check the box next to "External disks" under "Locations."
👉#5 Mount NTFS LaCie Drive on Mac
If the LaCie external hard drive has been formatted to NTFS, it may not mount on your Mac, here are two solutions to fix this issue:
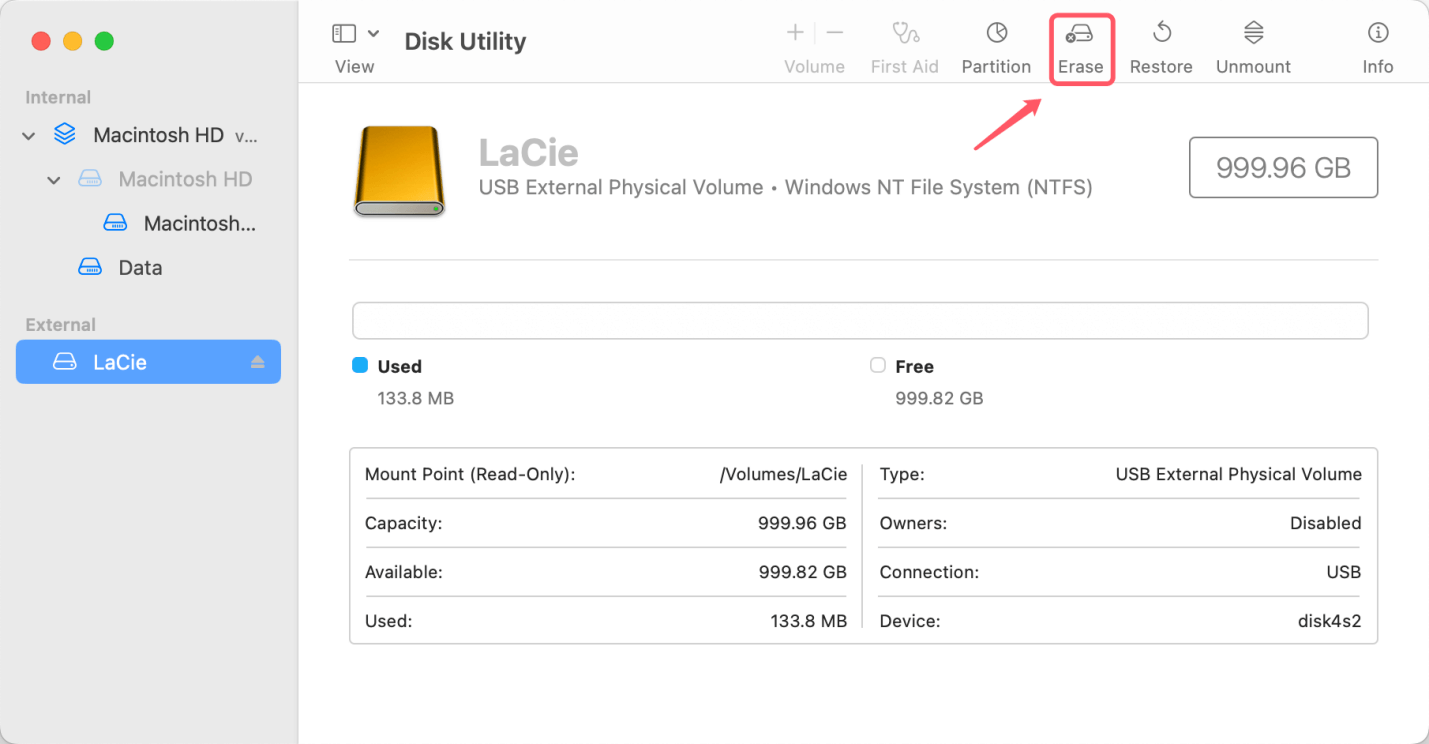
1. Erase the LaCie Drive to Mac-compatible File System.
Open Disk Utility, select the LaCie external hard drive, click on Erase button.
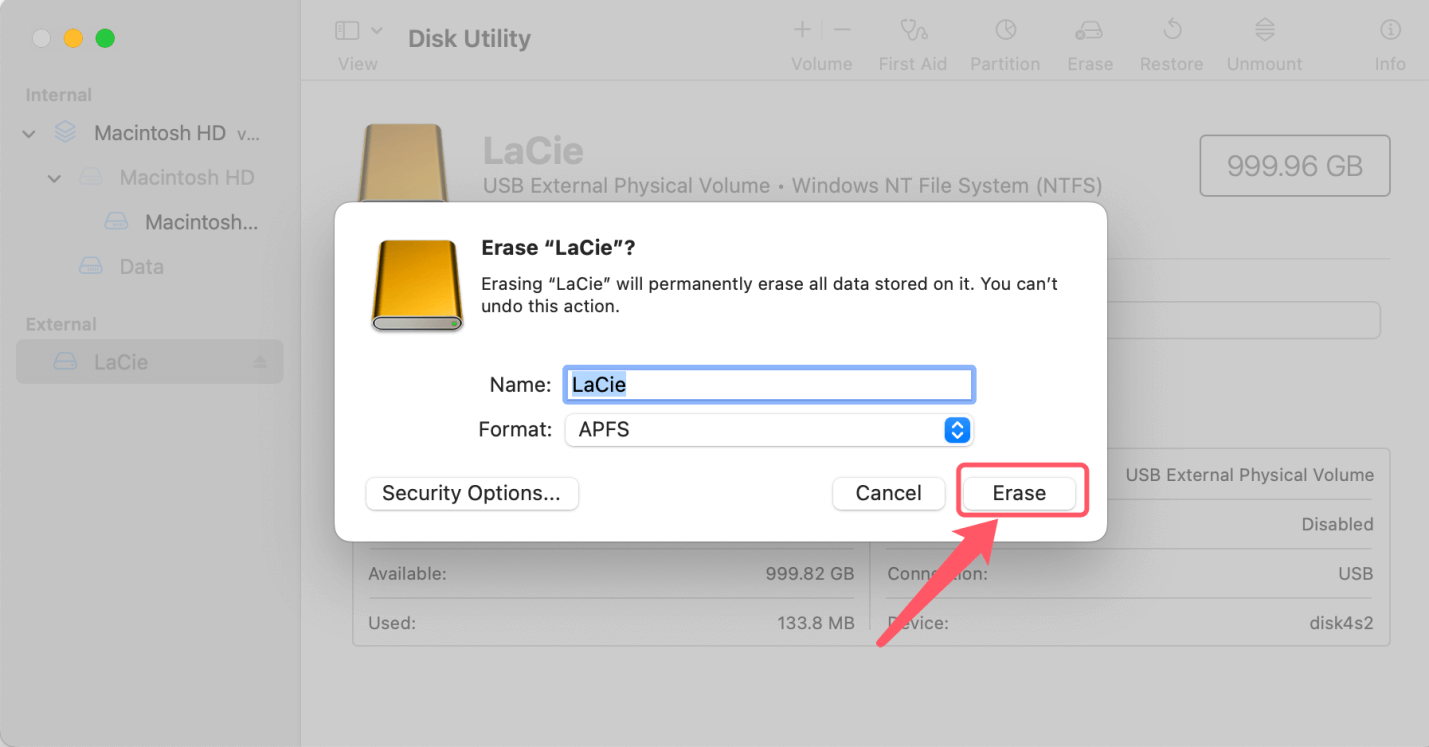
Then select a file system such as APFS, Mac OS Extended or ExFAT, click on Erase button again.
2. Use NTFS for Mac tool.
Download and install Donemax NTFS for Mac, then open this app, select the LaCie external hard drive, click on Mount button.

If you want to read-write the NTFS drive on your Mac, click on Enable Writable button. Then you can read-write the LaCie external hard drive without any limitation.

This NTFS for Mac tool also can help you repair damaged LaCie external hard drive on Mac.
How to Recover Data from Unmounted or Erased LaCie Drive on Mac?
We can use data recovery software to get files directly from the file system on a hard drive that isn't mounted on a Mac to regain the data. This way will work as long as Disk Utility shows that your external hard drive is there but won't mount. Just make sure that Disk Utility shows the right size.
Donemax Data Recovery for Mac will be used for this lesson. Because it's a well-known and simple-to-use tool, we often use it to show how to recover data in our pieces. How to do it:
Step 1. Download and install Donemax Data Recovery for Mac, open it from Launchpad.
Step 2. Open Donemax Data Recovery for Mac, select the LaCie external hard drive to start data recovery.

Step 3. Click on Scan button to deeply scan the LaCie external hard drive and find all recoverable files.

Step 4. Once the scan is completed, you can preview all recoverable files. Then select the wanted files and click on Recover button to save them.

Conclusion:
It can be frustrating when your LaCie hard drive won't mount on your Mac, especially if it has important files. By following the steps in this guide, you should be able to figure out what's wrong and fix it. This guide tells you everything you need to know to find and fix the problem, from basic checks and software solutions to advanced troubleshooting and data recovery choices. Don't forget to take preventative steps to lower the chance of having similar problems again.
If the LaCie external hard drive has been formatted to NTFS, you can use NTFS for Mac tool to mount the drive on your Mac and add Read-Write support for NTFS drives so that you can read-write the LaCie external hard drive without any limitation.
Related Articles
- Jan 12, 2025Fix WD External Hard Drive Not Showing Up in Disk Utility on Mac
- Feb 17, 20256 Solutions to Fix Can't Access WD My Passport on Windows 11/10/8/7?
- Mar 31, 2025[11 Fixes] Fix Seagate External Hard Drive Not Recognized by Mac – Guide 2025
- Jul 04, 2024Cannot Format Seagate External Hard Drive on Mac? Fix It Now
- Dec 05, 2024How to Use Samsung Portable SSD T5 EVO on Mac
- Feb 17, 2024How to Format SK Hynix Beetle X31 SSD for Mac?

Contributing Writer
Christina
Christina is the senior editor of Donemax software who has worked in the company for 4+ years. She mainly writes the guides and solutions about data erasure, data transferring, data recovery and disk cloning to help users get the most out of their Windows and Mac. She likes to travel, enjoy country music and play games in her spare time.

Editor in chief
Gerhard Chou
In order to effectively solve the problems for our customers, every article and troubleshooting solution published on our website has been strictly tested and practiced. Our editors love researching and using computers and testing software, and are willing to help computer users with their problems