PAGE CONTENT:
- How to Use Samsung Portable SSD T5 EVO on Mac
- About Samsung Portable SSD T5 EVO
- Connect Samsung Portable SSD T5 EVO to Your Mac
- How to Format Samsung Portable SSD T5 EVO for Mac?
- Set Up the Samsung T5 EVO SSD for Backup or File Storage
- Optimize the Performance of the Samsung Portable SSD T5 EVO
- Troubleshooting Common Issues
- Additional Tips and Features
- Conclusion
- FAQs About Using Samsung Portable SSD T5 EVO on Mac
How to Use Samsung Portable SSD T5 EVO on Mac
In this digital era, storage devices have evolved significantly, offering faster speeds and greater convenience. The Samsung Portable SSD T5 EVO is a highly regarded external storage solution, particularly for Mac users who demand reliability and efficiency. Whether you're using the SSD for backups, creative projects, or everyday storage, understanding how to set it up and maximize its potential is crucial. This article provides a comprehensive guide on using the Samsung Portable SSD T5 EVO with your Mac.
About Samsung Portable SSD T5 EVO
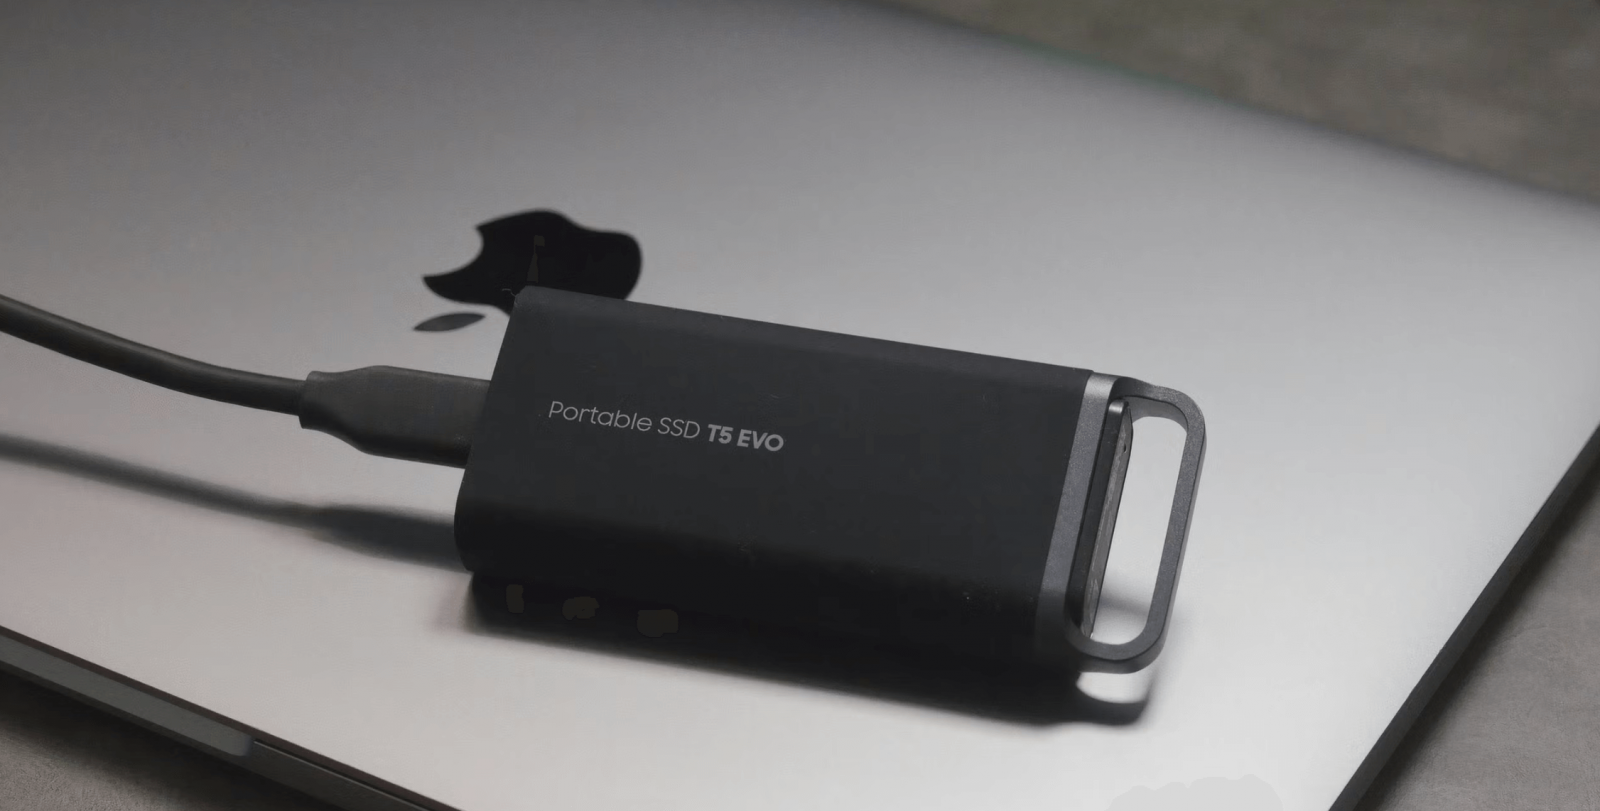
Portable SSDs like the Samsung T5 EVO have revolutionized the way we store and transfer data. With compact designs and blazing-fast speeds, these devices outperform traditional external hard drives in every aspect. For Mac users, the T5 EVO provides compatibility with macOS, making it an ideal choice for professionals and casual users alike.
Whether you're upgrading from an older drive or using an external SSD for the first time, this guide covers everything from initial setup to troubleshooting. Let's dive into how you can make the most of the T5 EVO on your Mac.
Connect Samsung Portable SSD T5 EVO to Your Mac
1. Prepare the SSD for Use
Before diving into the technical setup, start by unboxing and inspecting your Samsung Portable SSD T5 EVO. Ensure that the package includes:
- The SSD itself
- USB-C to USB-C cable
- USB-C to USB-A cable (for compatibility with older devices)
- User manual or warranty card
2. Check Compatibility
The Samsung Portable SSD T5 EVO is compatible with macOS versions 10.10 (Yosemite) and later. Before proceeding, ensure your Mac is updated to the latest version of macOS to avoid compatibility issues.
3. Connect the SSD to Your Mac
Modern Mac models feature USB-C ports, which are compatible with the T5 EVO. If you're using an older Mac with standard USB-A ports, you can use the included USB-C to USB-A cable. Plug the SSD into your Mac and wait for it to be recognized. If it doesn't show up immediately, don't worry – you may need to format it first.
How to Format Samsung Portable SSD T5 EVO for Mac?
1. Why Formatting is Necessary
When you first unbox your T5 EVO, the drive is typically preformatted with the ExFAT file system. While ExFAT allows for cross-platform use between macOS and Windows, it is not the most efficient option if you plan to use the SSD exclusively with a Mac. macOS-native file systems like APFS (Apple File System) or Mac OS Extended (Journaled) are optimized for the Mac environment, offering:
- Faster read/write speeds.
- Improved support for macOS features such as Time Machine backups.
- Enhanced security with native encryption options.
Additionally, formatting erases any preloaded software or data on the drive, ensuring that it's ready for your specific use case.
2. Step-by-Step Formatting Guide
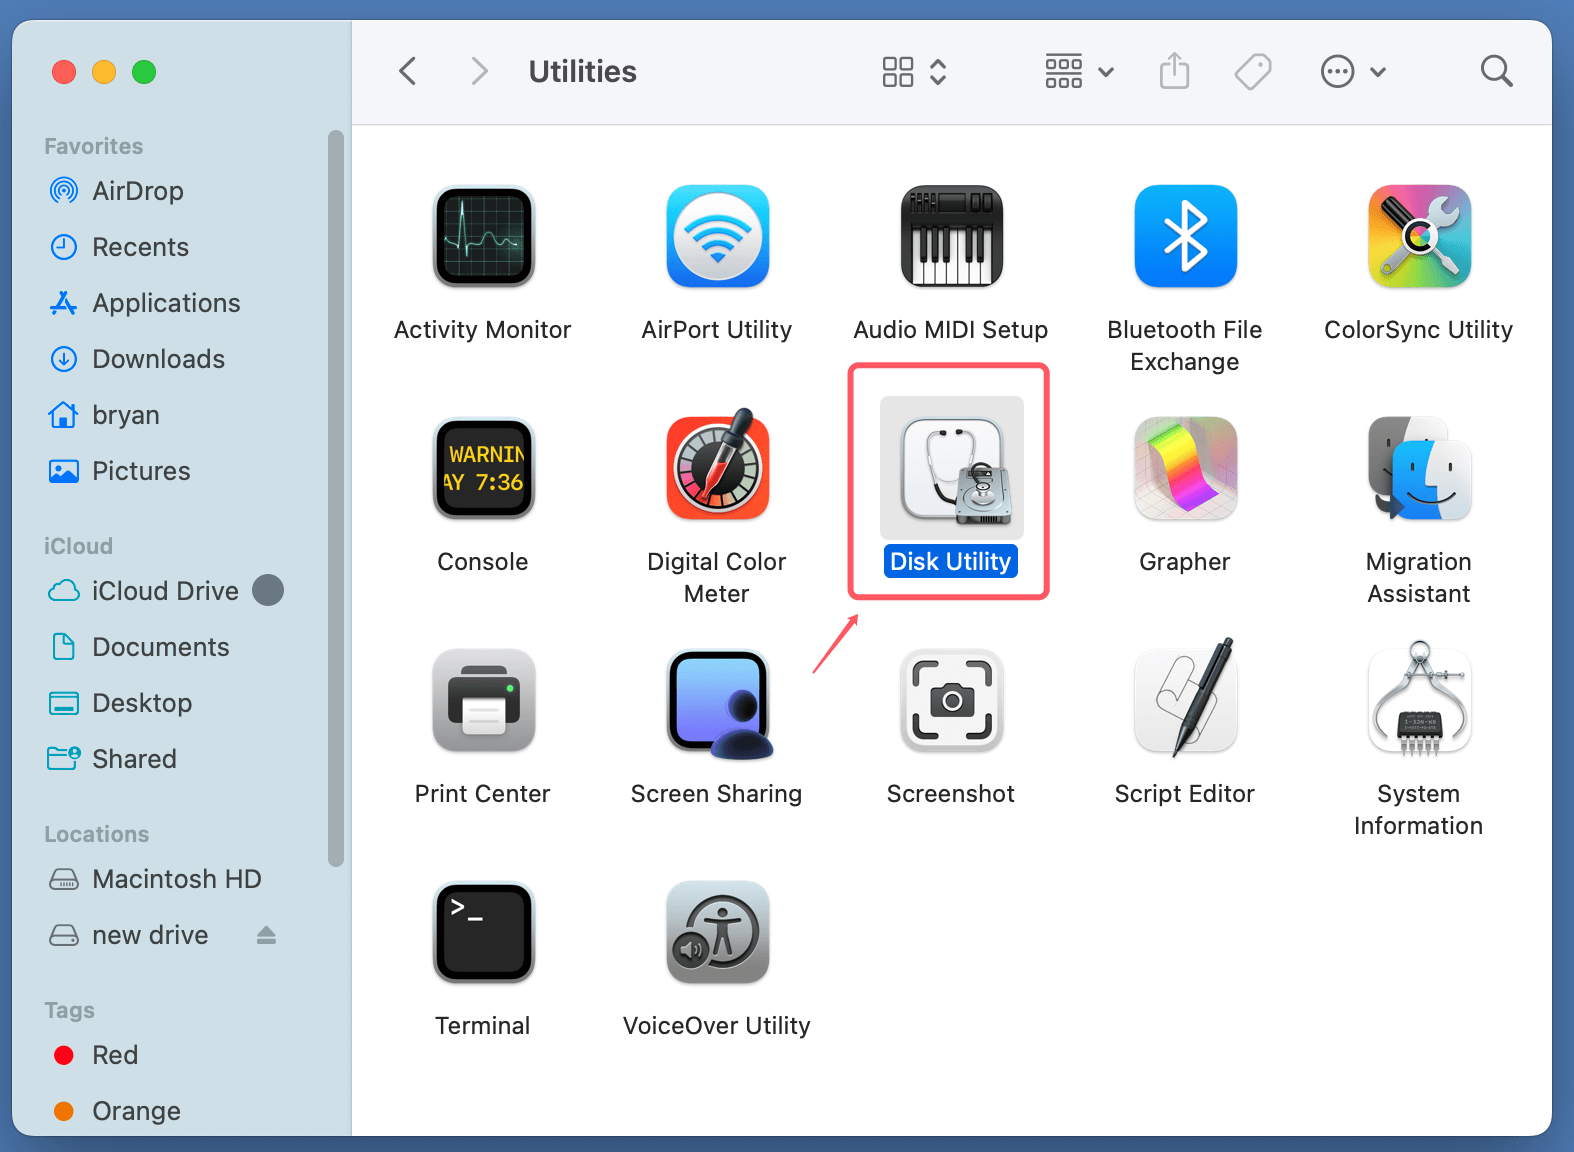
- Open Disk Utility:
- Click on the Finder icon in your Dock.
- Navigate to Applications > Utilities > Disk Utility or simply use Spotlight Search (Cmd + Space) and type "Disk Utility."
![using the Samsung Portable SSD T5 EVO with your Mac]()
- Locate the SSD:
- In Disk Utility, look at the left-hand sidebar under the "External" section. You should see your Samsung T5 EVO listed.
- Select the Drive:
- Click on the drive name (not the indented volume, which represents the partition).
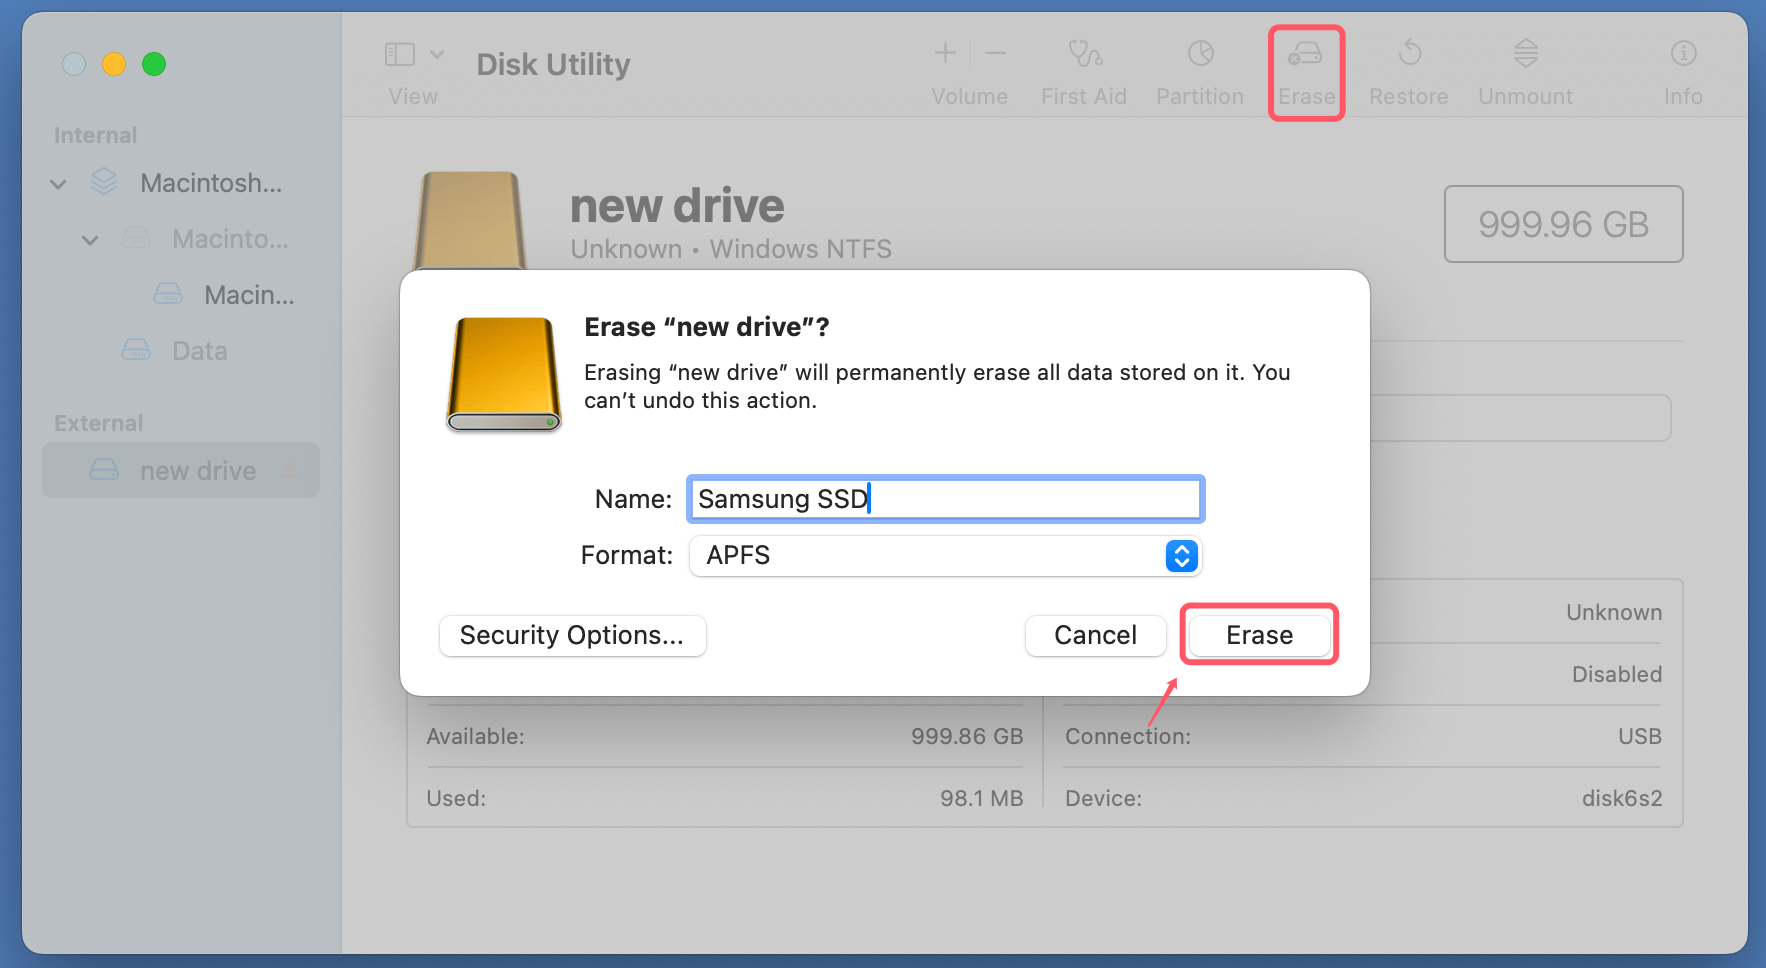
- Start the Formatting Process:
- Click on the Erase button located at the top of the Disk Utility window.
- Choose the File System:
- You'll be prompted to select a file system. Here's a quick breakdown to help you decide:
- APFS (Apple File System): Best for macOS High Sierra or later, ideal for SSDs due to its speed and efficiency. Recommended for modern Macs.
- Mac OS Extended (Journaled): Compatible with older macOS versions, offering robust performance for traditional storage needs. Use this if you're on macOS Sierra or earlier.
- ExFAT: Only choose this if you plan to use the SSD on both macOS and Windows without reformatting.
- You'll be prompted to select a file system. Here's a quick breakdown to help you decide:
- Assign a Name to the Drive:
- Enter a name for your SSD in the text field, such as"Samsung SSD" or "T5 EVO" or "Mac Backup."
- Adjust Scheme Settings:
- Ensure the Scheme is set to GUID Partition Map for macOS compatibility.
- Confirm and Erase:
- Click the Erase button to begin formatting the drive. The process should take only a few seconds to complete.
![using the Samsung Portable SSD T5 EVO with your Mac]()
- Click the Erase button to begin formatting the drive. The process should take only a few seconds to complete.
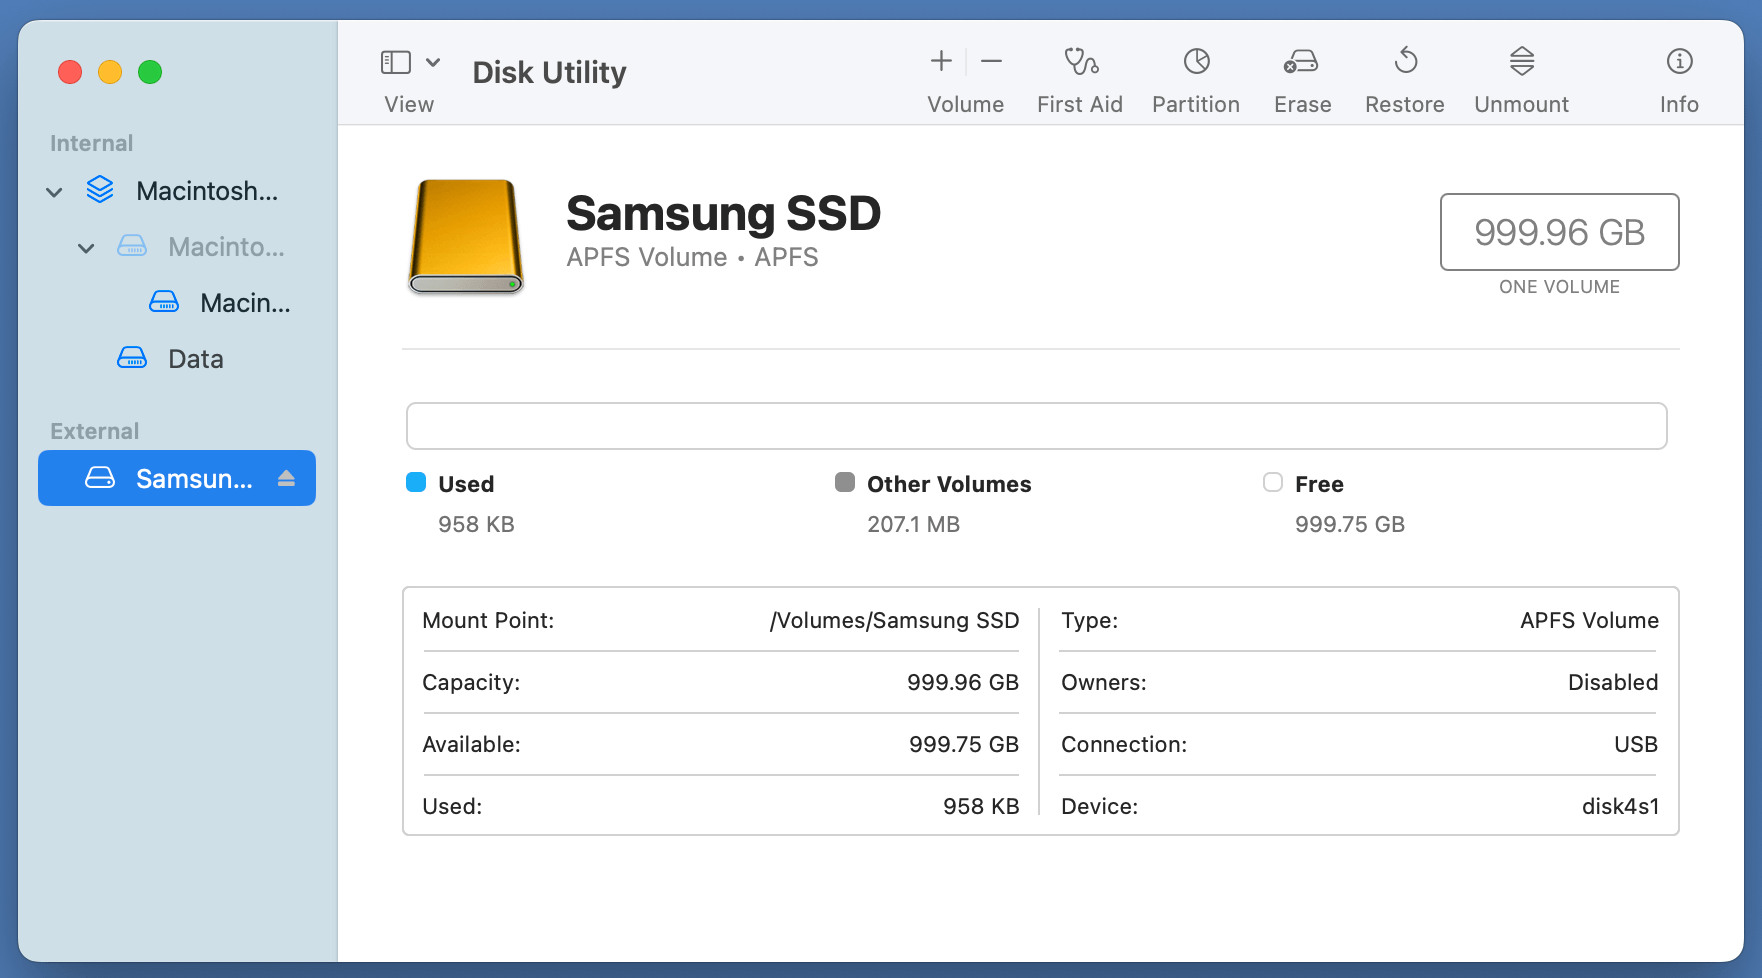
- Verification:
- Once the process is complete, the SSD will automatically remount on your Mac. Double-check the drive's details in Disk Utility to ensure it has been formatted correctly.
![using the Samsung Portable SSD T5 EVO with your Mac]()
- Once the process is complete, the SSD will automatically remount on your Mac. Double-check the drive's details in Disk Utility to ensure it has been formatted correctly.
Note: If you have lost data due to formatting your Samsung Portable SSD T5 EVO, you can use Mac data recovery software to scan the Samsung Portable SSD T5 EVO and get all lost data back.
APFS vs. Mac OS Extended: Choosing the Right Format:
Choosing the correct file system depends on your needs and macOS version. Here's a deeper dive into the two primary options:
- APFS (Apple File System):
- Introduced with macOS High Sierra (10.13), APFS is optimized for SSDs, offering better performance and reduced latency compared to older formats.
- It supports features like snapshots, fast directory sizing, and enhanced encryption.
- Ideal for Macs with SSD-based internal storage.
- Mac OS Extended (Journaled):
- The legacy format used by macOS before APFS.
- Works well with spinning hard drives but is compatible with SSDs too.
- Use this if you’re working with older Mac systems that don't support APFS.
Pro Tip: If you're unsure which format to choose, default to APFS for modern systems unless you have a specific need for older compatibility.
What to Do After Formatting:
Once formatted, you can begin using your SSD. Here are a few initial tasks you might want to complete:
- Create Folders for Organization:
- Start by creating a clear folder structure to keep your files organized. For instance, set up folders for work documents, media files, and personal projects.
- Test the Drive:
- Copy a few test files to the SSD to ensure that it’s functioning correctly and at the expected speed.
- Enable Time Machine (Optional):
- If you plan to use the SSD for backups, set it up with Time Machine as described in the next section.
Set Up the Samsung T5 EVO SSD for Backup or File Storage
Once formatted, you can configure the Samsung Portable SSD T5 EVO for specific tasks like backups or general file storage.
Using the Samsung Portable SSD T5 EVO for Time Machine Backups
Time Machine is macOS's built-in backup solution. Setting up the T5 EVO as a Time Machine drive is simple:
- Connect the SSD to your Mac.
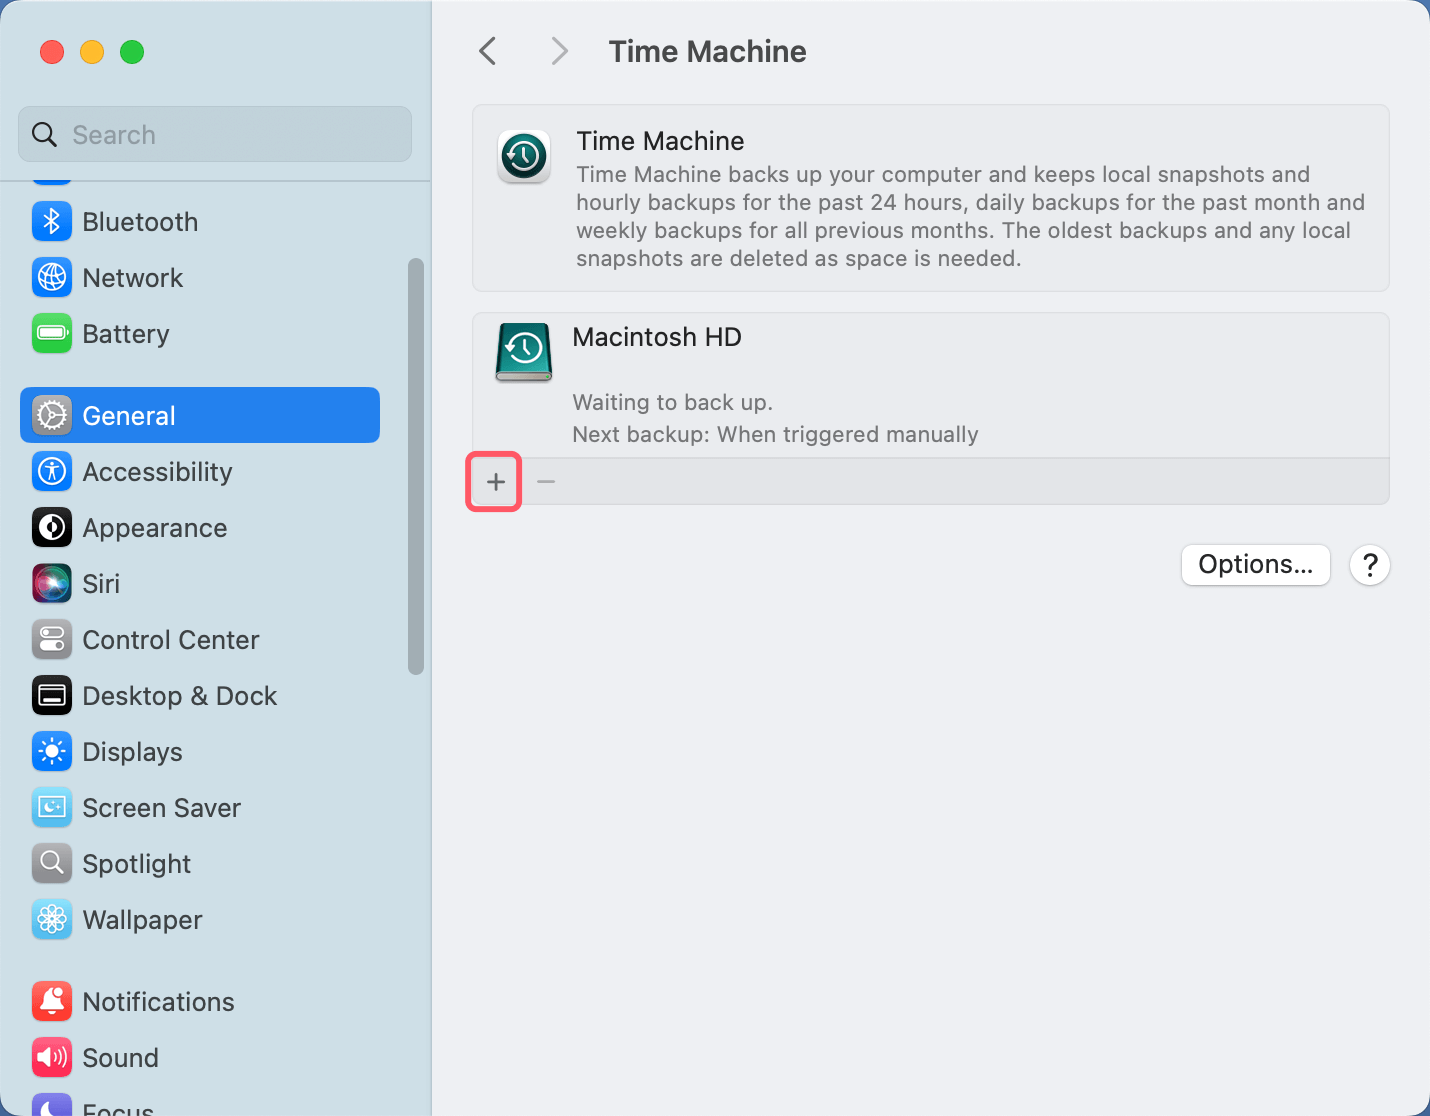
- Open System Settings > General > Time Machine.
![using the Samsung Portable SSD T5 EVO with your Mac]()
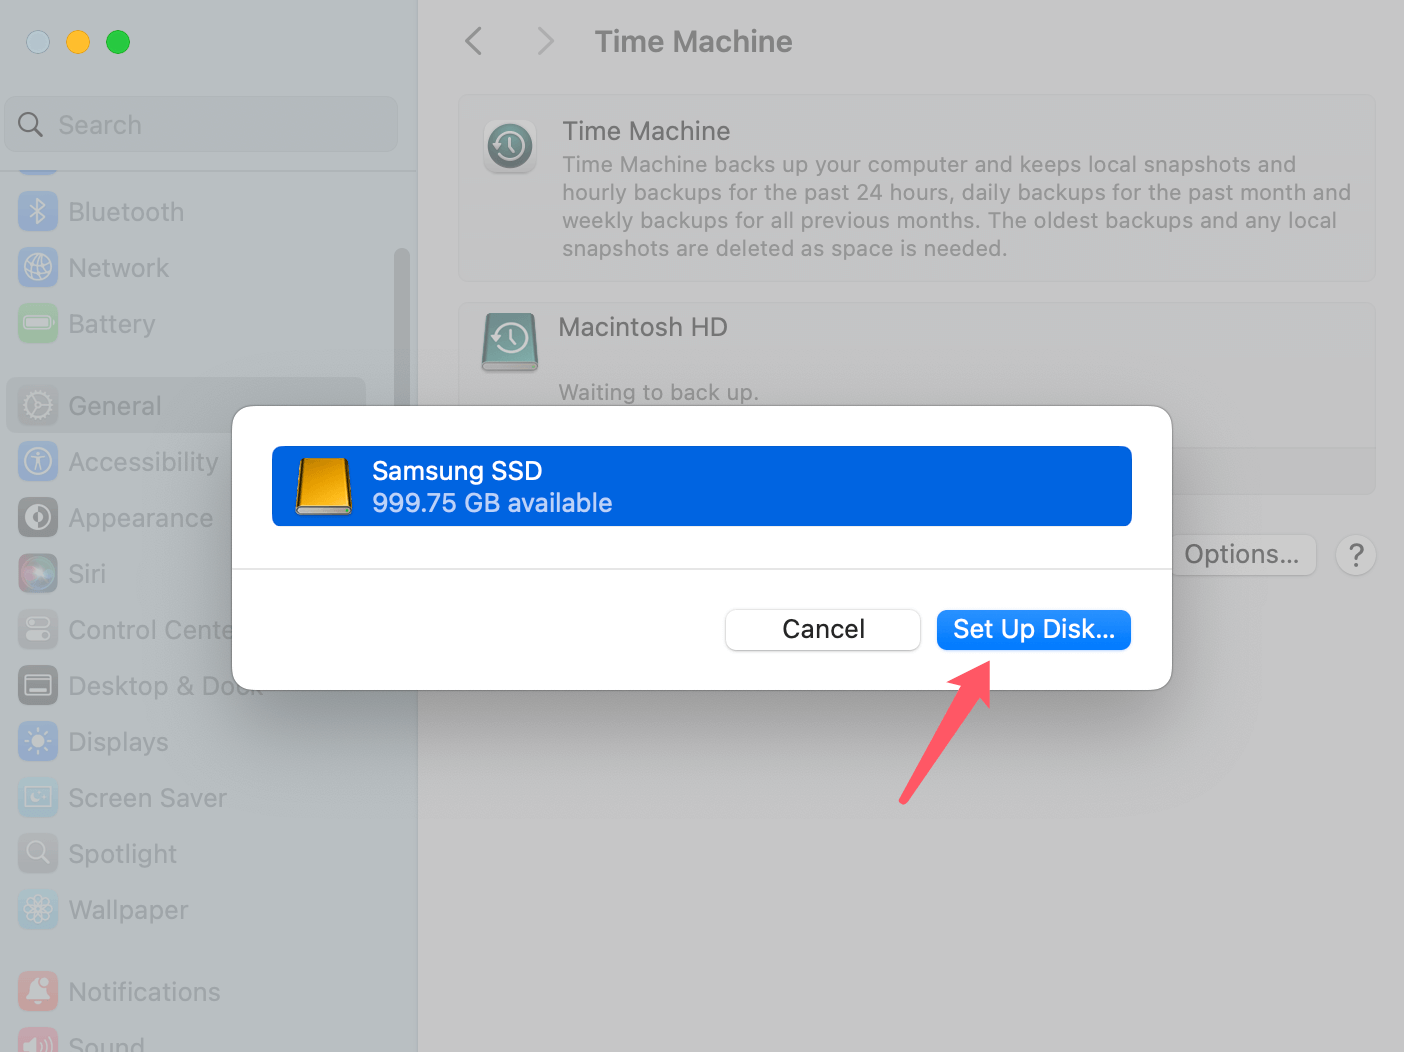
- Click Add Backup Disk or + and select your T5 EVO. Click Set Up Disk.
![using the Samsung Portable SSD T5 EVO with your Mac]()
- Choose whether to encrypt the backup (recommended for security).
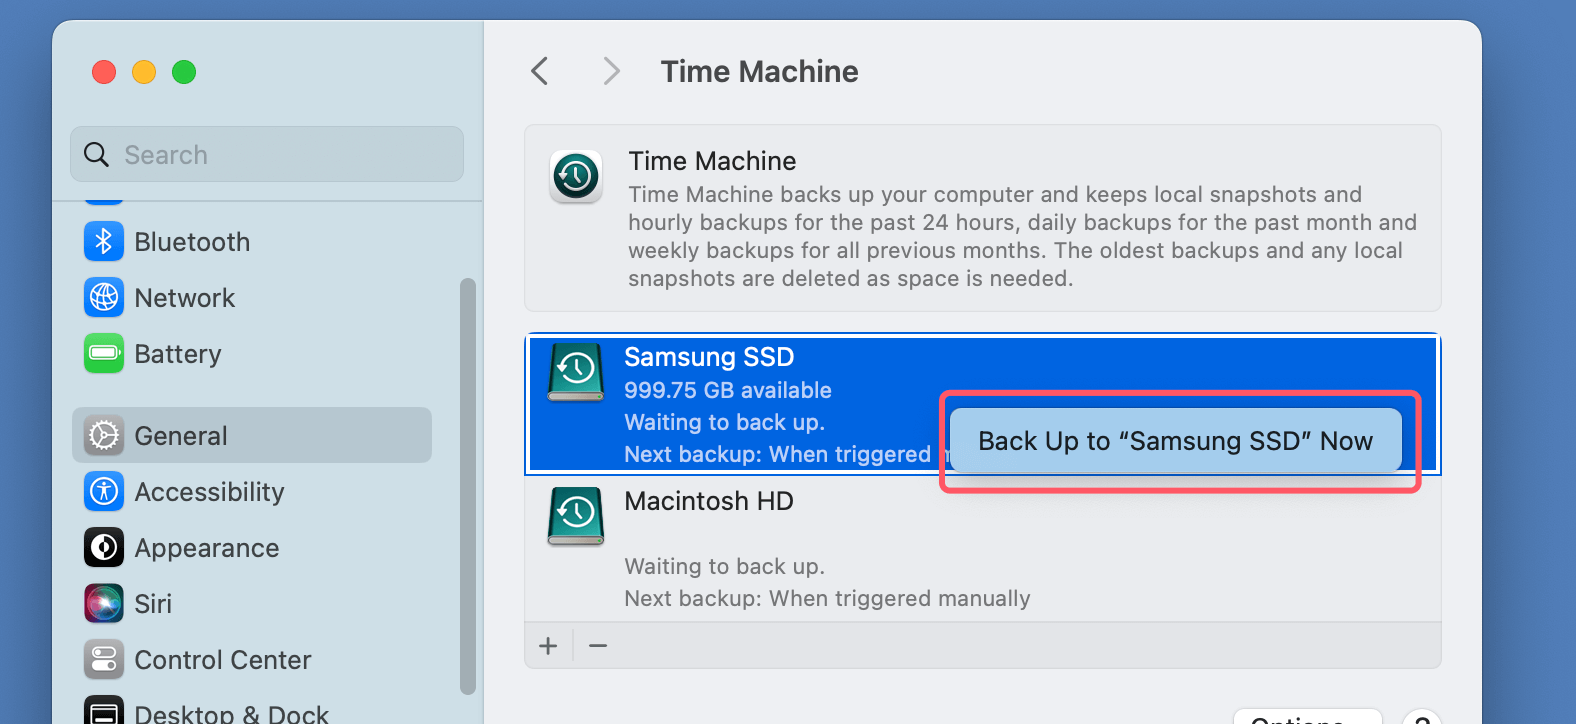
- Click Back Up to XXX to start the backup process.
![using the Samsung Portable SSD T5 EVO with your Mac]()
Creating a Folder Structure
If you're using the SSD for file storage instead of backups, organize your data with a clear folder structure. For example:
- "Photos and Videos" for multimedia files.
- "Work Documents" for professional files.
- "Archive" for older data.
Tips for Efficient Storage Management
- Avoid storing system or application files on the SSD.
- Regularly clean up unused files to free up space.
- Use tags and Finder labels to organize files further.
Using NTFS Samsung Portable SSD T5 EVO on Mac:
If your Samsung Portable SSD T5 EVO has been formatted to NTFS file system and you want to use it on your Mac, you can install a NTFS for Mac tool on your Mac. With NTFS for Mac tool, you can read-write the NTFS Samsung Portable SSD T5 EVO on Mac without any limitation.
Step 1. Connect the Samsung Portable SSD T5 EVO to your Mac and install the reliable NTFS for Mac tool - such as Donemax NTFS for Mac on your Mac.
Step 2. Open Donemax NTFS for Mac, select the NTFS Samsung Portable SSD T5 EVO, click on Enable Writable button.

Donemax NTFS for Mac also can help you mount Samsung Portable SSD T5 EVO on Mac, fix damaged Samsung Portable SSD T5 EVO on Mac and reformat Samsung Portable SSD T5 EVO on Mac, etc.
Optimize the Performance of the Samsung Portable SSD T5 EVO
The T5 EVO offers incredible read and write speeds, but optimizing its performance ensures you're getting the most out of it.
Ensuring High-Speed Connections:
- Use the included USB-C to USB-C cable for maximum data transfer speeds.
- Ensure your Mac's USB ports support USB 3.1 Gen 2 or higher for optimal performance.
Avoiding Fragmentation and Overfilling:
Unlike traditional hard drives, SSDs don't require defragmentation. However, to maintain speed and longevity, keep at least 20-30% of the drive empty. This provides room for wear leveling, a process that extends the SSD's lifespan.
Best Practices for Longevity:
- Avoid writing unnecessary data to the drive repeatedly.
- Store critical data in multiple locations to safeguard against failures.
- Update the SSD firmware regularly using Samsung's Magician Software (available for macOS).
Troubleshooting Common Issues
Even with seamless compatibility, occasional issues can arise. Here are solutions to common problems.
SSD Not Recognized by the Mac:
- Check Connections: Ensure the cable is securely plugged in. Try using another port or cable.
- Verify Formatting: If the SSD isn’t formatted for macOS, reformat it using Disk Utility.
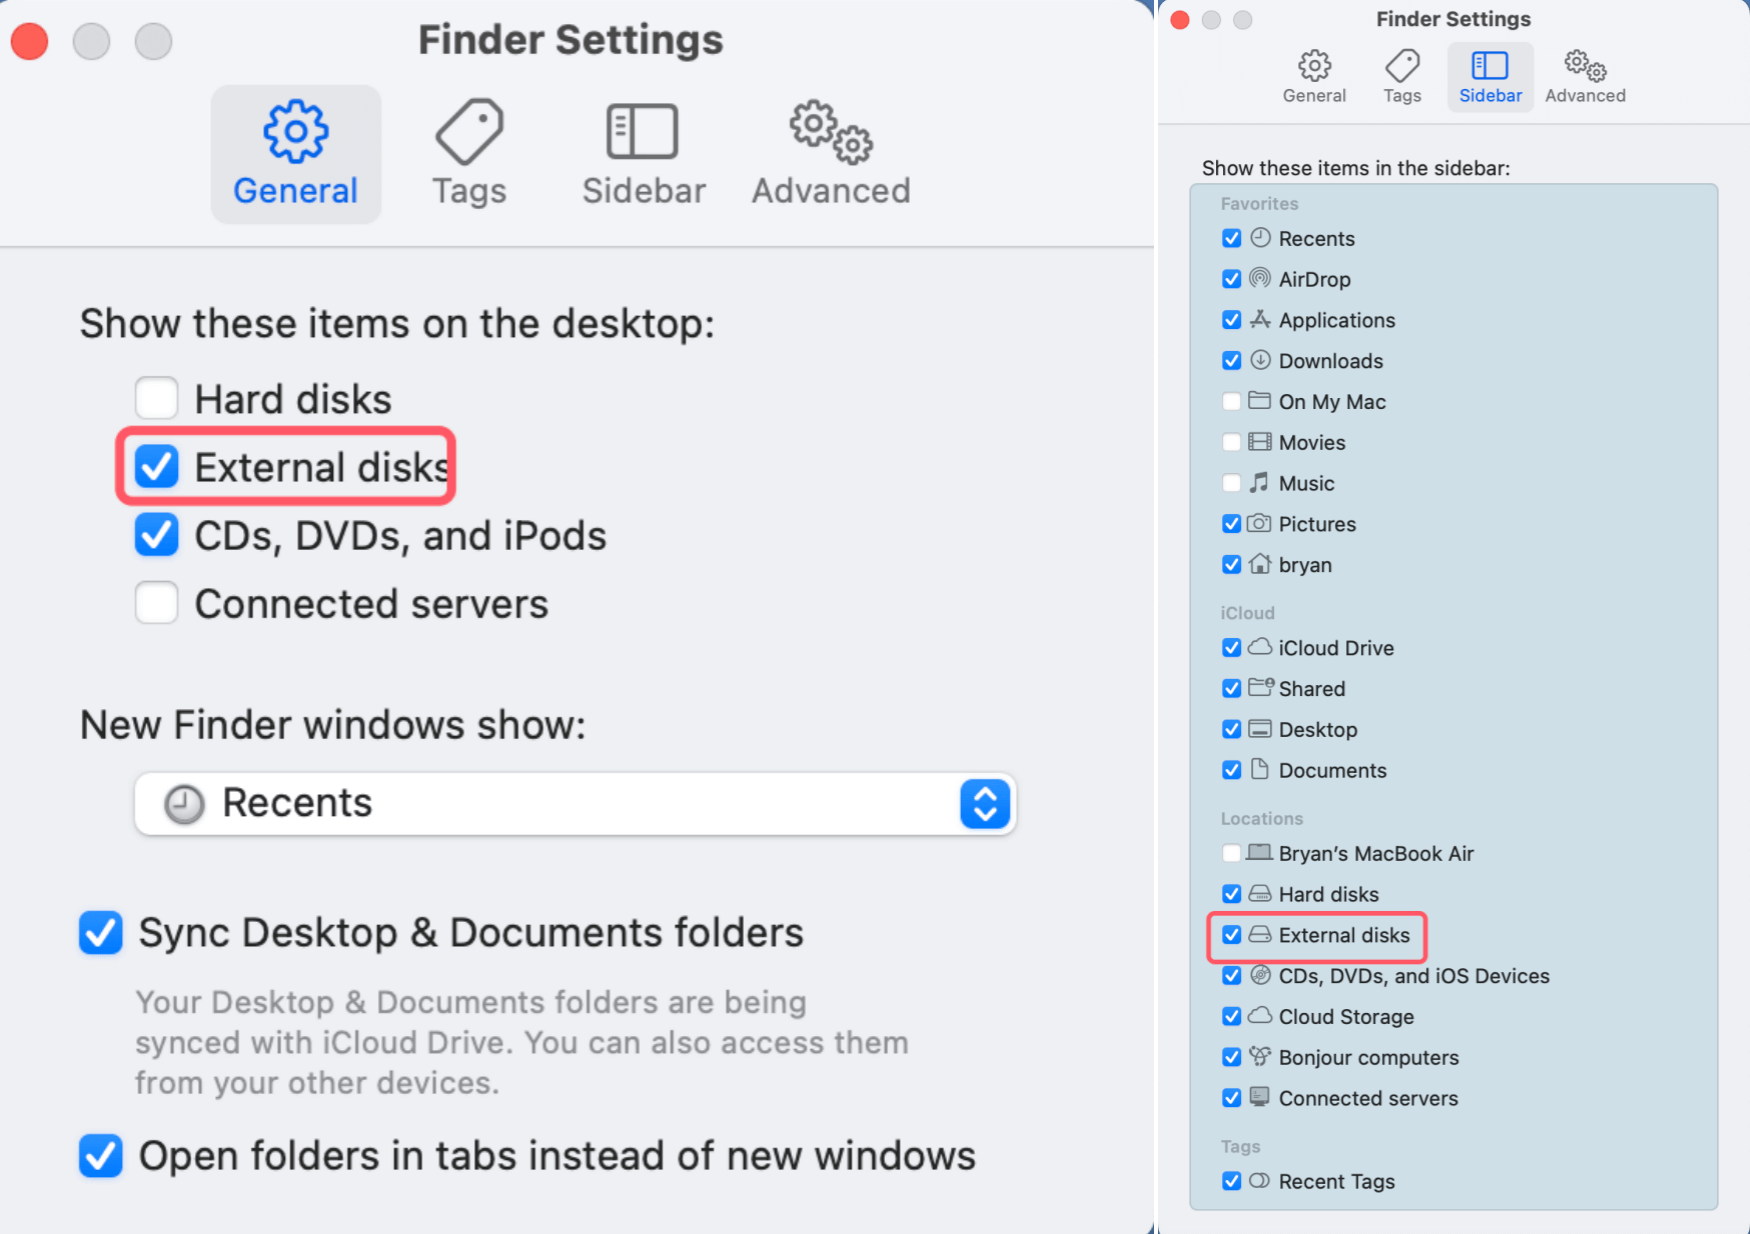
- Enable External Drives: Go to Finder > Preferences or Settings > Sidebar and ensure "External Disks" is checked.
Slow Transfer Speeds:
- Use the fastest available USB port (preferably USB 3.1 Gen 2 or Thunderbolt 3).
- Avoid transferring files to the SSD while running multiple resource-intensive apps.
Permission Errors:
- If you encounter "Read-Only" errors, adjust permissions:
- Right-click the SSD, select Get Info, and change permissions under Sharing & Permissions.
Additional Tips and Features
The Samsung Portable SSD T5 EVO offers several advanced features that can enhance your user experience.
Using Samsung's Management Software:
Samsung provides software tools for monitoring and managing the SSD:
- Download the Samsung Portable SSD Software from Samsung's website.
- Use it to check firmware updates, monitor drive health, and enable password protection.
Encrypting the SSD:
To secure your files, use built-in macOS encryption or the encryption feature within Samsung's software. Encryption ensures that even if the drive is lost, your data remains protected.
Cross-Platform Usage:
If you need to use the T5 EVO on both Mac and Windows, format it as ExFAT. While this file system isn't optimized for macOS, it allows seamless file sharing between operating systems. If you have a NTFS for Mac tool installed on your Mac, you can format the SSD to NTFS file system.
Conclusion
The Samsung Portable SSD T5 EVO is a versatile and reliable storage solution for Mac users. From lightning-fast data transfers to seamless compatibility with macOS features like Time Machine, it offers an excellent balance of performance and convenience.
By following this guide, you can set up your T5 EVO quickly and optimize it for your needs, whether for backups, creative work, or general file storage. With proper care and maintenance, your SSD will serve you well for years to come.
FAQs About Using Samsung Portable SSD T5 EVO on Mac
1. How to format a Samsung Portable SSD T5 EVO for Mac?
Make a backup of your data stored on the Samsung Portable SSD T5 EVO, then use Disk Utility to format it for your Mac:
- Connect the Samsung Portable SSD T5 EVO to your Mac.
- Open Disk Utility, select the Samsung Portable SSD T5 EVO.
- Click Erase.
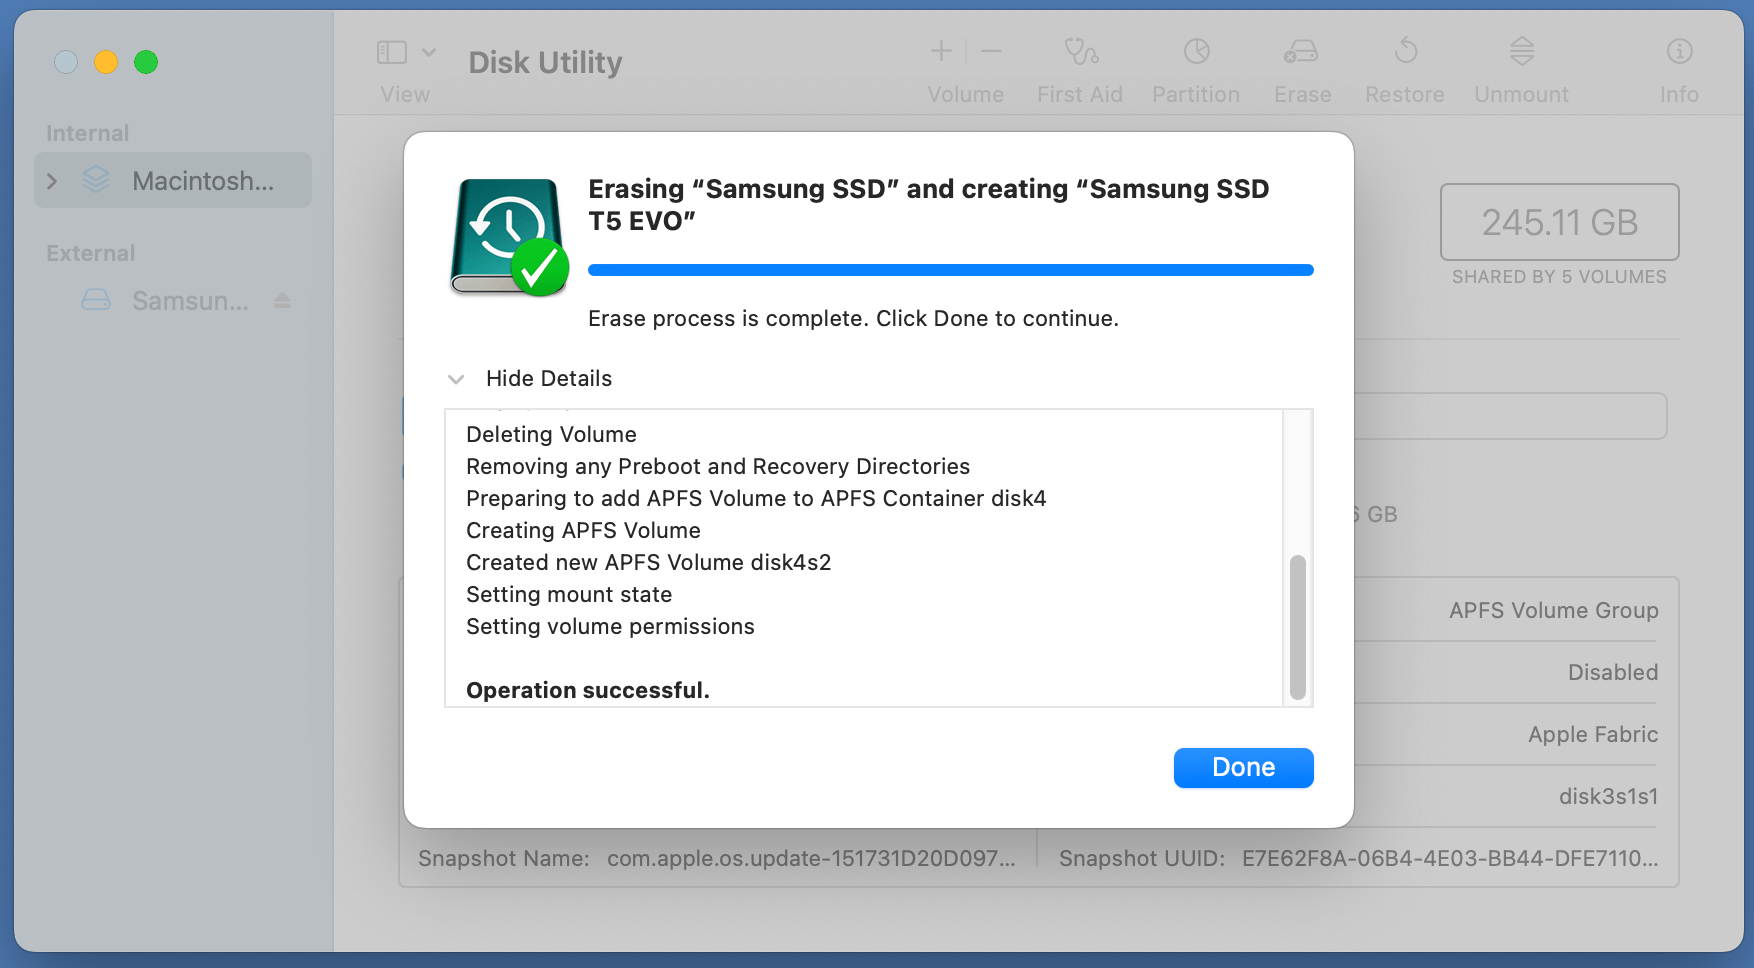
- Select APFS, Mac OS Extended or ExFAT as the file system, click Erase again.
- Once the process gets finished, click Done.
![using the Samsung Portable SSD T5 EVO with your Mac]()
2. How to fix Samsung Portable SSD T5 EVO not showing up on Mac?
If the Samsung Portable SSD T5 EVO is recognized by Disk Utility, but the SSD is not showing up on your Mac, just check the Finder Settings.
- Open a Finder, click Finder on Apple menu.
- Choose Settings.
- When Finder Settings opens, click General and Sidebar, ensure External disks is selected.
![using the Samsung Portable SSD T5 EVO with your Mac]()
3. How to mount a Samsung Portable SSD T5 EVO on Mac?
First of all, open Disk Utility on the Mac, select the Samsung Portable SSD T5 EVO, click on Mount button.
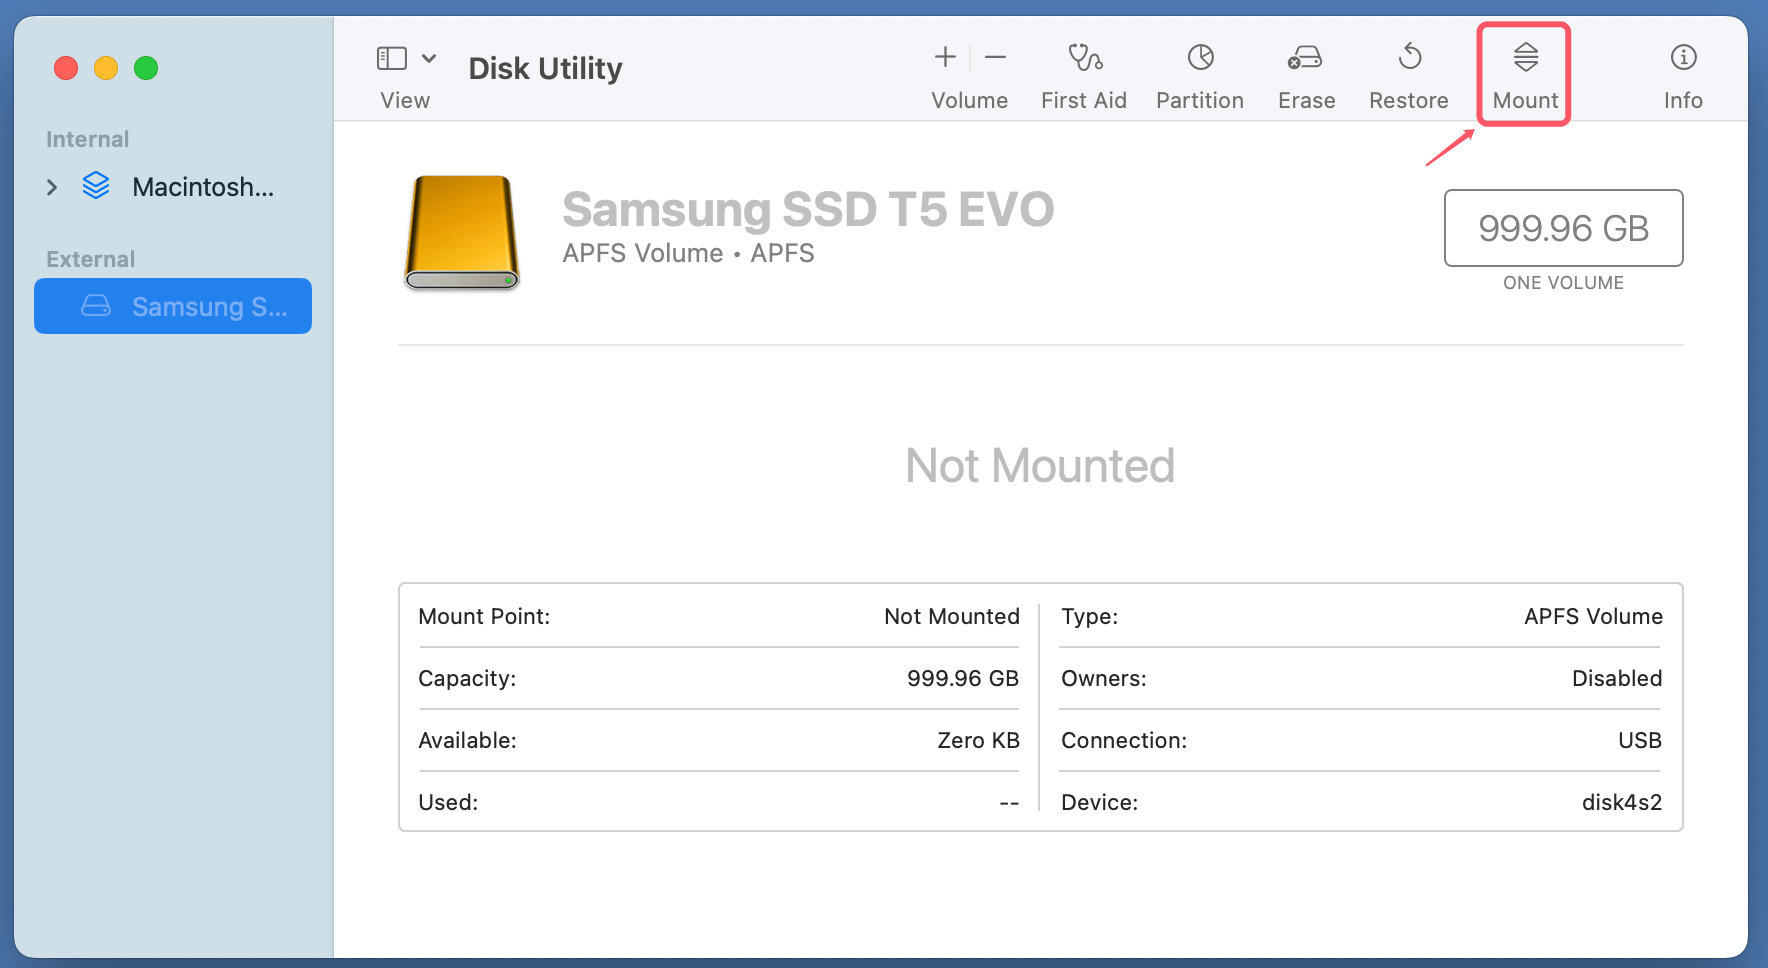
If the Samsung Portable SSD T5 EVO is an NTFS drive, you can use third-party NTFS for Mac tool to force mount your Samsung Portable SSD T5 EVO on the Mac.
4. Can I use NTFS Samsung Portable SSD T5 EVO on Mac?
Yes, you can install a NTFS for Mac tool, such as Donemax NTFS for Mac, to help you enable writable for NTFS Samsung Portable SSD T5 EVO, mount Samsung Portable SSD T5 EVO on Mac, etc.

Donemax NTFS for Mac
An easy-to-use NTFS for Mac tool to help you enable writable for NTFS drives on Mac so that you can read-write NTFS drives on Mac without any limitation. It also can help you mount, format, repair, rename, open drive on your Mac.
Related Articles
- Feb 06, 2024How to Format Lexar Portable SSD for Mac?
- Oct 23, 20249 Methods to Fix a Slow Seagate or WD External Hard Drive on Windows PC or Mac
- Jun 27, 2023How to Convert NTFS to ReFS or Convert ReFS to NTFS?
- Jul 26, 2023External Hard Drive Not Recognized After Unplugging, Fix It
- Feb 20, 2025How to Repair Apacer USB Flash Drive Without Losing Data?
- Mar 06, 2025How to Use WD My Passport/My Passport Ultra on Mac?

Maria
Maria is one of the senior writers & editors of Donemax who lives and works in Sydney, Australia. She loves PC, Mac and Internet Technology. She has 6 years of writing articles about data recovery on PC/Mac, disk cloning solution, data eraser and computer OS optimization, etc. She is also interested in testing various software and digital products.

Gerhard Chou
In order to effectively solve the problems for our customers, every article and troubleshooting solution published on our website has been strictly tested and practiced. Our editors love researching and using computers and testing software, and are willing to help computer users with their problems
