PAGE CONTENT:
The GUID Partition Map (GPM) and Master Boot Record (MBR) are two widely used partitioning schemes for managing data on storage devices. While GPM is the default for macOS and other modern operating systems, there are scenarios where converting a disk from GPM to MBR is necessary. This might be due to compatibility with legacy systems, certain bootloaders, or specific hardware constraints.
This detailed guide will walk you through the process of converting a GPM disk to MBR on macOS, covering everything from understanding these partitioning schemes to troubleshooting common issues.

GPM and MBR: Everything You Should Know
Before diving into the conversion process, it's essential to understand what GPM and MBR are, their roles, and the differences between them.
What is GPM (GUID Partition Map)?
GPM, or GUID Partition Map, is a modern partitioning scheme used by macOS and other operating systems. It uses a globally unique identifier (GUID) for each partition, enabling better management and compatibility with large storage devices. GPM supports disks larger than 2TB, multiple partitions, and advanced file systems like APFS.
Advantages of GPM:
- Supports storage devices over 2TB.
- Works seamlessly with modern file systems.
- Enables multiple partitions without strict limitations.
Drawbacks of GPM:
- Incompatible with older systems, particularly those requiring MBR.
- Limited support for legacy software.
What is MBR (Master Boot Record)?
MBR, or Master Boot Record, is a legacy partitioning scheme that has been around since the 1980s. It stores partition information in the first 512 bytes of the disk and supports up to four primary partitions or three primary partitions plus one extended partition.
Advantages of MBR:
- Compatible with older operating systems and devices.
- Works well for disks under 2TB.
Drawbacks of MBR:
- Limited to 2TB disk sizes.
- Does not support modern file systems like APFS.
Key Differences Between GPM and MBR
| Feature | GPM | MBR |
|---|---|---|
| Disk Size Support | Over 2TB | Up to 2TB |
| Compatibility | Modern systems | Legacy systems |
| Partition Limit | No strict limit | 4 primary or 3 + extended |
| Structure | GUID-based partitions | Boot sector-based partitions |
Understanding these differences will help you decide whether converting to MBR is necessary for your specific use case.
Pre-Conversion Checklist: Back Up Data Before Converting GPM to MBR
Before converting a disk from GPM to MBR, it's crucial to take certain precautions to ensure a smooth and safe process.
1. Backup Your Data
Converting a disk from GPM to MBR typically erases all data. Before proceeding, back up all important files to an external drive, cloud storage, or a Time Machine backup. Some reliable backup options include:
- Time Machine: Built-in macOS tool for full-disk backups.
- External Drives: Manually copy files to an external USB or Thunderbolt drive.
- Cloud Storage: Use services like iCloud, Google Drive, or Dropbox for important files.
- Disk Clone Software: Clone everything to an external hard drive to make a full bootable clone backup.
2. Verify Disk Requirements
Ensure the disk you're converting does not contain critical macOS boot files or data. If the disk is being used as a boot drive for macOS, consider using an alternative drive for your conversion.
3. Prepare Necessary Tools
You'll need the following tools to perform the conversion:
- Disk Utility: macOS's graphical disk management tool.
- Terminal: For command-line operations.
- Third-Party Tools: Optional tools like Donemax Data Eraser for Mac, Paragon Hard Disk Manager if you need advanced features.
Steps to Convert GPM Disk to MBR on Mac
Converting a disk from GUID Partition Map (GPM) to Master Boot Record (MBR) can be accomplished using macOS's built-in tools. Below, we provide a detailed breakdown of two methods: using Disk Utility for a graphical approach and Terminal for those comfortable with command-line operations.
Method 1: Using Disk Utility
Disk Utility is a built-in macOS application that offers a user-friendly interface for disk management tasks, including reformatting and partitioning. Here's an expanded step-by-step guide:
- Open Disk Utility
- Navigate to Applications > Utilities and open Disk Utility.
- Alternatively, use Spotlight Search (Command + Space) to find and launch it.
- Locate the Target Disk
- In the left-hand sidebar of Disk Utility, you will see a list of connected disks and their partitions.
- Identify the disk you want to convert. Ensure it's the physical disk (e.g., "Internal SSD" or "External USB") and not a specific partition.
- Back Up Data (Optional but Recommended)
- If you haven't already backed up your data, now is the time to do so. Use Time Machine, an external drive, or cloud storage to save any important files.
- Erase the Disk
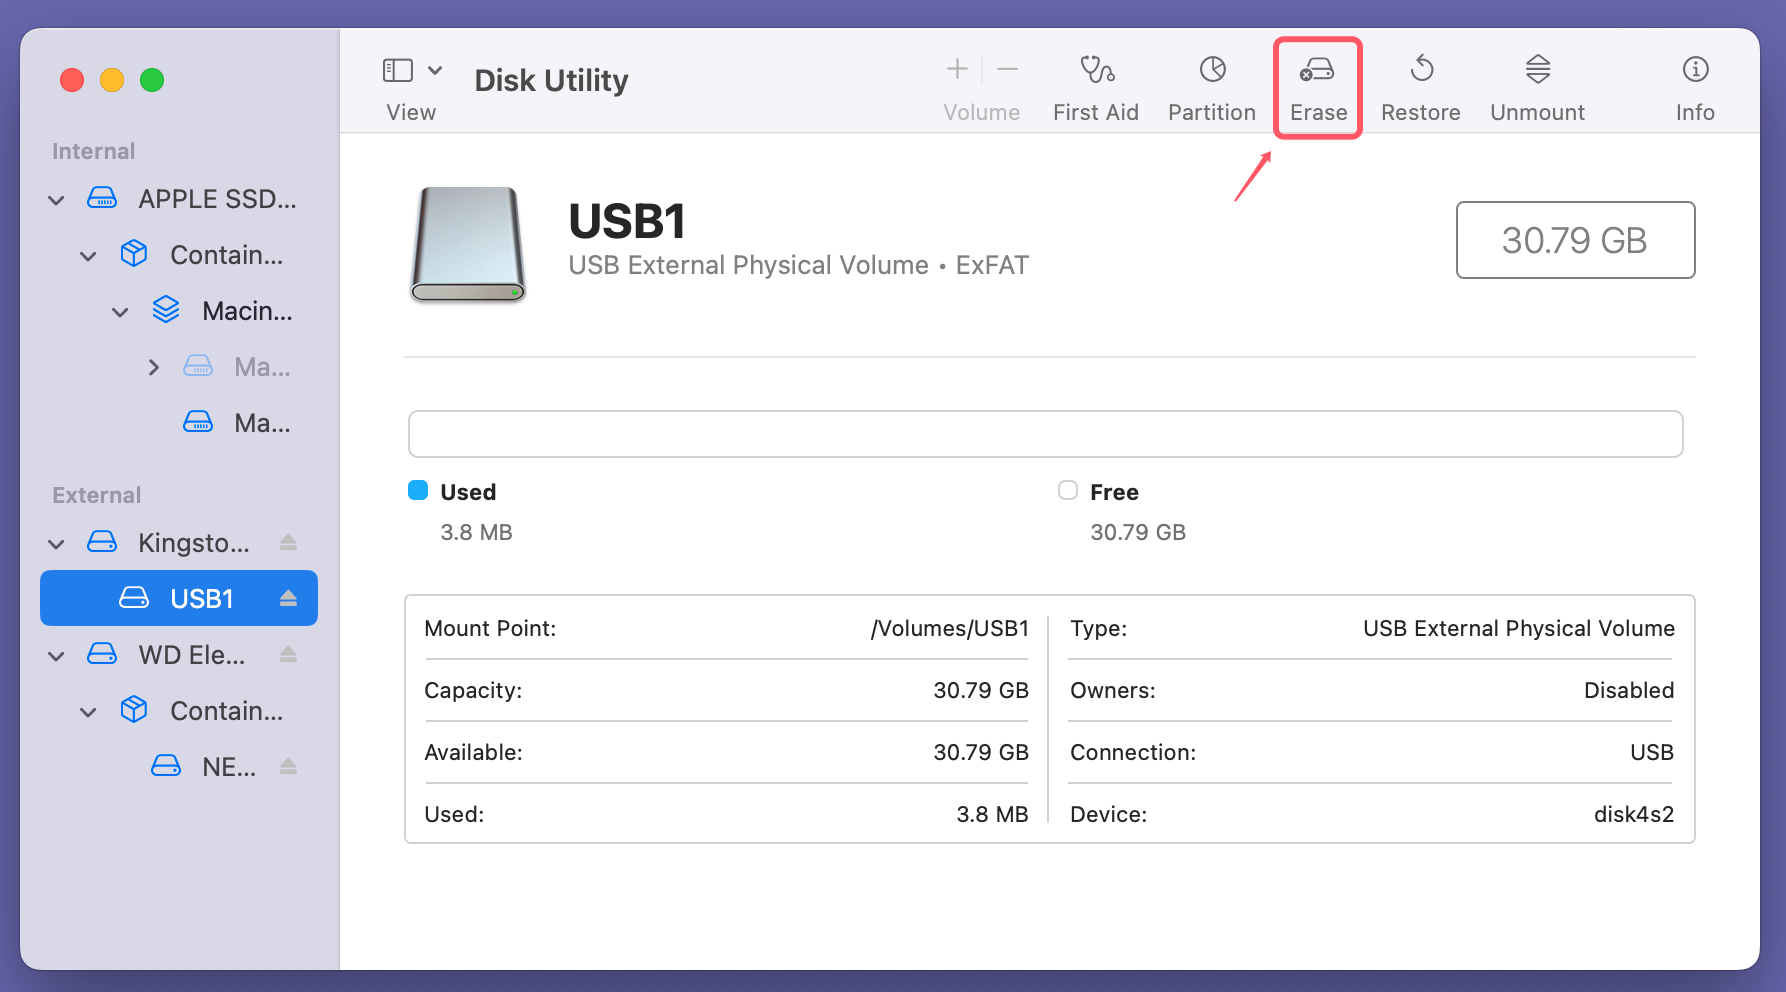
- Select the physical disk and click the "Erase" button in the toolbar at the top.
![converting a GPM disk to MBR on macOS]()
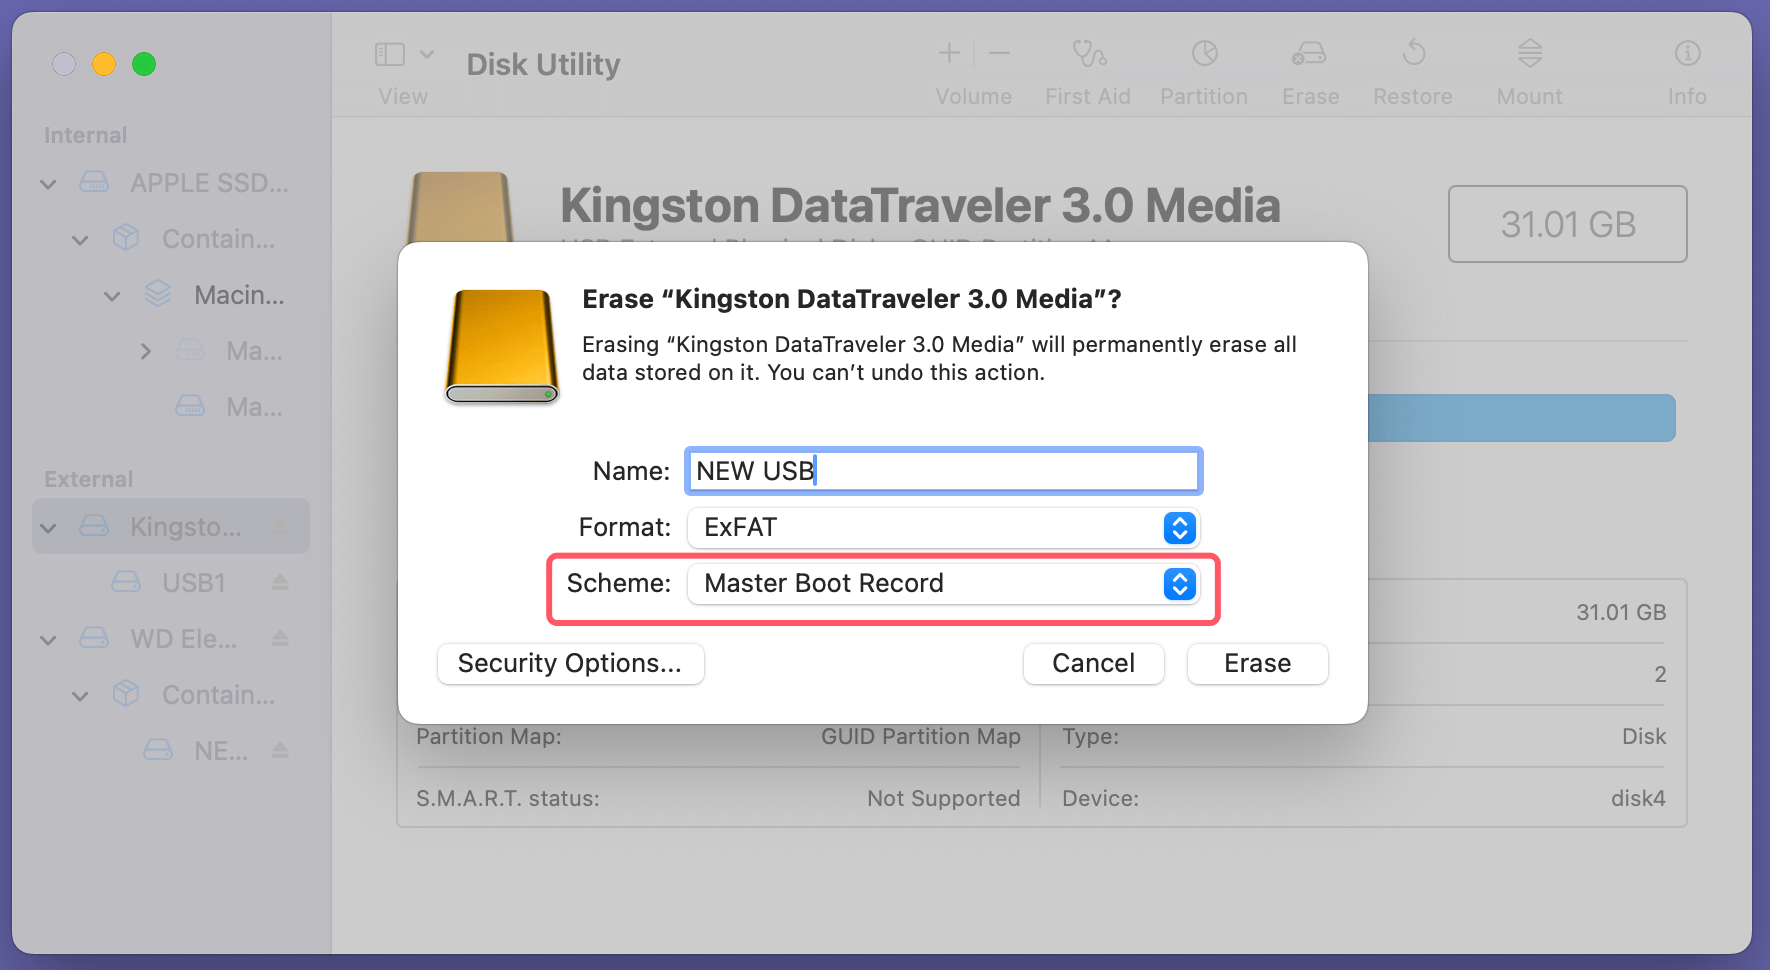
- A pop-up window will appear, asking for the following details:
- Name: Enter a name for the disk (e.g., "ExternalDrive").
- Format: Choose a compatible file system, such as FAT32 (MS-DOS) or ExFAT.
- Scheme: From the dropdown menu, select "Master Boot Record (MBR)."
![converting a GPM disk to MBR on macOS]()
- Select the physical disk and click the "Erase" button in the toolbar at the top.
- Confirm Changes
- Double-check the details before proceeding, as this action will erase all data on the disk.
- Click "Erase" to start the process. Disk Utility will format the disk to MBR and apply the selected file system.
- Verify the Conversion
- Once the process is complete, select the disk in the sidebar and click the "Info" button.
- Check the "Partition Map Scheme" field to ensure it reads "Master Boot Record."
- Eject and Use the Disk
- Safely eject the disk by clicking the eject icon in Disk Utility.
- The disk is now ready to be used with systems that require the MBR partitioning scheme.
Method 2: Using Terminal Commands
For advanced users or those who encounter issues with Disk Utility, Terminal provides a robust and precise method for converting a disk's partition scheme. Terminal commands can handle operations that Disk Utility may fail to perform due to locked or busy disks.
- Launch Terminal
Open Terminal from Applications > Utilities, or search for it using Spotlight (Command + Space).
![converting a GPM disk to MBR on macOS]()
- Identify the Target Disk
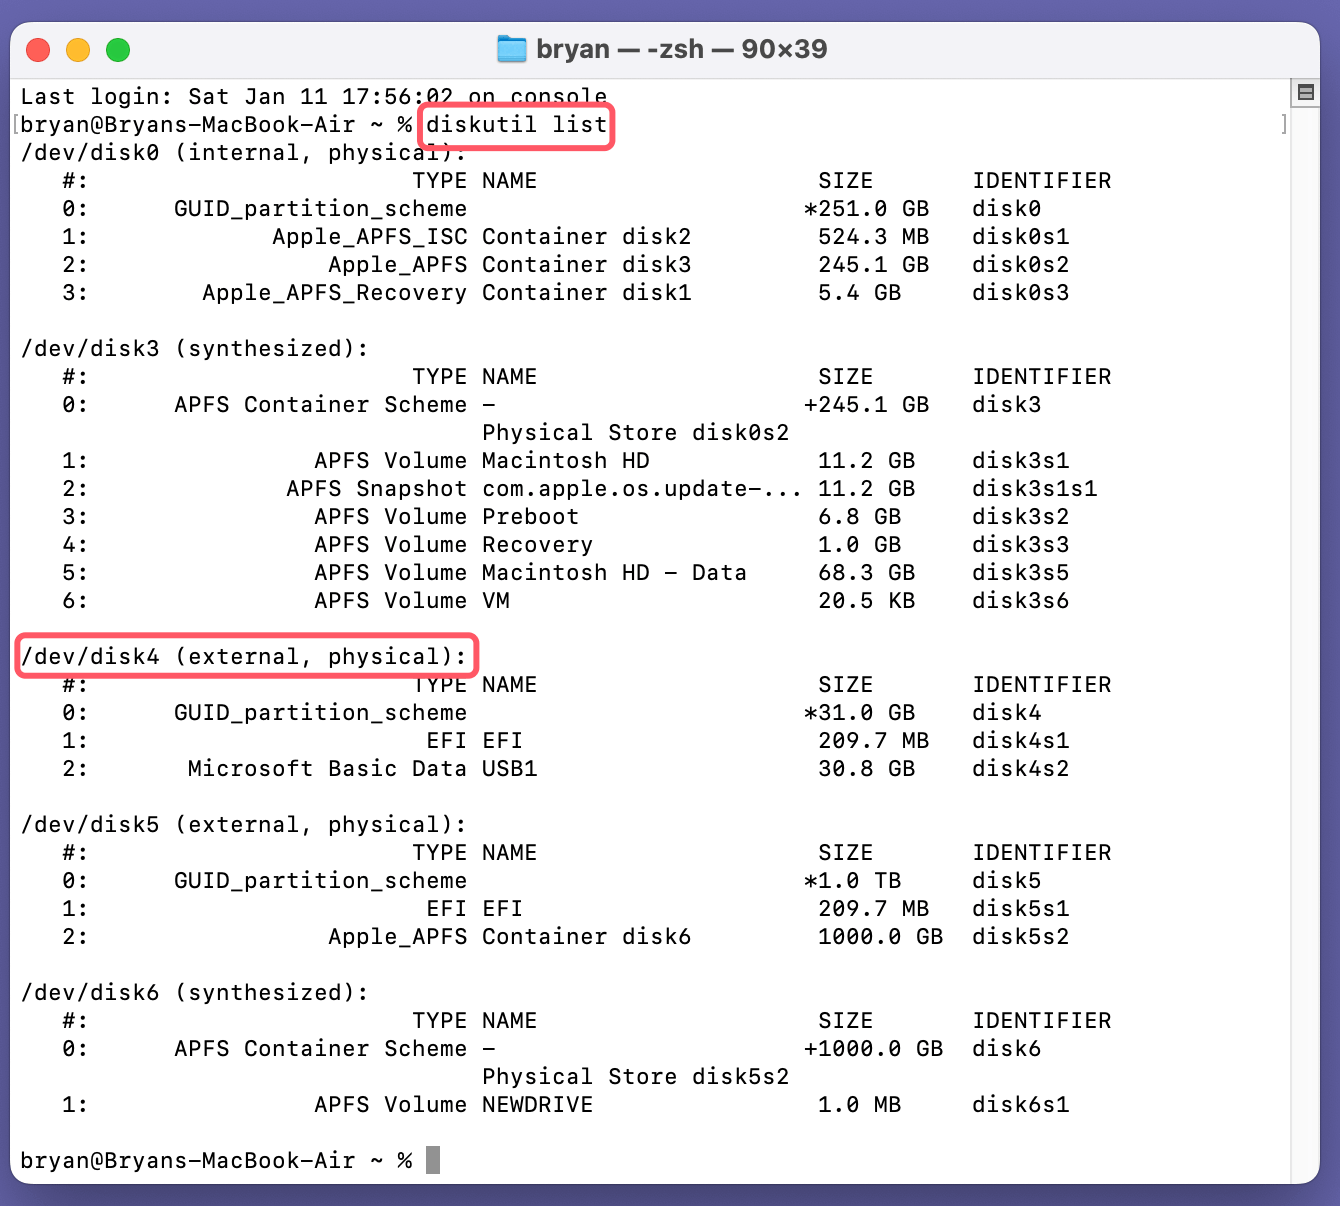
Enter the following command to list all connected disks:
diskutil list
Review the output and locate the disk you want to convert. Note its identifier, such as /dev/disk4.
![converting a GPM disk to MBR on macOS]()
- Unmount the Disk
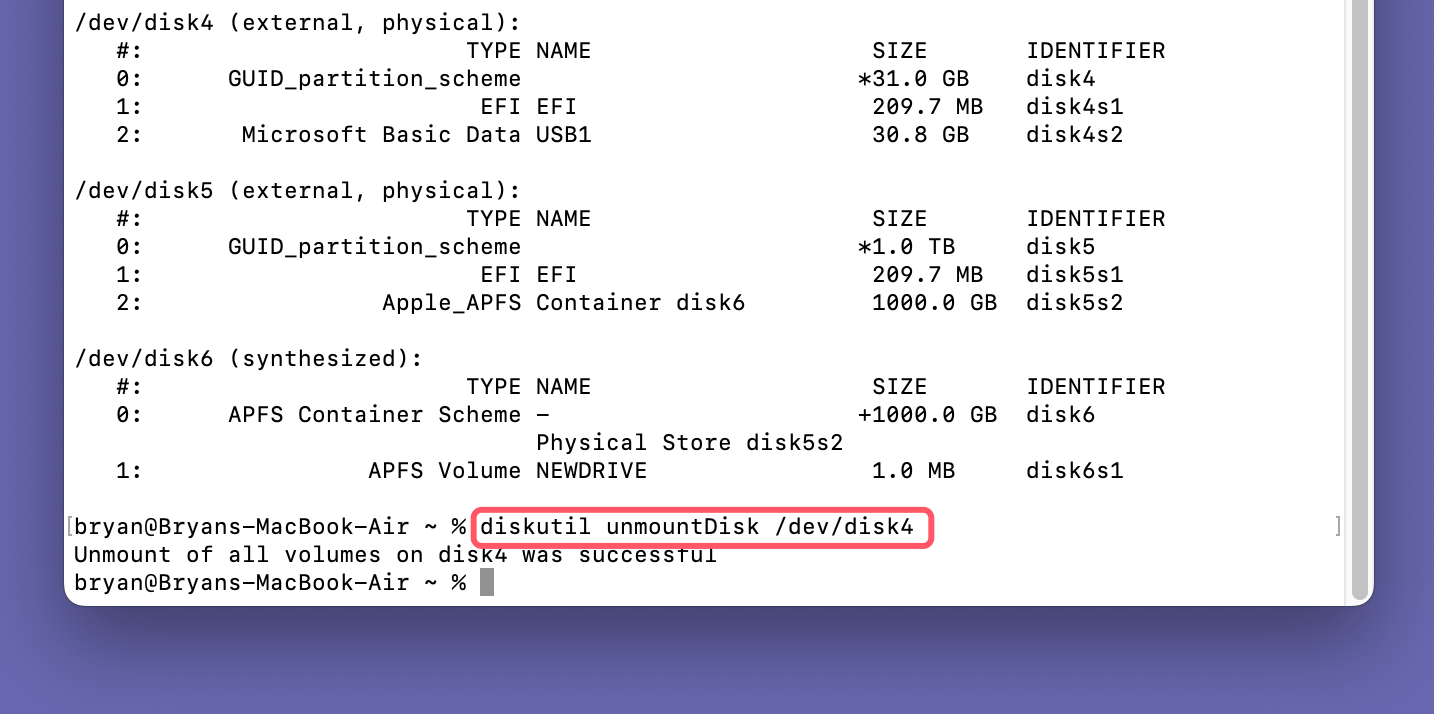
Before reformatting, you need to unmount the disk. Use the command:
diskutil unmountDisk /dev/diskX
Replace X with the disk number from the previous step (e.g., /dev/disk4).
![converting a GPM disk to MBR on macOS]()
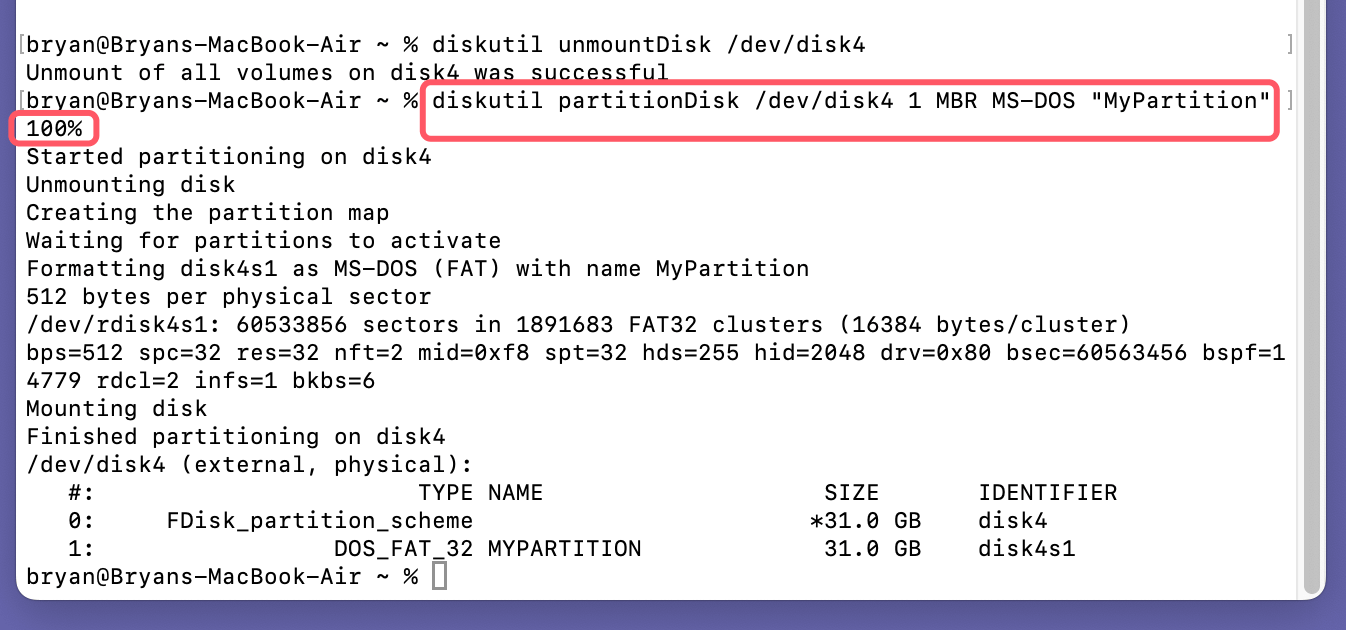
- Reformat the Disk
Use the diskutil command to reformat and apply the MBR scheme. Enter the following command:
diskutil partitionDisk /dev/diskX 1 MBR MS-DOS "MyPartition" 100%
- Replace X with your disk identifier.
- The "MyPartition" argument can be replaced with your preferred partition name.
- The 100% argument allocates the entire disk space to this partition.
![converting a GPM disk to MBR on macOS]()
- Verify the Changes
To confirm the disk was converted successfully, rerun the diskutil list command:
diskutil list
Check that the "Partition Map Scheme" for the target disk reads "Master Boot Record."
- Troubleshooting Tips
- If you encounter errors, such as "Disk in use," restart your Mac in Recovery Mode (hold Command + R during startup (for Intel-based Mac) or Power button (for Apple silicon Mac) until you see Loading startup options). Use Terminal from there to complete the operation.
- Add sudo before commands if administrative permissions are required (e.g., sudo diskutil partitionDisk ...).
Key Notes for Both Methods:
- Data Loss: Both methods will erase all data on the disk. Ensure you've backed up important files before proceeding.
- Choosing a File System: FAT32 (MS-DOS) is widely compatible but has a 4GB file size limit. ExFAT is better for larger files but may not work on older systems.
- External Disks: For external USB drives, ensure they are properly connected during the entire process to avoid interruptions.
These detailed steps provide comprehensive guidance for converting a GPM disk to MBR on macOS using either Disk Utility or Terminal, empowering users with options depending on their comfort level and specific requirements.
Troubleshooting and Common Issues
During the conversion process, you may encounter some issues. Here’s how to resolve them:
1. Conversion Errors
Error: Disk Could Not Be Unmounted:
This error occurs when the disk is in use. To fix it:
- Restart your Mac in Recovery Mode (hold Command + R or power button during boot).
- Open Disk Utility and retry the process.
Error: Permission Denied:
Ensure you have administrative privileges to make changes to the disk. If necessary, use sudo in Terminal for elevated permissions.
2. Compatibility with Older Devices
After converting to MBR, some systems may still have trouble recognizing the disk. Ensure:
- The file system (e.g., FAT32 or NTFS) is supported by the target device.
- The device firmware supports MBR.
3. File System Support Post-Conversion
The file system chosen during conversion (e.g., FAT32, ExFAT) affects compatibility:
- FAT32: Compatible with most systems but limited to files smaller than 4GB.
- ExFAT: Supports larger files but may require updates on older systems.
- NTFS: Read-only on macOS without third-party tools.
If you encounter issues, consider reformatting the disk using the desired file system.
4. Data Loss
If you have lost data due to converting GPM to MBR on Mac and don't have a backup, you can use Mac data recovery software to unformat the disk and get all lost data back.
Step 1. Download and install the reliable Mac data recovery software - such as Donemax Data Recovery for Mac.
Step 2. Open Donemax Data Recovery for Mac and select the formatted disk to start data recovery.

Step 3. Click on Scan button to deeply scan the disk and find all deleted/erased files.

Step 4. After deep scan, Donemax Data Recovery for Mac will list all recoverable files. Then select the wanted files, click on Recover button to save them.

Alternatives to Converting GPM to MBR
If you're hesitant about converting the partition scheme, consider these alternatives:
1. Creating a Virtual Machine
If the need for MBR is due to running legacy software, you can create a virtual machine using tools like VMware Fusion or Parallels Desktop. This allows you to emulate an environment compatible with MBR without altering your disk.
2. Using a Dual-Partition Scheme
If the disk size allows, you can set up both GPM and MBR partitions. Use Disk Utility to create two partitions, assigning one to each scheme. This ensures compatibility without fully committing to one partition format.
Conclusion
Converting a disk from GPM to MBR on macOS is a straightforward process, provided you take the necessary precautions. Whether you use Disk Utility's graphical interface or Terminal's command-line power, the key is to back up your data and ensure compatibility with your target system. While MBR is a legacy format, it remains valuable for specific use cases, making this conversion guide essential for users navigating between modern and older systems.


Donemax Data Recovery for Mac
Donemax Data Recovery for Mac is one of the best Mac data recovery software. It is easy-to-use and can help in recovering deleted, formatted, inaccessible or lost data from Mac HDD/SSD, external disk, USB drive, SD card, camera or other storage devices.
Related Articles
- Apr 25, 2025How to Reformat BitLocker Encrypted Hard Drive – A Comprehensive Guide
- Feb 22, 2024External Hard Drive Shows Wrong Storage Size, How to Fix It
- Feb 20, 2025How to Repair Apacer USB Flash Drive Without Losing Data?
- Feb 05, 2025How to Fix Failed Seagate External Hard Drive?
- Oct 09, 2025External Hard Drive/USB Drive Not Readable on macOS Tahoe, Fix It
- Jul 03, 2025How to Reformat Time Machine Drive?

Christina
Christina is the senior editor of Donemax software who has worked in the company for 4+ years. She mainly writes the guides and solutions about data erasure, data transferring, data recovery and disk cloning to help users get the most out of their Windows and Mac. She likes to travel, enjoy country music and play games in her spare time.

Gerhard Chou
In order to effectively solve the problems for our customers, every article and troubleshooting solution published on our website has been strictly tested and practiced. Our editors love researching and using computers and testing software, and are willing to help computer users with their problems

