PAGE CONTENT:
- Understanding APFS and the Concept of Containers
- What Are "Other Volumes in Container"?
- Why Should You Delete "Other Volumes in Container"?
- Preparing to Delete "Other Volumes in Container"
- Methods to Delete "Other Volumes in Container"
- Recover Lost Data after Deleting Other Volumes on Container
- Conclusion
If you're a Mac user, especially one who manages a lot of data, you may have encountered a situation where your storage space is mysteriously consumed by something called "Other Volumes in Container." This issue is perplexing to many, but it essentially boils down to how macOS manages data in its APFS (Apple File System) structure. In this article, we will take a deep dive into what these "Other Volumes" are, why they exist, and, most importantly, how to delete them to free up valuable storage space on your Mac.

Understanding APFS and the Concept of Containers
To fully grasp the concept of "Other Volumes in Container," it's crucial to understand the underlying structure of macOS's storage management, specifically the Apple File System (APFS). APFS was introduced in macOS High Sierra (10.13) as a significant upgrade to the previous HFS+ system, optimized primarily for SSDs (Solid-State Drives). APFS was designed to enhance performance, security, and flexibility in storage management. One of its key features is the ability to manage storage through containers, which function as flexible storage units that can house multiple volumes.
In traditional file systems, when you partition a disk, you assign a fixed amount of storage to each partition. This can be limiting because if one partition fills up, you cannot easily borrow space from another. APFS solves this problem by creating containers, which function more dynamically than standard partitions. A container in APFS can hold several volumes, and these volumes share the available space within the container. This means that storage is allocated as needed to each volume, making the system more efficient.
When you install macOS on a new machine, the system creates an APFS container that holds multiple volumes for different purposes. For example, you'll have the System Volume (where the operating system files are stored) and the Data Volume (where your personal files and applications are stored). However, macOS also automatically creates other volumes for tasks such as system recovery, preboot configurations, and temporary virtual memory storage. Over time, additional volumes may be created by the system or by third-party software, which can lead to a buildup of "Other Volumes in Container" that are no longer needed but still occupy valuable space.
These volumes might include:
- Preboot and Recovery Volumes: These are critical volumes created by macOS for recovery and boot purposes. The Preboot volume contains essential files required to boot the system, while the Recovery volume helps users reinstall macOS or troubleshoot system issues. Though vital, these volumes should not consume a lot of space unless there are issues or duplicate recovery partitions.
- Virtual Memory (VM) Volumes: This volume stores swap files used by macOS to manage virtual memory, and its size can fluctuate depending on your system's workload. It's typically temporary, but under certain conditions, these files may accumulate and consume significant space.
- Snapshot Volumes: These are APFS snapshots created by macOS or third-party applications like Time Machine to capture the system state at a particular time. Snapshots are useful for system recovery, but they can remain stored in the container long after they're needed, bloating the system.
- Third-Party Volumes: Some third-party applications, especially those that manage or partition disks (such as Parallels or Boot Camp for running Windows), may create their own volumes within the APFS container. These can often be deleted if they are no longer in use.
What Are "Other Volumes in Container"?
"Other Volumes in Container" generally refer to additional volumes created within your main APFS container. macOS automatically creates some of these volumes for various purposes, such as storing system updates or acting as recovery partitions. However, some third-party applications or user actions (like creating partitions or volumes manually) can also add to this collection.
The most common volumes include:
- System Volume: This holds the macOS system files.
- Data Volume: This stores user data, applications, and files.
- Preboot and Recovery Volumes: These are used for recovery and boot purposes.
- Other Volumes: This may include backup snapshots, temporary files, or any additional volumes created manually or by the system.
The issue often occurs when one or more of these volumes starts consuming significant storage without providing any clear benefit. This typically happens if you've installed multiple operating systems, created unnecessary partitions, or accumulated backups and snapshots.
Why Should You Delete "Other Volumes in Container"?
The main reason to delete "Other Volumes in Container" is to free up storage space. With SSDs, which are commonly used in Macs, every gigabyte counts. Left unchecked, these volumes can easily consume tens of gigabytes, especially if they contain old snapshots, system backups, or unused recovery partitions.
Furthermore, a cluttered container can affect system performance. As your available disk space shrinks, macOS may struggle to perform optimally, leading to slower speeds, longer boot times, and system lags.
By cleaning up these volumes, you can:
- Reclaim storage space.
- Improve system performance.
- Remove unused and unnecessary data that could potentially slow down the system.
Preparing to Delete "Other Volumes in Container"
Before proceeding with any deletions, it's essential to back up your important files. Even though the process we're discussing is generally safe, any operation that modifies the structure of your system's storage comes with risks. The most recommended method of backing up your data on a Mac is to use Time Machine, Apple's built-in backup solution.
After backing up, ensure that your Mac is updated to the latest version of macOS. Some of the problems associated with "Other Volumes in Container" are solved in newer system updates, and you might find that upgrading macOS alone frees up some space.
💡 Note: You can use Mac disk cloning software to create a full bootable clone backup for your Mac.
Methods to Delete "Other Volumes in Container"
There are several methods to delete these volumes, depending on your needs and technical comfort level. Below, we'll explore the most common and effective approaches.
Method 1: Using Disk Utility
The easiest and most user-friendly way to manage your storage is by using macOS's built-in Disk Utility tool.
- Open Disk Utility: You can do this by going to Applications > Utilities > Disk Utility or simply searching for it in Spotlight (Command + Space and type "Disk Utility").
- Select the Container: Once Disk Utility opens, you will see a list of drives and containers on the left sidebar. Select the container that holds the volumes you want to manage.
- View Volumes: After selecting the container, you will see all the volumes within that container listed. These volumes can include "Macintosh HD," "Macintosh HD - Data," "Preboot," "Recovery," and "VM."
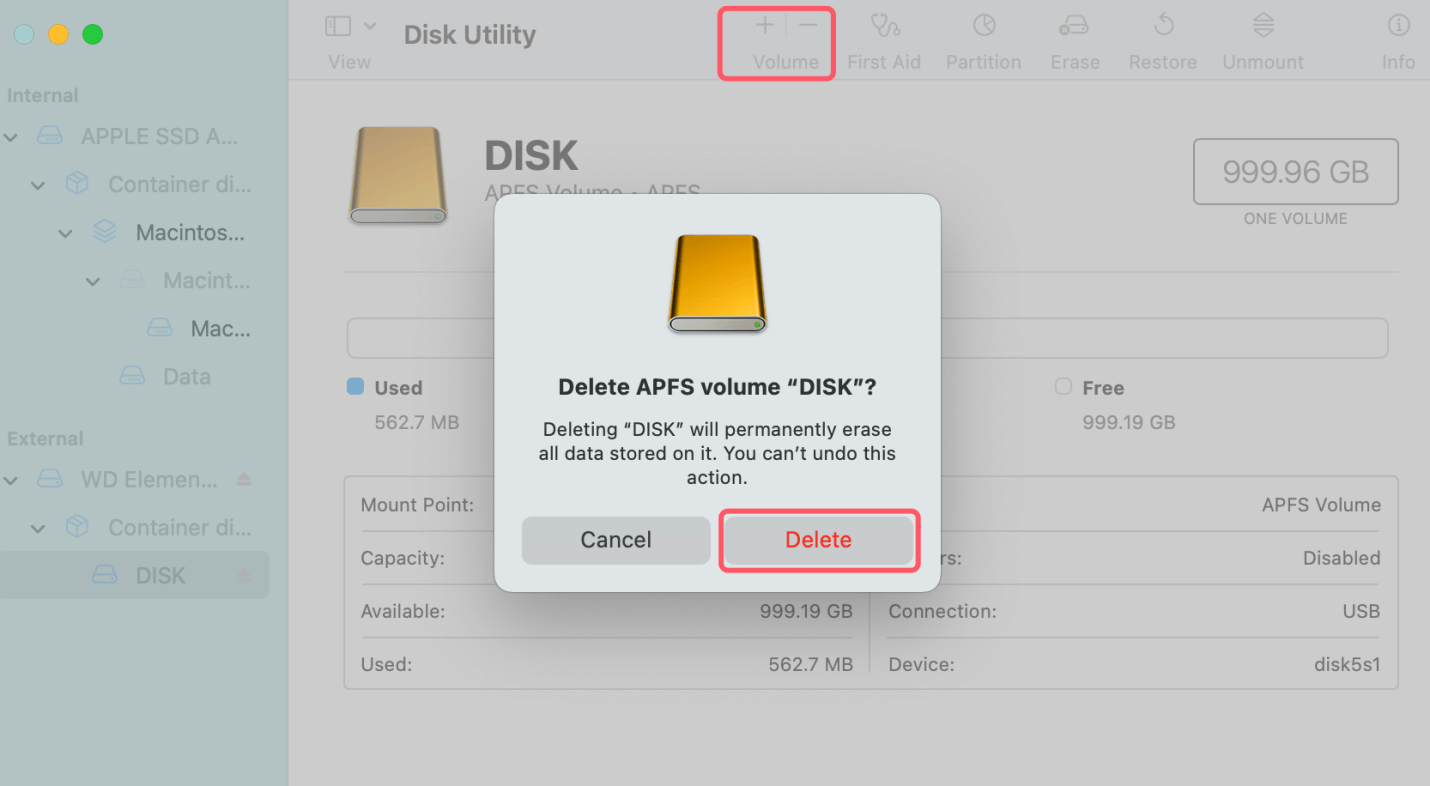
- Delete Unwanted Volumes: Click on the volume you wish to delete, and then click the Delete Volume (-) button. Be cautious when selecting which volumes to delete. For example, deleting the "Preboot" or "Recovery" volume may prevent your Mac from being able to recover if something goes wrong.
![Delete Unwanted Volumes]()
- Reclaim Storage: Once you've deleted the unwanted volume, the available space should immediately reflect in the container's free storage. However, if it doesn't, restarting your Mac may help.
Method 2: Using Terminal
For those who prefer a more hands-on approach or need to delete stubborn volumes that Disk Utility doesn't seem to handle well, you can use the Terminal app.
- Open Terminal: You can find Terminal in Applications > Utilities > Terminal or search for it using Spotlight.
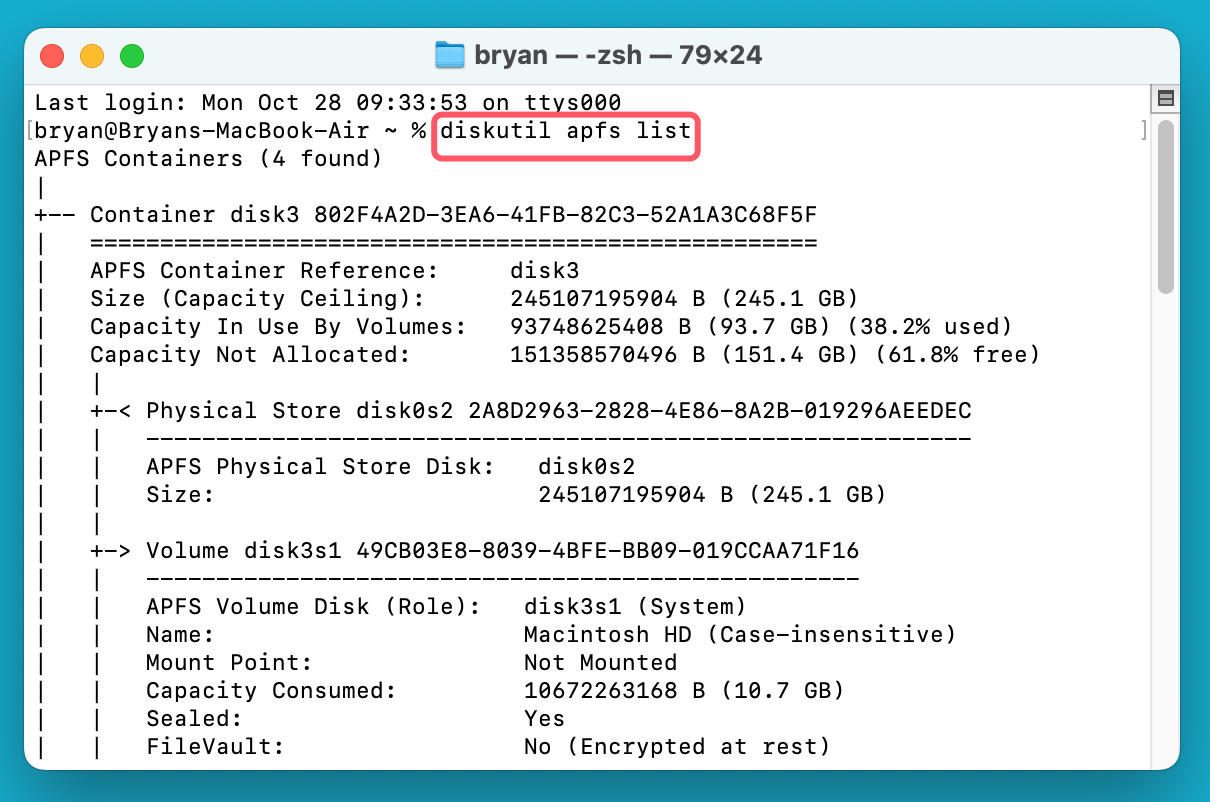
- List APFS Volumes: To see all the volumes in your container, type the following command:
diskutil apfs list
![List APFS Volumes]()
- Locate the Volume: In the output, locate the volume you want to delete. Each volume will have an identifier like disk1s1 or disk2s3. Make a note of this identifier.
- Delete the Volume: Use the following command to delete the volume:
sudo diskutil apfs deleteVolume diskXsX
Replace diskXsX with the appropriate volume identifier. For example, if your volume identifier is disk1s3, the command would be:
sudo diskutil apfs deleteVolume disk1s3
- Confirm Deletion: After entering the command, Terminal will ask for your password. Once confirmed, it will delete the volume.
Method 3: Removing APFS Snapshots
APFS snapshots can sometimes be the culprit behind excessive storage use under "Other Volumes in Container." Snapshots are created automatically by macOS (particularly during updates or Time Machine backups), and they can take up significant space. While macOS should delete older snapshots automatically, sometimes they linger and eat up space.
To check and remove snapshots, follow these steps in Terminal:
- List Snapshots:
tmutil listlocalsnapshots /
![List Snapshots]()
- Delete Snapshots: To delete a specific snapshot, use the following command:
sudo tmutil deletelocalsnapshots YYYY-MM-DD-HHMMSS
Replace YYYY-MM-DD-HHMMSS with the timestamp of the snapshot you wish to delete, which you’ll get from the output of the previous command.
- Free Up Space: After deleting the snapshot(s), your storage space should be reclaimed instantly.
Method 4: Erasing the APFS Container (Advanced)
This method is for users who want to completely start fresh and erase the entire APFS container, which will remove all volumes inside it. This is a more drastic approach and should only be done if you're comfortable erasing all data on the container.
Boot the Mac into macOS Recovery mode, select Disk Utility for erasing APFS container:
- Open Disk Utility and select the APFS container you want to erase.
- Click Erase: At the top of the Disk Utility window, click the Erase button.
- Select Format: Choose the format as APFS (if you plan to continue using macOS) and give the container a new name if necessary.
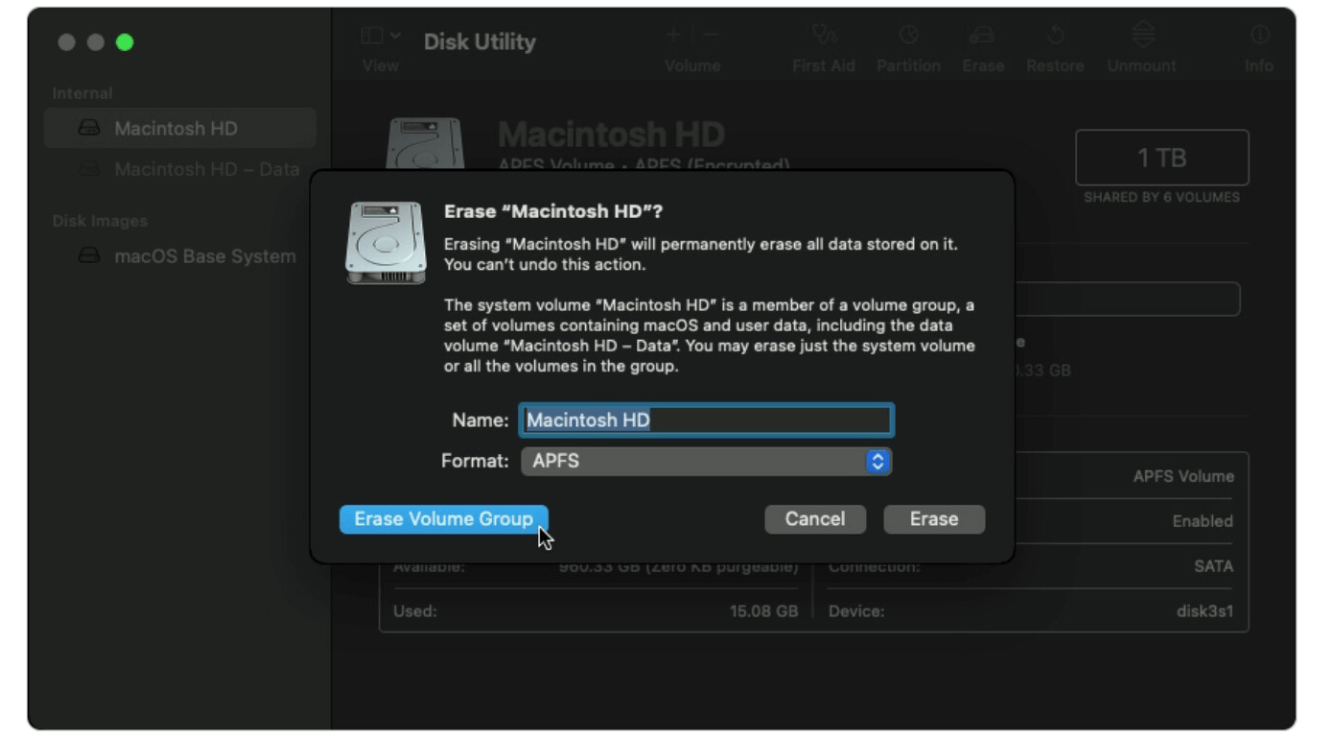
- Erase the Container: Click Erase to wipe the entire container and all of its volumes. This action is irreversible, so ensure you've backed up your data.
![Erase the Container]()
- Reinstall macOS: Once the container has been erased, you'll need to reinstall macOS to get your system back up and running. You can do this using macOS Recovery by restarting your Mac and holding down Command + R (for Intel-based Mac) or Power button (for Apple silicon Mac) during boot.

How to Reinstall Mac Operating System
Boot the Mac into macOS Recovery mode, then choose Reinstall macOS to reinstall Mac operating system.
Final Considerations
While deleting "Other Volumes in Container" can free up storage space, it's essential to understand the risks involved. Some volumes, such as those used for system recovery or boot purposes, are critical to the functioning of your Mac. Always ensure you know what a volume is before you delete it. If in doubt, consult Apple's support resources or seek help from a professional.
In summary:
- Start with Disk Utility for easy volume management.
- Use Terminal for more precise control and to remove snapshots.
- Back up your data before making any changes.
Recover Lost Data after Deleting Other Volumes on Container
Deleting Other Volumes in Container or erase APFS Container may cause data loss. If you have lost data due to deleting Other Volumes in Container, you can use Mac data recovery software to deeply scan the entire SSD and get all lost files back.
Step 1. Download and install the reliable Mac data recovery software - Donemax Data Recovery for Mac. It supports to recover deleted, formatted and erased data on Mac.
Step 2. Open Donemax Data Recovery for Mac, then select the internal SSD (Macintosh HD) to start data recovery.

Step 3. Click on Scan button to deeply scan the internal SSD and find all recoverable files.

Step 4. Once the scan is completed, you can preview all recoverable files. Select the wanted files, click on Recover button to save them.

Conclusion
Managing storage space on a Mac can be tricky, especially when dealing with the complexities of APFS containers. "Other Volumes in Container" can take up significant space, but by using Disk Utility, Terminal, and other tools, you can regain control of your storage. Always ensure you back up your data before making significant changes, and don't hesitate to seek expert advice if you're unsure about which volumes to delete. With these steps, you can free up storage and keep your Mac running smoothly.
Related Articles
- Nov 07, 2024Downgrade from macOS Sequoia to macOS Sonoma or Earlier Versions
- Dec 05, 2024Can't Install macOS Sonoma on My Mac, Why and How to Fix It
- Sep 25, 2024Fix Toshiba External Hard Drive Not Mounting on Mac (7 Solutions)
- Apr 01, 2025How to Use Seagate Ultra Compact SSD on Mac?
- Aug 10, 2025How to Install Google Drive on Mac (2025 Guide)?
- Jun 30, 2025Best 5 Methods to Format USB Flash Drive on Mac

Christina
Christina is the senior editor of Donemax software who has worked in the company for 4+ years. She mainly writes the guides and solutions about data erasure, data transferring, data recovery and disk cloning to help users get the most out of their Windows and Mac. She likes to travel, enjoy country music and play games in her spare time.

Gerhard Chou
In order to effectively solve the problems for our customers, every article and troubleshooting solution published on our website has been strictly tested and practiced. Our editors love researching and using computers and testing software, and are willing to help computer users with their problems


