Before we start: Donemax Data Recovery for Mac can help you completely recover lost data from uninitialized APFS drive on Mac. It also can help you run First Aid on uninitialized APFS drive or reformat APFS drive on Mac.
PAGE CONTENT:
Mac users occasionally encounter technical issues with their systems, and one particularly perplexing issue is the "AppleAPFSMedia uninitialized" error. This issue is often tied to the Apple File System (APFS), which is designed to handle data storage on modern Mac computers. When this error appears, it can cause significant concern as it typically points to a problem with how the system is accessing or reading the storage drive. More worrisome is the potential for data loss, especially if the issue is not addressed properly.
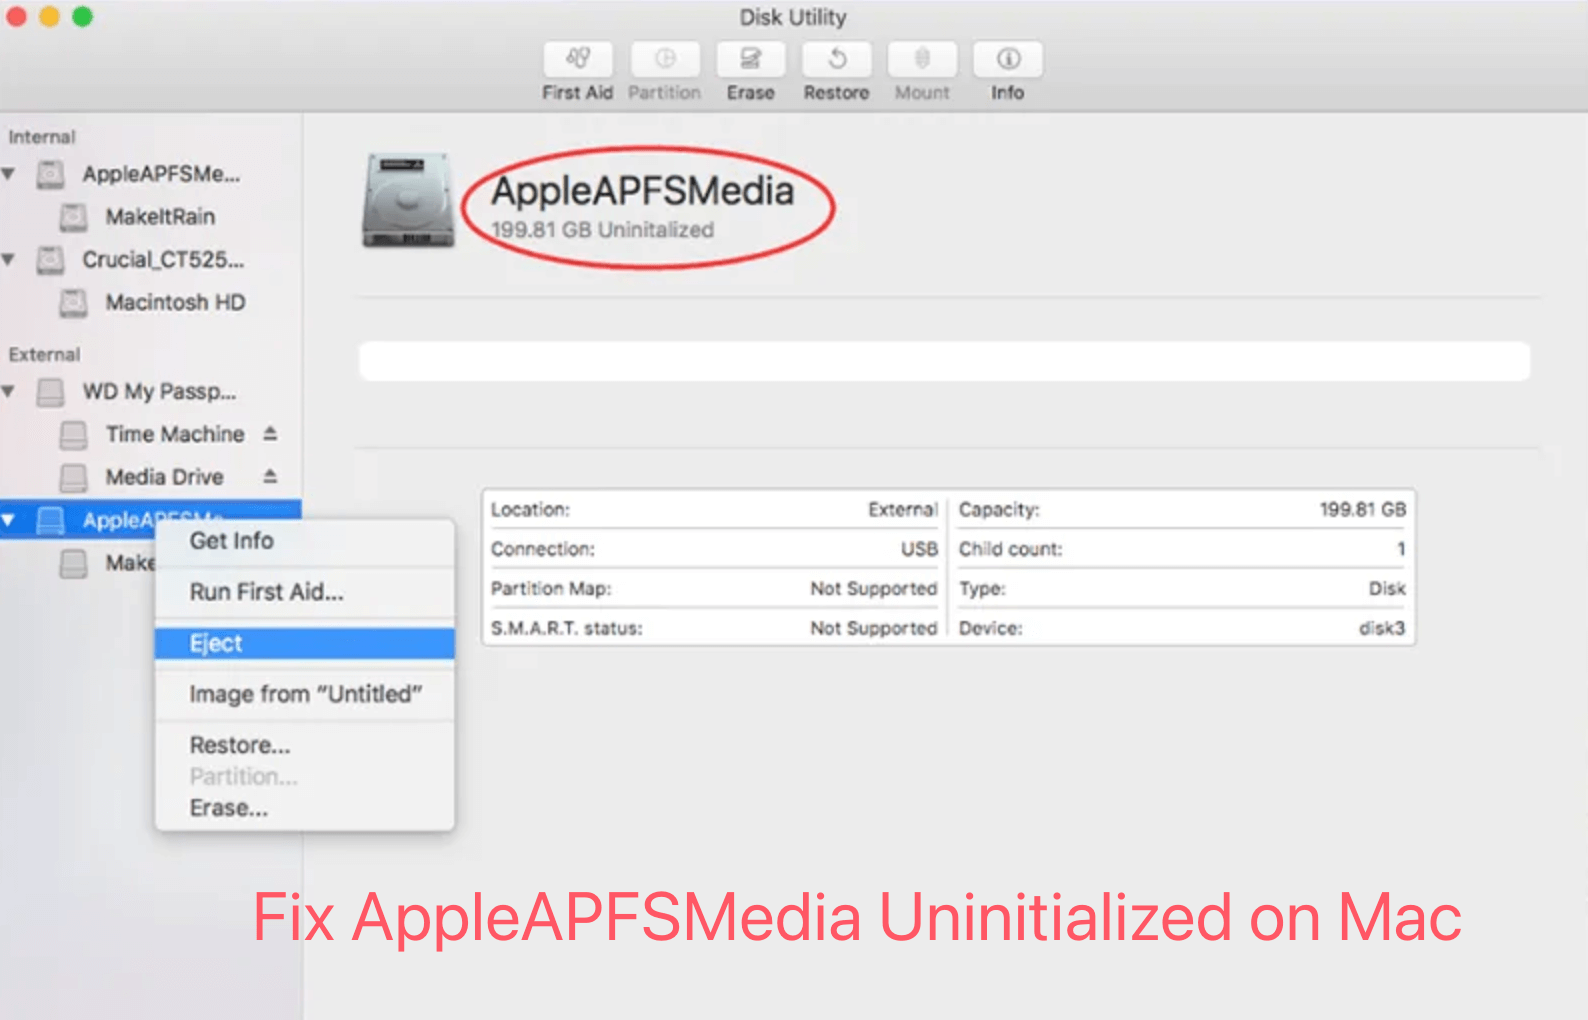
This article will guide you through the process of fixing the AppleAPFSMedia uninitialized error on your Mac without losing any important data. We'll explore the causes of the error, preventive measures, and step-by-step solutions, ensuring that you can navigate through the issue effectively and safely.s
Understanding the AppleAPFSMedia Uninitialized Error
The AppleAPFSMedia error is related to APFS (Apple File System), which is the default file system introduced by Apple in macOS High Sierra. APFS is optimized for solid-state drives (SSDs) and is designed to deliver improved performance, reliability, and data integrity. The AppleAPFSMedia refers to the media (typically an SSD or hard drive) that is managed by the APFS file system.
The term "uninitialized" in the context of this error message means that macOS is unable to properly access or initialize the APFS container, which is a critical structure that stores all data on your Mac's storage device. The system essentially fails to read the data, and as a result, your Mac may not be able to boot, or you may encounter errors when attempting to access files.
Common causes of the AppleAPFSMedia uninitialized error include:
- Corruption of the APFS volume: Due to improper shutdowns, power failures, or issues during system updates, the APFS volume may become corrupted.
- Physical damage to the drive: Hardware issues such as failing SSDs or hard drives can lead to uninitialized volumes.
- File system inconsistencies: Sometimes, the file system may become inconsistent due to system crashes or software bugs, leading to the uninitialized error.
- Improper formatting: If the APFS volume is incorrectly formatted or not initialized properly during system installation, it can lead to errors.
Key Considerations Before Fixing the Issue:
Before jumping into any technical fixes, it's essential to consider the following:
- Back Up Your Data: The first step in addressing the AppleAPFSMedia uninitialized issue is backing up your data. While some fixes can be done without risking data loss, it's always best to have a copy of your important files. If the error prevents you from accessing your data normally, data recovery tools can help, but prevention is always better.
- Choose the Right Tools: Having the right tools for the job can make a significant difference. If you're able to access your system, macOS's built-in Disk Utility tool is a good starting point. For more advanced issues, third-party tools like Donemax Data Recovery for Mac or Time Machine can be useful for data recovery and repair.
- Evaluate the Risks: If your drive is physically damaged, software repairs may not be sufficient. In this case, consulting with a professional technician or data recovery expert may be necessary to prevent irreversible data loss.
Step-by-Step Guide to Fixing AppleAPFSMedia Uninitialized Error
Now that we've covered the initial precautions, let's dive into the detailed steps to resolve the AppleAPFSMedia uninitialized error.
Step 1: Diagnose the Issue Using Disk Utility
The first tool to try is Disk Utility, macOS's built-in application that allows you to manage your storage devices. Disk Utility can often identify and fix common disk errors, including those related to the APFS file system.
- Open Disk Utility: You can access Disk Utility by searching for it in Spotlight or by navigating to Applications > Utilities > Disk Utility.
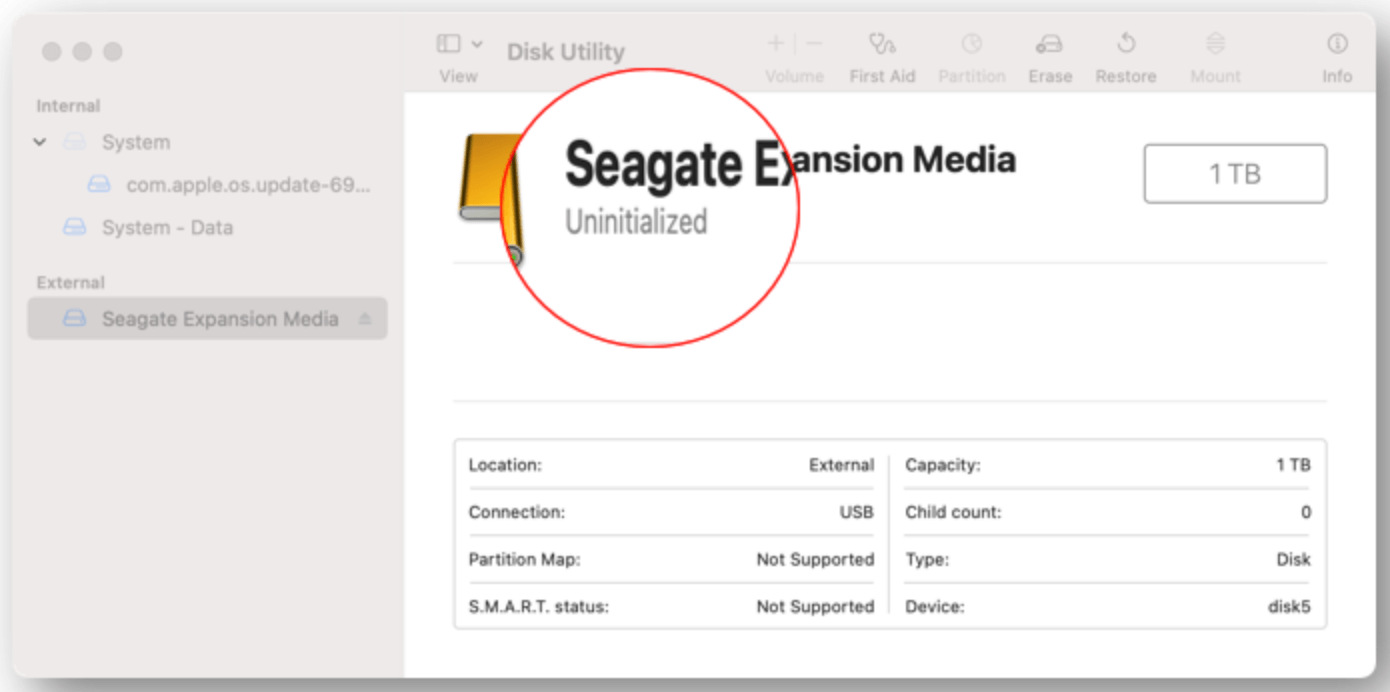
- Select the Affected Drive: In the left-hand pane of Disk Utility, select the disk or volume that is showing the "AppleAPFSMedia uninitialized" error.
- Check the Disk Status: In the main window, you will see the status of the selected drive. If the volume shows as "uninitialized" or if it displays an error message, you'll need to proceed with further actions.
![Fix AppleAPFSMedia Uninitialized Without Losing Data on Mac]()
Step 2: Run First Aid on the APFS Volume
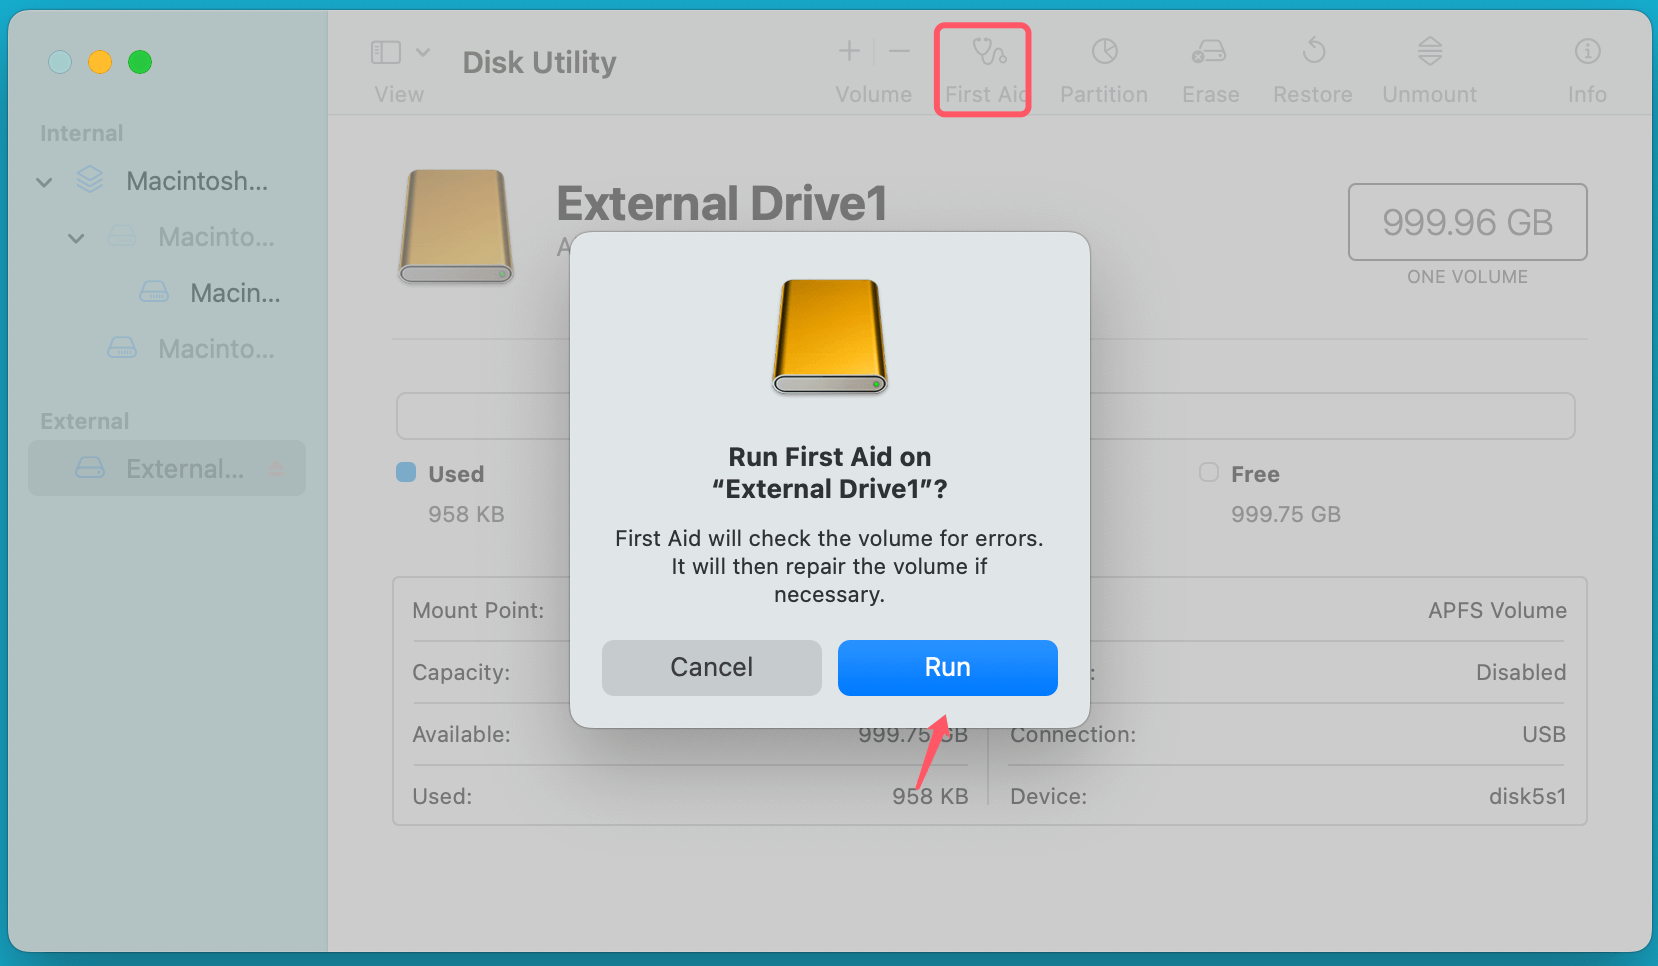
Disk Utility has a feature called First Aid that can automatically detect and repair minor file system issues. Running First Aid is a simple yet effective solution for resolving problems with an uninitialized APFS volume.
- Click on First Aid: With the affected disk selected in Disk Utility, click on the First Aid button at the top of the window.
![Fix AppleAPFSMedia Uninitialized Without Losing Data on Mac]()
- Allow the Repair Process to Complete: Disk Utility will scan the disk for errors and attempt to repair any issues it finds. This process can take anywhere from a few minutes to an hour, depending on the size of your disk and the severity of the issues.
- Review the Results: Once the process is complete, Disk Utility will display a report. If it finds and fixes errors, it will tell you that the disk is now repaired. If it fails to fix the issue or cannot proceed with the repair, you may need to take further steps.
Step 3: Use Terminal Commands for Advanced Repair
If Disk Utility's First Aid feature fails to fix the uninitialized error, the next step is to use macOS Terminal. Terminal allows you to run more advanced repair commands, which can be particularly useful when dealing with APFS volumes.
- Open Terminal: You can find Terminal in Applications > Utilities > Terminal.
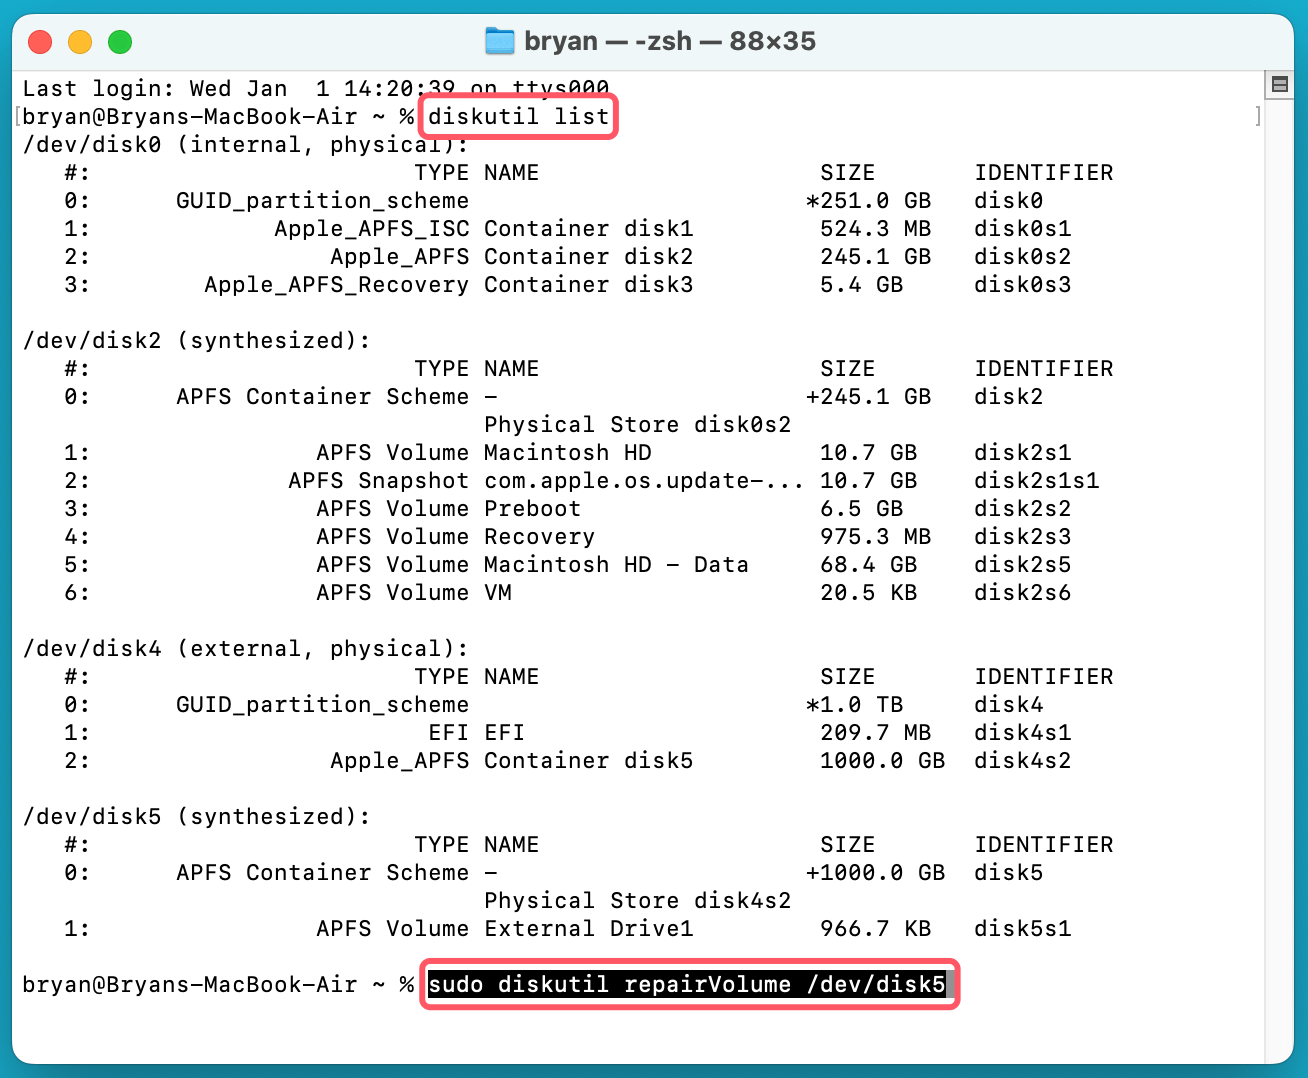
- Run the Diskutil Command: The diskutil command is a powerful tool that can help with a variety of disk-related problems. To attempt a repair of your APFS volume, type the following command:
sudo diskutil repairVolume /dev/diskX
![Fix AppleAPFSMedia Uninitialized Without Losing Data on Mac]()
Replace /dev/diskX with the actual identifier of your disk, which you can find using the command diskutil list in Terminal. This command will attempt to repair the APFS volume and restore it to a functional state.
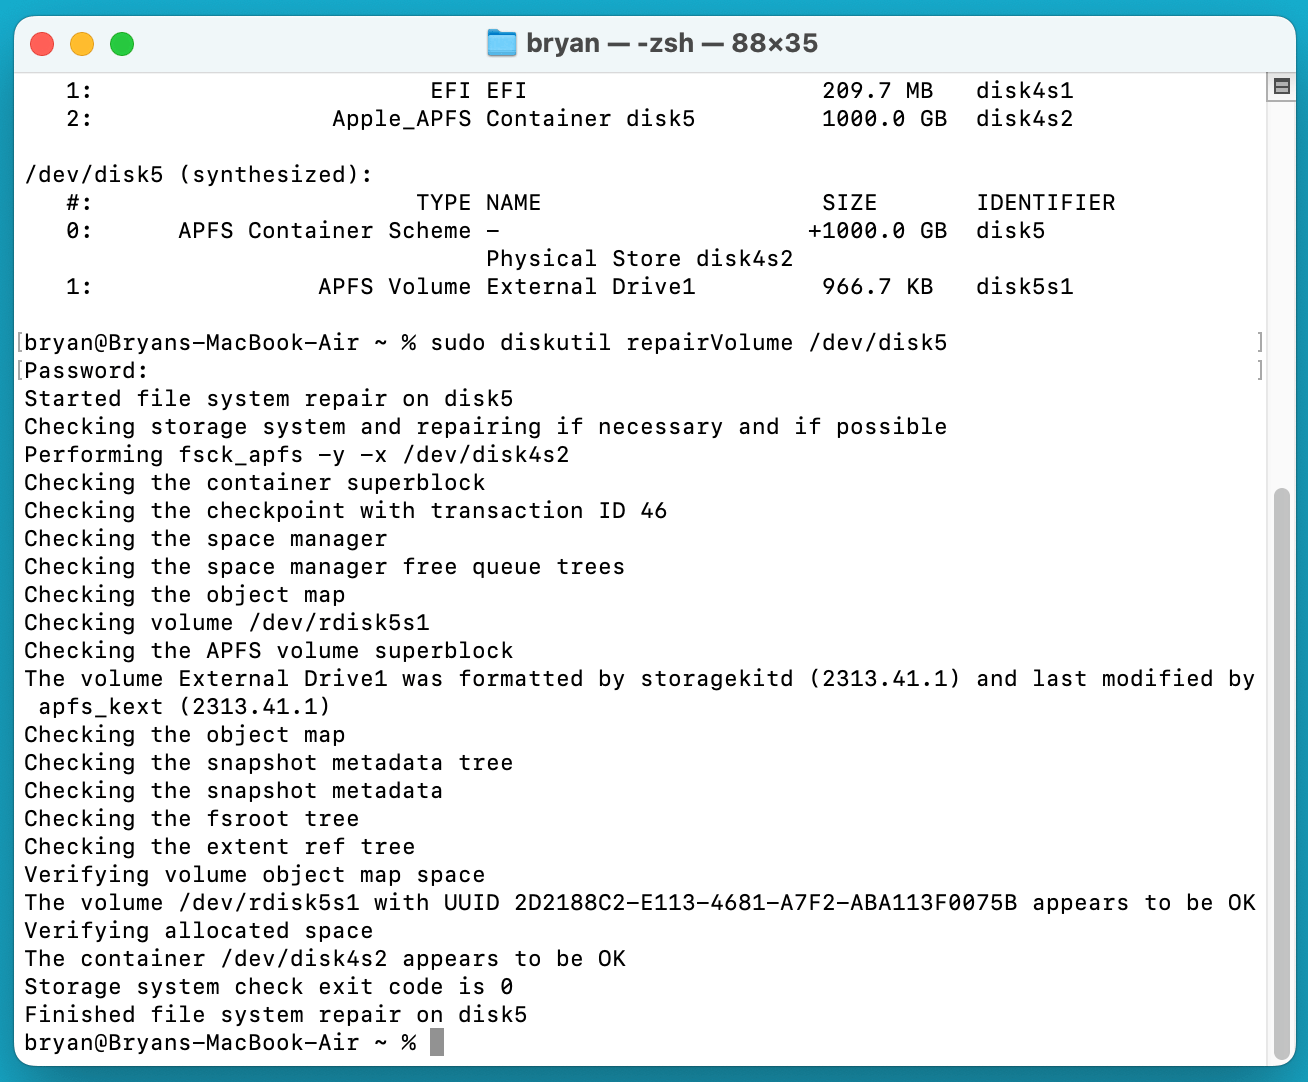
- Check the Results: Once the command completes, Terminal will output the results. If the repair is successful, the disk should be initialized and accessible again. If there are errors, Terminal will provide more information on what went wrong.
![Fix AppleAPFSMedia Uninitialized Without Losing Data on Mac]()
Step 4: Recover Data Using Data Recovery Tools
If you still cannot access your data after attempting the previous steps, you may need to resort to data recovery software. These tools can help you retrieve data from a corrupted or uninitialized APFS volume, though they may not always be able to recover everything.
1. Choose a Data Recovery Tool: Popular data recovery tools include Donemax Data Recovery for Mac, Data Rescue, and EaseUS Data Recovery. Choose one that supports APFS and has a good reputation for success.
Donemax Data Recovery for Mac
- Recover lost data and export data from uninitialized APFS volume on Mac.
- Recover deleted or erased data on Mac.
- Recover lost data from HDD/SSD and USB Drive/SD Card, etc.
2. Follow the Software's Instructions: Once you've installed the data recovery software (such as Donemax Data Recovery for Mac), follow the instructions to scan your APFS volume for recoverable files. This process may take time, depending on the size of the volume and the level of corruption.

3. Save Recovered Files: After the scan, the software will show a list of files it can recover. Save these files to an external drive to ensure they are not overwritten or lost during future repairs.

Step 5: Reinitialize the APFS Volume Without Data Loss
If the uninitialized error persists, you may need to reinitialize the APFS volume. Fortunately, there's a way to do this without losing your data - provided you've already backed up or recovered your files.
- Erase the Volume: In Disk Utility, select the affected volume and click on the "Erase" button. Choose the APFS format and confirm the erasure. This will delete the current APFS structure but will not erase your files if they have been backed up elsewhere.
- Reinstall macOS: After erasing the volume, reinstall macOS onto the freshly initialized APFS volume. This will restore the operating system and file system, making the drive usable again.
- Restore Data: If you've backed up your data with Time Machine or another tool, you can now restore your files to the newly initialized volume.
Preventative Measures to Avoid Future Issues
Once you've resolved the AppleAPFSMedia uninitialized error, it's crucial to take steps to prevent future problems:
- Regular Backups: Always keep a backup of your important files. Use Time Machine, iCloud, or third-party tools to automate regular backups.
- Monitor Disk Health: Use Disk Utility or third-party apps like DriveDx to monitor the health of your disk. These tools can provide early warnings of potential issues.
- Keep macOS Updated: Regularly update your macOS to ensure you have the latest system fixes, including those related to file system stability.
- Avoid Sudden Shutdowns: Ensure your Mac shuts down properly to prevent file system corruption. Always use the Apple menu to shut down or restart your Mac.
Conclusion
The AppleAPFSMedia uninitialized error can be a frustrating issue, but with the right tools and a systematic approach, it is possible to resolve the problem without losing data. By following the steps outlined in this article, you can diagnose, repair, and recover from the error, while also taking preventative measures to avoid future problems. Always back up your data, and when in doubt, consider seeking professional assistance to ensure your files remain safe.
Donemax Data Recovery for Mac is a powerful Mac data recovery program. It can completely recover data from an uninitialized APFS drive on Mac, and can help in reformatting damaged drives.


Donemax Data Recovery for Mac
Donemax Data Recovery for Mac is one of the best Mac data recovery software. It is easy-to-use and can help in recovering deleted, formatted, inaccessible or lost data from Mac HDD/SSD, external disk, USB drive, SD card, camera or other storage devices.
Related Articles
- Sep 23, 2025Fix Xcode Not Working on macOS Tahoe, Sequoia, Sonoma, etc.
- Feb 09, 2025[7 Solutions] Fix Storage System Verify or Repair Failed 69716 Error on Mac
- Sep 18, 2025OpenCore Legacy Patcher Overview & Download
- Feb 06, 2025[4 Methods] Fix The Volume Macintosh HD Was Found Corrupt and Needs to Be Repaired
- Apr 06, 2025Best 7 Solutions to Fix WD My Passport Not Mounting on Mac Without Losing Data
- Sep 04, 2025How to Delete iOS Files on Mac?

Christina
Christina is the senior editor of Donemax software who has worked in the company for 4+ years. She mainly writes the guides and solutions about data erasure, data transferring, data recovery and disk cloning to help users get the most out of their Windows and Mac. She likes to travel, enjoy country music and play games in her spare time.

Gerhard Chou
In order to effectively solve the problems for our customers, every article and troubleshooting solution published on our website has been strictly tested and practiced. Our editors love researching and using computers and testing software, and are willing to help computer users with their problems
