Written byCharlesUpdated on Mar 01, 2025
How to Format an External Hard Drive Using CMD (Command Prompt)?
Approved byGerhard Chou
Before we start: Command Prompt can help you easily format an external hard drive on Windows computer. If you have lost data due to reformatting an external hard drive with CMD, you can try Donemax Data Recovery. It can securely and easily recover lost data from a formatted external hard drive.
PAGE CONTENT:
External hard drives are useful for expanding storage, creating backups, and transferring large files between devices. However, there are times when you may need to format an external hard drive, such as when:
- The drive becomes corrupted or unreadable.
- You want to change the file system (e.g., NTFS, exFAT, or FAT32).
- You are preparing the drive for a different operating system.
- The drive is not being recognized properly.
While most people format external drives using the Windows File Explorer, the Command Prompt (CMD) provides a more powerful and flexible way to format a drive. This method is especially useful when the drive is not showing up in File Explorer or when encountering errors during formatting.
In this guide, we will walk you through the entire process of formatting an external hard drive using CMD.
Precautions Before Formatting the External HDD/SSD with CMD
Prior initiating the formatting process, it is essential to take some precautions to prevent data loss and errors.
1. Backup Important Data
Formatting erases all data on the external hard drive. If you have important files, make sure to back them up to another storage device or cloud storage.
Note: If the external hard drive gets corrupted and is not accessible, you can use data recovery program, such as Donemax Data Recovery to export all files from it to your computer.
2. Check the Drive Letter and Size
To avoid formatting the wrong drive, double-check the assigned drive letter and storage capacity. This can be done by:
- Opening File Explorer and looking for the external hard drive.
- Checking Disk Management (diskmgmt.msc) to verify the correct drive letter and storage space.
3. Ensure the Drive is Properly Connected
- Use a working USB cable and port.
- If the drive is not detected, try attaching it to a different computer.
- If the drive is new, ensure it is initialized in Disk Management before proceeding.
Once you have taken these precautions, you can proceed to format your external hard drive using Command Prompt's diskpart tool.
Steps to Format an External Hard Drive with Command Prompt (CMD)
#1 Open Command Prompt as Administrator
You must launch Command Prompt with administrator rights in order to format a hard drive using CMD. Follow these steps:
- Press Windows + S, type cmd, and right-click on "Command Prompt."
- To open an elevated Command Prompt window, choose Run as administrator.

#2 Find and Select the External Hard Drive
To format the correct drive, you first need to identify it using the diskpart tool.
Step 1: Open Diskpart
Enter the following command in the Command Prompt window and hit Enter:
Diskpart

This launches the Disk Partition tool, which allows you to manage drives.
Step 2: List Available Drives
To see all connected storage devices, type the following command and press Enter:
list disk

A list of the disks that are linked to your computer is shown by this command. Check the size column for your external hard disk.
Step 3: Select the External Hard Drive
Once you identify the correct disk, select it by running:
select disk X

(Replace X with the actual disk number of your external drive.)
To confirm that the correct drive is selected, type:
list disk
The selected disk will have a * mark next to it.
#3 Format the External Hard Drive Using CMD's diskpart
Now that you have selected the correct disk, follow these steps to format it properly.
Step 1: Clean the Drive
To remove all existing partitions and data, type the following command and press Enter:
Clean

This command wipes the disk completely, making it unallocated.
Step 2: Create a New Partition
After cleaning the disk, create a new primary partition with this command:
create partition primary

Step 3: Select the Newly Created Partition
To select the new partition, type:
select partition 1

Step 4: Format the Partition
Now, format the partition with the desired file system. You can choose from:
- NTFS (New Technology File System) – Ideal for Windows users, supports large files.
- exFAT (Extended File Allocation Table) – Compatible with Windows and macOS, suitable for large file storage.
- FAT32 (File Allocation Table 32) – Compatible with most devices, but has a 4GB file size limit.
To format as NTFS, type:
format fs=ntfs quick

To format as exFAT, type:
format fs=exfat quick
To format as FAT32, type:
format fs=fat32 quick
The quick parameter speeds up the process by skipping a full scan. If you want a deeper format (to remove all traces of previous data), omit quick:
format fs=ntfs
Step 5: Assign a Drive Letter
After formatting is finished, designate a drive letter (such as H:) using:
assign letter=H

Step 6: Exit DiskPart
Finally, type:
Exit

This will close Diskpart. You can now use your formatted external hard drive.
#4 Verify the Formatting Process
To ensure the drive is formatted correctly, follow these steps:
1. Check in File Explorer
- Open File Explorer (Windows + E).
- Look for the external hard drive under "This PC" or "Devices and Drives."
- Verify the file system is proper by right-clicking the drive, choosing Properties, and then clicking again.

2. Check Using Disk Management
- Press Windows + X and select Disk Management.
- Locate your external hard drive and verify the partition type and file system.

Formatting External Hard Drive with CMD Troubleshooting Common Issues
Even though formatting an external hard drive using CMD is a powerful method, users may encounter various errors or problems during the process. Below, we will cover some common issues and their solutions in detail.
1. Drive Not Showing Up in CMD
If the external hard drive is not appearing when you run the list disk command in Diskpart, it may be due to connection issues, driver problems, or an uninitialized drive.
Possible Causes:
- Loose or faulty USB connection.
- Outdated or missing drivers.
- The drive is not initialized or has no partition.
Solutions:
▪️ Check Hardware Connections
- Reinsert the Drive – Unplug the external hard drive and reconnect it to a different USB port.
- Try a Different Cable – A faulty cable can prevent the drive from being detected. Use a different USB cable.
- Use Another Computer – Plug the drive into another PC to check if it is recognized there.
▪️ Update Disk Drivers
- Choose Device Manager by pressing Windows + X.
- Locate your external hard drive by expanding the disk drives.
- Right-click the drive and choose Update driver. Then choose Search automatically for drivers.
![Formatting an external hard drive using CMD]()
- Restart your computer after updating.

▪️ Initialize the Drive (If It's New or Unallocated)
If the drive is brand new, it may not be initialized, meaning it won't appear in CMD. To initialize it:
- Choose Disk Management by pressing Windows + X.
- Search for a disk that says "Not Initialized" or "Unallocated."
- Choose Initialize Disk with a right-click on the disk.
![Formatting an external hard drive using CMD]()
- For more recent systems, select GPT; for older systems, select MBR.
- Create a new partition and assign a drive letter.

Once the drive is initialized, return to CMD and retry the list disk command.
2. "The Volume is in Use by Another Process" Error
Possible Causes:
- A program (like antivirus software or Windows Explorer) is actively using the drive.
- The drive contains system files or page files.
- Hidden background processes are accessing the drive.
Solutions:
▪️ Close All Running Programs
- Close any open files or folders from the external drive.
- Exit background programs like antivirus software that might be scanning the drive.
▪️ Force Format Using Safe Mode
If you still can't format the drive, try using Safe Mode:
- Type msconfig using Windows + R, then hit Enter.
- Select Safe boot under the Boot menu.
- Restart your PC in Safe Mode and try formatting again using CMD.
▪️ Use the Diskpart Override Command
If Safe Mode doesn't help, use the override parameter:
select volume X
format fs=ntfs quick override
This forces the format by overriding system locks.
3. Cannot Format Drive Due to Corruption
Sometimes, a drive refuses to format due to file system corruption or bad sectors.
Possible Causes:
- The file system is damaged.
- The drive has too many bad sectors.
- A virus or malware has affected the disk.
Solutions:
▪️ Run a Disk Check (CHKDSK)
The chkdsk command helps fix errors before formatting:
chkdsk X: /f /r /x

After running chkdsk, try formatting the drive again in CMD.
▪️ Use Low-Level Formatting (Full Format)
If chkdsk fails, try a full format instead of a quick one:
format fs=ntfs
This process takes longer but ensures all data is wiped and rewritten.
▪️ Use a Third-Party Tool
If CMD fails, tools like Donemax Data Recovery, MiniTool Partition Wizard, or HDD Low-Level Format Tool can force-format stubborn drives.
4. Incorrect Drive Selection – Accidental Formatting
One of the biggest risks when using CMD is accidentally formatting the wrong drive. If this happens, stop using the drive immediately and try recovering the lost data.
Solutions:
▪️ Use Data Recovery Software
Trustworthy tools can help recover lost files after accidental formatting.
▪️ Check for Previous Partitions Using TestDisk
If a full format was not performed, you might recover old partitions using:
- Download TestDisk (official site).
- Run TestDisk and select Analyze > Search for lost partitions.
- If partitions are found, restore them.
▪️ Prevent Future Mistakes
To avoid formatting the wrong drive in the future:
- Always double-check the disk number before using select disk X.
- Label important drives with unique names in File Explorer.
- Disable unnecessary drives before performing any risky operations.
By following these troubleshooting steps, you can handle most common issues related to formatting an external hard drive using CMD.
Recover Lost Data from Formatted External Hard Drive
Formatting the external hard drive using CMD erases everything from the drive. If you want to recover the formatted data from the external hard drive, just try data recovery program - such as Donemax Data Recovery.
Step 1. Download and install Donemax Data Recovery on your computer. Connect the external hard drive to your computer.
Step 2. Open Donemax Data Recovery, select the external hard drive to start data recovery.

Step 3. Click on Scan button to deeply scan the formatted external hard drive and find all erased/lost files.
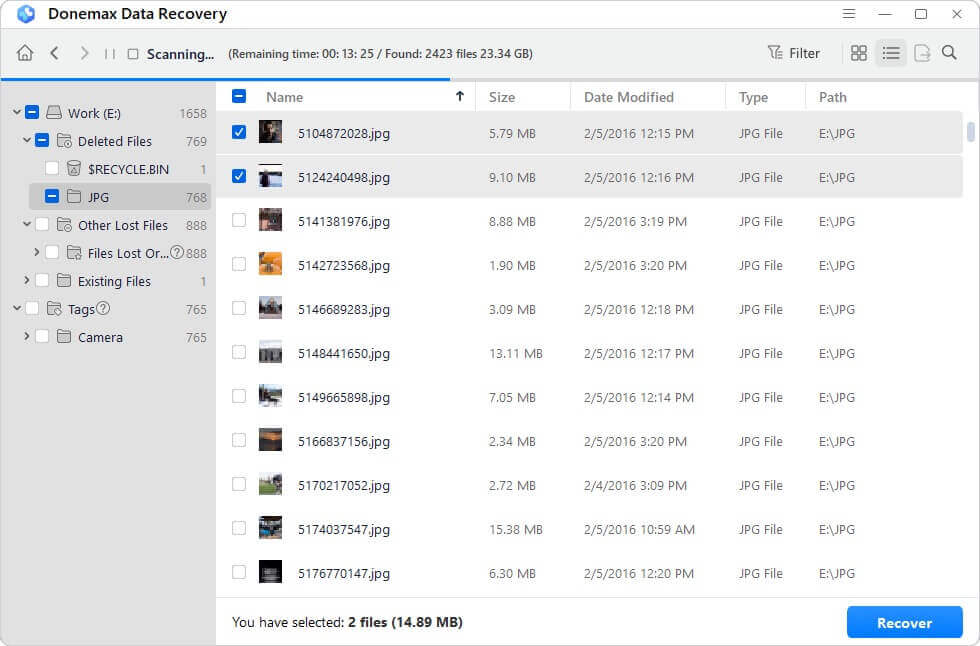
Step 4. Once the scan gets finished, you can preview all recoverable files. Then select the wanted files, click on Recover button to save them.

Conclusion
Formatting an external hard drive using CMD is a powerful method that ensures a clean and error-free process. By complying the steps in this article, you can format your drive efficiently and troubleshoot any issues that arise. With this guide, you can confidently format any external hard drive using CMD, ensuring it is ready for use in Windows or other systems.
Related Articles
- Jan 29, 2024How to Fix Toshiba External Hard Drive Not Showing Up on Mac?
- Nov 25, 2024Fix External Hard Drive Read-Only on macOS Monterey
- Dec 03, 2024Fix External Drive, USB Drive, SD Card Not Mounting on macOS Sequoia
- Jul 17, 2023Format A SD Card for Both Windows and Mac OS
- Jul 08, 2024APFS Drive Not Mounting on Mac, Fix It Now
- Jan 02, 2025Disk is OFF or Offline on Mac, Fix It Now

Contributing Writer
Charles
Charles, who lives in Sydney, Australia, is an editor & writer of Donemax Team. He is good at writing articles related with Apple Mac computers, Windows operating systems, data recovery, data erasure, disk clone and data backup, etc. He loves reading and playing tennis in his spare time and is interested in testing new digital devices such as mobile phones, Macs, HDDs, SSDs, digital cameras, etc.

Editor in chief
Gerhard Chou
In order to effectively solve the problems for our customers, every article and troubleshooting solution published on our website has been strictly tested and practiced. Our editors love researching and using computers and testing software, and are willing to help computer users with their problems