Written byMariaUpdated on Dec 03, 2024
Fix External Drive, USB Drive, SD Card Not Mounting on macOS Sequoia
Approved byGerhard Chou
Before we start: Donemax NTFS for Mac is an all-in-one disk management tool for macOS Sequoia and other macOS versions. It can help you mount APFS, NTFS, HFS+, ExFAT/FAT32 drives on mac, repair damaged drives on Mac and allow your Mac to read-write NTFS drives on your Mac without any limitation, etc.
PAGE CONTENT:
Mounting drives on macOS Sequoia is a basic skill that can improve your Mac experience, whether you're a casual user needing more space or a professional in charge of complex processes. With the latest updates to macOS Sequoia, it's easier than ever to view and manage network volumes and external drives.
However, you will still need to know a few things. This guide will take the mystery out of the process by giving step-by-step instructions and troubleshooting tips to ensure your drives are always available and ready to use.
We'll review everything you need to know about mounting drives, from how to use Disk Utility to other methods. Read on to learn how to improve your process, ensure you can access your data easily, and make the most of macOS Sequoia's powerful features.
Drive Mounting
When you install a drive, you make a storage device available to the operating system and its users. When you mount a drive on macOS, the system gives it a place in the file system where you can read and write files. It is correct for internal drives like extra hard drives or SSDs and external drives like USB flash drives, portable hard drives, and network-attached storage (NAS).
The root location of macOS's file system is “/,” and mounted drives appear in the `/Volumes` directory. For instance, if you put a drive called "Backup," you can get to it at `/Volumes/Backup.` This step is necessary to ensure that all connected storage devices work smoothly with macOS and that you can easily organize and access your data. Whether you're working with internal or external drives, you must know how to mount them to handle your data well.
Why Drive Not Mounting After Upgrading to macOS Sequoia?
It's annoying and hard to work when your Mac doesn't read your portable hard drive. Several things could cause this trouble:
- Connection Issues: Make sure the hard drive is properly attached. The problem may be with the link, so try using another USB port or cable.
- Power Supply: A single USB port isn't enough power for some portable hard drives. Ensure any extra power sources with your drive are plugged in and working.
- Drive Format Compatibility: macOS works with many file systems, but if your drive is formatted in a style that doesn't work with macOS, it might not be able to be read. You may need to change the drive to something that works, like exFAT or HFS+.
- Drive Errors: The hard drive itself could be broken. Check and fix the drive with Disk Utility. Then, open Disk Utility, pick out your external hard drive and click "First Aid" to check and fix it.
- Software Conflicts: Drive recognition can sometimes be messed up by third-party software. If you restart the Mac in Safe Mode, you can see if program conflicts are the problem.
- Outdated macOS: Make sure your macOS is up to date, as changes often make hardware work better with macOS.
- Hardware Fault: The hard drive may be broken if none of the other options work. In this case, you should get your info back from a professional.
Fix External Device Not Mounting on macOS Sequoia
After upgrading to macOS Sequoia, you may find the external device could not mount on your Mac. Here are some methods to help you fix this issue.
Method 1: Connect the Drive to Different USB Ports
Sometimes, you only need to try a different USB port. Many Macs have USB 2.0 and USB 3.0 and different power supplies and transfer rates, which can make the portable hard drive unusable. In addition, the USB port you're using could be broken. So, connect the portable hard drive to a different USB port on your Mac and see if that fixes the problem.
Method 2: Restart Your Mac
If changing USB ports doesn't help, turn your Mac off and on again. The operating system may have failed to mount the drive because it ran out of resources or had a problem. Take out the portable hard drive and USB devices you don't need.
Then, click on the Apple logo and choose "Restart" from the menu. Before you try to connect the external hard drive again, wait for the Mac to restart. If the Mac does nothing, hold down the power button until it turns off. Then, press and hold the power button to start it up again.
Method 3: Check Drive Display Settings on Your Mac
Sometimes, your Mac recognizes the external hard drive but doesn’t show it on the desktop or Finder. To fix this, follow these steps:
- Check if the drive is mounted.
- Go to Finder.
- Click Finder on Apple menu, choose Settings.
- Open Finder Settings, then click General and Sidebar, make sure External disks is selected.
Method 4: Mount An External Hard Drive Using Disk Utility
You can use Disk Utility if it is not already there. To get to Utilities, open Finder and go to Applications. Inside Disk Utility, look for and pick out the external hard drive. Then, click the "Mount" button. The drive should appear in the Finder menu or desktop if everything goes well. This method works especially well if the drive doesn't mount when attached.

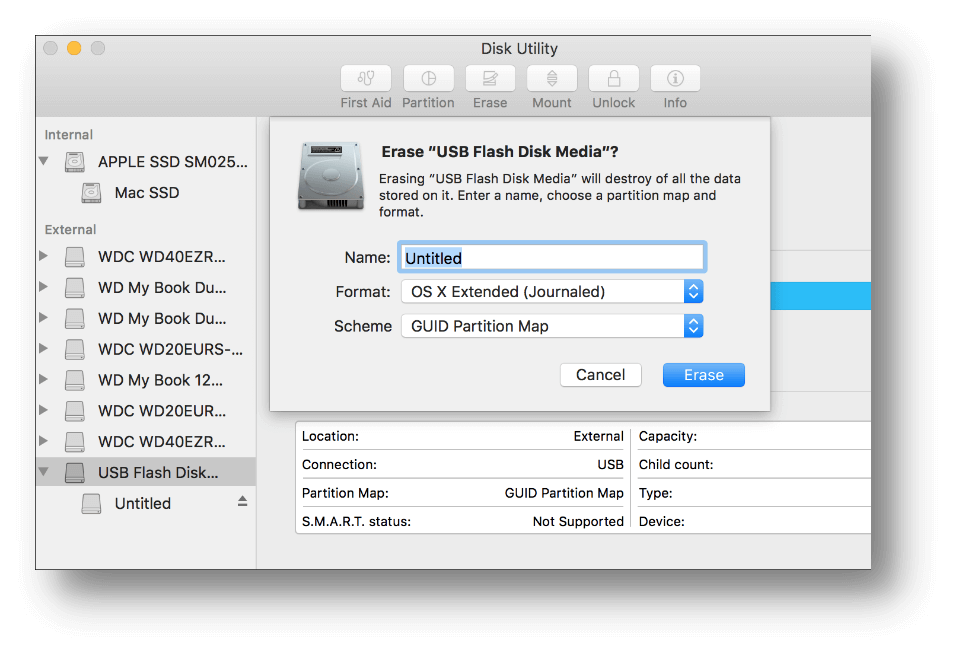
Method 5: Reformat the External Hard Drive
macOS might be unable to read your external hard drive if stored in NTFS. To change the drive's file system to one that works with Macs, do the following:
When you format a drive, everything is erased. So, it's important to back up your data.
- Connect the USB drive to your Mac.
- Start-up Disk Utility.
![Start-up Disk Utility]()
- Find and choose your external hard drive in Disk Utility.
- Press "Erase."
- Pick a type that works with your computer, such as FAT32, HFS+, APFS, or exFAT.
- Give the drive a name.
- Click "Erase."
![Click Erase]()

Note: If you have lost data due to erasing your drive, just try macOS Sequoia data recovery software, such as Donemax Data Recovery for Mac, to help you get the lost data back.
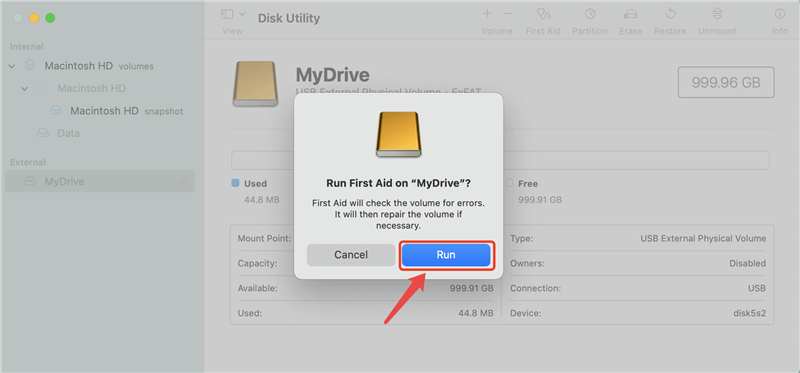
Method 6: Fix External Hard Drive
If the external hard drive gets corrupted, it won’t mount on your Mac. Just repair the drive with Disk Utility.
- Go to Launchpad > Other > Disk Utility, open Disk Utility.
- Select the external hard drive, click on First Aid button.
- Click on Run button to repair the external hard drive.
![Click on Run button]()
How to Fix NTFS Drive Not Mounting on Mac?
After upgrading to macOS Sequoia, you will find your Mac won’t mount NTFS drives. If you want to use NTFS drives on your Mac, just install a macOS Sequoia NTFS driver on your Mac.
Step 1. Download and install the best NTFS for Mac tool - Donemax NTFS for Mac, connect the NTFS drive to your Mac.
Step 2. Open Donemax NTFS for Mac, select the NTFS drive, click on Mount button.

Step 3. Then click on Enable Writable button so that you can read-write the drive without any limitation.

Conclusion:
It is necessary to mount drives on macOS Sequoia to manage data easily and get the best speed. You can fix problems with external hard drives by trying different USB ports, restarting your Mac, checking the display settings, mounting the drive with Disk Utility, and changing the drive format.
Whether you're a professional or a regular user, ensuring your Mac can read and write to all connected storage devices will speed up your work. After following these steps, you'll be ready to handle any drive mounting problems, making it easy to view and organize your data daily on your Mac.
FAQs About Using or Mounting External Hard Drive on macOS Sequoia
1. How to mount external hard drive on macOS Sequoia?
Connect the external hard drive on your Mac, then open Disk Utility, select the external hard drive, click on Mount button. If the mount button is not available, just click on First Aid button to repair the external hard drive.
2. How to mount and use NTFS drive on macOS Sequoia?
- You can reformat the NTFS drive to ExFAT, APFS or Mac OS Extended by using Disk Utility.
- You also can use NTFS for Mac tool to mount/enable writable for the NTFS drive on Mac.
3. How to recover lost data after erasing the drive on Mac?
To fix external hard drive not mounting on macOS Sequoia, you may need to reformat the external hard drive. Data recovery software can help you completely recover lost data from a drive which is erased by Disk Utility.
- Download and install Donemax Data Recovery for Mac.
- Open this software, select the drive.
- Click on Scan button.
- Preview and recover lost files after scanning.
4. What is the best NTFS for Mac tool for macOS Sequoia?
Here is the list of top 5 macOS Sequoia NTFS for Mac tool:
- Donemax NTFS for Mac
- Fuse for macOS
- DoYourData NTFS for Mac
- Paragon NTFS for Mac
- iBoysoft NTFS for Mac
5. How to fix external hard drive not showing up on macOS Sequoia?
- Open a Finder, then click Finder on Apple menu.
- Choose Settings to open Finder Settings window.
- Click General and Sidebar.
- Select External disks.
- Then check if you could see the drive on desktop and Finder sidebar.
Donemax NTFS for Mac
An easy-to-use NTFS for Mac tool to help you enable writable for NTFS drives on Mac so that you can read-write NTFS drives on Mac without any limitation. It also can help you mount, format, repair, rename, open drive on your Mac.
Related Articles
- Jan 17, 2024How to Format WD My Passport External HDD/SSD on Mac?
- Feb 22, 2024External Hard Drive Shows Wrong Storage Size, How to Fix It
- Mar 31, 2025[11 Fixes] Fix Seagate External Hard Drive Not Recognized by Mac – Guide 2025
- Dec 05, 2024How to Add an APFS Volume on Mac: A Comprehensive Guide
- Oct 17, 2024How to Format a RAW Drive to NTFS on Mac?
- Jul 26, 2023External Hard Drive Not Recognized After Unplugging, Fix It

Contributing Writer
Maria
Maria is one of the senior writers & editors of Donemax who lives and works in Sydney, Australia. She loves PC, Mac and Internet Technology. She has 6 years of writing articles about data recovery on PC/Mac, disk cloning solution, data eraser and computer OS optimization, etc. She is also interested in testing various software and digital products.

Editor in chief
Gerhard Chou
In order to effectively solve the problems for our customers, every article and troubleshooting solution published on our website has been strictly tested and practiced. Our editors love researching and using computers and testing software, and are willing to help computer users with their problems