How to format a WD My Passport external hard drive on Mac? My WD My Passport SSD is not working on my MacBook Pro, should I format it?
- Jan
PAGE CONTENT:
Why Should You Format Your WD My Passport on Mac?
- Hard Drive Crash: The WD My Passport gets crashed or becomes RAW, you should format it to rebuild a working file system on the drive.
- You Will Sell or Donate the WD My Passport Drive: Before you sell, donate or dispose of an old WD My Passport HDD or SSD, you should reformat it to securely delete all private data stored on it.
- Incompatible File System: Whether Windows or Mac OS has its native file systems. If the WD My Passport drive has been formatted to Windows NTFS file system, you should reformat it to APFS, Mac OS Extended or ExFAT/FAT32 so that you can use it on your Mac.
- Free Up Disk Space: Formatting the WD My Passport will quickly remove all data from the drive.
- Remove Virus or Malware: If the WD My Passport drive is infected by virus files/malware, just format it to quickly reset the drive to factory settings.

Before you format WD My Passport on Mac, you should make a backup of your important data since formatting will erase all data stored on the HDD or SSD. And you should know which file system can meet your needs:
- APFS: Native file system for macOS 10.13 or later.
- Mac OS Extended [HFS/HFS+]: If you will use the WD My Passport on older OS X systems such as macOS 10.12, 10.11, just choose this file system.
- MS-DOS (FAT): Also called FAT32, compatible with both Windows and Mac OS, but the single file size should not be bigger than 4GB.
- ExFAT: Compatible with both Windows and Mac OS, no 4GB file size limitation.
- NTFS: Native file system for Windows OS, is read-only on Mac.
Format WD My Passport on Mac Using Disk Utility
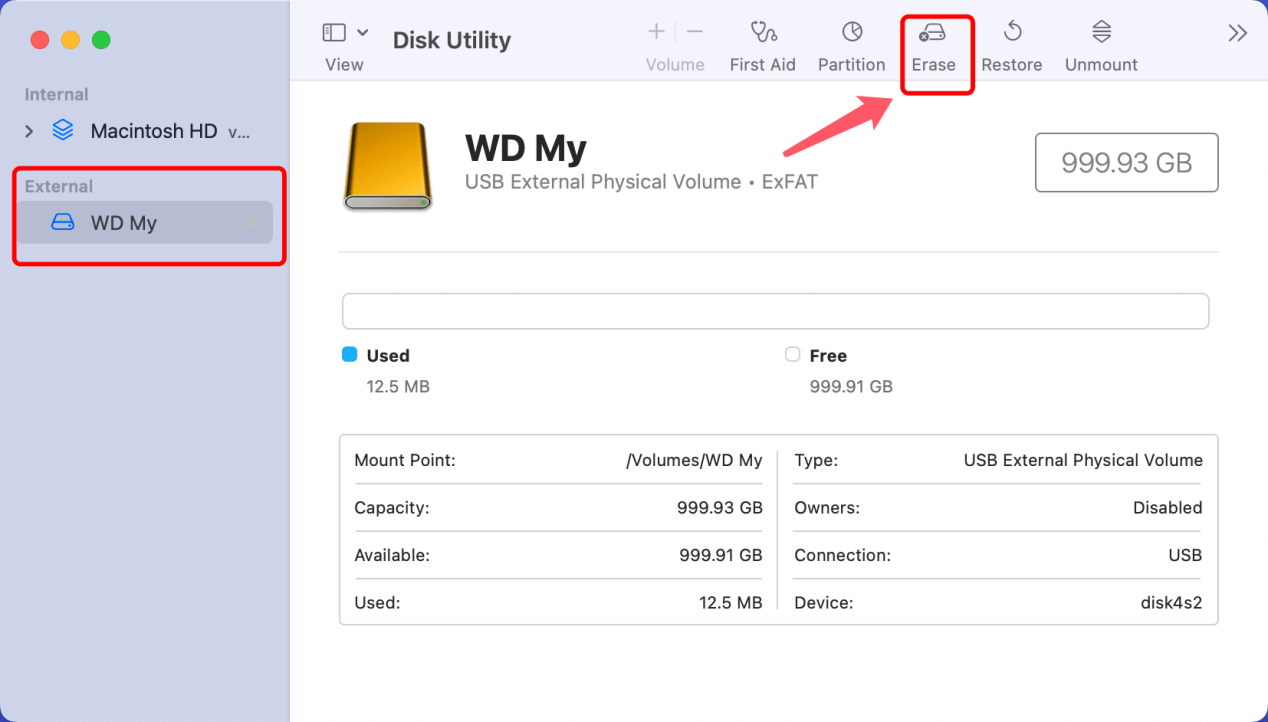
How to format WD My Passport disk on Mac? The first solution comes into Mac users’ mind is by using Disk Utility to format the disk. Here are the steps:
Step 1. Connect the WD My Passport to your Mac.
Step 2. Press Command+Space, in Spotlight Search, enter Disk Utility, press Return key to open Disk Utility.

Step 3. Select the WD My Passport, then click Erase.

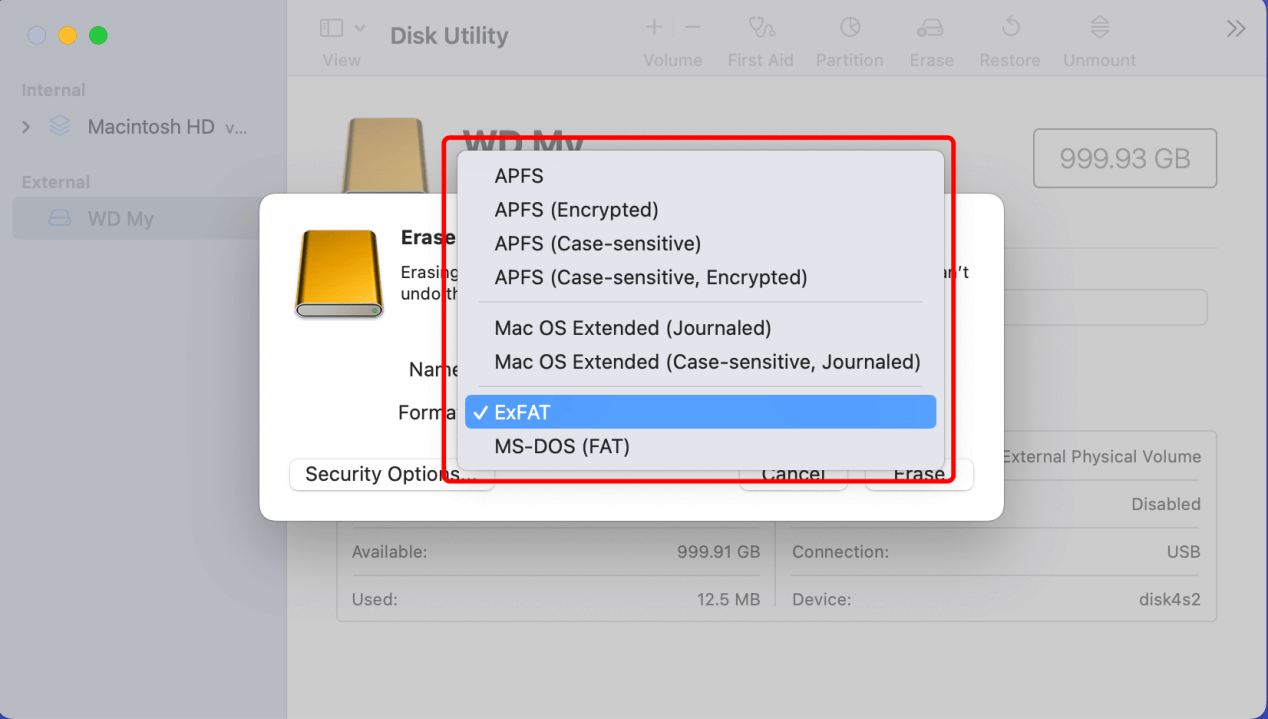
Step 4. Type a new name if you want to rename the drive, then select a file system such as APFS, ExFAT, Mac OS Extended.

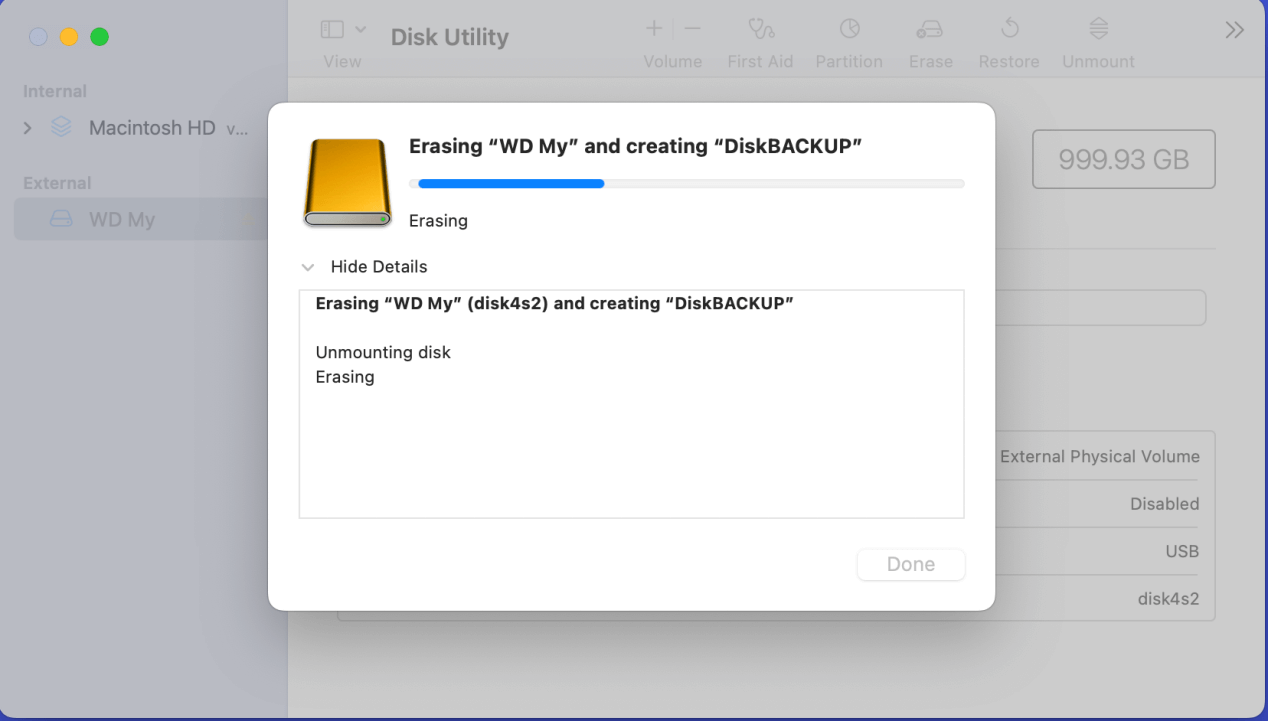
Step 5. Click Erase again. Once the process gets finished, click Done.

Note: If the Erase button is not available, just click Mount button. Then erase the WD My Passport drive. And if the WD My Passport gets damaged, just click on First Aid button to fix logical errors on the drive.
Format WD My Passport With NTFS for Mac Tool
What is NTFS for Mac tool? This software is designed for enabling NTFS read-write support on Mac. It means if your WD My Passport external hard drive has been formatted to NTFS, you don’t need to reformat it to APFS or ExFAT. With NTFS for Mac tool, you can enable writable for the NTFS WD My Passport drive, then read-write the drive without any limitation.
NTFS for Mac tool also can help you format WD My Passport on Mac:
- Step 1. Download and install Donemax NTFS for Mac tool, open it from Launchpad.
- Step 2. Connect the WD My Passport to your Mac.
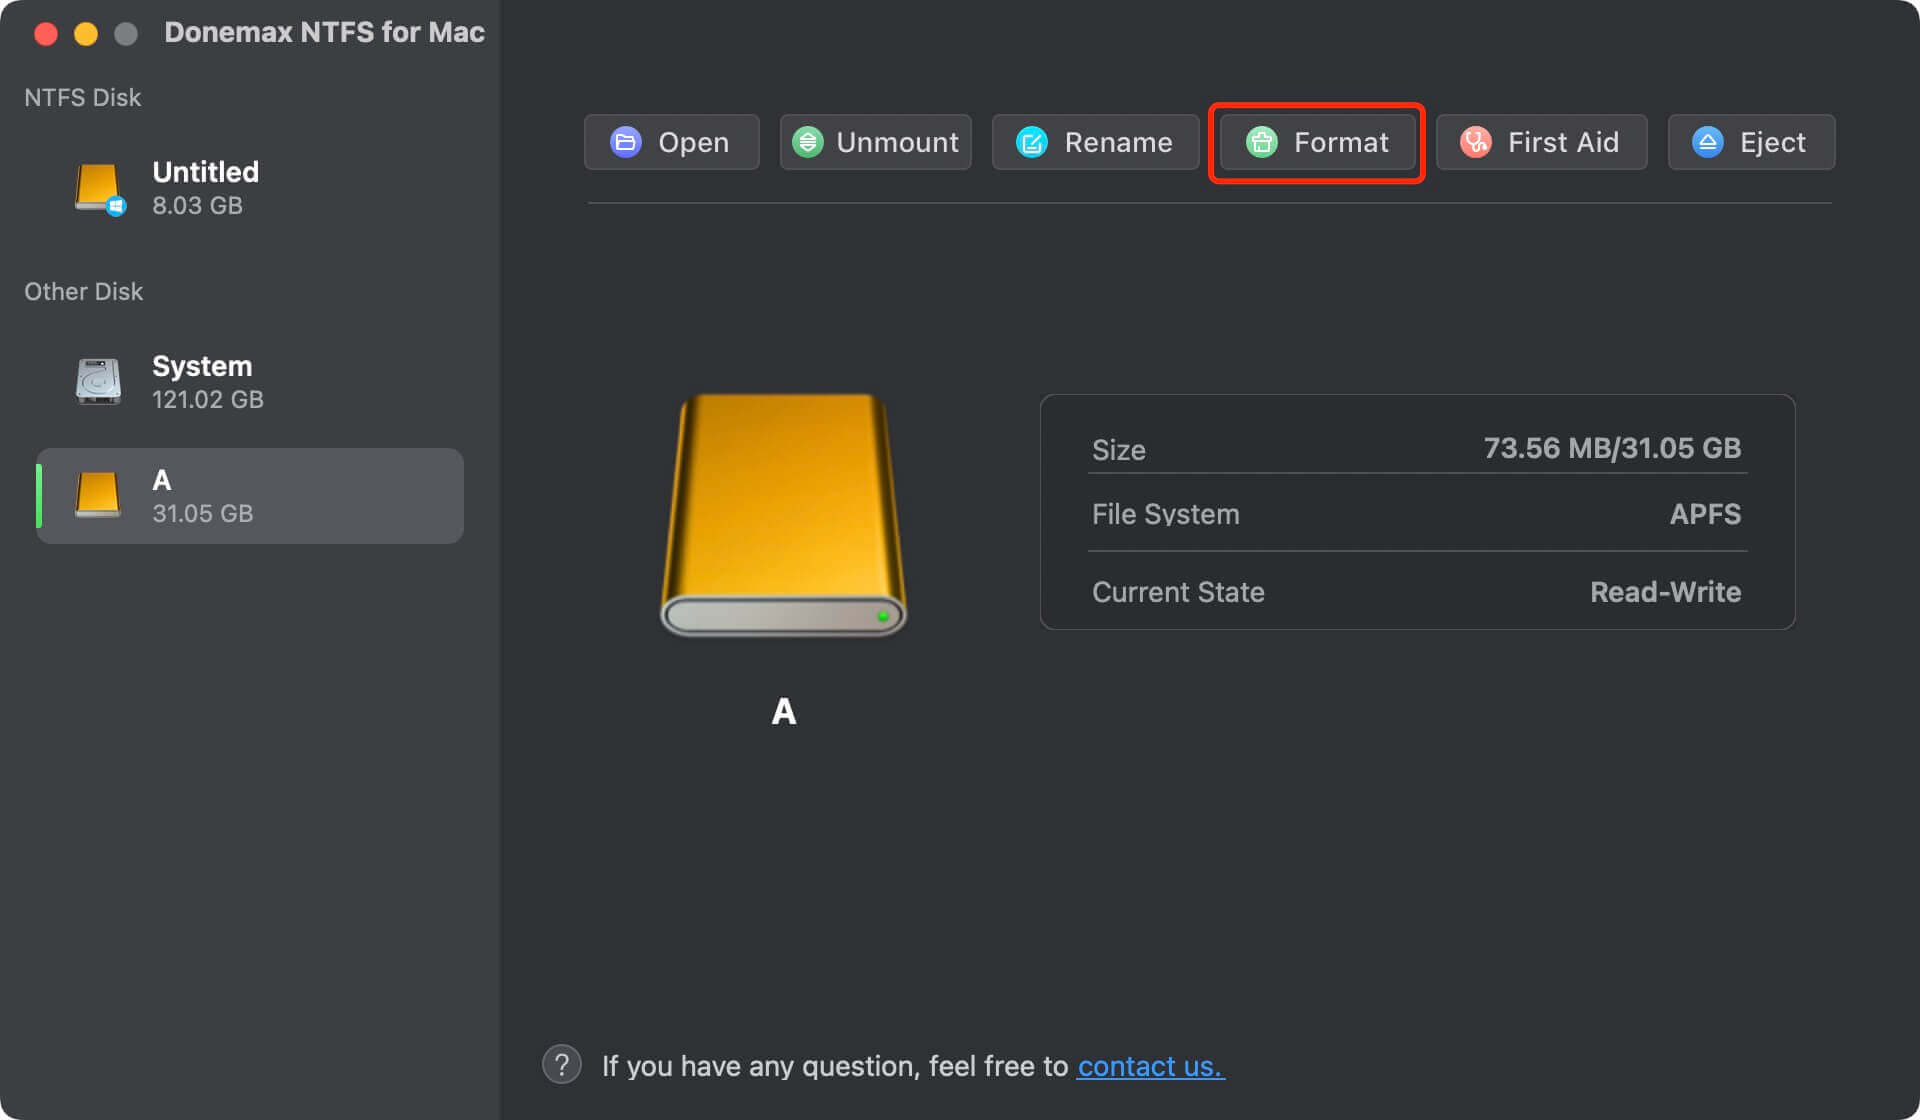
- Step 3. Select the WD My Passport, click Format button. Then select a file system, type a new name, format the WD My Passport for your Mac.

Note: Note: Whether you format the WD My Passport drive using Disk Utility or format it with NTFS for Mac tool, the formatted data is not lost forever. With a data recovery app - such as Donemax Data Recovery for Mac, you can unformat WD My Passport drive on Mac and get all lost data back. For example, you can use Donemax Data Recover for Mac to help you recover formatted data from a WD My Passport HDD/SSD.
Step 1. Download and install a data recovery app on your Mac. Here, try Donemax Data Recovery for Mac.
Step 2. Open Donemax Data Recovery for Mac, then select the formatted WD My Passport drive to start data recovery

Step 3. Click on Scan button to deeply scan the formatted WD My Passport drive and find all recoverable files.

Step 4. Once the scan is completed, you can preview all recoverable files. Then select the wanted files and save them by clicking on Recover button.

If you are planning to sell or donate your WD My Passport, you can use a data erasure tool to help you wipe the WD My Passport clean to prevent data recovery.
Wipe and Format WD My Passport Using Data Eraser
Donemax Data Eraser is a powerful data erasure program. It offers certified data erasure standards to help in permanently erasing data from HDD, SSD, USB drive, digital camera, etc.
Follow the steps below to wipe WD My Passport on Mac:
Step 1. Download and install Donemax Data Eraser on Mac. Then open it. Choose data erasure mode - Erase Hard Drive. This mode is able to securely and permanently erase all data stored on the hard drive.
Step 2. Select the WD My Passport, then click on Erase Now button.

Once the process gets finished, all data stored on the WD My Passport is erased forever, can not be recovered by any data recovery software.
If you only want to format the WD My Passport with Donemax Data Eraser, just choose Disk Manager tool. Then select the WD My Passport and click on Format button.

Format WD My Passport on Mac FAQs
- Connect the WD My Passport to your Mac.
- Open Disk Utility on Mac.
- Select WD My Passport and click Erase.
- Select ExFAT as the file system.
- Click Erase again.
Open Disk Utility, then find the WD My Passport and select it. Then you can check if the WD My Passport is a NTFS drive.
Yes, you can install an NTFS for Mac tool on your Mac. Then click on Enable Writable button to allow you to read-write NTFS drive on Mac without any limitation.

Yes, data recovery app can help you recover lost data from a formatted hard drive on Mac. Just follow the steps below:
- Connect the formatted WD My Passport to your Mac.
- Download and install Donemax Data Recovery for Mac, open this recovery app.
- Select WD My Passport to start data recovery.
- Click on Scan button.
- Preview and recover the lost files.
To permanently erase data from a hard drive, you should try data erasure software. Donemax Data Eraser for Mac can help you permanently erase data from WD My Passport, just try this tool.
Final Words
You can format your WD My Passport on Mac using Disk Utility, NTFS for Mac or Donemax Data Eraser for Mac. To use the WD My Passport on both Windows and Mac OS, you should format it to ExFAT or you can format it to NTFS and install a NTFS for Mac tool on your Mac. No matter how you format the WD My Passport, the lost data is still there and can be recovered by data recovery software.
Before you sell or donate your WD My Passport external HDD/SSD, you should wipe all sensitive data off. Donemax Data Eraser for Mac is a powerful data erasure application, and it can help you wipe the WD My Passport, permanently erase all data from the drive, making data recovery be impossible.
Related Articles
- Feb 17, 2024How to Format SK Hynix Beetle X31 SSD for Mac?
- Feb 19, 2024How to Use Samsung Portable SSD T7 on Mac?
- Feb 22, 2024External Hard Drive Shows Wrong Storage Size, How to Fix It
- Mar 21, 2025How to Use Seagate Game Drive for Xbox: A Complete Guide
- Jul 01, 2024How to Format and Unformat XQD Card on Windows PC or Mac?
- Jan 12, 2025Fix WD External Hard Drive Not Showing Up in Disk Utility on Mac

Steven
Steven has been a senior writer & editor of Donemax software since 2020. He's a super nerd and can't imagine the life without a computer. Over 6 years of experience of writing technical solutions and software tesing, he is passionate about providing solutions and tips for Windows and Mac users.

Gerhard Chou
In order to effectively solve the problems for our customers, every article and troubleshooting solution published on our website has been strictly tested and practiced. Our editors love researching and using computers and testing software, and are willing to help computer users with their problems