PAGE CONTENT:
- About RAW Drives and NTFS
- Why Format RAW Drive to NTFS on Mac?
- Recover Data from a RAW Drive on Mac (Optional)
- Format RAW Drive to NTFS on Mac Using NTFS for Mac Tool
- Format the RAW Drive to NTFS on Mac Using Terminal (Alternative Method)
- Verifying the Formatted Drive
- Troubleshooting Common Issues
- Conclusion
Sometimes, you connect an external drive to your Mac, expecting it to mount automatically, only to find that it appears as a RAW drive. A RAW drive is a storage device that has not been properly formatted or whose file system has become corrupted, making it inaccessible. For Mac users who want to make the drive usable again, the goal is often to format it to NTFS - a file system commonly used on Windows.
However, formatting a RAW drive to NTFS on a Mac is not straightforward, since macOS does not natively support writing to NTFS drives. This guide will walk you through all the steps necessary to format a RAW drive to NTFS on Mac, whether using third-party software, Terminal, or other tools, while also covering the data recovery process if needed.
About RAW Drives and NTFS
🔖What is a RAW Drive?
A RAW drive is a storage medium that lacks a recognized file system, making it unreadable by any computer operating system. Essentially, a drive becomes RAW when it loses the ability to communicate file structure information to the operating system. This can happen due to a number of reasons, each of which has implications for data accessibility and drive usability.
Some common reasons for a drive becoming RAW include:
- Power Interruptions: If a drive is being written to when a power loss occurs, such as a sudden shutdown of your Mac or a disconnection of the external drive, the write operation may be incomplete. This can corrupt the file system, leaving it in an unusable state. As a result, the operating system sees the drive as RAW.
- Improper Ejection: When an external drive is disconnected from a computer without properly ejecting it, there is a chance that some files are still being accessed or written. Disconnecting the drive improperly can result in incomplete data transfer or corruption of the file system, leading to a RAW state.
- Virus and Malware Attacks: Malicious software can damage the file structure of a drive, making it unrecognizable. In some cases, ransomware or other forms of malware will intentionally alter or encrypt the file system to make it unreadable, effectively making the drive appear as RAW.
- Physical Damage: External factors such as dropping a drive, exposing it to extreme temperatures, or getting it wet can physically damage the drive's components. This physical damage can lead to a loss of the logical structure of the file system, causing the drive to be recognized as RAW.
- Drive Corruption or Bad Sectors: Over time, especially with frequent use, a drive may develop bad sectors. These bad sectors can contain essential file system information, and if they become unreadable, the entire drive may appear as RAW to the computer. This often happens with aging drives or those with manufacturing defects.
🔖Symptoms of a RAW Drive:
It's important to recognize the symptoms that indicate a drive has become RAW:
- Error Messages: You may encounter messages like "You need to format the disk before you can use it," or "The volume does not contain a recognized file system."
- Drive Not Mounting: The drive fails to mount, meaning it doesn't appear on the desktop or Finder, though it is physically connected.
- Incorrect File System Information: When checking the drive information in Disk Utility, you may notice that it doesn't display a specific file system type (such as APFS, HFS+, FAT32, etc.) and instead says "Not Formatted" or provides no information.
🔖What is NTFS and Why Format to NTFS?
The New Technology File System (NTFS) was introduced by Microsoft in 1993 with the Windows NT operating system. It has become the standard file system for Windows operating systems due to its improved efficiency and reliability compared to its predecessors (like FAT and FAT32).
Key Features of NTFS:
- Support for Large File Sizes: NTFS supports larger individual file sizes and overall partition sizes, allowing for files greater than 4GB. This makes it ideal for drives that store multimedia files, databases, and virtual machine images.
- Advanced File Permissions and Security: NTFS offers robust security features, such as file and folder encryption, as well as permissions that determine who can access certain files. These features are particularly useful in networked or shared environments.
- Data Recovery and Journaling: NTFS supports journaling, which means it keeps records of changes to files and directories. This feature helps reduce data loss and can assist with recovering the drive in the event of power failure or system crashes.
- Disk Compression: It also offers built-in file compression, which can save space and allow more data to fit on the drive.
Why Format RAW Drive to NTFS on Mac?
While macOS has its native file systems like APFS and HFS+, there are situations where formatting to NTFS makes more sense:
- Cross-Platform Compatibility: If the drive will primarily be used with Windows systems or shared between Mac and Windows, NTFS provides better compatibility than APFS. It's ideal for users who frequently move data between the two operating systems.
- Preserve File Attributes: NTFS helps maintain certain file attributes that are critical to Windows, such as permissions and metadata. If you need to use software or data that depends on these attributes, NTFS is a suitable choice.
- Read-Only Limitation: By default, macOS can only read NTFS drives, but with the help of third-party NTFS drivers, you can both read and write to these drives. This makes NTFS a versatile solution for those with dual-system environments.
Recover Data from a RAW Drive on Mac (Optional)
If your drive has turned RAW and you want to recover data from it before reformatting, you will need to use dedicated data recovery software. Donemax Data Recovery for Mac is a powerful Mac data recovery application. It can help you recover deleted/formatted or inaccessible data from the RAW drive to your Mac.
Step 1. Click Download below to download Donemax Data Recovery for Mac, then click the .dmg file, install this Mac data recovery software on your Mac.
Step 2. Open Donemax Data Recovery for Mac, then select the RAW drive to start data recovery.

Step 3. Click on Scan button to deeply scan the RAW drive and find all existing files, deleted/lost files.

Step 4. Once the scan is completed, you can preview all recoverable files. Select the wanted files, click on Recover button to save them.

Format RAW Drive to NTFS on Mac Using NTFS for Mac Tool
To format the RAW drive to NTFS, you will need to use a third-party software since macOS lacks built-in NTFS formatting capabilities.
Step 1. Download and install the most powerful NTFS for Mac tool - Donemax NTFS for Mac.
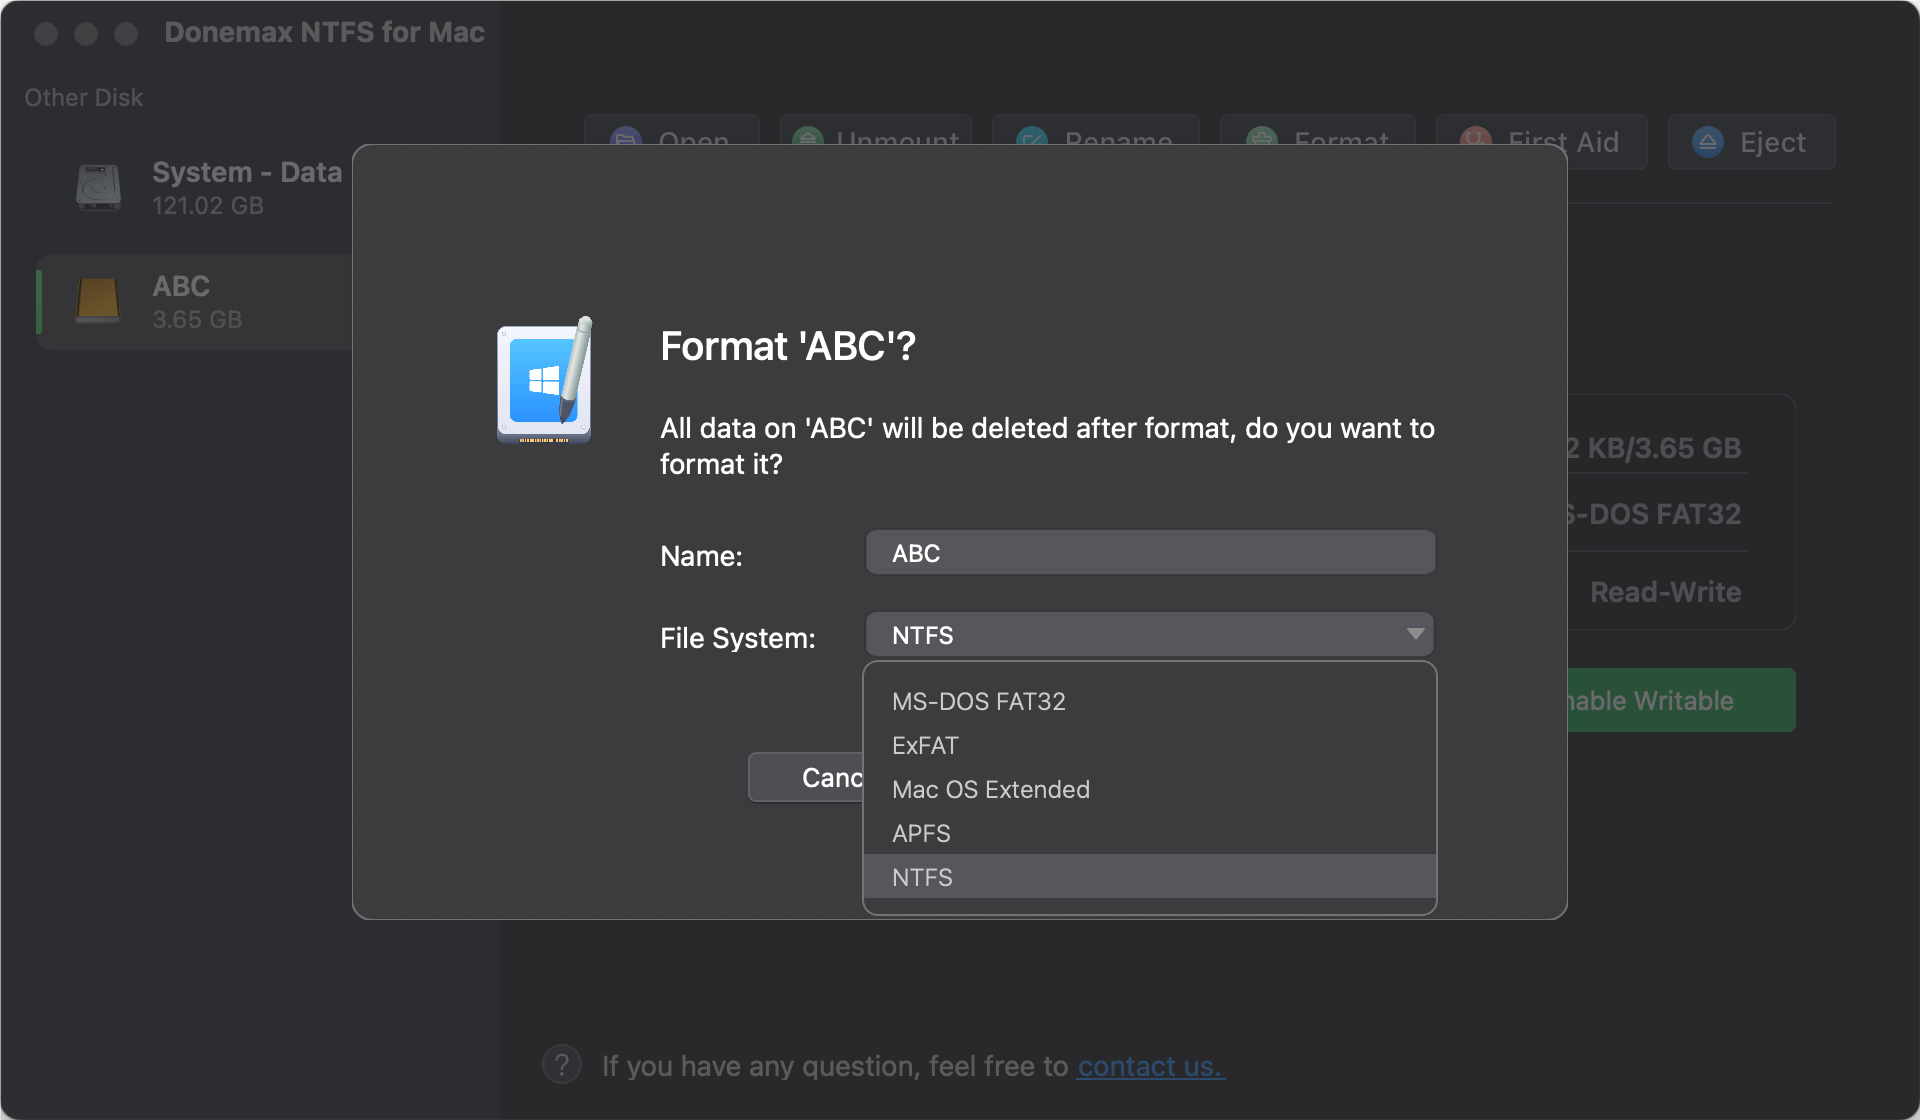
Step 2. Open Donemax NTFS for Mac, then select the RAW drive, click on Format button. Then select NTFS as the file system.

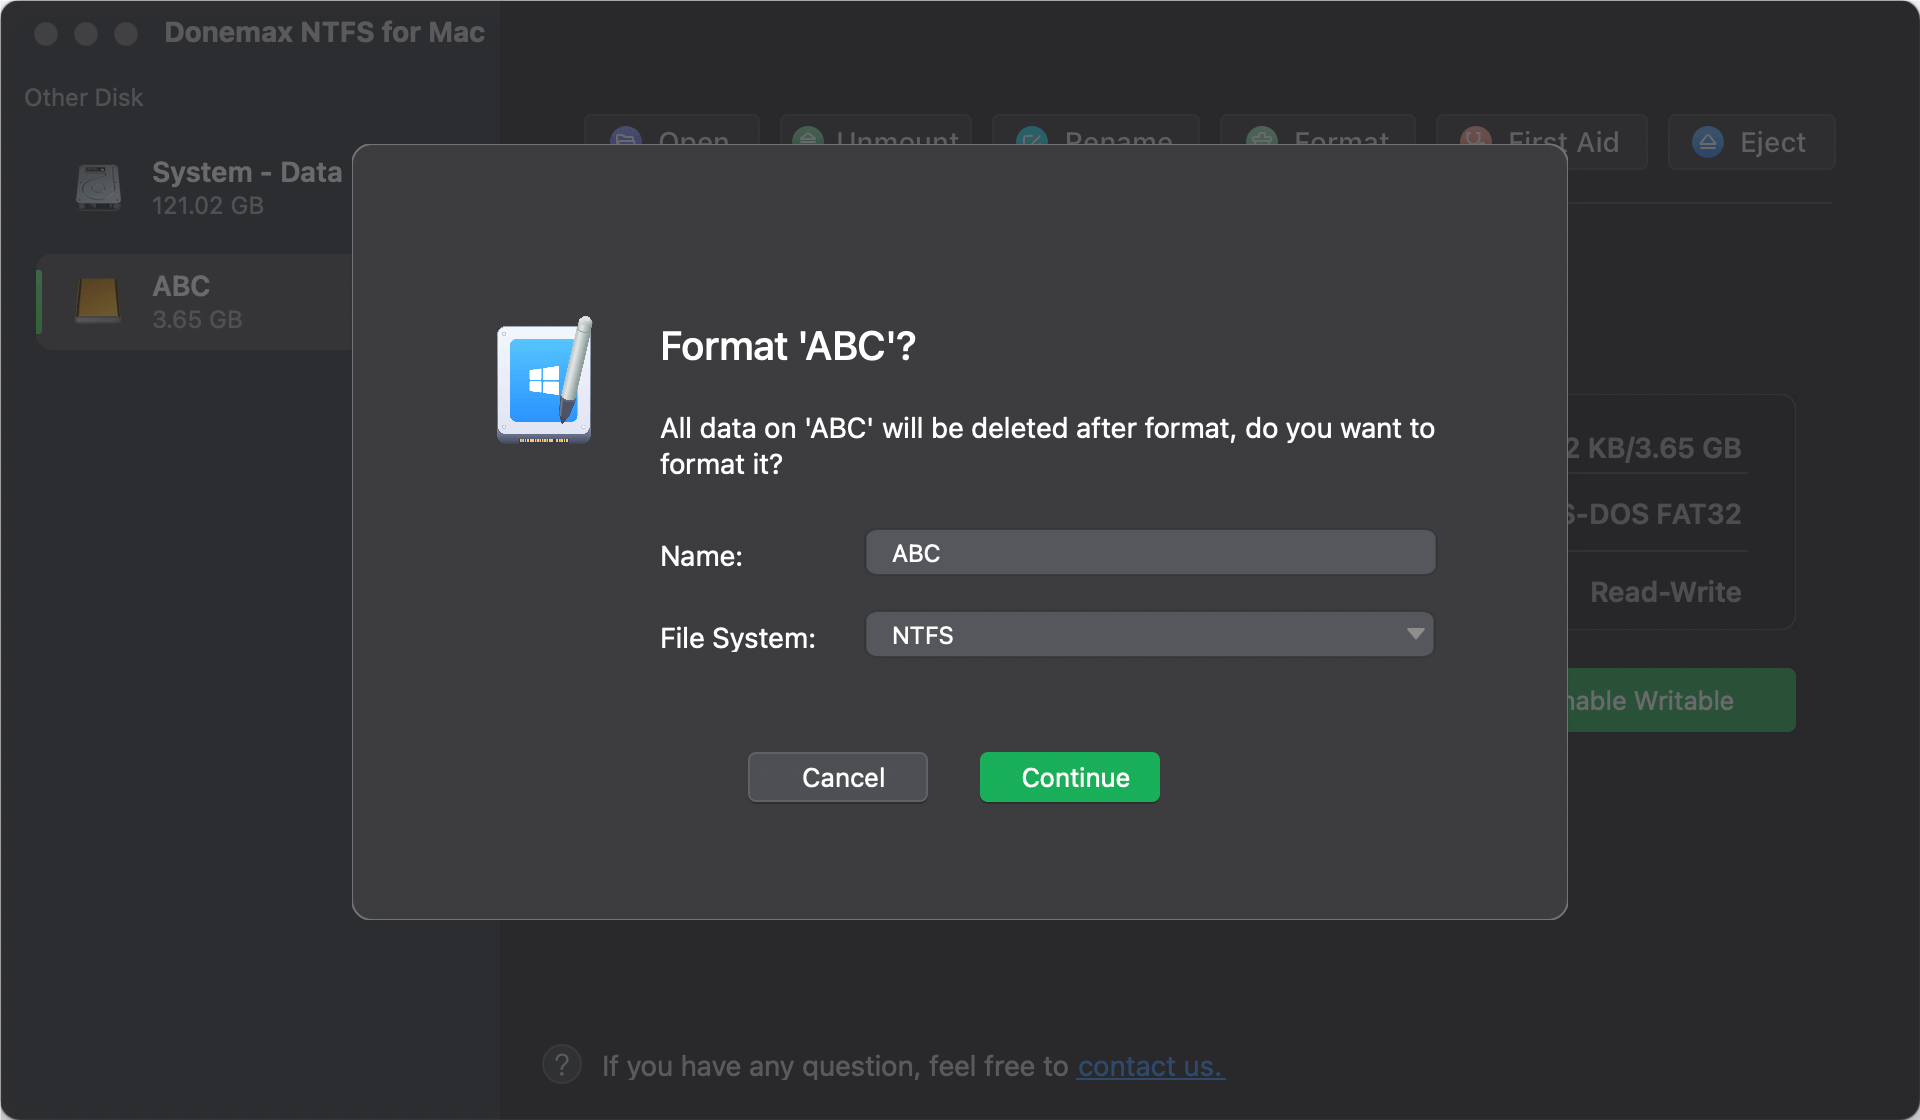
Step 3. Click on Continue button to format the RAW drive to NTFS.

Step 4. If you want to read-write NTFS drive on Mac, select the NTFS drive, click on Enable Writable button.

Format the RAW Drive to NTFS on Mac Using Terminal (Alternative Method)
If you prefer to use a command-line method, you can format the RAW drive using Terminal on your Mac. This method uses the diskutil command:
- Open Terminal:
- Go to Applications > Utilities > Terminal.
- List All Drives:
- Type the command diskutil list to see a list of connected drives.
- Identify the drive identifier (e.g., /dev/disk5) for the RAW drive.
- Erase and Format the Drive:
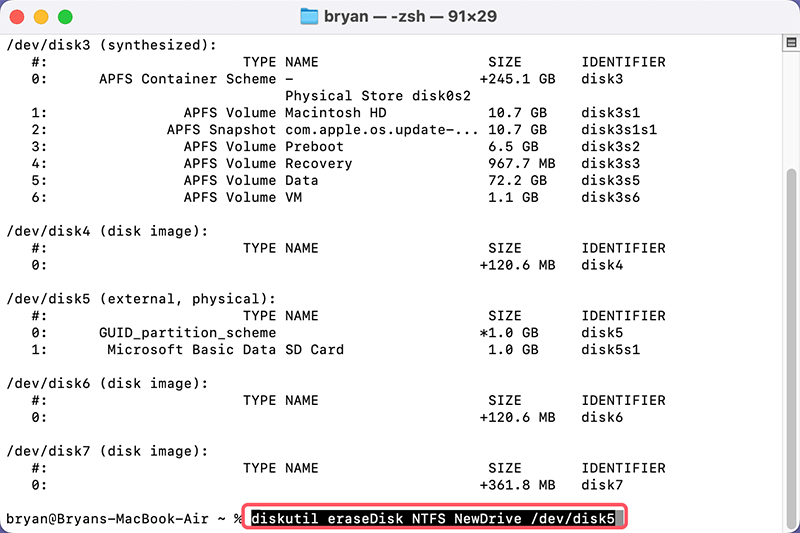
- Run the following command to format the drive to NTFS:
sudo diskutil eraseDisk NTFS DriveName /dev/disk5
- Replace DriveName with the desired name for your drive, and /dev/disk5 with the actual identifier for your drive.
![Format the RAW Drive to NTFS on Mac Using Terminal]()
- You may need to enter your Mac's password to authorize the operation.
- Run the following command to format the drive to NTFS:
Caveats and Limitations:
- The Terminal method may not always be successful in formatting RAW drives to NTFS if the necessary drivers are not installed.
- Third-party NTFS drivers may still be needed for write access after formatting.
Note: If you want to recover lost data from the formatted drive on Mac, you can run Donemax Data Recovery to deeply scan the formatted drive and get all lost data back.
Verifying the Formatted Drive
After formatting the drive, it's important to verify that it has been successfully converted to NTFS:
- Check via Disk Utility:
- Open Disk Utility and locate the drive.
- The drive should be labeled with the NTFS file system.
- Test Write Access:
- If you've installed third-party software like Donemax NTFS for Mac, try copying a file to the drive to ensure write access is working correctly.
Troubleshooting Common Issues
- Drive Not Recognized: Try reconnecting the drive or restarting your Mac.
- Cannot Write to NTFS: Ensure your NTFS driver software is correctly installed and activated.
Using the Formatted NTFS Drive on Mac:
Once your drive is formatted to NTFS, you can use it on both macOS and Windows. However, without third-party software, you'll only have read access on Mac.
Recommendations for Seamless Use:
- Donemax NTFS for Mac or Tuxera NTFS for Mac: Keep these tools installed to enable full read and write capabilities.
- Cross-Platform File Management: If you frequently need to use the drive between macOS and Windows, consider using exFAT instead, as it is natively supported by both operating systems.
Conclusion
Formatting a RAW drive to NTFS on a Mac can be a bit of a challenge, but with the right tools, it's completely manageable. Whether you choose to use third-party software like Donemax NTFS for Mac or the Terminal command-line method, following the correct steps will ensure that your drive is formatted successfully and ready for use.
It's also essential to take precautionary steps, such as attempting data recovery before formatting and verifying the drive after formatting. With the drive now in NTFS format, you can seamlessly share data between macOS and Windows.
Related Articles
- Mar 06, 2025How to Use WD My Passport/My Passport Ultra on Mac?
- Feb 17, 2025How to Fix Corrupted USB Flash Drive Without Formatting? [5 Methods]
- Jun 29, 2024Crucial Portable SSD Not Mounting on Mac, Fix It Now
- Feb 21, 2025How to Fix Overheated Hard Drive?
- Nov 29, 2024How to Format ExFAT or FAT32 Drive to NTFS on Mac?
- Jun 26, 2024Fix LaCie External Hard Drive Not Showing Up on Mac

Steven
Steven has been a senior writer & editor of Donemax software since 2020. He's a super nerd and can't imagine the life without a computer. Over 6 years of experience of writing technical solutions and software tesing, he is passionate about providing solutions and tips for Windows and Mac users.

Gerhard Chou
In order to effectively solve the problems for our customers, every article and troubleshooting solution published on our website has been strictly tested and practiced. Our editors love researching and using computers and testing software, and are willing to help computer users with their problems

