Written byMariaUpdated on Apr 11, 2025
7 Solutions to Fix Internal Hard Drive/External Hard Drive Only Shows Half Capacity
Approved byGerhard Chou
Before we start: Before fixing hard drive only shows half capacity issue, you can use data recovery software - such as Donemax Data Recovery to help you recover deleted, formatted and inaccessible files from the hard drive. This tool also can help you repair damaged hard drive, reformat RAW hard drive, etc.
PAGE CONTENT:
- Why Is Your Drive Showing Only Half Capacity?
- Recover Missing or Inaccessible Files Before Fixing Hard Drive Only Shows Half Capacity Issue
- Preliminary Checks Before Fixing Hard Drive Only Shows Half Capacity Issue
- 7 Solutions to Fix a Hard Drive Showing Half Capacity
- macOS Users: Fix Hard Drive Shows Less Space
- Prevent the Hard Drive Shows Half Capacity Issue in the Future
Are you puzzled by your computer's internal hard drive or external hard drive showing only half of its advertised capacity? This is a common issue many Windows and macOS users encounter. A 1TB drive appearing as 500GB or a 2TB drive showing only 1TB can be frustrating, especially when you're running out of space. The good news is, this issue is often software-related and fixable without replacing the drive.
In this comprehensive guide, we'll cover all the potential causes and walk you through step-by-step solutions to restore your hard drive's full capacity.
Why Is Your Drive Showing Only Half Capacity?
Before diving into the fixes, it helps to understand what might be causing this issue. Common reasons include:
- Unallocated space: The drive contains space that hasn't been partitioned or formatted.
- Incorrect partitioning: A partition might be set up to use only a portion of the drive.
- File system errors or corruption: Damage to the file system can misreport available space.
- Outdated or incompatible drivers: Drivers control how your OS interacts with the hardware.
- Incompatible partition table (MBR vs. GPT): MBR has limitations that can restrict usable space.
- Previous formatting by other systems (Xbox, macOS, Linux, DVRs): Non-Windows systems can use file systems or partition schemes not fully compatible with Windows.
Recover Missing or Inaccessible Files Before Fixing Hard Drive Only Shows Half Capacity Issue
Before fixing hard drive issues, you can use data recovery software - such as Donemax Data Recovery to recover deleted/formatted and inaccessible files from the hard drive disk.
Step 1. Download and install Donemax Data Recovery on your computer. It is fully compatible with Windows and macOS.
Step 2. Open Donemax Data Recovery, it shows all drives and external devices. Select the hard drive or entire disk where you lose your files.

Step 3. Click on Scan button. Donemax Data Recovery will deeply scan the selected drive and find all recoverable files including deleted/formatted/lost files, inaccessible files, existing files, hidden files, etc.
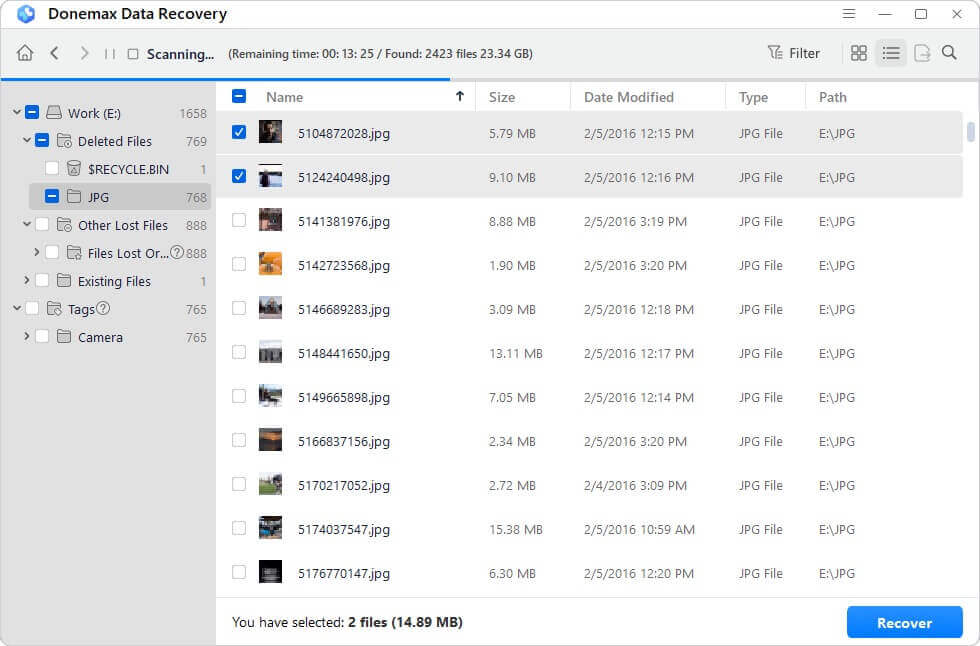
Step 4. After scan, you can preview all recoverable files. Then select the wanted files, click on Recover button to save them.

Donemax Data Recovery also can help you repair damaged hard drive, reformat a hard drive to its full capacity, etc.
Preliminary Checks Before Fixing Hard Drive Only Shows Half Capacity Issue
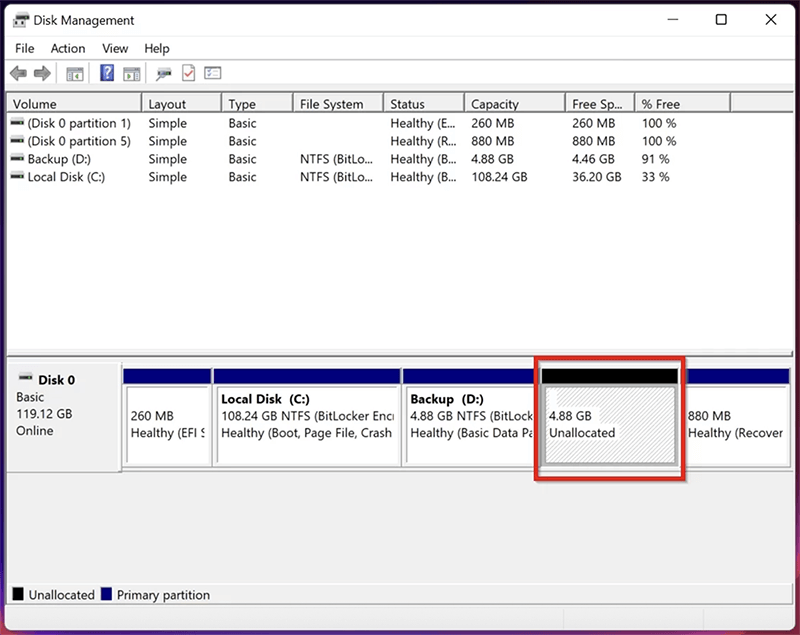
1. Verify Drive Capacity in Disk Management (Windows)
- Press Win + X, then select Disk Management.
- Look at the bottom pane to see partitions and unallocated space.
- If there's a large chunk labeled Unallocated, the full capacity hasn't been partitioned.
![Verify Drive Capacity in Disk Management]()
2. Test on Another Device or OS
- Try using a new computer or a different USB port to attach the drive.
- For external drives, use a different cable or USB adapter if available.
3. Check with Third-Party Tools
- Software like CrystalDiskInfo can reveal hidden or unallocated space and detailed disk health.
7 Solutions to Fix a Hard Drive Showing Half Capacity
Let's walk through effective methods to reclaim your drive's missing space. Follow these in order or choose the one that applies to your scenario.
Solution 1. Extend or Create Partitions in Disk Management
If a portion of the disk is unallocated, you can create a new partition or extend the current one.
Steps:
- Choose Disk Management by pressing Win + X.
- Locate the drive in question.
- If you see Unallocated space:
- Right-click the main partition > Click Extend Volume.
![Extend or Create Partitions in Disk Management]()
- Use the wizard to allocate all unallocated space.
- Right-click the main partition > Click Extend Volume.
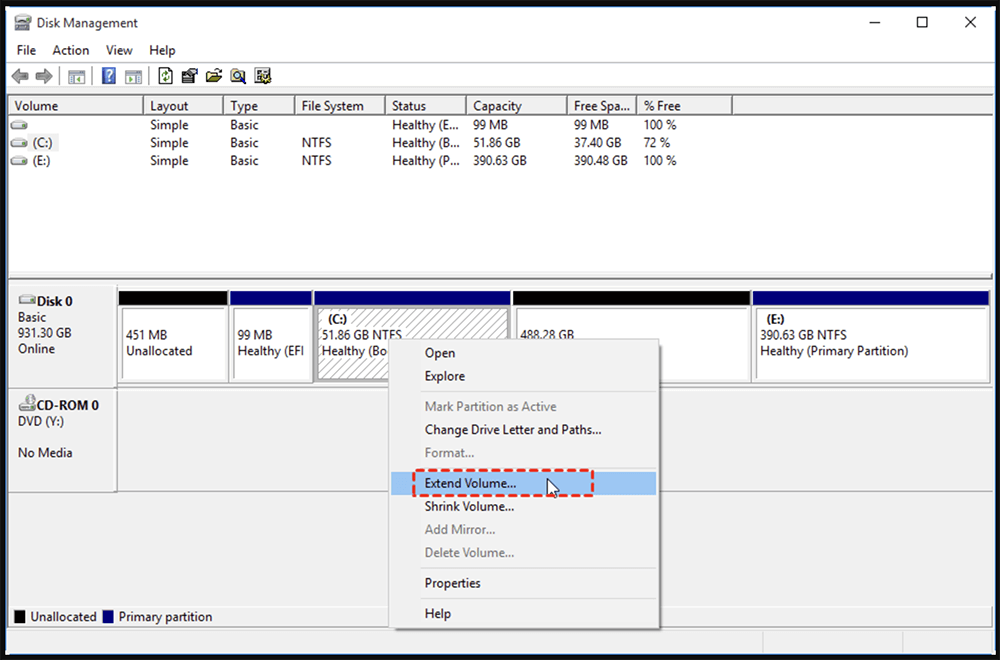
Note: If "Extend Volume" is greyed out, use third-party tools like Partition Master.
Solution 2. Update or Reinstall Disk Drivers
Old or incorrect drivers might not let Windows read the full capacity.
Steps:
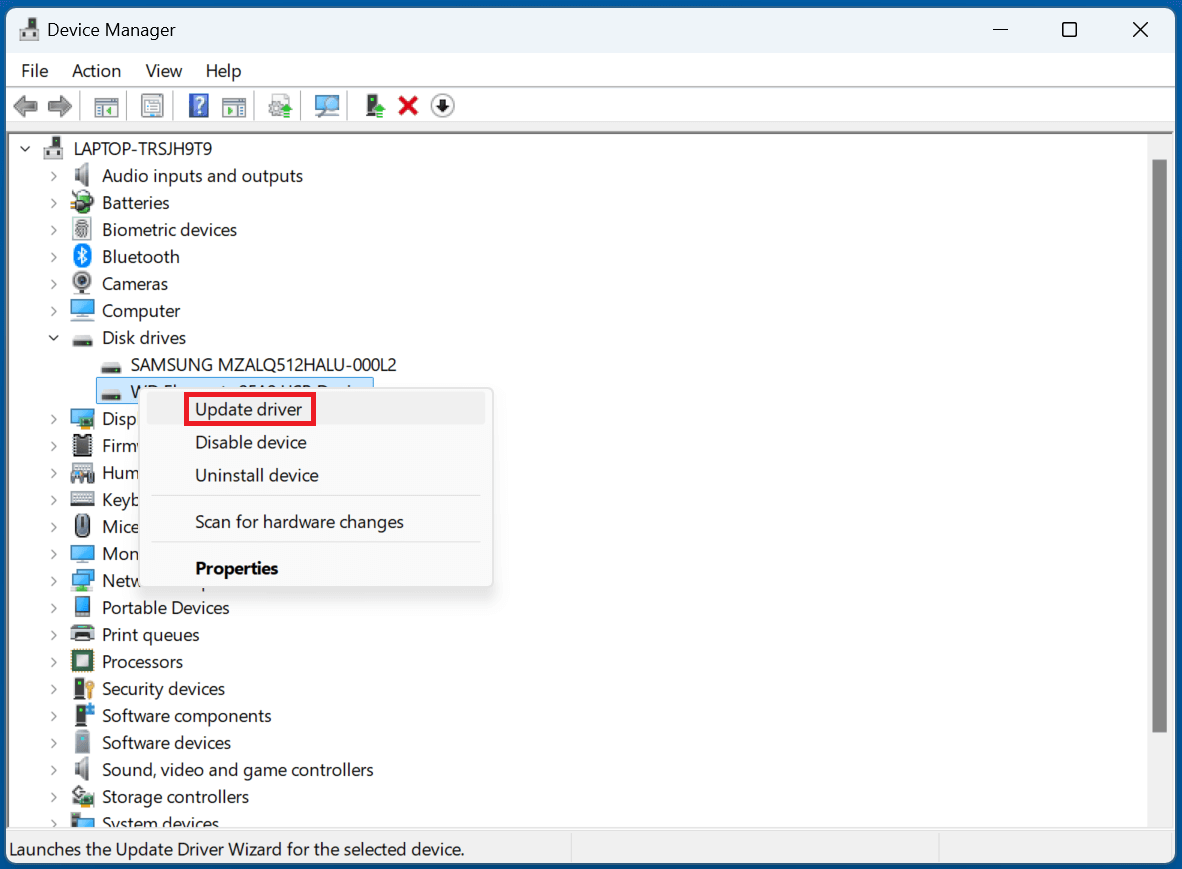
- Press Win + X > Open Device Manager.
- Expand Disk Drives.
- Right-click your hard drive > Click Update driver.
![Click Update driver]()
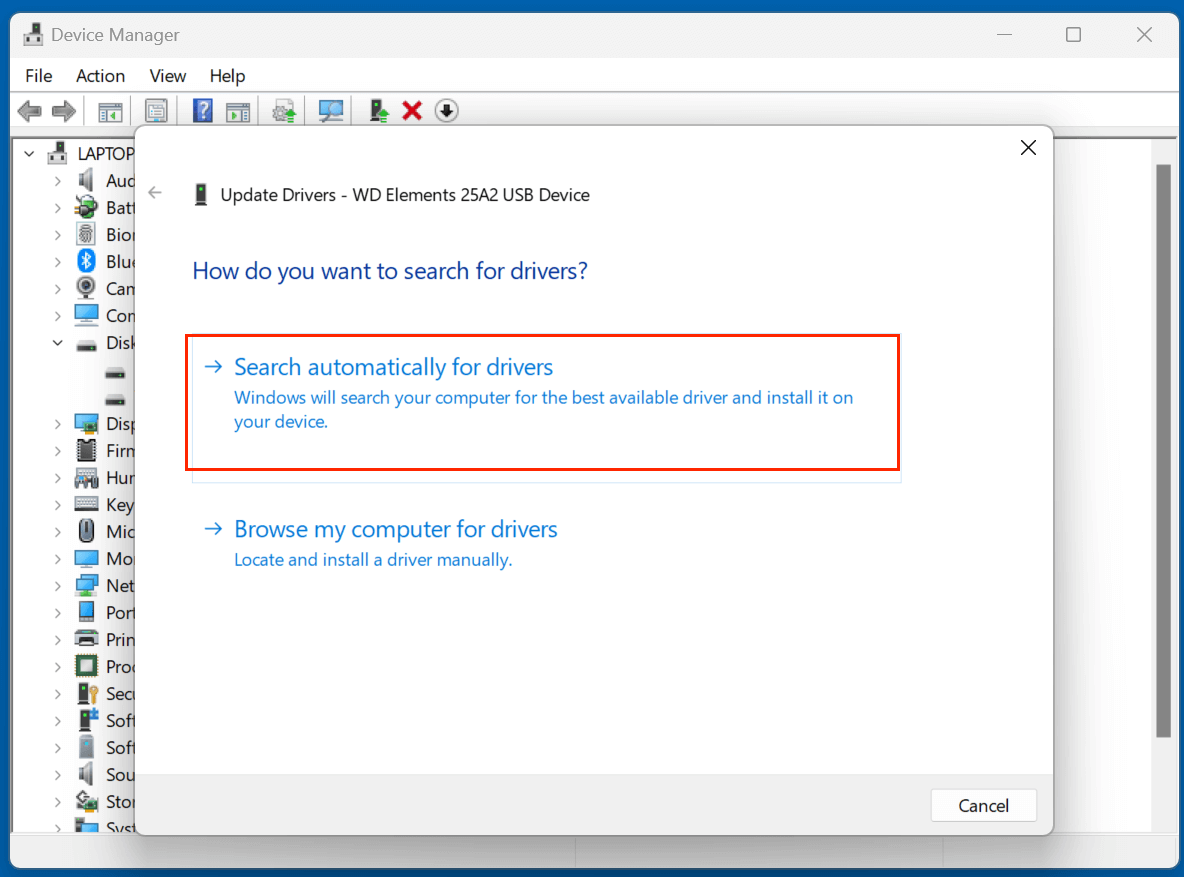
- Choose Search automatically for drivers.
![Choose Search automatically for drivers]()
- You can also uninstall the driver > reboot to let Windows reinstall it.
Solution 3. Convert MBR to GPT (or Vice Versa)
MBR (Master Boot Record) supports only up to 2TB of storage. If your drive is larger but using MBR, the rest of the space might be inaccessible.
Steps (Non-Destructive using DiskGenius or Gptgen):
- Download a trusted MBR-to-GPT tool (e.g., Partition Master, DiskGenius).
- Follow instructions to convert without data loss.
- If you're okay with data loss, you can do it via Command Prompt:
- Open CMD as Admin.
- Type diskpart > list disk > select disk X.
- Type clean (erases everything).
- Then type convert gpt.
![Convert MBR to GPT]()
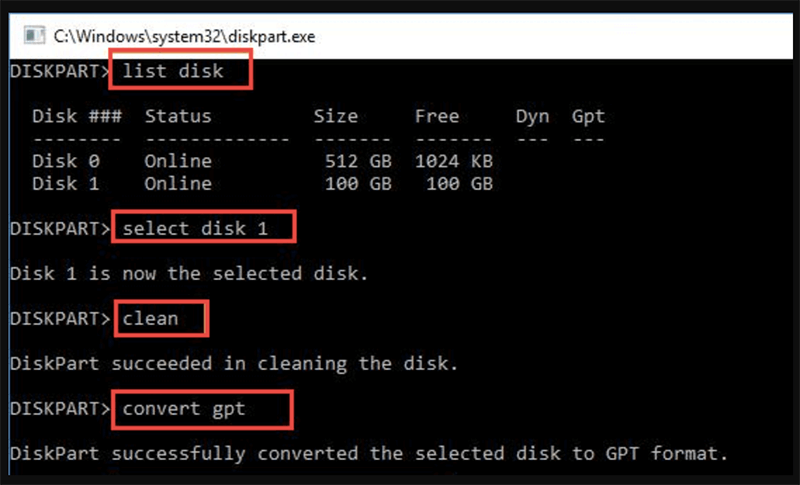
Back up your data before using clean.
Solution 4. Use Diskpart to Clean and Repartition
If you're dealing with a stubborn hard drive or external drive that won't reveal its full capacity - even after checking Disk Management and updating drivers - then using diskpart can be a powerful solution. This command-line utility is built into Windows and allows you to take complete control over the drive’s partition structure.
When to Use Diskpart?
- When the drive has been previously used in a console, DVR, or Linux system.
- When partitions don't show up properly or are unchangeable in Disk Management.
- When the "Extend Volume" option is greyed out.
- When you suspect that hidden or corrupted partition tables are causing issues.
Step-by-Step Instructions to Clean and Repartition Using Diskpart
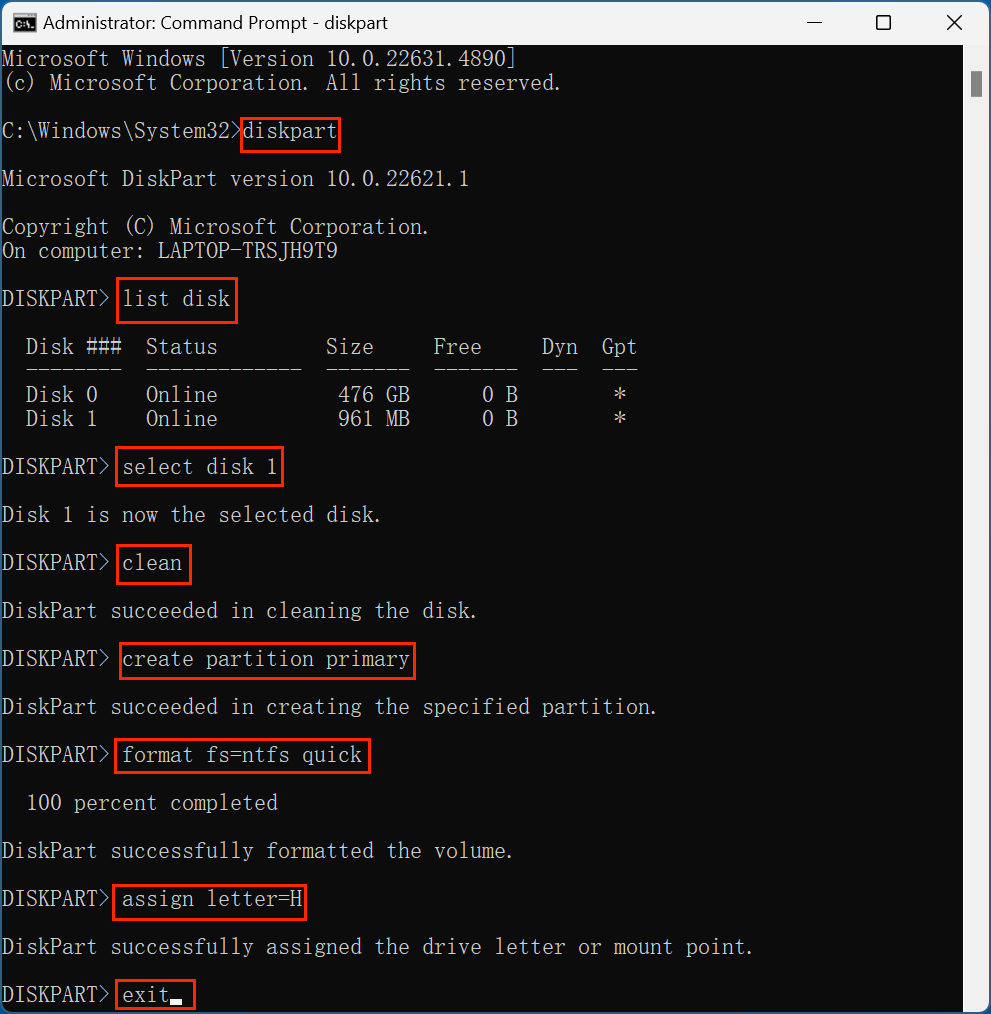
1. Open Command Prompt as Administrator
Press Win + S > type "cmd." Right-click Command Prompt > select Run as administrator.
2. Launch Diskpart Utility
In the Command Prompt window, type:
diskpart
3. List All Available Disks
Type:
list disk
This will display all storage devices connected to your computer. Look carefully at the Size column to identify your problematic drive.
4. Select the Target Disk
Suppose your external drive is listed as Disk 2, type:
select disk 2
You'll see the message: Disk 2 is now the selected disk.
Double-check the disk number! Choosing the wrong disk will wipe that disk completely.
5. Clean the Disk
Type:
clean
This command removes all partition or volume formatting from the disk, making it entirely unallocated.
After running this, you'll have a blank slate.
6. Create a New Primary Partition
Type:
create partition primary
7. Format the New Partition
Type:
format fs=ntfs quick
This will quickly format the drive using the NTFS file system. You can change this to exFAT if you want the drive to be compatible with macOS and Windows.
8. Assign a Drive Letter
Type:
assign
This will assign the next available drive letter to the newly created partition so that you can see it in File Explorer.
9. Exit Diskpart
Type:
Exit
After Diskpart: Confirm Full Capacity
Once these steps are complete:
- Open File Explorer or Disk Management again.
- The drive should now appear with its full capacity and as a single, healthy partition.
- You can rename the drive or start transferring files back onto it.
Troubleshooting After Diskpart
- Drive still shows less capacity? It's possible that:
- You're dealing with a hardware-level capacity lock (rare).
- The drive is a fake/counterfeit model showing false specs (common in budget USB drives or SD cards).
- There's a firmware bug (check manufacturer tools for firmware updates).
- Diskpart won't allow clean or format?
- The drive may be write-protected. In that case, type:
attributes disk clear readonly
![Troubleshooting After Diskpart]()
- The drive may be write-protected. In that case, type:
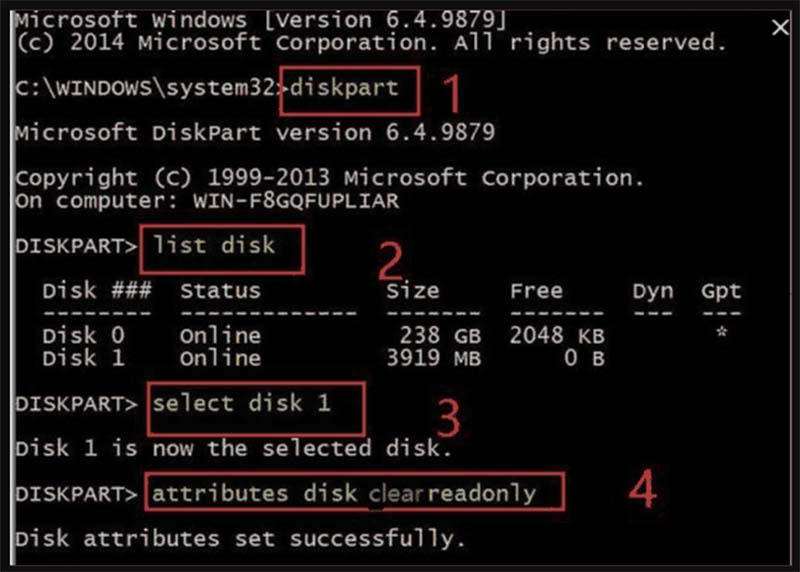
Then retry the clean command.
By using Diskpart, you essentially reset the entire partition map of the disk. This makes it one of the most effective methods for restoring full drive capacity - but it also carries the highest risk of data loss, so always proceed with caution.
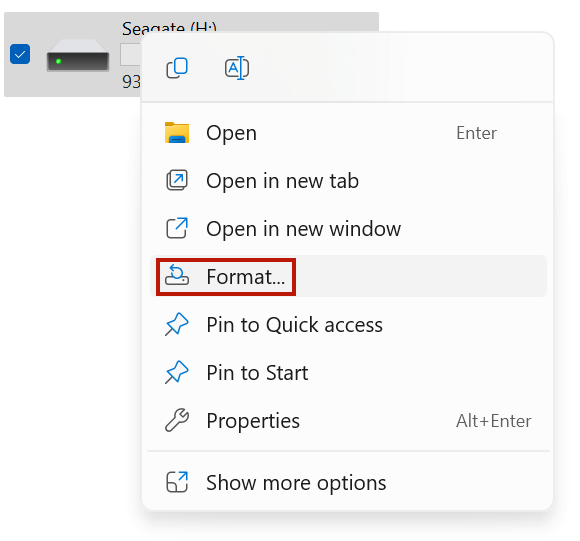
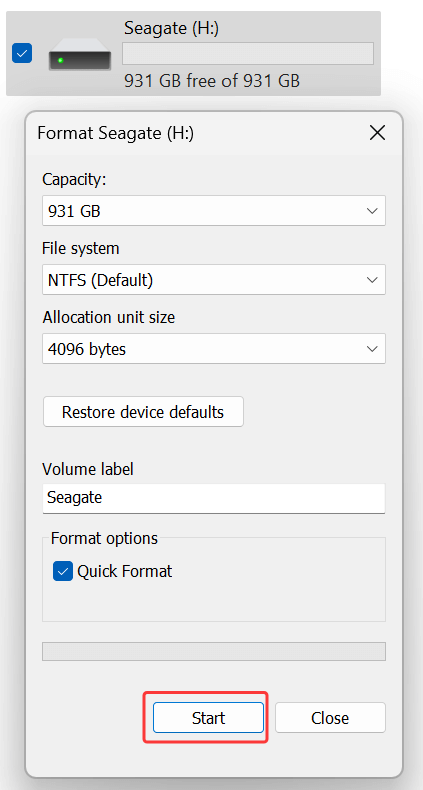
Solution 5. Format with Correct File System (NTFS, exFAT)
Drives formatted with FAT32 or HFS+ might not show correctly in Windows.
To Format (Windows):
- Open File Explorer > Right-click the drive.
- Choose Format.
![Choose Format]()
- Select NTFS or exFAT.
- Uncheck Quick Format for a deeper clean (optional).
![Select NTFS or exFAT]()
For macOS drives:
Use Disk Utility > Erase > Format as ExFAT if cross-platform use is needed.
Formatting will erase all data.
Solution 6. Check for Hidden Partitions or Recovery Volumes
Sometimes external drives include recovery or OEM partitions that take up space.
To Reveal Hidden Partitions:
Use third-party tools like:
- MiniTool Partition Wizard
- AOMEI Partition Assistant
These let you see and delete partitions Windows hides in Disk Management.
Solution 7. Use a Partition Recovery Tool (if the space was lost due to corruption)
If the drive previously had data but suddenly shows reduced capacity, the partition may be lost, not deleted.
Tools to try:
- Partition Data Recovery Wizard
- TestDisk (Free, command-line)
- Donemax Data Recovery
These can scan the disk and recover lost partitions or files before reformatting.
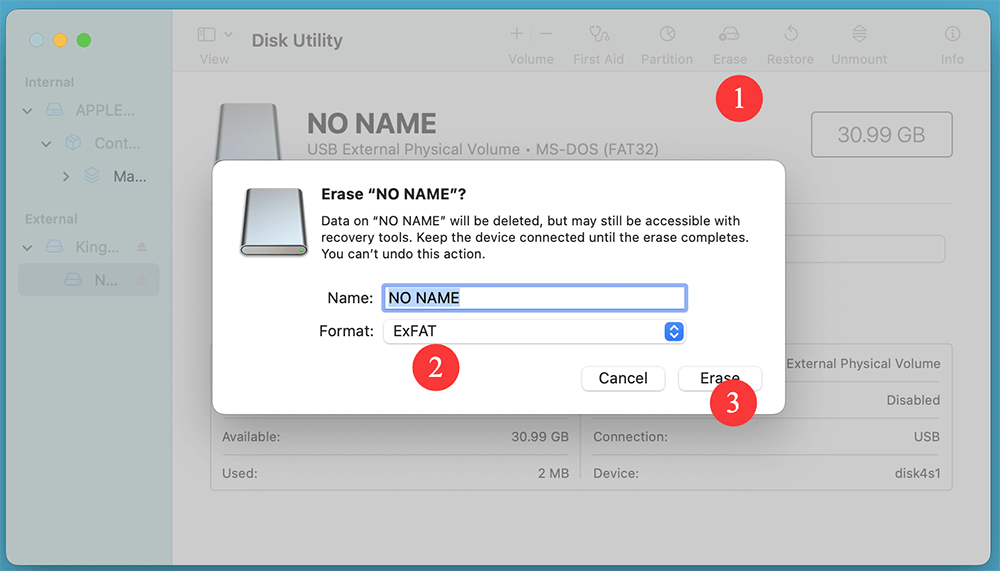
macOS Users: Fix Hard Drive Shows Less Space
For Mac users facing similar problems, here's how to resolve it:
Steps:
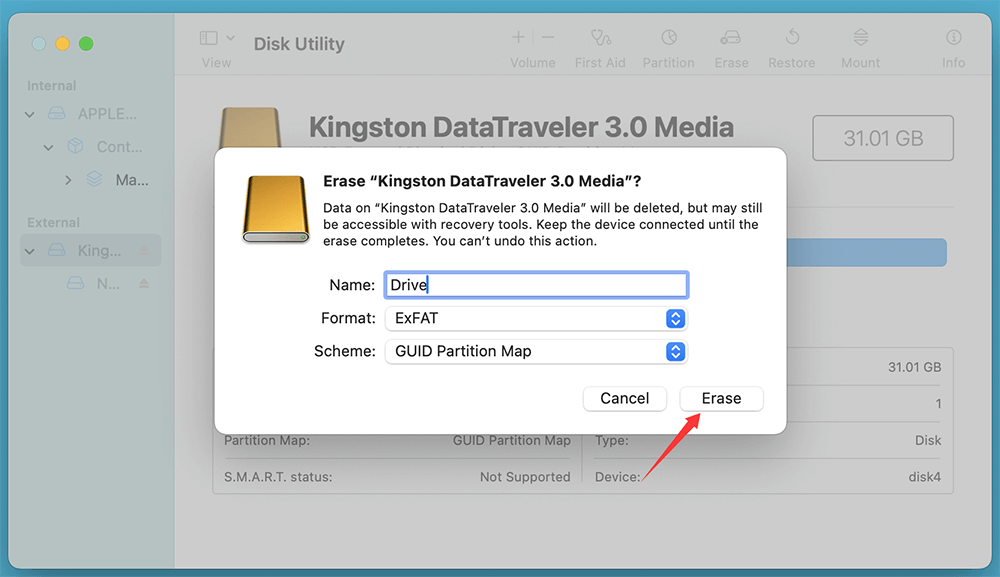
- Go to Disk Utility from Utilities via Applications.
- From the sidebar, choose the external drive.
- Click Erase.
- Choose:
- Format: ExFAT (for Windows compatibility) or APFS / Mac OS Extended
- Scheme: GUID Partition Map
- Click Erase to reformat the entire drive.
![Click Erase to reformat the entire drive]()
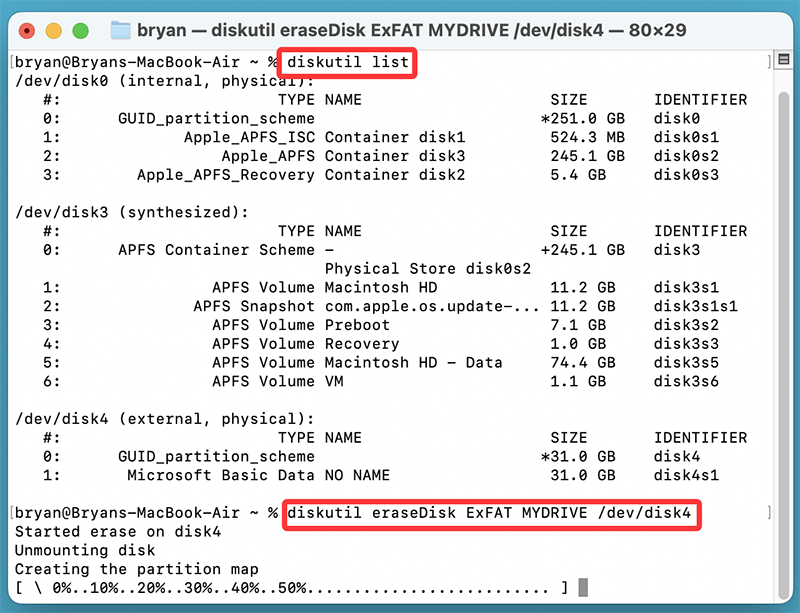
You can also use Terminal with diskutil commands:
diskutil list
diskutil eraseDisk ExFAT MYDRIVE /dev/diskX
Prevent the Hard Drive Shows Half Capacity Issue in the Future
Now that your drive is showing full capacity again, here are some tips to avoid similar problems:
- Always eject drives properly using "Safely Remove Hardware".
- Avoid switching between platforms (e.g., Xbox → Windows → macOS) without reformatting.
- Back up your data regularly to avoid data loss during repartitioning.
- Stick to NTFS or exFAT for Windows/macOS compatibility.
- Avoid using drives in DVRs, consoles, or routers if you plan to reuse them on a PC later.
When to Seek Professional Help?
If you've tried the above methods but still can't restore full capacity, it may be time to get expert help.
Signs of a hardware problem:
- Clicking or grinding noises from the drive.
- Drive not showing at all, even in Disk Management.
- Drive frequently disconnects or throws read/write errors.
- S.M.A.R.T. errors reported in diagnostic tools.
In these cases:
- Contact the manufacturer if the drive is under warranty.
- Seek data recovery specialists if critical data is at risk.
Conclusion
A hard drive or external hard drive showing only half capacity is often the result of partitioning issues, outdated drivers, or previous formatting from incompatible systems. Fortunately, using tools like Disk Management, Diskpart, or third-party software, most users can reclaim the full storage space without needing to replace the hardware.
Whether it's a 1TB drive stuck at 500GB or a 2TB external drive showing only 1TB, this guide offers a range of practical, tested solutions to get your storage back to full strength. Always remember to back up your data before making major changes, and keep your system updated to prevent future issues.
If you want to recover lost data from the drive, just try Donemax Data Recovery - a powerful data recovery program.
Donemax Data Recovery
Donemax Data Recovery offers advanced scan technology to ensure finding every recoverable file from your computer hard drive or external storage device. It supports to recover lost data or inaccessible data due to deletion, emptying recycle bin, format, OS upgrade, partition loss, hard drive crash, device damage, logical error, etc.
Related Articles
- Aug 06, 2024Fix External Hard Drive Not Working on Mac Without Losing Data
- Feb 05, 2025Fix/Repair Unallocated External Hard Drive without Losing Data
- Feb 25, 2025Fix SanDisk USB Drive Not Recognized Issue
- Jan 14, 2025How to Format MBR Disk to GPT on Mac Without Losing Data?
- Jan 08, 2024How to Format or Unformat Crucial X10 Pro Portable SSD on Windows/macOS?
- Mar 19, 2024How to Format SanDisk G-DRIVE for Mac?

Contributing Writer
Maria
Maria is one of the senior writers & editors of Donemax who lives and works in Sydney, Australia. She loves PC, Mac and Internet Technology. She has 6 years of writing articles about data recovery on PC/Mac, disk cloning solution, data eraser and computer OS optimization, etc. She is also interested in testing various software and digital products.

Editor in chief
Gerhard Chou
In order to effectively solve the problems for our customers, every article and troubleshooting solution published on our website has been strictly tested and practiced. Our editors love researching and using computers and testing software, and are willing to help computer users with their problems