PAGE CONTENT:
Managing storage devices effectively is a critical aspect of modern computing, particularly when using macOS, which increasingly favors the GUID Partition Table (GPT) over the Master Boot Record (MBR). Converting an MBR disk to GPT is often necessary for compatibility with macOS and to take advantage of GPT's benefits, such as supporting larger drives and numerous partitions. This article provides a comprehensive guide to help you format an MBR disk to GPT on a Mac, offering both Disk Utility and Terminal approaches.
What are MBR and GPT?
The Master Boot Record (MBR) and GUID Partition Table (GPT) are partitioning schemes that organize data on storage devices. MBR, an older standard, stores partitioning and boot information in the first sector of a disk, supporting up to four primary partitions or three primary and one extended partition. However, it is limited to drives smaller than 2 TB.
On the other hand, GPT is part of the Unified Extensible Firmware Interface (UEFI) and allows for a far greater number of partitions and support for drives exceeding 2 TB. GPT also offers redundancy, storing multiple copies of partitioning information, making it more robust than MBR.
Why Convert MBR to GPT?
Converting an MBR disk to GPT may be necessary when:
- macOS requires GPT for features such as APFS formatting.
- A drive needs to exceed MBR's 2 TB size limit.
- You seek enhanced partition management and reliability.
Converting from MBR to GPT, however, erases all data on the disk, making it imperative to back up your data beforehand.
What Need to Do Before Formatting MBR to GPT on Mac?
Before formatting your MBR disk to GPT, ensure the following:
● Backup Your Data
Formatting erases all data on the disk. Use macOS's Time Machine or an external drive to back up any important files.
● Verify Disk Compatibility
Ensure your disk is compatible with GPT. Most modern external and internal drives support it, but older drives may have limitations.
● Required Tools
- Disk Utility: A macOS graphical tool for disk management.
- Terminal: For users comfortable with command-line tools.
- Third-party Disk Formatting Tools: Some third-party tools offer more features for managing disks on Mac.
● macOS Version Requirements
macOS versions released in the last decade (e.g., macOS Sierra or later) fully support GPT. Ensure your macOS version is up-to-date for the smoothest experience.
Methods to Format MBR Disk to GPT on Mac
Ensure you have backed up your important data, then you can use Disk Utility or other tools to help you securely and easily format a MBR disk to GPT on Mac.
Method 1. Erase a MBR disk to GPT by using Disk Utility
Disk Utility is a graphical tool built into macOS that simplifies disk management tasks. Whether you're formatting an external drive, creating partitions, or converting partition schemes, Disk Utility provides an intuitive interface for most users. Below is a detailed, step-by-step guide to converting an MBR disk to GPT using Disk Utility.
Step 1. Open Disk Utility
Disk Utility is easily accessible on macOS:
- Navigate to Applications > Utilities > Disk Utility.
- As an alternative, launch Spotlight Search by pressing Command + Space, type "Disk Utility," and hit Enter.
- Once launched, you'll see a list of all available disks and volumes on your Mac in the sidebar.
![format an MBR disk to GPT on a Mac]()
Step 2. Identify the Disk
Before proceeding, carefully identify the disk you want to format:
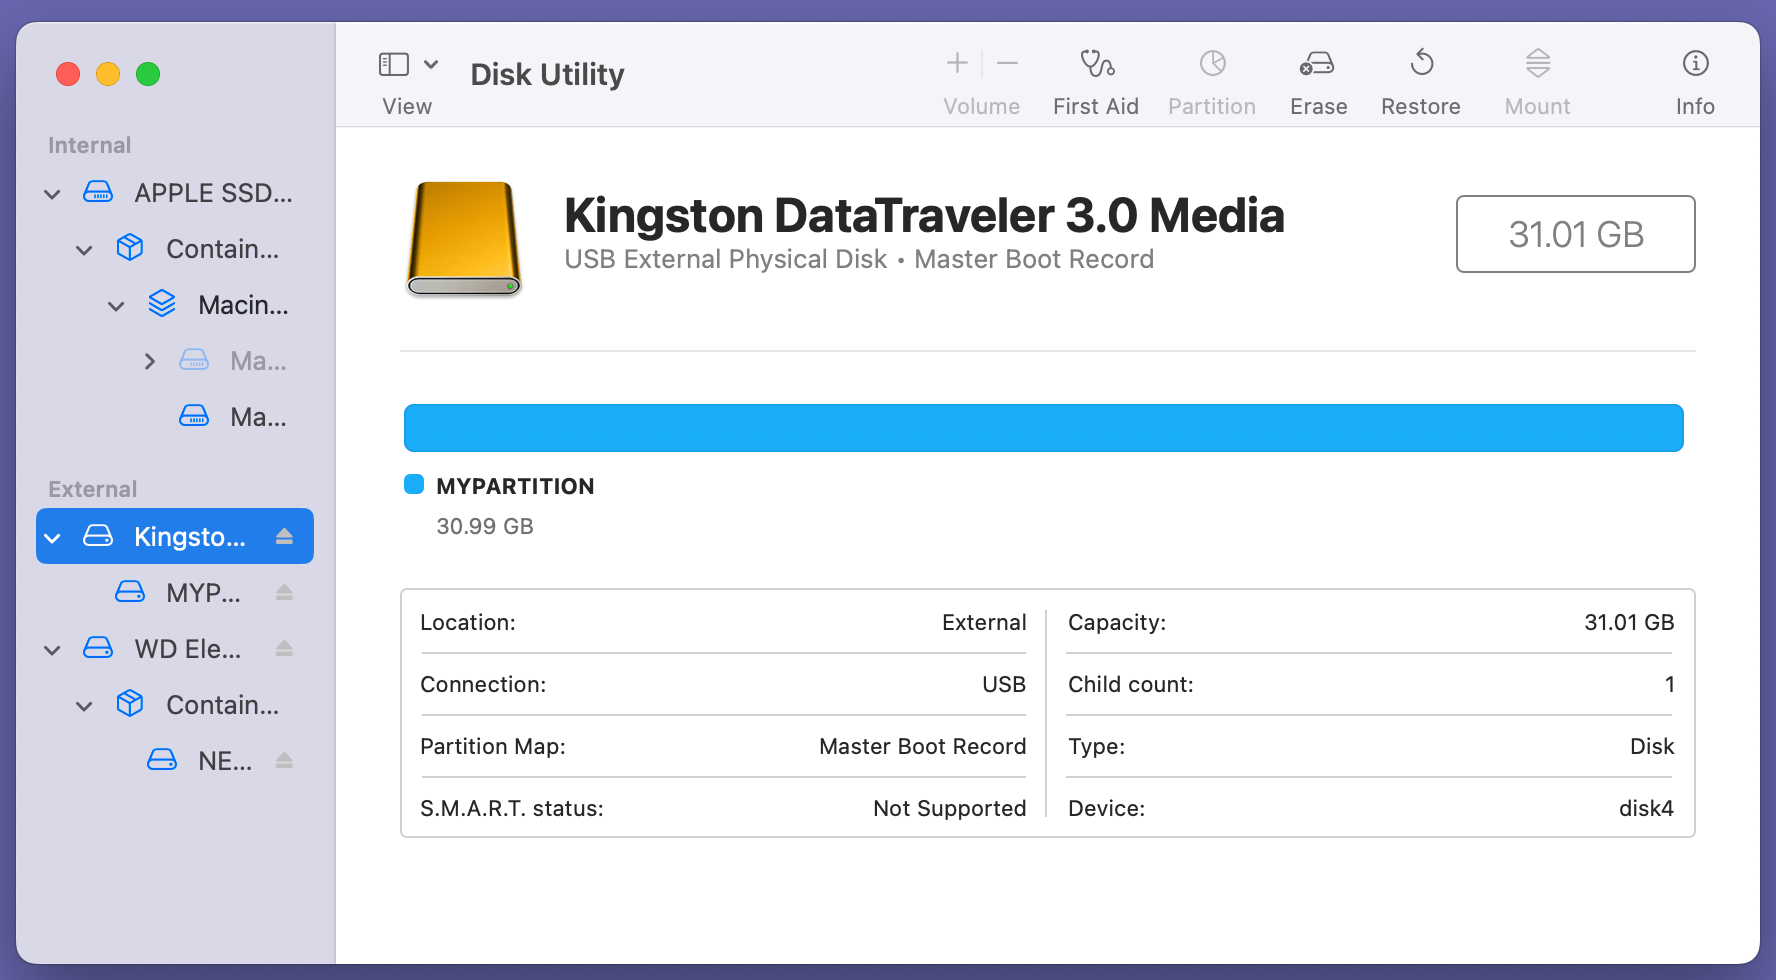
- Look for the MBR disk in the sidebar. External drives are usually listed under "External," while internal drives appear under "Internal."
- Click on the disk’s name to view its details. Ensure this is the correct disk by verifying its size, current filesystem, and connection type.
- If the disk does not appear, click View in the top-left corner and select Show All Devices to ensure all connected disks are visible.
![format an MBR disk to GPT on a Mac]()
⚠️ Warning: Be extra cautious when selecting the disk. Formatting the wrong disk will erase its data permanently.
Step 3. Erase the Disk
To convert the disk to GPT, you must erase it, which removes all data:
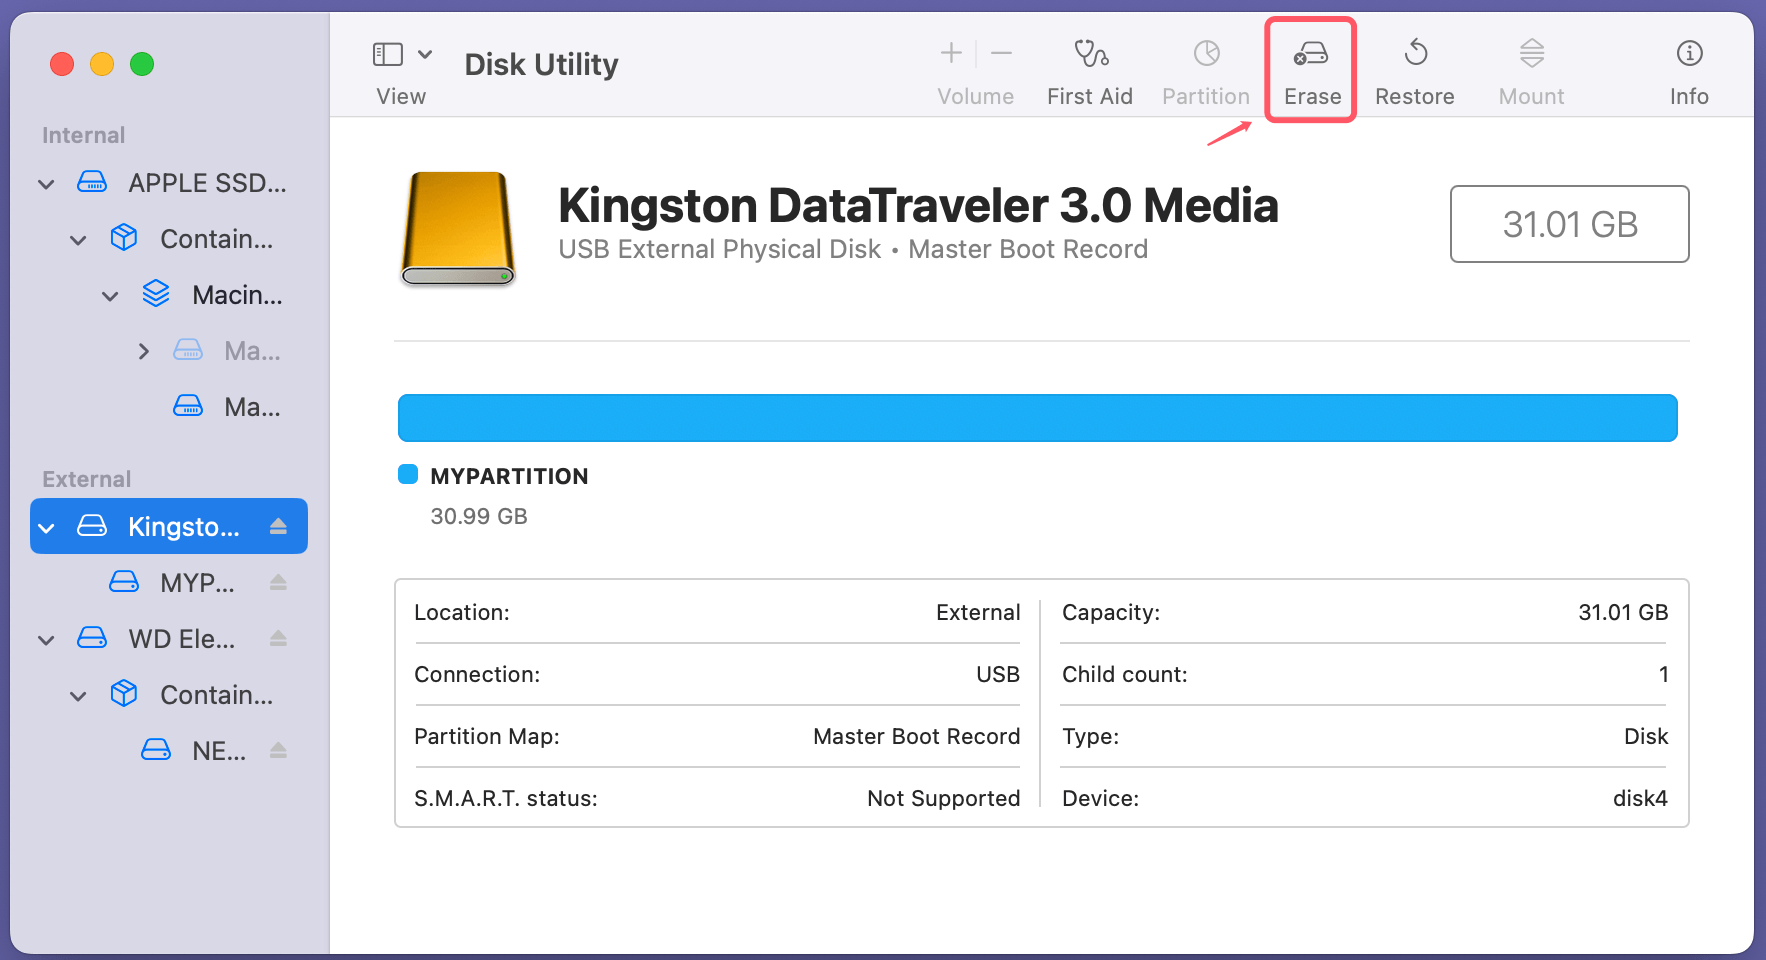
- Select the target disk from the sidebar.
- Click the Erase button in the toolbar.
![format an MBR disk to GPT on a Mac]()
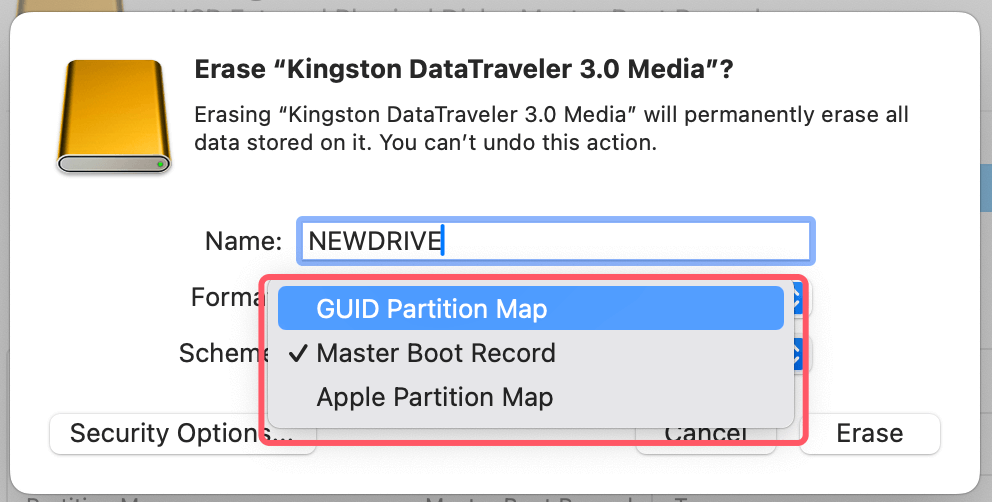
- A dialog box will appear with the following options:
- Name: Enter a descriptive name for the disk, such as "New Drive" or "Backup Disk."
- Format: Choose the filesystem. For macOS compatibility, select APFS or macOS Extended (Journaled).
- APFS is recommended for SSDs and newer macOS versions.
- macOS Extended (Journaled) is suitable for HDDs or compatibility with older macOS versions.
- Scheme: Choose GUID Partition Map (GPT). This is the essential step for converting the disk to GPT.
![format an MBR disk to GPT on a Mac]()
Step 4. Confirm Changes
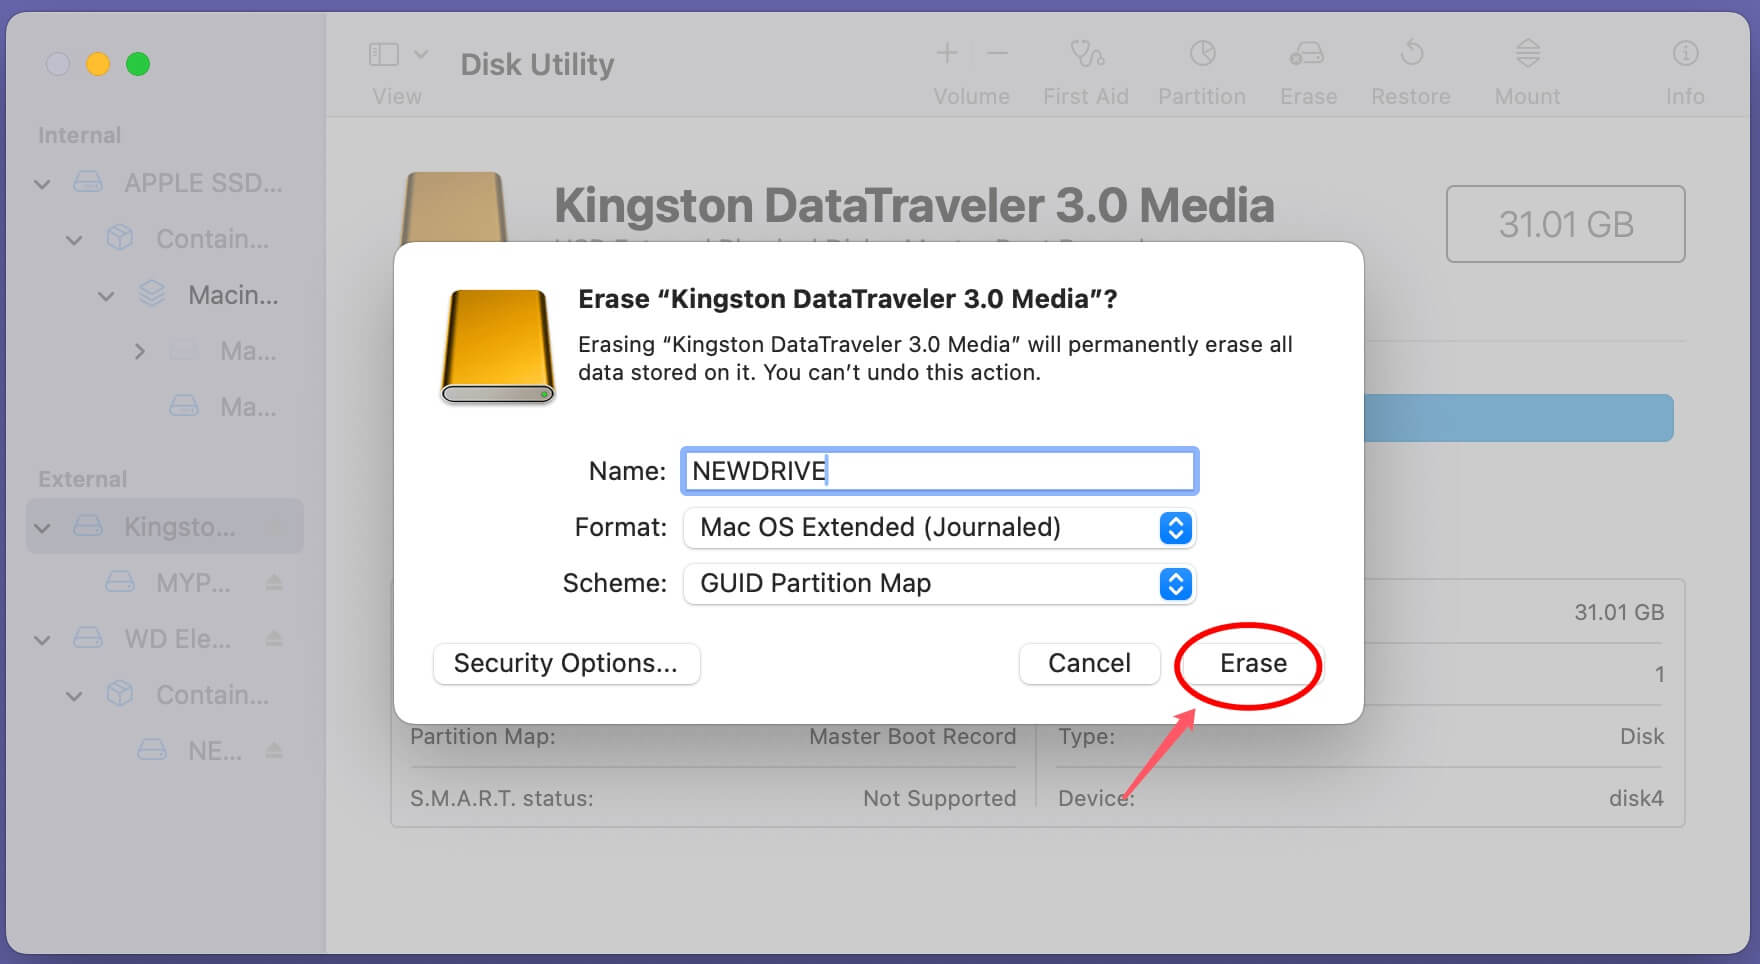
- Once you've set the options, click Erase to start the process.
![format an MBR disk to GPT on a Mac]()
- Disk Utility will erase the disk, apply the GPT partition scheme, and format it with the selected filesystem.
- A progress bar will appear, showing the formatting process. This typically takes a few seconds to a few minutes, depending on the disk size and speed.
Step 5. Verify the Format
After the process is complete:
- Click Done in the dialog box.
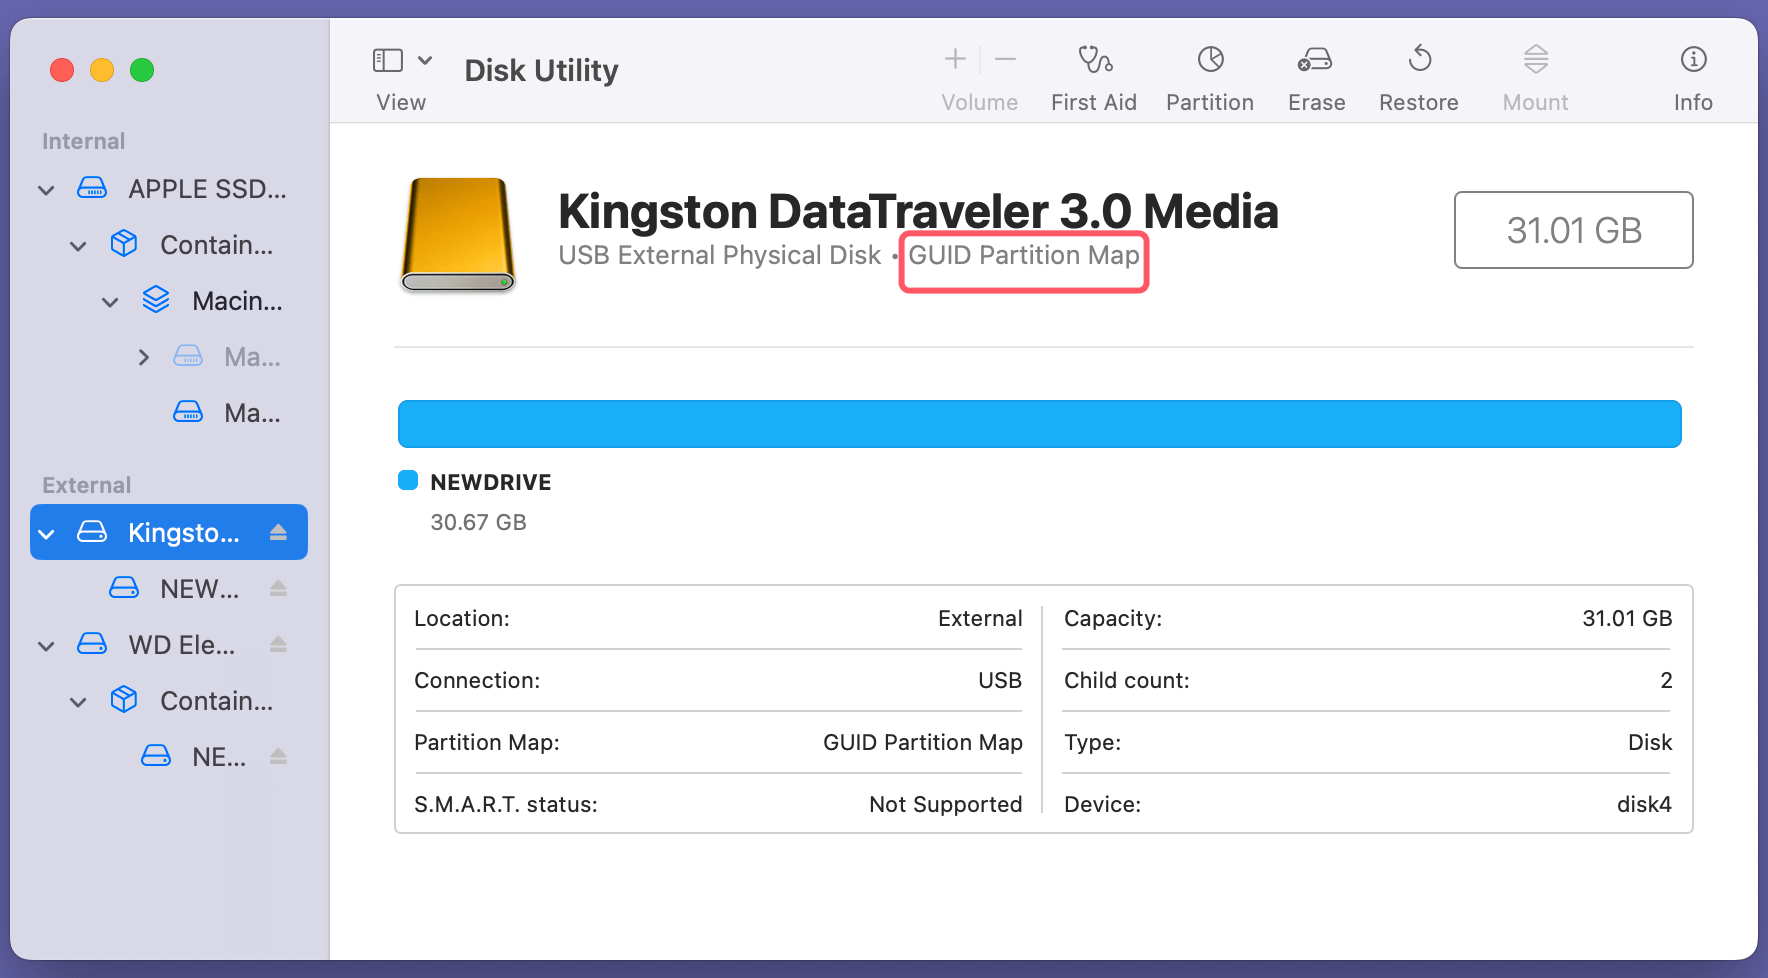
- Select the formatted disk in the sidebar and click the Info button in the toolbar.
- Look for the "Partition Map" field to confirm it says GUID Partition Map.
![format an MBR disk to GPT on a Mac]()
Step 6. Additional Partitioning (Optional)
If you need multiple partitions:
- Select the disk and click Partition in the toolbar.
![format an MBR disk to GPT on a Mac]()
- Use the graphical slider or enter specific sizes to create multiple partitions.
- Assign a name, format, and size to each partition as needed.
- Click Apply to finalize the partitioning.
Method 2. Use Terminal to format a MBR disk to GPT
For users comfortable with command-line tools, Terminal offers a precise and efficient method to format an MBR disk to GPT.
Step 1. Open Terminal
Terminal is a powerful tool built into macOS, and you can access it as follows:
- Navigate to Applications > Utilities > Terminal.
- Alternatively, press Command + Space to open Spotlight Search, type "Terminal," and press Enter.
- Once Terminal is open, you're ready to input commands to manage the disk.
![format an MBR disk to GPT on a Mac]()
Step 2. List All Disks
Before formatting, identify the target disk to avoid accidentally erasing the wrong one:
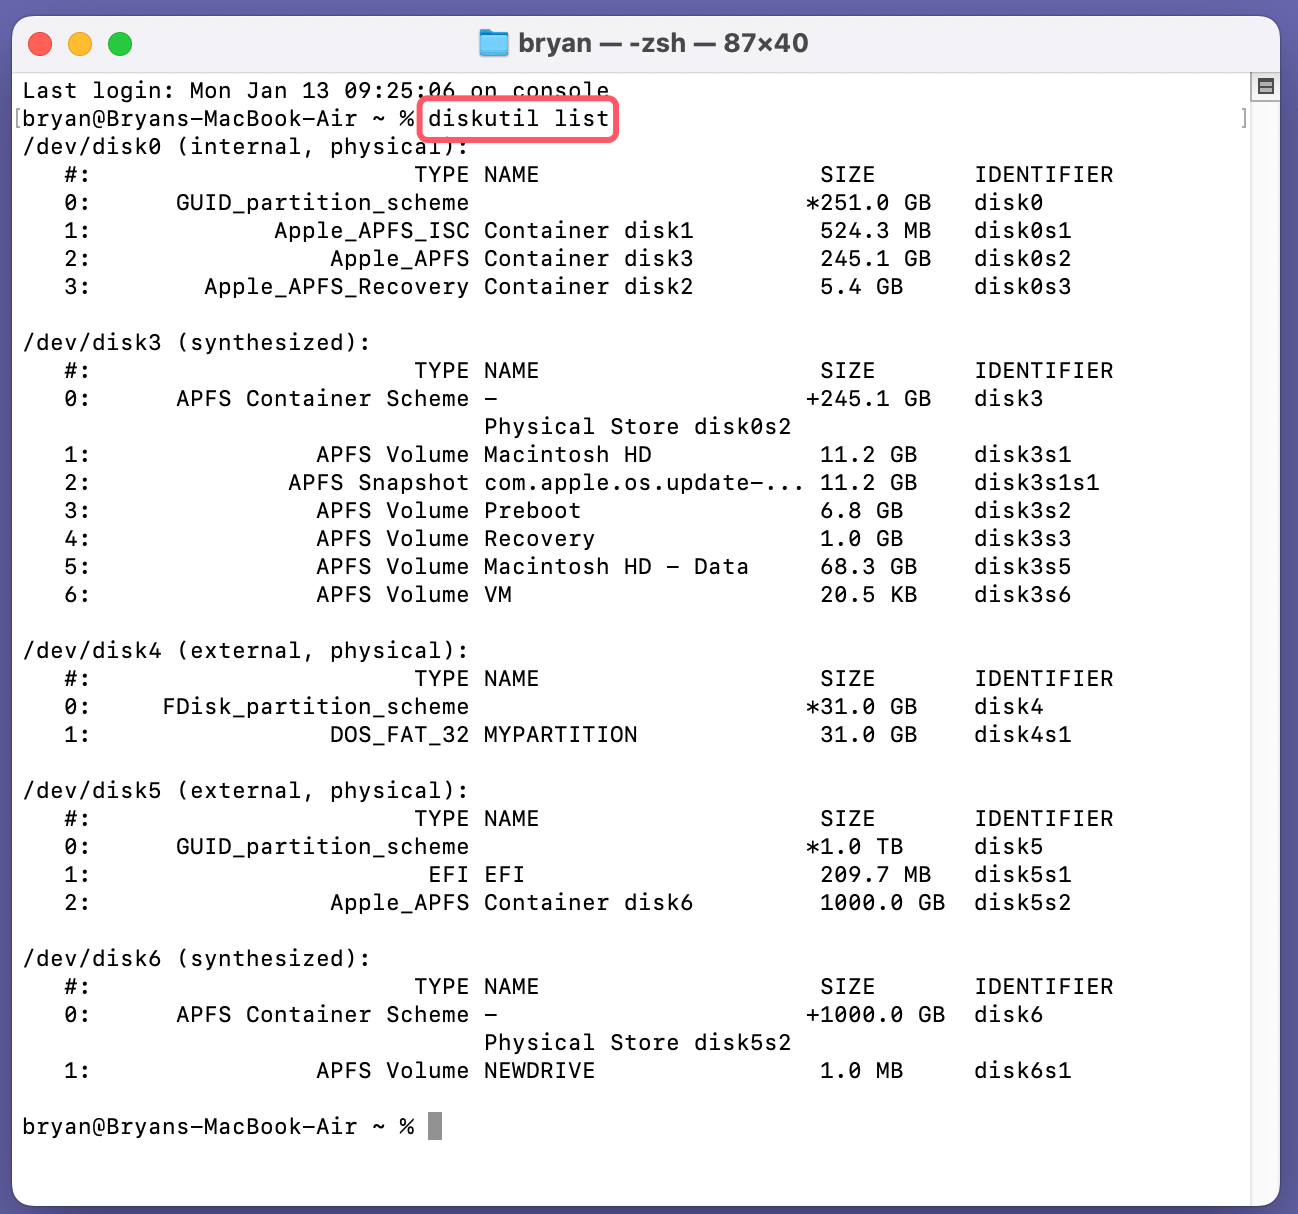
- Type the following command and press Enter:
diskutil list
- The output will display a list of all connected disks and their partitions. Each disk is identified by a name like /dev/disk0, /dev/disk1, etc.
![format an MBR disk to GPT on a Mac]()
- Look for the disk you want to format. Check its size, partition scheme (e.g., MBR or GPT), and name to ensure you've identified the correct one. For example:
/dev/disk4 (external, physical)
In this example, /dev/disk4 is an MBR disk.
⚠️ Warning: Double-check the disk identifier to avoid formatting the wrong disk, especially if you have multiple drives connected.
Step 3. Erase the Disk with GPT
If the disk is currently in use, it must be unmounted before formatting:
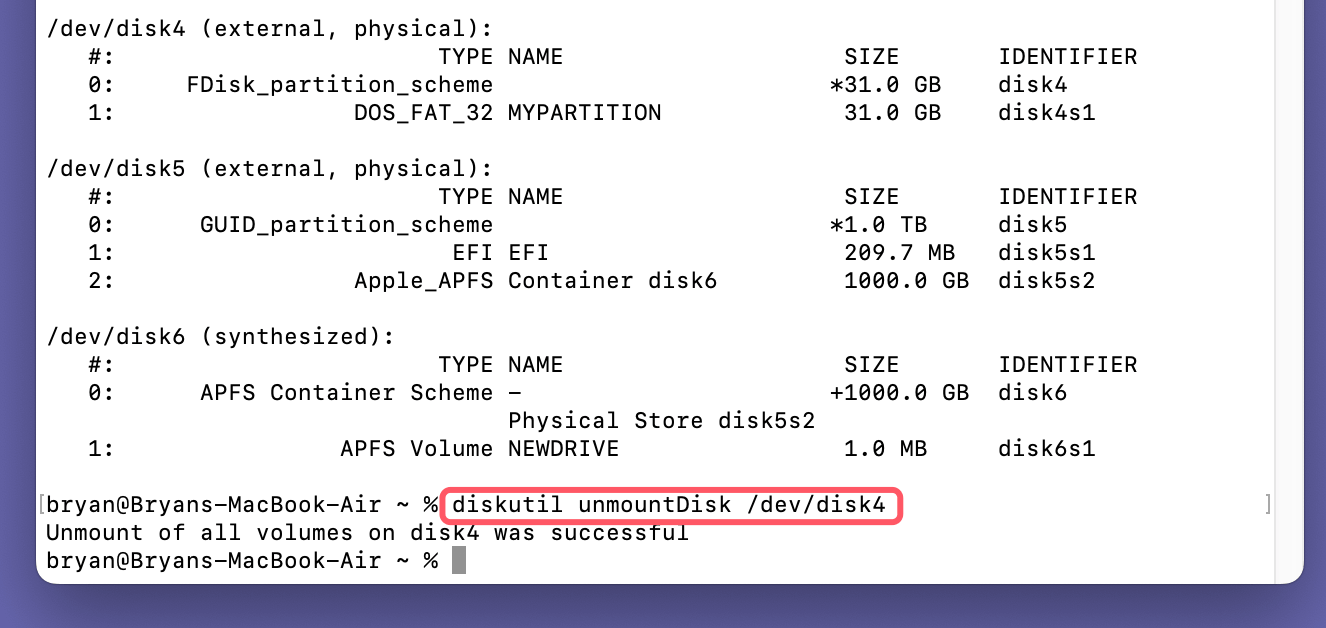
- Use the following command to unmount the disk:
diskutil unmountDisk /dev/diskX
Replace /dev/diskX with the disk identifier from Step 2.
![format an MBR disk to GPT on a Mac]()
- You'll see a confirmation message:
Unmount of all volumes on diskX was successful
If the disk fails to unmount, use a force unmount command:
diskutil unmountDisk force /dev/diskX
- Type in diskutil eraseDisk HFS+ NEWDRIVE /dev/diskX, such as diskutil eraseDisk HFS+ NEWDRIVE /dev/disk4
![format an MBR disk to GPT on a Mac]()
Step 4. Confirm and Verify
- After formatting, use diskutil info /dev/diskX to confirm the disk is now using GPT.
- Replace diskX with your disk's identifier.
Troubleshooting Common Issues
While formatting a disk to GPT is straightforward, you may encounter issues. Below are common problems and their solutions.
Disk Not Showing in Disk Utility
- Check if the disk is connected properly.
- Use Terminal to mount the disk:
diskutil mountDisk /dev/diskX
Error: Disk Cannot Be Erased
- Ensure the disk is not in use by another application.
- Use Terminal to force the drive to unmount.:
diskutil unmountDisk force /dev/diskX
Formatting Fails with Errors
- Check if the disk is physically damaged.
- Run diskutil repairDisk /dev/diskX to repair it before formatting.
Data Loss Concerns
- Always back up your data before attempting any disk formatting.
Benefits of Successfully Converting to GPT
Converting your disk to GPT offers several benefits:
1. Enhanced Compatibility
GPT is the default partition scheme for macOS, ensuring seamless compatibility with features such as Time Machine backups and APFS formatting.
2. Support for Larger Drives
Unlike MBR, which is limited to 2 TB, GPT supports drives larger than 2 TB, making it ideal for modern storage needs.
3. More Partitions
GPT allows for virtually unlimited partitions, compared to MBR's restriction of four primary partitions.
4. Improved Reliability
GPT stores multiple copies of partition data, reducing the risk of partition table corruption and ensuring better recovery options.
5. Future-Proofing
With MBR being phased out in favor of GPT, converting your disk ensures compatibility with newer technologies and systems.
Recover Lost Data After Formatting MBR to GPT on Mac
Disk Formatting will erase everything from the disk. If you have lost data due to formatting a disk from MBR to GPT on Mac, you can use Mac data recovery software to unformat the disk and get all lost data back.
Step 1. Donemax Data Recovery for Mac is a powerful Mac data recovery app. Download and install it on your Mac.
Step 2. Open Donemax Data Recovery for Mac, then select the formatted disk to start data recovery.

Step 3. Click on Scan button to deeply scan the formatted disk. It will deeply scan the disk and find all deleted/erased files.

Step 4. After deep scan, Donemax Data Recovery for Mac lists all recoverable files. Just select the wanted files and click on Recover button to save them.

Conclusion
Formatting an MBR disk to GPT on a Mac is a straightforward process with the right tools and knowledge. By complying the processes described in this article, you can ensure your disk is ready for modern macOS features and storage requirements.
Using Disk Utility provides a user-friendly approach for most users, while Terminal offers precision and control for advanced users. Always remember to back up your data before beginning the process and verify the disk format afterward to ensure successful conversion.
With your disk now using GPT, you'll enjoy enhanced compatibility, reliability, and flexibility, setting you up for a smoother computing experience.


Donemax Data Recovery for Mac
Donemax Data Recovery for Mac is one of the best Mac data recovery software. It is easy-to-use and can help in recovering deleted, formatted, inaccessible or lost data from Mac HDD/SSD, external disk, USB drive, SD card, camera or other storage devices.
Related Articles
- Feb 05, 2025Fix/Repair Unallocated External Hard Drive without Losing Data
- Feb 25, 2025Fix SanDisk USB Drive Not Recognized Issue
- Jul 27, 2025WD Elements Not Mounting on Mac? Fix It Now
- Feb 06, 2024How to Format Lexar Portable SSD for Mac?
- Apr 11, 20257 Solutions to Fix Internal Hard Drive/External Hard Drive Only Shows Half Capacity
- Jul 09, 2024External Hard Drive Is Not Initialized, How to Fix It?

Steven
Steven has been a senior writer & editor of Donemax software since 2020. He's a super nerd and can't imagine the life without a computer. Over 6 years of experience of writing technical solutions and software tesing, he is passionate about providing solutions and tips for Windows and Mac users.

Gerhard Chou
In order to effectively solve the problems for our customers, every article and troubleshooting solution published on our website has been strictly tested and practiced. Our editors love researching and using computers and testing software, and are willing to help computer users with their problems

