PAGE CONTENT:
It's not fun when your external hard drive (HDD, SSD or USB Drive) suddenly stops working on your Mac. Whether you're trying to get to important files, back up important data, or move papers, a broken drive can slow you down and be frustrating. But don't worry - there are a few things you can do to figure out what's wrong and maybe fix it before you get too stressed out.
Figuring out why your drive isn't working can save you time and trouble. You can do this by checking simple links or going into system settings. We'll show you how to fix problems with your external hard drive by giving real-world examples in this guide. You'll know how to immediately fix your drive to return to important work.
Reasons Why Your External Hard Drive Is Not Working on Mac
There are several reasons why your external hard drive might not be working on your Mac:
- Connection Issues
The external hard drive might not be identified if the USB cable is damaged, frayed, or loose. The USB port on your Mac may also be broken. You can find this problem by testing another port.
- Power Supply Problems
Some portable hard drives, especially the bigger ones, need extra power sources. Make sure that any power adapters you need are safely connected. For drives that use a USB Y-cable to get enough power, both USB connectors may need to be put in.
- Software and System Issues
If you use an old version of macOS, it might not work with some apps. Make sure that the latest version is on your Mac. If the software or drivers for the external hard drive are outdated, it might not work right.
- Disk Errors and Corruption
The drive's file system might not work with macOS. For Macs to reach formats like NTFS, you need third-party software. If the disk is damaged or has errors, it might not be identified. Running Disk Utility can find and fix these problems.
- Security and Permission Settings
If the permissions are wrong, you might be unable to view the drive. You can fix the issue by changing these settings. Setting up an antivirus or firewall can sometimes stop external devices from working. Turning them off can help you figure out what's wrong.
How to Fix External Hard Drive Not Working on Mac?
Here is how you can fix this issue by following these steps:
#1 Check and Reconnect the Drive
To start, safely remove the portable hard drive from your Mac. Take the drive off the Mac and look for any damage in the USB cord, the drive's ports, and the Mac's ports. Ensure the links are tight and there is no dust or other debris.
Connect the portable hard drive to a different Mac USB port. Sometimes, a certain port might not work or give off enough power. If possible, hook up the drive to a different computer. It helps determine whether the problem is with your Mac or the drive. If the drive works elsewhere, look for problems unique to the Mac.
#2 Restart Your Mac
Before you restart, back up any open files or papers to avoid losing things. Open the Apple menu and choose "Restart." If you do this, your Mac will restart, and the system will be refreshed. It can sometimes fix small software problems that affect external files.
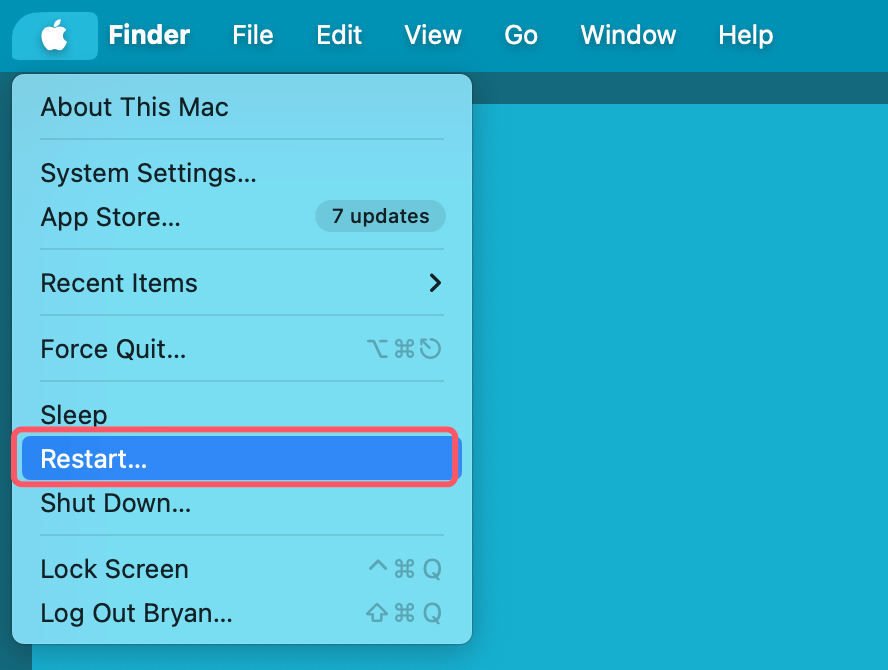
Connect the external hard drive again after restarting your Mac. Check to see if it works now. Often, a simple restart is all it takes to fix short-term problems with device recognition.
#3 Update macOS and Drivers
See if macOS has any updates. Get into System Settings > General and click on "Software Update." Ensure the most recent version of macOS is installed on your Mac. Updating your system can fix problems with how it works with external gear.
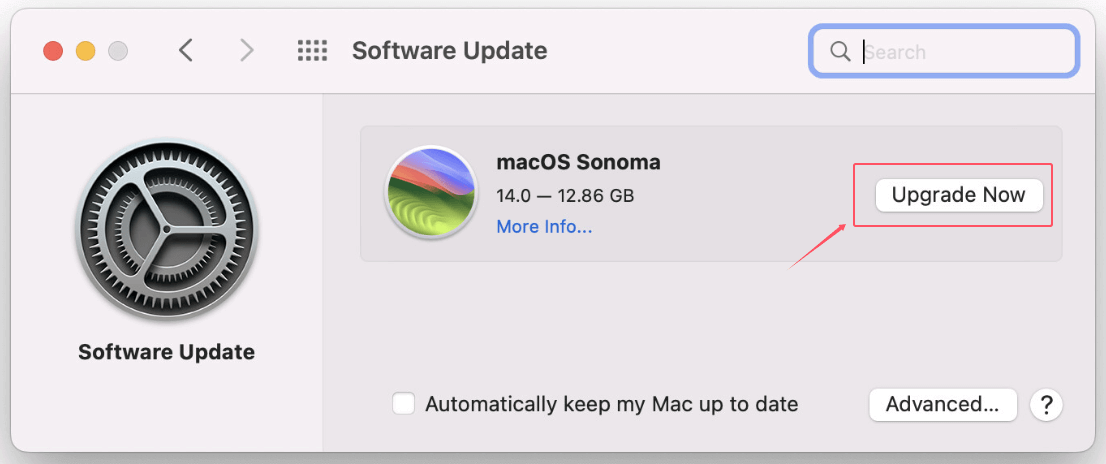
Go to the manufacturer's website. Check the company's website that made the external hard drive to see if any firmware or driver changes are available. If there are changes, download and install them.
After installing updates, restart your Mac. Connect the external hard drive again to check if the changes fixed the problem. Keeping your drivers and apps updated ensures they work better and are compatible with other devices.
#4 Use Disk Utility to Diagnose and Repair
You can resolve the issue by using Disk Utility to diagnose and repair any errors on the drive.
Step 1. Open Disk Utility: On your Mac, go to Applications > Utilities > Disk Utility. This built-in tool helps you manage connected drives and fix problems with them.
Step 2. Run First Aid: Open First Aid and choose the external hard drive from the list on the left side of the Disk Utility window. Press "Run" after clicking "First Aid." It will look for mistakes on the drive and try to fix any problems.
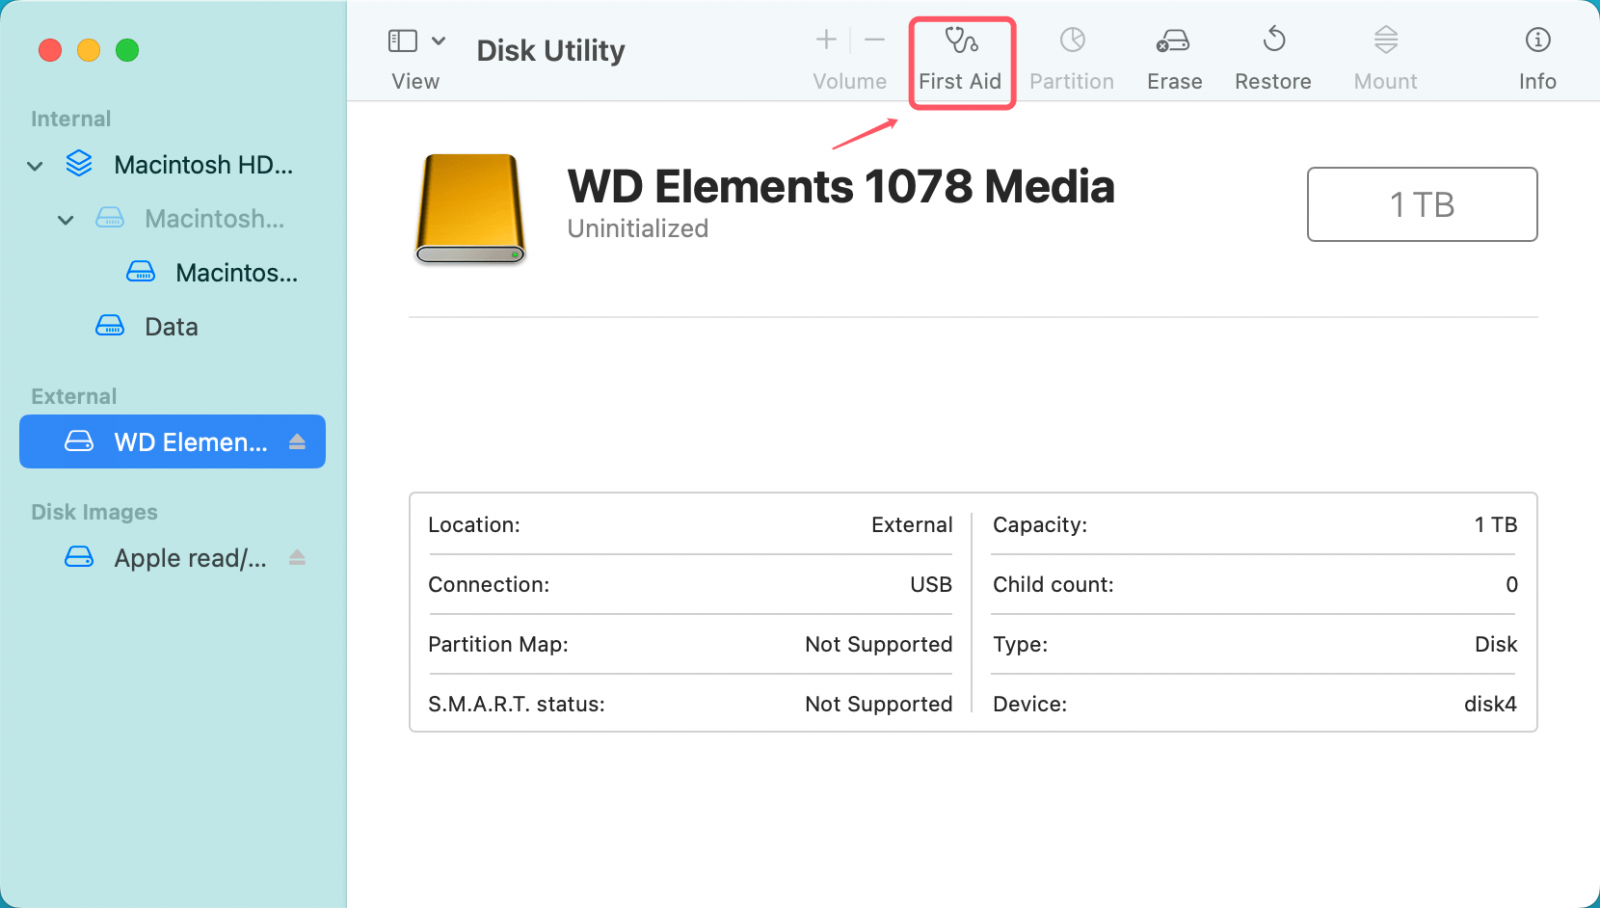
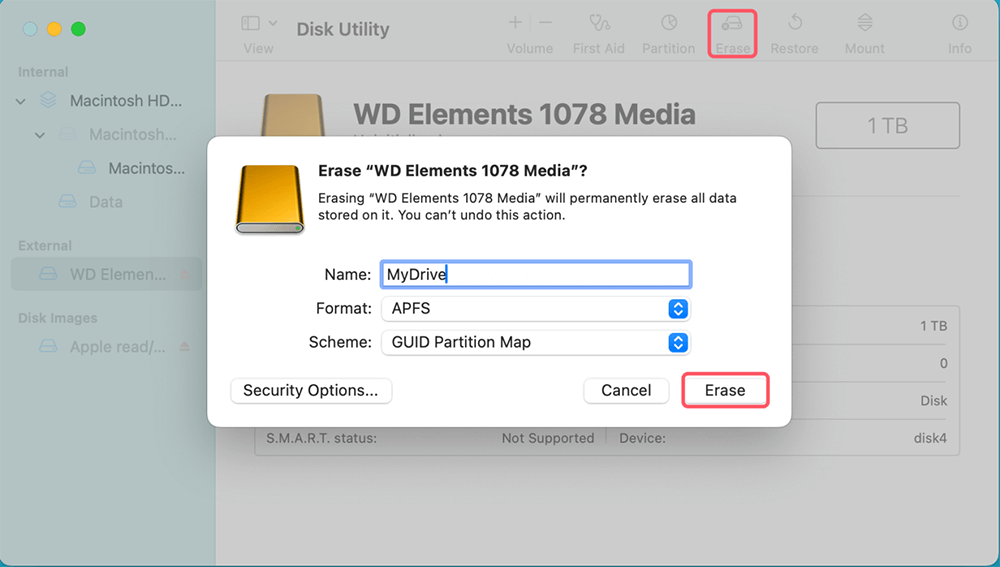
Reformat if Necessary: If First Aid doesn't work and you have saved your data, you may need to format the drive. Choose the drive, click "Erase," pick a format that works with macOS (like APFS or Mac OS Extended), and then format the drive.
#5 Check and Adjust Permissions
You can fix the problem by adjusting permissions to ensure you have the access rights. Here is how to do it:
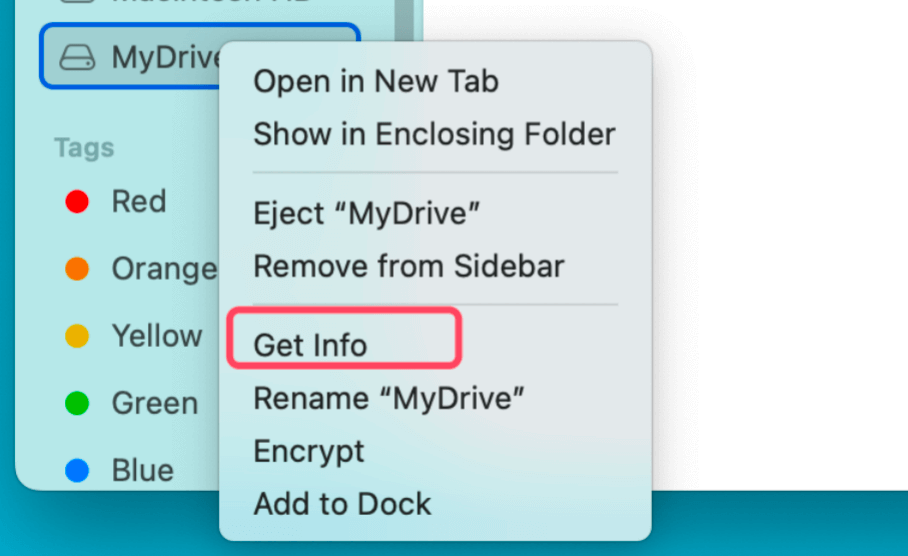
Get Info on the Drive: Find the portable hard drive in Finder and right-click. From the pop-up screen, choose "Get Info" for more information about the drive.
Review Permissions: Find "Sharing & Permissions" by scrolling down. Make sure that you can read and write. To change rights, click the lock icon and enter your administrator password if asked.
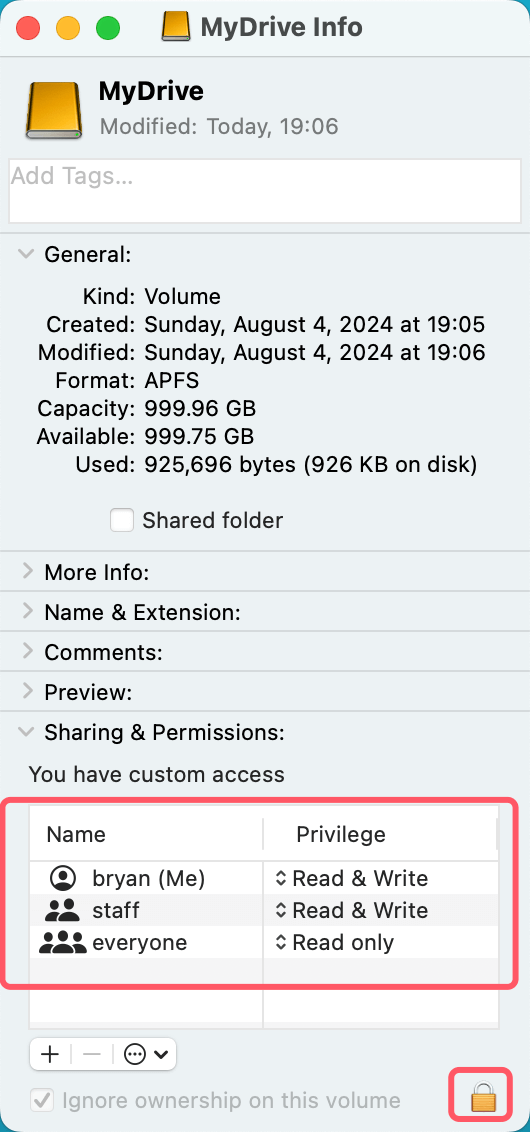
Apply Changes: Close the Get Info window and plug the external hard drive back in after changing rights. Check to see if you can get to the drive without any problems. You must have the right permissions to view and change files on the drive.
Recover Lost Data from Erased External Hard Drive on Mac
Erasing your external hard drive deletes everything from the drive. If you’ve lost data due to erasing the external hard drive, you can use a Mac data recovery app to scan the drive and get all erased/deleted files back.
Step 1. Download and install Donemax Data Recovery for Mac.
Step 2. Open Donemax Data Recovery for Mac, select the erased hard drive, then click on Scan button.

Step 3. Donemax Data Recovery for Mac will deeply scan the erased external hard drive and find all deleted/lost files.

Step 4. Once the scan gets finished, you can preview all recoverable files. Then select the wanted files, click on Recover button and save them.

Fix External Hard Drive Read-only on Mac
Can’t write data to your external hard drive on Mac? Can’t copy files to your external hard drive or you can’t delete files from your external hard drive? All these issues may be caused by NFFS incompatibility.
NTFS file system is a Windows-based file system and it is not compatible with macOS. If you want to use NTFS external hard drive on Mac, you can install a NTFS driver on your Mac.
Step 1. Download and install the best Mac NTFS driver - Donemax NTFS for Mac.
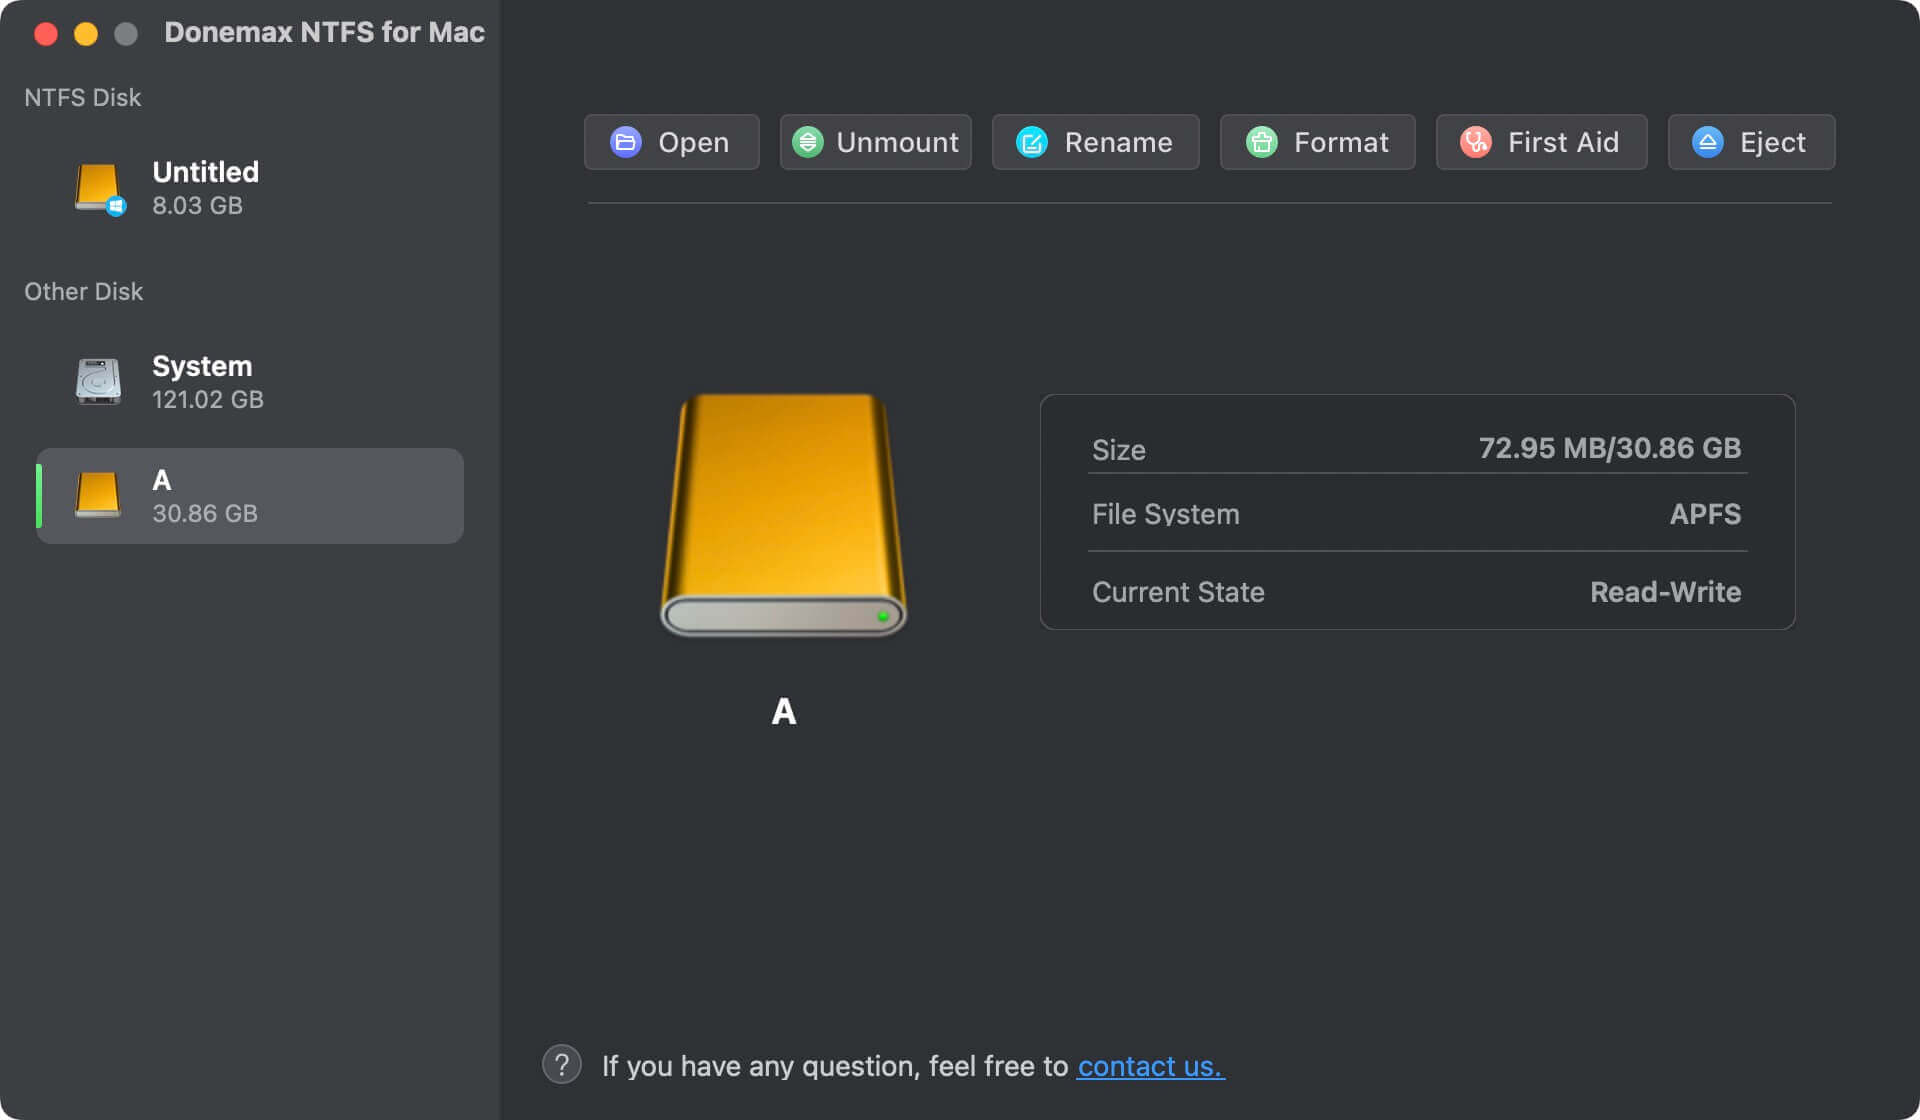
Step 2. Open Donemax NTFS for Mac, select the NTFS drive, click on Enable Writable button to allow your Mac to read-write any NTFS drive on Mac.

Donemax NTFS for Mac also can help you mount external hard drive on Mac, fix damaged external hard drive on Mac, format external hard drive to APFS, ExFAT, Mac OS Extended or NTFS, etc.
Conclusion:
It can be annoying when your external hard drive doesn't work with your Mac, but if you approach the problem methodically, you can fix it quickly. You can fix many common problems by checking your connections, restarting your Mac, installing new software, using Disk Utility, and changing rights.
These steps can help you determine if the issue is with the drive or the settings on your Mac. With these methods, you'll be able to access your important files again and keep working without any delays. Performing regular backups and repairs will also help prevent problems like these from happening again.
| External Hard Drive Not Working on Mac | Fixes |
|---|---|
| External hard drive not detected, not showing up or not recognized by Mac. |
1. Open Disk Utility, find the external hard drive, select it, click on Mount button. 2. Open Finder Settings, select External disks under General and Sidebar. |
| External hard drive is not mounting on Mac. |
1. Go to Launchpad > Other > Disk Utility, open it, select the external hard drive, click Mount. 2. Download and install NTFS for Mac, open it, select the external hard drive, click on Mount button. |
| External hard drive is read-only, and can’t write data to it. |
1. Run Disk Utility to erase the external hard drive to Mac-compatible file system. 2. Use NTFS drive - such as Donemax NTFS for Mac to enable writable for the NTFS drive. 3. Right-click the drive, choose Get Info, change it from Read-only to Read-write. |
| Can’t repair an external hard drive using Disk Utility. |
1. Unmount the external hard drive and use First Aid feature to repair it. 2. Use third-party tool or Terminal to repair the external hard drive. |
If you have lost data due to fixing damaged external hard drive on Mac, you can use data recovery app - such as Donemax Data Recovery for Mac to help you get the lost data back. This Mac data recovery app can help you recover deleted files, recover formatted or erased data, recover lost data from unmounted external hard drive or damaged SSD, etc.
Related Articles
- Oct 17, 2024How to Format a RAW Drive to NTFS on Mac?
- Feb 19, 2025Fix The Parameter is Incorrect Without Losing Data
- Feb 19, 2024How to Use Samsung Portable SSD T7 on Mac?
- Aug 13, 2023How to Remove A Hard Drive from Time Machine Backup?
- Jun 27, 2023How to Convert NTFS to ReFS or Convert ReFS to NTFS?
- Jan 12, 2024How to Format Kingston XS1000/XS2000 External SSD on Mac?

Christina
Christina is the senior editor of Donemax software who has worked in the company for 4+ years. She mainly writes the guides and solutions about data erasure, data transferring, data recovery and disk cloning to help users get the most out of their Windows and Mac. She likes to travel, enjoy country music and play games in her spare time.

Gerhard Chou
In order to effectively solve the problems for our customers, every article and troubleshooting solution published on our website has been strictly tested and practiced. Our editors love researching and using computers and testing software, and are willing to help computer users with their problems