PAGE CONTENT:
When your Mac suddenly reports that a disk is "OFF" or "Offline" it can feel like a moment of sheer panic. Maybe it's an external hard drive with your important documents or an internal disk that holds your operating system. Whatever the case, understanding what this issue means and how to resolve it is essential. This article dives into the causes behind this issue, offers a step-by-step guide to fixing it, and provides tips for preventing it from happening in the future.
What Does "Disk is OFF/Offline" Mean on a Mac?
When macOS reports that a disk is "OFF/Offline," it usually signifies that the disk is not mounted or recognized by the operating system. In simpler terms, the disk is present, but the system cannot access it. This issue can occur with both external and internal drives, and it renders the data stored on the disk temporarily or permanently inaccessible until the issue is resolved.
The term "OFF" isn't an official macOS message but a common way users describe situations where the disk is not functioning as expected. The symptoms of this problem may vary depending on the type of disk involved. For example, an external drive may not show up in Finder or Disk Utility, while an internal drive might prevent the Mac from booting altogether. Understanding the specific causes and manifestations of this issue can help pinpoint the exact solution.
Common Symptoms of a Disk Being OFF/Offline
- External Drives:
- The drive does not appear in Finder or on the desktop.
- Disk Utility shows the drive as grayed out or not listed at all.
- The drive lights up (if applicable) but is unresponsive to actions.
- Error messages like "The disk you inserted is not readable by this computer" appear.
- Internal Drives:
- The Mac fails to boot and shows a blinking folder icon or a prohibitory symbol.
- Disk Utility, when accessed in macOS Recovery Mode, lists the drive as unmounted.
- Terminal commands such as diskutil list do not show the internal disk.
- General Indicators:
- Applications that rely on the disk fail to load or crash unexpectedly.
- You may hear unusual noises, such as clicking or grinding, which could indicate hardware failure.
Why Does This Happen?
Several underlying reasons can cause a disk to become "OFF" on a Mac, and understanding these can help in diagnosing the issue.
- Improper Ejection: When an external disk is removed without properly ejecting it (via Finder or dragging the disk to the trash), it can lead to corruption in the disk's file system. The next time you connect the drive, macOS might struggle to read it.
- Software Glitches or Conflicts: macOS occasionally encounters bugs or conflicts with connected devices. For example, a recent system update might introduce compatibility issues with older external drives, or a background process might fail to recognize the disk.
- File System Corruption: The file system - whether it's APFS, HFS+, or FAT32 - acts as the structure that macOS uses to read data on a disk. If the file system becomes corrupted due to a power outage, improper ejection, or software error, macOS might fail to mount the disk.
- Hardware Failures: For external disks, issues like damaged cables, faulty connectors, or failing USB ports are common culprits. For internal drives, aging hardware, overheating, or physical damage can render the disk inaccessible.
- macOS Preferences and Settings: Occasionally, Finder preferences or Spotlight indexing settings might cause a disk to appear invisible. Similarly, certain macOS updates can create temporary compatibility issues that prevent disks from mounting.
How to Confirm the Problem
Before attempting to fix the issue, it's essential to confirm that the disk is indeed "OFF/Offline" and identify the potential cause. Here's how to do this:
- Check Finder and Desktop: Open Finder and look for the disk under the Devices section in the sidebar. If the disk isn't visible, it's likely unmounted or disconnected.
- Open Disk Utility: Disk Utility is macOS's primary tool for managing disks. Open it via Applications > Utilities > Disk Utility. If the disk appears but is grayed out, it's unmounted. If it doesn't appear at all, it may indicate a hardware connection issue.
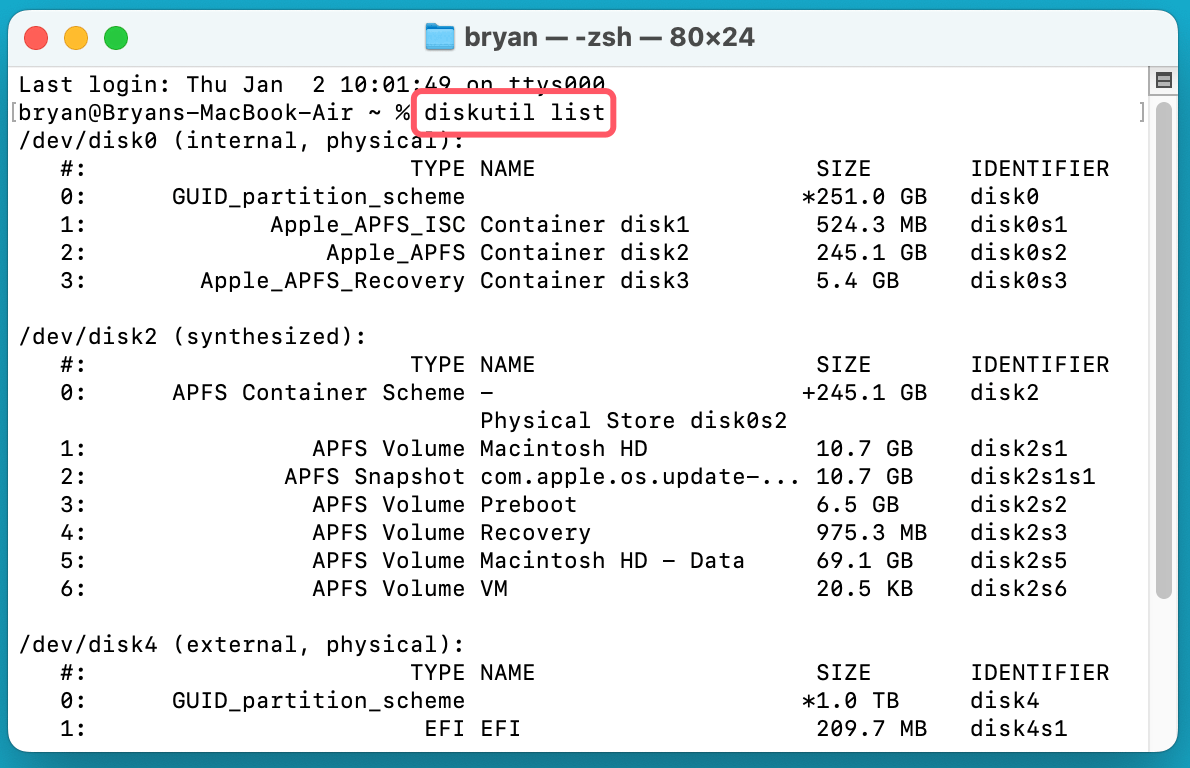
- Use Terminal for Diagnostics: Terminal offers advanced diagnostics for checking disk status. Open Terminal and type:
diskutil list
![Fix Disk is OFF or Offline on Mac]()
This command lists all connected drives. If your disk doesn't appear in the list, the issue may be hardware-related. If it does appear but isn't mounted, software or file system corruption might be the cause.
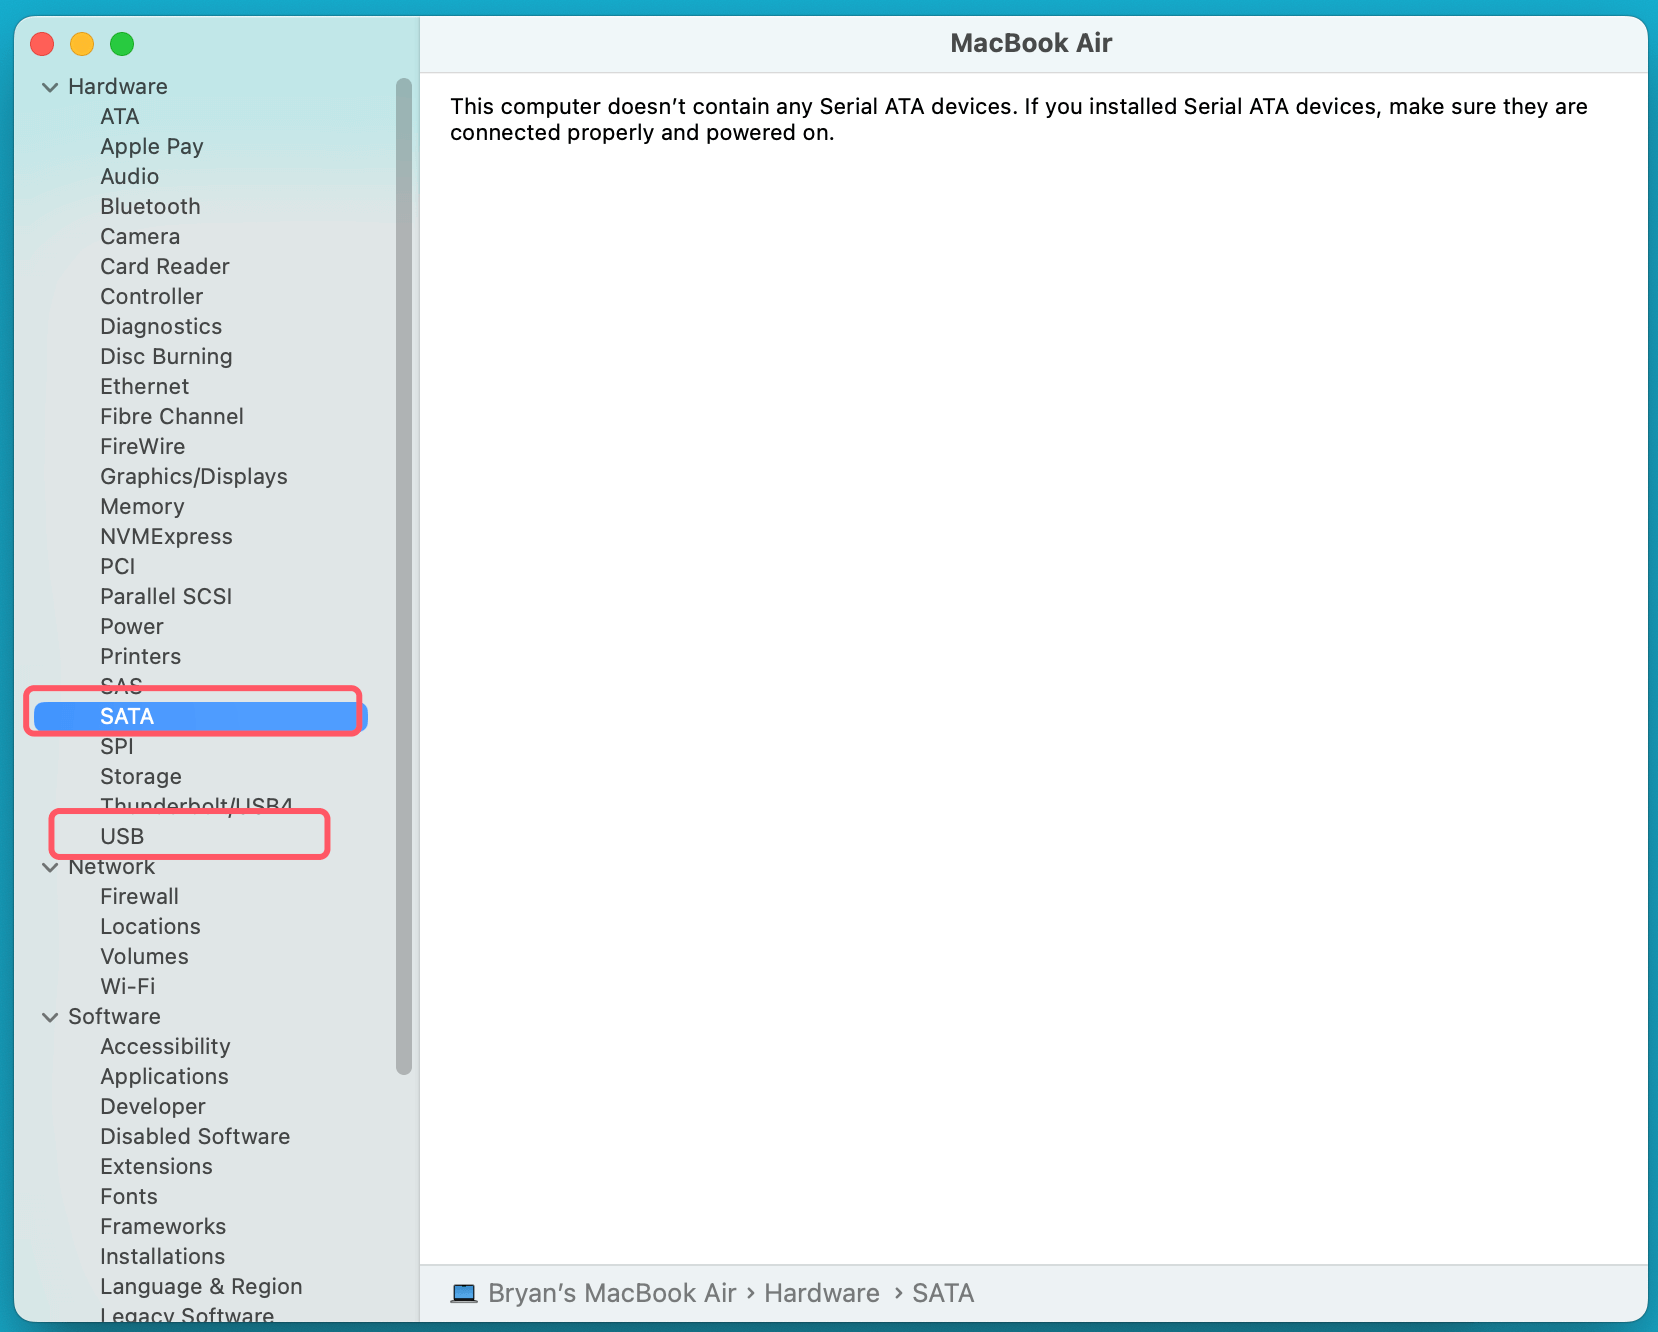
- Check System Information: To determine whether macOS recognizes the disk at a hardware level, use System Information. Go to Apple Menu > About This Mac > More Info > System Report. Under USB or SATA, check if your disk is listed. If it's not listed, the issue might be related to faulty hardware.
![Fix Disk is OFF or Offline on Mac]()
By thoroughly understanding and confirming the problem, you can proceed confidently to resolve the "disk is OFFLINE" issue, using the appropriate steps based on the root cause.
Step-by-Step Guide to Fix a Disk That is OFF or Offline on Mac
1. Check Physical Connections (For External Disks)
Sometimes, the simplest explanation is the correct one. If you‘re dealing with an external disk, ensure that all connections are secure.
- Inspect the USB or Thunderbolt cable for fraying or damage.
- Test the disk using a different cable or port on your Mac.
- Connect the disk to another computer to determine whether the issue is with the disk or your Mac.
If the disk works elsewhere, the problem likely lies with your Mac's ports or software.
2. Restart and Reconnect the Disk
A simple restart can work wonders in resolving temporary glitches.
- Disconnect the external disk.
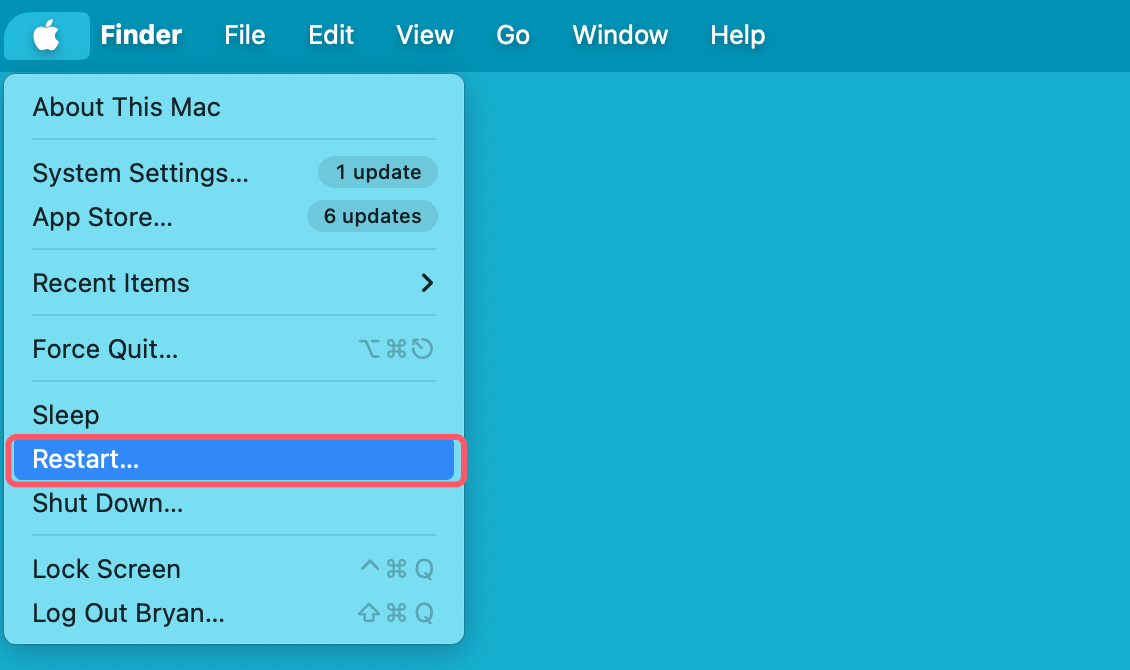
- Restart your Mac by clicking the Apple menu and selecting "Restart."
![Fix Disk is OFF or Offline on Mac]()
- Once the system is up, reconnect the disk and check if it appears in Finder or Disk Utility.
3. Use Disk Utility to Mount the Disk
Disk Utility is macOS's built-in tool for managing drives.
- Open Disk Utility from Applications > Utilities.
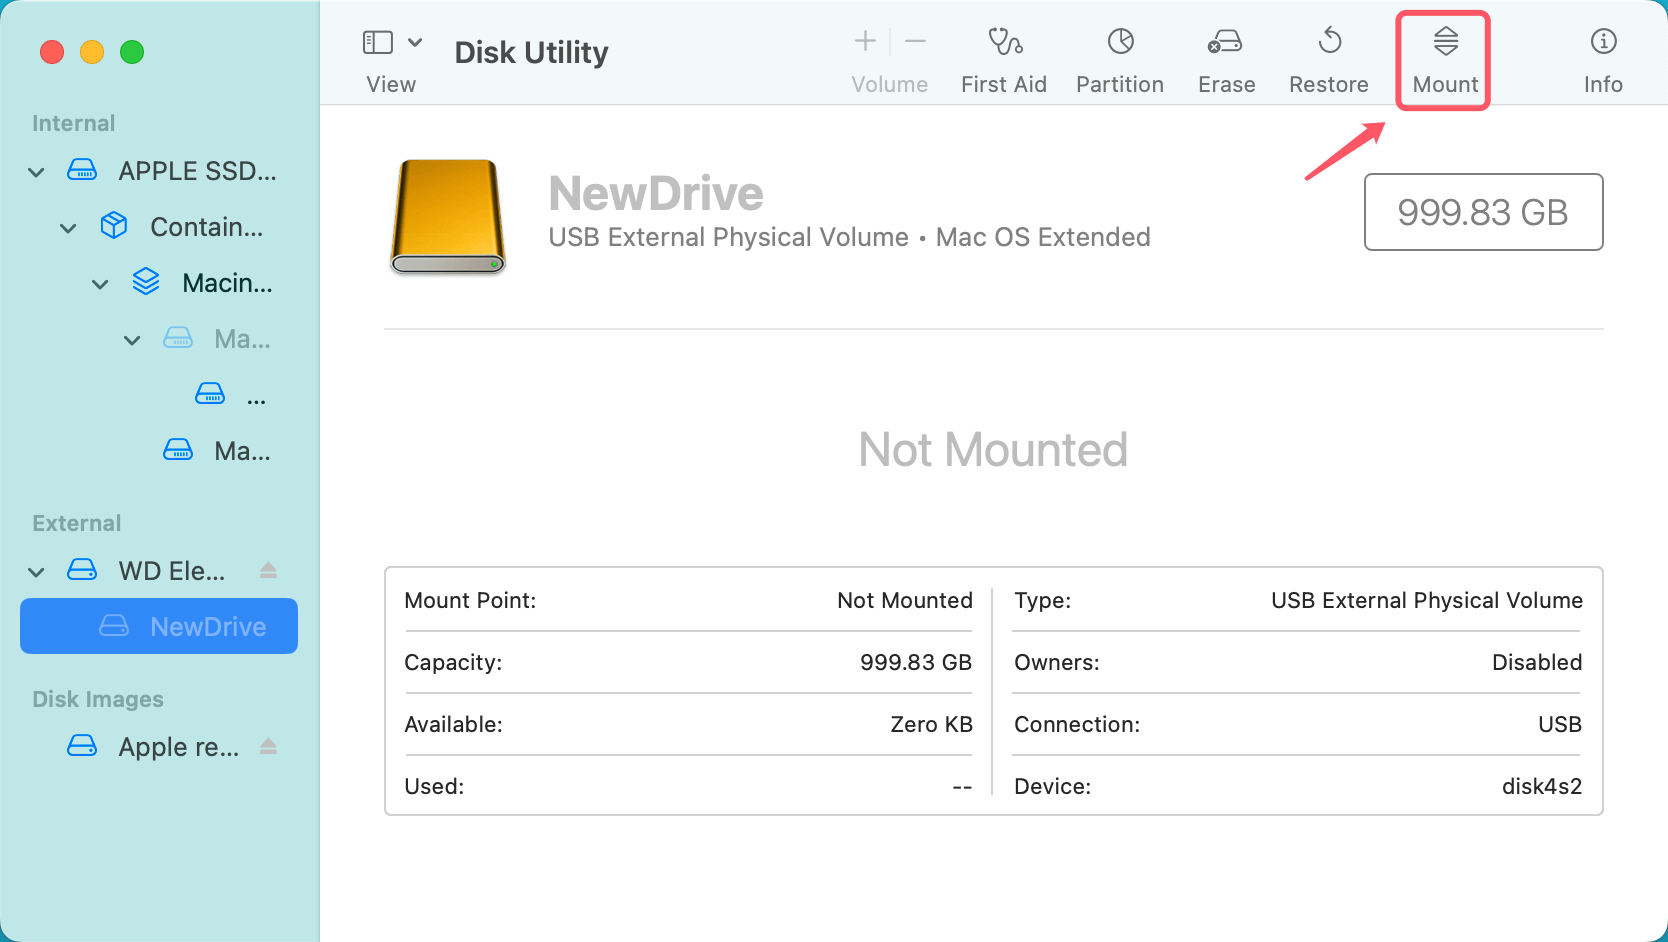
- Look for your disk in the sidebar. If it's grayed out, it's unmounted.
- Select the disk and click "Mount" at the top.
![Fix Disk is OFF or Offline on Mac]()
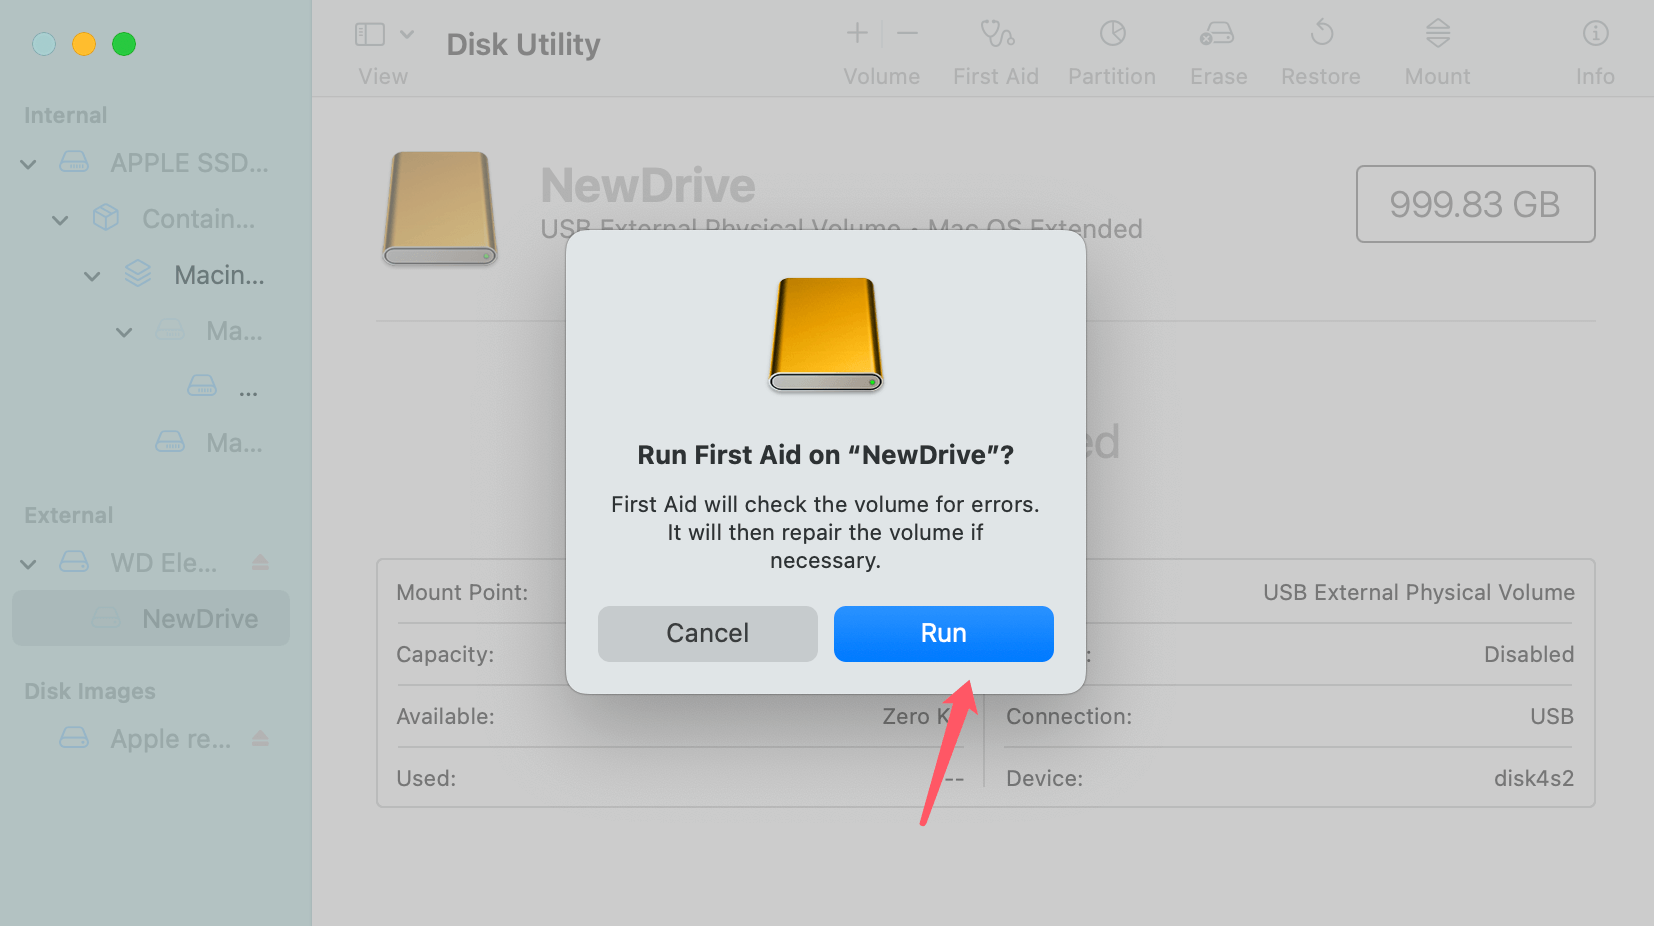
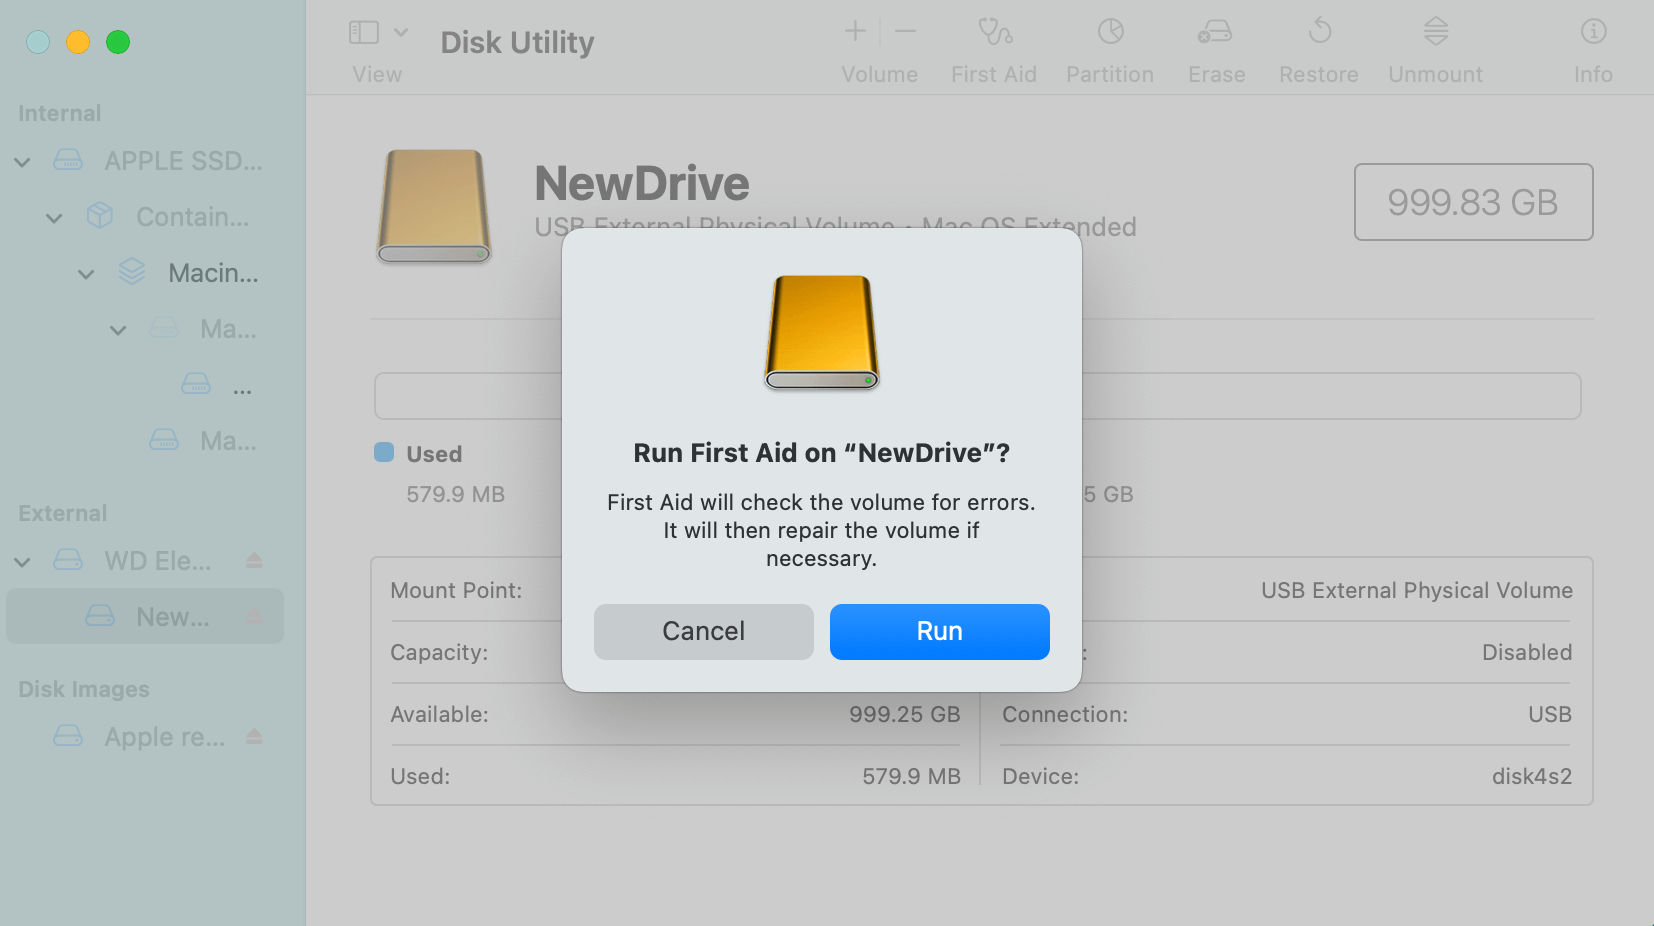
If mounting fails, use the First Aid feature:
- Click "First Aid" and then "Run" to repair the disk.
![Fix Disk is OFF or Offline on Mac]()
- Follow the prompts and check if the disk becomes accessible.
4. Check Finder Settings
Sometimes, the disk is recognized but not displayed in Finder.
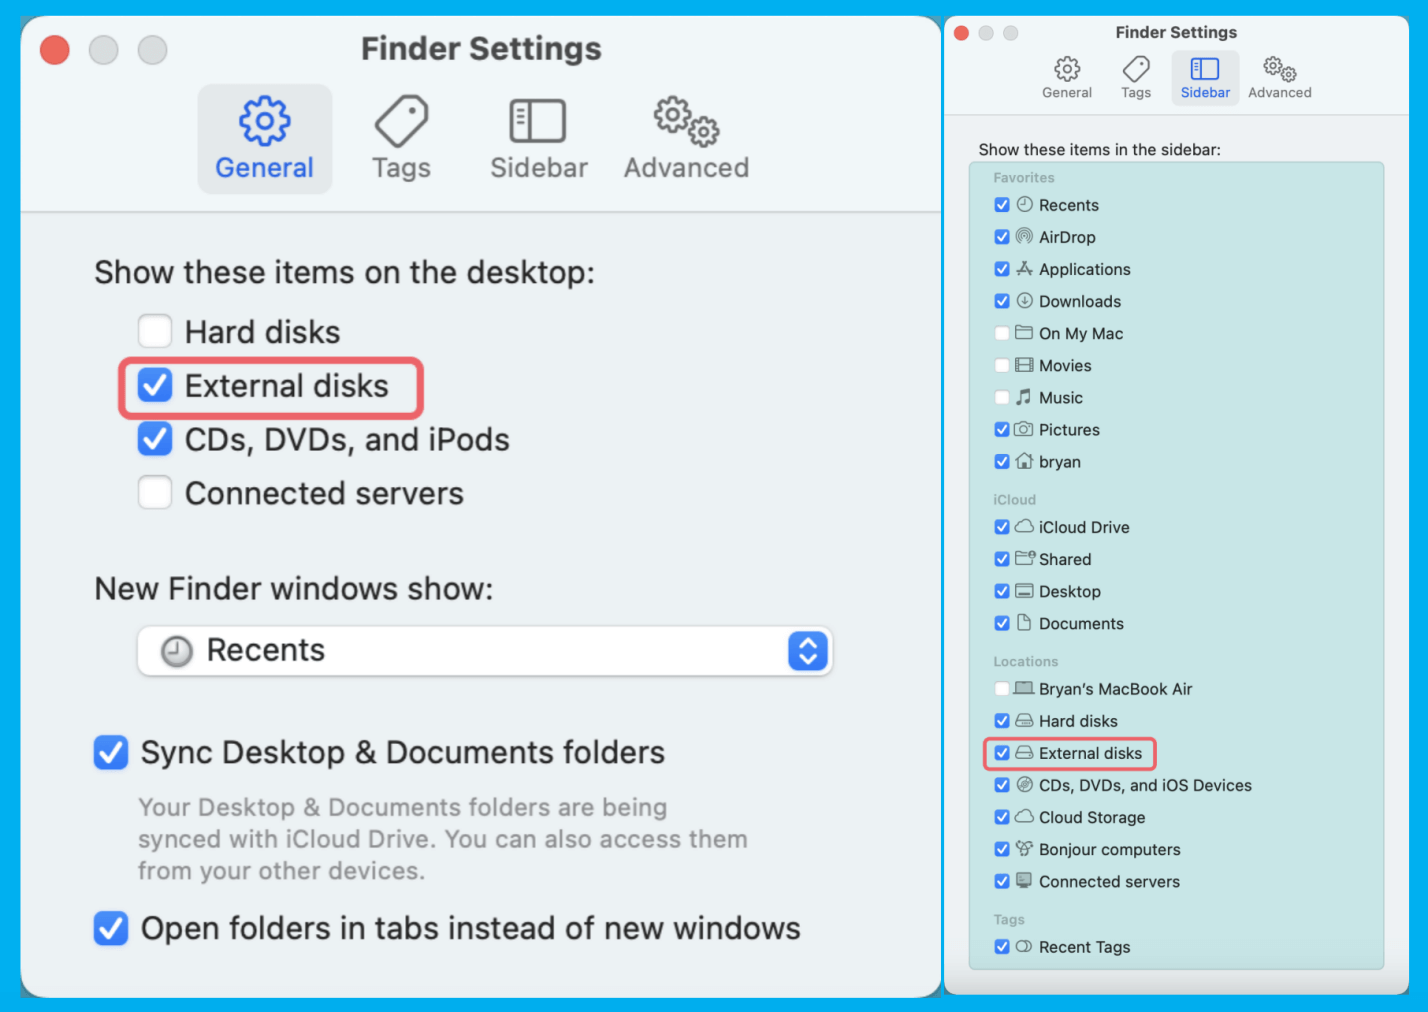
- Open Finder and go to Finder > Settings > General.
- Ensure that "External Disks" is checked under "Show these items on the desktop."
- Switch to the Sidebar tab and ensure "External Disks" is also selected there.
![Fix Disk is OFF or Offline on Mac]()
5. Reset NVRAM and SMC (For Persistent Issues)
For persistent issues, resetting the NVRAM and SMC can help.
- NVRAM Reset:
- Shut down your Mac.
- Turn it on and immediately press and hold Option + Command + P + R for about 20 seconds.
- Release the keys and let the Mac boot normally.
- SMC Reset (Intel-based Macs):
- Shut down your Mac.
- For MacBooks, press and hold Shift + Control + Option on the left side and the power button for 10 seconds.
- Release all keys and turn on your Mac.
6. Use Terminal for Advanced Troubleshooting
If the above steps fail, Terminal can provide more control.
- Open Terminal (Applications > Utilities > Terminal).
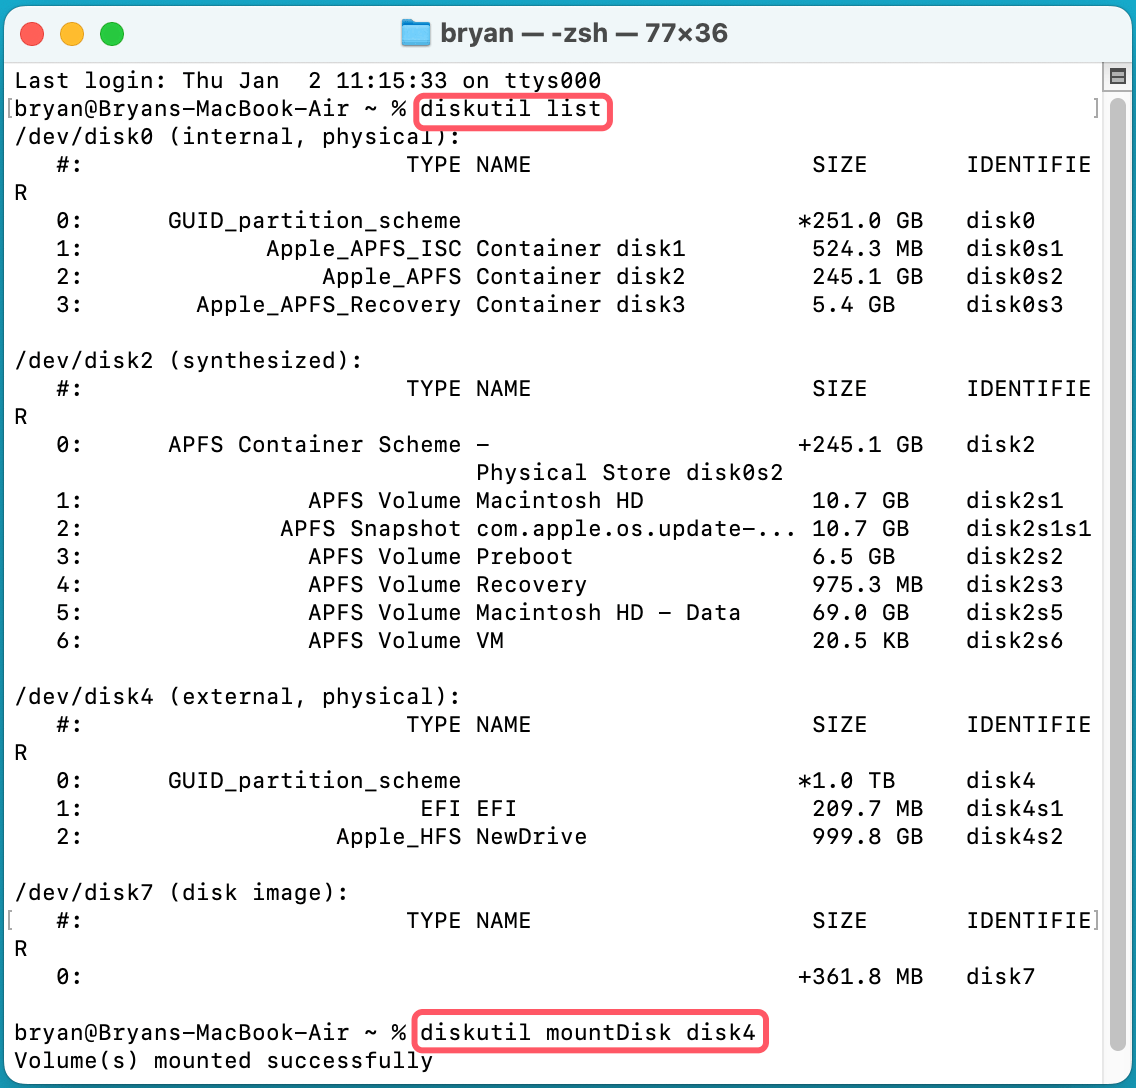
- Run diskutil list to display all connected disks.
- Note the identifier of your "OFF" disk (e.g., disk4).
- Mount the disk using the command:
diskutil mountDisk disk2
![Fix Disk is OFF or Offline on Mac]()
- If you suspect permissions issues, use:
sudo chown $(whoami) /Volumes/YourDiskName
Replace YourDiskName with your disk's name.
7. Update macOS
Outdated macOS versions can cause compatibility issues.
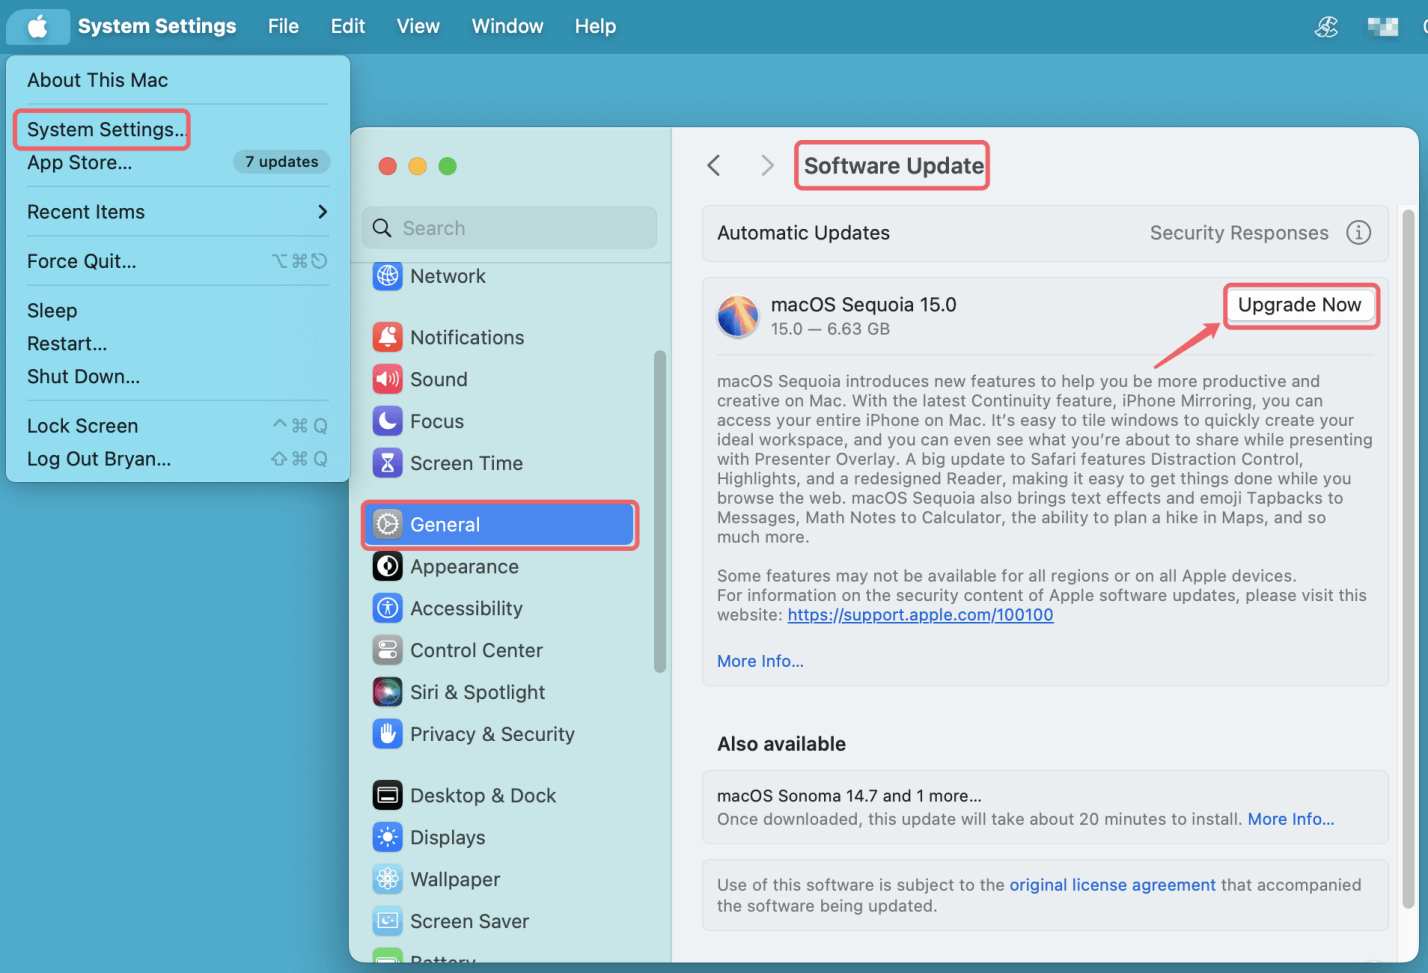
- Open System Settings (or System Preferences in older versions).
- Click General > Software Update and check for any available updates.
![Fix Disk is OFF or Offline on Mac]()
- Install updates and restart your Mac.
8. Reformat or Recover Data (Last Resort)
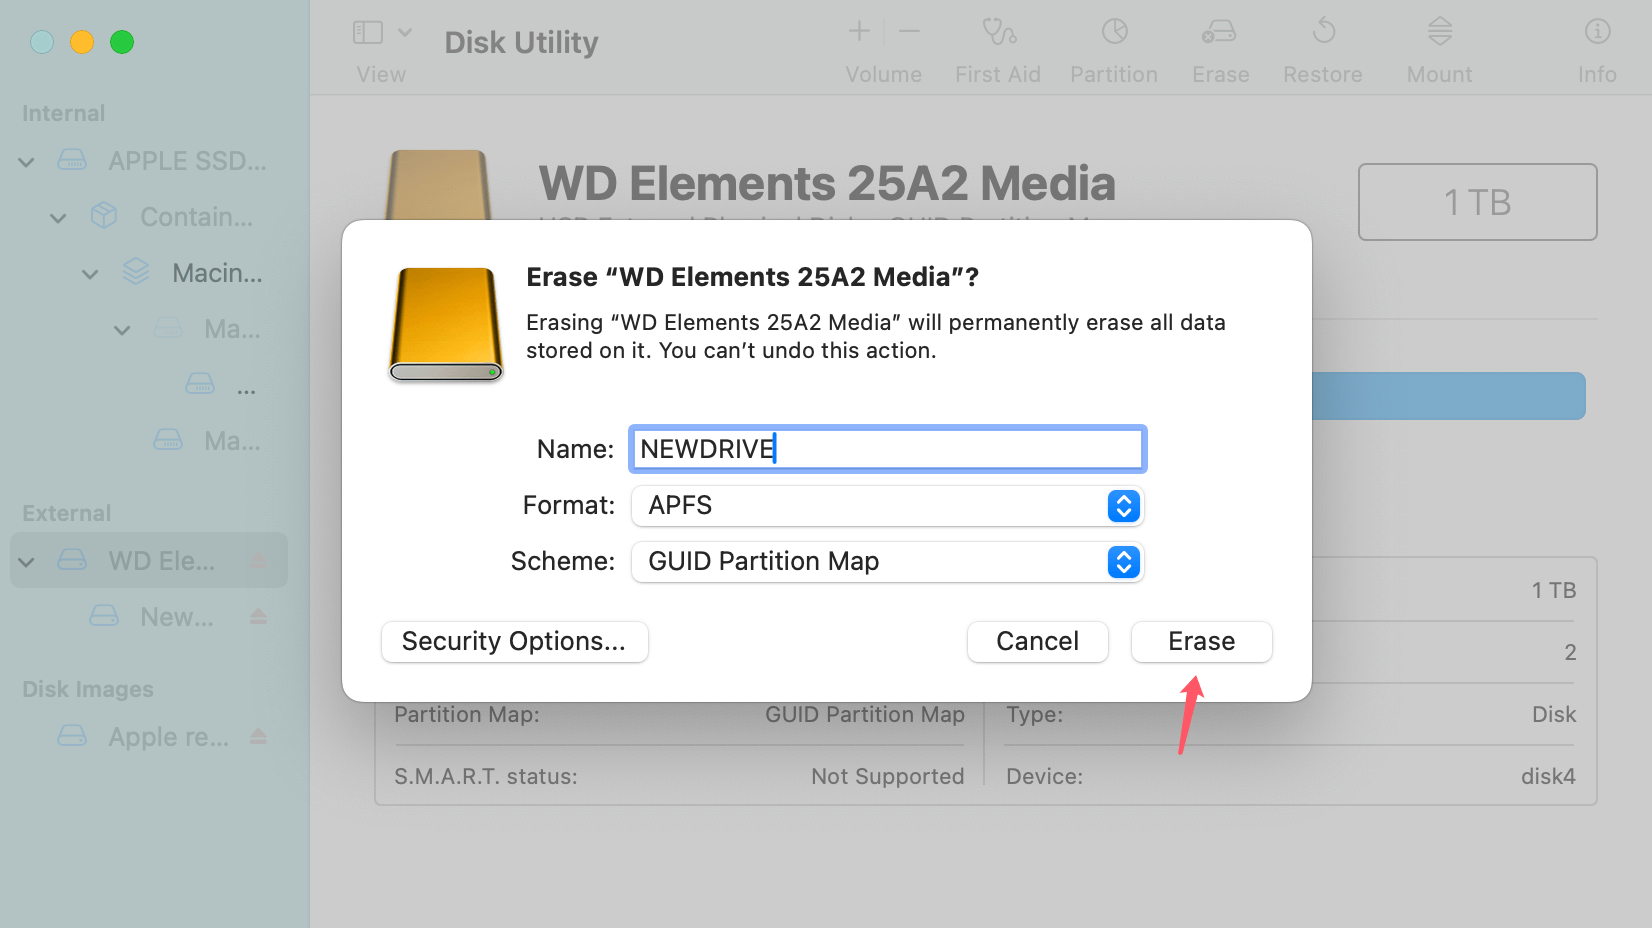
If all else fails, reformatting the disk may be necessary. Warning: This will erase all data.
- Open Disk Utility and select the disk.
- Click "Erase" at the top.
- Choose a format like APFS or Mac OS Extended (Journaled) and click "Erase."
![Fix Disk is OFF or Offline on Mac]()
To recover data before reformatting, use third-party tools like Donemax Data Recovery for Mac, EaseUS, or Stellar Data Recovery. These can often retrieve files from corrupted disks.
Step 1. Download and install the reliable Mac data recovery software - Donemax Data Recovery for Mac to start data recovery.
Step 2. Open Donemax Data Recovery for Mac, select the erased disk to start data recovery.

Step 3. Click on Scan button to start scanning the disk.

Step 4. Once the scan gets finished, you can preview all recoverable files. Then select the wanted files, click on Recover button to save them.

Preventive Measures to Avoid "Disk is OFF/Offline" Errors
1. Safely Eject Disks
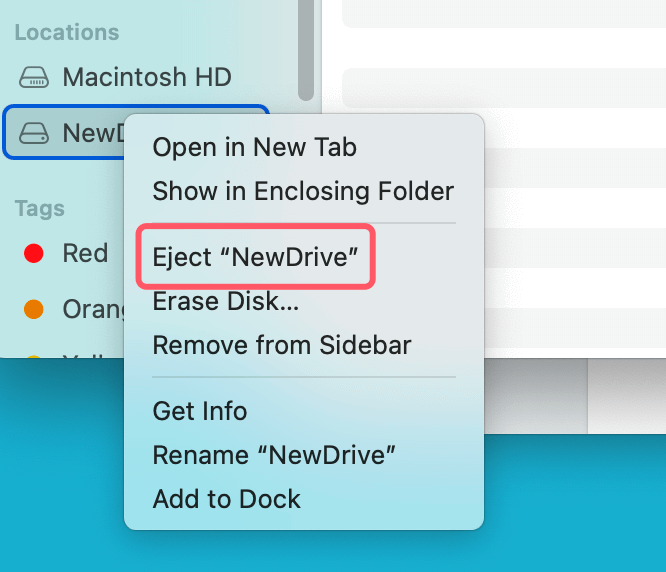
Always eject disks properly by right-clicking on the disk in Finder and selecting "Eject." Alternatively, drag the disk icon to the trash.
2. Regular Disk Maintenance
Use macOS's First Aid or third-party tools like Donemax Data Eraser for Mac to regularly check and repair disks.
3. Backup Your Data
Maintain regular backups using Time Machine or other backup solutions. This ensures you won't lose important files if a disk becomes inaccessible.
4. Update macOS Regularly
Stay on top of macOS updates to benefit from bug fixes and improved disk management.
5. Avoid Overloading Ports
Overloading USB hubs or using unpowered hubs can cause disk recognition issues.
When to Seek Professional Help
If your disk consistently fails to mount or makes unusual noises (e.g., clicking or grinding), it might indicate hardware failure. At this point, it's best to consult professionals.
- Apple Support: Contact Apple for diagnosis and repair.
- Certified Repair Services: Look for authorized Apple repair centers.
- Data Recovery Firms: For critical data, consider firms like DriveSavers or Ontrack.
Conclusion
The "disk is OFF or Offline" issue on a Mac can range from mildly inconvenient to deeply stressful, depending on the disk's contents. Fortunately, most cases can be resolved using the steps outlined in this guide. By checking physical connections, using Disk Utility, or leveraging Terminal commands, you can bring your disk back online.
Remember to practice good disk habits, like safe ejection and regular backups, to minimize the risk of future issues. If all else fails, don't hesitate to seek professional assistance. With the right approach, you can tackle this problem head-on and keep your Mac running smoothly.
Related Articles
- Feb 06, 2024How to Format Lexar Portable SSD for Mac?
- Jan 17, 2024How to Format WD My Passport External HDD/SSD on Mac?
- Feb 20, 2025How to Repair Apacer USB Flash Drive Without Losing Data?
- Jun 21, 2024How to Format LaCie Rugged Portable Hard Drive (HDD or SSD) for Mac?
- Sep 14, 2023How to Check SSD Health and Fix Damaged SSD?
- Jul 02, 2025exFAT vs. NTFS Full Comparison: Speed, Performance, Compatibility, etc.

Charles
Charles, who lives in Sydney, Australia, is an editor & writer of Donemax Team. He is good at writing articles related with Apple Mac computers, Windows operating systems, data recovery, data erasure, disk clone and data backup, etc. He loves reading and playing tennis in his spare time and is interested in testing new digital devices such as mobile phones, Macs, HDDs, SSDs, digital cameras, etc.

Gerhard Chou
In order to effectively solve the problems for our customers, every article and troubleshooting solution published on our website has been strictly tested and practiced. Our editors love researching and using computers and testing software, and are willing to help computer users with their problems

