Written byCharlesUpdated on Mar 11, 2025
How to Format a Seagate Backup Plus Drive on Windows or macOS?
Approved byGerhard Chou
Tip: If you are going to sell or donate your Seagate Backup Plus drive, you can use Donemax Data Eraser to format and wipe the Seagate Backup Plus drive. It will securely and permanently erase all data from the Seagate Backup Plus, making data recovery be impossible.
PAGE CONTENT:
- Choose File System Formats for Seagate Backup Plus
- How to Format Seagate Backup Plus on Windows?
- How to Format Seagate Backup Plus on macOS?
- Troubleshooting Common Seagate Backup Plus Formatting Issues
- How to Recover Lost Data from a Formatted Seagate Backup Plus Drive?
- How to Wipe a Seagate Backup Plus drive?
- Conclusion
The Seagate Backup Plus is a widely used external hard drive that offers reliable storage and backup solutions. Whether you use it to store important files, media, or backups, you may occasionally need to format it.
Formatting a Seagate Backup Plus drive can be necessary for several reasons:
- Changing the file system to match your operating system (Windows or macOS).
- Fixing file system errors that make the drive unreadable or slow.
- Erasing data before selling or donating the drive.
This guide will walk you through how to format the Seagate Backup Plus on both Windows and macOS, explaining the different file systems and troubleshooting common issues.
Choose File System Formats for Seagate Backup Plus
Before formatting, it's crucial to understand different file system formats and their compatibility with Windows and macOS. Each file system has its pros and cons, depending on how you plan to use the Seagate Backup Plus drive.
1. NTFS (New Technology File System)
- Best for: Windows users who do not need macOS compatibility.
- Pros: Fast, supports large files, offers advanced security features.
- Cons: Read-only on macOS (you can't modify files without third-party software).
2. exFAT (Extended File Allocation Table)
- Best for: Users who need to use the drive on both Windows and macOS.
- Pros: Supports large files and is compatible with both operating systems.
- Cons: Lacks journaling, making it less reliable than NTFS or APFS.
3. FAT32 (File Allocation Table 32-bit)
- Best for: Compatibility with older devices, game consoles, and Linux.
- Pros: Works on almost all operating systems and devices.
- Cons: Limited to 4GB file size, outdated for modern storage needs.
4. APFS (Apple File System) & Mac OS Extended (HFS+)
- Best for: macOS users who don't need Windows compatibility.
- Pros: APFS is optimized for SSDs, while Mac OS Extended is better for HDDs.
- Cons: Not compatible with Windows without third-party software.
Which File System Should You Choose for Your Seagate Backup Plus?
- If you only use Windows → Choose NTFS.
- If you only use macOS → Choose APFS (for SSDs, macOS High Sierra or later) or Mac OS Extended (HFS+) (for HDDs).
- If you switch between Windows and macOS → Choose exFAT.
How to Format Seagate Backup Plus on Windows?
Step 1: Connect the Seagate Backup Plus Drive
- Plug the Seagate Backup Plus into a USB port on your Windows PC.
- Wait for the system to recognize the drive. If it's not detected, try another USB port or cable.
Step 2: Open Disk Management
- To launch the Run dialog, press Win + R.
- To launch Disk Management, type diskmgmt.msc and hit Enter.
![Format a Seagate Backup Plus Drive]()

Step 3: Locate the Seagate Backup Plus Drive
- In Disk Management, find your external hard drive.
- It may appear as "Unallocated" or with an assigned drive letter.
Step 4: Format the Drive
- Right-click on the Seagate Backup Plus drive.
- Select "Format" from the menu.
![Format a Seagate Backup Plus Drive]()
- In the File System dropdown, choose the desired format (NTFS, exFAT, or FAT32).
![Format a Seagate Backup Plus Drive]()
- Enter a Volume Label (e.g., "Seagate").
- Check the Perform a quick format box (if you want a faster process).
- Click OK, then confirm formatting.


Step 5: Verify the Formatting Process
Open File Explorer (Win + E) and check if the drive appears under This PC.

If everything looks correct, the drive is ready for use.
How to Format Seagate Backup Plus on macOS?
Step 1: Connect the Seagate Backup Plus Drive
- Plug the Seagate Backup Plus into a USB port on your Mac.
- If the drive doesn't appear, try another USB port or cable.
Step 2: Open Disk Utility
- Click on the Apple menu and select "Go" > "Utilities".
- Open Disk Utility.
Step 3: Select the Seagate Backup Plus Drive
- Locate the external drive in the left panel of Disk Utility.
- Click on it to select it.
![Format a Seagate Backup Plus Drive]()

Step 4: Erase and Format the Drive
- Click the Erase button at the top.
![Format a Seagate Backup Plus Drive]()
- Choose a Format from the list:
- APFS (for SSDs, macOS-only).
- Mac OS Extended (Journaled) (for HDDs, macOS-only).
- ExFAT (for compatibility with Windows and macOS).
- Enter a Name for the drive.
- Click Erase to start formatting.
![Format a Seagate Backup Plus Drive]()


Step 5: Confirm Formatting and Check in Finder
Once the process completes, open Finder and check if the drive is visible.

Troubleshooting Common Seagate Backup Plus Formatting Issues
Formatting an external hard drive should be a straightforward process, but sometimes, you may encounter issues such as the drive not showing up, the format option being unavailable, or the drive being read-only. Below are common problems users face when formatting a Seagate Backup Plus drive, along with solutions for both Windows and macOS.
1. Seagate Backup Plus Drive Not Detected in Windows or macOS
Symptoms:
- The drive doesn't appear in File Explorer (Windows) or Finder (macOS).
- Disk Management (Windows) or Disk Utility (Mac) does not recognize the drive.
- The drive makes clicking noises or disconnects frequently.
Possible Causes:
- A faulty USB cable or damaged USB port.
- The drive is not initialized or has a corrupt partition table.
- Outdated USB drivers on your computer.
- A hardware failure in the Seagate Backup Plus drive.
Solutions:
For Windows Users:
- Try a different USB port or cable – Sometimes, USB ports stop working. Try a different port on your PC or use another cable.
- Check Disk Management:
- Type diskmgmt.msc using Win + R, then hit Enter.
- Right-click the disk and choose Initialize Disk if it shows as Unallocated or Not Initialized.
![Format a Seagate Backup Plus Drive]()
- Update USB drivers:
- Open Device Manager by pressing Win + X and selecting Device Manager.
- Increase the number of Universal Serial Bus Controllers.
- Right-click your external drive and select Update driver.
![Format a Seagate Backup Plus Drive]()
- Assign a Drive Letter:
Right-click the drive and select Change Drive Letter and Paths > Add a Letter if it shows up in Disk Management without a letter.
![Format a Seagate Backup Plus Drive]()


For macOS Users:
- Check Disk Utility:
- Go to Disk Utility from Utilities via Apple Menu.
- If the drive is listed but grayed out, click Mount.
![Format a Seagate Backup Plus Drive]()
- Try a different cable or port – If possible, test the drive on another Mac.
- Reset NVRAM and SMC:
- Hold Option + Command + P + R for 20 seconds to restart your Mac after shutting it down.
- For an SMC reset, shut down the Mac, unplug it, wait 30 seconds, then restart.
- Erase and reformat the drive in Disk Utility if it's still not working.

2. Format Option is Grayed Out or Unavailable
Symptoms:
- You right-click the drive in Disk Management (Windows), but "Format" is grayed out.
- The Erase button in Disk Utility (Mac) is disabled.
Possible Causes:
- The drive is write-protected or has a corrupt partition.
- The drive is set as Read-Only.
- The drive has bad sectors preventing formatting.
Solutions:
For Windows Users:
- Remove Write Protection:
- Open Command Prompt (Admin) (Win + X > Command Prompt (Admin)).
- Type:
diskpart
list disk
select disk X (replace X with your Seagate drive number)
attributes disk clear readonly
exit - Retry formatting in Disk Management.
- Delete the Volume and Recreate It:
- Go to Disk Management.
- Right-click the drive and select Delete Volume.
- Then, create a New Simple Volume, choosing NTFS or exFAT.
For macOS Users:
- Unmount the Drive in Disk Utility:
- Open Disk Utility, select the drive, and click Unmount, then Erase.
- Erase the Drive via Terminal:
- Open Terminal and type:
diskutil list
diskutil eraseDisk exFAT Seagate /dev/diskX - (Replace X with your actual disk number from diskutil list).
- Open Terminal and type:
3. Cannot Format Drive to FAT32 in Windows
Symptoms:
- Windows doesn't allow FAT32 as an option for large drives (over 32GB).
- The drive formats to exFAT, but a game console or older system won’t recognize it.
Possible Causes:
- Windows' built-in tools don't allow FAT32 formatting for drives over 32GB.
- The drive is set to another file system, preventing FAT32 formatting.
Solutions:
- Use Command Prompt (CMD) to Format to FAT32:
- Open Command Prompt (Admin).
- Type:
format /FS:FAT32 X:
- (Replace X: with your actual Seagate drive letter).
- Use a Third-Party Tool like Rufus or FAT32 Formatter:
- Download Rufus or FAT32 Formatter.
- Select your Seagate Backup Plus drive and choose FAT32.
4. Drive is Read-Only on macOS
Symptoms:
- You can see the files on your Seagate Backup Plus but cannot copy, delete, or edit them.
- The drive works fine on Windows but is read-only on Mac.
Possible Causes:
- The drive is formatted in NTFS, which macOS can only read but not write to.
- The drive has a corrupt partition causing read-only access.
Solutions:
- Check the File System:
- Right-click the drive in Finder > Get Info.
- If it says Format: NTFS, you need to convert it.
- Reformat the Drive to exFAT (Compatible with Both macOS & Windows):
- Open Disk Utility.
- Select the Seagate Backup Plus drive and click Erase.
- Choose ExFAT and click Erase.
- Use NTFS for Mac Software:
If you want to keep NTFS without reformatting, install Donemax NTFS for Mac to enable write access.
How to Recover Lost Data from a Formatted Seagate Backup Plus Drive?
The data which is removed from the Seagate Backup Plus drive is not lost for good and can be recovered by data recovery software. If you have lost important data after formatting your Seagate Backup Plus drive, you can use Donemax Data Recovery to unformat the Seagate Backup Plus drive and get all deleted/formatted/lost data back.
Step 1. Download and install Donemax Data Recovery on your computer and connect the Seagate Backup Plus drive to your computer.
Step 2. Open Donemax Data Recovery, select the Seagate Backup Plus drive to start data recovery.

Step 3. Click on Scan button. This software will deeply scan the formatted Seagate Backup Plus drive and find all recoverable files.
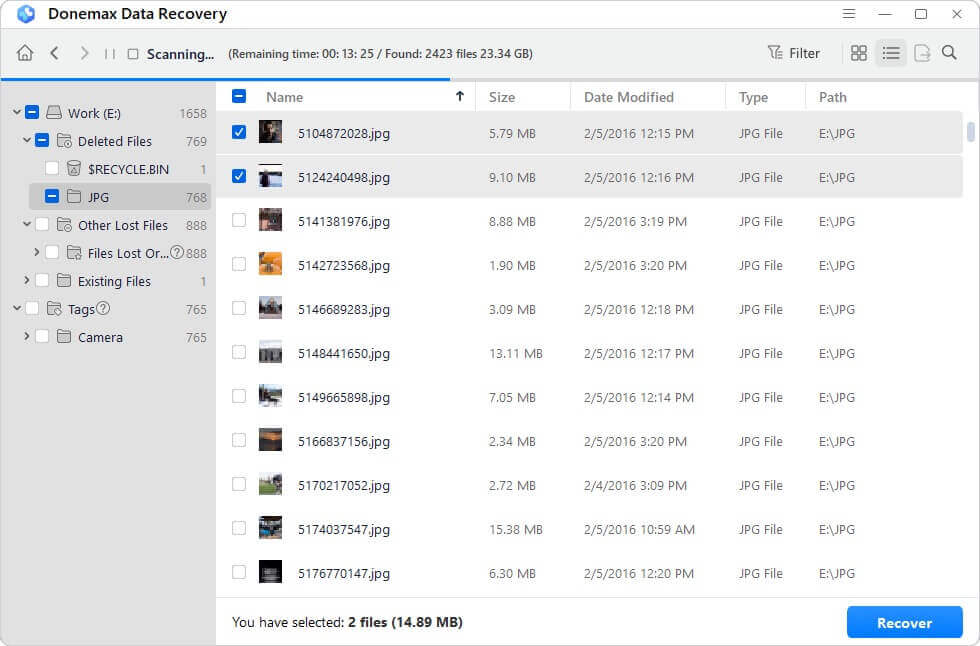
Step 4. Once the scan is completed, you can preview all recoverable files. Then select the wanted files, click on Recover button to save them to a safe location.

Donemax Data Recovery also can help you format a Seagate Backup Plus drive, fix a corrupted Seagate Backup Plus drive, etc.
How to Wipe a Seagate Backup Plus drive?
Before you sell, donate or dispose of an old Seagate Backup Plus drive, you'd better permanently erase all data from it to prevent potential data recovery. Follow the steps to wipe your Seagate Backup Plus drive:
Step 1. Click Download button below to download Donemax Data Eraser and install it on your computer.
Step 2. Open Donemax Data Eraser, choose Erase Hard Drive mode. Select the Seagate Backup Plus drive, click on Erase Now button.
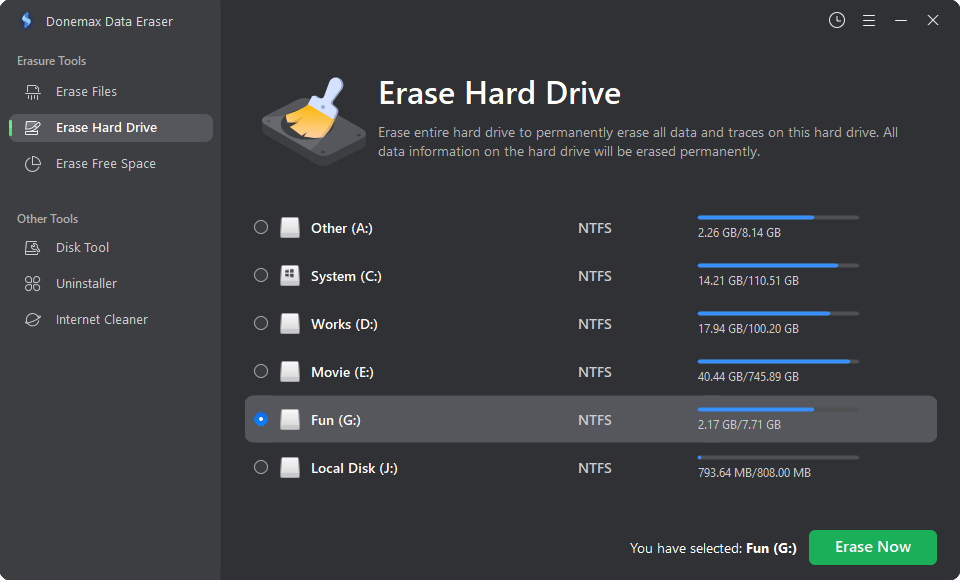
It will format and wipe the Seagate Backup Plus drive, securely and permanently erase all data from it.
Conclusion
Formatting your Seagate Backup Plus drive is a simple yet essential task for ensuring compatibility and optimal performance. Whether you're using Windows or macOS, the key steps include:
- Choosing the right file system (NTFS, exFAT, FAT32, APFS, or HFS+).
- Using Disk Management (Windows) or Disk Utility (Mac) to format the drive.
- Troubleshooting common formatting issues if the drive isn't detected.
By following this guide, you can easily format your Seagate Backup Plus drive and make it ready for seamless use on your preferred operating system. Always back up your data before formatting to prevent data loss.
If you are going to sell, donate or dispose of your old Seagate Backup Plus drive, just use Donemax Data Eraser to format and wipe it. All data stored on the drive will be erased permanently, no way to recover it.
Donemax Data Eraser
One of the best data erasure programs for permanently erase data from PC, Mac, HDD, SSD, USB drive, digital camera and other devices. Once the data is erased, it is lost for good, cannot be recovered by any method.
Related Articles
- Mar 11, 20258 Solutions to Fix Seagate One Touch SSD Not Mounting on Mac
- Jun 20, 2023How to Convert NTFS Drive to exFAT Drive?
- Dec 18, 2024External Hard Drive Works on Windows, but Not Working on Mac: 7 Solutions to Fix It
- Jul 17, 2023What to Do If An USB Flash Drive Not Working on Mac?
- Oct 17, 2024How to Format a RAW Drive to NTFS on Mac?
- Dec 12, 20244 Methods to Fix Seagate External Hard Drive Read-Only on Mac

Contributing Writer
Charles
Charles, who lives in Sydney, Australia, is an editor & writer of Donemax Team. He is good at writing articles related with Apple Mac computers, Windows operating systems, data recovery, data erasure, disk clone and data backup, etc. He loves reading and playing tennis in his spare time and is interested in testing new digital devices such as mobile phones, Macs, HDDs, SSDs, digital cameras, etc.

Editor in chief
Gerhard Chou
In order to effectively solve the problems for our customers, every article and troubleshooting solution published on our website has been strictly tested and practiced. Our editors love researching and using computers and testing software, and are willing to help computer users with their problems