Before we start: Most of Seagate external hard drives are pre-formatted with NTFS file system which is not compatible with macOS. If you want to use an NTFS Seagate external hard drive on Mac, just install an NTFS driver - such as Donemax NTFS for Mac. It can quickly enable writable for the Seagate external hard drive and mount the drive even it gets crashed.
PAGE CONTENT:
External hard drives are essential tools for data storage and backup, with Seagate being one of the most trusted brands in the industry. However, Mac users often encounter a frustrating issue where their Seagate external hard drive becomes "read-only." This means you can view files on the drive but cannot add, modify, or delete them.
This problem can arise due to file system compatibility issues, macOS permissions, or even outdated drivers. In this article, we will explore the reasons behind the read-only issue and provide effective solutions to resolve it. You can securely fix Seagate external hard drive read-only issue on Mac.
Lean About Seagate External Hard Drive Read-only Issue on Mac
The "read-only" problem is common when using Seagate external hard drives (SSDs included) on macOS due to differences in file system compatibility. Seagate drives often come pre-formatted with the NTFS (New Technology File System), which is the default format for Windows devices. While macOS can read NTFS-formatted drives, it cannot write to them without additional support.
Aside from NTFS incompatibility, the read-only issue can also occur due to:
- Permission restrictions: Incorrect user permissions on macOS can block write access.
- Software conflicts: Security software or third-party applications may interfere with drive functionality.
- Drive corruption: File system errors on the Seagate drive can make it inaccessible.
Understanding these causes will help determine the best solution.
Preliminary Checks:
Before diving into specific fixes, conduct these preliminary checks to rule out simple issues:
- Verify the Drive Connection: Ensure the Seagate drive is properly connected to your Mac. Check the USB or Thunderbolt cable for damage, and try connecting the drive to a different port.
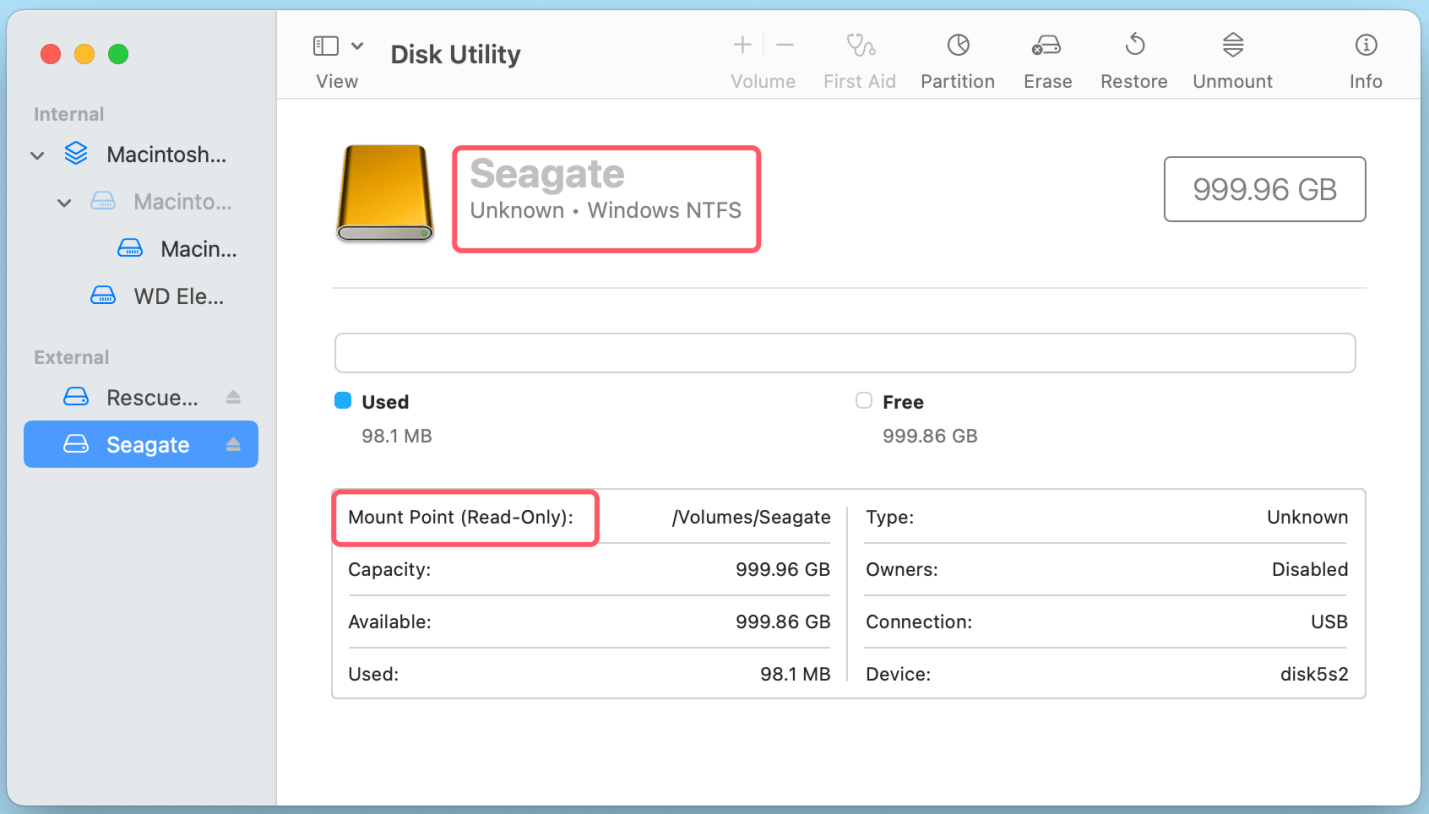
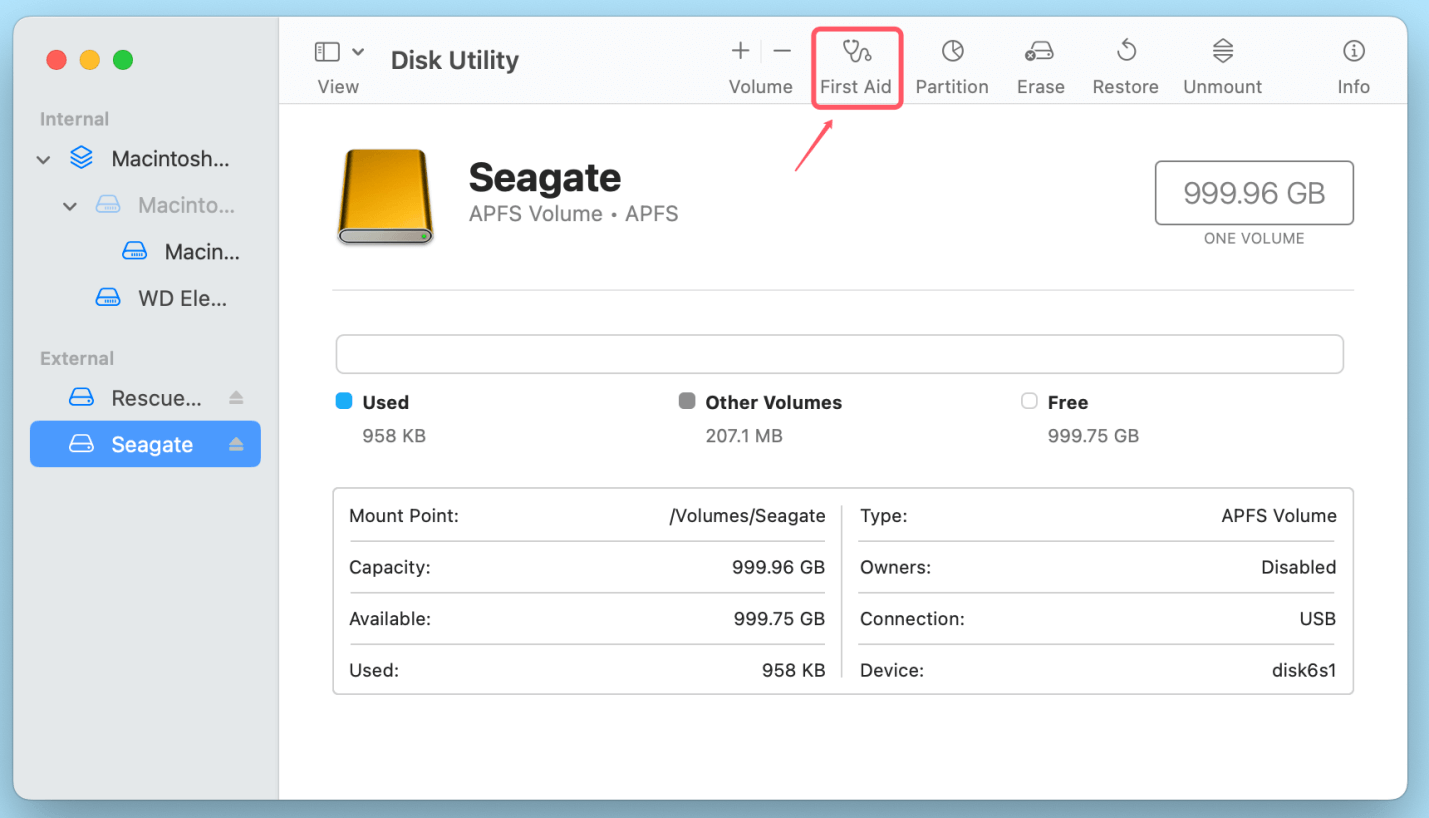
- Check Drive Recognition: Open Disk Utility (found in Applications > Utilities) to confirm if the drive is recognized. If the drive appears but is marked as "read-only," the problem likely lies with the file system or permissions.
![fix Seagate external hard drive read-only issue on Mac]()
- Update macOS and Drivers: Ensure your Mac is running the latest version of macOS. Outdated software can cause compatibility issues. Seagate provides drivers and tools on their website; download and install these if available for your model.
4 Solutions to Fix the Seagate Drive Read-Only Issue on Mac
Below are four effective methods to resolve the read-only problem, depending on the cause.
Method 1: Enable NTFS Write Support Using Third-Party Tools
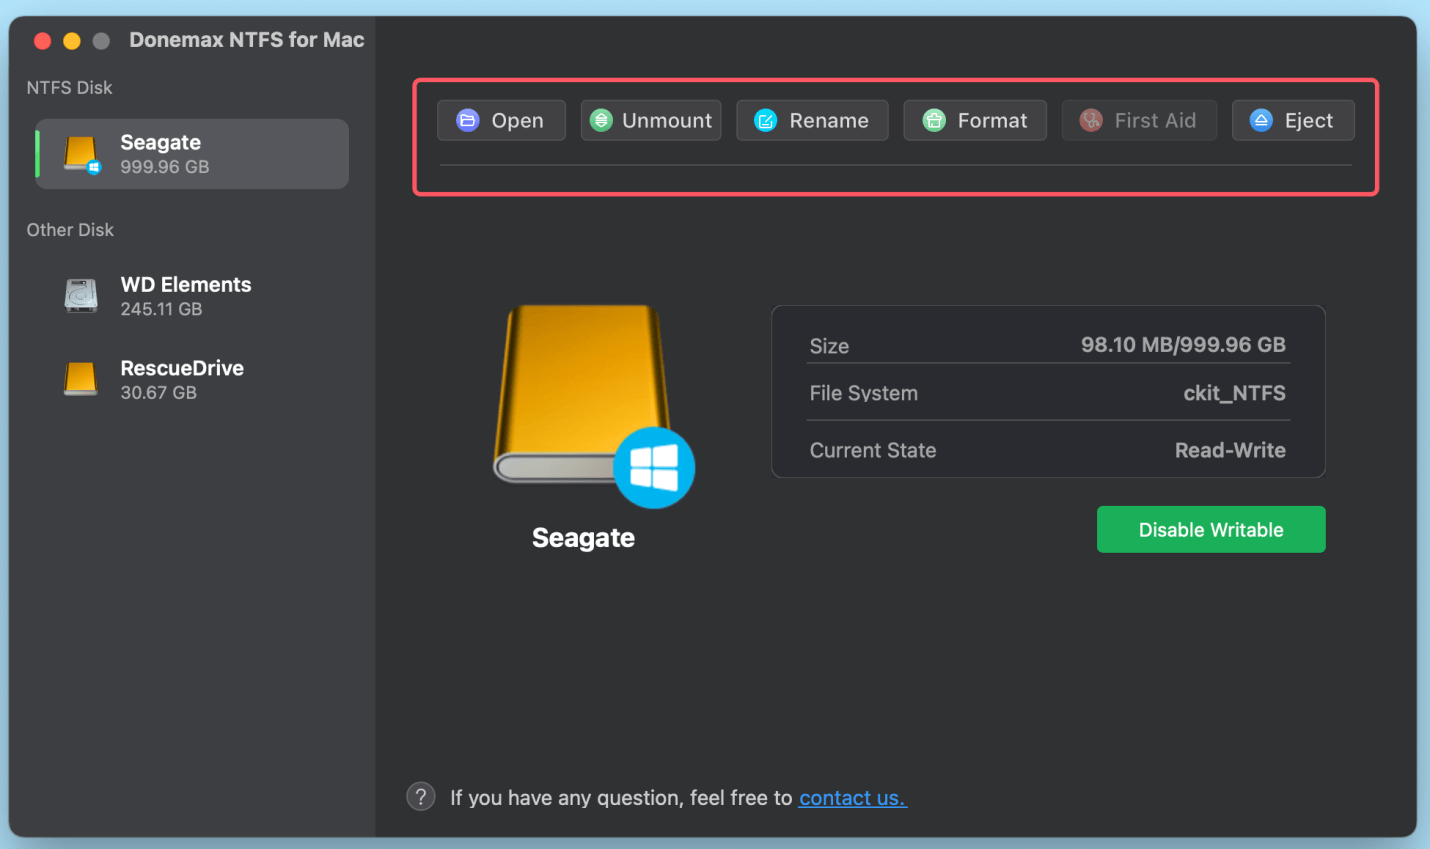
If the drive is formatted with NTFS, macOS requires additional software to enable write access. Donemax NTFS for Mac is one of the best NTFS for Mac tools. It is 100% safe, easy to use and powerful. With this tool, you can fix Seagate external hard drive read-only on Mac issue with only 1 click.
Step 1. Download and install the 100% safe NTFS for Mac tool - Donemax NTFS for Mac.
Step 2. Open Donemax NTFS for Mac, select the NTFS Seagate external hard drive, click on Enable Writable button so that you can write data to NTFS drive on your Mac.

Donemax NTFS for Mac also can help you mount/unmount Seagate external hard drive, reformat Seagate external hard drive, repair damaged Seagate external hard drive, etc.
More third-party tools can enable writable for Seagate drive on Mac:
1. Paragon NTFS for Mac
Paragon NTFS for Mac is a popular and reliable solution for enabling NTFS write support.
- Download and install Paragon NTFS for Mac from the Paragon website.
- Open the software, and it will automatically detect NTFS drives.
- You can now read, write, and modify files on your Seagate drive.
2. Tuxera NTFS for Mac
Another effective tool is Tuxera NTFS, which provides seamless NTFS support.
- Install Tuxera NTFS for Mac from the Tuxera website.
- Once installed, connect your drive, and Tuxera will handle write operations.
3. Free Alternatives
Free tools like Mounty for NTFS can also enable NTFS write access, though they may lack the advanced features of paid options.
Method 2: Reformat the Drive to a Compatible File System
If the Seagate external hard drive is formatted with NTFS, macOS users will experience limitations because macOS cannot write to NTFS-formatted drives without third-party software. In such cases, reformatting the drive to a format that is fully supported by macOS, such as ExFAT, APFS, or Mac OS Extended (Journaled), is one of the most straightforward solutions to resolve the read-only issue.
Reformatting the drive is especially beneficial if you want to ensure smooth operation across multiple devices (Mac and Windows) or if you only use the drive with Apple devices. However, it's important to note that reformatting will erase all data on the drive. Therefore, backing up your data beforehand is essential.
Here's an expanded guide on how to approach reformatting your Seagate drive:
Why Reformatting Helps:
When you reformat the Seagate external hard drive, you're effectively resetting its file system to one that is fully compatible with macOS. The most common file systems for Mac users are:
- ExFAT: This format is ideal if you need to use the drive with both Windows and macOS. It supports larger files (greater than 4 GB) and is widely compatible across both platforms.
- APFS (Apple File System): This is the default file system for macOS, introduced with macOS High Sierra (10.13). It's optimized for modern storage technologies like SSDs and offers improved performance, security, and efficiency.
- Mac OS Extended (Journaled): This is the older file system for macOS, suitable for traditional hard drives (HDDs). It's still a good choice if you only need to use the drive with Mac devices.
Choosing the right format for your needs depends on whether you need compatibility with other operating systems (like Windows) or whether the drive will be used exclusively with Mac.
How to Reformat Your Seagate Drive Using Disk Utility:
Follow these steps to reformat your Seagate external hard drive to a compatible file system:
1. Back Up Your Data
Before proceeding, back up any important files from your Seagate drive. Reformatting erases all the data on the drive, so it's crucial to create a copy of your files on another storage device or cloud service.
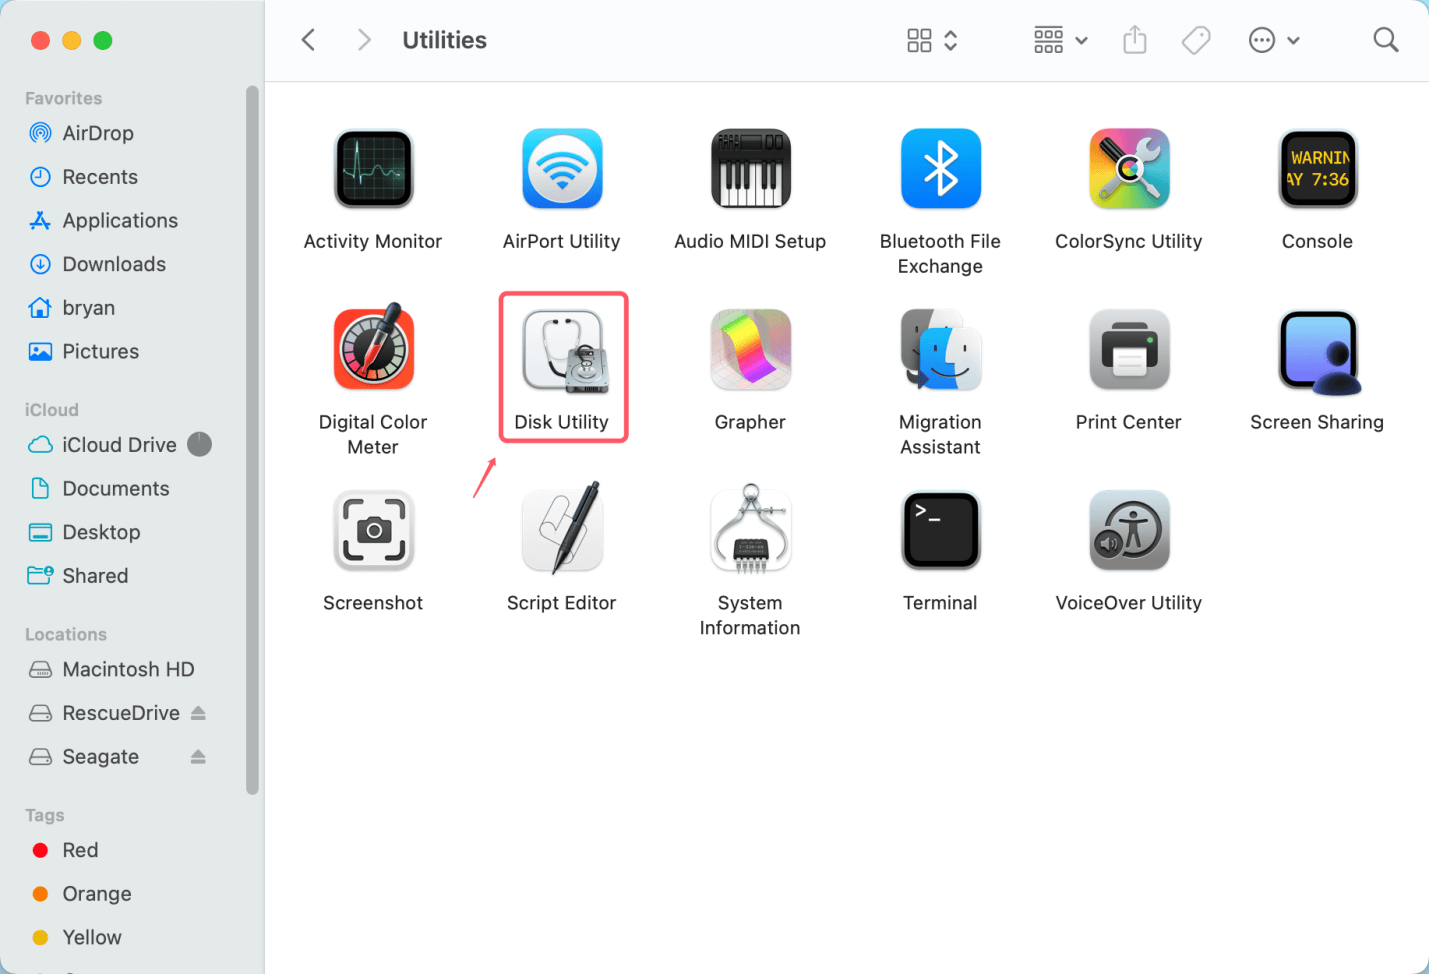
2. Open Disk Utility
On your Mac, open Disk Utility by going to Applications > Utilities > Disk Utility. This tool allows you to manage, format, and repair storage devices.
3. Select Your Seagate Drive
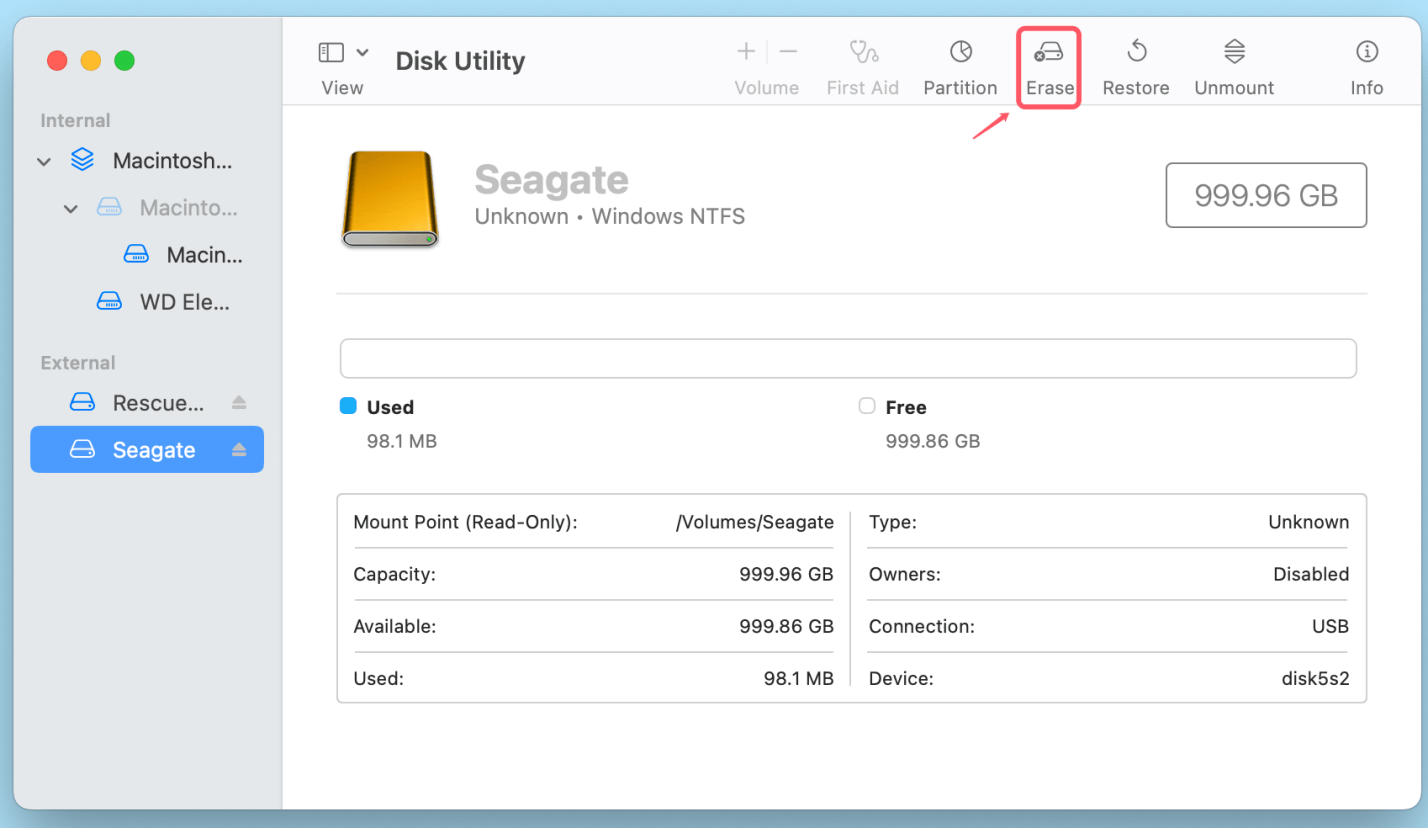
In Disk Utility, you will see a list of storage devices on the left sidebar. Locate and select your Seagate external hard drive. Ensure you select the external drive and not just a partition on the drive (it will typically appear as "Seagate" or similar).
4. Erase the Drive
Once the Seagate drive is selected, click the Erase button at the top of the window.
You will be prompted to choose a new format for the drive.
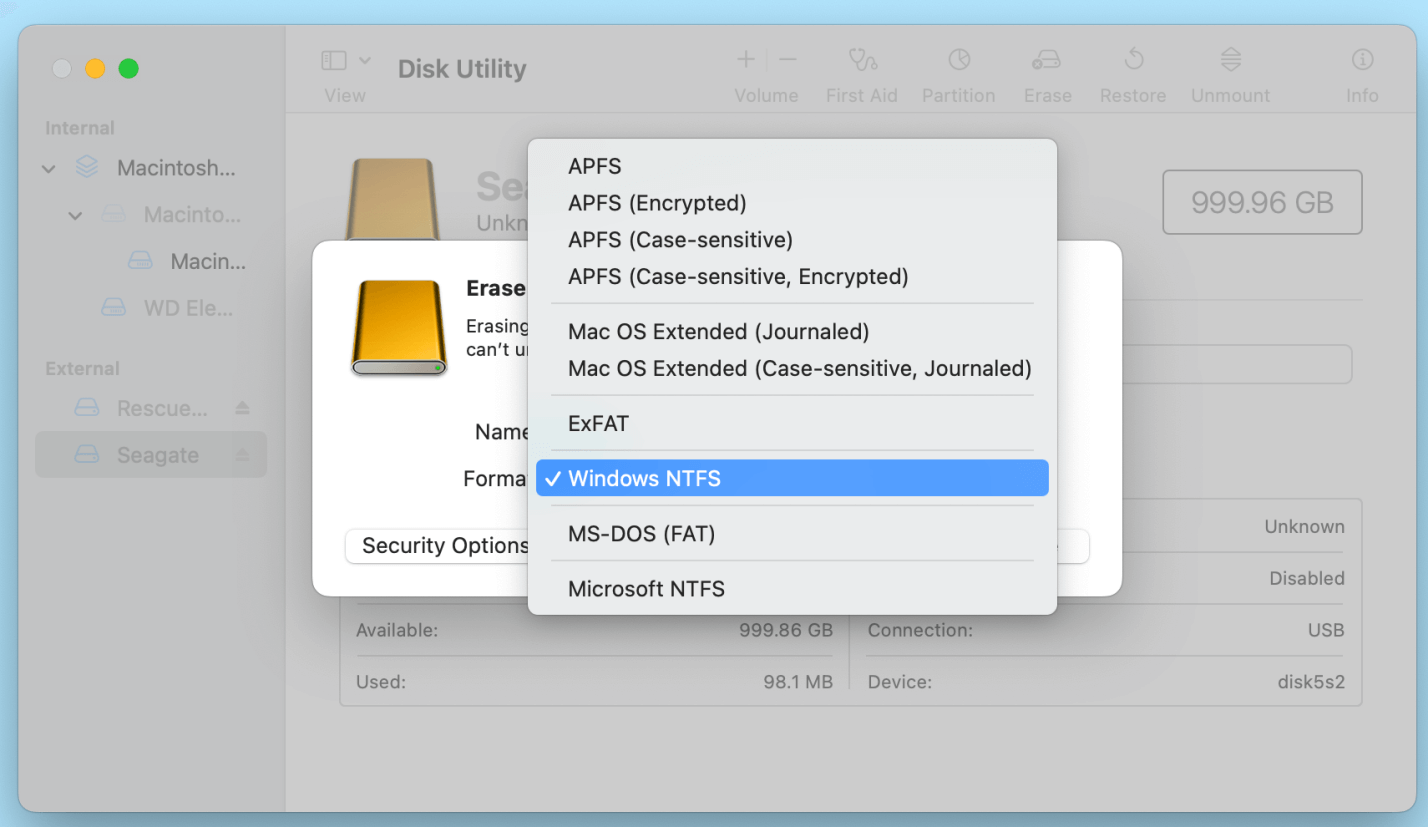
5. Choose the Right File System
- For cross-platform compatibility (Mac and Windows), select ExFAT.
- For exclusive Mac use, choose APFS if you're using a solid-state drive (SSD) or Mac OS Extended (Journaled) if you're using a traditional hard disk drive (HDD).
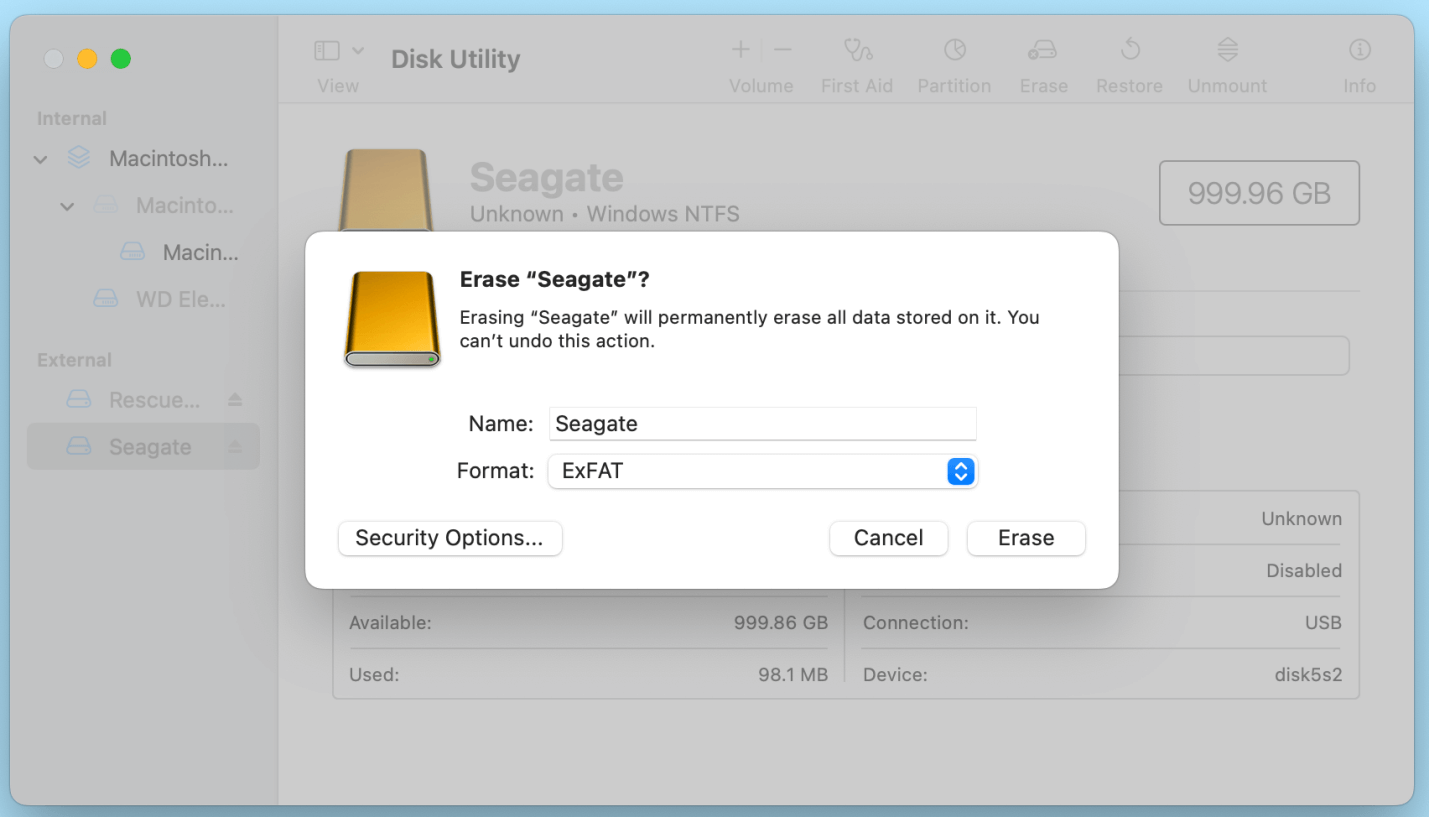
- Enter a name for your drive (e.g., "Seagate Drive"), and ensure the Scheme is set to GUID Partition Map (this is recommended for external drives that are used with modern Macs).
6. Start the Reformatting Process
After you've selected the appropriate file system and entered a name for the drive, click Erase. This will begin the reformatting process. The drive will be wiped clean, and a new file system will be created.
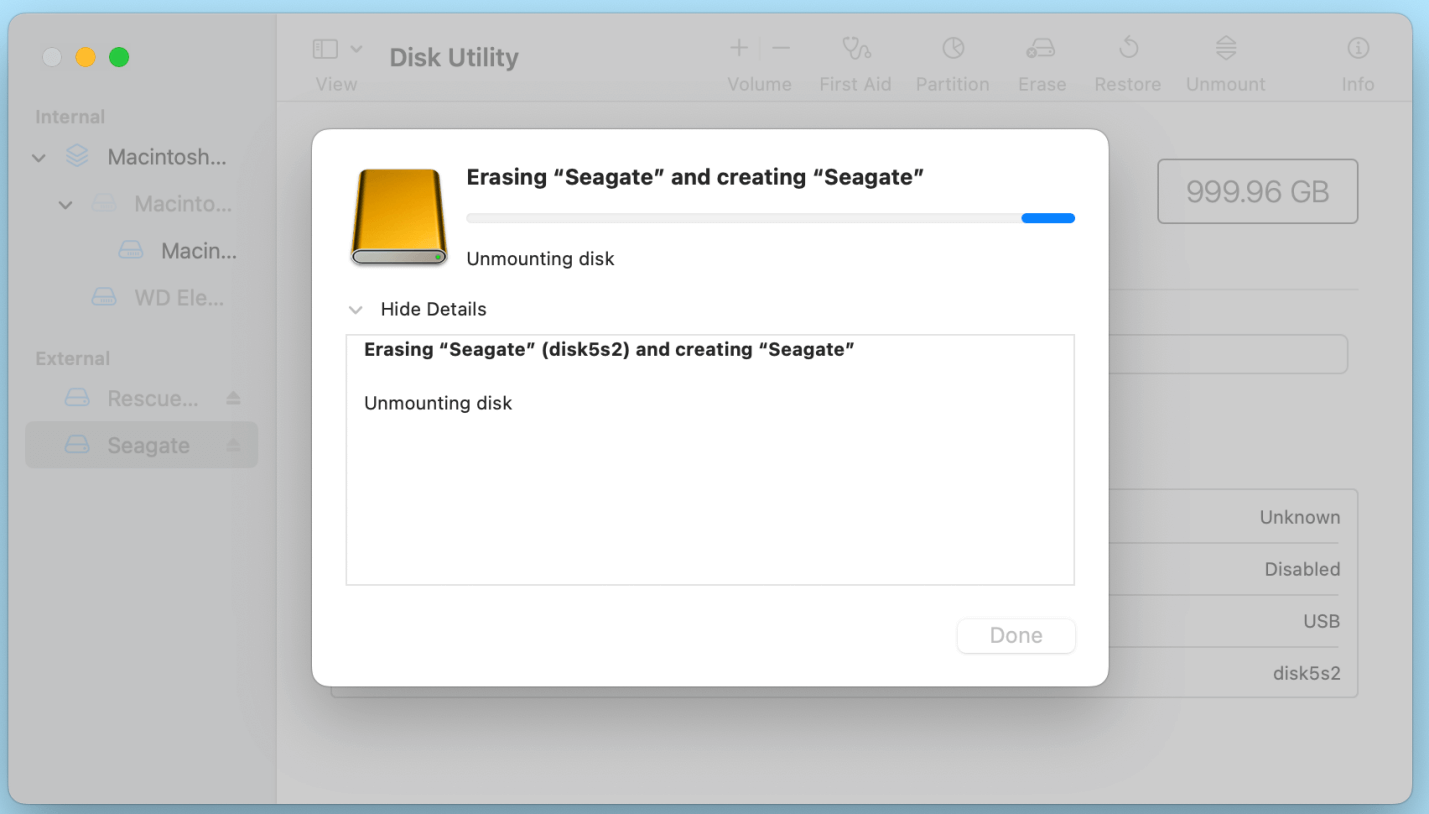
The process typically takes a few minutes depending on the size of the drive and the chosen file system.
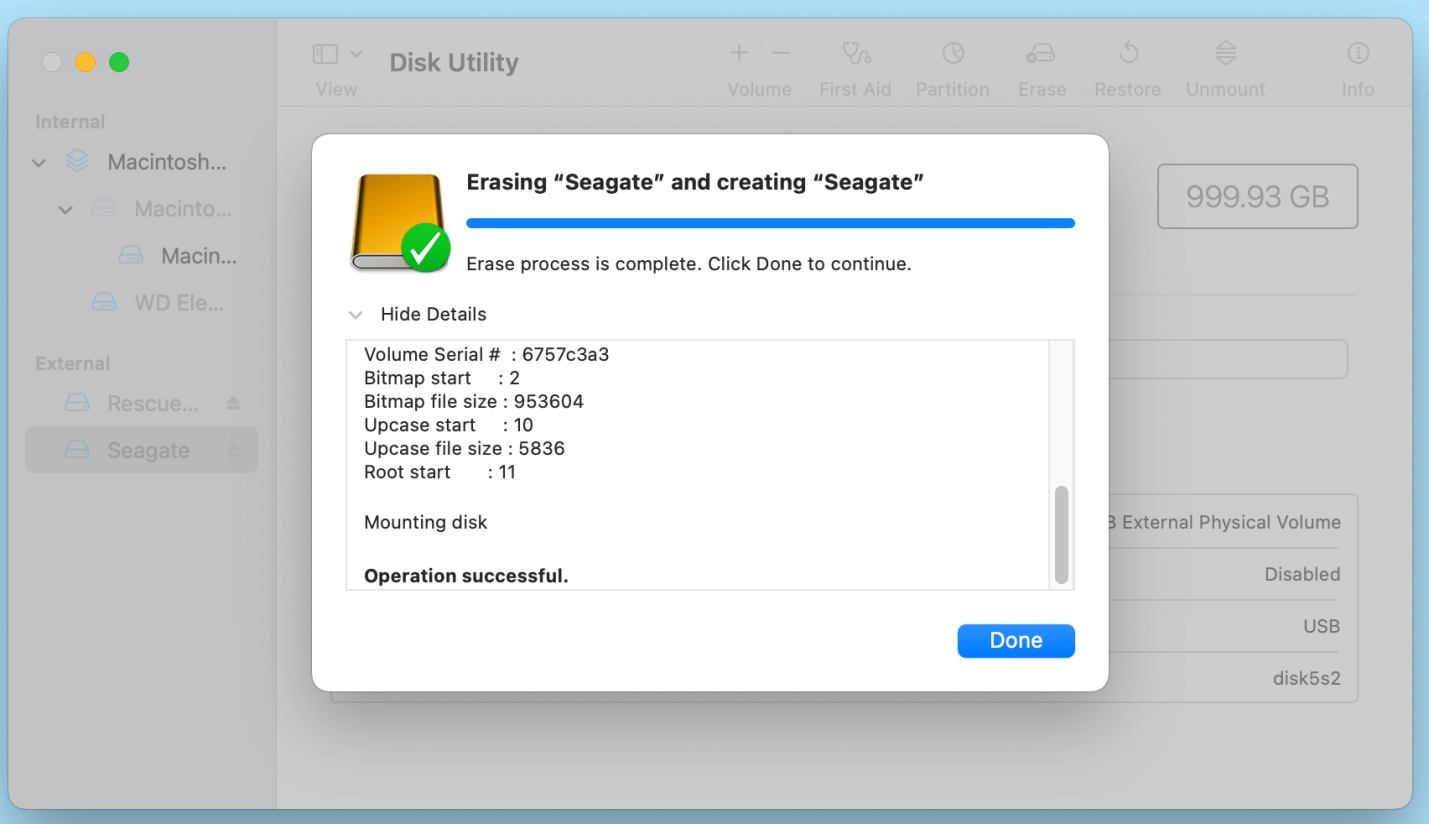
7. Complete the Reformatting
Once the reformatting is complete, Disk Utility will notify you. Click Done to finish the process. Your Seagate drive should now be ready for use with the newly selected file system.
8. Check Drive Functionality
After reformatting, your Seagate drive should no longer be read-only. Try copying, modifying, or deleting files on the drive to ensure that it is functioning as expected.
If you chose ExFAT, the drive should be readable and writable on both macOS and Windows systems.
Note: If you have lost data due to erasing your Seagate external hard drive with Disk Utility, you can use Mac data recovery software to help you scan the formatted Seagate drive and get the lost data back.
Method 3: Adjusting Drive Permissions
Sometimes, macOS permissions settings can restrict write access to external drives. Adjusting these settings may resolve the issue.
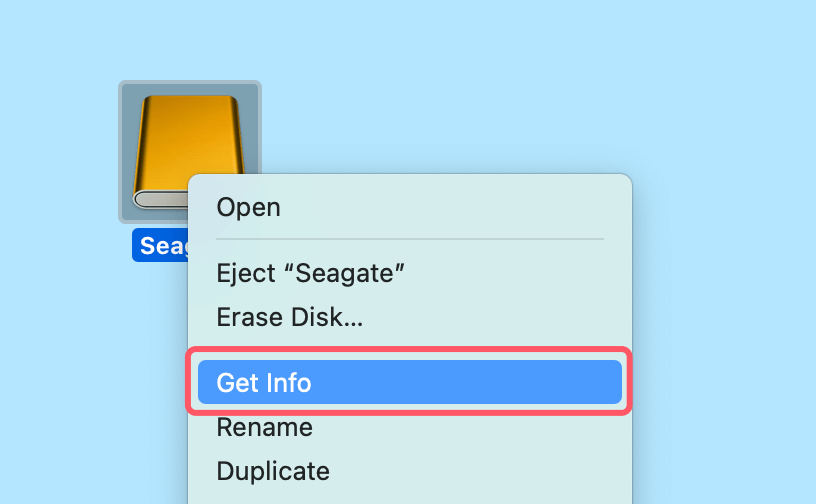
- Check Permissions
- Right-click the Seagate drive icon on your desktop and select Get Info.
![fix Seagate external hard drive read-only issue on Mac]()
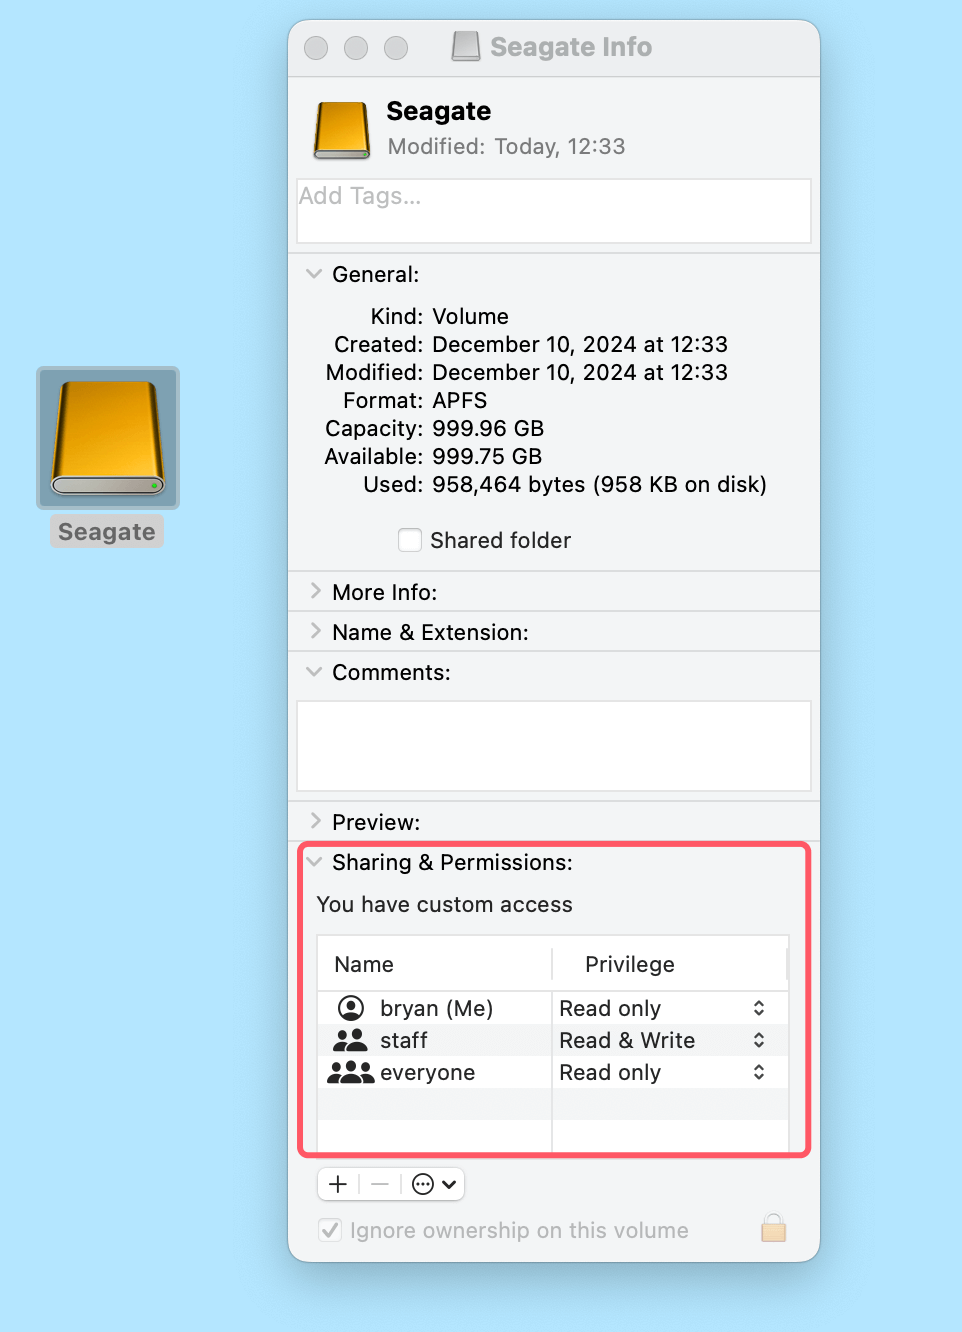
- Scroll to the Sharing & Permissions section.
- Check if the drive is set to "Read only" under your username.
![fix Seagate external hard drive read-only issue on Mac]()
- Right-click the Seagate drive icon on your desktop and select Get Info.
- Modify Permissions
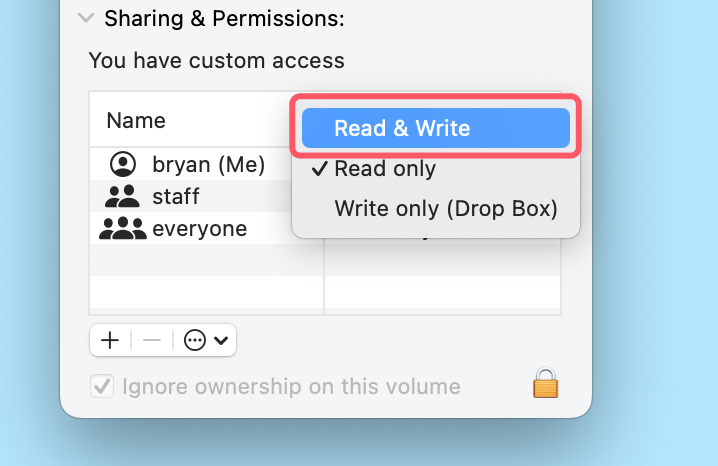
- Click the Lock icon at the bottom-right corner of the Get Info window.
- Enter your admin password to unlock permissions.
- Change your username's access to Read & Write.
![fix Seagate external hard drive read-only issue on Mac]()
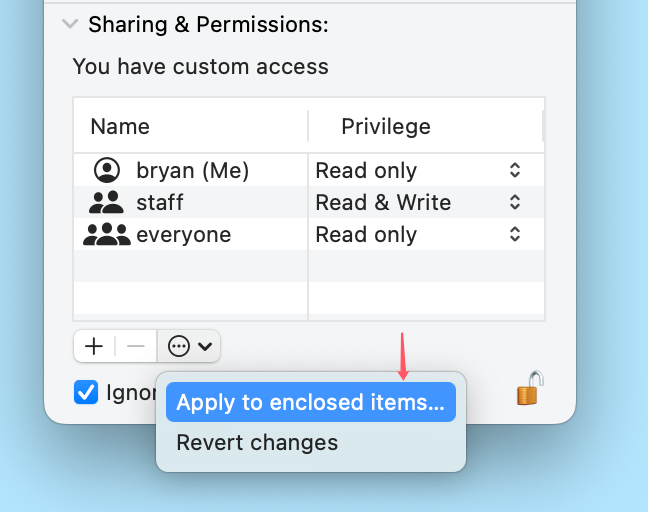
- Click the gear icon and select Apply to enclosed items to ensure permissions apply to all files.
![fix Seagate external hard drive read-only issue on Mac]()
Method 4: Using Terminal Commands [Low Success Rate]
For advanced users, macOS Terminal provides commands to enable write access or repair the drive.
- Enable Write Access for NTFS Drives
- Open Terminal (Applications > Utilities).
- Type the following command and press Enter:
sudo nano /etc/fstab
- Add this line to the file:
LABEL=DRIVENAME none ntfs rw,auto,nobrowse
Replace DRIVENAME with the name of your Seagate drive.
- Press Control + O to save and Control + X to exit.
- Unplug and reconnect the drive.
- Repair File System Errors
- Open Disk Utility.
- Select the drive and click First Aid.
![fix Seagate external hard drive read-only issue on Mac]()
- If Disk Utility cannot repair the drive, run the following command in Terminal:
diskutil repairVolume /Volumes/DRIVENAME
Prevent Future Read-Only Issues
Once you've resolved the problem, follow these tips to prevent similar issues in the future:
- Choose the Right File System: If you frequently switch between macOS and Windows, format your drive with ExFAT for compatibility.
- Regular Backups: Regularly back up your data to avoid losing files in case of drive corruption.
- Keep Software Updated: Update macOS and any third-party NTFS for Mac tools to maintain compatibility.
- Safely Eject Drives: Always eject your Seagate drive properly before unplugging it to avoid corruption.
Conclusion
The Seagate external hard drive read-only issue on Mac can be frustrating, but it is often easy to fix. Whether the problem stems from NTFS file system limitations or macOS permissions, solutions like using third-party NTFS for Mac tools, reformatting the drive, or adjusting permissions can restore full functionality.
By following the methods outlined in this article, you can ensure your Seagate drive remains a reliable and versatile storage solution for your Mac. Always remember to back up your data and choose the right file system for your needs.

Donemax NTFS for Mac
An easy-to-use NTFS for Mac tool to help you enable writable for NTFS drives on Mac so that you can read-write NTFS drives on Mac without any limitation. It also can help you mount, format, repair, rename, open drive on your Mac.
Related Articles
- May 13, 2024How to Unlock USB Flash Drive?
- Jul 08, 2024APFS Drive Not Mounting on Mac, Fix It Now
- Mar 13, 2025How to Format Seagate Game Drive: A Step-by-Step Guide
- Jan 02, 2025Disk is OFF or Offline on Mac, Fix It Now
- Mar 05, 2024How to Format Samsung Portable SSD X5 on Windows or Mac?
- Feb 09, 2025Fix Corrupted SanDisk Drive Without Losing Data: A Comprehensive Guide

Christina
Christina is the senior editor of Donemax software who has worked in the company for 4+ years. She mainly writes the guides and solutions about data erasure, data transferring, data recovery and disk cloning to help users get the most out of their Windows and Mac. She likes to travel, enjoy country music and play games in her spare time.

Gerhard Chou
In order to effectively solve the problems for our customers, every article and troubleshooting solution published on our website has been strictly tested and practiced. Our editors love researching and using computers and testing software, and are willing to help computer users with their problems
