Before we start: Donemax Data Recovery for Mac can help you mount & repair damaged WD My Passport drives on Mac. If your WD My Passport drive is not showing up on your Mac, you can use this software to recover data from the drive, then use it to mount it on your Mac.
PAGE CONTENT:
External hard drives like the WD My Passport are essential tools for storing and transporting data. However, it can be frustrating when your Mac doesn't recognize the drive. Whether it's due to hardware issues, software conflicts, or compatibility problems, there are several solutions to address this issue. In this article, we'll explore common causes and provide detailed steps to fix the problem.
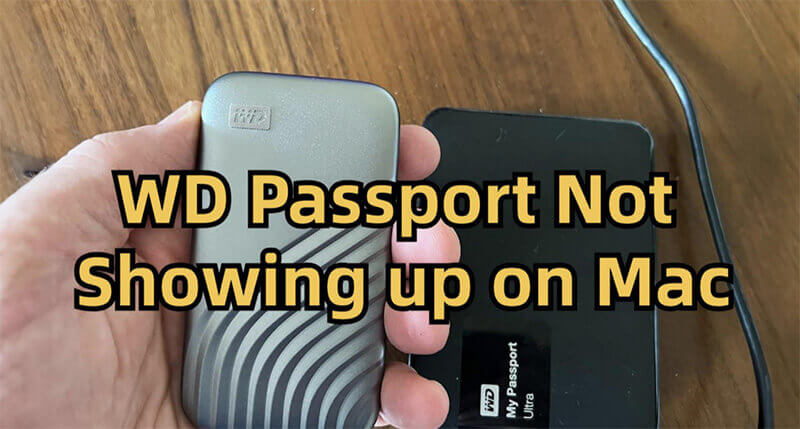
Why WD My Passport Not Showing Up on Mac?
A WD My Passport external hard drive is a convenient storage device for many Mac users. It is known for its reliability and high capacity. However, encountering the problem of it not showing up on your Mac can disrupt workflows and prevent access to critical data. This guide aims to help you troubleshoot and resolve the issue with step-by-step instructions.
Possible Causes:
Before diving into solutions, it's essential to understand what could cause your WD My Passport not to show up on your Mac:
- Incompatible File System: If the drive is formatted in an unsupported format like NTFS (commonly used for Windows), macOS may not detect it.
- Hardware Issues: Problems with the USB cable, port, or even the drive itself could prevent proper detection.
- Power Supply Issues: Some external drives require more power than the Mac's USB port provides, particularly older models or drives with high capacities.
- Outdated Software or Drivers: Outdated macOS versions or missing drivers can lead to incompatibility with your external drive.
- Disk Corruption or Partition Errors: If the drive's file system or partitions are corrupted, macOS may fail to recognize the drive.
- macOS System Bugs or Settings: Certain macOS settings or system bugs could also prevent the drive from appearing.
Preliminary Checks:
Before attempting any advanced fixes, perform these basic checks to rule out simple issues:
1. Verify USB Connections
- Verify that the USB cord is firmly attached to your Mac and the drive.
- Test the drive using another USB port on your Mac.
- To rule out the possibility of a defective cable, try using an alternative USB cord.
2. Check Power Supply
- For older or larger drives, ensure they are properly powered. If your drive has a separate power adapter, ensure it's plugged in.
3. Test on Another Computer
- Connect the drive to another Mac or even a Windows PC. If it works elsewhere, the issue might be specific to your Mac.
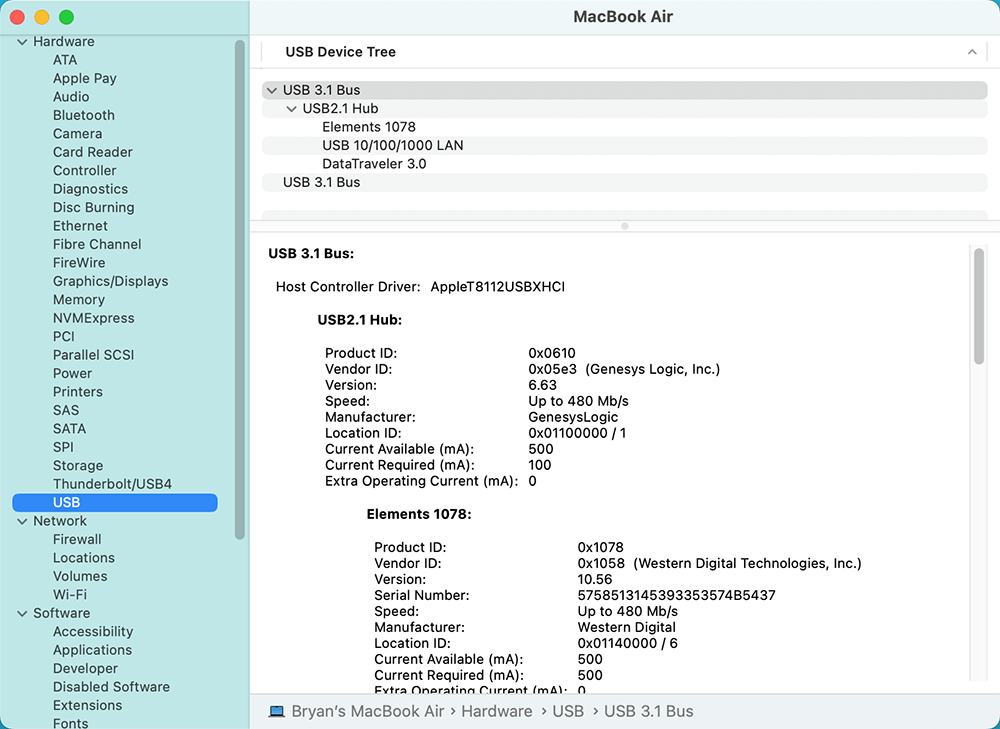
4. Open System Information
- Go to Apple Menu > About This Mac > More Info > System Report > USB.
![Open System Information]()
- Look for the drive under the USB section. If it's listed here but doesn't appear in Finder, it may be a software issue.
Solutions to Fix WD My Passport Not Showing Up on Mac
If the preliminary checks don't resolve the problem, try the following solutions:
Solution 1: Check Disk Utility
Disk Utility is macOS's built-in tool for managing drives. If the WD My Passport is not showing up in Finder, it might still appear in Disk Utility.
Step 1. Open Disk Utility using Spotlight Search or find it in Utilities from Applications.
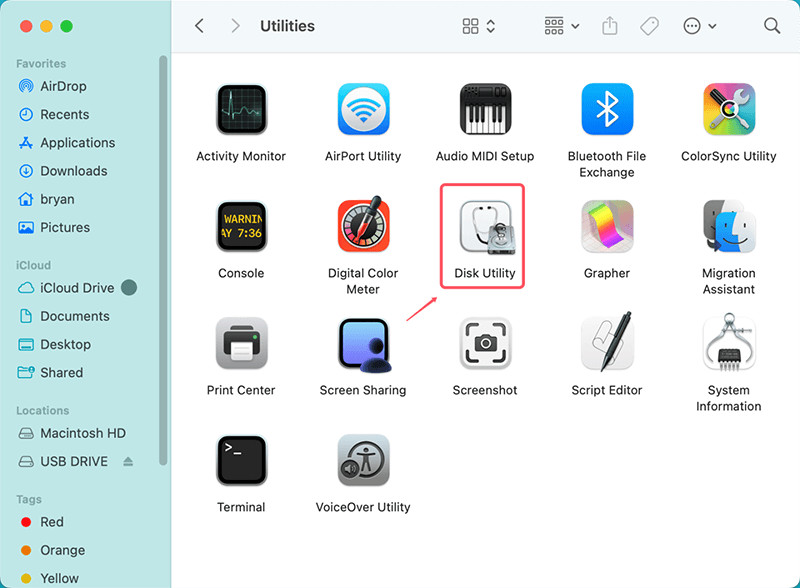
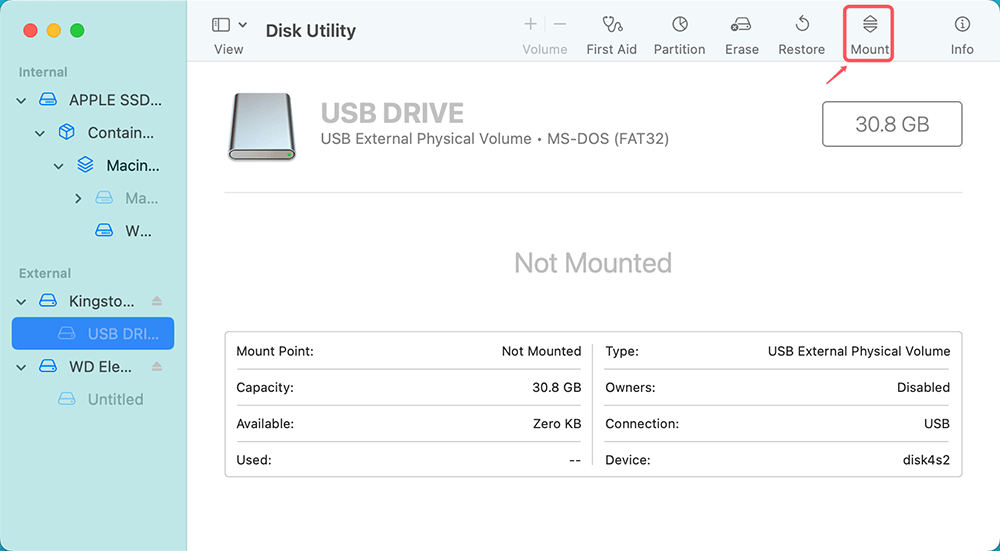
Step 2. Verify that the drive is visible in the sidebar. If it's listed but grayed out, right-click on it and select Mount.
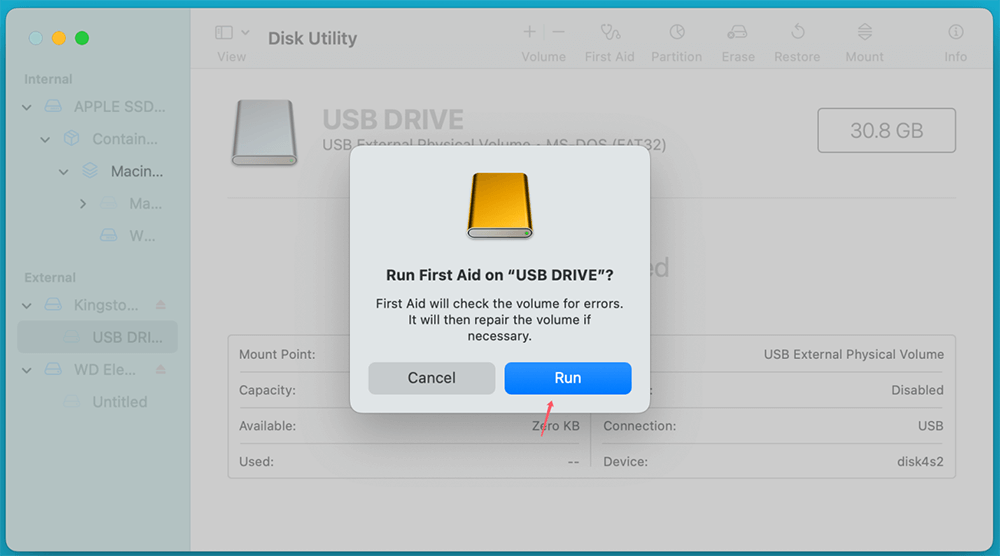
Step 3. If the drive still doesn't show up, try running First Aid:
- Select the drive.
- Click First Aid at the top.
- Follow the on-screen prompts to repair any detected issues.
Solution 2: Use NTFS for Mac Tool
If your WD My Passport drive is an NTFS drive, you can use a WD NTFS driver to help you mount it on your Mac and grant full read-write access to it.
Step 1. Download and install the best WD NTFS driver - Donemax NTFS for Mac.
Step 2. Open WD My Passport drive, select the WD My Passport drive, click on Enable Writable button.

Step 3. Click on Mount button. Then check if you can see it on Desktop and Finder's sidebar.

Donemax NTFS for Mac also can help you repair damaged WD My Passport drive on Mac, reformat WD My Passport drive or eject WD My Passport drive on Mac.
Solution 3: Reformat the Drive
If the drive is detected but still inaccessible, it might need to be reformatted to a macOS-compatible file system.
Note: Reformatting will erase all data on the drive, so back up your data first if possible.
Step 1. Launch the disk utility.
Step 2. Pick the drive that you use for WD My Passport.
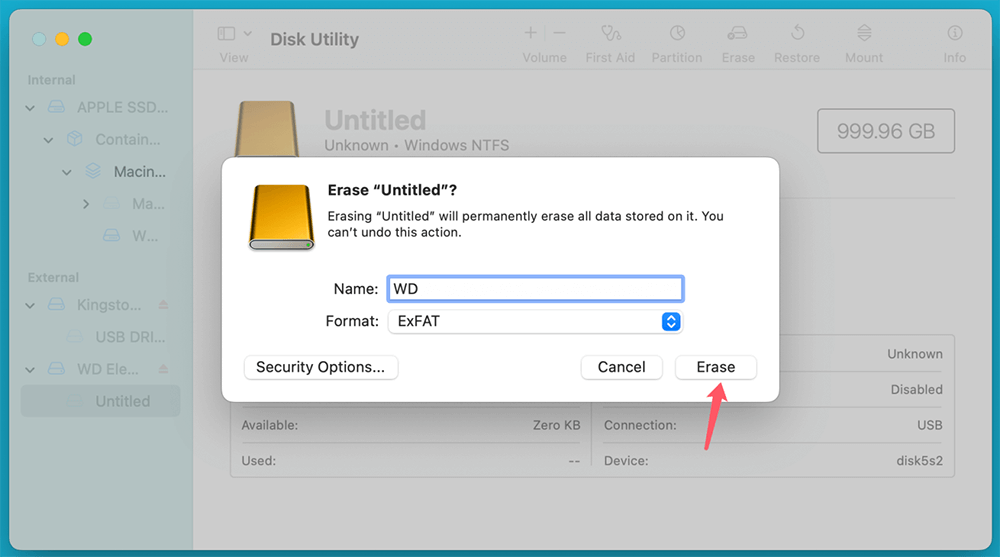
Step 3. At the window's top, select Erase.
Step 4. Choose a format:
- APFS: Best for modern macOS systems.
- Mac OS Extended (Journaled): Compatible with older macOS versions.
- ExFAT: Cross-compatible with Windows and macOS (for sharing files).
Step 5. Give the drive a name and click Erase.
Solution 4: Install or Update Drivers
Some WD drives require specific drivers or software to work with macOS.
- Visit the Western Digital Support website.
- Search for your WD My Passport model.
- Download and install the latest drivers or software updates for macOS.
Solution 5: Run First Aid in Recovery Mode
Disk Utility's First Aid tool is one of the most effective ways to repair a malfunctioning drive. If running First Aid in normal macOS mode doesn't work, attempting the same process in Recovery Mode can often yield better results. Here's why and how to do it:
Why Use Recovery Mode?
- In Recovery Mode, macOS runs a minimal operating system that excludes third-party software, extensions, and unnecessary processes.
- This environment reduces the risk of software conflicts and provides unrestricted access to Disk Utility, allowing deeper diagnostics and repair capabilities.
Steps to Run First Aid in Recovery Mode:
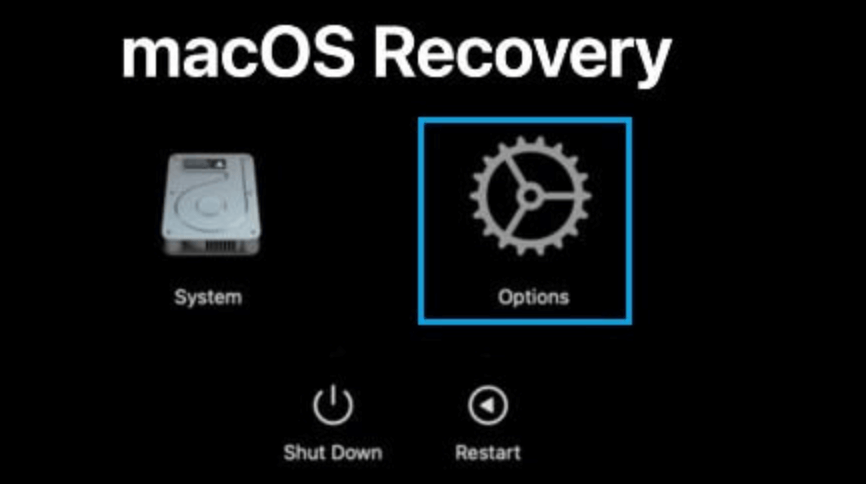
Step 1. Enter Recovery Mode:
- Shut down your Mac completely.
- Turn it back on while holding down Command (⌘) + R (for Intel-based Mac) or Power button (for Apple silicon Mac) until the Apple logo or a spinning globe appears.
- Release the keys when you see the macOS Utilities screen or Loading startup options. Choose Options, click Continue.
![Enter Recovery Mode]()
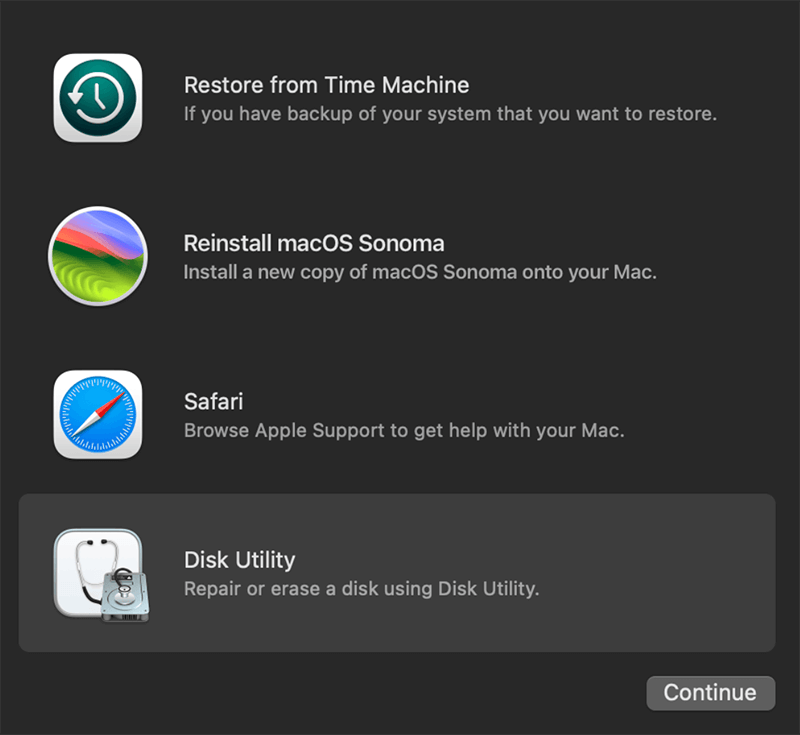
Step 2. Open Disk Utility:
- Select Disk Utility from the options presented in the macOS Utilities window.
![Open Disk Utility]()
- Click Continue to open Disk Utility.
Step 3. Locate Your WD My Passport Drive:
- In the sidebar, look for your external drive under External or Internal sections.
- If the drive appears but is grayed out, it means it's unmounted.
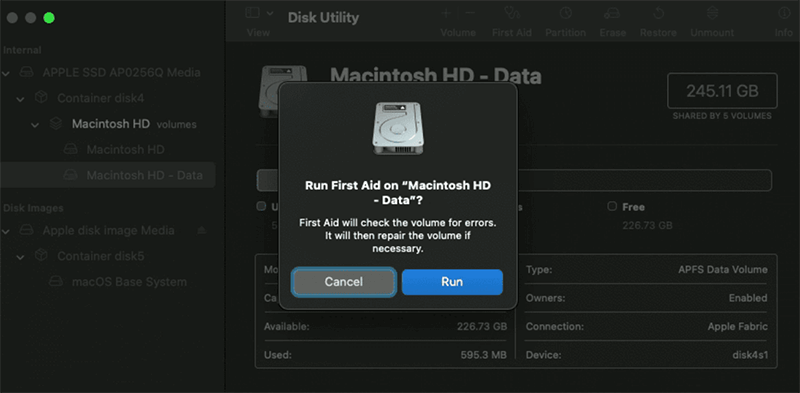
Step 4. Run First Aid:
- Select the drive and click First Aid at the top of the window.
- Confirm by clicking Run when prompted.
![Run First Aid]()
- macOS will scan the drive for errors and attempt to repair any issues with the disk structure, file system, or partition map.
Step 5. Evaluate the Results:
- If the repair is successful, reconnect the drive to check if it appears in Finder.
- If Disk Utility reports that repairs couldn't be completed, note the error message. It can guide you in choosing your next steps (e.g., reformatting or using professional recovery tools).
Step 6. Optional: Attempt Mounting:
- After running First Aid, try manually mounting the drive if it's still unmounted.
- Select the drive and click Mount in Disk Utility.
![Optional: Attempt Mounting]()
Solution 6: Check Finder Settings
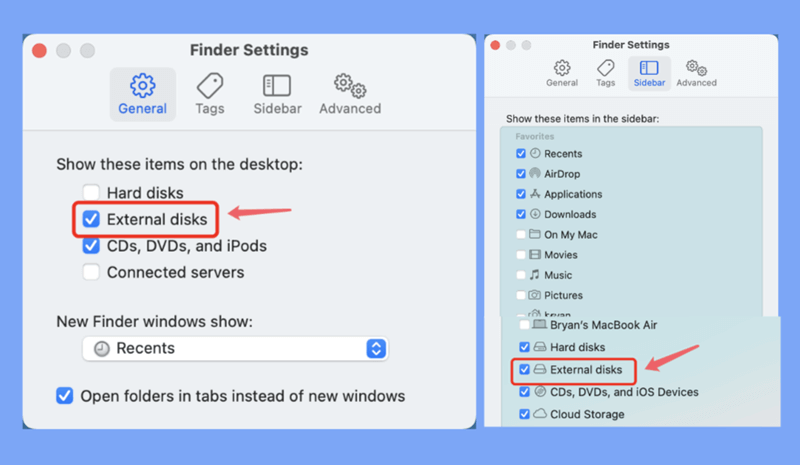
If the WD My Passport drive is recognized by Disk Utility, but still not showing up on desktop or Finder's sidebar, just check Finder Settings.
Step 1. Open a Finder.
Step 2. Click Finder on Apple menu.
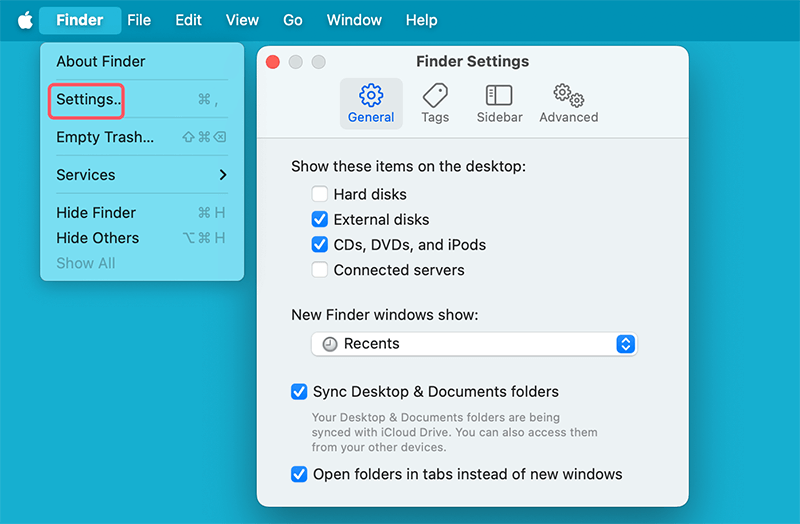
Step 3. When Finder Settings opens, click Sidebar and General, ensure External disks is selected.
Solution 7: Reset NVRAM/PRAM and SMC
Sometimes, resetting the NVRAM/PRAM or SMC can resolve hardware detection issues.
Resetting NVRAM/PRAM:
- Launch the disk utility.
- Pick the drive that you use for WD My Passport.
- At the window's top, select Erase.
- Keep holding until you hear the startup chime twice, then release the keys.
Resetting SMC:
- For MacBooks with a T2 chip:
- Shut down your Mac.
- Press the Power button after holding Control (⌃) + Option (⌥) + Shift for seven seconds.
- Hold down all keys for a further seven seconds, then let go to switch on the Mac.
- For Macs without a T2 chip:
- Shut down your Mac.
- Unplug the power cord, wait 15 seconds, then plug it back in.
- Wait another 5 seconds and turn on your Mac.
Solution 8: Use Terminal Commands
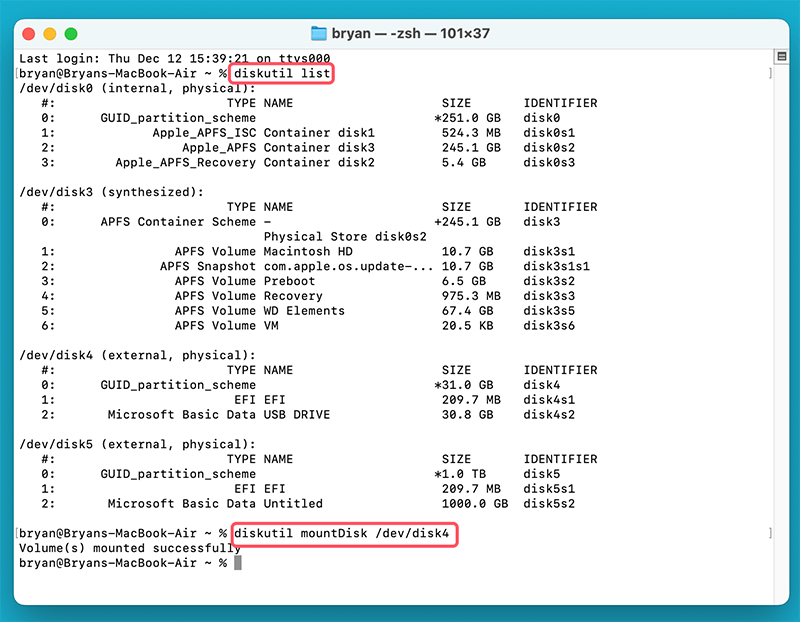
If the drive still doesn’t appear, you can use macOS's Terminal to manually mount it.
- Open Terminal (use Spotlight Search).
- Type the command:
diskutil list
This will show all connected drives.
- Locate your WD My Passport and note its identifier (e.g., disk4).
- Run the following command to mount the drive:
diskutil mountDisk /dev/disk2
![Use Terminal Commands]()
Solution 9: Test for Physical Damage
If none of the above solutions work, your drive might be physically damaged. Look out for these signs:
- Clicking or grinding noises from the drive.
- The drive heats up excessively.
In such cases, professional assistance might be necessary.
Recover Lost Data from WD My Passport Drive on Mac
If you cannot access critical data on the drive, data recovery might be required.
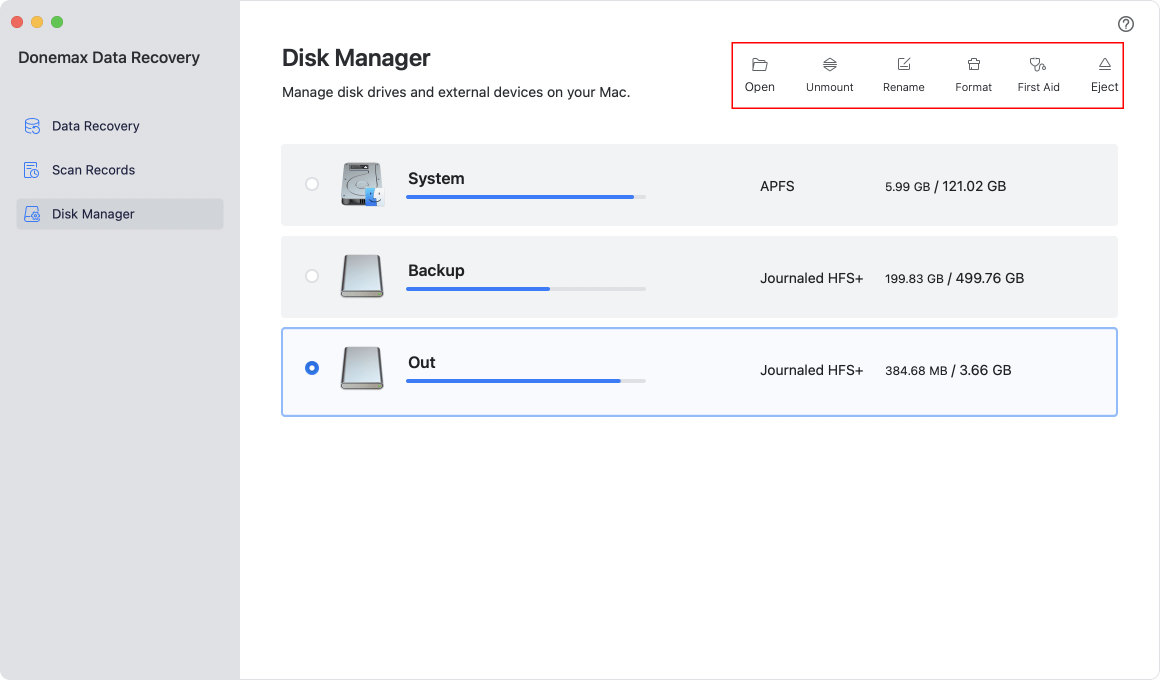
Donemax Data Recovery for Mac is a powerful Mac data recovery program. It can deeply scan the WD My Passport external hard drive and find all recoverable files.
Step 1. Download and install Donemax Data Recovery for Mac, and connect the WD My Passport external hard drive to your Mac.
Step 2. Open Donemax Data Recovery for Mac, select the WD My Passport external hard drive to start data recovery.

Step 3. Click on Scan button to deeply scan the WD My Passport external hard drive and find all recoverable files.

Step 4. Once the scan is completed, you can preview all recoverable files. Then select the wanted files, click on Recover button to save them.

Donemax Data Recovery for Mac also can help you:
- Open WD My Passport external hard drive on Mac.
- Eject WD My Passport external hard drive on Mac in safe mode.
- Mount WD My Passport external hard drive on Mac.
- Reformat WD My Passport external hard drive on Mac.
- Repair damaged WD My Passport external hard drive on Mac.
Preventative Measures
To avoid similar issues in the future, consider the following preventative steps:
- Back Up Data Regularly: Use Time Machine or other backup software to keep your files safe. Consider cloud storage for critical documents.
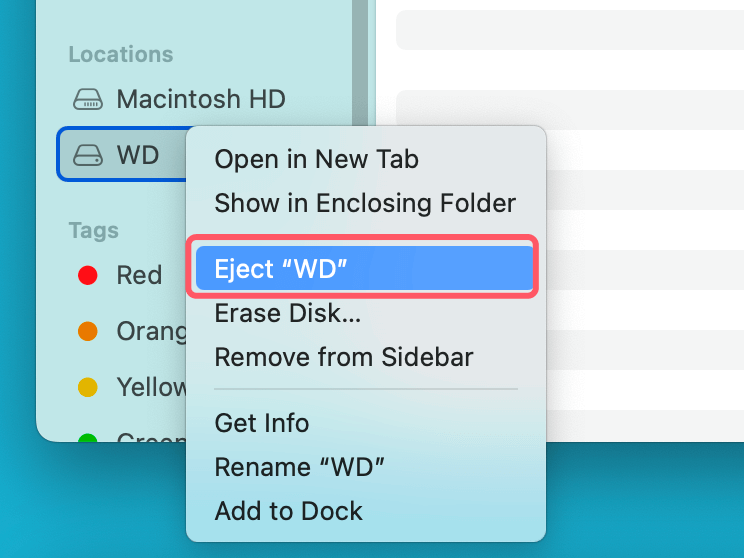
- Eject Drives Properly: Always eject external drives safely before disconnecting them from your Mac. Right-click the drive in Finder and select Eject, or drag it to the Trash icon.
![Eject Drives Properly]()
- Update macOS and Drivers: Regularly update your macOS and WD software to ensure compatibility.
- Use Surge Protectors: Protect your drive from power surges by using surge-protected outlets.
- Handle Drives Carefully: Avoid dropping or exposing the drive to extreme temperatures or moisture.
Conclusion
Experiencing issues with your WD My Passport not showing up on your Mac can be inconvenient, but with the solutions outlined above, you should be able to troubleshoot and resolve the problem effectively. By performing basic checks, exploring software fixes, and taking preventative measures, you can ensure a smooth experience with your external drive in the future. If the issue persists despite all efforts, it's recommended to consult a professional or contact WD support for further assistance.
By addressing the root cause and applying the appropriate solution, you can regain access to your important files and keep your storage device functioning optimally.


Donemax Data Recovery for Mac
Donemax Data Recovery for Mac is one of the best Mac data recovery software. It is easy-to-use and can help in recovering deleted, formatted, inaccessible or lost data from Mac HDD/SSD, external disk, USB drive, SD card, camera or other storage devices.
Related Articles
- Mar 17, 202510 Solutions to Fix Seagate External Hard Drive Not Mounting on Mac
- Dec 12, 2024External Hard Drive Not Working on M3-Chip Mac: Fix It Now
- Nov 09, 2024(Solved) Fix macOS Sequoia Keeps Crashing or Freezing When Starting
- Feb 11, 2025How to Repair an xD Card: A Comprehensive Guide
- Jan 12, 2025Fix APFS fsroot tree is invalid on Mac
- Mar 17, 2025[8 Solutions] Fix Unreadable Seagate External Hard Drive on Mac Without Losing Data

Steven
Steven has been a senior writer & editor of Donemax software since 2020. He's a super nerd and can't imagine the life without a computer. Over 6 years of experience of writing technical solutions and software tesing, he is passionate about providing solutions and tips for Windows and Mac users.

Gerhard Chou
In order to effectively solve the problems for our customers, every article and troubleshooting solution published on our website has been strictly tested and practiced. Our editors love researching and using computers and testing software, and are willing to help computer users with their problems
Hot Donemax Products

Clone hard drive with advanced clone technology or create bootable clone for Windows/Mac OS.

Completely and easily recover deleted, formatted, hidden or lost files from hard drive and external storage device.

Certified data erasure software - permanently erase data before selling or donating your disk or any digital device.
