PAGE CONTENT:
Apple File System (APFS) is a cutting-edge file system designed for macOS and iOS devices, offering high performance and reliability. However, users occasionally encounter the error fsroot tree is invalid, which can disrupt system operations and potentially risk data loss. This article explains the issue, its causes, and practical solutions to address it.
Understand the 'fsroot tree is invalid' Error
What is the fsroot tree?
The fsroot tree is an essential structure in the APFS system. It functions as the organizational backbone of the file system, keeping track of the directory hierarchy and file locations. If the fsroot tree becomes invalid, macOS may struggle to read or write data on the disk, causing significant system issues.
What causes the error?
The 'fsroot tree is invalid' error occurs due to corruption in the APFS metadata. Common causes include:
- Sudden Shutdowns: Power loss during disk operations can corrupt the file system.
- Hardware Issues: Faulty storage drives or cables can lead to metadata inconsistencies.
- macOS Updates: Unsuccessful updates may result in partial changes to the file structure.
- Malware: While rare on macOS, certain malicious activities can damage file metadata.
- Physical Damage: Wear and tear on older storage devices may result in bad sectors, affecting the fsroot tree.
Diagnose the problem
1. Use Disk Utility
Disk Utility is the simplest tool to diagnose the issue:
- Open Disk Utility from the Applications > Utilities folder.
- Select the affected disk or volume.
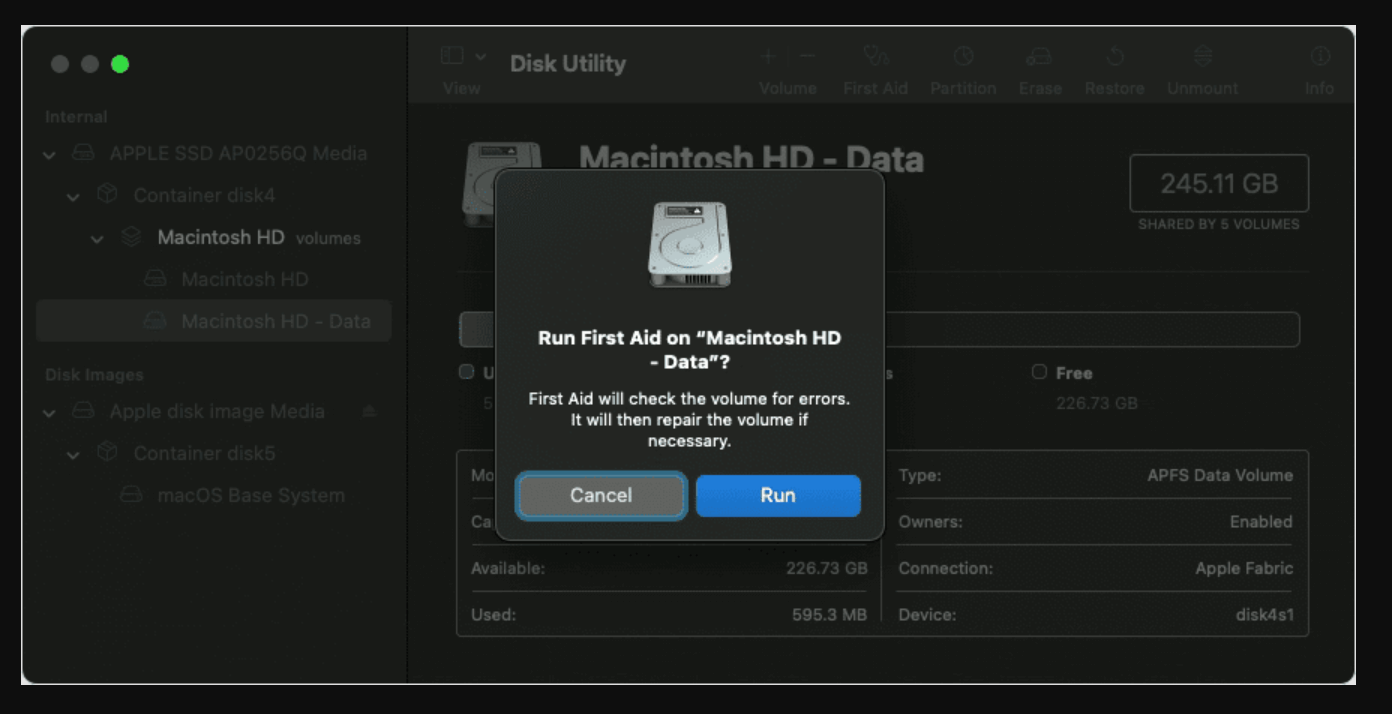
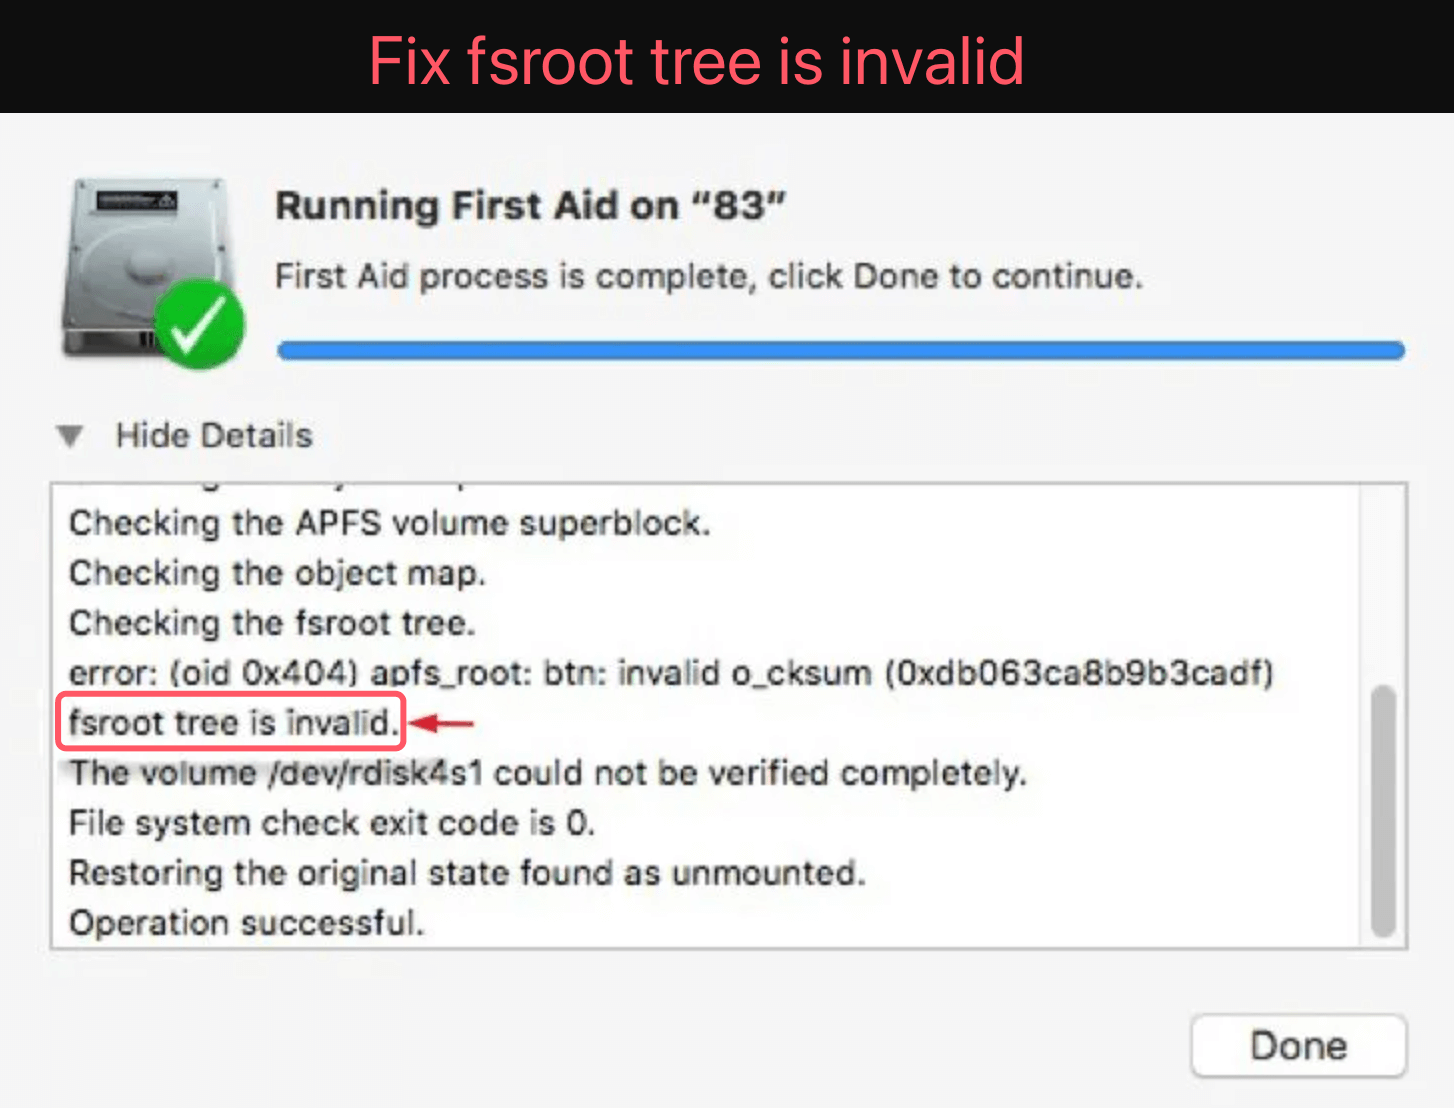
- Click on First Aid and follow the on-screen instructions.
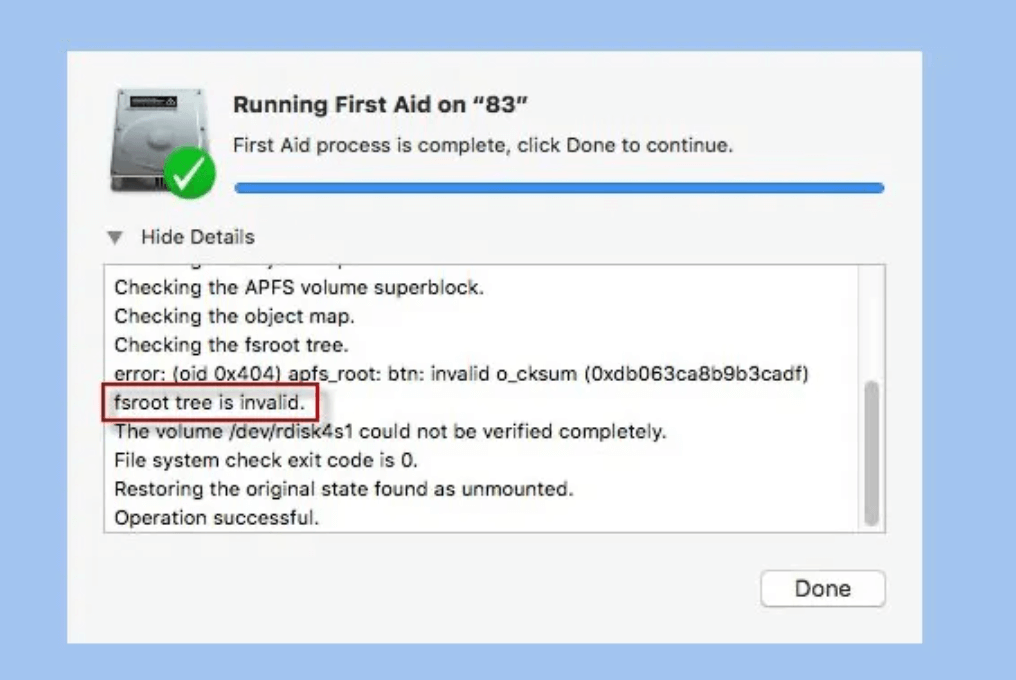
- If Disk Utility flags the 'fsroot tree is invalid' error, it's confirmed.
![fsroot tree is invalid]()
2. Use Terminal Commands
For advanced users, Terminal can provide more detailed diagnostics:
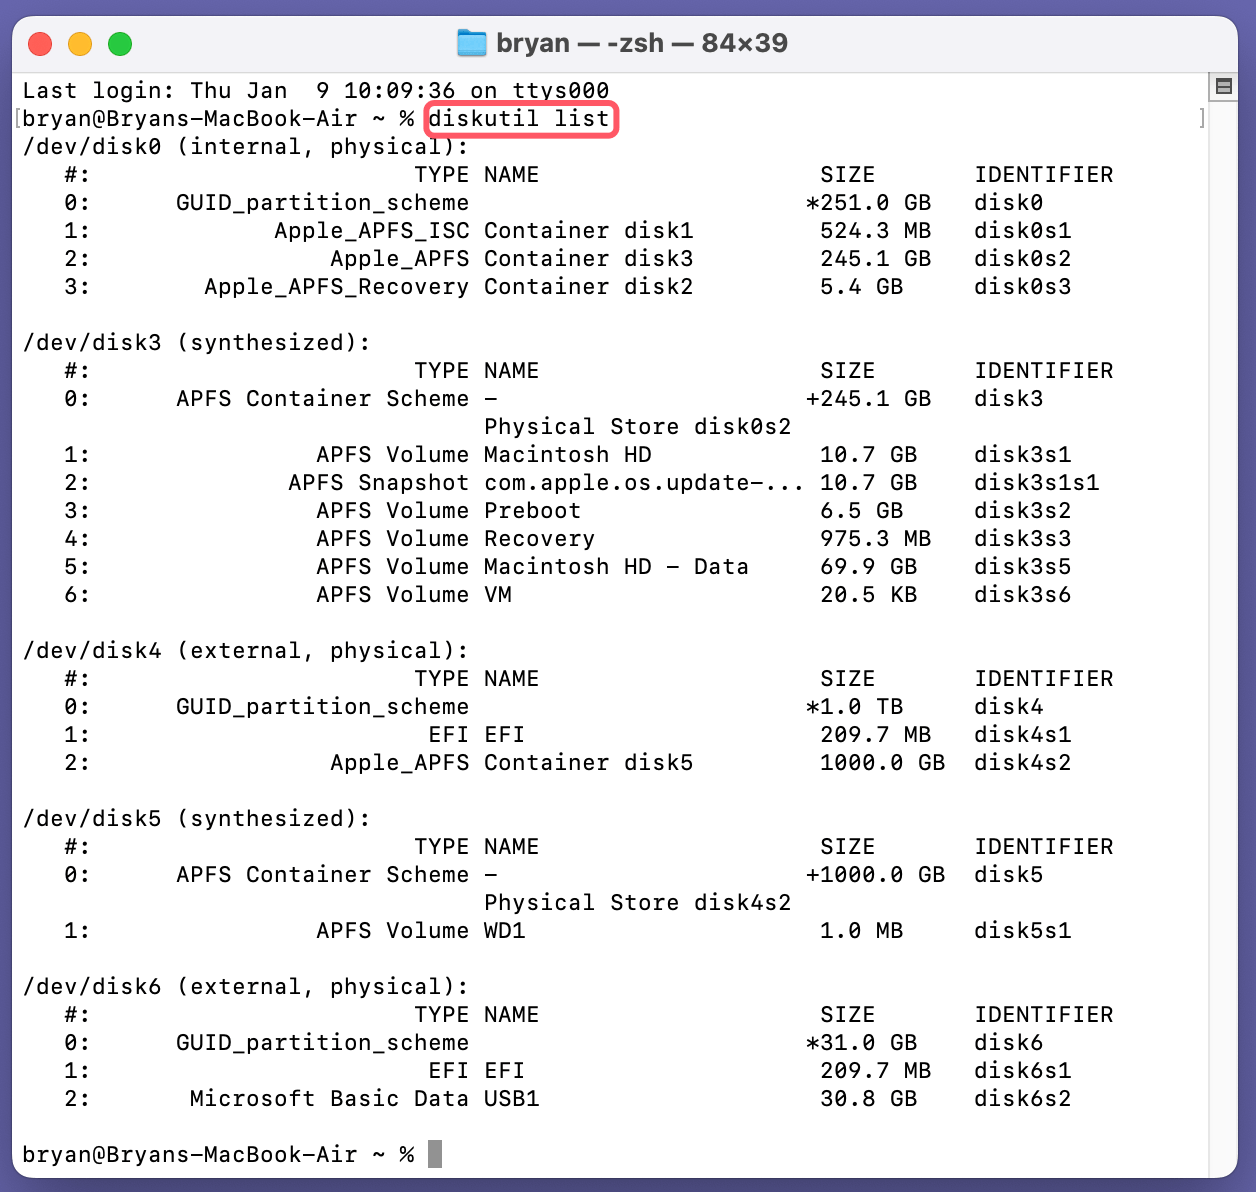
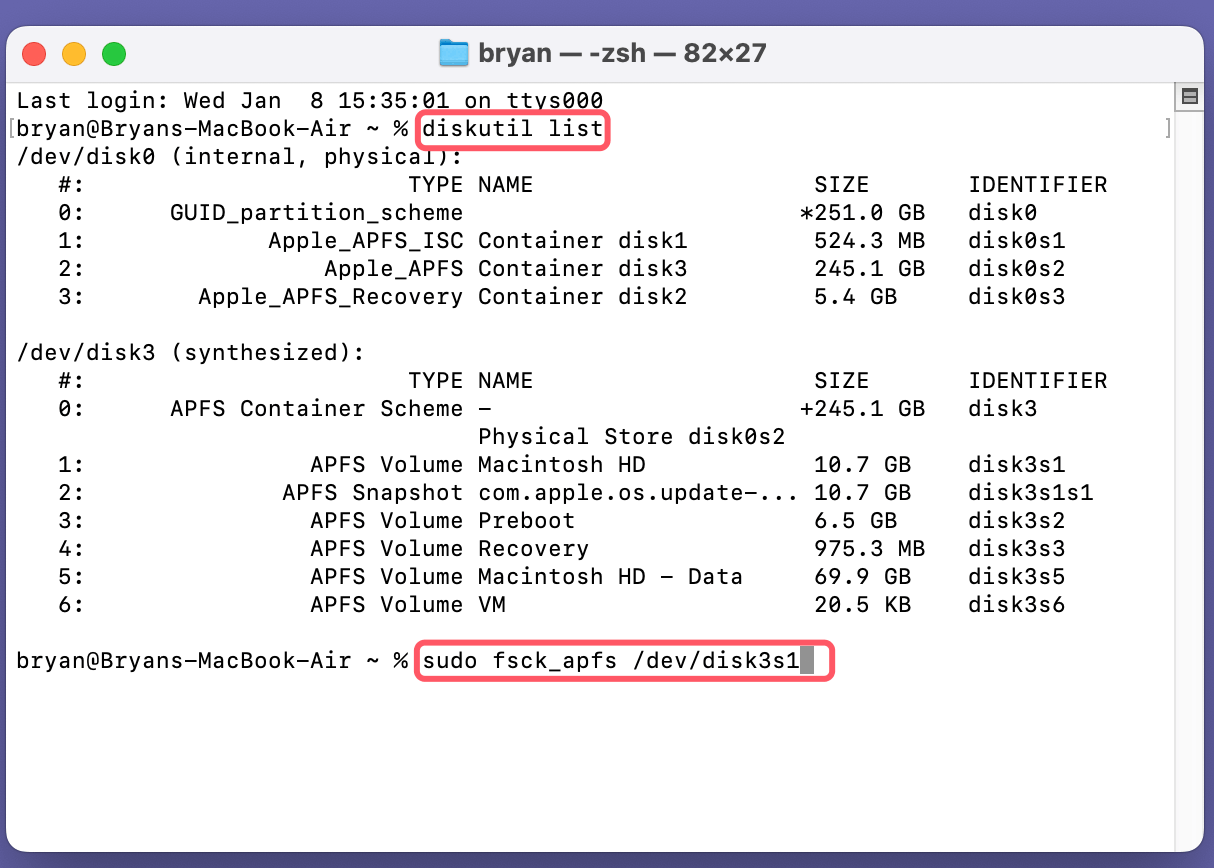
Check APFS Status: Use the following command to list your APFS containers:
diskutil list
Identify the relevant volume and then run:
sudo fsck_apfs /dev/diskXsY
Replace diskXsY with the correct identifier (e.g., disk3s1). Terminal outputs will indicate whether the fsroot tree is corrupt.
3. Use third-party tools
If macOS tools fail to give adequate information, third-party utilities such as DiskWarrior or TechTool Pro can provide a deeper analysis of disk issues.
How to fix the 'fsroot tree is invalid' error?
When dealing with the 'fsroot tree is invalid' error, there are multiple approaches based on the severity of the issue. Let’s dive deeper into each solution, highlighting potential challenges and providing actionable advice.
1. Use Disk Utility to repair the disk
Disk Utility is a user-friendly tool designed to diagnose and repair disk-related issues. It is often the first line of defense against filesystem errors. Follow these steps for a detailed repair process:
- Access Disk Utility:
- Open the Applications folder, navigate to Utilities, and launch Disk Utility. Alternatively, restart your Mac in Recovery Mode (hold Command + R for Intel Mac, Power button for Apple silicon Mac during boot) and select Disk Utility from the macOS Utilities menu.
- Run First Aid:
- Select the affected volume or disk from the left-hand sidebar.
- Click on First Aid in the top menu and confirm when prompted to run the repair.
![fsroot tree is invalid]()
- The tool may unmount the disk temporarily to perform the operation.
- Review the Results:
- A green checkmark indicates the repair was successful.
- If Disk Utility reports that repairs failed or could not be completed, it will usually recommend additional steps.
- Retry in Recovery Mode:
- If the repair fails, try running First Aid from Recovery Mode. This environment is more effective for fixing system drives because no active processes interfere with repairs.
💡 Pro Tip: Disk Utility might repair minor issues but fail on heavily corrupted filesystems. If you encounter repeated failures, transition to Terminal for more in-depth fixes.
2. Repair via Terminal
Terminal provides advanced users with direct access to macOS disk management tools. The fsck_apfs command (File System Consistency Check for APFS) is a powerful utility for repairing APFS volumes. Here's an expanded guide:
- Identify the Disk: Open Terminal and run:
diskutil list
This command lists all connected disks and partitions. Look for the identifier corresponding to the problematic APFS volume (e.g., /dev/disk5s1).
![fsroot tree is invalid]()
- Run the Repair Command: Execute the following command to perform a consistency check:
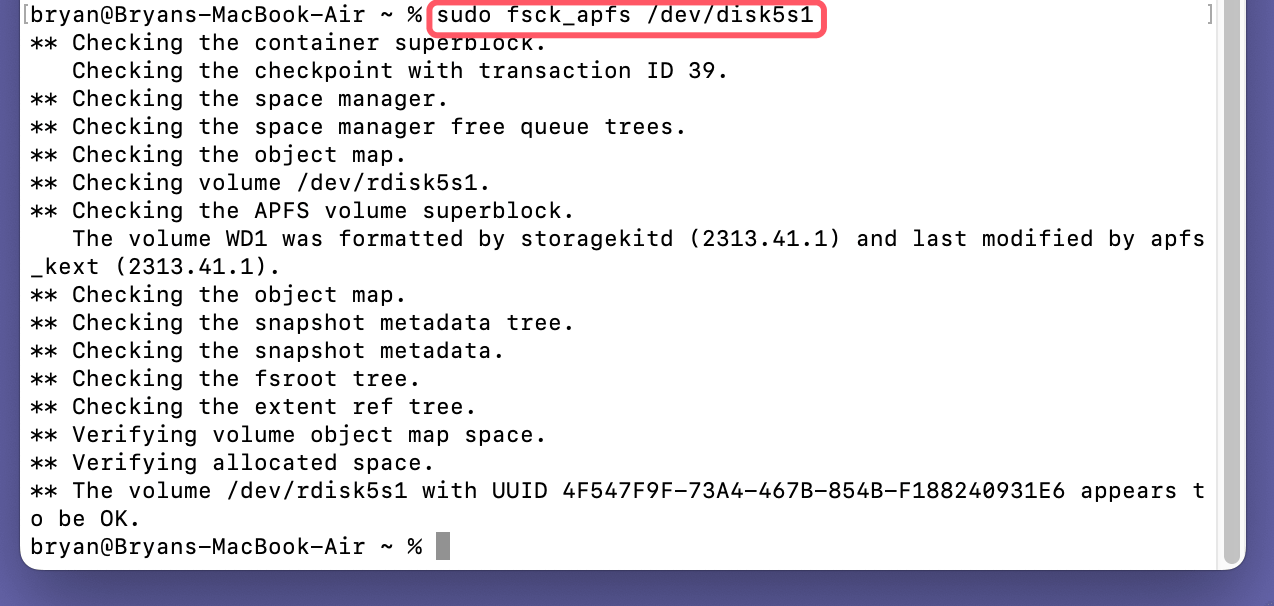
sudo fsck_apfs /dev/diskXsY
Replace diskXsY with the disk identifier. For example:
sudo fsck_apfs /dev/disk5s1
![fsroot tree is invalid]()
- Analyze the Output:
- If the command reports "The volume appears to be OK," the issue is resolved.
- If errors are found, the tool will attempt to repair them. Rerun the command if prompted.
- Repeat or Exit:
- Persistent errors may require multiple attempts. If the tool ultimately fails to fix the issue, consider reformatting the disk or consulting a professional.
💡 Advanced Tip: Use the -n flag for a read-only analysis if you’re hesitant to allow fsck_apfs to make changes:
sudo fsck_apfs -n /dev/diskXsY
3. Mount the disk in Read-Only mode
If you cannot repair the disk but need to recover files, mounting it in read-only mode can be a lifesaver. This approach prevents further corruption while allowing access to data.
- Mount the Disk Read-Only: Use the Terminal to mount the disk in a non-modifiable state:
sudo mount -o ro /dev/diskXsY /Volumes/Recovery
Replace diskXsY with the identifier of the disk. This mounts the volume in a safe, read-only state under /Volumes/Recovery.
- Recover Your Data:
- Use Finder to navigate to the mounted volume and copy important files to a secure location.
- For complex recoveries (e.g., lost directories), use third-party tools like Donemax Data Recovery, EaseUS Data Recovery Wizard, or R-Studio.
- Unmount When Done: After recovery, unmount the disk safely:
sudo umount /Volumes/Recovery
4. Reformat the disk
Reformatting is a drastic yet effective solution for irreparable fsroot tree corruption. While it erases all data on the disk, it provides a fresh start.
- Backup Data: If possible, use the read-only mode or third-party recovery tools to save critical files.
- Reformat the Disk:
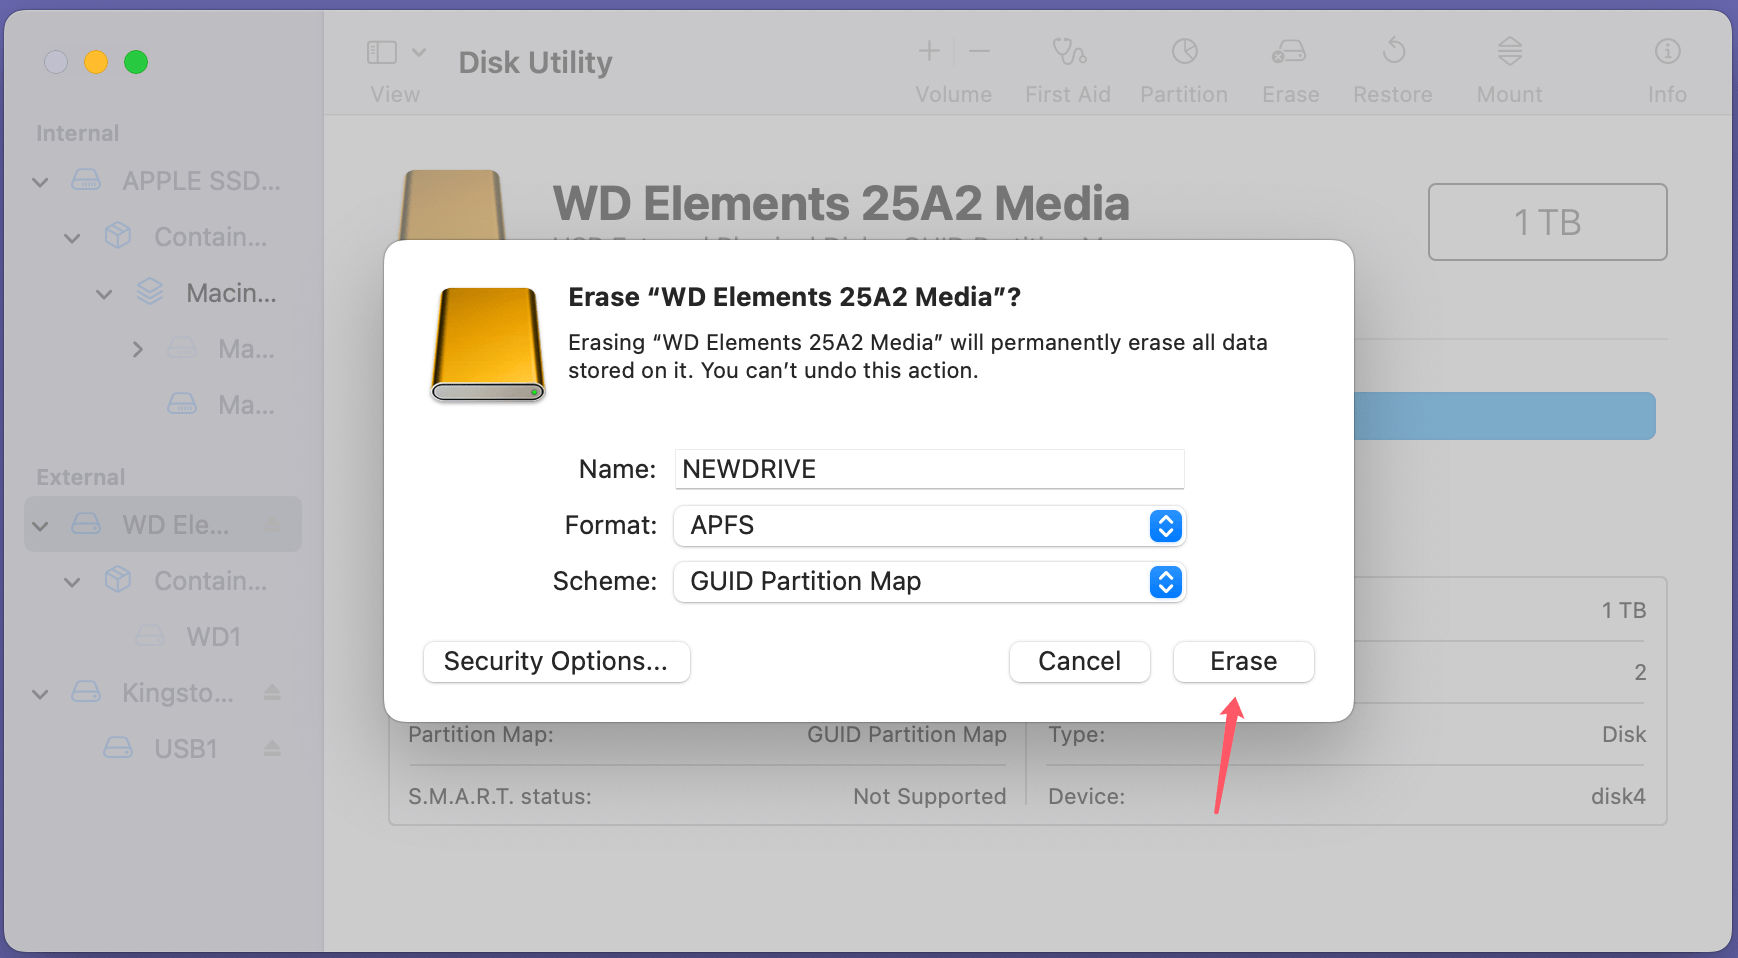
- Open Disk Utility and select the affected disk from the sidebar.
- Click Erase and configure the settings:
- Format: APFS (for modern macOS versions).
- Scheme: GUID Partition Map (default for macOS).
- Confirm the operation.
![fsroot tree is invalid]()
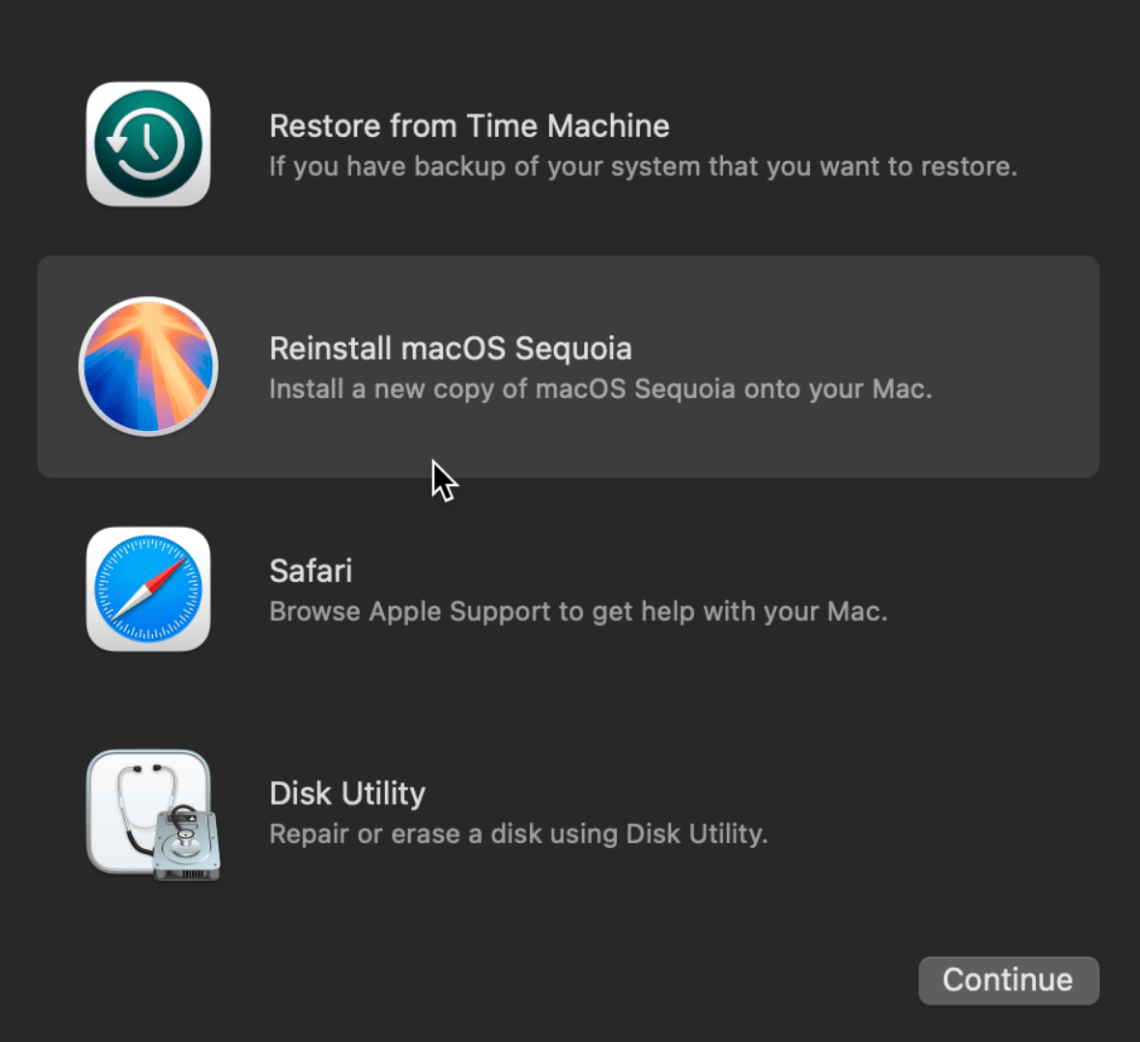
- Reinitialize macOS: If the reformatted disk contains your macOS installation, you'll need to reinstall macOS:
- Boot into Recovery Mode (hold Command + R or Power button (for Apple silicon Mac) during startup).
- Select Reinstall macOS and follow the prompts.
![fsroot tree is invalid]()
- Restore from Backup: After reformatting, use Time Machine or another backup to restore your data.
⚠️ Warning:
Ensure you’ve exhausted all other options before reformatting, as it permanently deletes all data.
5. Restore from a Backup
Restoring your system from a backup ensures that you can recover your system's functionality without extensive manual repairs.
- Access Recovery Mode: Restart your Mac while holding Command + R (for Intel-based Mac) or Power button (for Apple silicon Mac) to enter Recovery Mode.
- Connect Backup Drive: Attach your Time Machine drive or cloud-based backup storage.
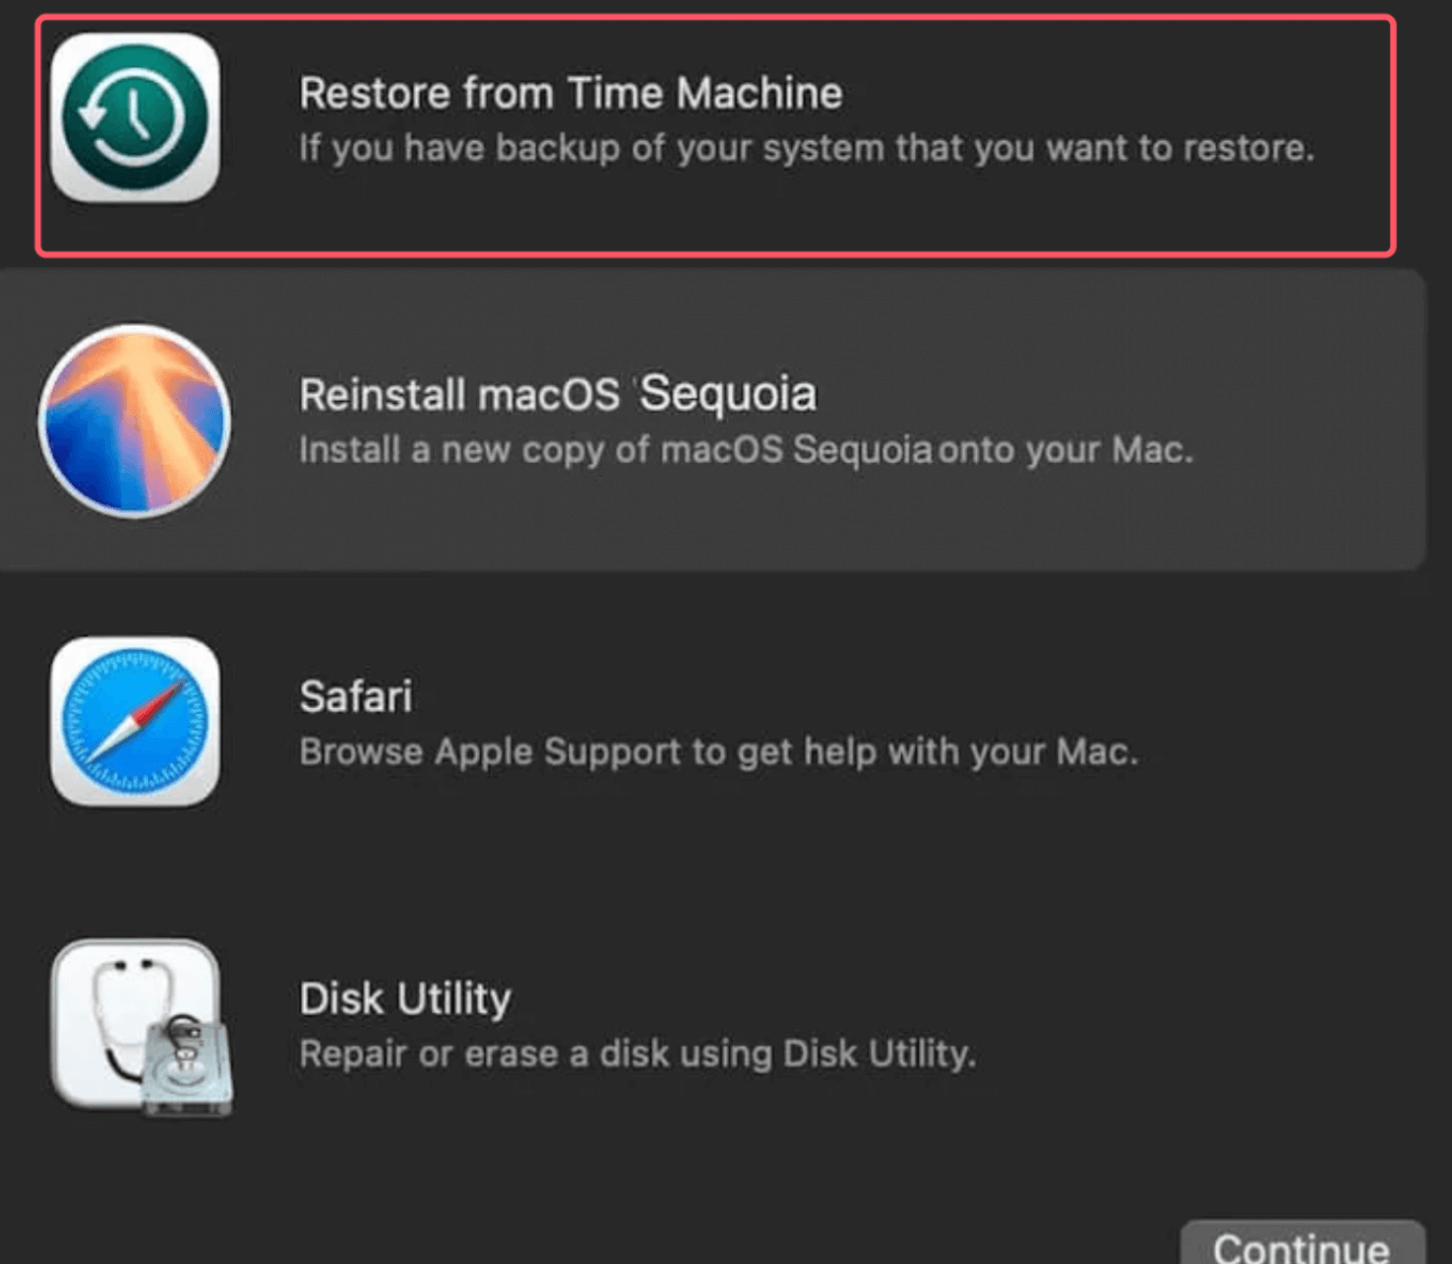
- Restore the System:
- Choose Restore from Time Machine Backup in the macOS Utilities window.
![fsroot tree is invalid]()
- Select the desired backup (preferably the most recent stable state).
- Follow the on-screen instructions to complete the restoration.
- Choose Restore from Time Machine Backup in the macOS Utilities window.
- Verify System Health: After restoring, check the disk's integrity using Disk Utility to ensure no residual errors remain.
Recover lost data from APFS drive on Mac
Data recovery software, such as Donemax Data Recovery for Mac, can help you recover lost data from corrupted or erased APFS drive on Mac.
1. Download and install Donemax Data Recovery for Mac on your Mac, then run it from Launchpad.
2. Open Donemax Data Recovery for Mac, select the APFS drive to start data recovery.

3. Click on Scan button. Donemax Data Recovery for Mac will deeply scan the APFS drive and find all recoverable files including inaccessible files, deleted/lost/erased files and existing files.

4. Once the scan is completed, you can preview all recoverable files. Then select the wanted files, click on Recover button to save them.

Prevent the 'fsroot tree is invalid' Error
Prevention is better than cure, especially with critical system errors. Here are steps to minimize the risk:
1. Regular Backups
Frequent backups ensure your data remains safe even if the filesystem is corrupted. Use Time Machine or cloud-based services like iCloud, Google Drive, or Dropbox.
2. Avoid Sudden Shutdowns
Invest in a UPS (Uninterruptible Power Supply) to protect desktop systems from power outages. For laptops, ensure your battery is charged before performing critical tasks.
3. Update macOS Responsibly
Keep macOS updated to benefit from bug fixes and security patches. However, always check reviews or forums to ensure the update doesn’t introduce new issues.
4. Monitor Disk Health
Use tools like DriveDx or Smart Utility to monitor your SSD or HDD health regularly. Early detection of bad sectors can prevent larger problems.
5. Safe Ejection of Drives
Improperly ejecting external drives can corrupt filesystems. Always use the Eject option before disconnecting drives.
When to Seek Professional Help
1. Persistent Issues
If the error persists despite repairs and reformatting, it may indicate severe physical damage or unrecoverable corruption.
2. Hardware Damage
Physical damage to the drive requires professional data recovery services. Companies like DriveSavers or Ontrack specialize in such scenarios.
3. Apple Support
Contact Apple Support for assistance if the issue arises within warranty coverage or with Apple-branded storage devices.
Conclusion
The 'fsroot tree is invalid' error highlights the importance of a robust file system and careful disk management. While macOS provides tools like Disk Utility and Terminal to diagnose and repair this issue, severe cases may require professional intervention.
Key Takeaways:
- Regular backups are essential to safeguard against data loss.
- Proactive measures like monitoring disk health and safe drive ejection can prevent such errors.
- If repairs fail, reformatting the disk and restoring from a backup is often the best solution.
- Use third-party tool such as Donemax Data Recovery for Mac to help you recover lost data.
By understanding and following these steps, you can effectively address the error and maintain your macOS system's integrity.


Donemax Data Recovery for Mac
Donemax Data Recovery for Mac is one of the best Mac data recovery software. It is easy-to-use and can help in recovering deleted, formatted, inaccessible or lost data from Mac HDD/SSD, external disk, USB drive, SD card, camera or other storage devices.
Related Articles
- Jan 21, 2025SD Card Suddenly Stopped Working? Fix It
- Apr 11, 2025(Solved) Camera Says the SD Card Is Full, But Nothing on It
- Apr 07, 2025[6 Fixes] Fix Hard Drive Partition Shows 0 Bytes Error on Windows 11/10/8/7
- Jul 31, 2023Can't Delete Files on Mac, How to Fix It?
- Oct 12, 2024External Hard Drive Not Appearing In Finder (Mac), Fix It Now
- Jan 21, 2025Fix SD Card Won't Read or Open

Christina
Christina is the senior editor of Donemax software who has worked in the company for 4+ years. She mainly writes the guides and solutions about data erasure, data transferring, data recovery and disk cloning to help users get the most out of their Windows and Mac. She likes to travel, enjoy country music and play games in her spare time.

Gerhard Chou
In order to effectively solve the problems for our customers, every article and troubleshooting solution published on our website has been strictly tested and practiced. Our editors love researching and using computers and testing software, and are willing to help computer users with their problems
Hot Donemax Products

Clone hard drive with advanced clone technology or create bootable clone for Windows/Mac OS.

Completely and easily recover deleted, formatted, hidden or lost files from hard drive and external storage device.

Certified data erasure software - permanently erase data before selling or donating your disk or any digital device.

