Written byChristinaUpdated on Feb 25, 2025
[8 Fixes] Fix Drive Is Not Accessible: Access Is Denied
Approved byGerhard Chou
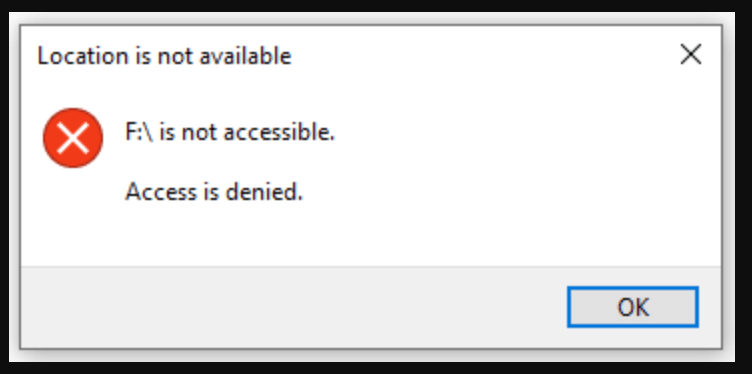
Before we start: When you see the message "Drive is not accessible. Access is denied," it means you can't access to the files stored on the drive. You can use data recovery program - such as Donemax Data Recovery to recover and export all files from the inaccessible drive and save the files to another drive.
PAGE CONTENT:
Encountering the error message "Drive is not accessible. Access is denied" can be both frustrating and concerning, especially when it prevents you from accessing important data. This issue is common among Windows users and can occur with internal drives, external hard drives, USB devices, and even network drives. Understanding the causes and applying the right solutions is key to resolving the problem efficiently.
This article provides a comprehensive guide to troubleshooting and fixing the "Access is denied" error, exploring its causes and offering detailed solutions to restore access to your drives.
About Error "Drive is not accessible. Access is denied"
The error message "Drive is not accessible. Access is denied" is a security measure in Windows to prevent unauthorized access. While this feature is beneficial in certain scenarios, it can also mistakenly block legitimate users from accessing their data. This issue can occur for several reasons, ranging from permission conflicts to file system corruption.
This article will guide you through the various causes of this problem and provide step-by-step solutions to regain access to your drive.
Common Causes of the Access Denied Error
Prior exploring the solutions, it is important to understand the possible reasons behind this error. Here are some of the most common causes:
1. File System Corruption
File system corruption can make the operating system unable to recognize the drive structure. This may occur due to improper shutdowns, power surges, or removing external drives without safely ejecting them.
2. Permission Issues
Drives have specific permissions that dictate who can access their contents. If ownership or user permissions are misconfigured, the system may deny access to the drive.
3. Drive Encryption
Drives encrypted using BitLocker or third-party tools require authentication before access. If the encryption key or password is missing, access will be restricted.
4. Malware or Virus Infection
Some malware programs are designed to block access to drives, encrypt files, or alter permissions. These infections can trigger the "Access is denied" error.
5. Faulty or Missing Drivers
If the drivers associated with the drive are outdated, corrupt, or missing, the system may fail to communicate with the hardware properly, resulting in restricted access.
Recover Lost Data from Inaccessible Drive
Before fixing the Drive is not accessible error, you can use data recovery program - such as Donemax Data Recovery to export and recover all files from the drive to another drive.
Step 1. Click Download button below to download Donemax Data Recovery, then install it on your computer.
Step 2. Open Donemax Data Recovery, then select the drive which can't be accessed to start data recovery.

Step 3. Click on Scan button. Donemax Data Recovery will deeply scan the selected drive and find all recoverable files including existing files, inaccessible files, deleted/formatted/lost files, etc.
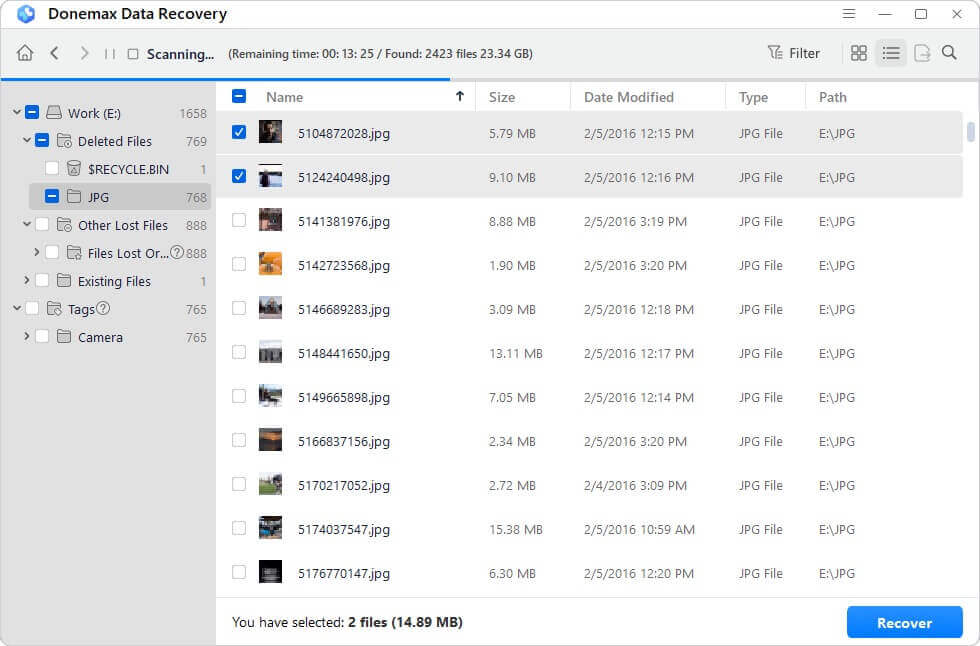
Step 4. After deep scan, Donemax Data Recovery lists all files you can recover. You can preview these files, then select the wanted files, click on Recover button to save them.

8 Solutions to Fix Drive is Not Accessible Issue
Here are several solutions to help you fix the "Drive is not accessible. Access is denied" error. Follow these steps in order of complexity to identify and resolve the issue effectively.
Solution 1. Basic Troubleshooting to Check If the Drive Can Be Accessed
Sometimes, the issue can be resolved with simple troubleshooting steps:
- Reconnect the Drive: Disconnect the drive and reconnect it to your system. Ensure the connection is secure.
- Try a Different Port or Device: If it is an external drive, connect it to another USB port or use a different computer to rule out hardware issues.
- Inspect for Physical Damage: Check the drive and its cables for visible damage that might be affecting functionality.
Solution 2. Verify Drive Ownership and Permissions
One of the most common reasons for the "Access is denied" error is incorrect drive ownership or permission settings. These settings determine who can access, modify, or manage the files and folders on a drive. If ownership changes or user permissions are altered (intentionally or due to system updates or errors), Windows may deny access to the drive. Below is a more detailed guide on how to address this issue effectively.
Step 1: Access Drive Properties
- Press Windows + E to open File Explorer.
- Locate the drive displaying the error. Right-click on the drive and opt Properties from the context menu.
Step 2: Open Advanced Security Settings
- Select the Security tab in the Properties box. This tab displays the permissions assigned to users and groups for the selected drive.
![Open Advanced Security Settings]()
- To open the Advanced Security Settings window, click the Advanced button.
![open the Advanced Security Settings window]()


Step 3: Change Ownership of the Drive
- In the Advanced Security Settings window, look for the Owner field at the top. It will display the current owner of the drive, which may be a system account or an unknown user.
- Click Change next to the Owner field.
- In the Select User or Group dialog box:
- Enter your Windows username or type Administrators if you want all administrator accounts to have ownership.
- Click Check Names to verify the entry. If it's correct, the name will underline.
- Click OK to confirm the change.
Step 4: Apply Ownership to All Subfolders and Files
- After changing ownership, check the box labeled Replace owner on subcontainers and objects.
- Click Apply and OK. This ensures that all files and subfolders within the drive inherit the new ownership settings.
Step 5: Grant Full Control to Your Account
- Return to the Properties window and remain in the Security tab.
- Tap Edit to change the permissions.
![Tap Edit to change the permissions]()
- Select your username from the list of users and groups. If it is not listed, click Add, enter your username, and click OK.
![Select your username from the list of users and groups]()
- Check the box next to Full Control to grant complete access to the drive.
- To save the modifications, click Apply and OK.


Step 6: Test Drive Accessibility
Close all windows and attempt to open the drive in File Explorer. If permissions were the issue, you should now be able to access the drive without encountering the error.
What to Do If Permission Changes Fail
If the above steps don't resolve the issue, try the following:
- Boot into Safe Mode and repeat the process. Safe Mode runs a minimal set of drivers and services, which can prevent permission conflicts.
- Use the built-in Administrator account (if available) to take ownership. This account typically has unrestricted access.
- Consider running a third-party tool, such as TakeOwnershipEx, to simplify the process of taking ownership and managing permissions.
Solution 3. Use Disk Management to Fix Inaccessible Drive
It is a built-in Windows tool that allows you to manage drives and partitions.
- Open Disk Management: Choose Disk Management from the menu by pressing Windows + X.
![Open Disk Management]()
- Check Drive Status: Look for the drive in the list and note its status. If it shows as RAW or unallocated, the file system may be corrupted.
- Assign a Drive Letter: Right-click the drive and choose Change Drive Letter and Paths... if it is letter-free.
![Assign a Drive Letter]()


Assign a new letter and click OK.
Solution 4. Disable or Enable BitLocker
If the drive is encrypted with BitLocker, follow these steps to unlock it:
- Check BitLocker Status: Open Control Panel and go to BitLocker Drive Encryption.
- Unlock the Drive: Enter the BitLocker password or recovery key to unlock the drive.
- Disable BitLocker (Optional): If you no longer wish to use BitLocker, select Turn off BitLocker and follow the prompts.
![Disable or Enable BitLocker]()

Solution 5. Run System Tools
1. Use CHKDSK (Check Disk)
The CHKDSK utility can identify and repair file system errors:
- Press Windows + S, type Command Prompt, and select Run as administrator.
- Type the following command:
chkdsk X: /f /r
![Run System Tools]()
Replace X with the drive letter.
- Press Enter and follow the prompts to scan and fix errors.

2. Run Hardware Troubleshooter
- Open Settings by pressing Windows + I.
- Go to Troubleshoot from Update & Security.
- Select Hardware and Devices and click Run the troubleshooter.
![Run Hardware Troubleshooter]()

Solution 6. Update or Reinstall Drivers
Outdated or corrupt drivers can cause accessibility issues.
- Open Device Manager: Press Windows + X and select Device Manager.
- Locate the Drive: Expand the Disk Drives section and locate the problematic drive.
- Update Drivers: To update drivers, right-click the drive, choose Update driver, then select Search automatically for drivers.
![Update or Reinstall Drivers]()
- Reinstall Drivers: Right-click the drive and choose Uninstall device if updating doesn't work. Windows will automatically restore the drivers if you restart your machine.

Solution 7. Scan for Malware or Viruses
To rule out malware as a cause, perform a thorough scan of your system:
- Use Built-in Antivirus: Open Windows Security and select Virus & threat protection. Click Quick scan or Full scan.
![Scan for Malware or Viruses]()
- Install Third-Party Antivirus: Use a trusted antivirus program to conduct a deep scan of your system and drives.

Solution 8. Format the Drive
If all else fails, formatting the drive might be the only solution. This process will erase all data, so back up your files if possible.
- Open Disk Management: Press Windows + X and select Disk Management.
- Format the Drive: Right-click the drive and select Format.
![Format the Drive]()
Choose a file system (e.g., NTFS or exFAT) and click OK.

How to Avoid "Access is denied" Happening Again?
Taking preventive measures can minimize the likelihood of encountering the "Access is denied" error again.
1. Regularly Back Up Data
Create regular backups of important files to prevent data loss in case of drive issues. Use tools like File History, OneDrive, or external backup drives.
2. Use Reliable Antivirus Software
Keep your system protected by using trusted antivirus software and ensuring it's up to date.
3. Avoid Abrupt Drive Removal
Always safely eject external drives before disconnecting them from your computer to prevent file system corruption.
4. Keep Drivers and OS Updated
To guarantee compatibility and stability, update your device drivers and operating system on a regular basis.
5. Monitor Drive Health
To keep an eye on the condition of your disks and take care of problems early, use programs like CrystalDiskInfo.
Conclusion
The "Drive is not accessible. Access is denied" error can be alarming, but it is usually fixable with the right approach. By understanding the common causes and systematically applying the solutions outlined above, you can regain access to your data and ensure the smooth functioning of your drives.
Taking proactive steps such as regular backups, updating drivers, and monitoring drive health can prevent such issues from occurring in the future. If none of the solutions work, consider seeking professional help to recover your data and resolve the issue.
Stay proactive, stay prepared, and keep your data safe.
Donemax Data Recovery
Donemax Data Recovery is one of the best data recovery software. It is easy-to-use and can help in recovering deleted, formatted, inaccessible or lost data from HDD/SSD, external disk, USB drive, SD card, camera or other storage devices.
Related Articles
- Jan 15, 2025USB Drive Requires to Be Formatted: How to Fix It
- May 10, 2024How to Fix Can't Open A Folder On Mac?
- Dec 26, 2024How to Remove SD Card's Write Protection on Mac? [5 Methods]
- Mar 13, 2024Samsung Portable SSD Not Mounting on Mac, Fix It Now
- Jan 06, 2025How to Quickly Fix RAW External Hard Drive without Losing Data?
- Dec 12, 2024External Hard Drive Not Working on M3-Chip Mac: Fix It Now

Contributing Writer
Christina
Christina is the senior editor of Donemax software who has worked in the company for 4+ years. She mainly writes the guides and solutions about data erasure, data transferring, data recovery and disk cloning to help users get the most out of their Windows and Mac. She likes to travel, enjoy country music and play games in her spare time.

Editor in chief
Gerhard Chou
In order to effectively solve the problems for our customers, every article and troubleshooting solution published on our website has been strictly tested and practiced. Our editors love researching and using computers and testing software, and are willing to help computer users with their problems
Hot Donemax Products
Clone hard drive with advanced clone technology or create bootable clone for Windows/Mac OS.

Completely and easily recover deleted, formatted, hidden or lost files from hard drive and external storage device.
Certified data erasure software - permanently erase data before selling or donating your disk or any digital device.