Tip: If the SD card has been formatted to NTFS file system, your Mac can't write data to it. To solve this issue, you can reformat the SD card to other file system or use a NTFS driver to enable writable for the SD card. Donemax NTFS for Mac is a powerful NTFS driver, it can quickly grant full read-write to the NTFS SD card, try it.
PAGE CONTENT:
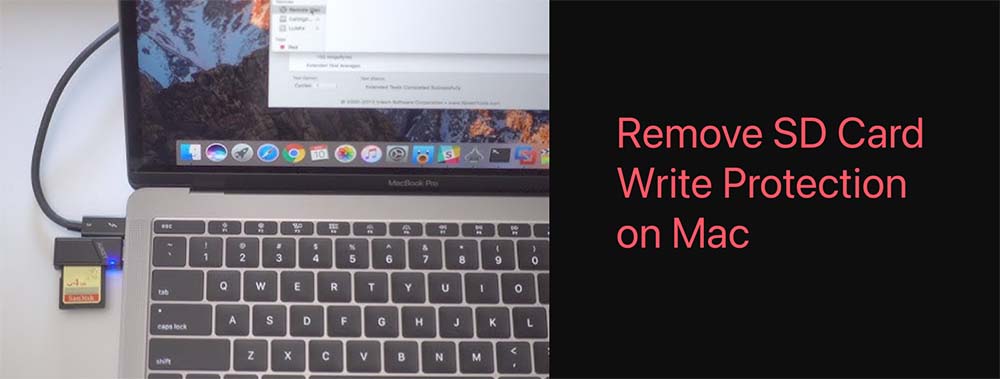
SD cards are widely used for storing data in a variety of devices, such as cameras, smartphones, and computers. However, one of the frustrating issues that users encounter when working with SD cards is write protection. Write protection on an SD card prevents the user from modifying the files on the card, whether it be adding, deleting, or editing them. This can be especially problematic when trying to transfer data, format the card, or use it for important tasks. While there are various causes of write protection, Mac users often face this issue due to a combination of physical switches, software settings, or file system errors.
This article will guide you through the process of removing write protection on an SD card on a Mac, covering everything from the physical aspects of the card to software and system-level fixes. By the end, you'll have a solid understanding of how to deal with this problem and prevent it from happening in the future.
Understand SD Card Write Protection
Physical Write Protection:
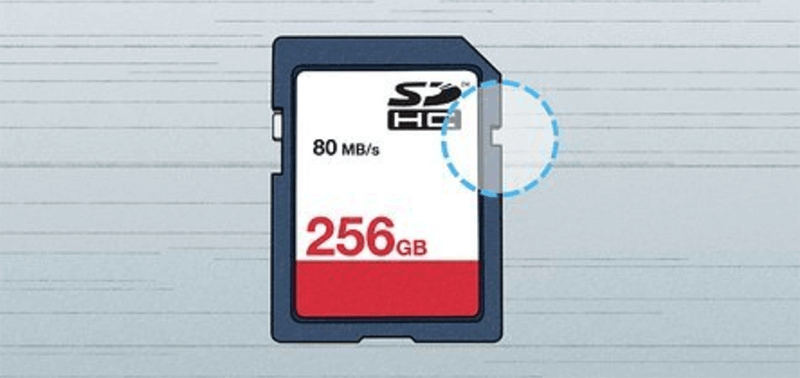
Most SD cards come with a small switch on the side, often referred to as the "write protection switch." This switch is designed to prevent accidental data loss or modification by locking the card in a write-protected mode. The write protection switch essentially prevents the card from being altered, whether through deletion or addition of files.
If your SD card has a physical write protection switch, it’s important to check its position first. Typically, the switch is in the "locked" position by default to protect your data from accidental modification. However, it's easy to forget that this is the case.
To unlock the SD card, simply slide the switch to the opposite side (unlocked position). When the switch is in the unlocked position, the SD card should no longer be write-protected.
Software-Based Write Protection:
In some cases, write protection on an SD card may not be physical. Instead, the issue could stem from software-based settings or file system issues. Mac users may face this problem if the SD card has been corrupted or if certain settings have been applied to restrict modifications.
Common causes of software-based write protection include:
- File system errors: When an SD card has file system corruption or issues, macOS may flag it as read-only to prevent further damage.
- Improper ejection: If an SD card is removed from a Mac without safely ejecting it, it can lead to write protection being enabled to safeguard the data.
- Permissions issues: If the SD card's permissions have been incorrectly set, it could result in write protection being applied.
- System preferences or third-party software: Occasionally, macOS system settings or third-party software could create conditions where the SD card is unintentionally locked.
Check and Disable Write Protection on Mac
#1 Inspect the Physical Write Protection Switch
Before diving into software fixes, it's always a good idea to check the physical write protection switch on your SD card. The switch can often be the simplest and quickest solution. The location of the switch may vary slightly depending on the manufacturer, but it is typically located on the left side of the card.
- Locate the switch: Examine the SD card for a small slider switch.
- Move the switch: Slide it from the locked position (usually labeled "Lock") to the unlocked position (usually labeled "Unlock").
![Inspect the Physical Write Protection Switch]()
- Test the card: Insert the SD card into your Mac and try to modify the files on it. If you can now write to the card, you've resolved the issue.
If the SD card still shows write protection after adjusting the switch, the issue may be related to software settings or system permissions.
#2 Use Disk Utility to Check for Errors
If your SD card doesn't have a physical write protection switch, or adjusting it didn’t resolve the issue, the next step is to use macOS's built-in Disk Utility tool to check the card for file system errors or damage.
- Open Disk Utility: You can do this by searching for "Disk Utility" using Spotlight (press Command + Space and type "Disk Utility").
- Select the SD card: In the left panel of Disk Utility, you will see a list of connected drives. Find your SD card in this list and click on it to highlight it.
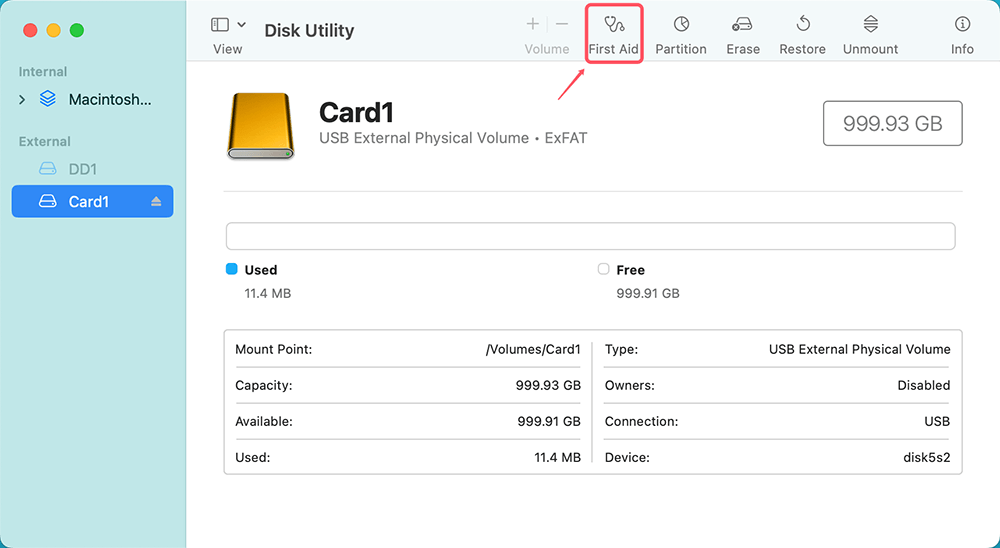
- Run First Aid: Click on the "First Aid" button in the toolbar. Disk Utility will scan the SD card for errors and attempt to repair them.
![Run First Aid]()
- Check for errors: If Disk Utility reports any issues, it will attempt to fix them. After the process is complete, try to access the SD card again to see if the write protection issue has been resolved.
In some cases, the SD card may still show as write-protected after running First Aid. If this happens, you may need to reformat the card, but be aware that this will erase all the data on it.
#3 Reformat the SD Card
If all else fails, you can reformat the SD card to remove write protection. Reformatting the card will erase all the data stored on it, so be sure to back up your files before proceeding.
- Open Disk Utility: As before, open Disk Utility from Spotlight.
- Select the SD card: In the left panel, choose the SD card you want to reformat.
- Click on "Erase": At the top of the Disk Utility window, click on the "Erase" button.
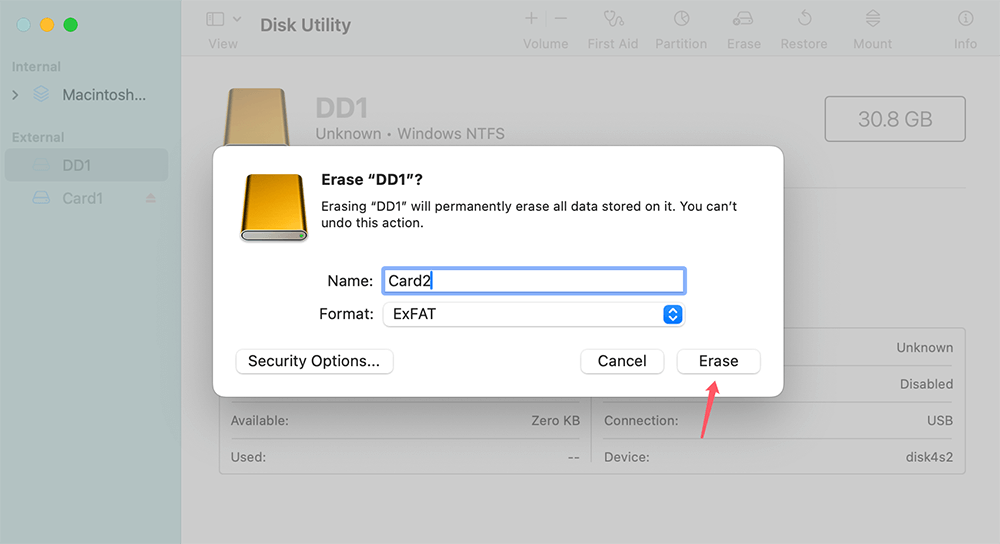
- Choose a file system: In the dialog box that appears, choose the file system you want to use. For most SD cards, the default "ExFAT" format works well.
![Choose a file system]()
- Erase the card: Click "Erase" to begin the formatting process.
Once the formatting is complete, your SD card will be free of write protection and ready for use. You can now add, remove, or modify files on it.
#4 Use Terminal to Remove Write Protection
For advanced users, macOS's Terminal application can be used to address write protection on SD cards. Terminal allows you to issue commands that can change the system settings, which can help fix issues that may not be resolved through other methods.
Step 1. Open Terminal
To begin, you'll need to open Terminal. You can do this by searching for "Terminal" in Spotlight (Command + Space and type "Terminal").
Step 2. Checking SD Card Permissions
First, you need to check the permissions of the SD card to see if write protection is active. Run the following command:
ls -l /Volumes/

This will display the list of volumes connected to your Mac, including your SD card. Look for the SD card and check if there are any permissions preventing you from writing to it.
Step 3. Removing Write Protection via Terminal
If the SD card is showing as write-protected, you can try using the following command to remove the protection:
sudo diskutil disableJournal /dev/diskX
Replace /dev/diskX with the actual disk identifier for your SD card (you can find this by running diskutil list in Terminal). The "disableJournal" command can sometimes resolve write protection issues caused by journaling on the disk.
If this doesn't work, you can also try reformatting the card via Terminal using the following command:
sudo diskutil eraseDisk FAT32 SD_CARD /dev/diskX
Again, replace /dev/diskX with the actual disk identifier for your SD card. This will reformat the card to FAT32, removing write protection and restoring the card's full functionality.
#5 Use NTFS for Mac Tool
NTFS is a file system which is not supported by macOS. If the SD card is formatted with NTFS file system, it will become read-only on Mac. To solve this issue, you can try third-party NTFS for Mac tool which grants full read-write to NTFS drives on Mac.
Step 1. Download and install the best NTFS for Mac tool - Donemax NTFS for Mac. Insert the SD card into the card reader or the Mac's slot (if available).
Step 2. Open Donemax NTFS for Mac, select the NTFS SD card, click on Enable Writable button.

Alternative Solutions if Write Protection Persists
If write protection continues to be an issue despite using the above methods, there are a few additional solutions to consider.
Reformatting the SD Card
As mentioned earlier, reformatting the SD card is a surefire way to remove write protection. However, this will erase all data on the card, so make sure to back up any important files before proceeding.
You can reformat the SD card either through macOS's Disk Utility or using a third-party SD card formatting tool, such as SD Card Formatter (available for download on the official SD Association website). These tools are specifically designed to handle SD cards and can often resolve issues that Disk Utility cannot.
Third-Party Tools
If Disk Utility and Terminal are unable to fix the write protection, third-party utilities can offer more advanced tools to address the problem. One popular option is Donemax NTFS for Mac, a disk management tool that provides features for repairing SD card write protection and reformatting drives.
Before using third-party software, make sure to back up all your data to avoid any potential loss.
Prevent Future SD Card Write Protection Issues
To avoid encountering write protection issues in the future, here are a few preventative measures you can take:
1. Safely eject your SD card: Always eject your SD card safely from your Mac before removing it to avoid file system corruption.
2. Use antivirus software: Viruses and malware can sometimes cause write protection. Using reliable antivirus software can help protect your SD card and other devices from threats.
3. Avoid physical damage: Take care not to damage the SD card physically, as this can cause write protection issues or make the card unusable.
Additionally, regularly backing up your data will ensure that you don't lose important files in the event that write protection or another issue arises.
Conclusion
Write protection on an SD card can be a frustrating issue, but it's usually easy to resolve with a bit of troubleshooting. By inspecting the physical switch, using macOS tools like Disk Utility and Terminal, and taking steps to prevent future issues, you can keep your SD card in working order and avoid disruptions to your workflow. Whether it's a simple toggle of the switch or a more in-depth system check, the solutions provided in this article should help you remove write protection from your SD card on a Mac.

Donemax NTFS for Mac
An easy-to-use NTFS for Mac tool to help you enable writable for NTFS drives on Mac so that you can read-write NTFS drives on Mac without any limitation. It also can help you mount, format, repair, rename, open drive on your Mac.
Related Articles
- Jan 15, 2025Mac Won't Boot After Restoring from Time Machine Backup: Troubleshooting Guide
- Nov 27, 2024How to Fix RAW External Hard Drive, USB Drive, SD Card on Mac?
- Mar 17, 2025[8 Solutions] Fix Unreadable Seagate External Hard Drive on Mac Without Losing Data
- Dec 23, 20247 Solutions to Fix 'Cannot Reinstall macOS' – Troubleshooting and Solutions
- Jul 05, 2024Samsung Portable SSD T9 Is Not Mounting on Mac, Fix It Now
- Nov 25, 2024Dock Disappeared on Mac: Fix It Now

Lucien
Lucien is a writer and a chief programmer of Donemax software who has worked in the company for 5+ years. He has written much of the content on the site and devotes to providing troubleshooting and solution for Windows and Mac users including disk cloning, data recovery, migration, eraser, error fixes.

Gerhard Chou
In order to effectively solve the problems for our customers, every article and troubleshooting solution published on our website has been strictly tested and practiced. Our editors love researching and using computers and testing software, and are willing to help computer users with their problems
Hot Donemax Products

Clone hard drive with advanced clone technology or create bootable clone for Windows/Mac OS.

Completely and easily recover deleted, formatted, hidden or lost files from hard drive and external storage device.

Certified data erasure software - permanently erase data before selling or donating your disk or any digital device.

