Written byCharlesUpdated on Mar 17, 2025
[7 Fixes] Fix Couldn't Unmount Disk 69888 Error on Mac
Approved byGerhard Chou
PAGE CONTENT:
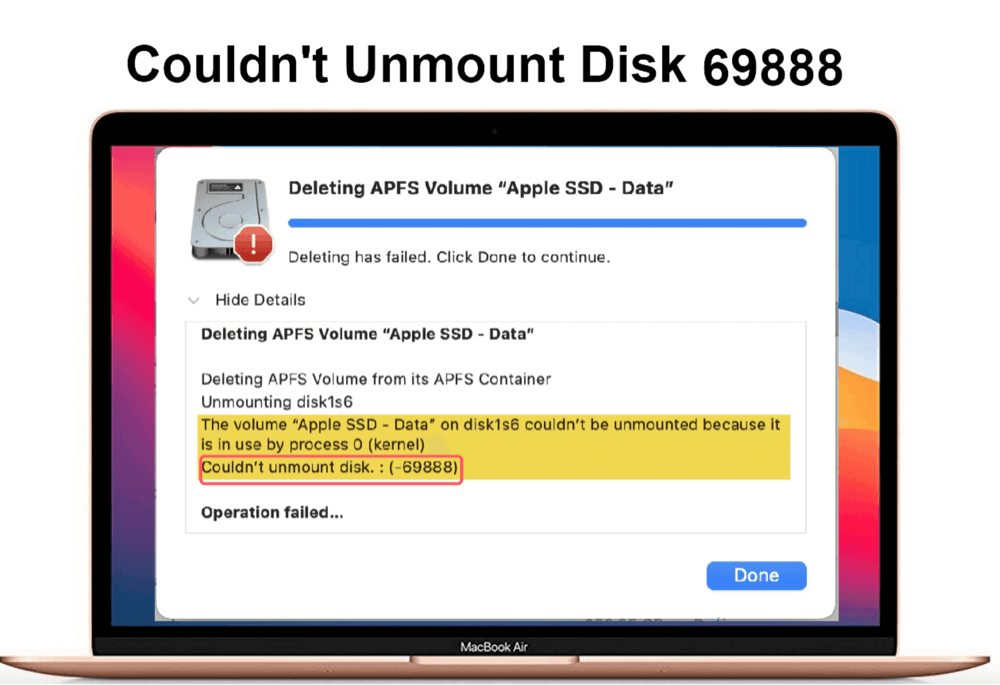
Encountering the "Couldn't unmount disk (Error 69888)" message on your Mac can be awful, especially when you are trying to format, partition, or erase a disk in Disk Utility. This error occurs when macOS cannot unmount the drive because it's in use, corrupted, or restricted by system processes.
Whether the issue affects an internal drive (like the startup disk) or an external disk (USB, SSD, or HDD), several solutions can help resolve it. This guide covers the causes, step-by-step fixes, and preventive measures to avoid facing this issue in the future.
Causes of "Couldn't Unmount Disk 69888" Error on Mac
Understanding why this error occurs can help in choosing the best solution. Here are some common causes:
1. Active Processes Using the Disk
- If macOS or an application is actively using the disk, Disk Utility may fail to unmount it.
- The system may be reading/writing data in the background, preventing unmounting.
2. Corrupted File System
- A damaged or corrupt file system structure can lead to unmounting failures.
- This can happen due to improper ejection of external drives or sudden system crashes.
3. Disk Utility Limitations
- Sometimes, Disk Utility struggles to force-unmount drives, requiring alternative methods like Terminal commands or Recovery Mode.
4. Hardware or Connection Issues
- For external drives, faulty cables, ports, or even the drive itself can cause unmounting errors.
- Internal drive issues may indicate hardware failure or disk corruption.
5. System Integrity Protection (SIP) Restrictions
- macOS has a security feature called System Integrity Protection (SIP) that restricts certain disk modifications.
- If SIP is enabled, unmounting the startup disk may fail unless done from Recovery Mode.
Solutions to Fix "Couldn't Unmount Disk 69888" Error on Mac
Here are the best solutions to fix this issue:
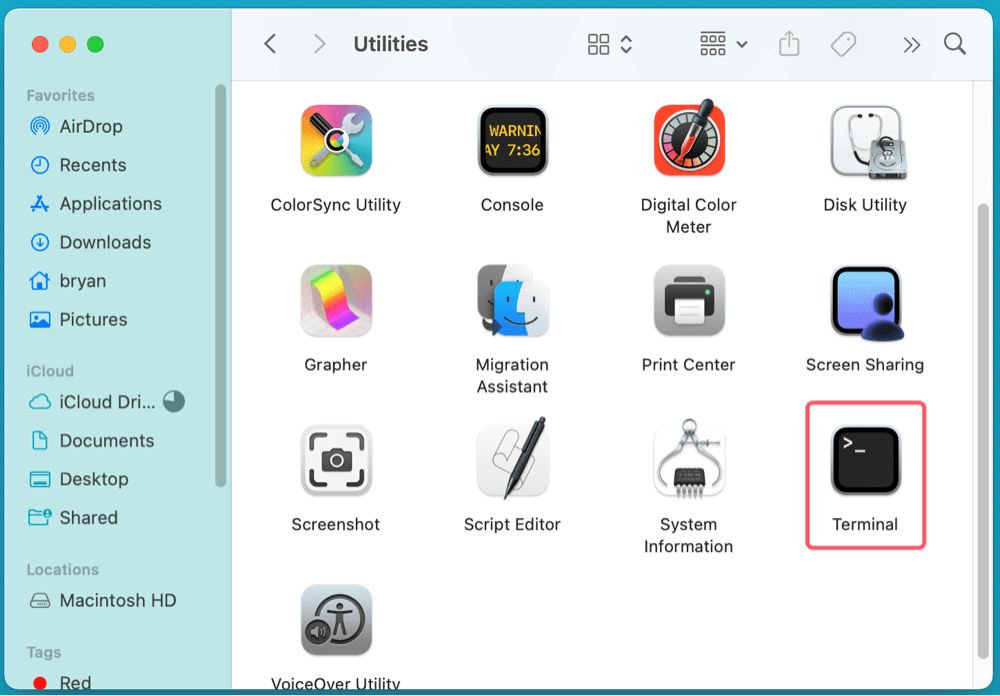
Fix 1. Use Terminal to Force Unmount the Disk on Mac
If Disk Utility fails, try unmounting the disk manually using Terminal:
Steps:
- Open Terminal from Utilities via Applications.
![Fix Couldn't Unmount Disk 69888 Error on Mac and Mount Internal/External Disk]()
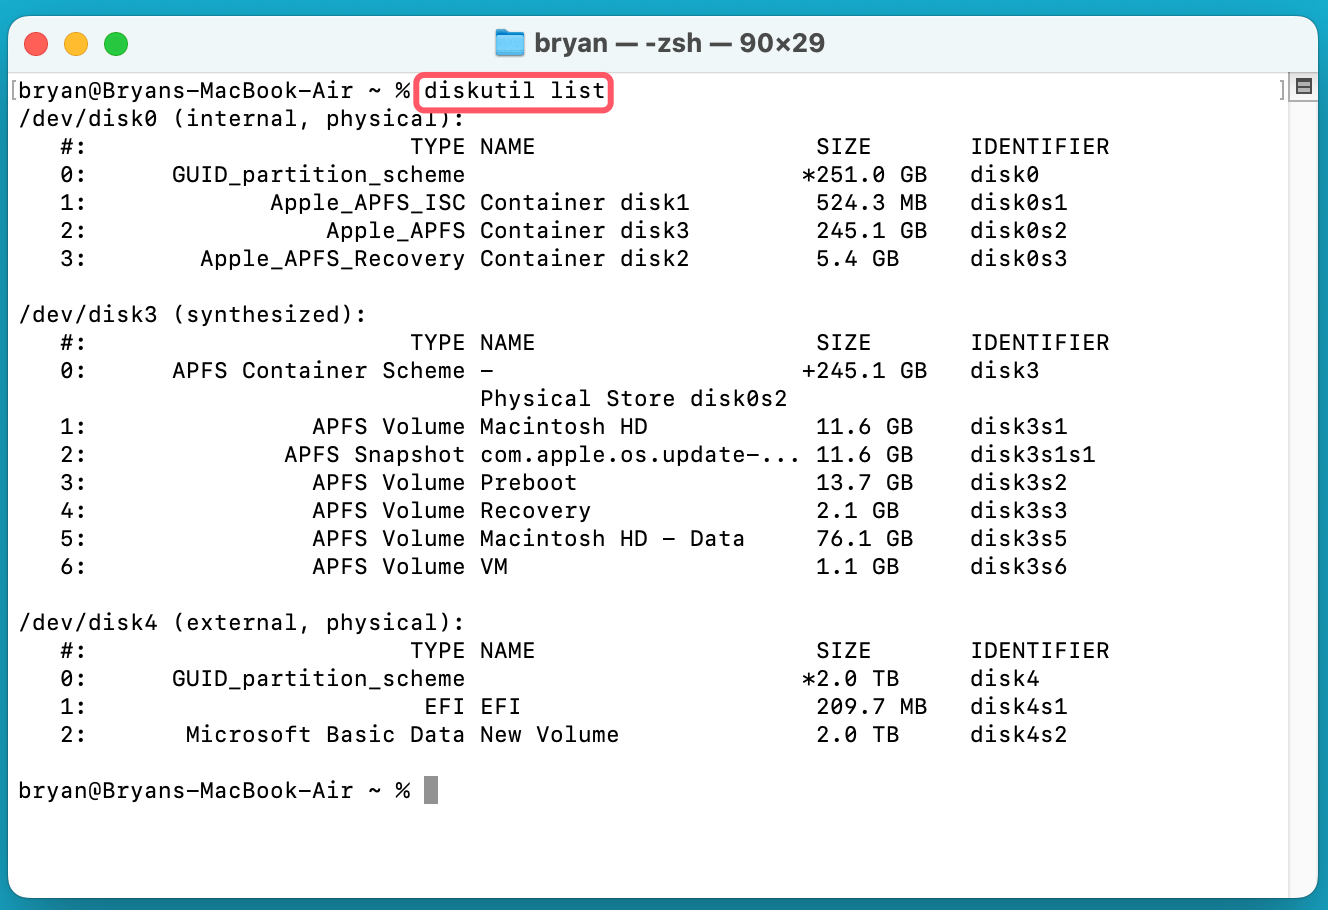
- Type the following command to list available disks:
diskutil list
![Fix Couldn't Unmount Disk 69888 Error on Mac and Mount Internal/External Disk]()
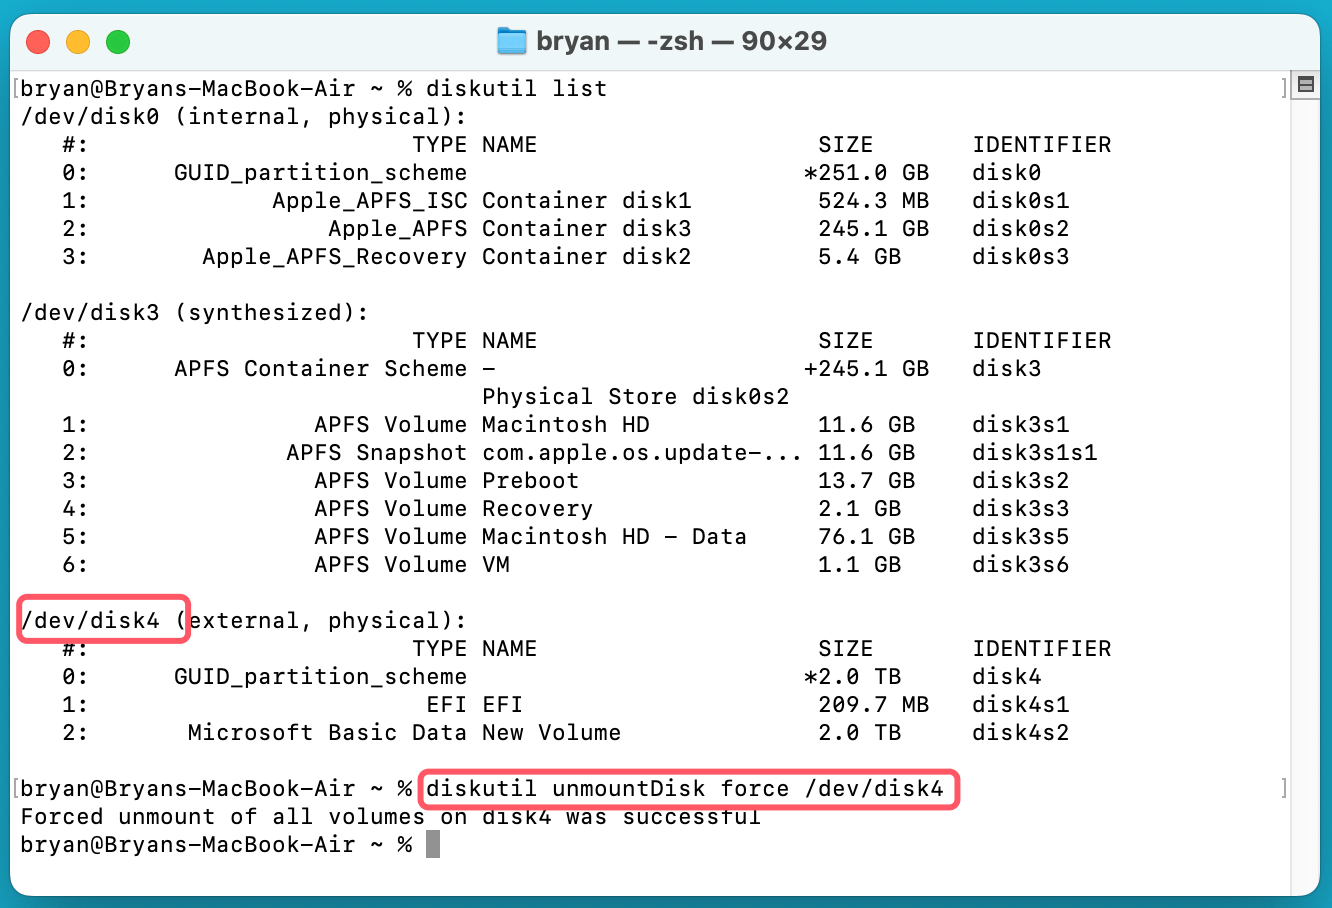
- Identify the affected disk (e.g., /dev/disk4).
- Run the following command to force unmount it:
diskutil unmountDisk force /dev/diskX
![Fix Couldn't Unmount Disk 69888 Error on Mac and Mount Internal/External Disk]()
(Replace diskX with your actual disk number.)
- If successful, proceed with formatting or repairing the disk.
Fix 2. Use macOS Recovery Mode to Repair or Erase the Disk
If the drive is in use, booting into macOS Recovery Mode can help unmount it.
Steps to Use Recovery Mode:
- Start the Mac into macOS Recovery mode:
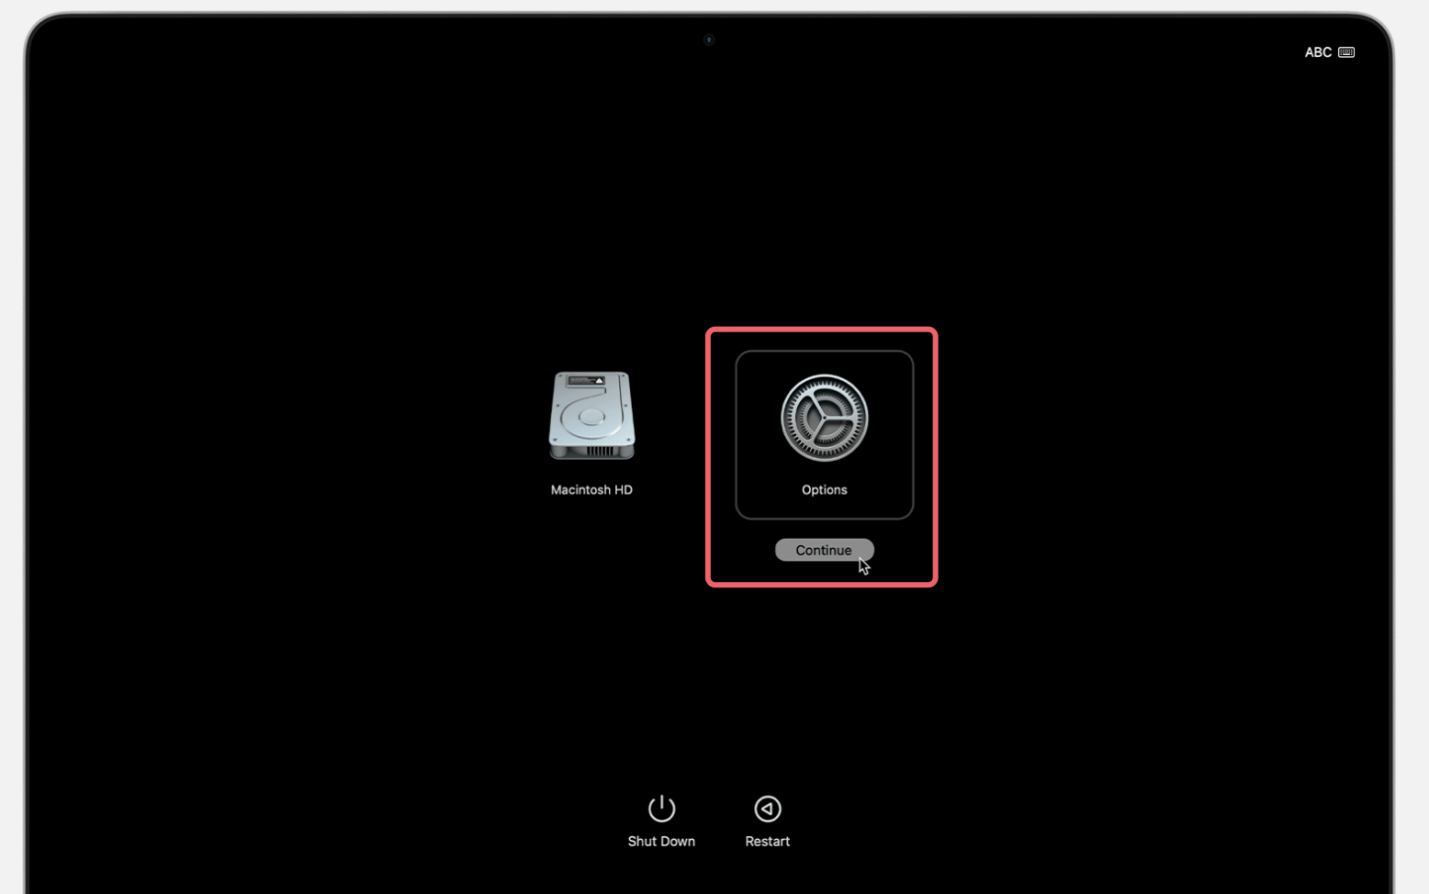
- For Intel-based Mac: Hold down Command (⌘) + R after restarting your Mac until the Apple logo appears.
- For Apple silicon Mac: Press and hold Power button until you see Loading Startup Options. Choose Options, click on Continue button.
![Fix Couldn't Unmount Disk 69888 Error on Mac and Mount Internal/External Disk]()
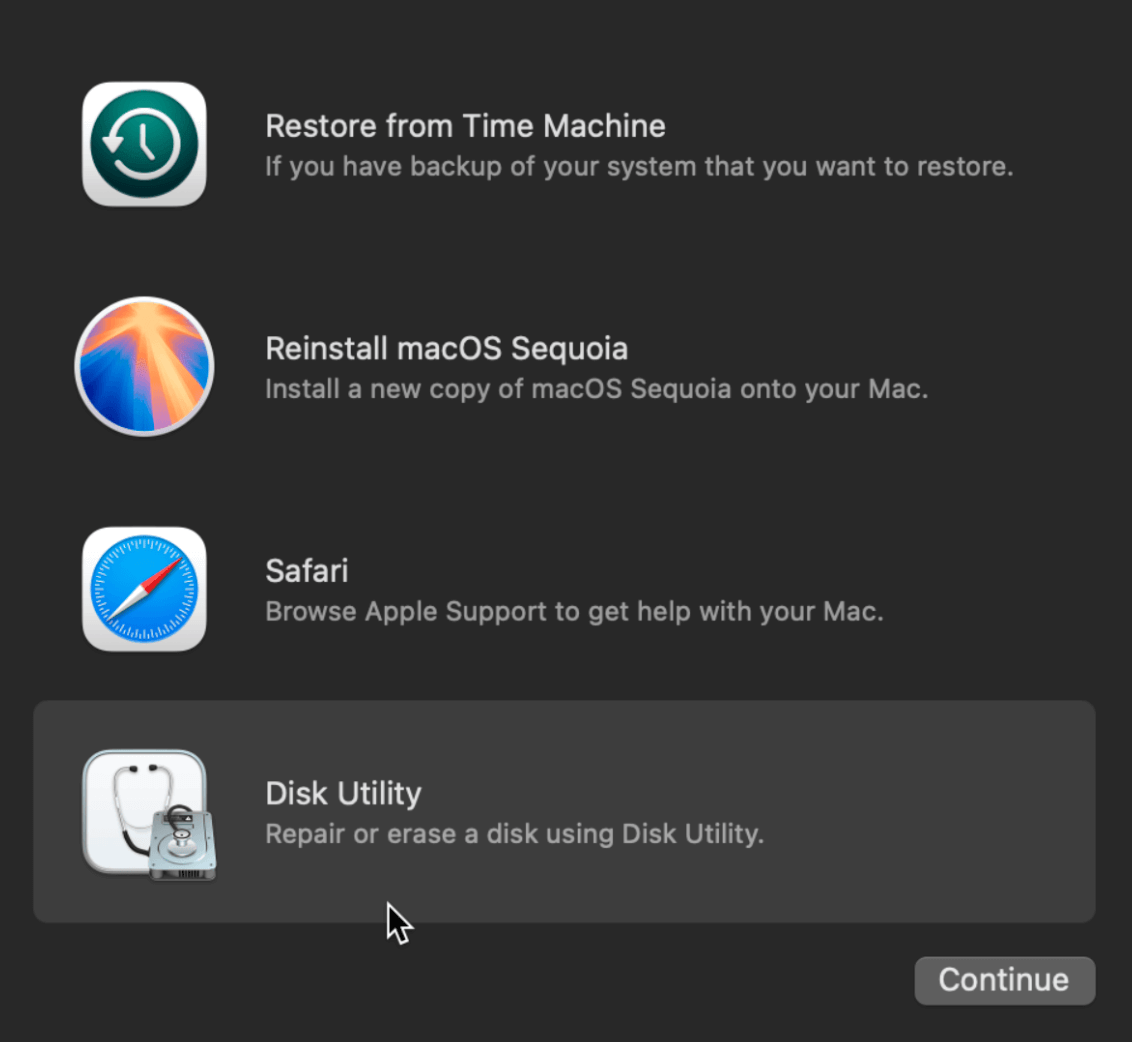
- Select Disk Utility from the macOS Utilities menu.
![Fix Couldn't Unmount Disk 69888 Error on Mac and Mount Internal/External Disk]()
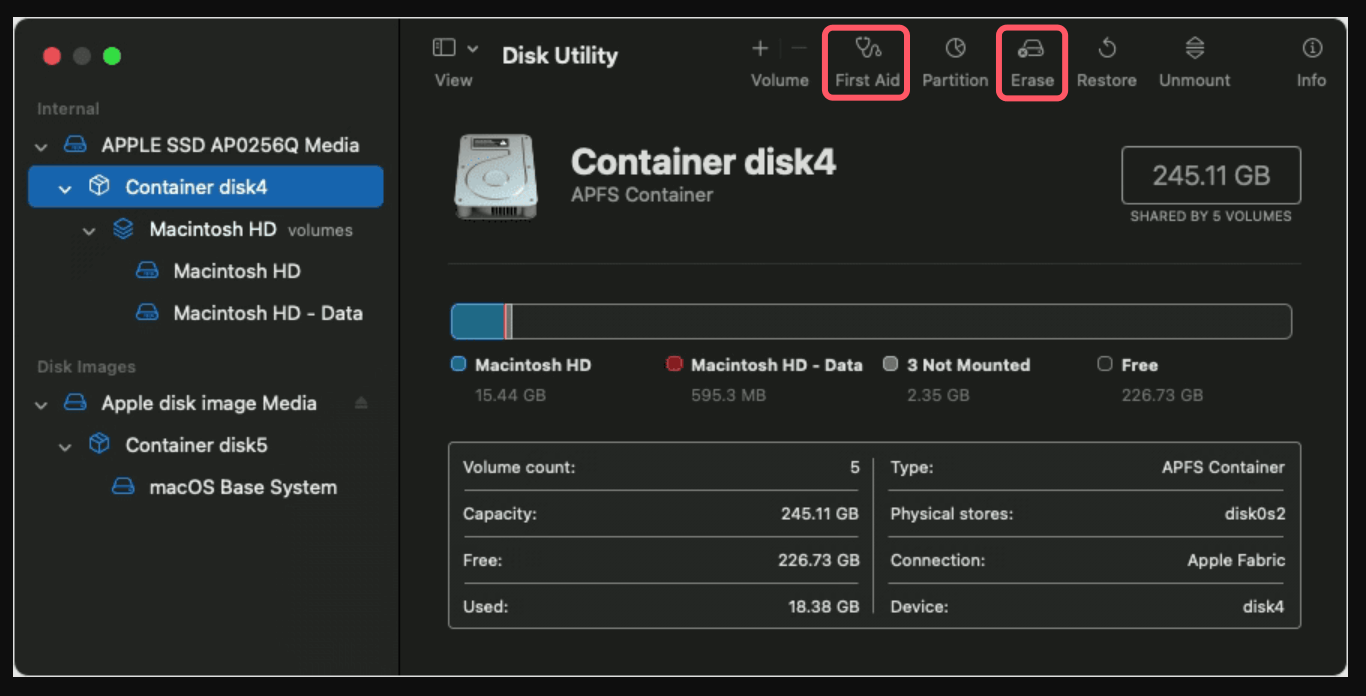
- Select the problematic disk and click Erase or First Aid to repair it.
![Fix Couldn't Unmount Disk 69888 Error on Mac and Mount Internal/External Disk]()
- If erasing fails, close Disk Utility and open Terminal from the Utilities menu.
![Fix Couldn't Unmount Disk 69888 Error on Mac and Mount Internal/External Disk]()
- Run this command:
diskutil eraseDisk APFS "NewDiskName" /dev/diskX

Try restarting your Mac to see whether the problem has been fixed.
Fix 3. Use Safe Mode to Unmount the Disk
Safe Mode disables non-essential processes, making it easier to unmount disks.
Steps to Boot into Safe Mode:
- For Intel Macs:
- Shut down your Mac, then turn it on while holding the Shift key.
- Release the key when the login screen appears.
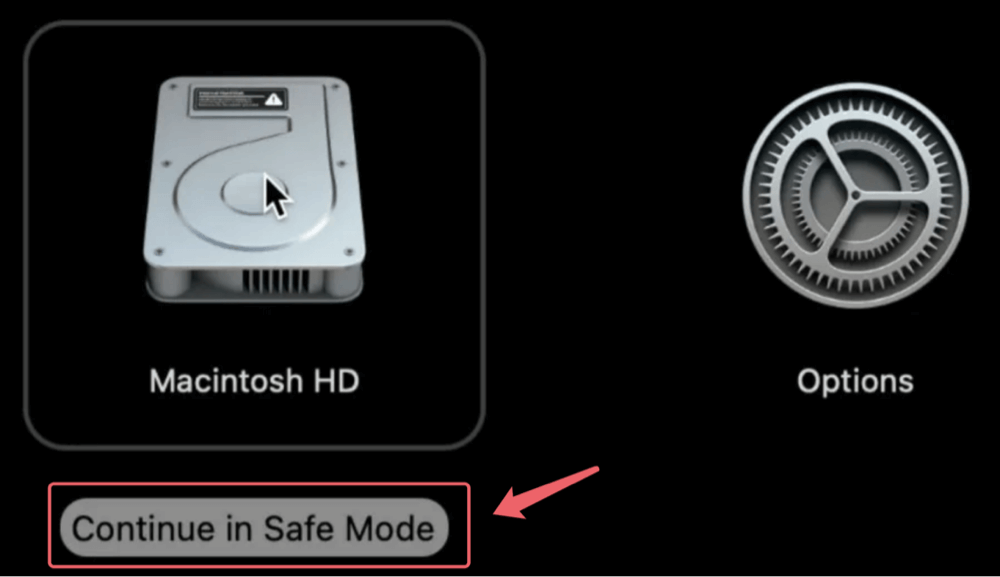
- For Apple Silicon (M-chip) Macs:
- Turn Off your Mac.
- Holding down the Power button will bring up the startup options.
- Click Continue in Safe Mode after selecting your startup disk and holding Shift.
![Fix Couldn't Unmount Disk 69888 Error on Mac and Mount Internal/External Disk]()
- Open Disk Utility and try unmounting the disk.
Fix 4. Unmount Using Third-Party Disk Management Tools
If built-in macOS tools fail, third-party software can help. Some popular options include:
- Donemax NTFS for Mac – Allows force unmounting and repairing disks.
- Paragon Hard Disk Manager – Useful for advanced disk management.
- Stellar Partition Manager – Helps with disk formatting and partitioning.
Download and install one of these tools to attempt unmounting the disk. For example:
1. Download and install Donemax NTFS for Mac, and open it from Launchpad.
2. Open Donemax NTFS for Mac, select the disk you want to unmount, then click on Unmount button.

Fix 5. Disable System Integrity Protection (SIP) and Unmount the Disk (for Intel-based Mac)
If SIP is preventing unmounting, you can temporarily disable it.
Steps to Disable SIP:
- Boot into macOS Recovery Mode (Command + R or Power button).
- Open Terminal and type:
csrutil disable
Reboot![Fix Couldn't Unmount Disk 69888 Error on Mac and Mount Internal/External Disk]()
- Try unmounting the disk using Disk Utility or Terminal.
- Once done, re-enable SIP by running:
csrutil enable
reboot

⚠️ Warning: Disabling SIP reduces system security, so re-enable it after fixing the issue.
Fix 6. Check and Fix Hardware or Connection Issues
Sometimes, the "Couldn't Unmount Disk (Error 69888)" isn't due to software issues but rather a faulty connection, failing hardware, or disk damage. Before attempting software-based solutions, it's essential to rule out hardware-related causes.
▪️ Troubleshooting External Drives
If you're experiencing this error on an external hard drive, SSD, or USB flash drive, the problem might be related to cables, ports, or drive damage. Follow these steps to diagnose and fix external drive issues:
1. Reconnect the Drive Properly
- Unplug and Reinsert the Drive – Sometimes, simply unplugging the drive and reconnecting it can resolve temporary unmounting issues.
- Try a Different USB Port – If you're using a USB-A, USB-C, or Thunderbolt port, switch to another port.
- Use Another Cable – If the drive connects via a USB-C or Micro-USB cable, swap it out with a different cable to check for faults.
2. Test the Drive on Another Mac or PC
- If possible, plug the external drive into another Mac or a Windows PC to see if it works.
- If the drive is accessible on another device, the issue is likely software-related on your Mac.
- If the drive doesn't mount anywhere, it might be physically damaged.
3. Try a Different External Enclosure or Dock
- If you're using an external SSD or HDD in a third-party enclosure, the issue might be with the enclosure itself rather than the disk.
- Try connecting the drive using another enclosure, dock, or directly via SATA/USB adapters (if applicable).
4. Check for Drive Activity and Power Issues
- Listen for clicking, beeping, or strange noises - these may indicate physical drive failure.
- If using an external HDD, make sure it's getting enough power. Some drives need a powered USB hub.
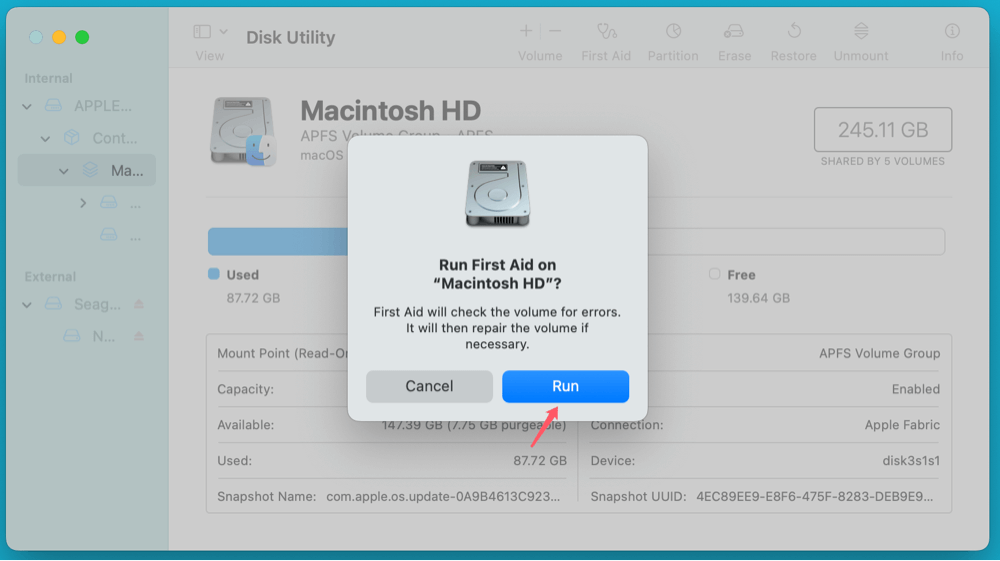
5. Run First Aid in Disk Utility
If the drive is detected but won't unmount, run First Aid:
- Open Disk Utility.
- Select the external drive from the sidebar.
- Click First Aid and select Run.
![Fix Couldn't Unmount Disk 69888 Error on Mac and Mount Internal/External Disk]()
- If First Aid reports errors, try repairing them and check if the issue is resolved.
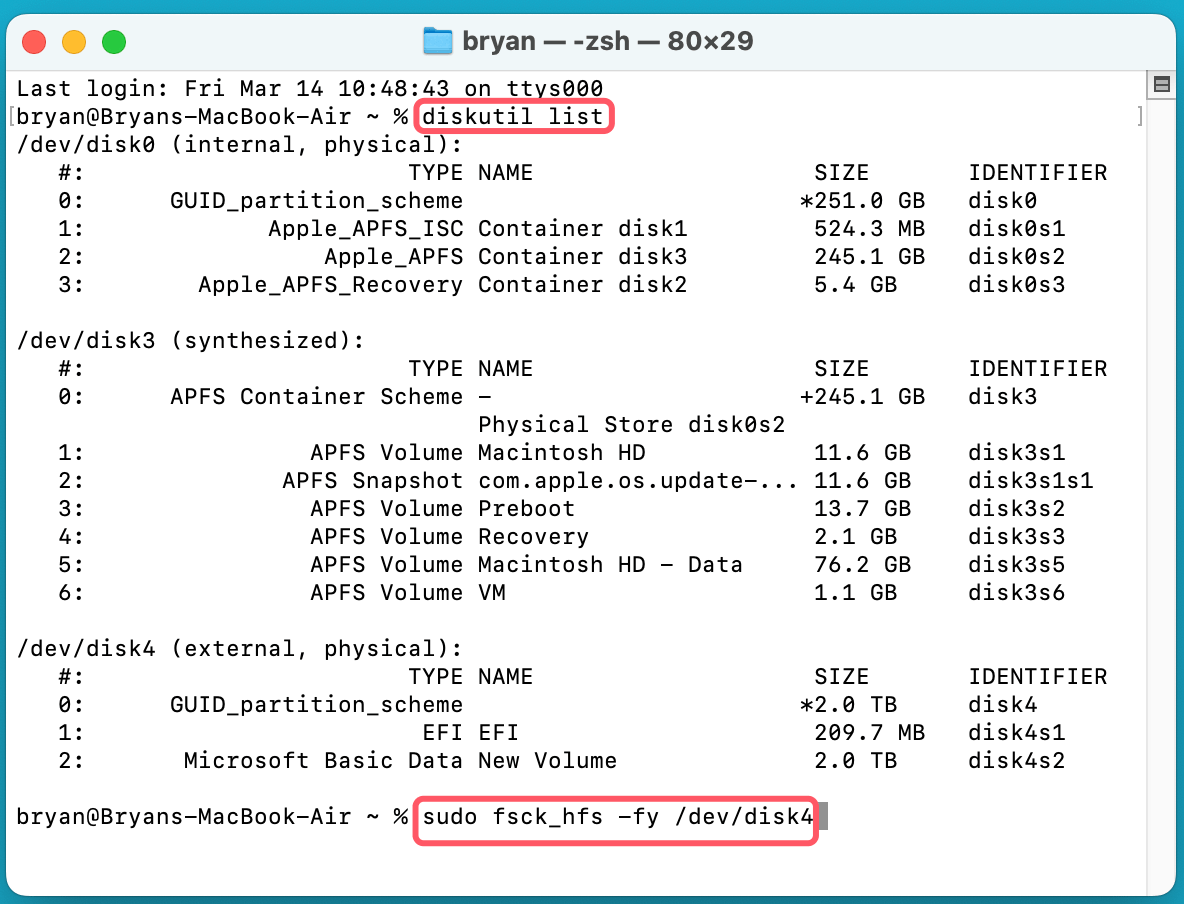
6. Check for Drive Errors Using Terminal
If Disk Utility fails, run fsck (File System Consistency Check) via Terminal:
- Open Terminal.
- Identify the disk with:
diskutil list
- Run the fsck command on the unmounted disk:
sudo fsck_hfs -fy /dev/diskX
![Fix Couldn't Unmount Disk 69888 Error on Mac and Mount Internal/External Disk]()
(Replace diskX with the correct disk identifier.)
- If the process finds and repairs errors, try unmounting the disk again.
▪️ Troubleshooting Internal Disks (Startup Disk Issues)
If you see the "Couldn't Unmount Disk" error on your Mac's internal drive, it usually means that the disk is corrupted, failing, or in use by the system. Since it's the startup disk, macOS won't let you unmount it while the system is running.
1. Boot into macOS Recovery Mode
Since macOS is actively using the internal drive, booting into Recovery Mode allows you to unmount and repair it without interference.
Steps to Access Recovery Mode:
- Restart your Mac and hold Command (⌘) + R or Power button to boot into macOS Recovery mode.
- Select Disk Utility from the macOS Utilities window.
- Choose your internal drive from the list and attempt to unmount, erase, or repair it.
2. Run Apple Diagnostics to Check for Hardware Issues
If your internal drive is failing, Apple Diagnostics can help detect issues.
Steps to Run Apple Diagnostics:
- Restart your Mac.
- Hold down D immediately after pressing the power button.
- Follow the on-screen instructions to run hardware tests.
- If an error code appears, visit Apple's support page for more details.
3. Use Terminal in Recovery Mode
If Disk Utility fails to unmount the disk, try Terminal:
- In macOS Recovery Mode, go to Utilities > Terminal.
- Type:
diskutil list
(Find the identifier of your internal drive, usually /dev/disk1.)
- Force unmount the disk:
diskutil unmountDisk force /dev/diskX
(Replace diskX with the correct disk identifier.)
▪️ When to Consider Professional Data Recovery
If your drive is physically damaged or none of the above steps work, you may need data recovery services:
For External Drives:
- If the drive makes clicking or beeping noises, it's likely suffering from mechanical failure.
- Avoid running software-based recovery attempts, as they could worsen the issue.
- Contact professional data recovery services like DriveSavers, Ontrack, or Stellar Data Recovery.
For Internal Drives:
- If macOS won't boot, you may need a new SSD or HDD replacement.
- If you need to recover important files before replacing the drive, use Target Disk Mode:
- Connect your Mac to another Mac using a Thunderbolt or USB-C cable.
- Boot the affected Mac into Target Disk Mode (hold T while starting up).
- Access the drive from the second Mac and copy your important files.
Fix 7. Format the Drive via Terminal (If Necessary)
If all else fails, formatting the disk may be necessary.
Steps to Format via Terminal:
- Open Terminal and list all disks:
diskutil list
- Identify the disk you want to format (e.g., /dev/disk2).
- Run this command to format it to APFS:
diskutil eraseDisk APFS "NewDiskName" /dev/diskX
- Replace "NewDiskName" with a name of your choice.
![Fix Couldn't Unmount Disk 69888 Error on Mac and Mount Internal/External Disk]()
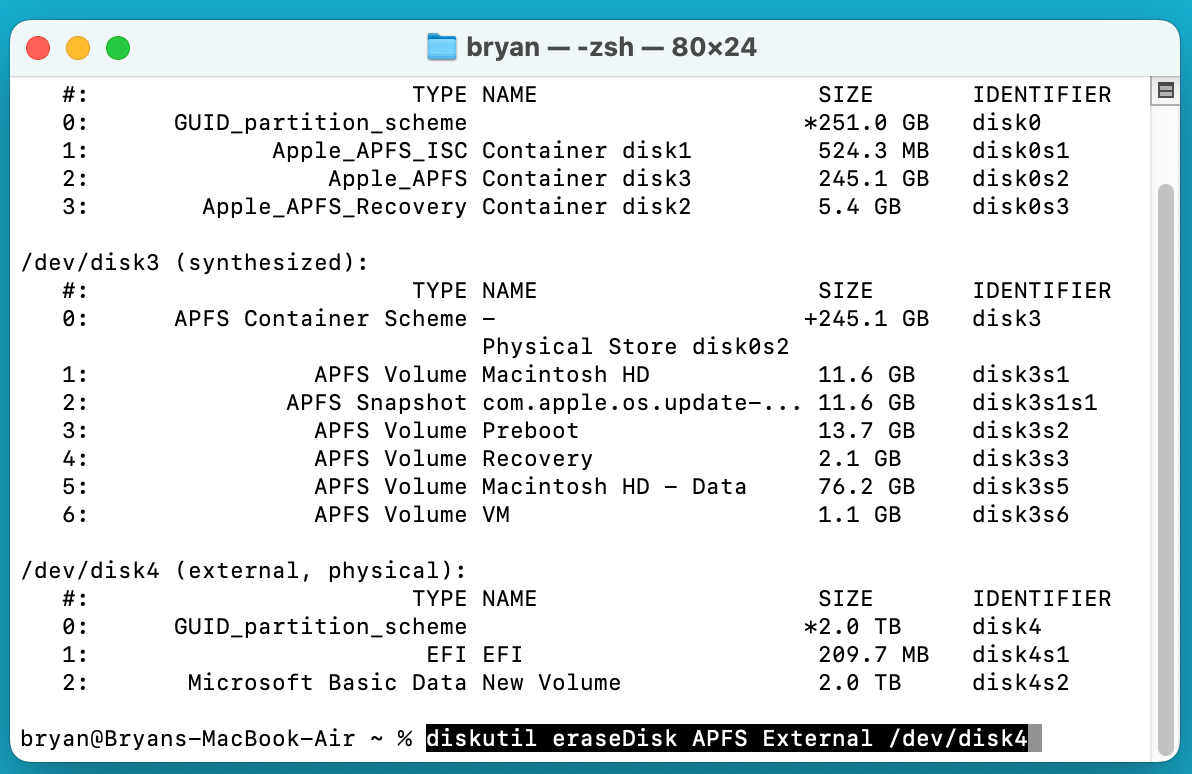
⚠️ Warning: This will erase all data, so back up important files first.
Preventive Measures to Avoid This Error in the Future
To minimize the chances of encountering this error again:
- Properly Eject External Drives – Always eject using Finder before unplugging.
- Regular Backups – Use Time Machine or cloud backups to prevent data loss.
- Check Disk Health Periodically – Run Disk Utility First Aid monthly.
- Keep macOS Updated – Software updates often fix disk-related issues.
- Avoid Abrupt Shutdowns – Force shutdowns can lead to file system corruption.
Recover Lost Data from Unmounted or Erased Disk on Mac
Before or after fixing "Couldn't Unmount Disk (Error 69888)" error on Mac, you can use data recovery software - such as Donemax Data Recovery for Mac to recover inaccessible/lost data from the disk.
Step 1. Download and install Donemax Data Recovery for Mac on your Mac, run it from Launchpad.
Step 2. Open Donemax Data Recovery for Mac, the select the unmounted disk or erased disk to start data recovery.

Step 3. Click on Scan button to deeply scan the selected disk and find all recoverable files.

Step 4. Once the scan is completed, you can preview all recoverable files. Then select the wanted files, click on Recover button to save them.

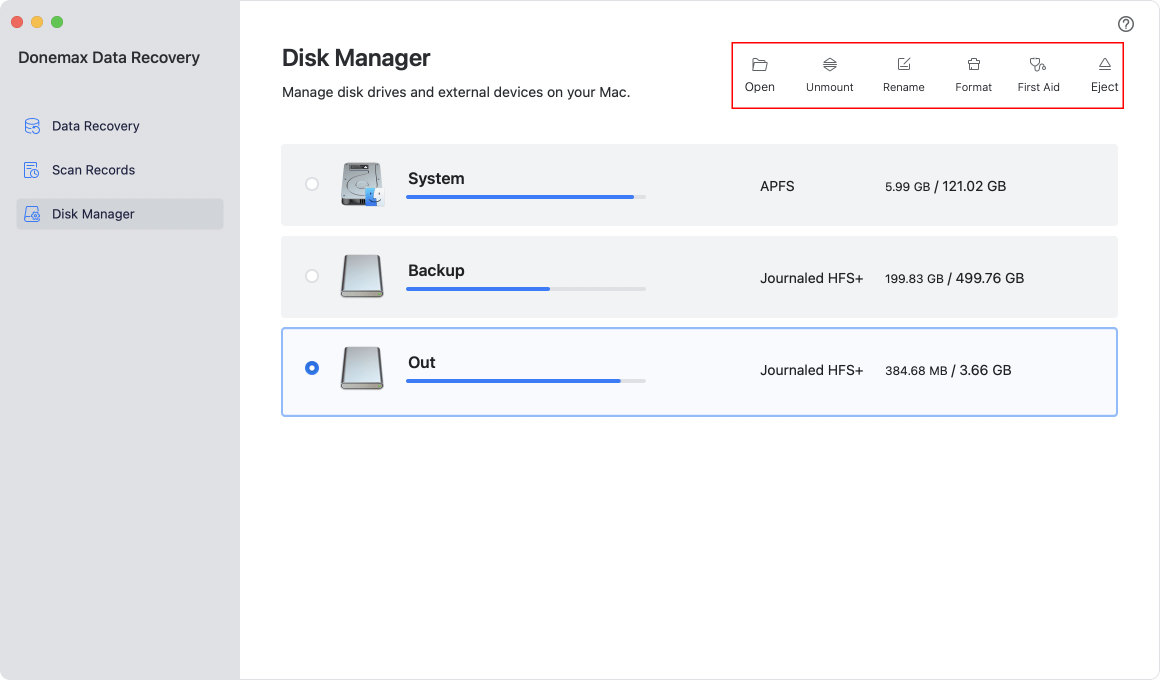
Donemax Data Recovery for Mac also can help you mount or unmount a disk on Mac, reformat a disk on Mac, fix a damaged disk on Mac, etc. Just choose Disk Manager tool.
Conclusion
The "Couldn't Unmount Disk (Error 69888)" error can be frustrating, but the solutions above should help resolve it. Whether using Terminal commands, macOS Recovery Mode, Safe Mode, or third-party tools, you have multiple ways to fix the issue on both internal and external drives.
If none of the methods work, the disk may be physically damaged, and professional data recovery may be necessary.
Donemax Data Recovery for Mac
Donemax Data Recovery for Mac is one of the best Mac data recovery software. It is easy-to-use and can help in recovering deleted, formatted, inaccessible or lost data from Mac HDD/SSD, external disk, USB drive, SD card, camera or other storage devices.
Related Articles
- Oct 14, 20246 Proven Methods to Fix Mac's USB Port Not Working
- Jun 06, 2024Lenovo Computer Not Booting Up, Fix It Now
- Mar 31, 2025How to Fix The Disk Macintosh HD Can't Be Unlocked?
- Dec 26, 2024How to Remove SD Card's Write Protection on Mac? [5 Methods]
- May 28, 2025Fix Common USB Drive Issues and Errors
- May 27, 2025CHKDSK Not Working on Windows 11/10/8/7, How to Fix It?

Contributing Writer
Charles
Charles, who lives in Sydney, Australia, is an editor & writer of Donemax Team. He is good at writing articles related with Apple Mac computers, Windows operating systems, data recovery, data erasure, disk clone and data backup, etc. He loves reading and playing tennis in his spare time and is interested in testing new digital devices such as mobile phones, Macs, HDDs, SSDs, digital cameras, etc.

Editor in chief
Gerhard Chou
In order to effectively solve the problems for our customers, every article and troubleshooting solution published on our website has been strictly tested and practiced. Our editors love researching and using computers and testing software, and are willing to help computer users with their problems
Hot Donemax Products
Clone hard drive with advanced clone technology or create bootable clone for Windows/Mac OS.

Completely and easily recover deleted, formatted, hidden or lost files from hard drive and external storage device.
Certified data erasure software - permanently erase data before selling or donating your disk or any digital device.