Before we start: Donemax NTFS for Mac tool is a powerful disk management tool. It can help you mount and enable writable for NTFS drives on Mac, rename any drive including NTFS drives and reformat/mount NTFS/APFS/ExFAT/FAT32/HFS+ drives on Mac.
PAGE CONTENT:
Renaming external drives, whether an external hard drive or a USB drive, can be crucial for managing your data efficiently. Whether you're using multiple drives or need to distinguish between different projects or backups, having distinct names helps. However, sometimes macOS won't let you rename an external drive, and that can be frustrating.
In this article, we'll dive deep into the possible causes for this issue and, more importantly, how to fix it. If you're struggling with renaming your external hard drive or USB drive on a Mac, rest assured, there are several solutions available, and we'll walk you through each one.
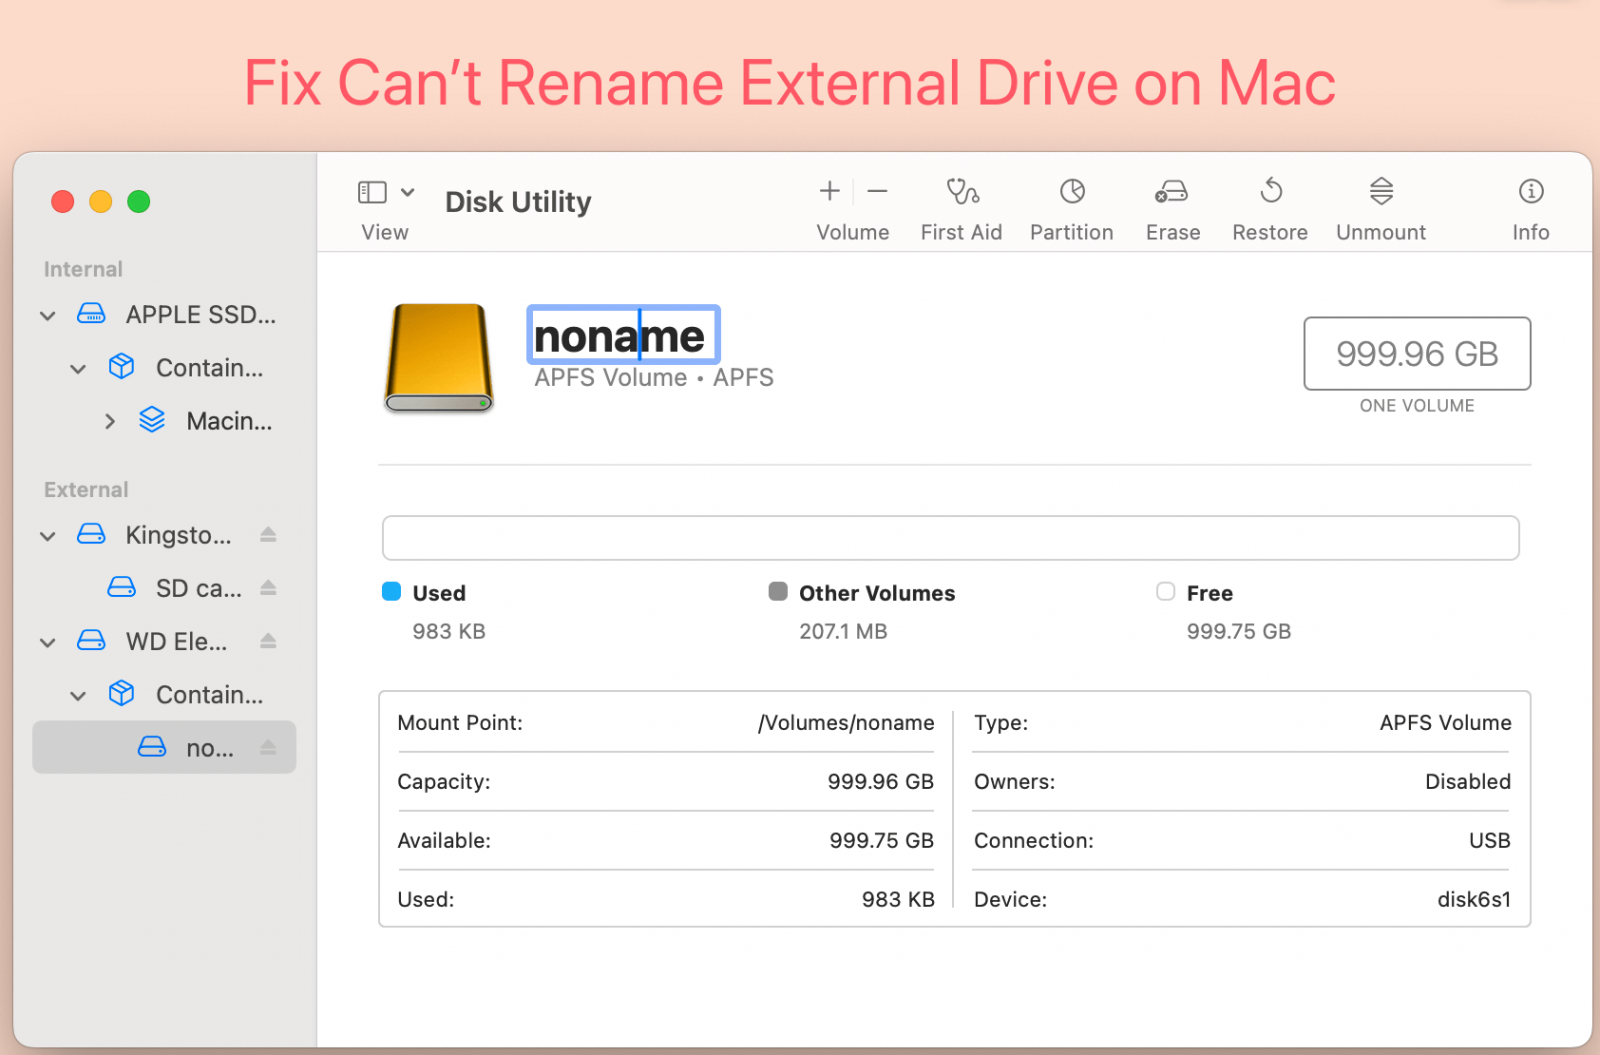
Why You Might Encounter Renaming Issues on Mac
There are several reasons why macOS might prevent you from renaming your external drive. Let's explore the most common ones to give you a better understanding of what might be going wrong.
1. Permission-Related Problems
macOS uses a permissions system to control which users and apps can access certain files and folders. When it comes to external drives, these permissions might not be correctly configured, especially if the drive was used on a different computer or operating system before.
If you don't have permission to make changes on the drive, renaming it will be blocked. This issue is particularly common with drives that have been shared across different platforms, such as between macOS and Windows.
2. File System Incompatibility
External drives come in different file system formats, such as NTFS (used by Windows), FAT32, ExFAT, and the macOS-native APFS or Mac OS Extended (HFS+). Some of these formats have restrictions on how macOS can interact with them.
For example, NTFS is a read-only file system for macOS by default, which means you cannot modify the drive, including renaming it. FAT32 and ExFAT are more compatible, but even they can encounter issues, especially with larger drives or fragmented files.
3. Drive Corruption or Errors
If your drive is experiencing issues, such as corrupted data or bad sectors, macOS might prevent you from renaming it as a protective measure. Corrupted file structures make it difficult for the operating system to handle basic operations like renaming or moving files.
4. Drive is Still in Use
macOS prevents modifications to external drives if they are currently in use by another application or process. If you have an app accessing files on the drive or if macOS is indexing the drive for Spotlight search, you won't be able to rename it until those tasks are complete.
Preliminary Checks
Before diving into more complex solutions, start with these basic checks. Sometimes the issue might be resolved with a simple adjustment.
1. Ensure Proper Connection
Ensure that your external hard drive or USB drive is connected properly to your Mac. Try switching to a different USB port or detaching and rejoining the device. A loose or faulty connection could be causing temporary issues.
2. Check Readability of the Drive
Verify that the drive is fully readable on your Mac. Go to Finder and check whether the external drive appears under Locations. If the drive isn't appearing, it might have issues being recognized, which could prevent renaming.
3. Close Any Open Files
Ensure no files or apps are actively using the external drive. This includes hidden processes or services like backup software, Spotlight indexing, or media players. If files are being accessed, macOS might prevent the renaming process.
Top 8 Step-by-Step Solutions to Fix Can't Rename External Device on Mac
If the preliminary checks didn't solve the issue, it's time to dive into specific solutions. The following step-by-step instructions should help you rename your external drive.
Solution 1: Ensure You Have the Right Permissions
As mentioned earlier, a lack of proper permissions could be the root cause preventing you from renaming your drive. Here's how you can check and fix the permissions:
Step 1: Open Finder
Navigate to Finder and locate your external hard drive or USB drive in the left sidebar under "Locations."
Step 2: Get Info
On the external drive, perform a right-click (or control-click) and choose Get Info from the drop-down menu. This will cause the drive's information window to open.
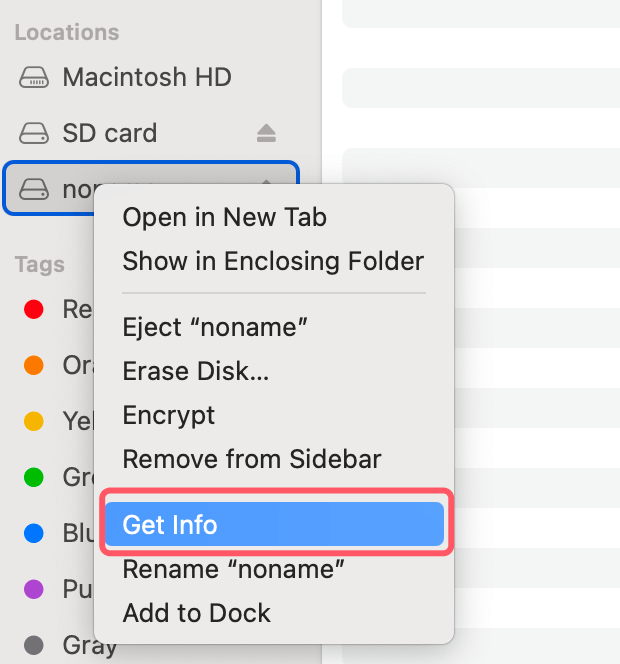
Step 3: Check Permissions
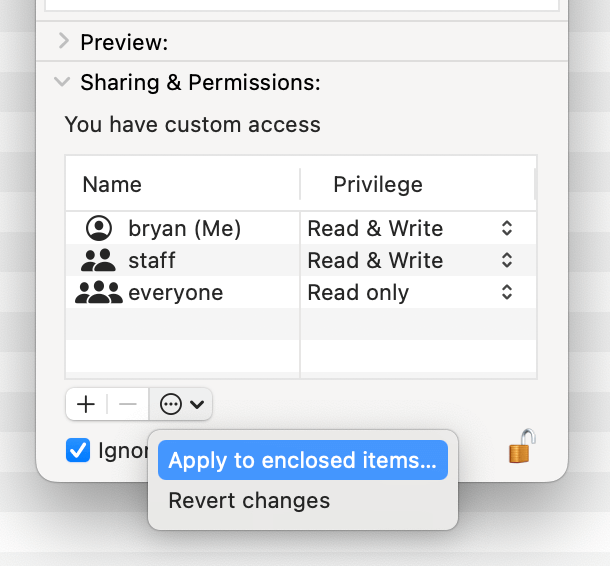
Scroll down to the Sharing & Permissions section at the bottom of the window. Here, you can see who has permission to read or write to the drive. Ensure that your user account has "Read & Write" permissions. If it says "Read Only," you won't be able to rename the drive.
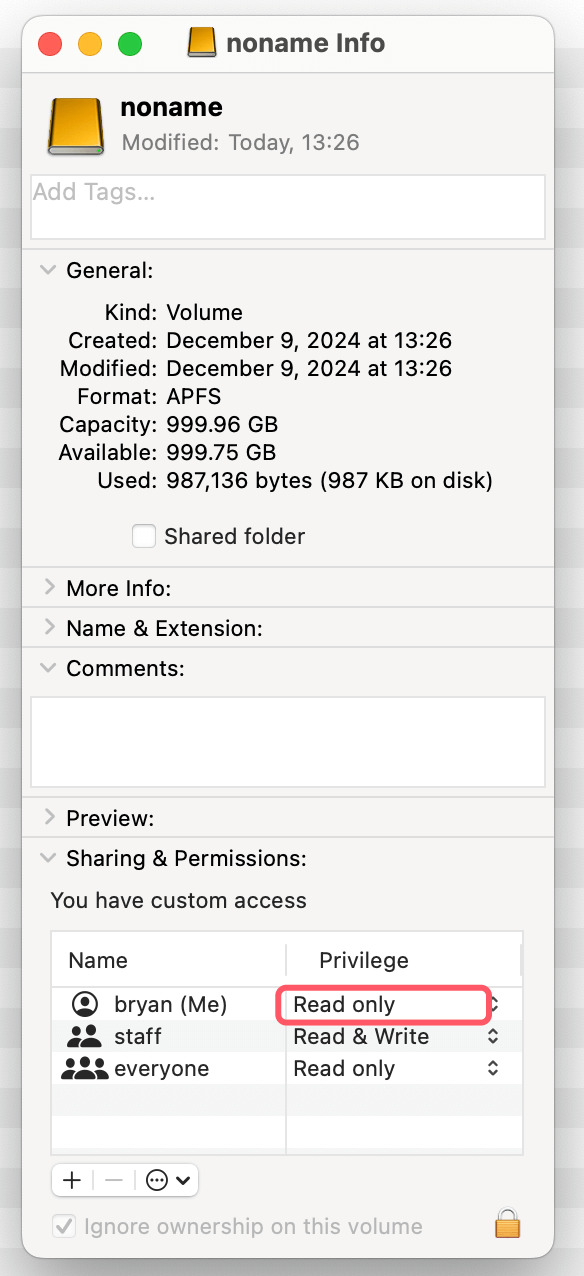
Step 4: Modify Permissions (if needed)
If you don't have write permissions, you can change them by clicking the lock icon at the bottom-right of the window. Enter your Mac's administrator password to unlock the settings. Now, click on the privileges next to your username and select Read & Write from the dropdown menu. Afterward, try renaming your drive again.
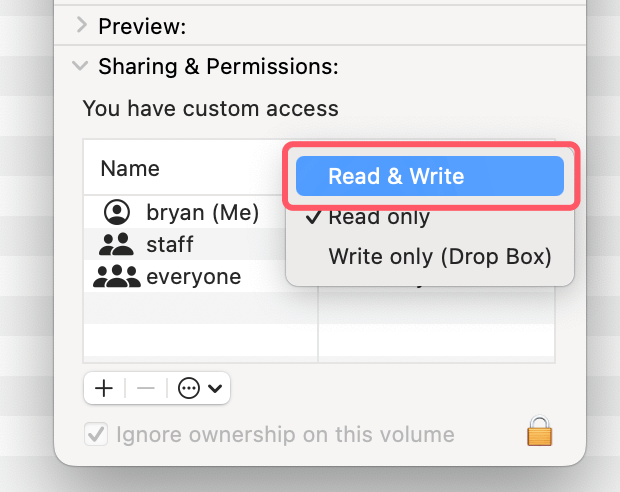
Step 5: Apply to Enclosed Items
If you suspect permissions issues may extend to the files on the drive, click on the gear icon at the bottom of the Get Info window and select Apply to enclosed items. This ensures the new permissions apply to all files and folders within the drive.
Solution 2: Use NTFS for Mac tool
macOS doesn't support NTFS file system. If the external hard drive has been pre-formatted to NTFS, you can't write data to it or rename it.
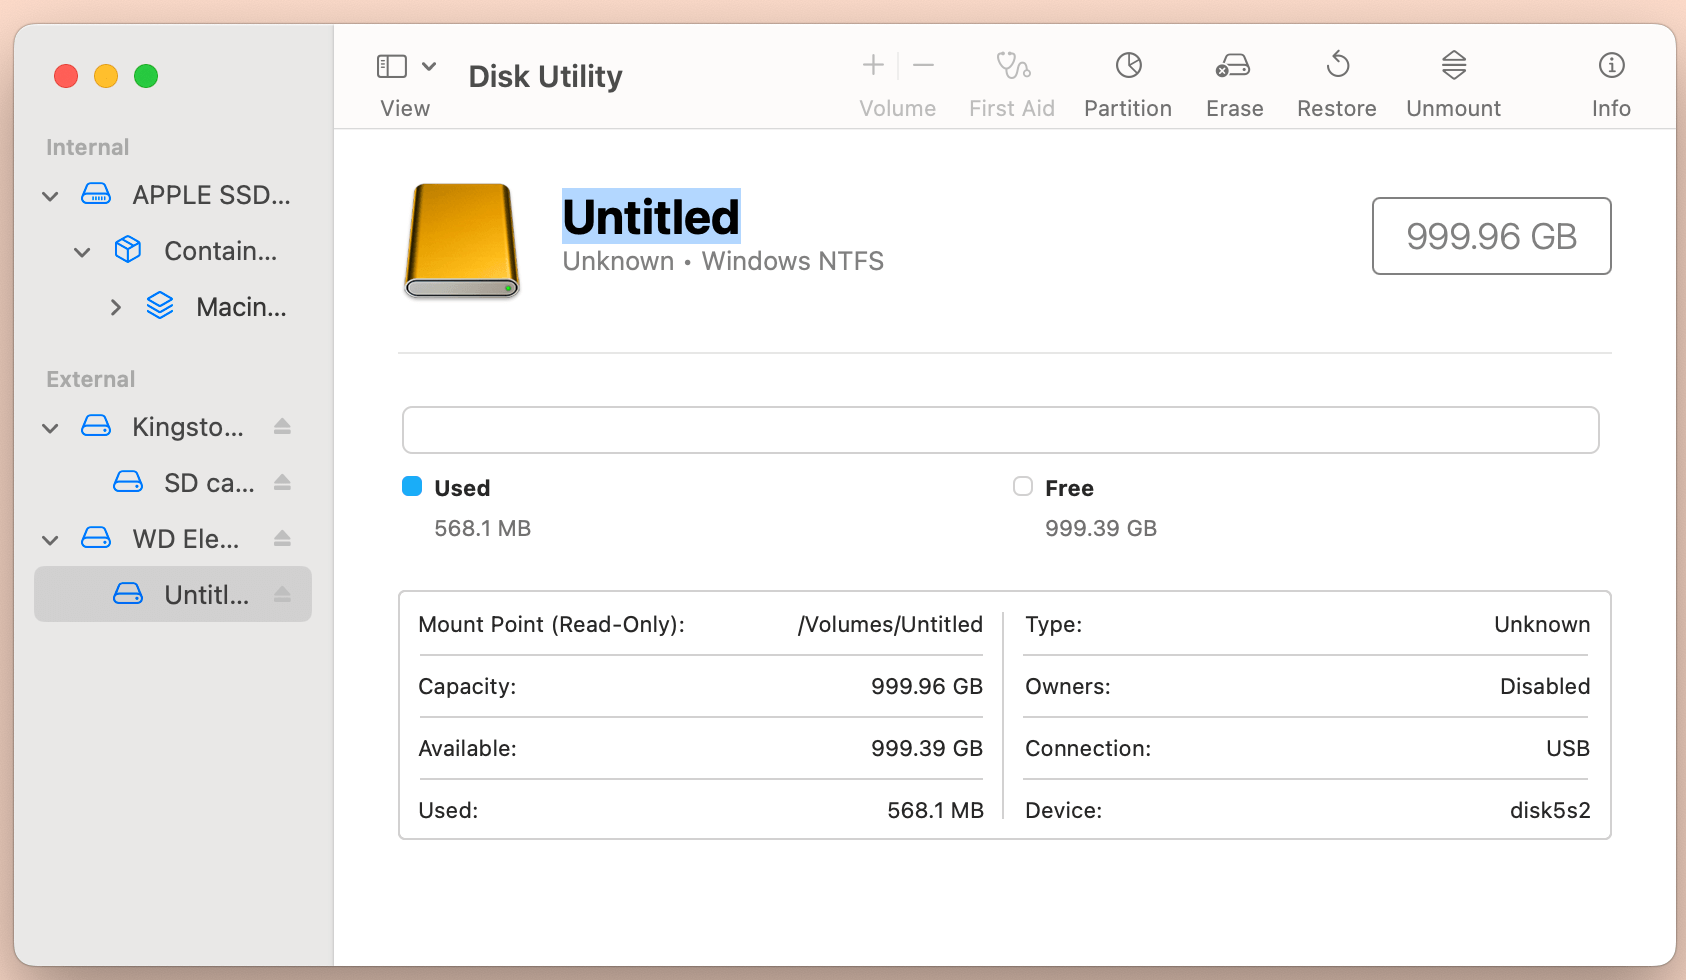
Fortunately, NTFS for Mac tool can help you easily and securely fix this issue. You just need to install a NTFS for Mac tool, run it to enable writable for the NTFS drive, then you can rename it.
Step 1. Download and install the reliable NTFS for Mac tool - Donemax NTFS for Mac.
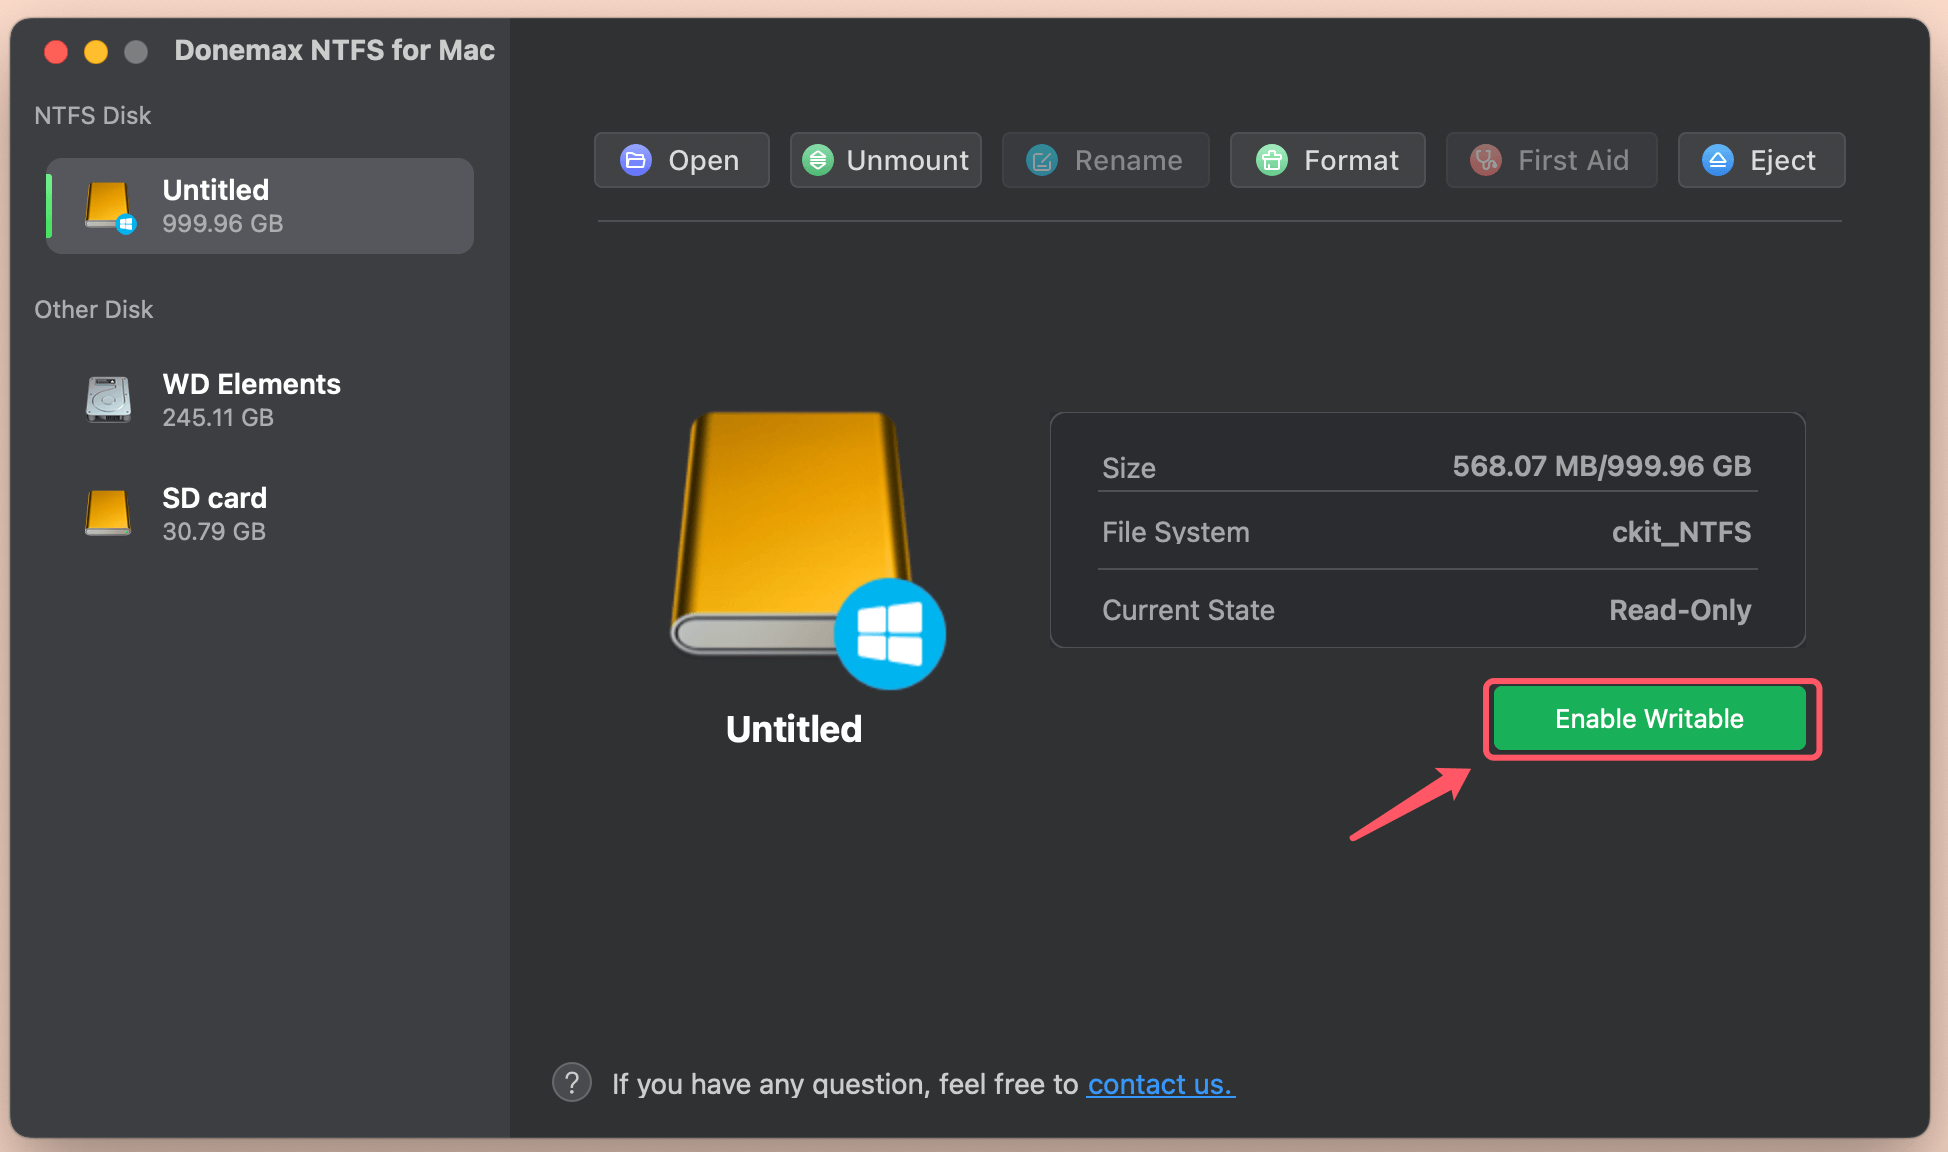
Step 2. Open Donemax NTFS for Mac, select the NTFS drive, click on Enable Writable button.
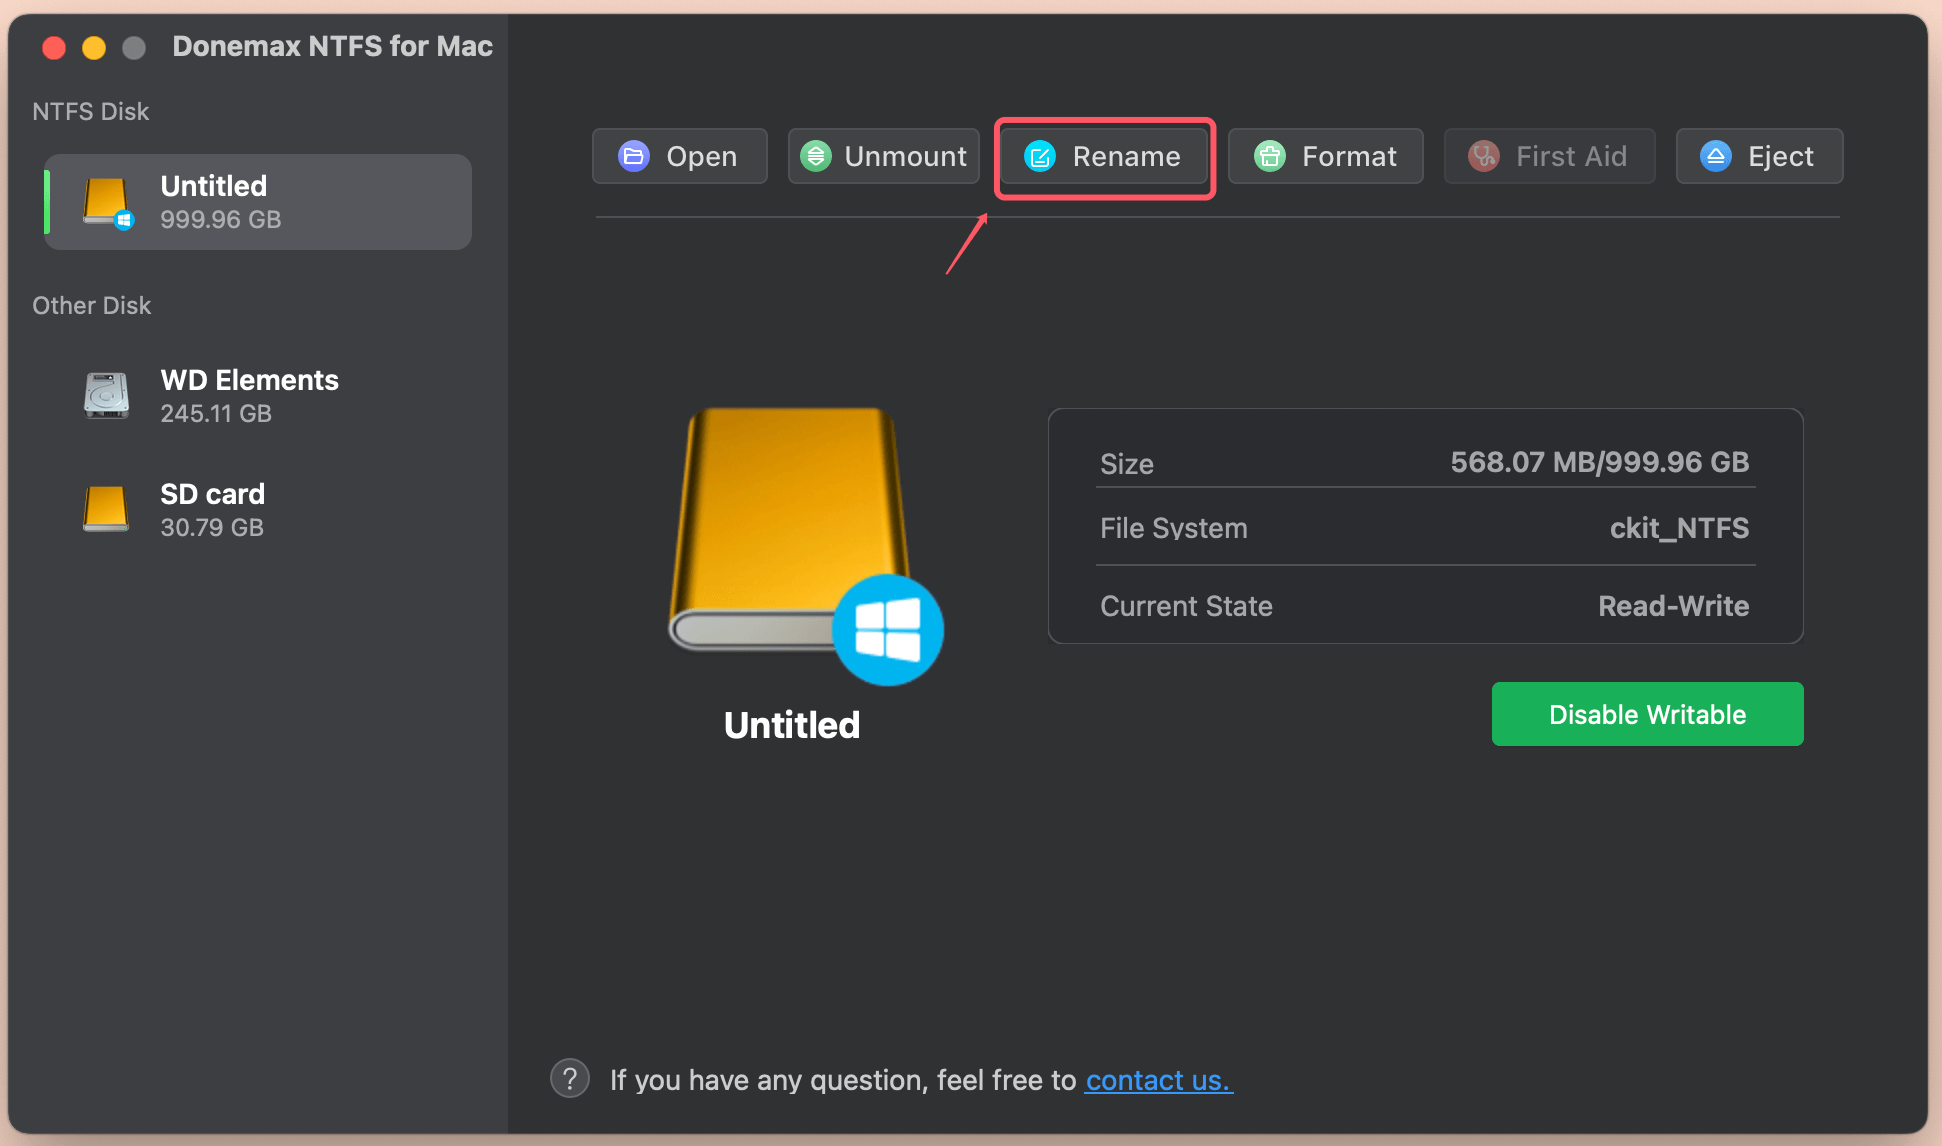
Step 3. Click on Rename button to rename the drive.
You also can rename the external hard drive via Finder or Disk Utility after enabling writable with Donemax NTFS for Mac.
Solution 3: Reformat the Drive to a macOS-Compatible File System
If your external drive is formatted in an NTFS (Windows-based) file system, macOS won't allow you to write or rename the drive without third-party software. You can either install software to allow write access or reformat the drive to a format compatible with macOS.
⚠️ Warning: Reformatting will erase all data on the drive. Be sure to back up your files before proceeding.
Step 1: Open Disk Utility
In the Disk Utility, you will find a list of all the drives connected to your Mac.
Step 2: Select the Drive
Choose your USB device or external hard disk from the list on the left in Disk Utility.
Step 3: Erase the Drive
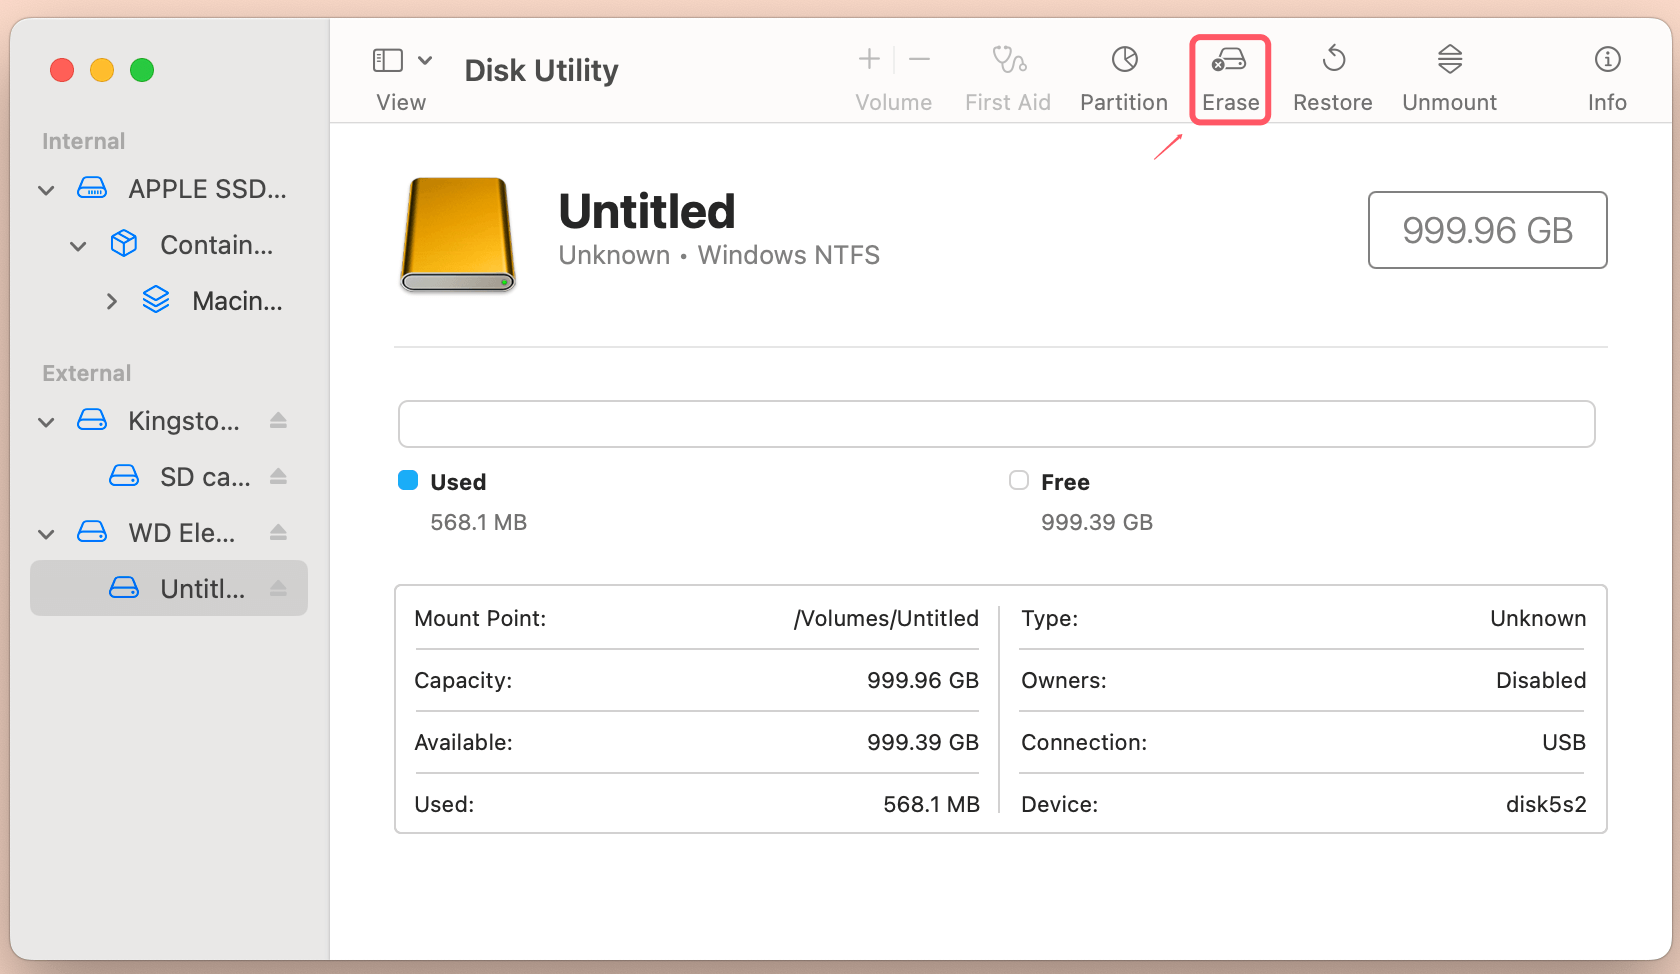
Click on the Erase button at the top of the window. A pop-up menu will appear, asking you to choose a file system.
Step 4: Choose the Right Format
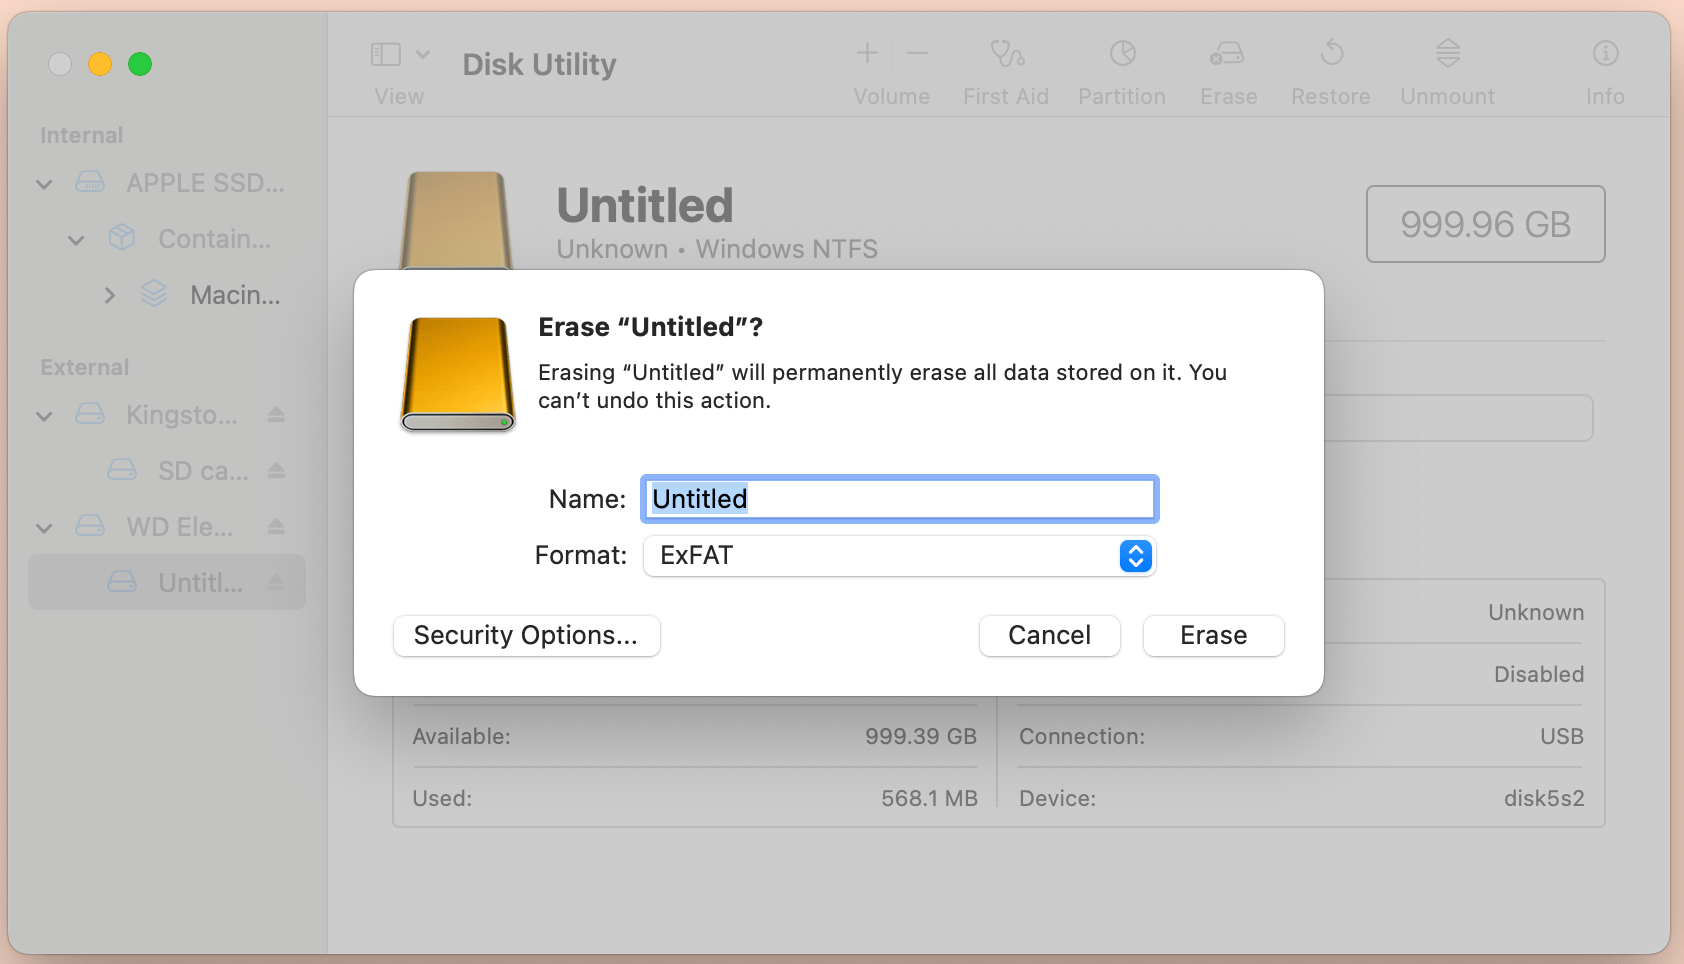
If you primarily use the drive with Macs, choose Mac OS Extended (Journaled) or APFS (for SSDs). If you need compatibility with both Windows and Mac, choose ExFAT. This file system allows for both read and write access on both operating systems.
Step 5: Rename the Drive
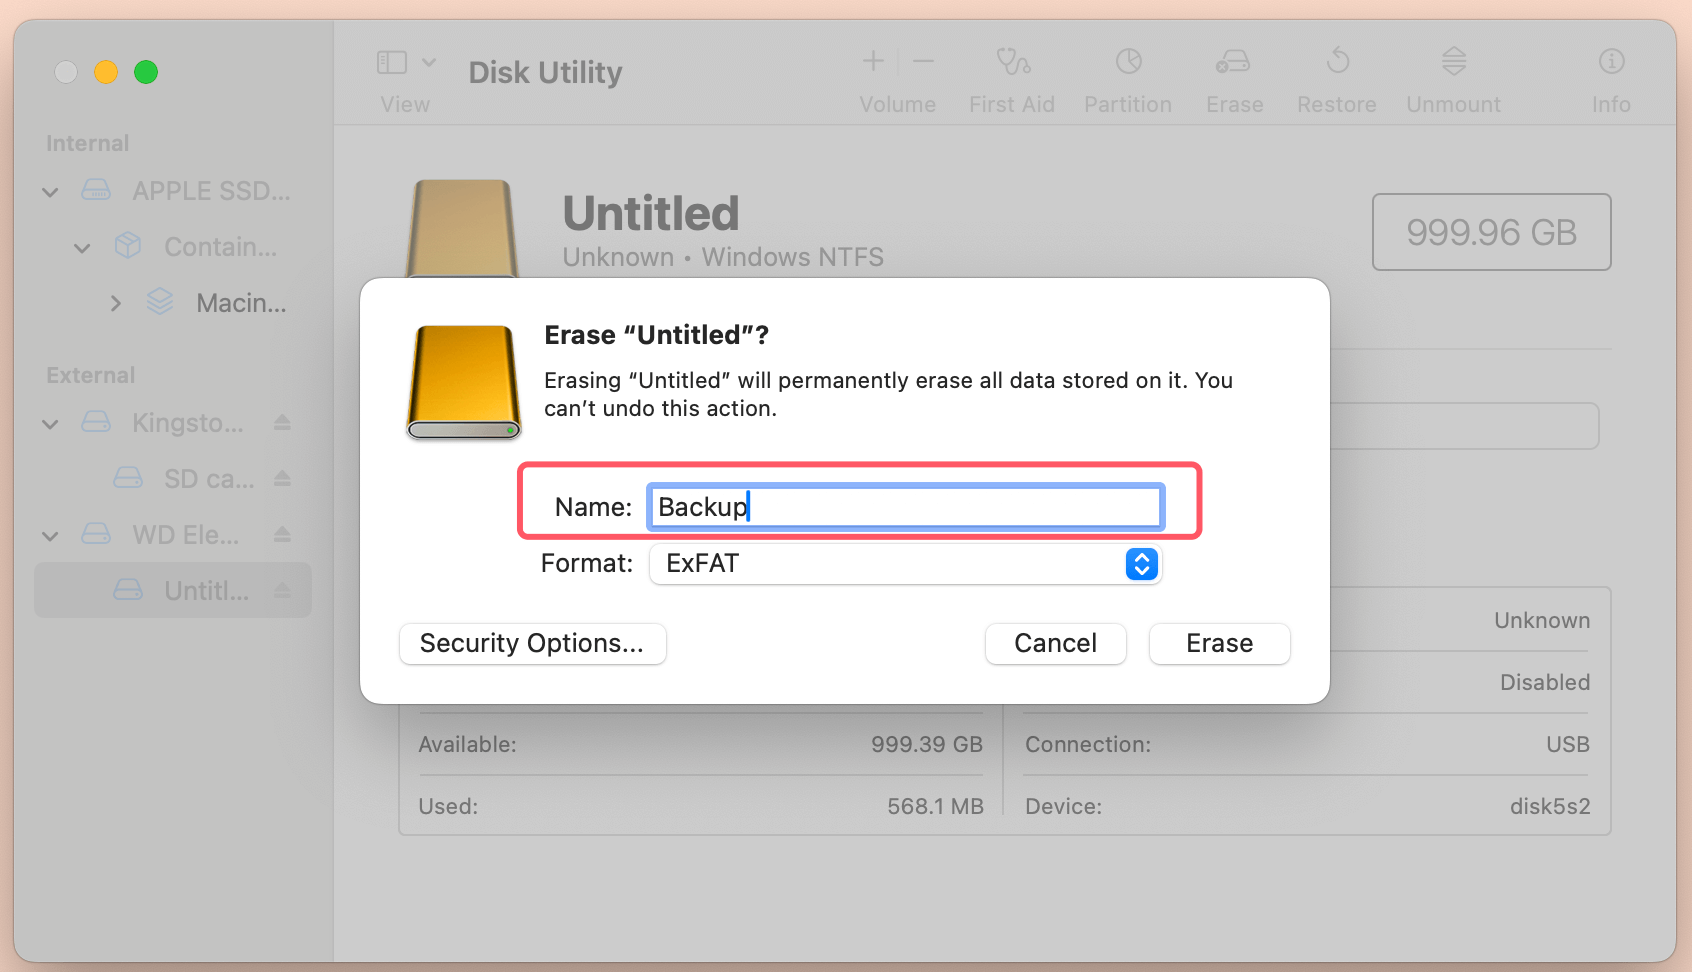
Before you proceed with the erase, you'll have the option to rename your drive. Enter the new name, and once the formatting process is complete, your drive should have the new name.
💡 Note: If you have lost data due to reformatting the external hard drive, you can use Mac data recovery software to deeply scan the drive and get all lost data back.
Solution 4: Restart Finder
Sometimes, a simple Finder glitch may prevent you from renaming your external drive. Restarting Finder can resolve this issue.
Step 1: Open Force Quit Menu
From the drop-down option that appears when you click on the Apple logo in the upper-left corner of the screen, choose Force Quit.
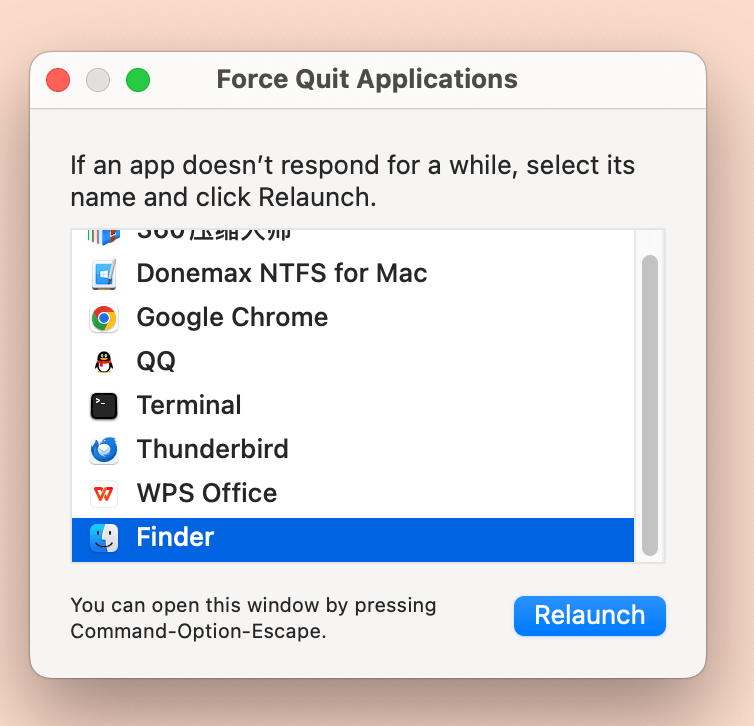
Step 2: Relaunch Finder
In the Force Quit window, select Finder and then click Relaunch. This will restart the Finder without affecting any of your open files or applications.
After restarting Finder, try renaming your drive again.
Solution 5: Use Terminal to Rename the Drive
If the standard method isn't working, you can use Terminal, macOS's command-line tool, to rename your external hard drive or USB drive.
Step 1: Open Terminal
Go to Applications > Utilities > Terminal.
Step 2: Locate the Drive
In Terminal, type the following command and press Enter:
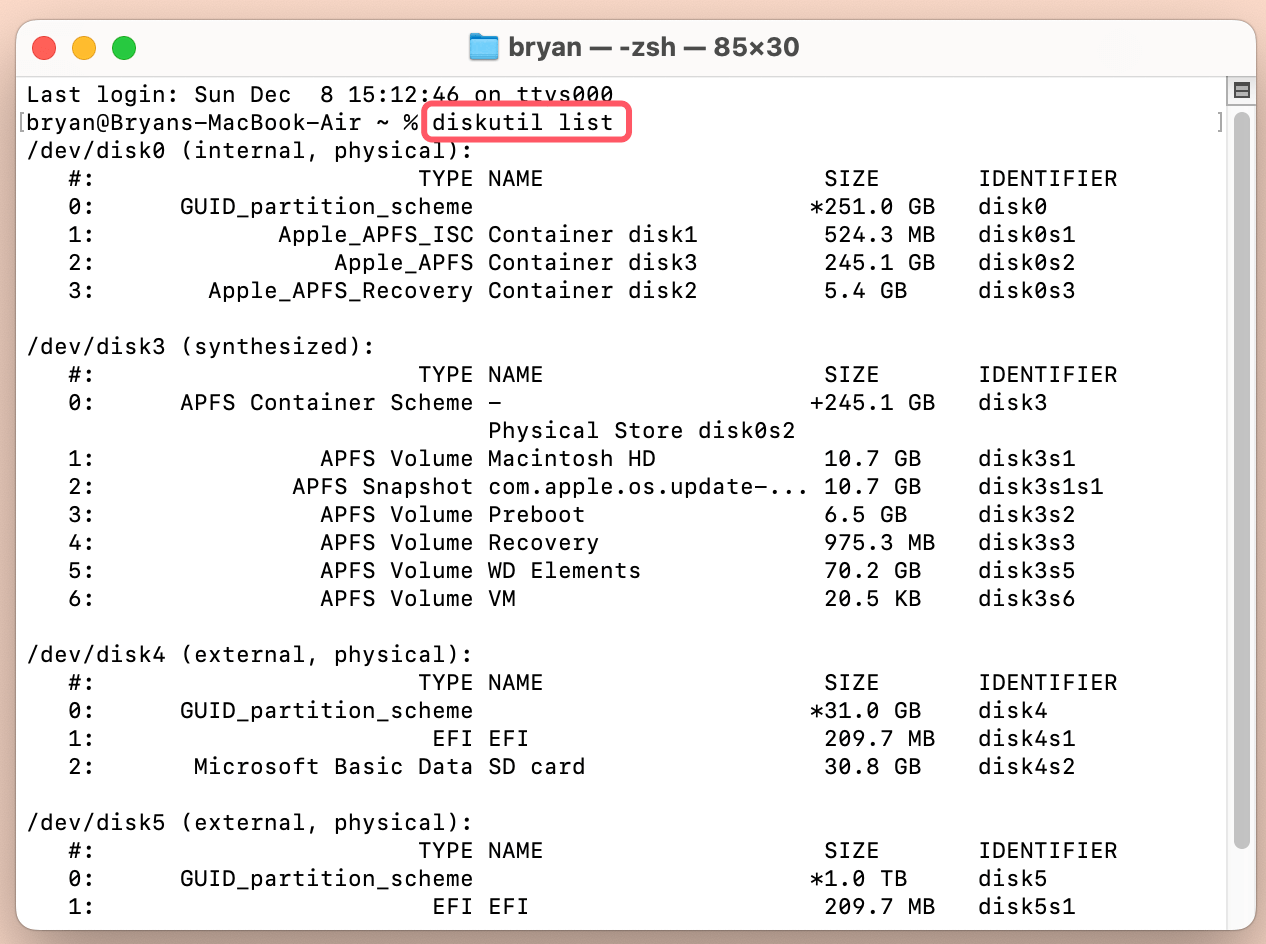
diskutil list
This will show a list of all your connected drives. Look for the external drive you wish to rename. You'll find its identifier under the Identifier column, usually something like disk2s1 or disk4s2.
Step 3: Rename the Drive
Once you've found the correct drive identifier, type the following command, replacing IDENTIFIER with your drive's identifier and NEWNAME with the name you want to give the drive:
diskutil rename IDENTIFIER NEWNAME
For example, if your drive's identifier is disk4s2 and you want to name it "UUB," you would type:
diskutil rename disk4s2 UUB
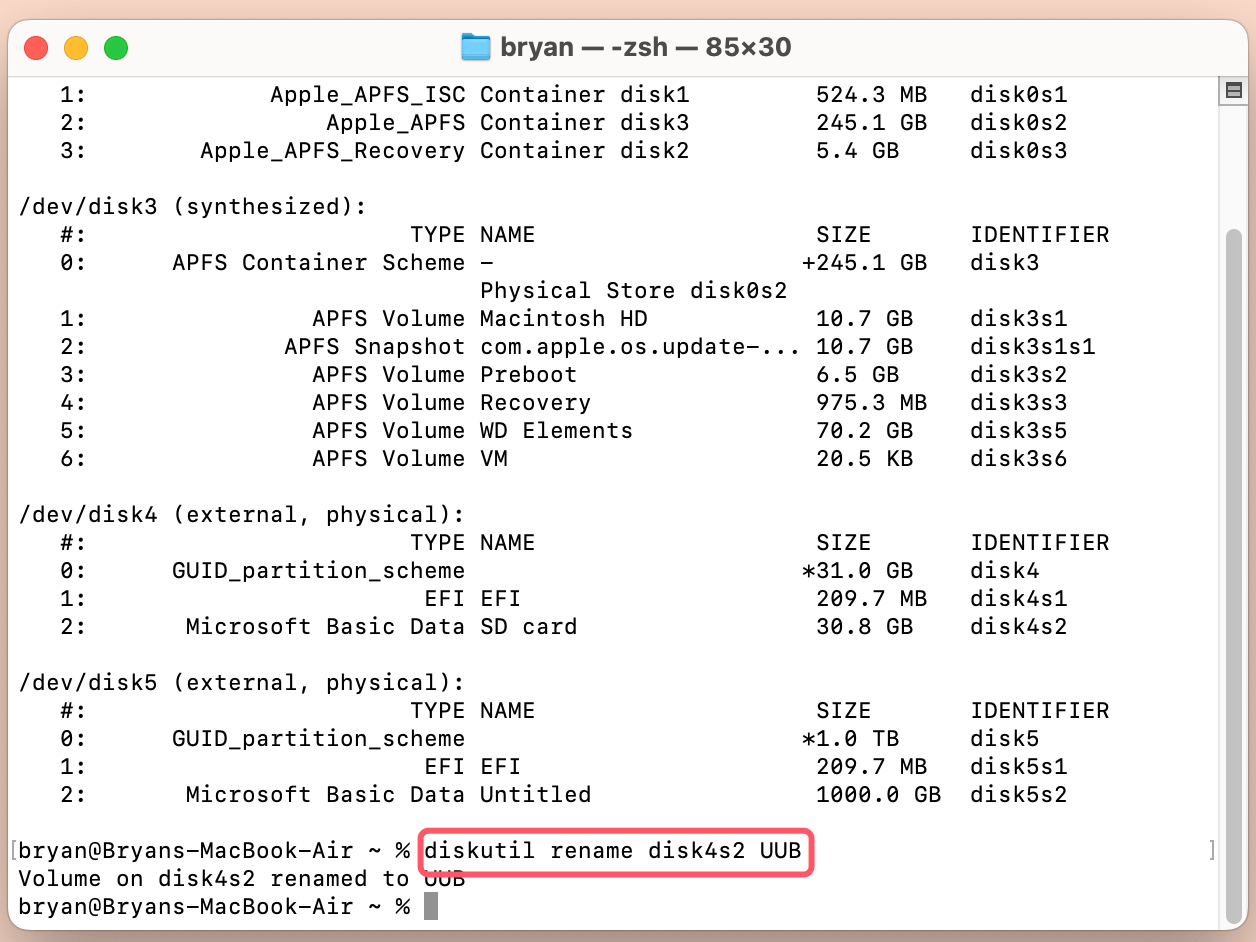
Press Enter and the drive will be renamed.

Solution 6: Run First Aid on the Drive
If your external drive is experiencing some corruption or errors, macOS may prevent you from renaming it. Using Disk Utility's First Aid feature can resolve these minor issues.
Step 1: Open Disk Utility
Go to Applications > Utilities > Disk Utility.
Step 2: Select the Drive
Choose your external drive from the list of drives on the left side of the window.
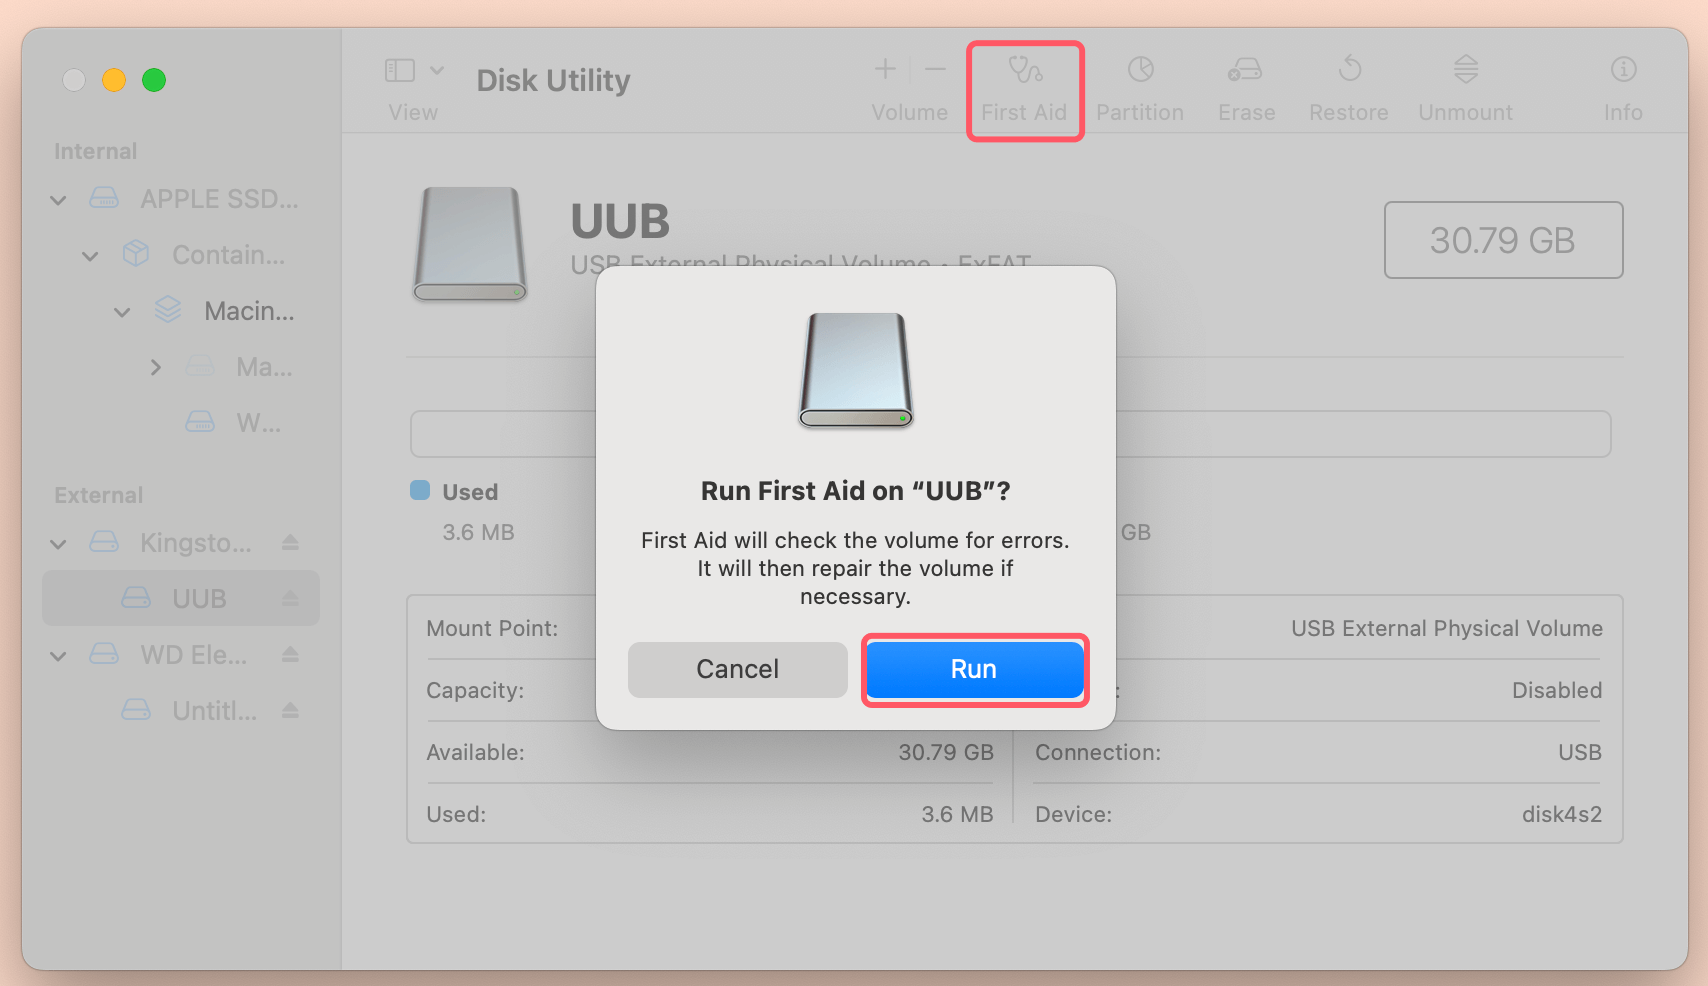
Step 3: Run First Aid
Click the First Aid button at the top of the Disk Utility window. This will run a diagnostic on the drive and attempt to fix any detected issues. After First Aid completes, try renaming the drive again.
Solution 7: Disable or Uninstall Third-Party Software
If you're using third-party software to manage your external drives (such as NTFS-3G Tuxera NTFS, or other drive management tools), this software may be interfering with your ability to rename the drive.
Step 1: Disable Third-Party Software
Check whether the third-party software has an option to disable its management of the drive. You can usually find this in the software's settings or preferences.
Step 2: Uninstall Third-Party Software (if necessary)
If disabling the software doesn't work, you may need to uninstall it temporarily to see if it's causing the issue. To uninstall, go to System Preferences > Software and remove the program, or simply drag the application from the Applications folder to the trash.
After disabling or uninstalling the software, attempt to rename the drive again.
Solution 8: Check for macOS Updates
Sometimes, a software glitch or bug in macOS could cause problems when renaming external drives. Ensuring that your Mac is running the latest version of macOS can help resolve this.
Step 1: Open System Settings
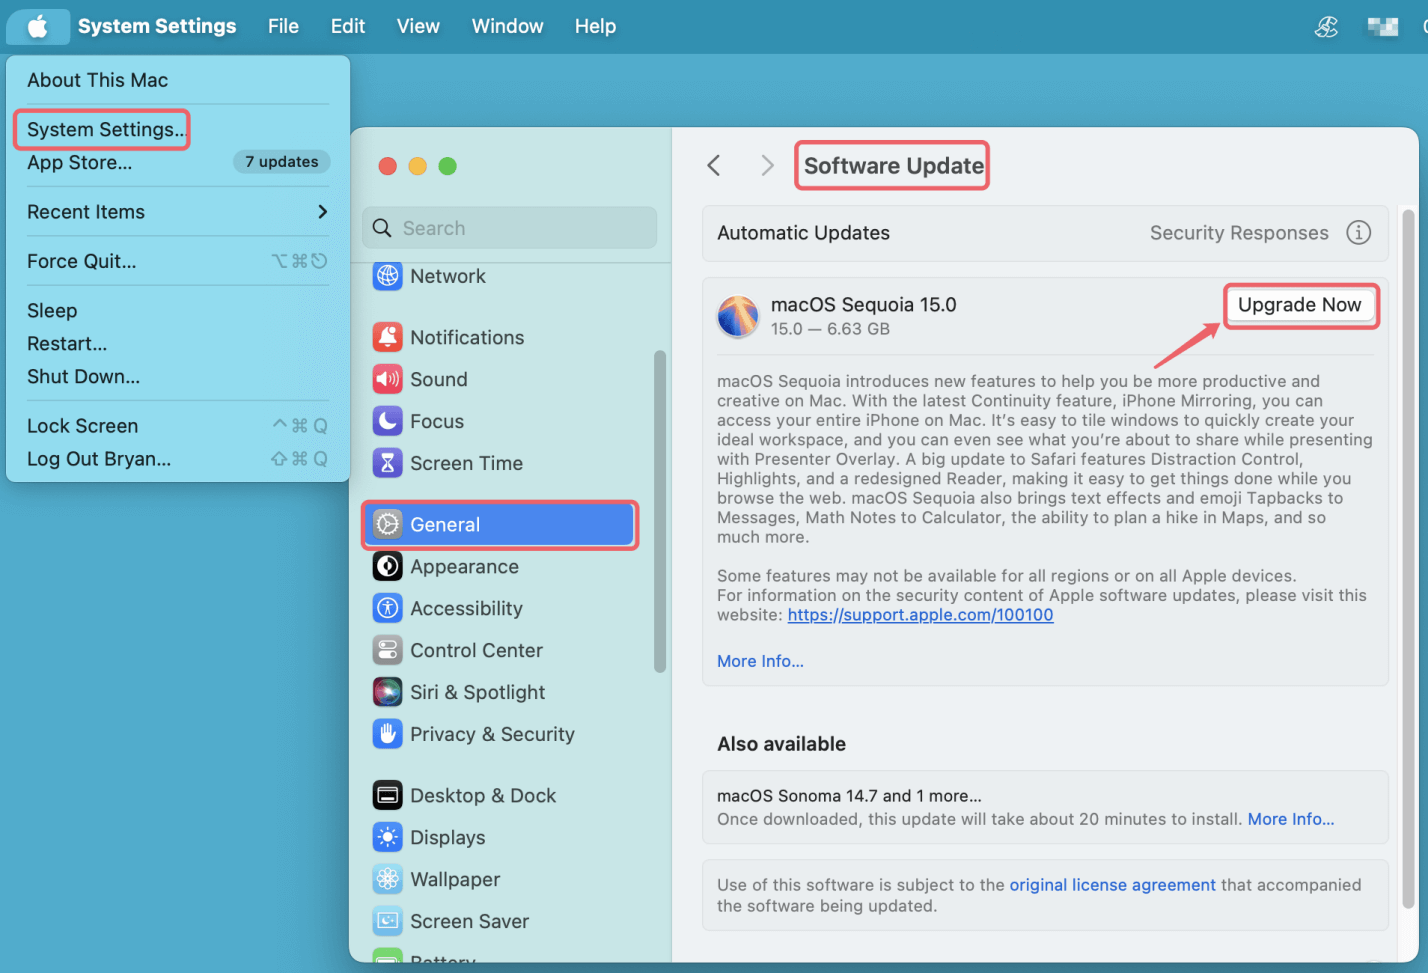
Go to the Apple menu and click on System Settings.
Step 2: Check for Updates
Click General > Software Update. If any updates are available, download and install them. Restart your computer once the update is complete and try renaming the drive again.
Conclusion
Renaming an external hard drive or USB drive on a Mac should be a simple task, but various issues can sometimes make it tricky. Whether it's a permissions problem, an incompatible file system, or a minor software glitch, the methods outlined above should help you resolve the issue. Start with the easiest solutions, such as checking permissions or restarting Finder, and work your way down to more advanced steps like using Terminal or reformatting the drive. With patience and persistence, you'll be able to rename your drive successfully and get back to organizing your files.

Donemax NTFS for Mac
An easy-to-use NTFS for Mac tool to help you enable writable for NTFS drives on Mac so that you can read-write NTFS drives on Mac without any limitation. It also can help you mount, format, repair, rename, open drive on your Mac.
Related Articles
- Mar 11, 2025Fix Seagate Ultra Compact SSD Not Showing Up on Windows or Mac Computer
- Feb 11, 2025Mac Can't Recognize the Connected SD Card? Fix It Now
- Jul 14, 2024Connected Digital Camera Not Working on Mac, How to Fix This Issue?
- Mar 29, 2024How to Fix Broken External Hard Drive?
- Mar 17, 20256 Methods to Fix Couldn't Open Device 69877 Error on Mac
- Jan 12, 20255 Fixes for Fixing Partition Map Error on Mac

Christina
Christina is the senior editor of Donemax software who has worked in the company for 4+ years. She mainly writes the guides and solutions about data erasure, data transferring, data recovery and disk cloning to help users get the most out of their Windows and Mac. She likes to travel, enjoy country music and play games in her spare time.

Gerhard Chou
In order to effectively solve the problems for our customers, every article and troubleshooting solution published on our website has been strictly tested and practiced. Our editors love researching and using computers and testing software, and are willing to help computer users with their problems
Hot Donemax Products

Clone hard drive with advanced clone technology or create bootable clone for Windows/Mac OS.

Completely and easily recover deleted, formatted, hidden or lost files from hard drive and external storage device.

Certified data erasure software - permanently erase data before selling or donating your disk or any digital device.