Written byCharlesUpdated on Apr 10, 2025
Where Are Voice Memos Stored on Mac?
Approved byGerhard Chou
PAGE CONTENT:
The Voice Memos app on Mac is an incredibly useful tool for recording notes, lectures, interviews, and personal reminders. Whether you use it for professional purposes or personal organization, voice memos provide a simple and efficient way to capture audio. However, many users eventually find themselves asking: Where are my voice memos stored on my Mac? This question arises for a variety of reasons—perhaps you need to transfer a recording, back up your files, or retrieve a lost memo.
While the Voice Memos app provides easy access to your recordings within its interface, the actual audio files are stored deep within macOS's file system. Additionally, if you use iCloud syncing, your memos may also be available on other Apple devices, making file management even more complex. This article provides a comprehensive guide to locating, accessing, exporting, backing up, and recovering your voice memos on Mac.
Where Voice Memos Are Stored
Voice Memos is a system app that keeps recordings in an organized yet somewhat hidden manner. While it's easy to access and play recordings within the app itself, finding the actual storage location requires deeper navigation. Understanding how these files are stored is essential if you want to manually transfer, back up, or edit them outside of the app.
How Voice Memos Are Saved in macOS
Unlike regular audio files that you might save to your Music or Documents folder, voice memos are stored in a system directory managed by macOS. This ensures that the app can keep them synchronized across devices when iCloud is enabled, while also keeping them separate from user-accessible media libraries.
When you create a new recording, macOS does not immediately store it in a visible location. Instead, the file is placed inside the hidden Library folder, specifically under:
~/Library/Group Containers/group.com.apple.VoiceMemos.shared/Recordings
Each memo is saved as an .m4a file, a format that maintains high audio quality while keeping file sizes manageable.
File Naming System for Voice Memos
One notable aspect of how macOS stores voice memos is that filenames are not human-readable. Instead of using the name you assign to a recording (e.g., Meeting Notes or Lecture Recording), macOS assigns a date and time information string like:
20250410 093042.m4a
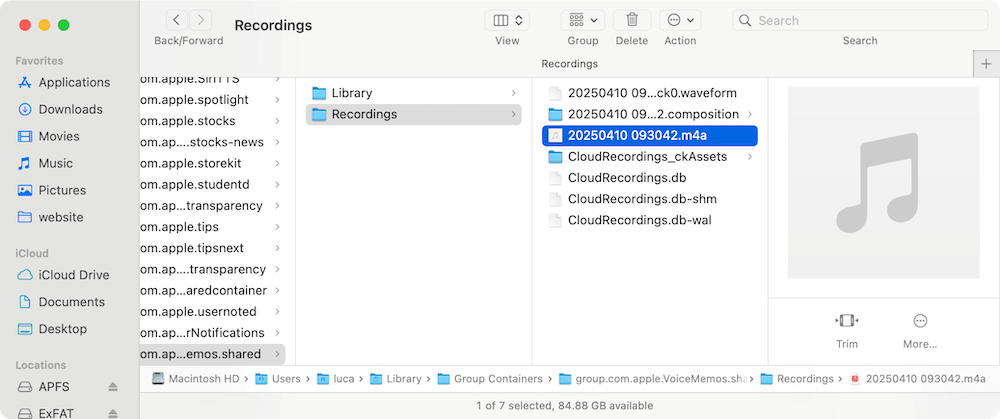
This means that if you navigate directly to the storage location, you won't immediately recognize which recording is which. The best way to identify a specific file is by sorting them by Date Modified, which helps locate recent recordings. Alternatively, you can play the files in QuickTime Player to check their contents.
How iCloud Syncing Affects Storage
If iCloud syncing is enabled for Voice Memos, your recordings are automatically uploaded to iCloud and made available on all your Apple devices. This means that while the files are still stored locally in "~/Library/Group Containers/group.com.apple.VoiceMemos.shared/Recordings", they are also backed up to iCloud.
Here's how this affects storage:
- Local Storage Usage – Even with iCloud syncing, a copy of each memo remains stored on your Mac.
- Device Synchronization – If you delete a voice memo from one device, it will also be removed from iCloud and other connected Apple devices.
- Offline Access – If your Mac is not connected to the internet, you can still access locally stored voice memos. However, new recordings won't sync until you reconnect.
If you disable iCloud syncing, all recordings remain stored only on the Mac. You can check your iCloud settings by navigating to:
- System Settings (or System Preferences on older macOS versions)
- Click Apple ID
- Select iCloud, click See All button and look for Voice Memos
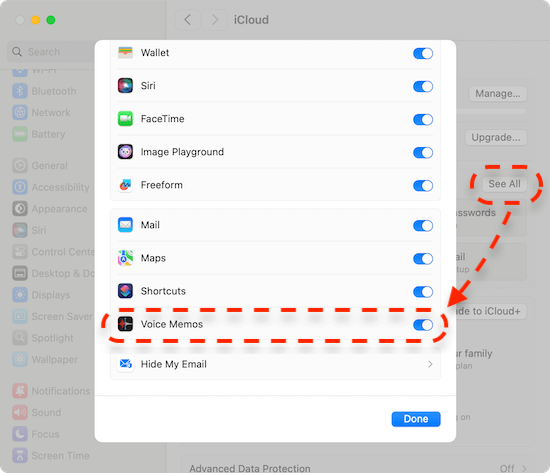
If toggled off, your memos will be stored strictly on your local drive.
Retrieving Voice Memos via iCloud
If iCloud syncing is enabled, you can retrieve voice memos from any Apple device. There are several ways to access them:
- Open Voice Memos on Mac.
- Ensure you're signed into the same Apple ID that you use on your other devices.
- All synced memos should appear automatically.
What Happens When You Delete a Voice Memo?
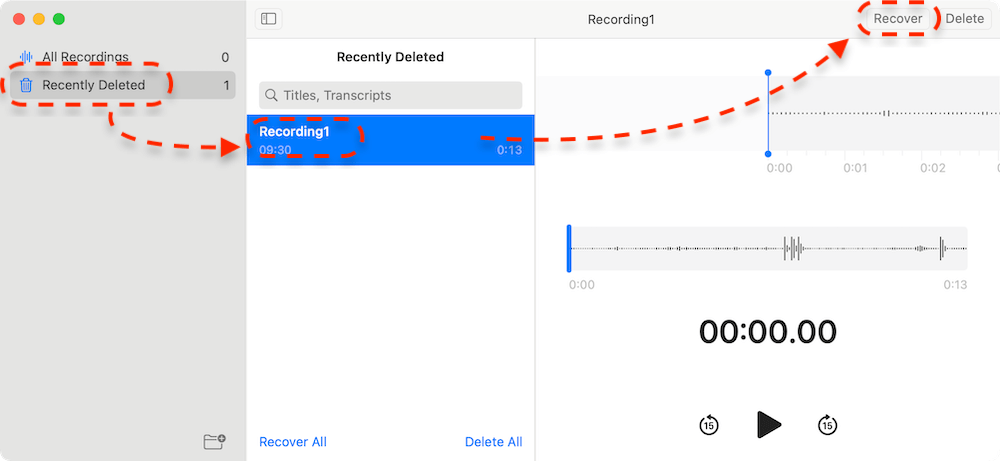
If you delete a recording within the Voice Memos app, it is not immediately removed from your Mac. Instead, it moves to the Recently Deleted folder within the app, where it remains for 30 days before being permanently erased.
To manually recover a deleted memo:
- Open Voice Memos.
- Click Recently Deleted in the left-hand sidebar.
- Select the memo and click Recover to restore it.
If the memo is no longer in the Recently Deleted folder, you may still be able to retrieve it through Time Machine backups or iCloud (if syncing was enabled).
Impact of macOS Updates on Voice Memo Storage
With each macOS update, Apple refines how system apps store data. In older versions (pre-Catalina), Voice Memos data was stored differently, often integrated into the iTunes or Music library. However, starting with macOS Catalina (10.15), Voice Memos adopted the "~/Library/Group Containers/group.com.apple.VoiceMemos.shared/Recordings" directory structure.
If you upgrade from an older macOS version, your voice memos should automatically migrate to the new location. However, in some cases, users have reported missing memos after an update. If this happens:
- Check if iCloud syncing is enabled.
- Look for old backups using Time Machine.
- Use Spotlight Search (Command + Space) and type .m4a to scan for misplaced voice memo files.
Understanding how Voice Memos are stored ensures that you can always access your recordings, prevent accidental loss, and efficiently manage your audio files.
Finding Voice Memos in the File System
To locate the actual audio files for your voice memos on Mac, you need to access the Library folder where macOS stores app data. Unlike traditional media files, these recordings are not saved in obvious locations like "Documents" or "Music." Instead, they are stored within a hidden system folder.
File Path for Voice Memos
For macOS Catalina (10.15) and later, voice memos are stored in the following directory:
~/Library/Group Containers/group.com.apple.VoiceMemos.shared/Recordings
This path means that the files are stored inside the user's Library folder, which is normally hidden from casual access.
How to Access the Hidden Library Folder
Since the Library folder is hidden by default, you must manually reveal it to access the recordings. Here's how:
- Open Finder.
- Click Go in the top menu bar.
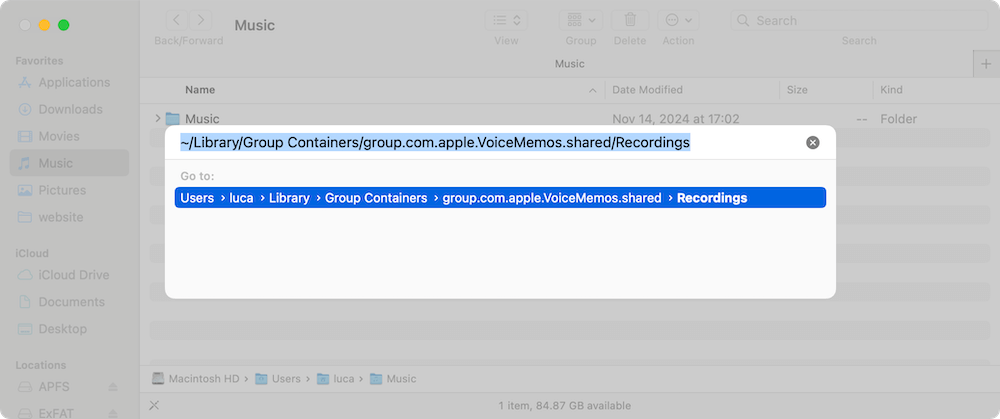
- Select Go to Folder... (or press Command + Shift + G).
- Type the following path and press Enter:
~/Library/Group Containers/group.com.apple.VoiceMemos.shared/Recordings
- The folder containing your voice memo files will open.
Accessing Voice Memos Through Finder
Once you locate the folder, you will see that each voice memo is stored as an .m4a file. The filenames may appear as long alphanumeric strings instead of readable names. These unique identifiers are assigned by macOS and do not reflect the original memo names as they appear in the app.
Making the Folder Visible
If you frequently need access to your voice memos, you can make the hidden Library folder visible:
- Open Finder and navigate to your home directory ("/Users/yourusername/").
- Press Command + Shift + . (period key) to reveal hidden files.
- The Library folder should now appear.
You can now navigate to "~/Library/Group Containers/group.com.apple.VoiceMemos.shared/Recordings" whenever needed.
Exporting and Backing Up Voice Memos
If you want to transfer or back up your recordings, you have several options.
Exporting Recordings from the Voice Memos App
- Open the Voice Memos app.
- Select the recording you want to export.
- Click the Share button (square with an upward arrow).
- Choose an export option (e.g., AirDrop, Mail, Save to Files).

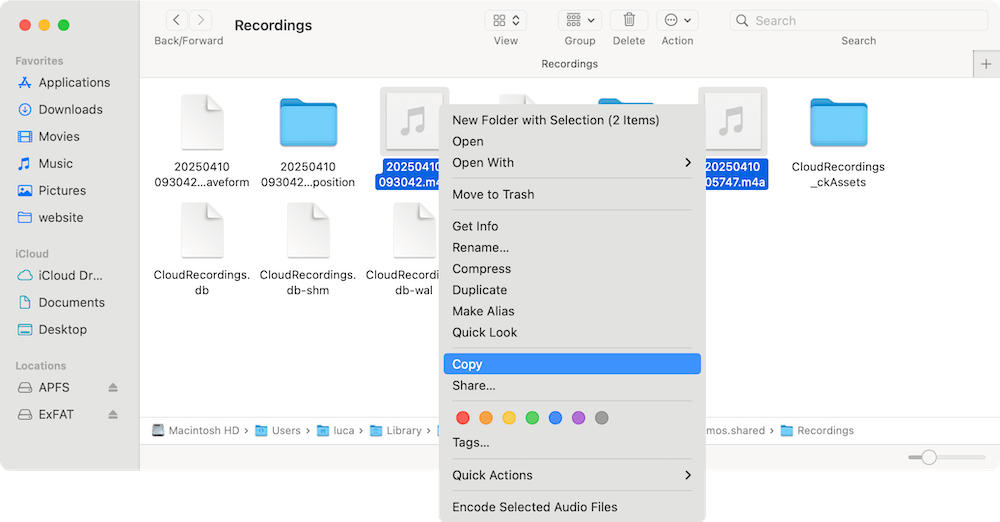
Manually Copying Files from the Storage Location
If you want to move or back up multiple files at once, you can copy them directly from the Recordings folder:
- Navigate to "~/Library/Group Containers/group.com.apple.VoiceMemos.shared/Recordings".
- Select the .m4a files.
- Copy and paste them to another location, such as an external drive or cloud storage.
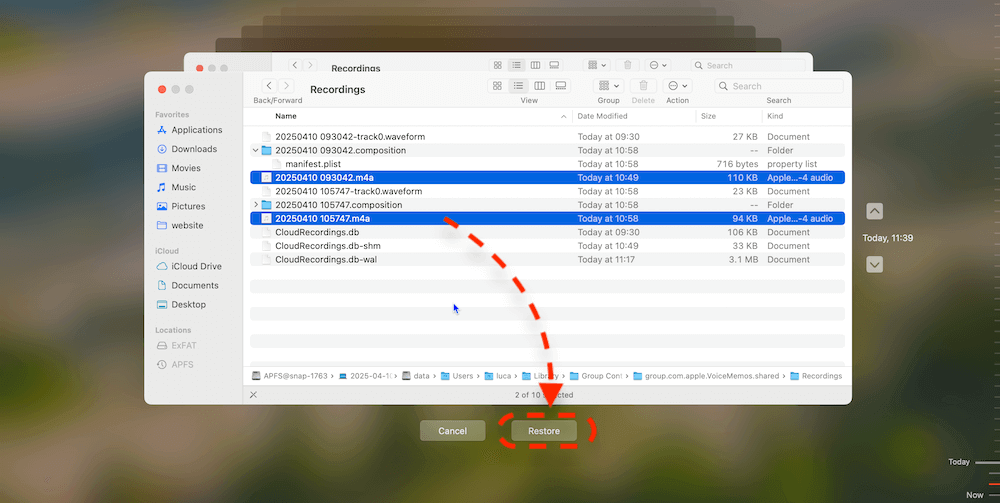
Using Time Machine for Backup
If you use Time Machine, your voice memos are automatically backed up along with other system files. To restore them:
- Open Time Machine and navigate to "~/Library/Group Containers/group.com.apple.VoiceMemos.shared/Recordings".
- Restore previous versions of the files if necessary.
Troubleshooting Missing or Lost Voice Memos
If you can't find your voice memos, here are some troubleshooting steps:
Checking the Recently Deleted Folder
Voice Memos has a Recently Deleted folder where recordings remain for 30 days before permanent deletion.
- Open Voice Memos.
- Click Recently Deleted in the left sidebar.
- Select the recording and click Recover.
Ensuring iCloud Syncing Is Enabled
If recordings are missing, check whether iCloud syncing is turned on in System Settings > iCloud > Voice Memos.
Restoring from a Backup
If voice memos were lost due to system issues, restore them using Time Machine or other backup solutions.
Recover Lost Voice Memos with Data Recovery Software
When some voice memos cannot be found anywhere, these files might be deleted by mistake or lost due to unknown issues. In such cases, you can still get back the missing voice memos.
To recover the missing or lost voice memos on Mac, you can use the professional recovery tool Donemax Data Recovery for Mac. The software is is able to recover deleted or lost data on Mac effectively.
Donemax Data Recovery for Mac
- Reliable and professional data recovery software for macOS.
- Recover deleted, formatted, or lost data in different data loss scenarios.
- Support data recovery for SD card, USB flash drive, hard drive, etc.
With the software, it's easy and fast to recover deleted or lost files on Mac. You can refer to the following steps to recover lost voice memos with the software:
Step 1. Download and install the software on your Mac. Start the software from launchpad. Select the Mac drive from the drive list.

Step 2. Click the Scan button and the software will start to search for any possible lost files, including the voice memos.

Step 3. After the scanning process is finished, the software will show you all the found files. Check and locate the voice memos. Preview and then choose the wanted ones, click Recover button to save them to another drive.

Conclusion
Voice memos on Mac are stored deep within the system, making them somewhat challenging to locate without guidance. While the Voice Memos app provides a seamless way to access recordings, finding the actual .m4a files requires navigating to "~/Library/Group Containers/group.com.apple.VoiceMemos.shared/Recordings". For users who rely on iCloud syncing, memos can also be accessed across multiple Apple devices.
To prevent accidental loss, regularly back up your voice memos by exporting them manually or using Time Machine. By following these steps, you can ensure that your important recordings remain safe and easily retrievable whenever needed.
If you still cannot find some missing or lost voice memos on Mac, you can try to recover them with the reliable Mac data recovery software Donemax Data Recovery for Mac.
Donemax Data Recovery for Mac
Donemax Data Recovery for Mac is one of the best Mac data recovery software. It is easy-to-use and can help in recovering deleted, formatted, inaccessible or lost data from Mac HDD/SSD, external disk, USB drive, SD card, camera or other storage devices.
Related Articles
- Mar 19, 2025Fix The Disk You Attached Was Not Readable by This Computer on Mac
- Nov 18, 2024How to Restart and Force Restart Mac?
- Feb 07, 2025(7 Solutions Solved) Can't Format or Erase an SD Card on Mac
- Nov 04, 2024How to Create Bootable USB Installer for macOS Sequoia?
- Feb 17, 2025Fix XQD Card Not Showing Up or Not Mounting on Mac [10 Fixes]
- Nov 25, 2024How to Create a Bootable USB Installer for macOS Monterey?

Contributing Writer
Charles
Charles, who lives in Sydney, Australia, is an editor & writer of Donemax Team. He is good at writing articles related with Apple Mac computers, Windows operating systems, data recovery, data erasure, disk clone and data backup, etc. He loves reading and playing tennis in his spare time and is interested in testing new digital devices such as mobile phones, Macs, HDDs, SSDs, digital cameras, etc.

Editor in chief
Gerhard Chou
In order to effectively solve the problems for our customers, every article and troubleshooting solution published on our website has been strictly tested and practiced. Our editors love researching and using computers and testing software, and are willing to help computer users with their problems