PAGE CONTENT:
If you've ever noticed that your Mac is running out of storage, it might be time to take a closer look at your Trash Bin. Many users overlook the importance of managing the Trash Bin, but doing so can make a significant difference in the performance of your computer. In this article, we'll go through the step-by-step process of emptying or wiping the Trash Bin on your Mac, explain how it works, discuss different methods to clean it, and share tips on how to do it securely.

How the Trash Bin Works on Mac?
The Trash Bin on your Mac is a temporary storage location for files and folders you have deleted. When you delete an item, it doesn't immediately disappear from your hard drive. Instead, it moves to the Trash Bin. This feature allows you to recover deleted files if you change your mind or accidentally delete something important.
It's essential to understand the difference between moving items to the Trash and permanently deleting them. When you move something to the Trash, the file is not entirely removed from your Mac, it's just hidden from view. The Trash Bin acts as a holding area where items can be restored, if needed. However, once you empty the Trash Bin, the files are deleted (unless you're using recovery software to recover them).
In addition to the convenience of recovering files, the Trash Bin also gives you a buffer before you permanently delete items, which can help prevent accidental data loss.
How to Empty the Trash Bin Manually?
If you want to free up storage on your Mac and eliminate unnecessary files, it's important to know how to empty the Trash Bin manually. Here's a step-by-step guide:
- Open Finder: To begin, click on the Finder icon in your Mac's Dock. Finder is the file management system on your Mac that lets you navigate through folders and files.
- Access the Trash Bin: In the Finder sidebar, look for the Trash icon at the bottom. This icon represents your Mac's Trash Bin. You can also access it by clicking on the Trash icon on the Dock.
- Review the Contents: Before you delete files permanently, it's a good idea to take a moment to review what's inside the Trash Bin. Open it, and make sure there are no files you might want to restore.
- Empty the Trash:
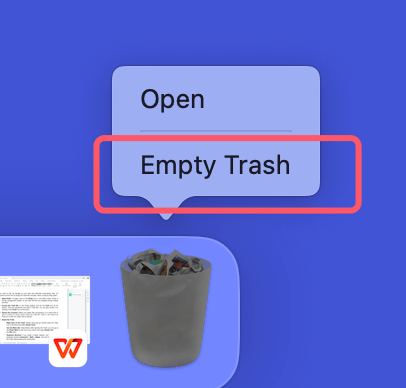
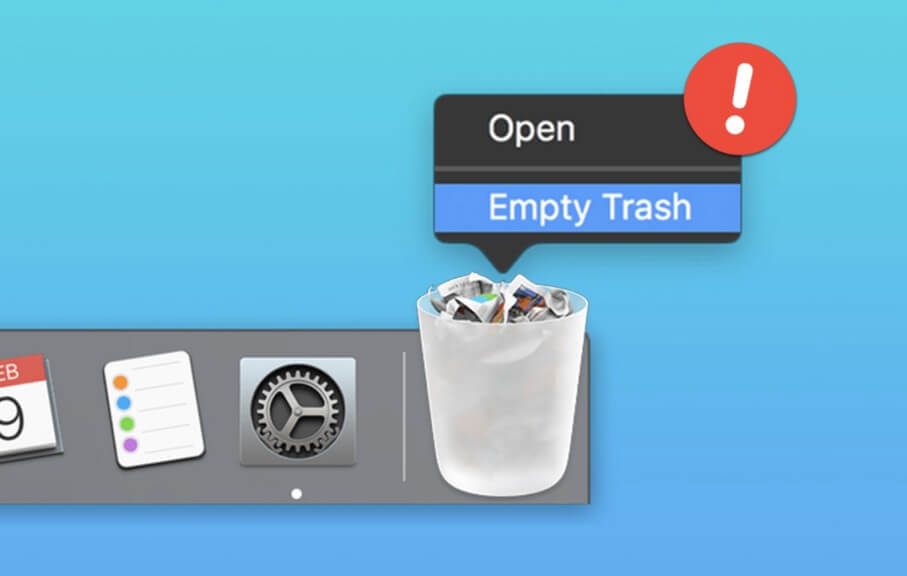
- Right-click on the Trash: Simply right-click (or Control-click) the Trash icon in the Dock and select Empty Trash.
![Right-click on the Trash]()
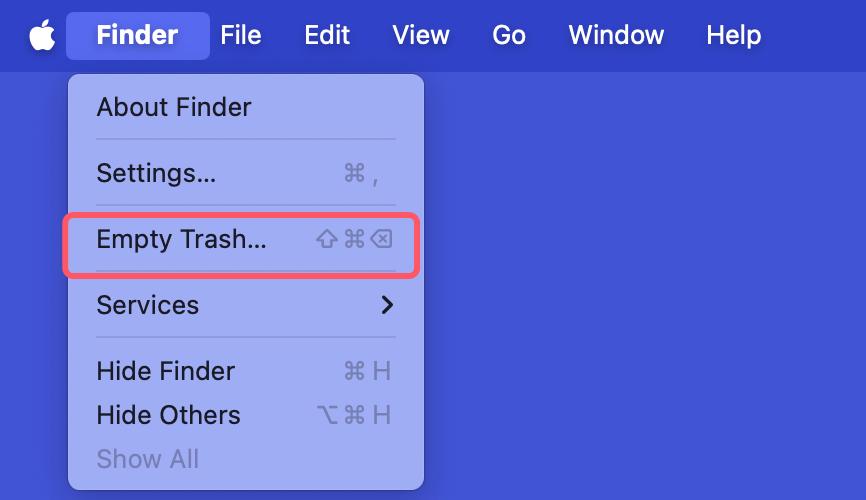
- Use the Menu Bar: Alternatively, after opening the Trash, you can go to the Finder Menu at the top of your screen and select Empty Trash from the Finder menu.
![Use the Menu Bar]()
- Keyboard Shortcut: If you prefer a faster method, you can use the keyboard shortcut Command + Shift + Delete. This will instantly empty the Trash without asking for confirmation.
- Right-click on the Trash: Simply right-click (or Control-click) the Trash icon in the Dock and select Empty Trash.
- Confirm Deletion: Once you confirm, the contents of the Trash Bin will be permanently deleted, and the storage they occupied will be reclaimed.
How to Automatically Empty the Trash Bin on Mac?
For users who want to streamline the process and save time, macOS offers the ability to automatically empty the Trash Bin. This is an excellent option if you regularly forget to empty your Trash or if you prefer not to worry about managing it manually. Here's how to set up automatic trash deletion:
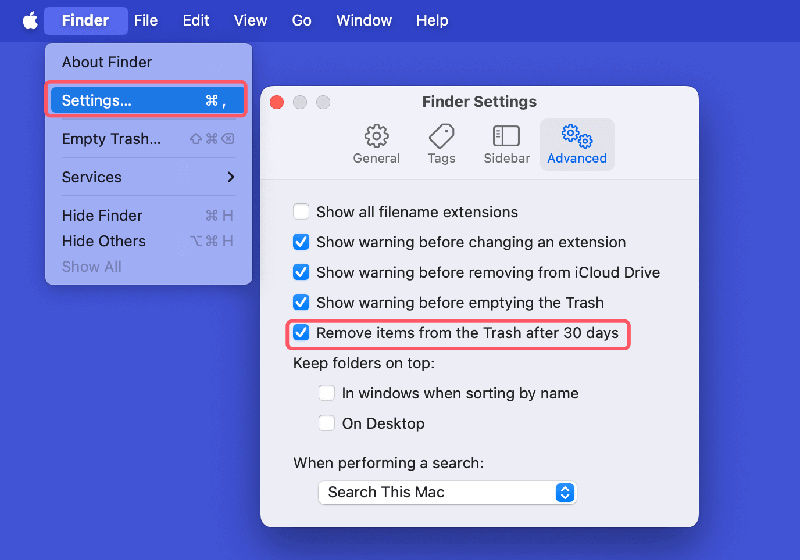
- Open Finder Settings: Open Finder and click on the Finder menu at the top of the screen. Select Settings.
- Go to the Advanced Tab: In the Finder Preferences window, click the Advanced tab.
- Enable Automatic Trash Deletion: You’ll see an option labeled "Remove items from the Trash after 30 days". Check this option to enable automatic trash deletion. Once enabled, any items in your Trash Bin that are older than 30 days will be automatically deleted.
![Enable Automatic Trash Deletion]()
- Save Settings: After selecting this option, close the Preferences window. The automatic trash-emptying feature is now active.
While automatic deletion is convenient, it does come with some risks. If you accidentally delete something important, it will be permanently lost after 30 days, and you won't have a chance to recover it. Therefore, be mindful of this option if you frequently need to recover files from your Trash.
Note: The files which have been emptied from trash bin are not lost for good and can be recovered by data recovery software.
Recover Deleted Files from Emptied Trash on Mac
Data recovery software can scan Mac's internal HDD/SSD and find all recoverable files including deleted files, erased or lost files, etc.
How to Wipe the Trash Bin Using Terminal?
For more advanced users or those who prefer to have extra control over their system, using Terminal is an option to manually wipe the Trash Bin. Terminal allows you to execute commands directly on your Mac, giving you greater control over system functions.
Here's how to securely wipe the Trash using Terminal:
- Open Terminal: You can find the Terminal app by going to Applications > Utilities > Terminal, or by using Spotlight (press Command + Space, then type Terminal).
- Enter the Command: In Terminal, type the following command:
sudo rm -rf ~/.Trash/*
This command will delete all items in your Trash Bin, bypassing any prompts that would normally appear when emptying it manually.
- Enter Your Password: You may be prompted to enter your administrator password to confirm the command. Type it in and hit Enter.
- Check Your Trash: You can verify that your Trash has been emptied by checking it in Finder. All files should be deleted.
Note: Be very cautious when using Terminal commands, especially the sudo command. This grants you superuser access, and a mistake could potentially delete important system files or cause issues with your Mac's operation. If you're not comfortable using Terminal, it's better to stick with the manual methods described earlier.
How to Securely Wipe the Trash Bin [Files Unrecoverable]
If you're concerned about the security of your deleted files, simply emptying the Trash Bin isn't always enough. When files are moved to the Trash and then deleted, they can often still be recovered using data recovery software. If you have sensitive data you want to ensure is permanently erased, you'll need to take extra steps to wipe the Trash securely.
macOS includes a secure delete option that overwrites the deleted data, making it harder to recover. Unfortunately, in recent versions of macOS (starting from macOS Sierra), Apple has removed the "Secure Empty Trash" option from the Finder menu. However, you can still securely erase files using Mac disk wipe software.
Donemax Data Eraser for Mac is a powerful Mac disk wipe application. It offers certified data erasure standards including U.S. Army AR380-19 (3 passes), DoD 5220.22-M ECE to help in permanently erase data from Mac internal drive or external storage device. It can help you securely wipe Mac's trash bin and permanently erase all already deleted/erased/lost data from your Mac HDD/SSD, ensure the deleted files are unrecoverable, lost for good.
Follow the steps below to wipe trash bin on Mac:
Step 1. Download and install Donemax Data Eraser for Mac on your Mac.
Step 2. Open Donemax Data Eraser for Mac, choose Erase Free Space mode. Then select the internal drive such as Macintosh HD, click on Erase Now button.

It will wipe free disk space of the Mac disk and permanently erase all deleted/erased/lost data.
More Tips:
Why You Should Wipe the Trash Bin Regularly?
Regularly emptying your Trash Bin offers several benefits:
- Reclaim Storage Space: Items in the Trash still take up space on your hard drive. By emptying it regularly, you free up valuable storage that can be used for other files or apps.
- Improve System Performance: A full hard drive can slow down your Mac. By managing your Trash and keeping your storage clean, you help maintain your Mac’s optimal performance.
- Enhance Security: If you've deleted sensitive information, like personal documents or passwords, it's important to wipe the Trash securely to prevent it from being recovered by anyone who gains access to your Mac.
- Avoid Accidental Deletion: If your Trash Bin becomes overloaded with files, it can be easy to overlook important documents that you may want to recover. Regularly emptying the Trash ensures you don't lose control over the files that you've discarded.
Troubleshooting Common Trash Bin Issues
Sometimes, you might encounter issues with your Trash Bin that prevent it from emptying properly. Here are some common problems and their solutions:
- Trash Won't Empty: If the Trash won't empty, try these solutions:
- Close open apps: Files that are in use may prevent the Trash from emptying.
- Use Terminal: Use the Terminal method to force-empty the Trash.
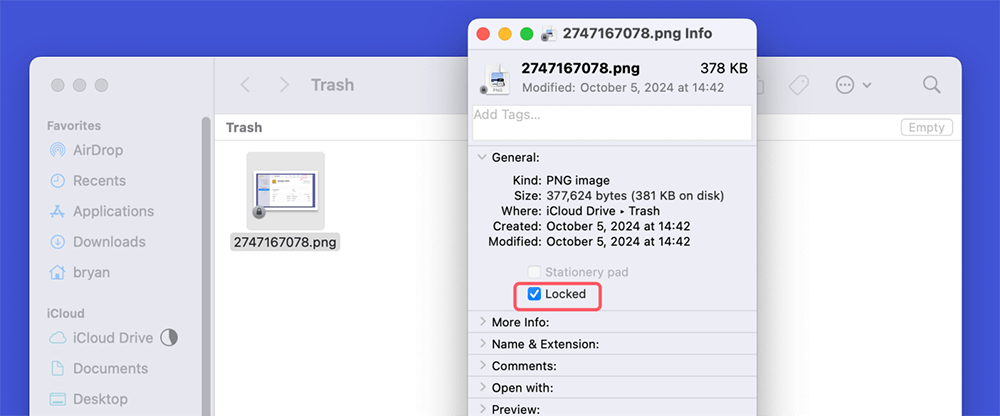
- File Stuck in Trash: If a file is stuck in the Trash, it might be because the file is in use or locked. Right-click the file and choose Get Info to check if the file is locked. Uncheck the "Locked" box and try emptying the Trash again.
- Trash Is Full: If your Trash Bin is full but won't empty, you may have a corrupted system cache. You can use Disk Utility to repair your drive or reset the Trash manually using Terminal commands.
Conclusion
Managing your Trash Bin on Mac is more than just a routine maintenance task. It plays a crucial role in optimizing your storage, enhancing system performance, and protecting your data. Whether you prefer to do it manually, set up automatic deletion, or securely wipe files for privacy reasons, keeping your Trash Bin clean can make a big difference in your Mac's overall health. Be mindful of your files and remember that once the Trash Bin is emptied, the contents are gone for good - unless you use data recovery tools promptly.
FAQs About Emptying or Wiping Trash Bin on Mac
1. How to empty trash bin on Mac?
- Find Trash icon on Dock.
- Right-click Trash, choose Empty Trash.
2. How to recover lost files after emptying trash bin on Mac?
It's important to remember that once you've emptied the Trash Bin, files are permanently deleted. However, if you've emptied your Trash Bin by accident or you've changed your mind about deleting a file, there are a few ways to recover it - if you act quickly.
Method 1: Use Data Recovery Software: Several data recovery tools can help you recover deleted files even after you've emptied the Trash.
Step 1. Download and install Donemax Data Recovery for Mac and run it from Launchpad.
Step 2. Open Donemax Data Recovery for Mac, select the internal disk to start data recovery.

Step 3. Click on Scan button to deeply scan the internal disk.

Step 4. Once the scan is completed, you can preview all recoverable files. Then select the wanted files, click on Recover button to save them.

Method 2: Use Time Machine: If you have Time Machine set up on your Mac, you can restore deleted files by going back to a backup from before the file was deleted. Open Time Machine, navigate to the date you want to restore from, and restore the deleted file.
3. How to wipe trash bin to permanently erase deleted files on Mac?
Mac disk wipe software can help you securely wipe trash bin on Mac:
- Download and install Donemax Data Eraser for Mac, open it.
- Choose Erase Free Space mode.
- Select the startup disk, click on Erase Now button.
- Permanently erase all deleted/formatted/lost data.
4. Can't empty a file in trash bin, how to fix this issue?
- Just right-click the file and choose Get Info.
- Uncheck Locked.
![Uncheck Locked]()
Related Articles
- Nov 20, 2024How to Factory Reset macOS Big Sur? [Intel-based/Apple silicon supported]
- Nov 15, 2024Best Hard Drive Erasing Tool for Mac: A Comprehensive Guide
- Nov 27, 2024Factory Reset macOS 13 Ventura: A Comprehensive Guide
- May 27, 2024How to Wipe All Data Before Selling or Donating iMac?
- May 07, 2024How to Wipe Free Disk Space on Mac?
- Feb 19, 2024How to Permanently Delete or Shred Files on Mac?

Lucien
Lucien is a writer and a chief programmer of Donemax software who has worked in the company for 5+ years. He has written much of the content on the site and devotes to providing troubleshooting and solution for Windows and Mac users including disk cloning, data recovery, migration, eraser, error fixes.

Gerhard Chou
In order to effectively solve the problems for our customers, every article and troubleshooting solution published on our website has been strictly tested and practiced. Our editors love researching and using computers and testing software, and are willing to help computer users with their problems
