Tip: If you will sell or donate your Mac which is running macOS Ventura, you can factory reset it and use disk wipe software - such as Donemax Data Eraser for Mac to wipe free disk space of the Mac, so that no data is recoverable.
PAGE CONTENT:
macOS Ventura is a robust and feature-rich operating system, but sometimes, a factory reset becomes necessary. Whether you're preparing to sell your Mac, troubleshooting persistent software issues, or simply starting fresh, understanding how to reset macOS Ventura safely and effectively is crucial. This guide walks you through every step of the process, from preparation to post-reset setup, ensuring your data is safe and your system runs smoothly afterward.
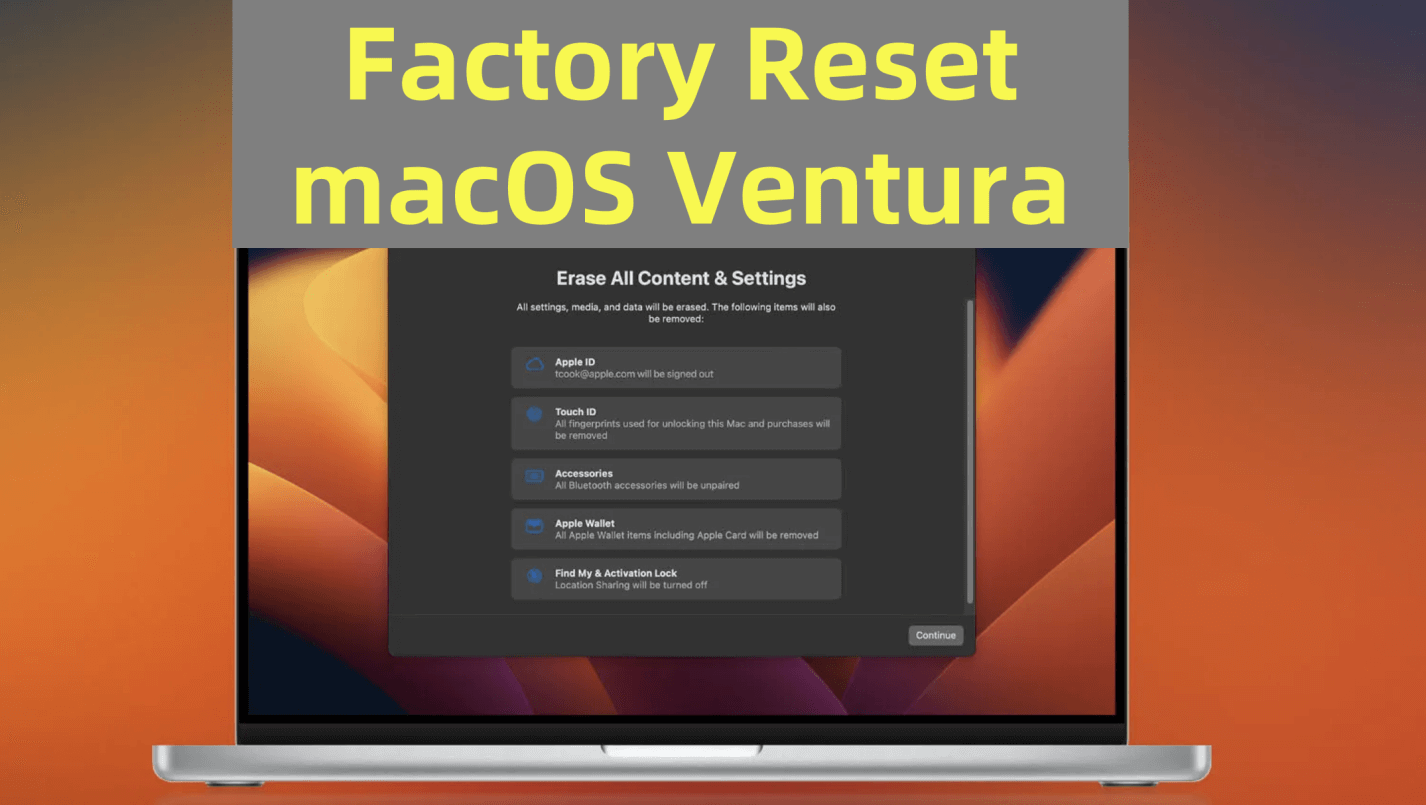
Things You Need to Do Before Factory Reset macOS Ventura
Before embarking on the journey of factory resetting macOS Ventura, it's essential to prepare your Mac properly. This step is crucial not only for safeguarding your data but also for ensuring a smooth and trouble-free reset process. Here, we dive deeper into each preparatory task to help you set the stage for success.
1. Backup Your Data
The importance of backing up your data cannot be overstated. A factory reset will erase everything on your Mac, including personal files, documents, photos, videos, and installed applications. Losing these without a backup can be devastating, especially if the reset was intended to resolve a specific problem rather than start fresh.
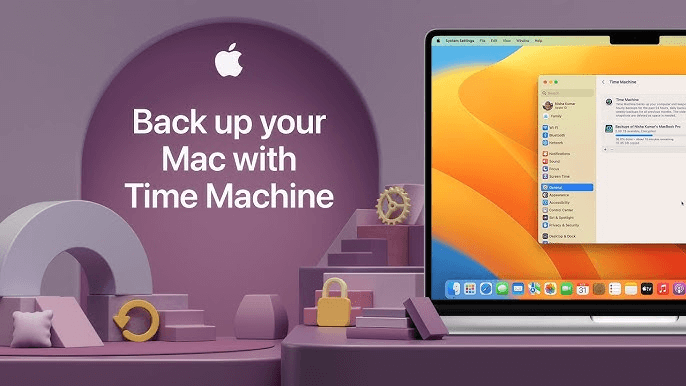
Apple's Time Machine remains the gold standard for backing up a Mac. This built-in utility is both intuitive and effective. To create this backup:
- Attach your Mac to an external hard disk.
- Select General > Time Machine from the System Settings menu.
- Launch the backup procedure after choosing the external drive as your backup disk.
![Factory Reset macOS 13 Ventura]()
Time Machine offers incremental backups, meaning it saves changes made to your files over time. This enables you to recover particular file versions following a Mac reset.
For those who prefer alternatives, third-party tools like Donemax Disk Clone for Mac, Carbon Copy Cloner or SuperDuper! provide powerful cloning features, allowing you to create an exact replica of your system. Cloud storage services such as iCloud Drive, Google Drive, or Dropbox also serve as convenient options for storing essential files online, accessible anytime, anywhere.
🔗 Related article: how to make a full bootable clone backup for macOS Ventura.
2. Sign Out of iCloud and Other Services
Failing to sign out of iCloud and other services can lead to complications during the reset process. Apple employs a security feature called Activation Lock, which links your Apple ID to the Mac. While this feature protects against unauthorized access, it can also prevent you from completing the reset if you forget to sign out beforehand.
To sign out of iCloud:
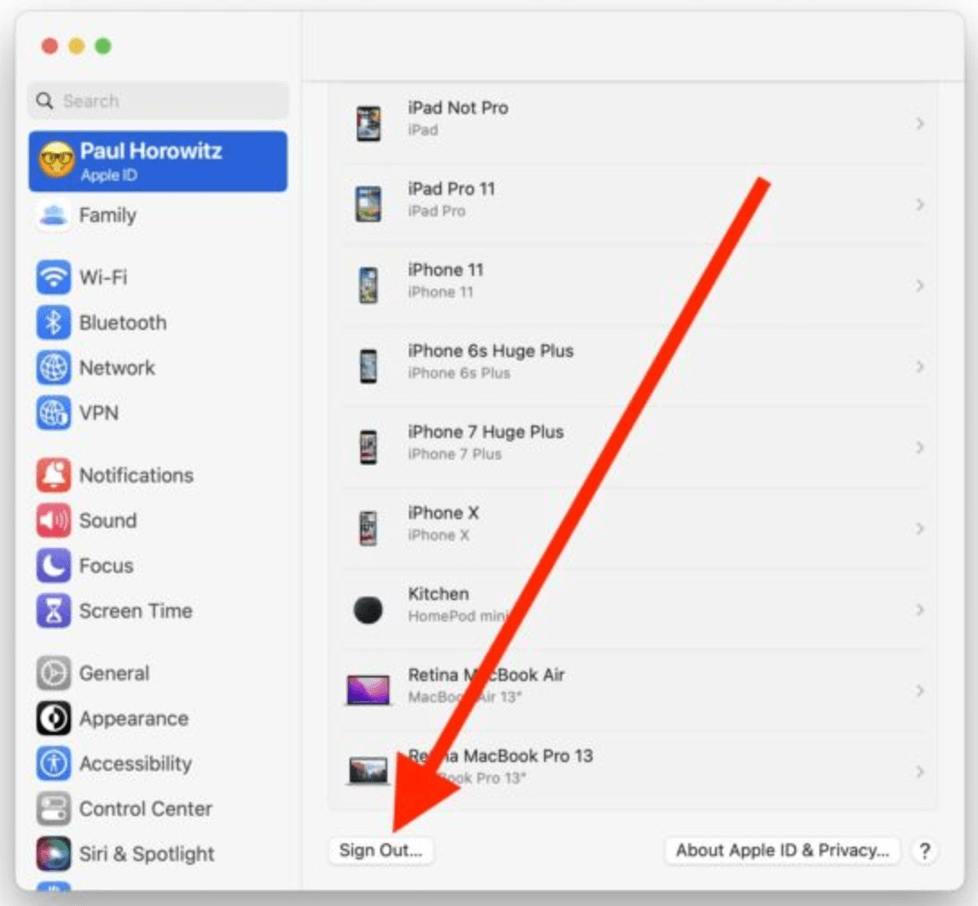
- Open System Settings.
- Click your Apple ID at the top of the sidebar.
- Scroll down and select Sign Out.
![Factory Reset macOS 13 Ventura]()
When signing out, your Mac will ask if you'd like to keep a copy of iCloud data, such as contacts or calendars, on your Mac. Choose based on your backup preferences, as this data will still be erased during the reset.
Don't forget to sign out of other services like iMessage, FaceTime, and any third-party accounts linked to your Mac. This ensures your system is entirely disconnected from your personal accounts, which is especially important if you're selling or giving away your device.
3. Confirm Requirements
A successful reset requires meeting a few essential conditions. First, ensure your MacBook is sufficiently charged or plugged into power during the process. A sudden loss of power during the reset could result in data corruption or system errors.
Next, verify your internet connection. Reinstalling macOS Ventura typically requires downloading the operating system files from Apple's servers. A stable Wi-Fi connection ensures this process runs without interruptions. If you're working in an area with unreliable Wi-Fi, consider using a wired Ethernet connection for added stability.
Lastly, make sure your hardware satisfies the system requirements for the reset and reinstallation, and that the version of macOS Ventura you are using on your Mac is suitable. If you're unsure, check Apple's official support documentation for compatibility details.
By taking the time to carefully back up your data, sign out of services, and prepare your Mac, you're setting yourself up for a smooth factory reset experience. These steps may take a little extra effort upfront, but they save time and potential frustration in the long run, ensuring your transition to a fresh start is as seamless as possible.
How to Factory Reset macOS Ventura?
Once your preparations are complete, you’re ready to reset your Mac. Follow these detailed steps to perform a factory reset on macOS Ventura.
Step 1: Boot Into macOS Recovery Mode
Recovery Mode is a special environment that allows you to repair or reinstall macOS. Here's how to access it:
- Give your Mac a restart.
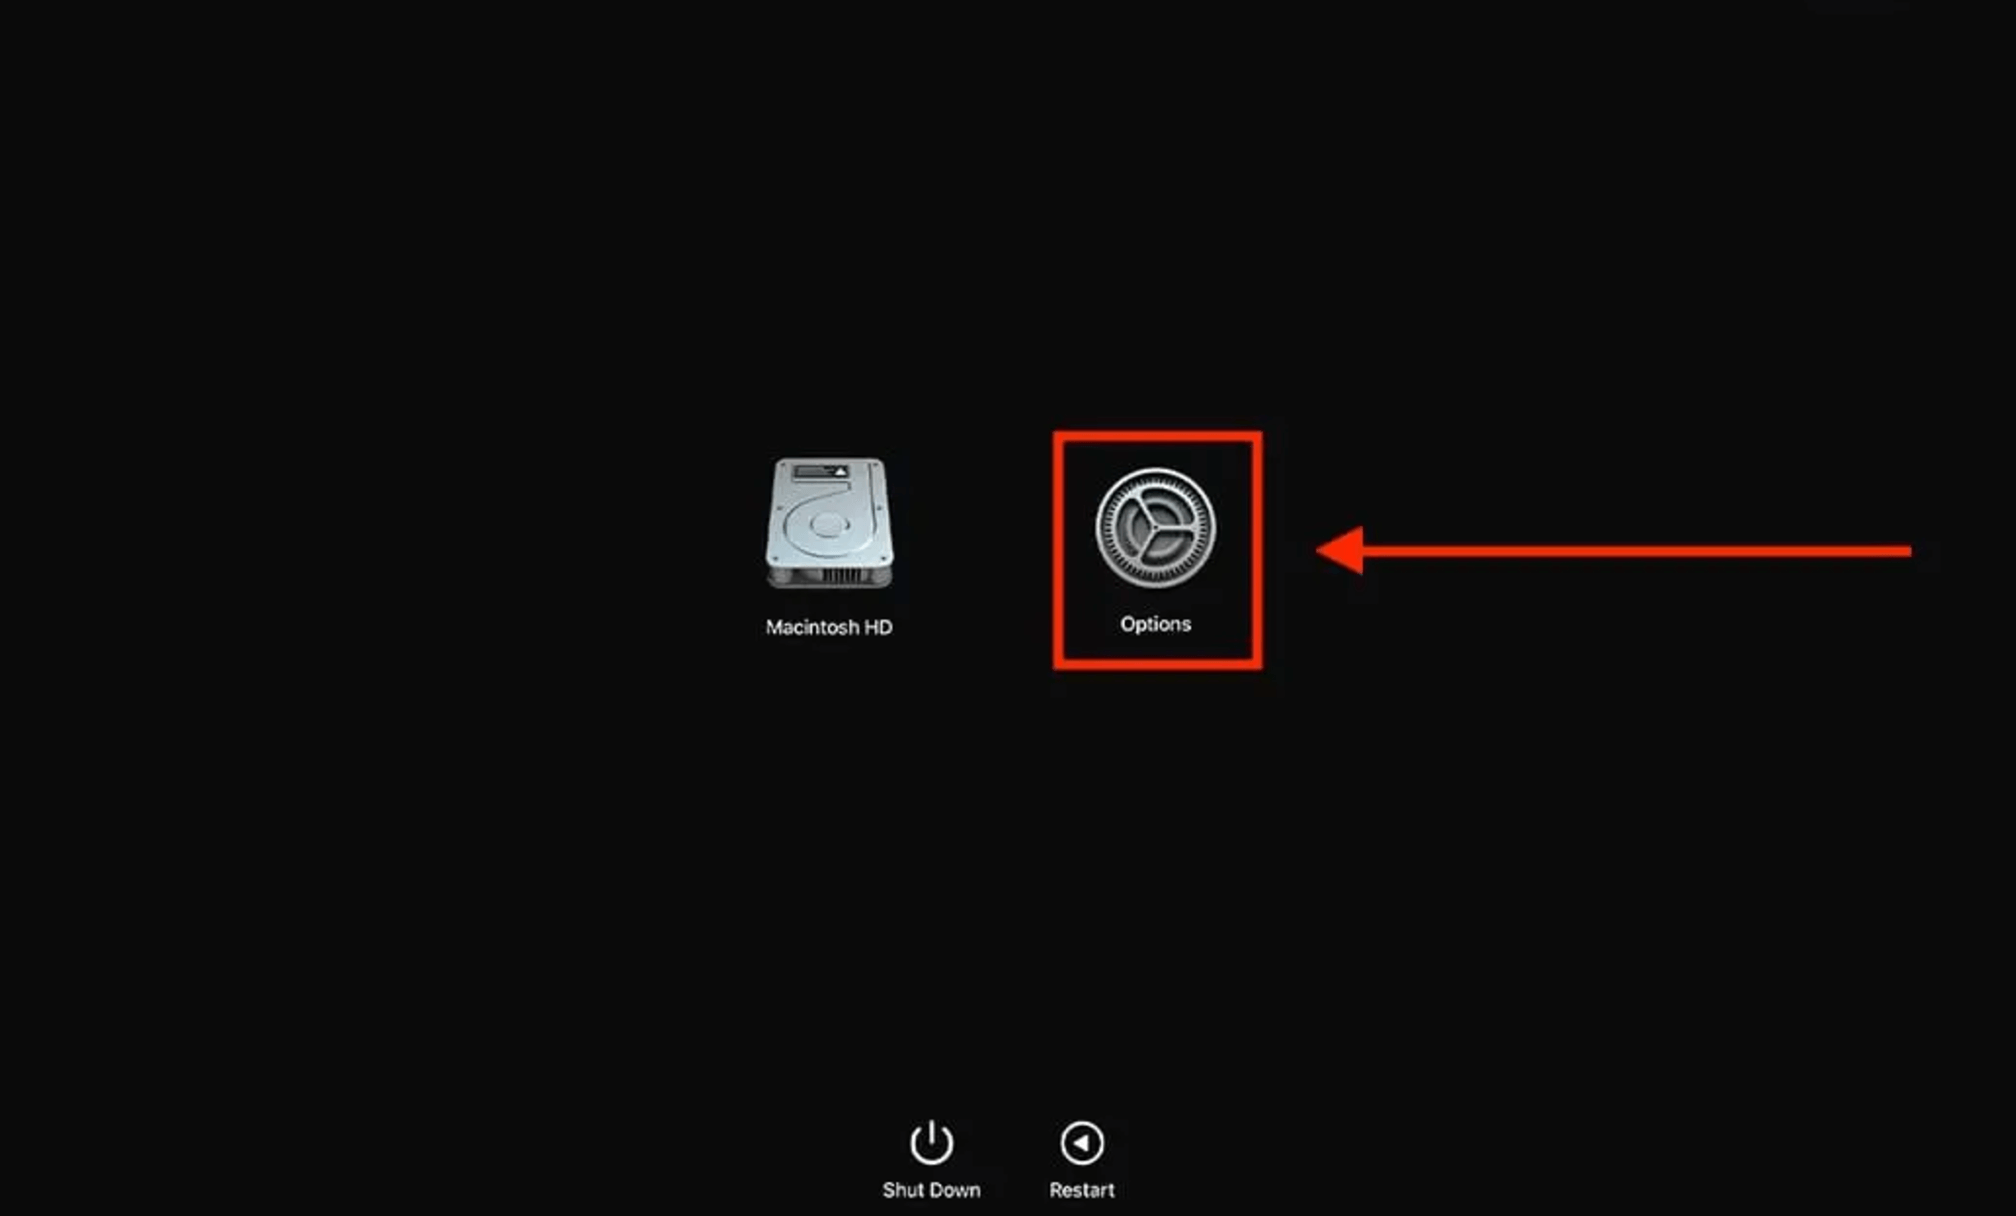
- Press and hold Command + R (for Intel-based Mac) to boot in to macOS Recovery mode. For Apple silicon Mac, press and hold Power button until Loading Startup Options appears, then choose Options and click Continue.
![Factory Reset macOS 13 Ventura]()
Step 2: Erase the Disk
With Recovery Mode open, the next step is to erase your Mac's internal storage. This ensures a clean slate for reinstalling macOS Ventura.
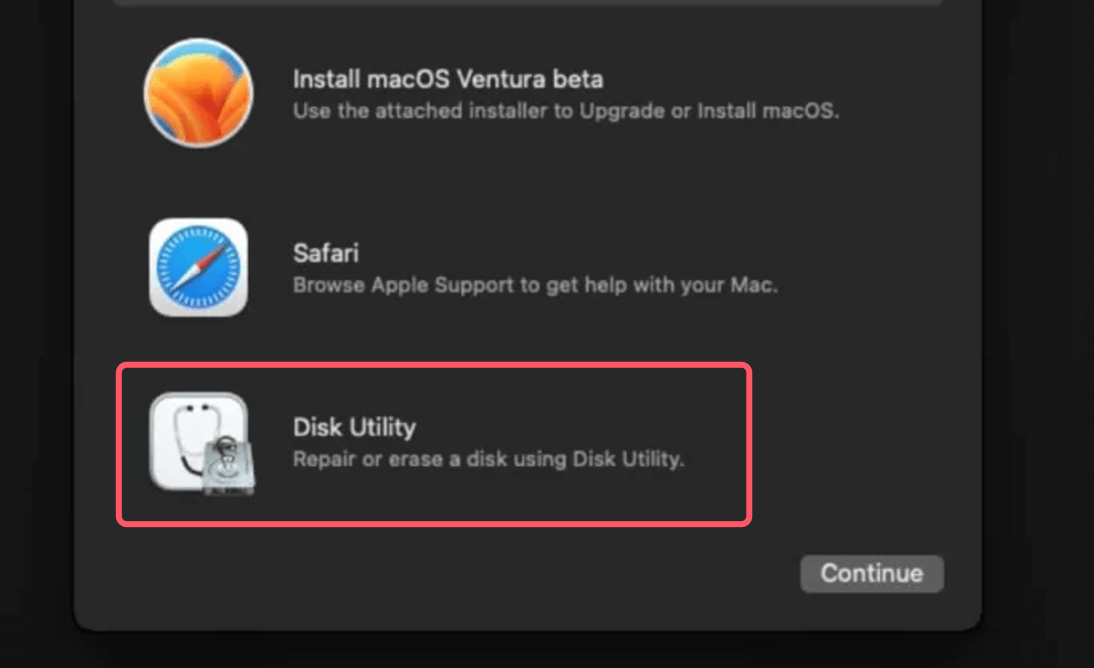
- Choose Disk Utility from the macOS Utilities box, then click Continue.
![Factory Reset macOS 13 Ventura]()
- In Disk Utility, locate your startup disk (typically named Macintosh HD).
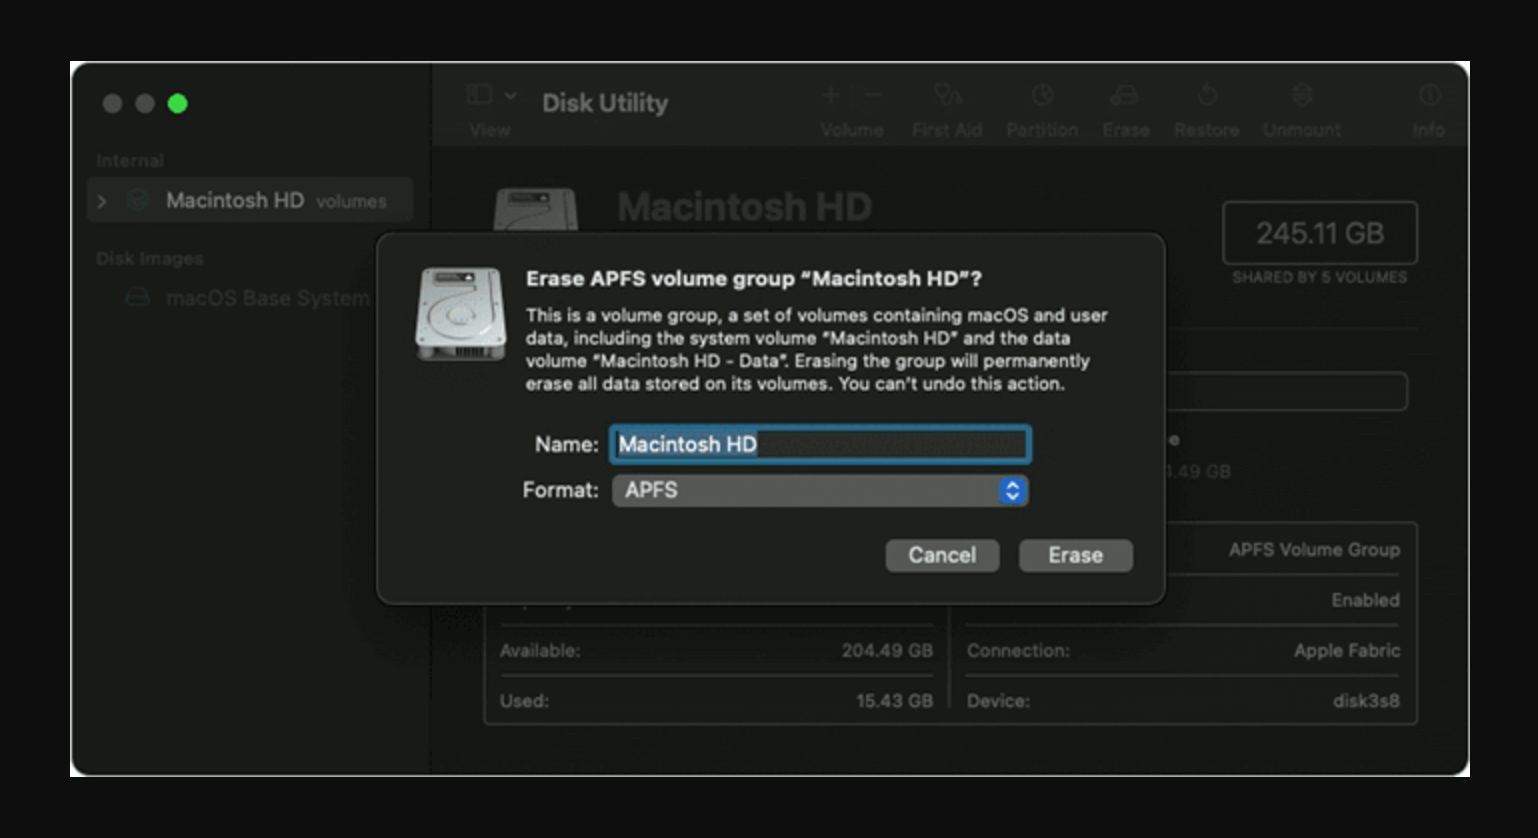
- Select the disk and click Erase at the top of the window.
- Choose a format: Choose Mac OS Extended (Journaled) for older Macs or APFS for newer Macs.
- Click Erase to confirm.
![Factory Reset macOS 13 Ventura]()
After the process completes, to get back to the macOS Utilities window, shut Disk Utility.
Step 3: Reinstall macOS Ventura
With your disk erased, it's time to reinstall macOS Ventura.
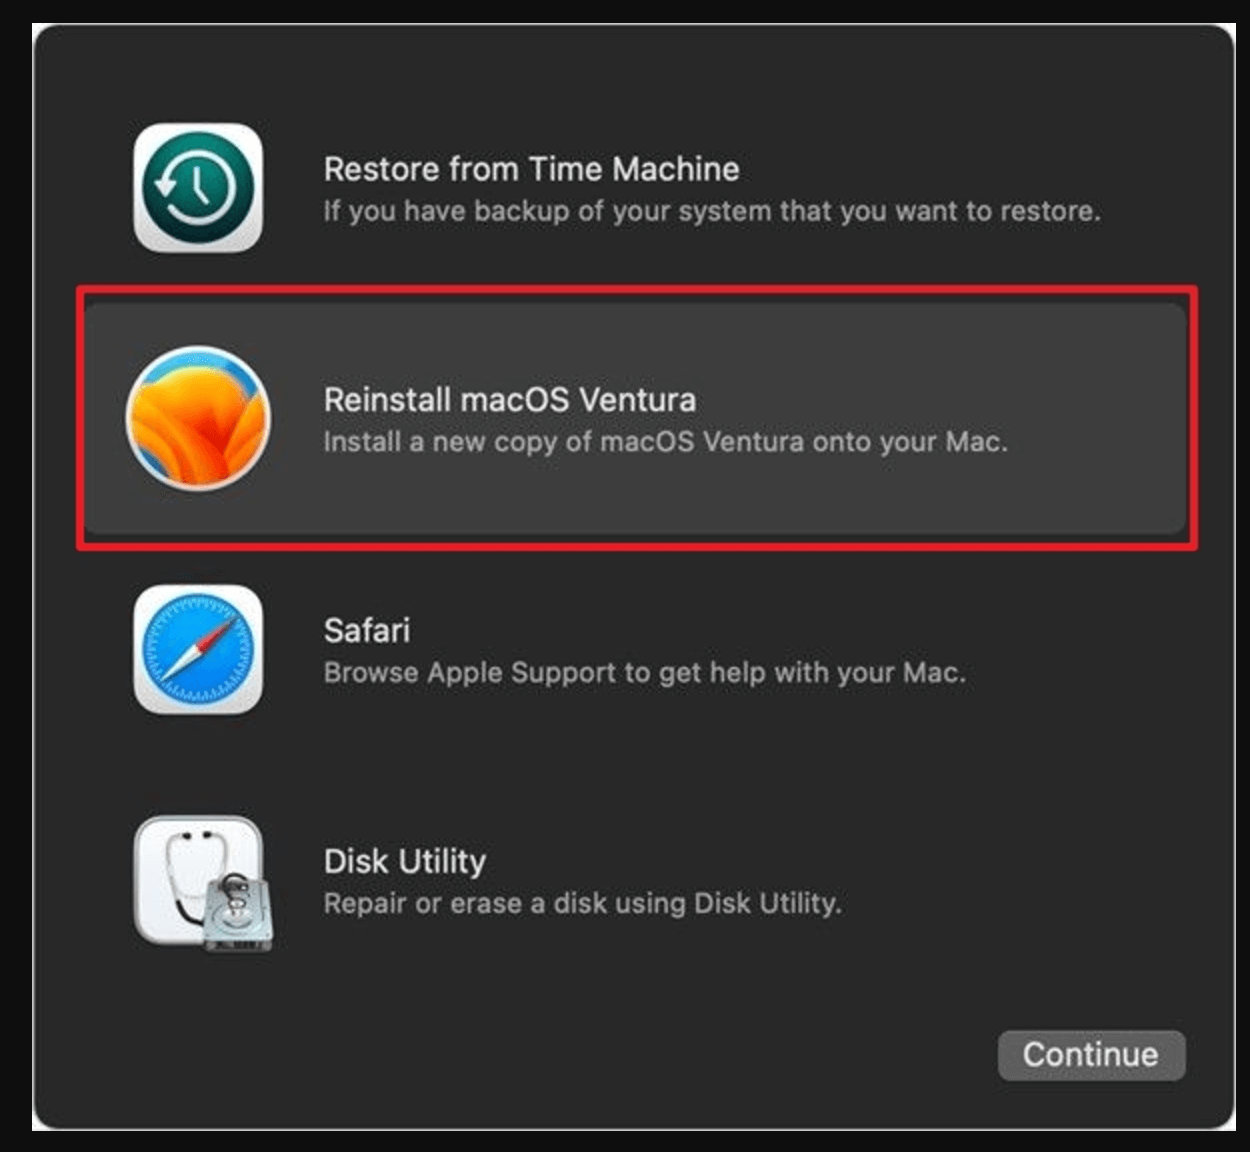
- Click Continue after choosing Reinstall macOS Ventura in the macOS Utilities window.
![Factory Reset macOS 13 Ventura]()
- Follow the on-screen prompts to select your disk and begin the installation.
- Ensure your Mac remains connected to power and Wi-Fi throughout the process.
Depending on your Mac model and internet speed, the installation could take a while. Once complete, your Mac will restart and display the setup assistant.
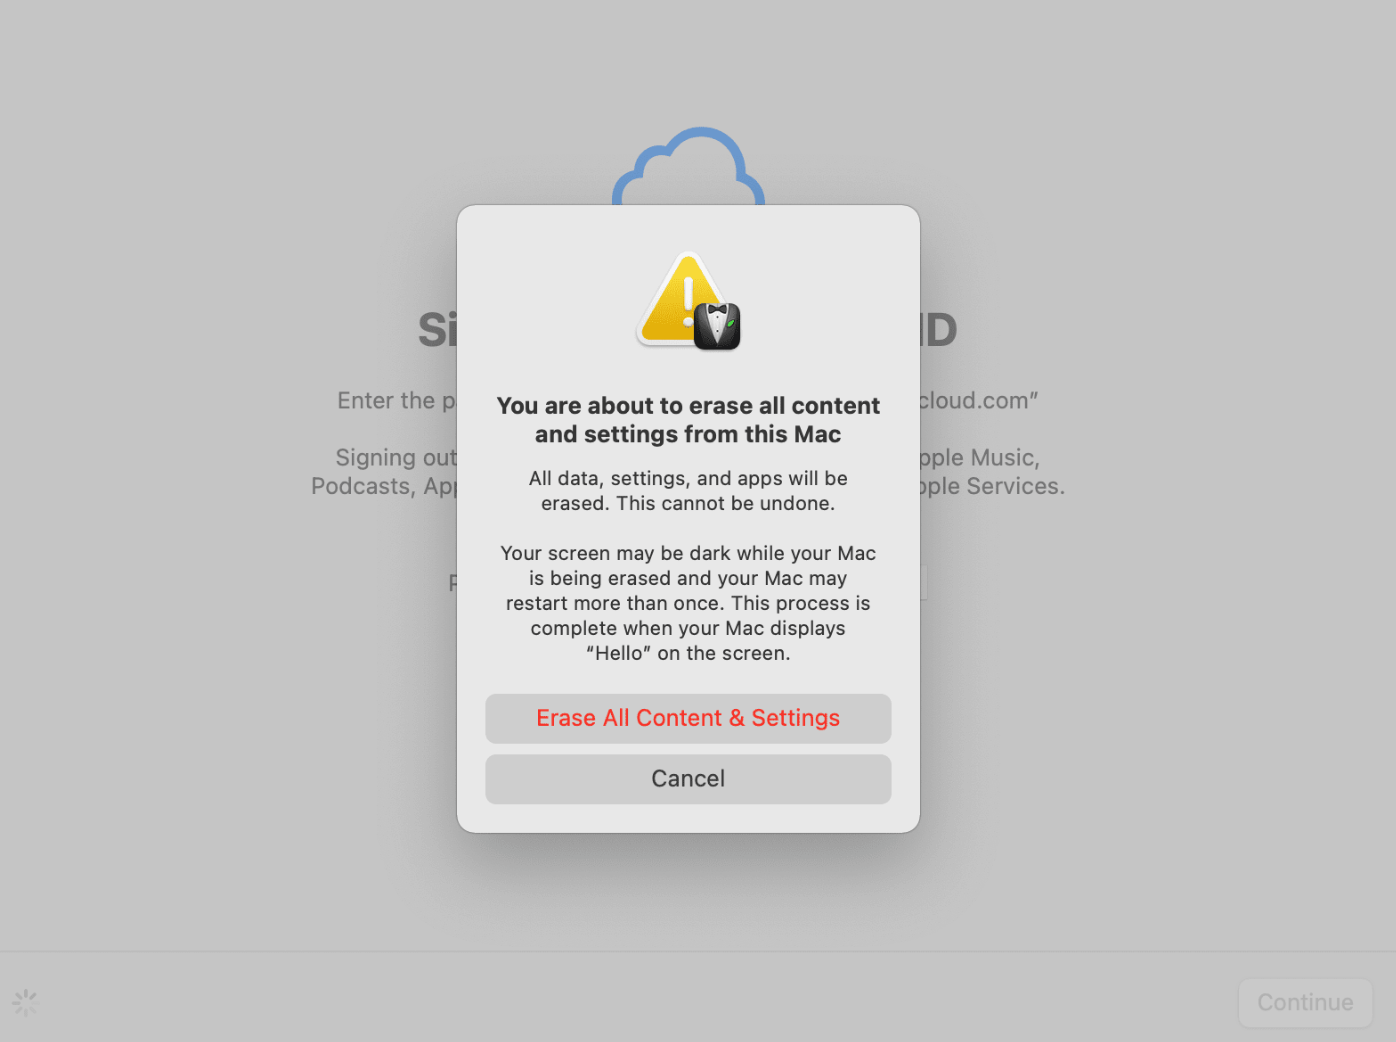
You also can use Erase All Content and Settings feature to help you reset macOS Ventura:
- Click Apple logo, choose System Settings.
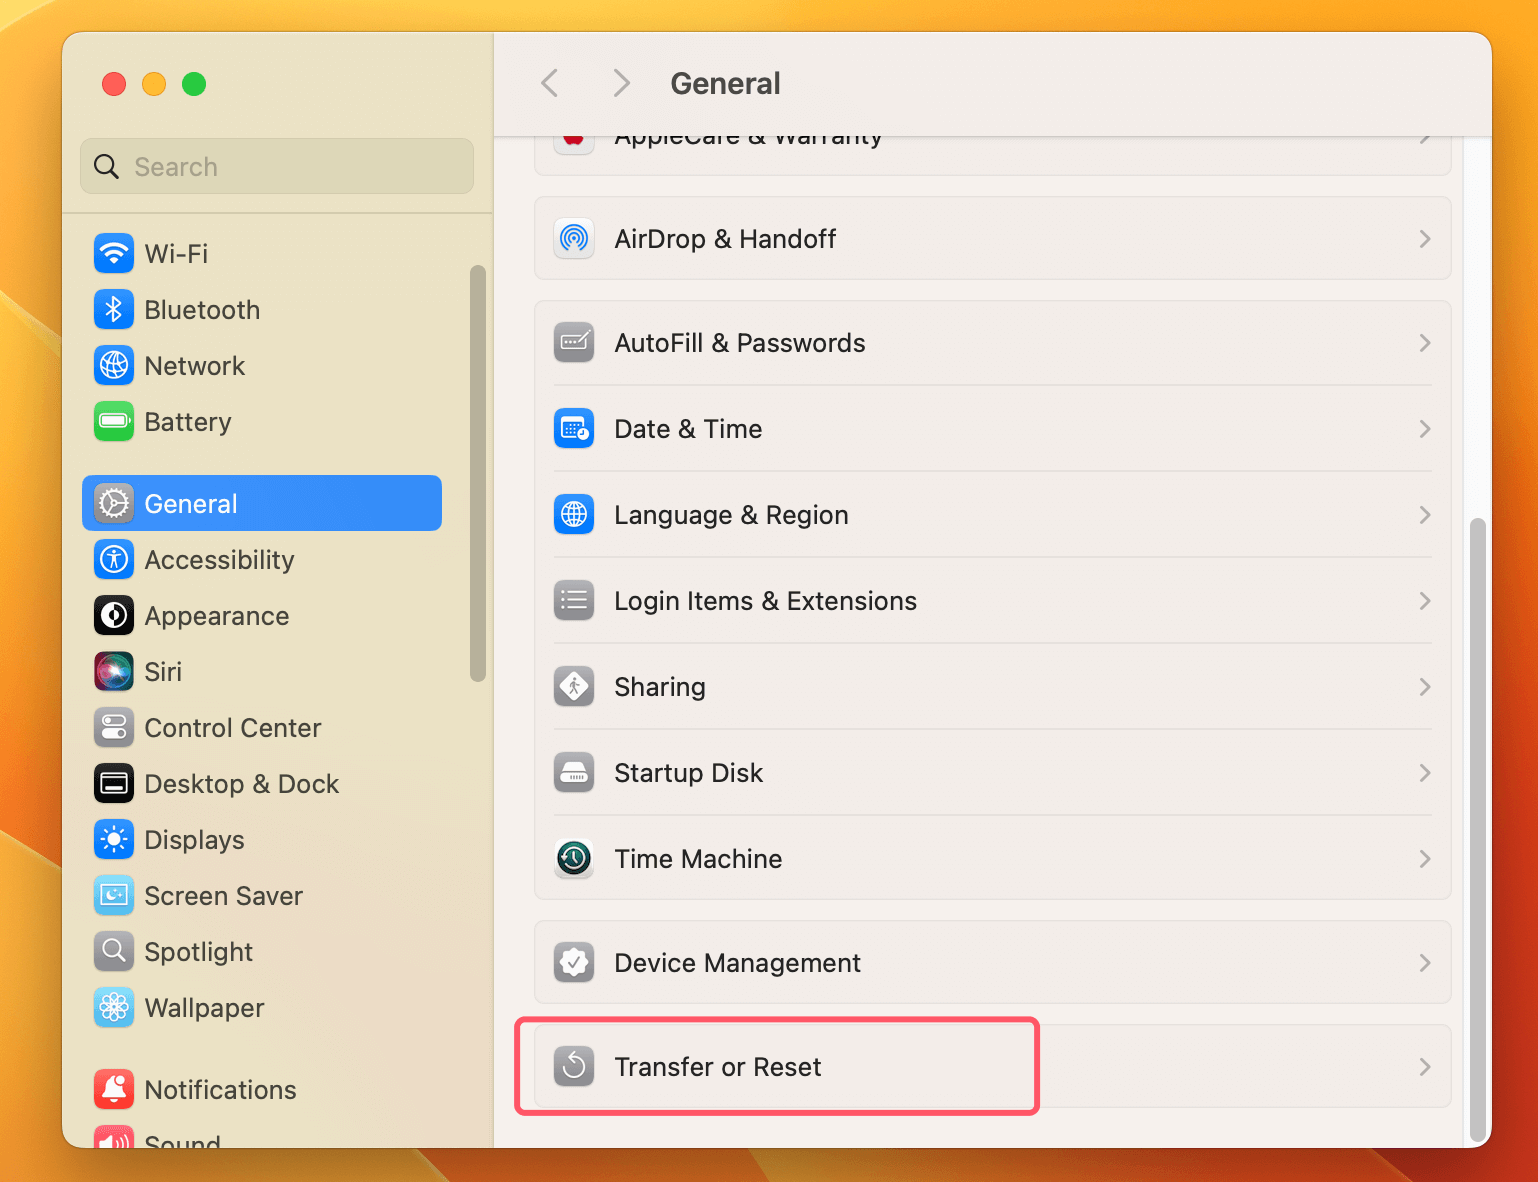
- Go to General > Transfer or Reset.
![Factory Reset macOS 13 Ventura]()
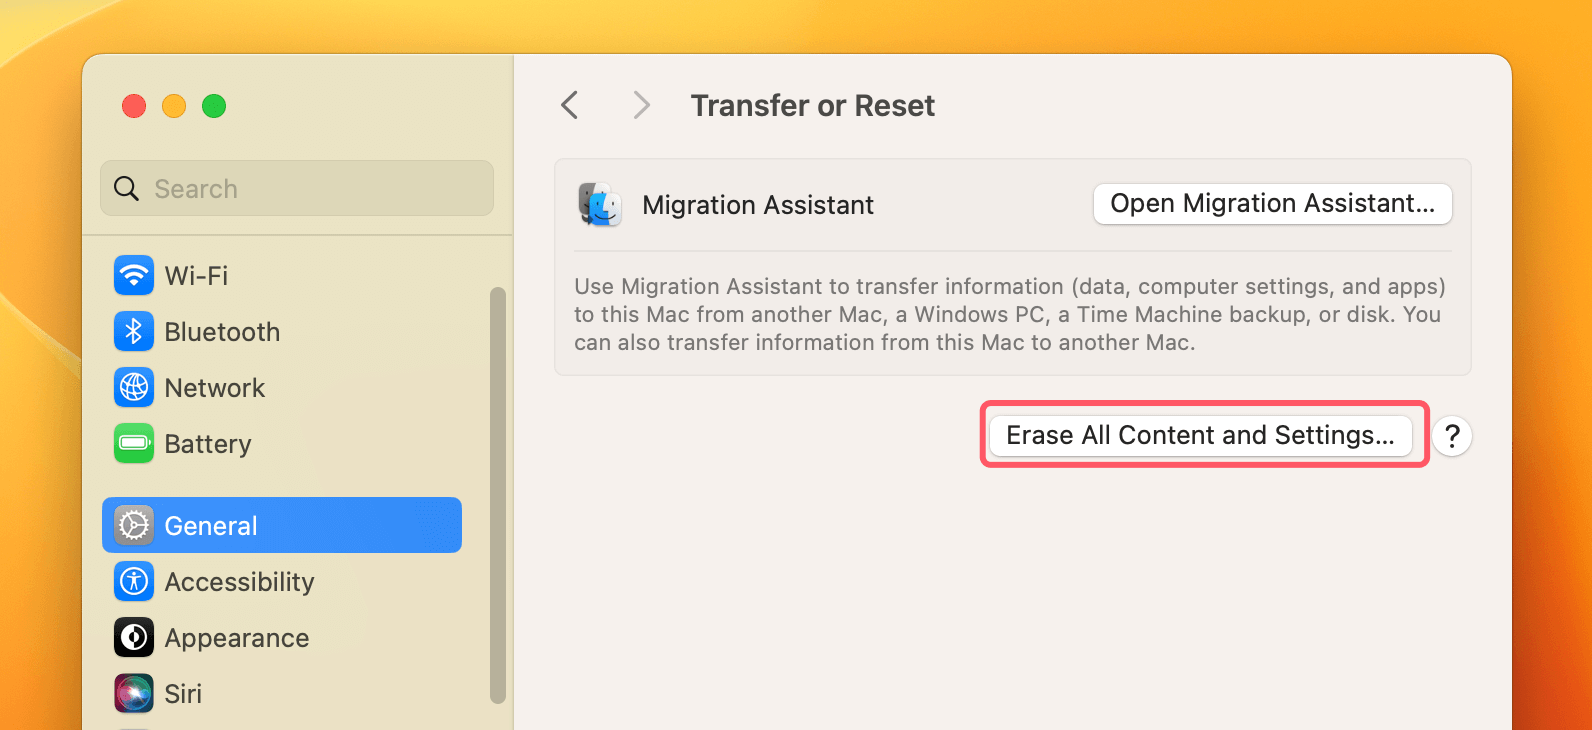
- Click Erase All Content and Settings.
![Factory Reset macOS 13 Ventura]()
- Then a window (erase assistant) opens, follow the onscreen instructions to erase everything from the Mac.
![Factory Reset macOS 13 Ventura]()
Post-Reset Setup
A freshly reset Mac requires configuration before it's ready to use. The setup process is straightforward and allows you to customize your preferences.
Initial Configuration:
After the reset, your Mac will guide you through its setup assistant. This includes:
- Choosing a Language and Region: Select your preferred options for the interface and keyboard.
- Connecting to Wi-Fi: Choose your network and enter the password.
- Signing in With Your Apple ID: Enter your Apple ID credentials to sync iCloud, the App Store, and other services.
- Setting Up Security Options: Create a password for your Mac and enable features like Touch ID or Face ID, if supported.
Follow the on-screen prompts to complete the setup.
Restoring Backup (If Applicable):
If you created a backup before resetting, you can restore your data now. During setup, macOS will offer the option to migrate data from a backup. Choose From a Time Machine Backup and connect your backup drive to begin the restoration process.
Alternatively, manually transfer files from cloud storage or external drives after setup is complete.
Testing the System:
Once your Mac is up and running, test the system to ensure everything works as expected. Verify that the reset resolved any issues you were experiencing, and confirm that essential features like Wi-Fi, Bluetooth, and installed apps function properly.
Common Troubleshooting Tips
Despite following the steps, issues can sometimes arise during the reset process. Here are some troubleshooting tips to address common problems.
Can't Access Recovery Mode:
If you're unable to enter Recovery Mode, try these solutions:
- For Intel Macs: Ensure you're holding Command (⌘) + R immediately after restarting.
- For Apple Silicon Macs: Make sure you’re pressing and holding the Power button long enough to access startup options.
- Use Internet Recovery: Restart your Mac and press Option (⌥) + Command (⌘) + R to enter Internet Recovery. This requires a strong internet connection.
Disk Won't Erase:
If Disk Utility fails to erase your disk:
- Ensure you've selected the correct disk.
- Click View in the Disk Utility toolbar and choose Show All Devices to locate the parent disk.
- Boot into Internet Recovery and repeat the erasure process.
Installation Issues:
If macOS Ventura fails to reinstall:
- Check your internet connection.
- Restart your Mac and try again.
- Use a bootable USB installer if the issue persists. You can create one on another Mac using the Terminal.
Data Loss:
If you have lost data due to resetting macOS Ventura and you don't have a backup, you can use Mac data recovery software to get the lost data back.
Step 1. Download and install the best Mac data recovery software on your Mac.
Step 2. Open Donemax Data Recovery for Mac, select the internal drive (usually named Macintosh HD) to start data recovery.

Step 3. Click on Scan button to deeply scan the internal drive and find all recoverable files.

Step 4. Once the scan is completed, you can preview all recoverable files. Just select the wanted ones, click on Recover button to save them.

When to Seek Professional Help
Sometimes, technical difficulties or hardware issues may prevent you from completing the reset process. In such cases, it’s best to seek professional assistance. Contact Apple Support or visit an Apple Store to resolve complex issues. Additionally, third-party repair services specializing in Macs can provide expert help.
Securely Wipe Free Space of macOS Ventura Before Selling Your Mac
To prevent the deleted/erased data on the Mac which is running macOS Ventura from being recovered by data recovery software, you can use Mac data erasure program to wipe the free disk space of the internal drive.
Step 1. Download and install the best Mac data erasure program - Donemax Data Eraser for Mac, then open it.
Step 2. Open Donemax Data Eraser for Mac, choose Erase Free Space mode, then select the internal drive, click on Erase Now button.

It wipes free disk space of the internal drive and permanently erase all deleted/erased/lost data from the drive.
Conclusion
A factory reset can breathe new life into your Mac, resolving persistent issues or preparing it for a new owner. By following the steps outlined in this guide, you can reset macOS Ventura safely and confidently. Remember to back up your data, sign out of accounts, and test your system after resetting to ensure a seamless experience. With the right preparation and a clear understanding of the process, you'll have a clean and efficient Mac ready for anything you need.


Donemax Data Eraser for Mac
100% safe and powerful Mac data erasure program. It offers certified data erasure standards including U.S. Army AR380-19, DoD 5220.22-M ECE to help in securely and permanently erase data from Mac HDD/SSD and external storage device, making data recovery be impossible.
Related Articles
- Dec 09, 2024How to Use Terminal Commands to Erase a Drive on Mac?
- Aug 21, 2023How to Permanently Erase Data on MacBook Air?
- Mar 04, 20242025 Full Guide to Reset Mac mini [Intel-based and Apple Silicon Supported]
- Feb 22, 2024Use Erase All Content and Settings on macOS [macOS Sequoia Supported]
- Dec 28, 2024Free WD or Seagate Disk Formatting Tool for Mac
- Nov 13, 2023How to Permanently Erase Data from Mac Startup Disk?

Christina
Christina is the senior editor of Donemax software who has worked in the company for 4+ years. She mainly writes the guides and solutions about data erasure, data transferring, data recovery and disk cloning to help users get the most out of their Windows and Mac. She likes to travel, enjoy country music and play games in her spare time.

Gerhard Chou
In order to effectively solve the problems for our customers, every article and troubleshooting solution published on our website has been strictly tested and practiced. Our editors love researching and using computers and testing software, and are willing to help computer users with their problems
