PAGE CONTENT:
Performing a clean install of macOS Ventura is a great way to refresh your Mac, enhance performance, and resolve lingering software issues. Unlike a standard upgrade, a clean install wipes your drive entirely and installs the operating system from scratch. This process ensures that no leftover files, old settings, or unnecessary clutter slow down your machine.
With macOS Ventura, Apple has introduced a host of new features and optimizations, making it an excellent candidate for a fresh start. Whether you're upgrading from an older macOS version or looking to solve persistent problems, this guide will walk you through the steps to perform a clean install of macOS Ventura effectively.
Why Choose a Clean Install macOS Ventura?
A clean install has several benefits:
- Improved Performance: Removes unnecessary files and legacy software that might slow down your Mac.
- Resolved Issues: Clears software conflicts and system bugs.
- Optimized Storage: Frees up space by eliminating old, unused files and applications.
- Fresh Start: Offers a clutter-free experience with only essential applications and files.
If you're ready to experience macOS Ventura at its best, let's dive into the process.
Preparation Before Installing macOS Ventura
1. Backup Your Data
A clean install deletes everything on your drive, so creating a backup is crucial. Use one of the following methods:
- Time Machine: The easiest way to back up your entire system. Connect an external drive, open Time Machine, and follow the prompts.
- iCloud: Backup essential files like photos, documents, and settings to iCloud.
- External Drive: Manually copy critical files and folders to an external storage device.
After backing up, verify the integrity of the backup by attempting to access a few files. This ensures you can restore your data if needed.
2. Check System Requirements
Before proceeding, confirm that your Mac supports macOS Ventura. You'll also need at least 12 GB of free storage and a stable internet connection for downloading the installer.
3. Download macOS Ventura
Download the macOS Ventura installation file directly from Apple's website:
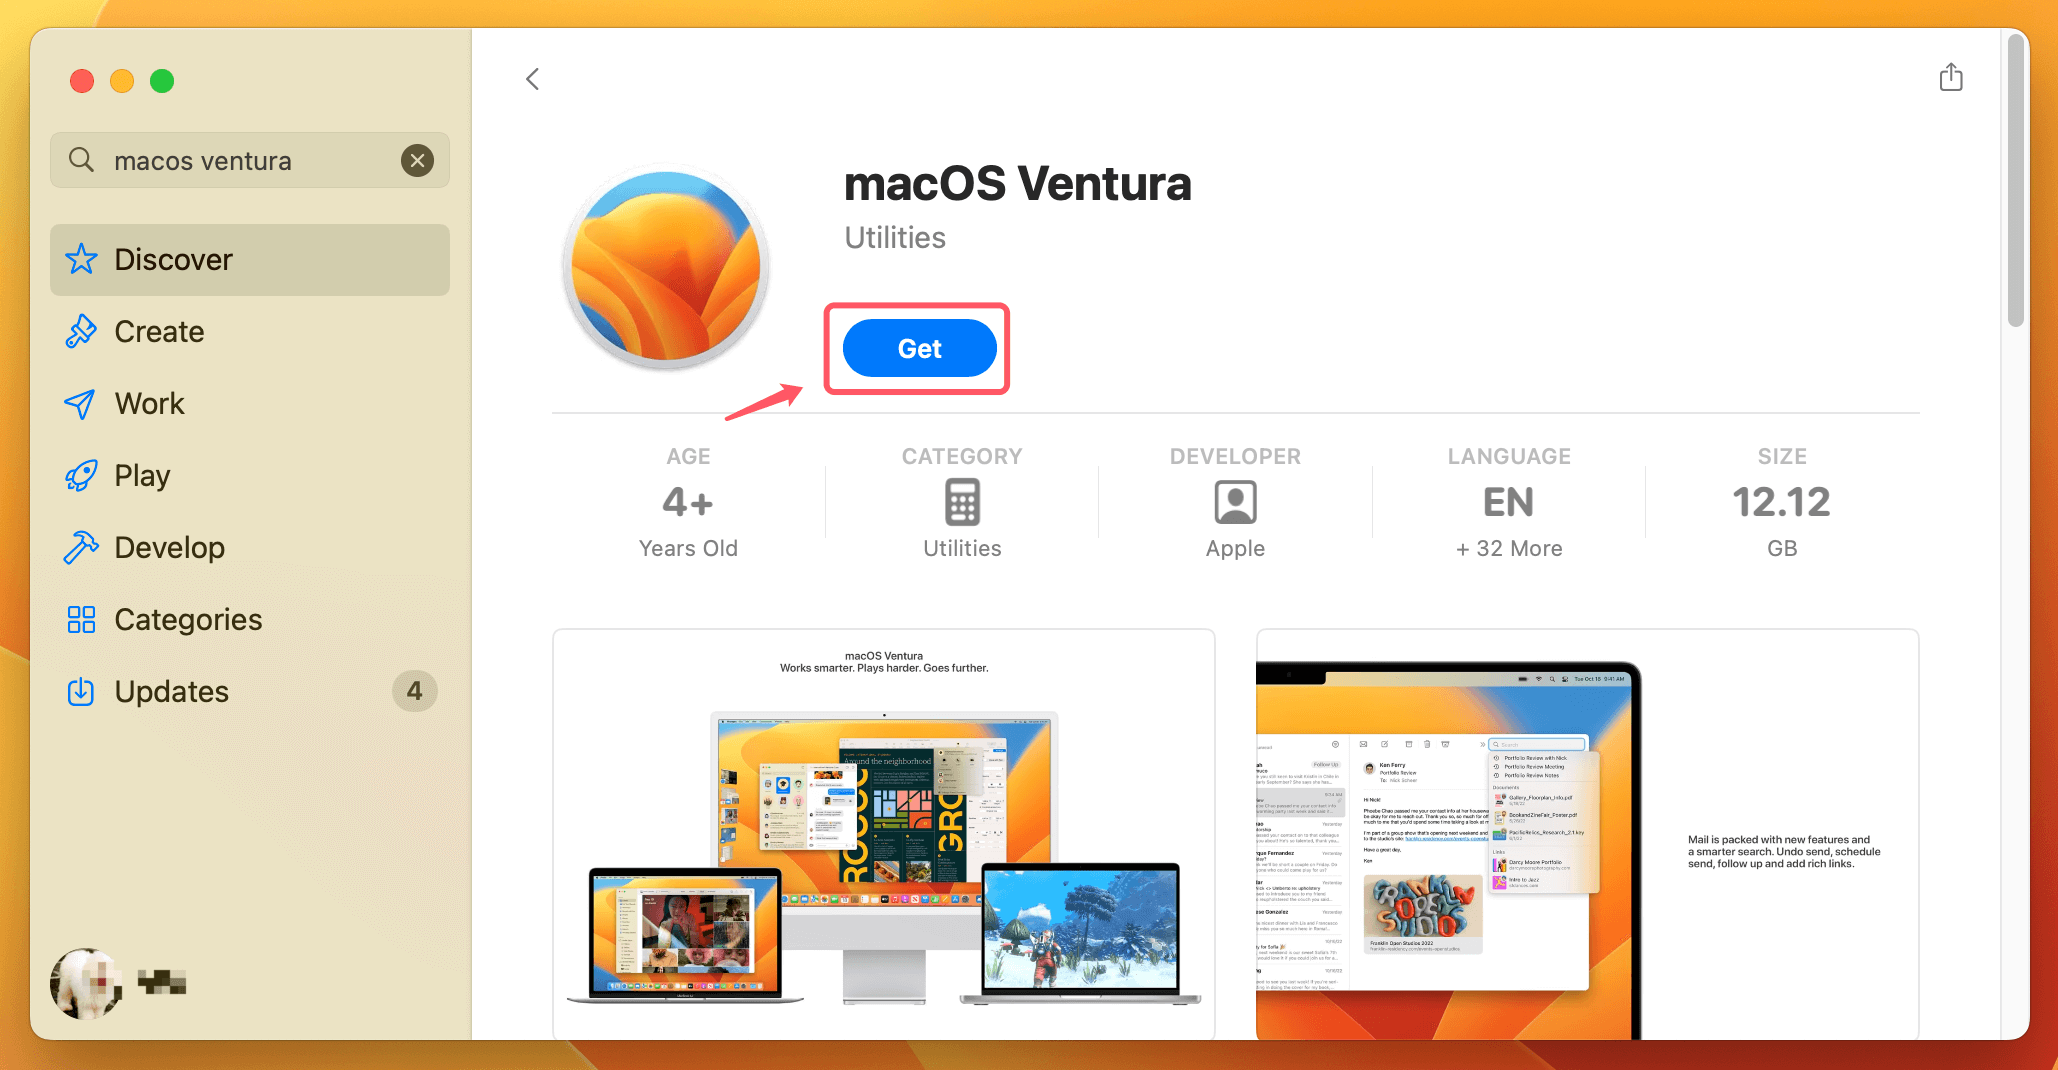
- Open the App Store and search for "macOS Ventura", or click link macappstores://apps.apple.com/app/macos-ventura/id1638787999?mt=12 to download macOS Ventura.
- Click Get.
![Clean Install macOS Ventura]()
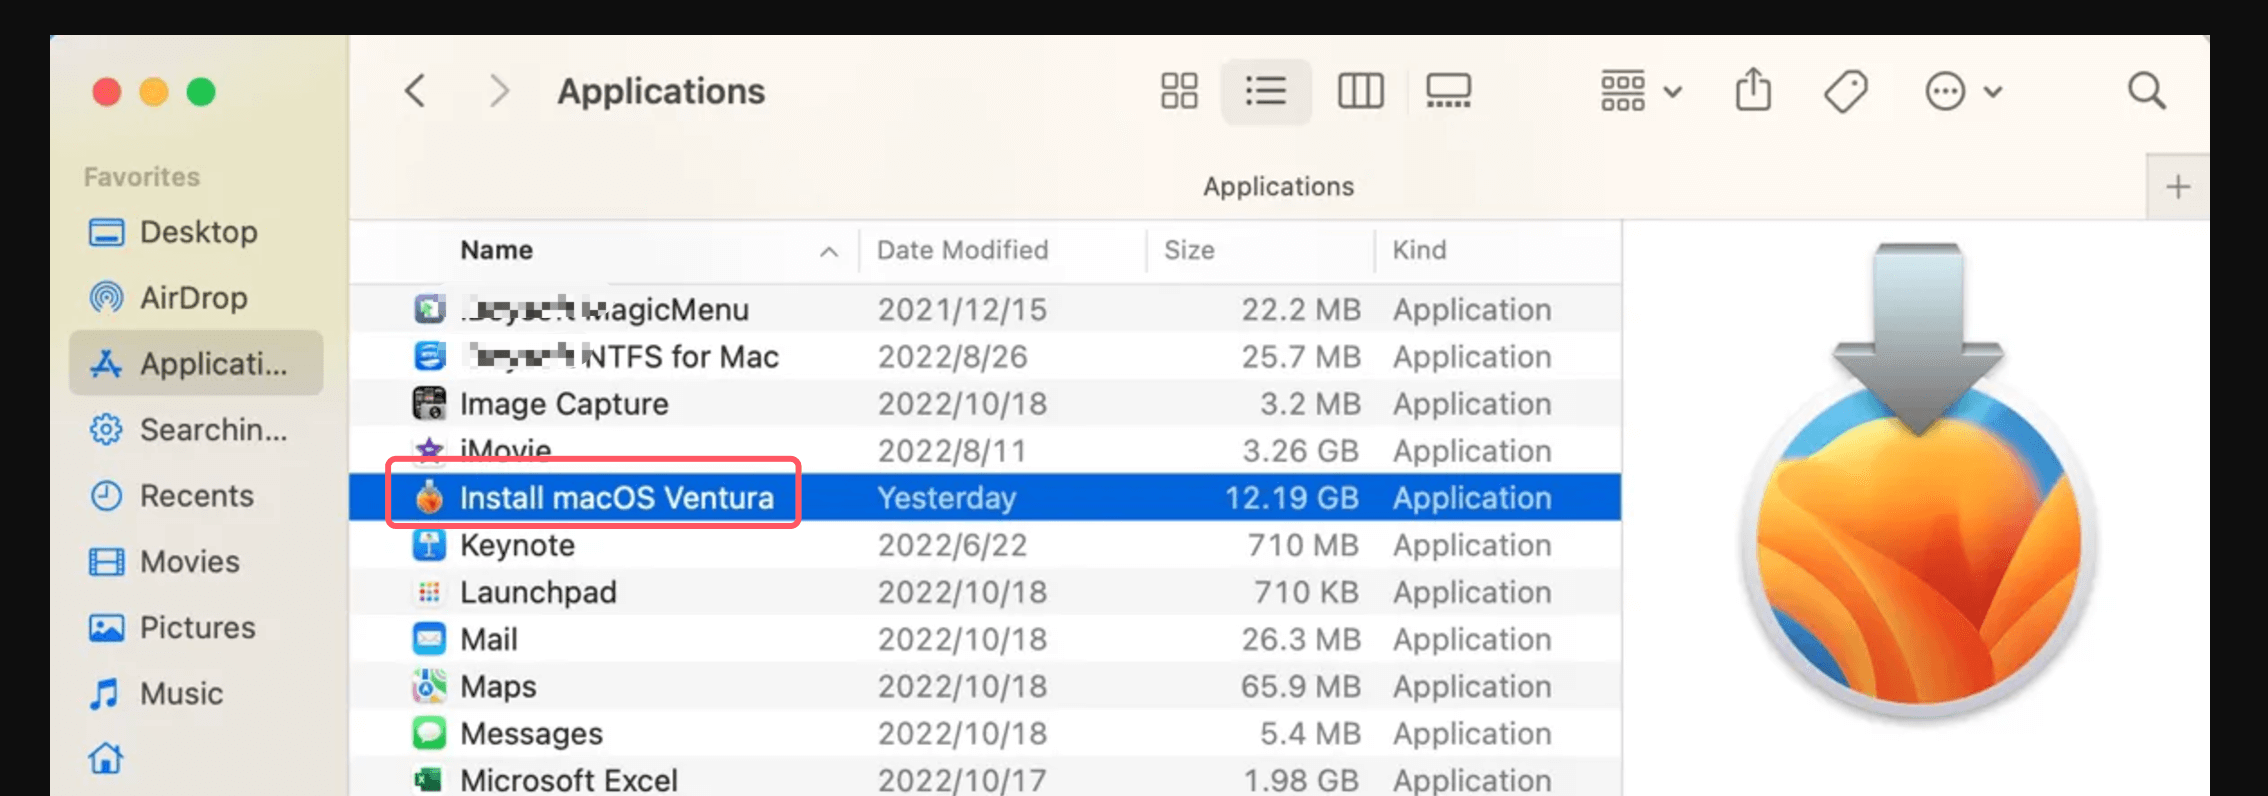
- Once downloaded, the installer will appear in the Applications folder. (usually named Install macOS Ventura.app)
![Clean Install macOS Ventura]()
Create a Bootable macOS Ventura USB Installer
Why Create a Bootable USB Installer?
A bootable USB installer is a handy tool for clean installs and system troubleshooting. It allows you to install macOS Ventura without relying on internet access during the installation process. This can save time and prevent errors caused by interrupted or slow connections. Additionally, the bootable installer is reusable, meaning you can use it for future reinstalls or to help a friend upgrade their Mac.
Requirements:
To create a bootable USB installer for macOS, you'll need:
- A USB Drive: At least 16 GB of storage space. Opt for a high-speed USB 3.0 drive for faster performance during the installation process.
- macOS Ventura Installer File: Ensure the file is complete and saved in the Applications folder by default.
- Admin Privileges: Necessary for using Terminal commands to create the installer.
Steps to Create the Installer
1. Format the USB Drive
Proper formatting ensures the drive is compatible with macOS. Follow these steps:
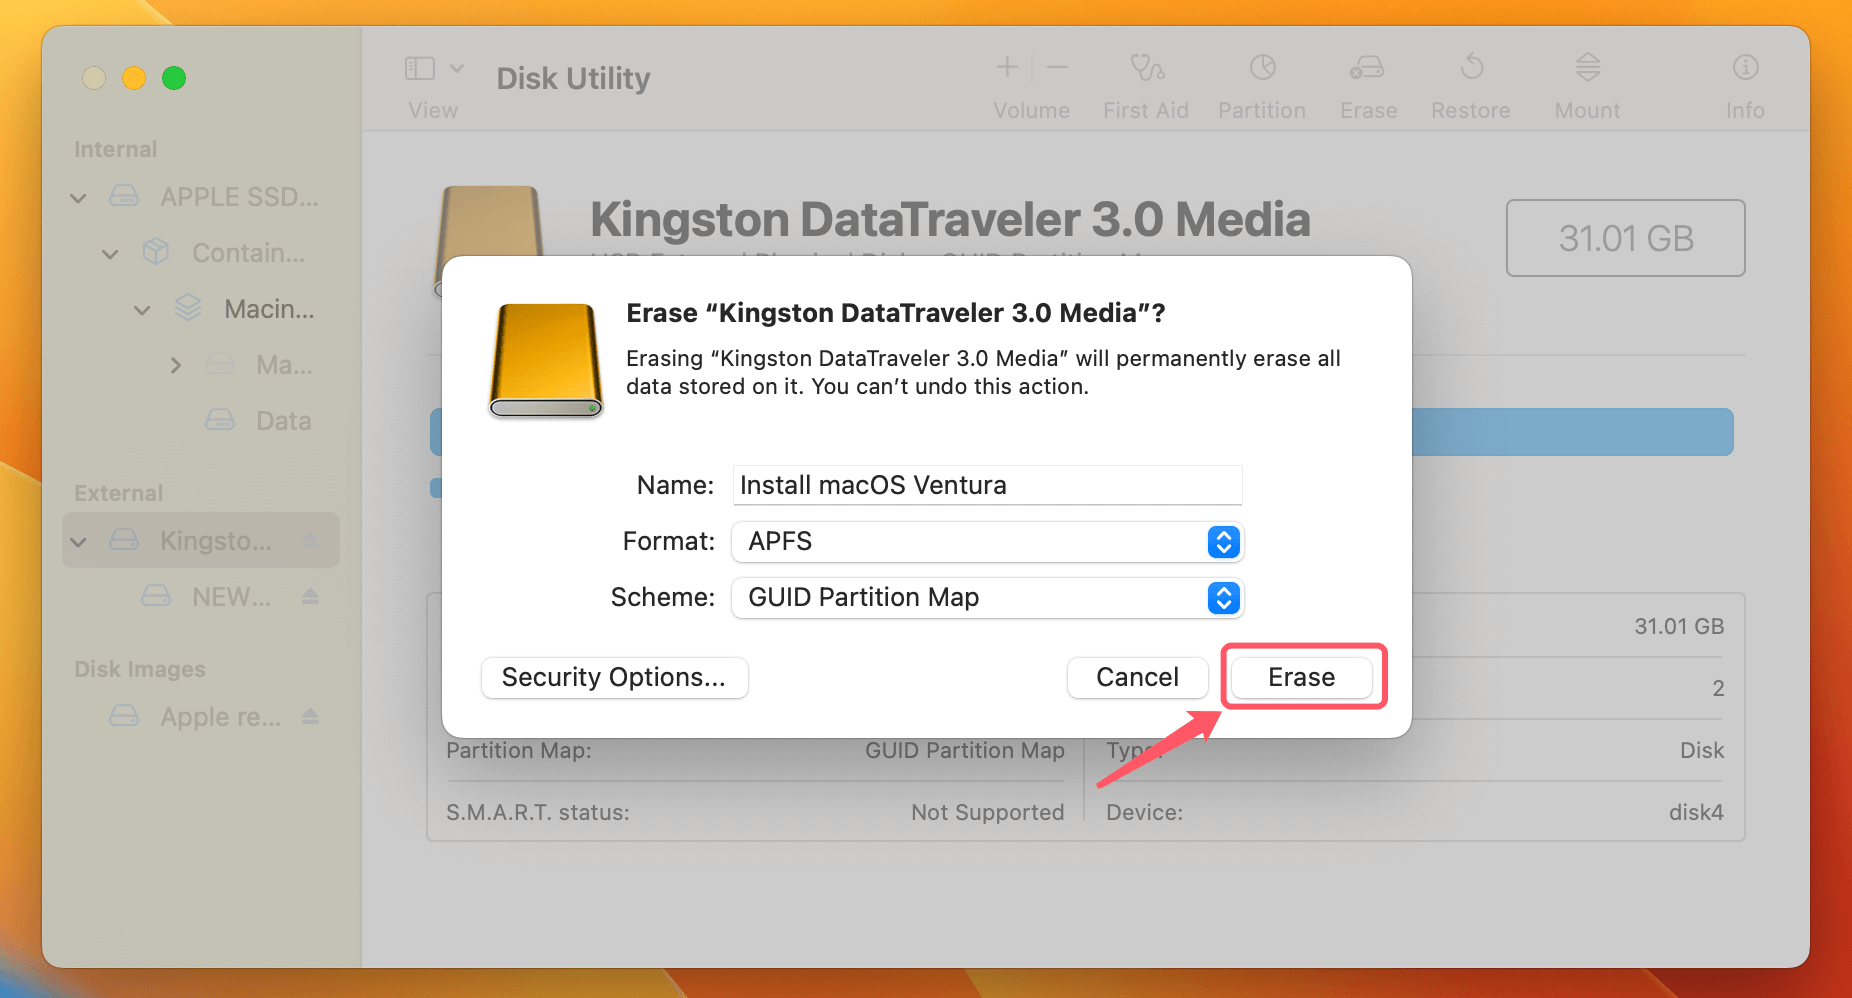
- Open Disk Utility after inserting the USB device into your Mac.
- Click Erase after selecting your USB drive from the sidebar.
- Choose the format APFS (for new Macs) or Mac OS Extended (Journaled) (for older Macs) and the scheme GUID Partition Map.
- Rename the drive (e.g., "Install macOS Ventura") for easy identification, then click Erase to complete the process.
![Clean Install macOS Ventura]()
2. Download macOS Ventura Installer
If you haven't already downloaded the installer, do so from the App Store:
- Open the Mac App Store and search for "macOS Ventura."
- Click Get to start the download. The file will be saved to the Applications folder as "Install macOS Ventura."
3. Use Terminal to Create the Installer
Creating the bootable USB installer requires a simple Terminal command:
- Open Terminal (Applications > Utilities).
- Enter the following command, replacing YourUSBDriveName with the name of your USB drive:
sudo /Applications/Install\ macOS\ Ventura.app/Contents/Resources/createinstallmedia --volume /Volumes/YourUSBDriveName
![Clean Install macOS Ventura]()
- Press Enter. You’ll be prompted to enter your Mac's admin password. Type it and press Enter again.
- Confirm when prompted by typing Y and pressing Enter. The process will begin and may take several minutes.
4. Verify the Installer
After everything is finished, the USB stick will be renamed "Install macOS Ventura." You can confirm its functionality by inserting it into your Mac and checking if it appears as a bootable option in the Startup Manager.
Tips for a Smooth Bootable USB Creation Process
- Use High-Quality Drives: Cheap USB drives may fail or have slower write speeds, causing delays. Invest in a reliable USB 3.0 drive.
- Keep the Installer File: After creating the bootable USB, keep a copy of the installer file in case you need it for another clean install.
- Double-Check the Command: Mistyped commands in Terminal can lead to errors. Copy-pasting the command from a trusted source is a good practice.
A properly created bootable USB installer is the cornerstone of a seamless clean installation. By investing time in this step, you’re setting yourself up for a smooth and efficient installation experience.
Clean Install macOS Ventura via USB Installer
1. Boot from the USB Installer
- Insert the bootable USB drive into your Mac.
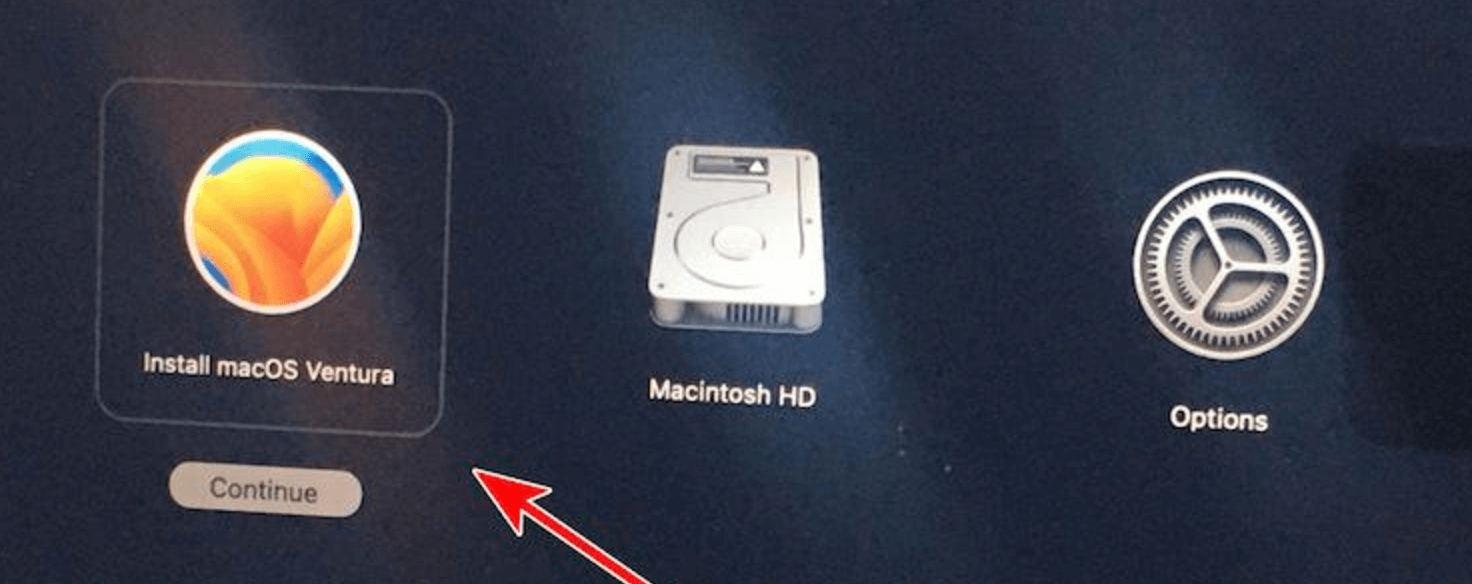
- Restart your Mac and immediately press and hold Power button until Loading Startup Options appears.
- Select the USB drive as the startup disk and click Continue.
![Clean Install macOS Ventura]()
2. Erase the Existing macOS Partition
- From the macOS Utilities menu, choose Disk Utility.
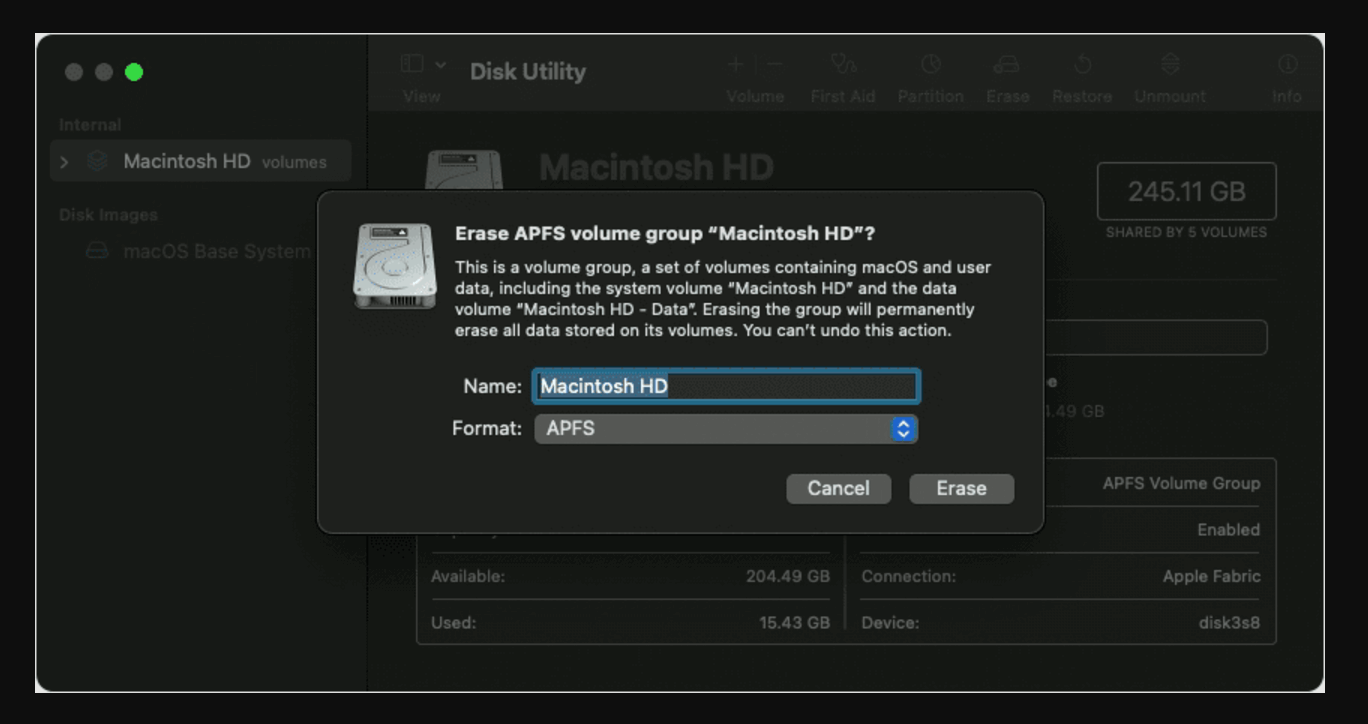
- Select your primary drive (Macintosh HD) and click Erase.
- Format the drive as APFS or Mac OS Extended (Journaled), depending on your needs.
![Clean Install macOS Ventura]()
- Confirm and exit Disk Utility.
3. Install macOS Ventura
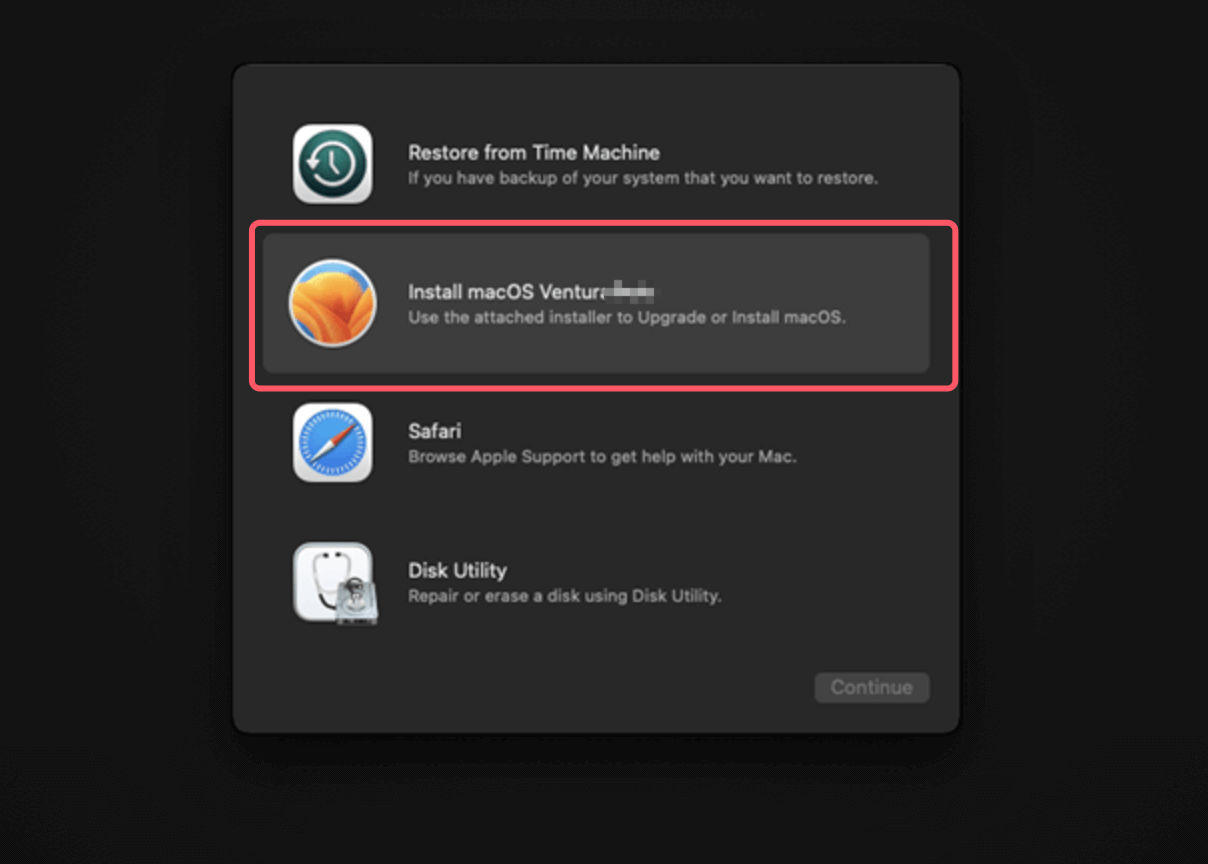
- From the macOS Utilities menu, select Install macOS Ventura.
![Clean Install macOS Ventura]()
- Follow the on-screen instructions to complete the installation.
- Once installed, your Mac will restart, and the macOS Ventura setup process will begin.
Post-Installation Setup
1. Restoring Data
One of the key decisions after a clean install is how to restore your data. You have two primary options:
- Selective Restore: Instead of restoring a full backup, you can manually copy files and folders from your backup drive. This approach is ideal for avoiding clutter and only bringing back what you genuinely need. For example:
- Transfer documents, photos, and other important files.
- Skip apps you rarely use or outdated software versions.
- Organize your restored data into clearly labeled folders for easy access.
- Time Machine Restore: If you backed up your system using Time Machine and prefer to return to your previous setup entirely, use this method:
- Connect your Time Machine drive to your Mac.
- During the initial macOS Ventura setup, select Restore from Time Machine Backup and follow the prompts. This method is quicker for those who want to recreate their previous environment with minimal manual effort.
💡 Pro Tip: If you're restoring files manually, take the opportunity to organize your folders, delete duplicate files, and archive rarely used data to external storage.
2. Reinstall Essential Applications
Rather than restoring all your old applications, use this fresh start to carefully select and reinstall the software you truly need.
- Mac App Store: Open the App Store and log in with your Apple ID to quickly reinstall apps purchased or downloaded in the past.
- Navigate to the Purchased tab to view a list of previously downloaded apps.
- Third-Party Software: For apps not available on the App Store, download the latest versions directly from official websites to ensure compatibility with Ventura.
- Use a Checklist: Create a list of essential apps by category to avoid missing anything. For example:
- Productivity: Microsoft Office, Google Chrome, Slack.
- Media: Adobe Photoshop, VLC Media Player.
- Utilities: CleanMyMac, Dropbox, 1Password.
💡 Pro Tip: Skip applications you rarely use. This helps reduce disk clutter and keeps your Mac running efficiently.
3. Configure macOS Ventura Settings
macOS Ventura introduces several new features and customization options. Spend some time exploring and personalizing your system:
- Apple ID and iCloud:
- Log in with your Apple ID during the setup process to sync iCloud data, including contacts, calendars, and bookmarks.
- Enable iCloud Drive for seamless file sharing across devices.
- Privacy and Security:
- Review your privacy settings under System Settings > Privacy & Security.
- Grant permissions only to trusted apps and check for Ventura’s new security features like Lockdown Mode.
- System Preferences Overhaul: macOS Ventura replaces System Preferences with a streamlined System Settings interface. Familiarize yourself with the new layout to quickly access key options, including:
- Battery Settings: Optimize for performance or power saving.
- Display Settings: Adjust resolution and enable Night Shift for better eye comfort.
- Ventura-Specific Features:
- Stage Manager: Organize windows and tasks for focused multitasking. Enable it via Control Center and experiment with different workflows.
- Focus Filters: Customize notifications and app behavior based on your activities, like work or leisure.
4. Optimize Startup and Performance
A clean install is a perfect opportunity to fine-tune your Mac for optimal performance.
- Disable Unnecessary Login Items: Prevent apps from launching at startup by going to System Settings > General > Login Items. This reduces boot time and improves system responsiveness.
- Check Activity Monitor: Monitor CPU and memory usage to identify and manage resource-intensive apps.
- Enable Automatic Updates: Keep your Mac secure by enabling automatic updates for macOS and apps under System Settings > Software Update.
5. Organize Your Workspace
- Desktop: Avoid cluttering your desktop with too many files or shortcuts. Use folders for better organization.
- Dock Customization: Rearrange your Dock to include frequently used apps while removing rarely accessed ones.
- Finder Preferences: Customize Finder's sidebar to display folders and locations you access most often.
Troubleshooting Common Issues
1. Boot Problems
- Verify that the disk is properly formatted and has a legitimate installer on it if your Mac doesn't boot from the USB installer.
- Check your Mac's Startup Security Utility settings to allow booting from external media.
2. Installation Errors
- Errors like "macOS cannot be installed on this computer" may indicate a compatibility issue. Verify your Mac model and download the installer again if necessary.
3. Post-Installation Bugs
- For missing drivers or software incompatibility, ensure all apps are updated for Ventura.
- Reset NVRAM or SMC if you experience performance issues or hardware-related glitches.
4. Data Loss
- Try to restore files from Time Machine backups and iCloud backups.
- If you have lost data due to clean install of macOS Ventura and don't have a backup, you can use Mac data recovery software to help you recover the erased drive and get the lost data back.
Tips for Maintaining a Clean macOS Installation
1. Regular Maintenance
- Use Disk Utility to check for disk errors periodically.
- Monitor system performance with Activity Monitor to identify resource-heavy apps.
2. Stay Updated
- Regularly update macOS to benefit from the latest security patches and features.
3. Avoid Clutter
- Organize files and uninstall unused applications to keep your system lean and fast.
Conclusion
A clean install of macOS Ventura is an excellent way to rejuvenate your Mac and enjoy the full potential of Apple's latest operating system. By following this guide, you can ensure a smooth and hassle-free installation process.
Remember, preparation is key. Backup your data, create a bootable installer, and carefully follow the steps outlined here. Once installed, macOS Ventura will provide a fresh, responsive, and feature-rich experience, allowing you to focus on productivity without the distractions of a cluttered system.
Embrace the clean slate and take full advantage of all that macOS Ventura has to offer!
💡 Note: Before or after clean installing macOS Ventura on your Mac, you can use Mac disk cloning software - such as Donemax Disk Clone for Mac to create a full bootable clone backup for your Mac in case of data loss or system crash.

Donemax Disk Clone for Mac
An award-winning disk cloning program to help Mac users clone HDD/SSD/external device. It also can create full bootable clone backup for Macs.
Related Articles
- Feb 11, 2025Fix SanDisk Memory Card Not Working Without Losing Data
- Feb 17, 2025Fix External Hard Drive Not Responding Without Losing Data [6 Solutions]
- Mar 01, 2025How to Safely Eject/Remove an SD Card from Windows PC, Mac, and Mobile Phone?
- Feb 23, 2024How to Format and Unformat Sony SD Card on Windows & macOS?
- Mar 19, 2025How to Use Seagate Game Drive PS5 SSD?
- Dec 26, 2024Format a WD External Hard Drive for Both Windows and macOS

Christina
Christina is the senior editor of Donemax software who has worked in the company for 4+ years. She mainly writes the guides and solutions about data erasure, data transferring, data recovery and disk cloning to help users get the most out of their Windows and Mac. She likes to travel, enjoy country music and play games in her spare time.

Gerhard Chou
In order to effectively solve the problems for our customers, every article and troubleshooting solution published on our website has been strictly tested and practiced. Our editors love researching and using computers and testing software, and are willing to help computer users with their problems
