Tip: If you have formatted the WD external hard drive to NTFS file system and you want to use it on your Windows PC and Mac, you can install a third-party NTFS driver - such as Donemax NTFS for Mac on your Mac, then run it to enable writable for the NTFS drives.
PAGE CONTENT:
When you purchase an external hard drive, such as a Western Digital (WD) drive, one of the first tasks you'll face is formatting it. If you plan on using the drive across both Windows and macOS platforms, it's essential to ensure that the drive is formatted in a way that's compatible with both operating systems. This process is critical, as formatting a drive incorrectly can result in data loss or reduced functionality across systems. In this article, we'll guide you through the steps to format a WD external hard drive for use with both Windows and macOS, covering the essential concepts, file systems, and procedures.
Understand File System Compatibility
One of the most important concepts to grasp when formatting an external drive is the choice of file system. A file system is a method of organizing and storing files on a disk. Different operating systems use different file systems, and not all file systems are cross-compatible between Windows and macOS. Here's an overview of the most common file systems you’ll encounter and their compatibility:
- exFAT: This is one of the most popular choices for formatting an external hard drive that will be used with both Windows and macOS. exFAT (Extended File Allocation Table) is a modern file system designed to bridge the gap between different operating systems. It supports large file sizes (over 4GB) and is recognized natively by both Windows (from Windows XP onward) and macOS (from macOS 10.6.5 onward). exFAT provides seamless file sharing between the two systems and is the ideal format for most users.
- FAT32: Another widely used file system, FAT32, has been around for decades and is compatible with both Windows and macOS. However, FAT32 has limitations: it cannot handle files larger than 4GB, which makes it less ideal for transferring high-definition videos, large software files, or any other data that exceeds this size. While it offers broad compatibility, the file size limitation is a significant drawback for modern users.
- NTFS: The default file system for Windows, NTFS (New Technology File System) provides advanced features like file permissions and security. However, macOS can only read NTFS-formatted drives by default. If you primarily use the drive with Windows but occasionally need to access it on macOS, NTFS can be useful, but it's not the ideal choice for full compatibility across both platforms.
- HFS+: HFS+ (Hierarchical File System Plus) is the native file system for macOS. While macOS can read and write to HFS+ drives, Windows cannot do so without additional software. If you primarily use macOS but need access to the drive on Windows occasionally, you may want to consider HFS+; however, it's not suitable for cross-platform use.
- APFS: This file system is primarily designed for SSDs. Like HFS+, it is not compatible with Windows, so it's not a viable choice for cross-platform use.
Given these options, exFAT is generally the best choice for users who need a drive to work seamlessly on both Windows and macOS. It avoids the file size limitations of FAT32 and provides compatibility with both operating systems without the need for additional software.
Before Formatting Your WD External HDD/SSD on PC or Mac
Before you begin formatting your WD external hard drive, there are several important steps to ensure that the process goes smoothly:
- Backup Your Data: Formatting a drive will erase all existing data on it. If you have files on the drive that you want to keep, make sure to back them up to another storage device or cloud service. Data recovery after formatting can be difficult or even impossible, so this step is critical.
- Check Drive Requirements: Some WD external drives come pre-formatted with a specific file system (usually NTFS for Windows). If you're planning to use the drive across both operating systems, you'll need to reformat it or install NTFS driver on your Mac.
- Ensure Both Devices Are Ready: Make sure your Windows and macOS devices are ready for the process. Ensure that both devices have the necessary software to access Disk Management (Windows) and Disk Utility (macOS), and that both devices are functioning properly.
How to Format a WD External Hard Drive for both Windows and macOS?
Format the WD External Hard Drive on Windows
Formatting a WD external hard drive on Windows is a straightforward process, and you can use the built-in Disk Management tool to do it.
- Connect the Drive: Plug your WD external hard drive into a USB port on your Windows computer.
- Open Disk Management: From the context menu, choose "Disk Management" after performing a right-click on the Start menu button. Alternatively, select "Disk Management" from the list by pressing Win + X.
- Locate Your External Drive: In Disk Management, you'll see a list of all connected drives. Find your WD external hard drive in the list. It may be labeled as “Disk 1,” “Disk 2,” or similar, depending on how many drives are connected.
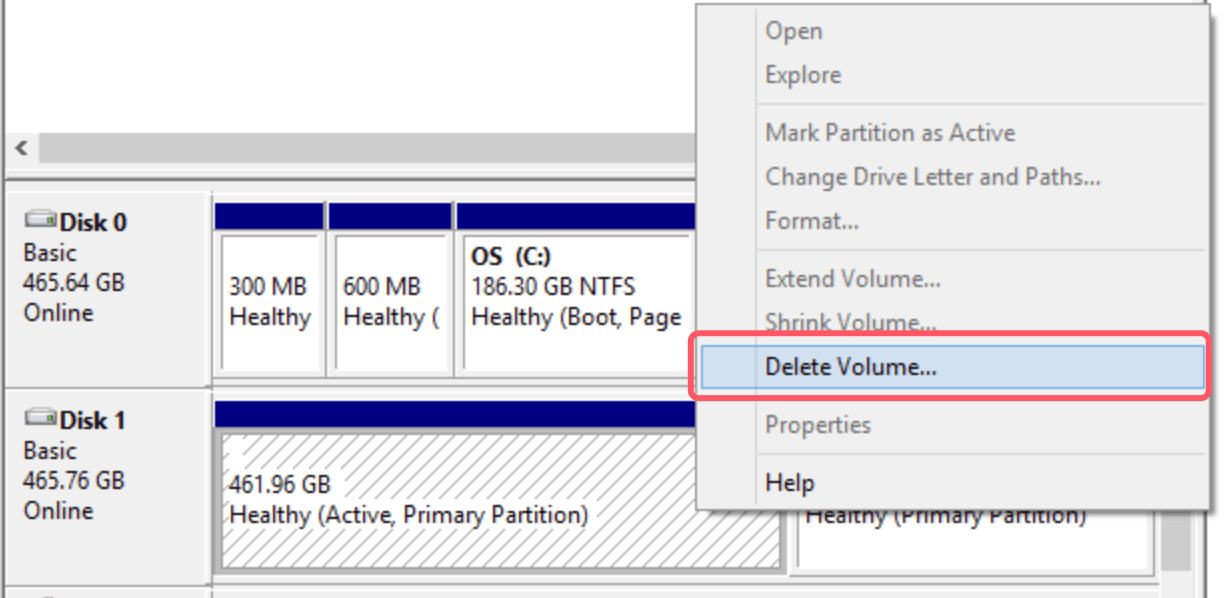
- Delete Existing Partitions (if needed): If the drive is already formatted in a different file system (like NTFS or FAT32), you’ll need to delete the existing partition before proceeding:
Right-click on the partition and select "Delete Volume." Confirm the action when prompted.
![Format a WD External Hard Drive for Both Windows and macOS]()
- Create a New Partition:
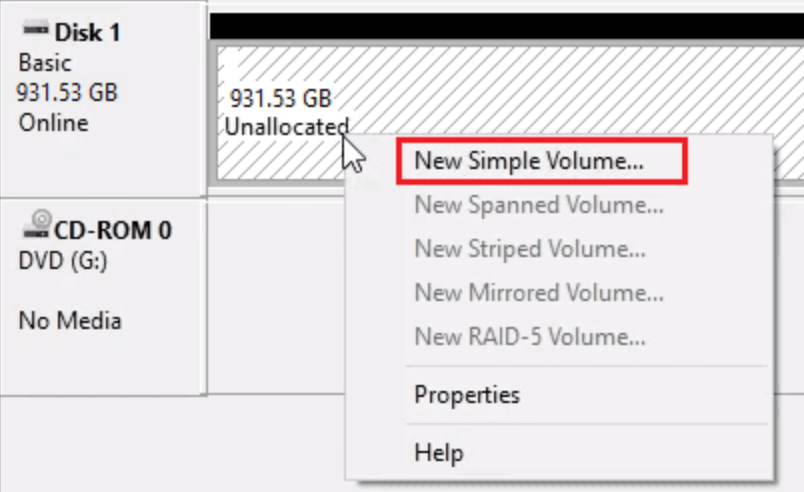
- To access the unallocated space, right-click on it and select "New Simple Volume."
![Format a WD External Hard Drive for Both Windows and macOS]()
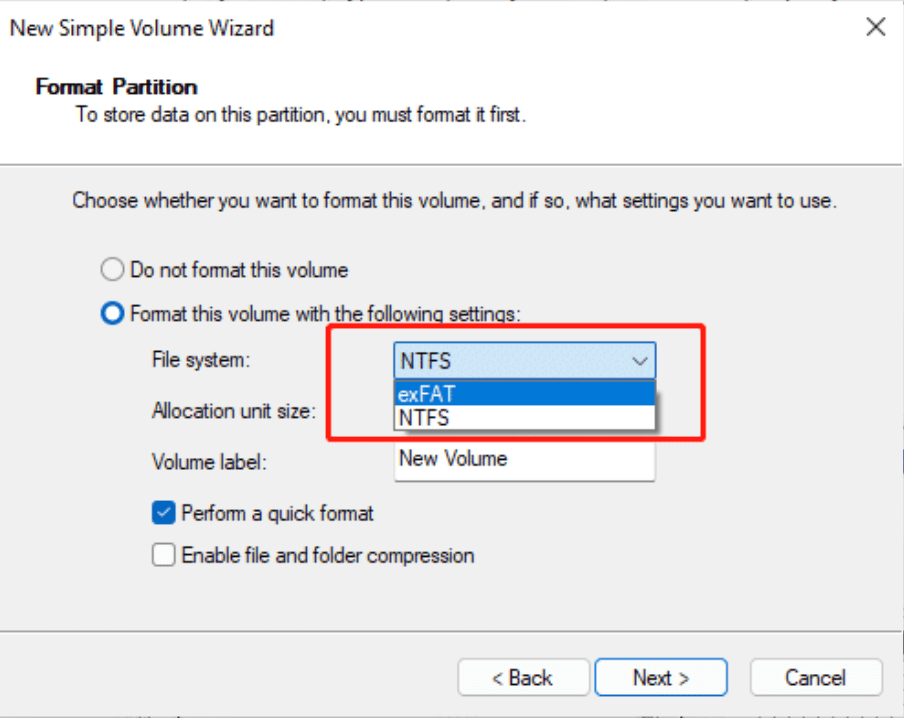
- Follow the wizard to create a new partition. When prompted to choose a file system, select exFAT.
![Format a WD External Hard Drive for Both Windows and macOS]()
- You can also assign a drive letter at this stage, though it is typically done automatically.
- To access the unallocated space, right-click on it and select "New Simple Volume."
- Finish the Formatting Process:
- Once you've selected exFAT and chosen any other preferences (such as drive label), click "Next" and then "Finish" to begin formatting.
- The process will take a few moments, and once complete, your WD external hard drive will be ready for use on both Windows and macOS.
Format the WD External Hard Drive on macOS
Now that you've formatted the drive on Windows, let's move on to macOS. Formatting a WD external hard drive on macOS is just as simple, using the built-in Disk Utility app. Here's how to do it:
- Connect the Drive: Plug your WD external hard drive into a USB port on your Mac.
- Open Disk Utility: You can find Disk Utility by going to Utilities via Applications, or by using Spotlight search (Command + Space and type "Disk Utility").
![Format a WD External Hard Drive for Both Windows and macOS]()
- Select Your External Drive: Find your WD external hard drive and select it.
- Erase the Drive:
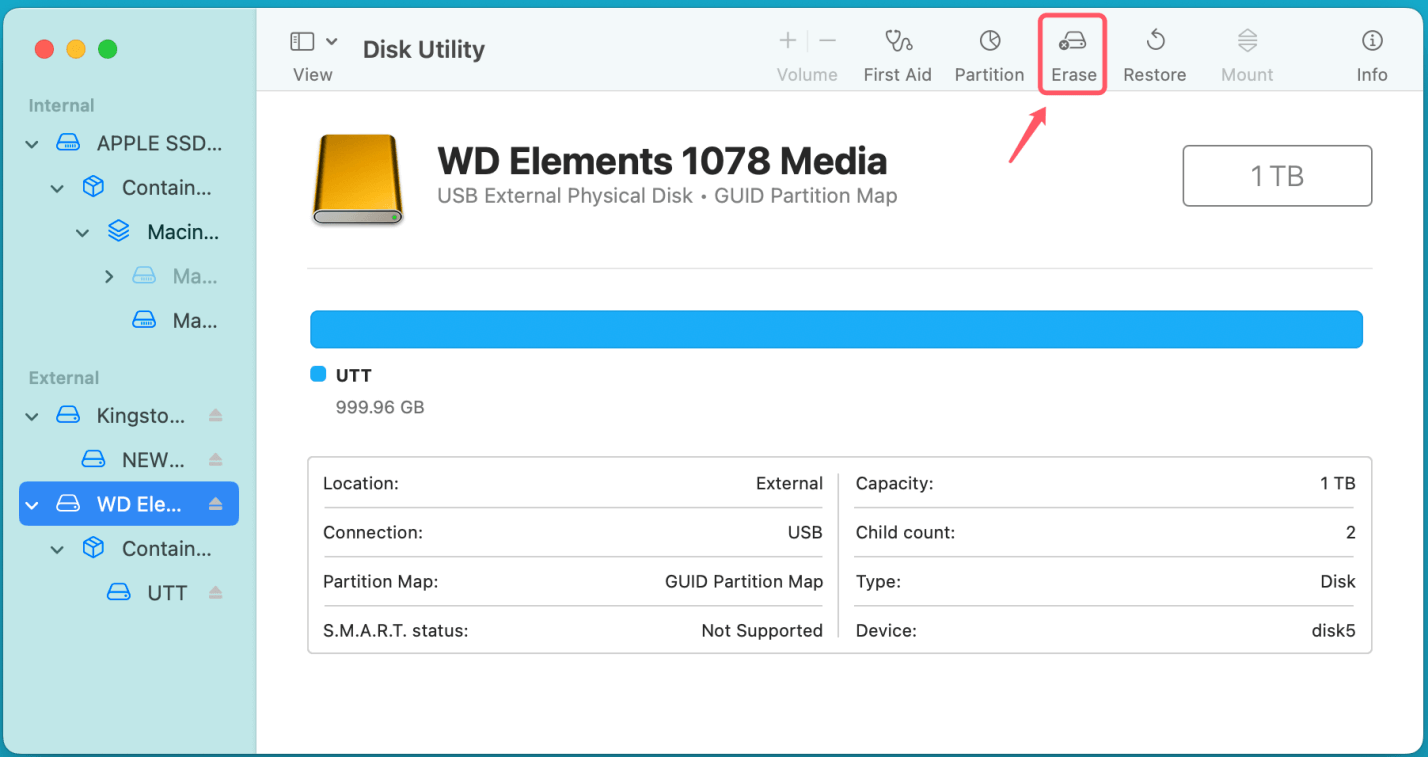
- In the Disk Utility window, click the "Erase" button at the top.
![Format a WD External Hard Drive for Both Windows and macOS]()
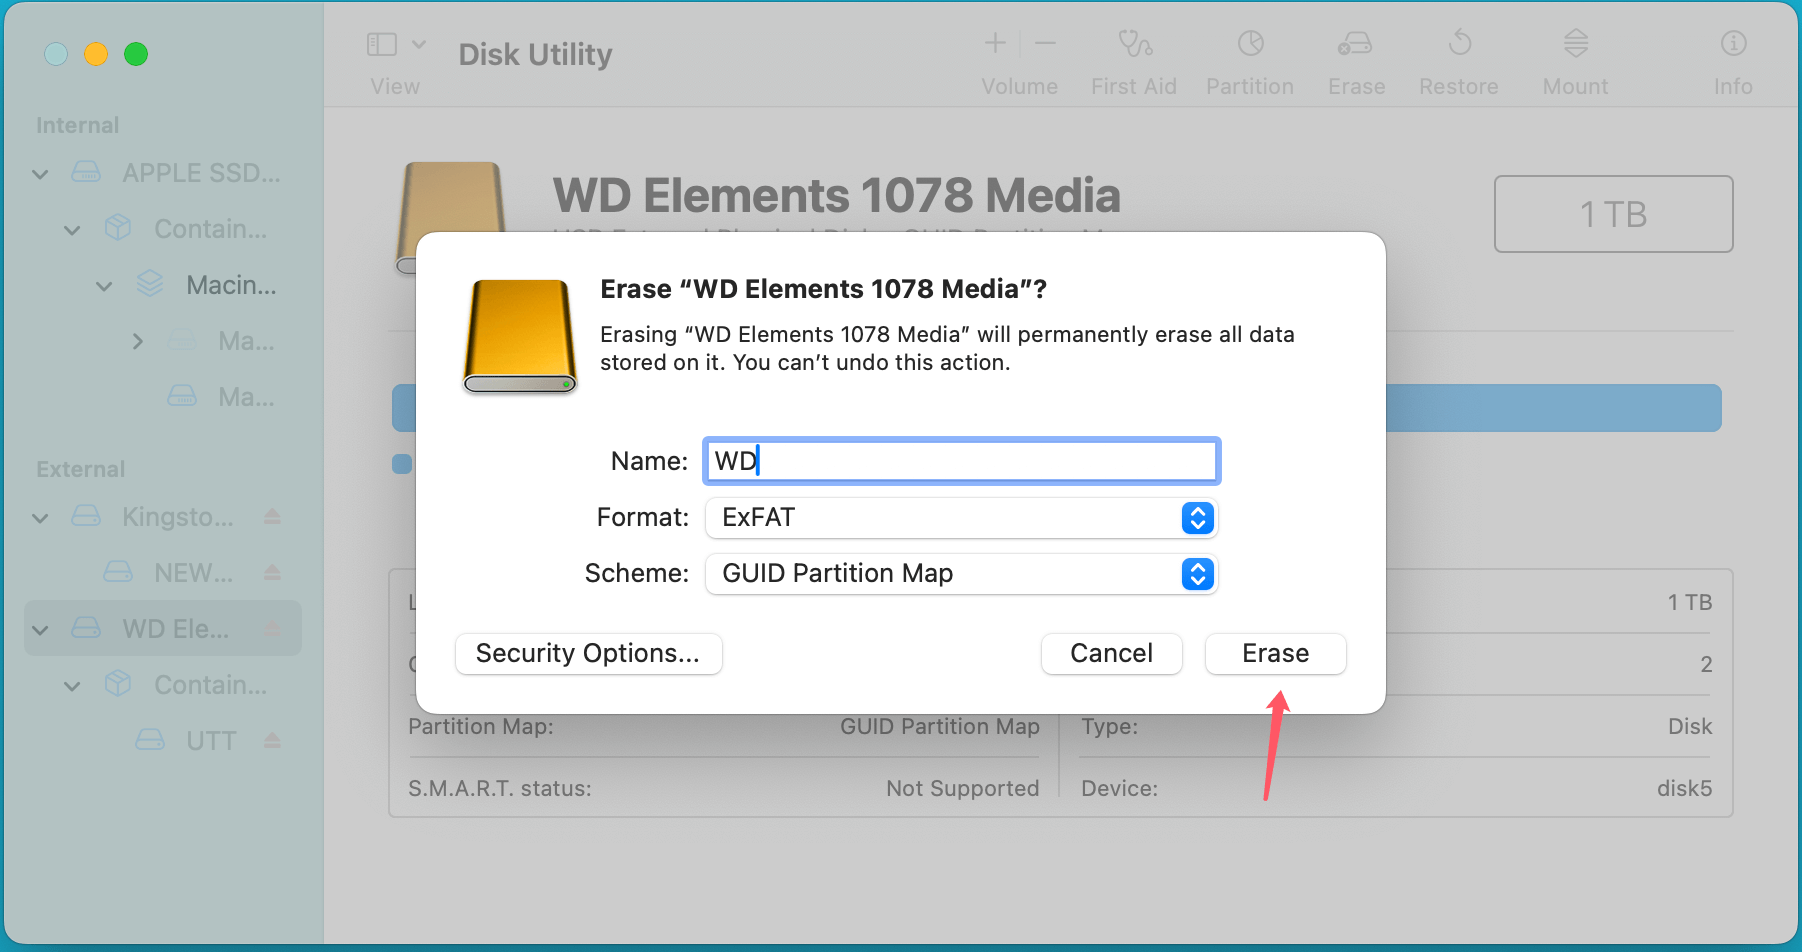
- In the dialog box that appears, choose ExFAT as the file system. You can also give the drive a name (this will be the label that appears on both Windows and macOS).
![Format a WD External Hard Drive for Both Windows and macOS]()
- Make sure to select GUID Partition Map as the scheme if prompted.
- In the Disk Utility window, click the "Erase" button at the top.
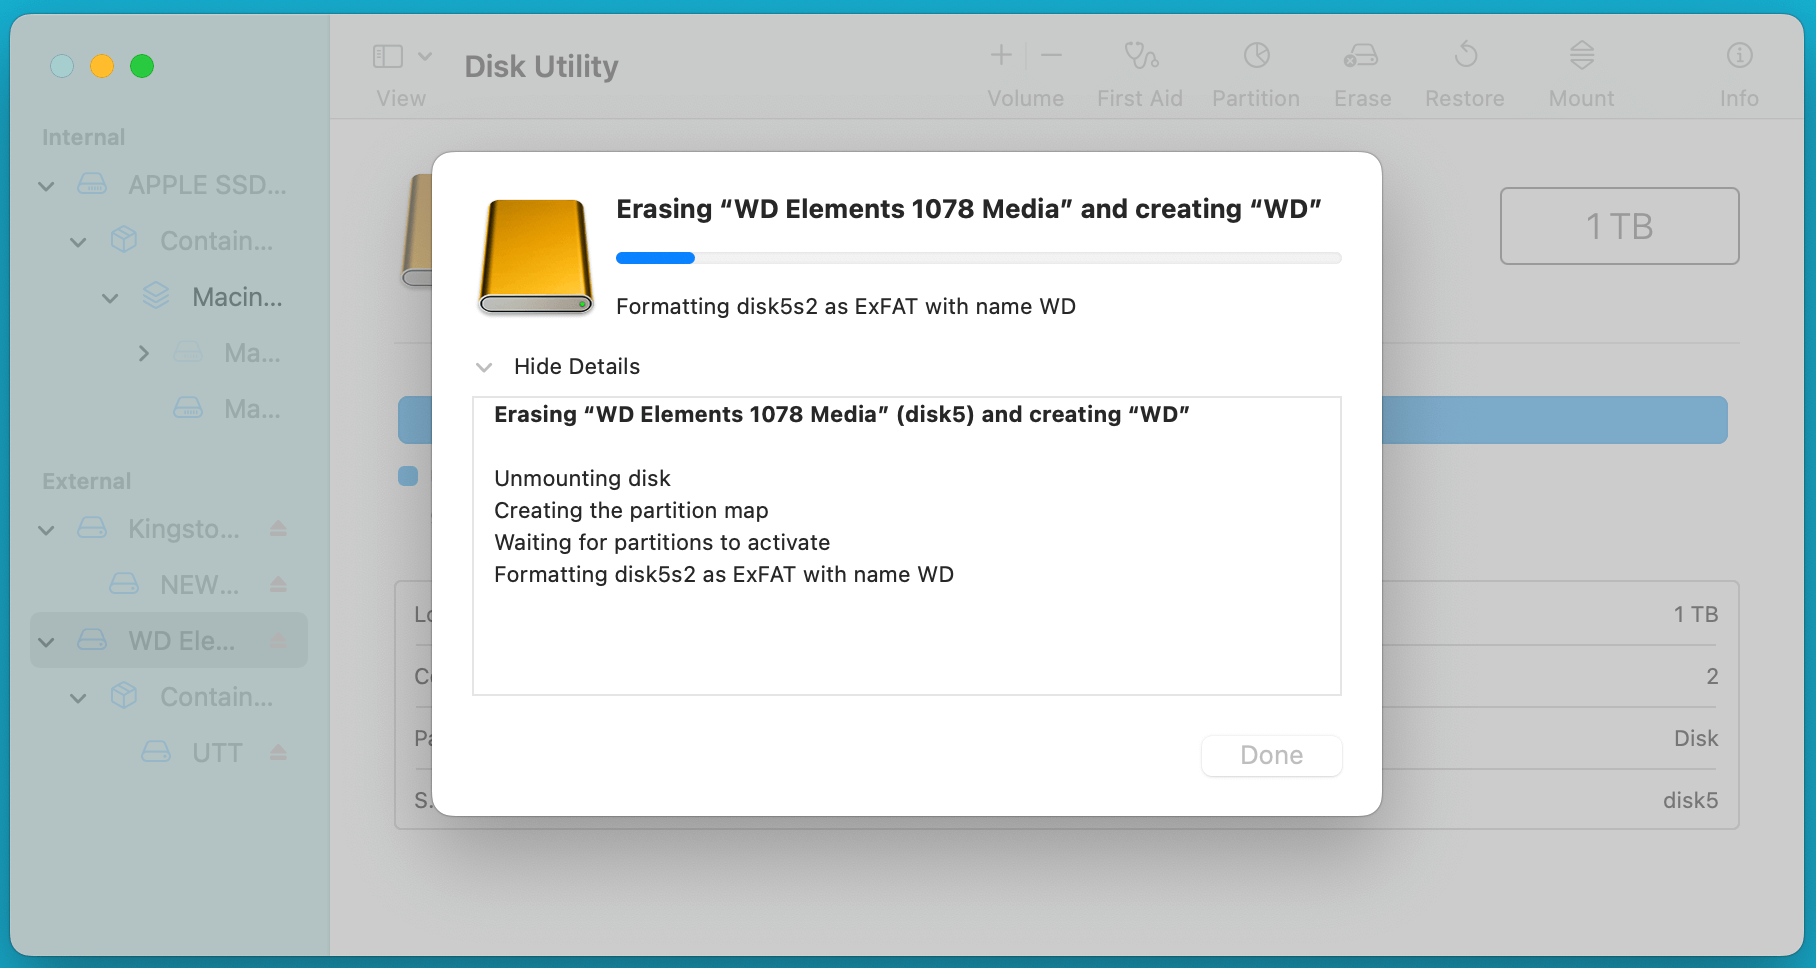
- Confirm and Format: After selecting the desired file system and partition scheme, click "Erase" to begin formatting.
![Format a WD External Hard Drive for Both Windows and macOS]()
The process should only take a few moments, and once it's finished, your drive will be ready for use on both Windows and macOS.
Test the Drive Across Both Systems
After formatting the drive, it's important to test it on both systems to ensure it works as expected.
- On Windows: Open "This PC" or "File Explorer" and check if the WD external hard drive appears. Try transferring some files to and from the drive to ensure everything is working correctly.
- On macOS: Open "Finder" and check if the WD external hard drive shows up on the sidebar. Try copying files to the drive and accessing them to ensure compatibility.
If the drive isn't showing up on one of the systems, try restarting both devices and reconnecting the drive. If the issue persists, it might indicate a problem with the format or the connection.
Troubleshooting Common Issues
- Drive Not Showing Up: If the drive is not showing up on either system, it might not have been properly formatted. Revisit the formatting steps and ensure you selected the correct file system (exFAT).
- Write Issues on macOS: If the drive is read-only on macOS (i.e., you can't write to it), ensure that you selected exFAT when formatting. If you accidentally chose another file system, you’ll need to reformat the drive.
- Drive Not Recognized by Both OSes: If the drive works on one system but not the other, ensure that both operating systems are updated to the latest versions. Sometimes, outdated drivers or software can cause issues with external drives.
- Data Loss: If you have lost data due to formatting the WD external hard drive and don't have a backup, you can use data recovery software - such as Donemax Data Recovery to unformat the drive and get all lost data back.
Additional Considerations and Tips
- Security: If you plan to store sensitive information on the external drive, consider encrypting it for added security. Both Windows (via BitLocker) and macOS (via FileVault) offer built-in encryption options.
- Performance: exFAT offers good performance for most users, but if you’re transferring large files regularly, you may want to test performance on both systems. NTFS and HFS+ might offer better performance on their native systems.
- Software for NTFS Access: If you need to use NTFS on macOS, there are third-party tools like Donemax NTFS for Mac that allow for full read/write support.
Can I Use NTFS WD External Hard Drive on Windows and macOS Without Formatting?
Most of WD external hard drives are pre-formatted to NTFS file system. NTFS file system is a Windows-based file system, it is fully supported by Windows. macOS can only read NTFS drive, but cannot write data to it. To use a NTFS WD external hard drive on your Mac, you need install a third-party NTFS driver - such as Donemax NTFS for Mac.
Step 1. Download and install Donemax NTFS for Mac on your Mac, then connect the WD external hard drive to your Mac.
Step 2. Open Donemax NTFS for Mac, select the NTFS WD external hard drive, click on Enable Writable button.

Conclusion
Formatting a WD external hard drive for use on both Windows and macOS is a straightforward process that requires careful consideration of the file system. exFAT is typically the best choice for cross-platform compatibility, offering large file size support and seamless use across both operating systems. By following the steps outlined above, you can ensure that your external hard drive works reliably on both systems, giving you the flexibility to transfer and store files between them without issue. Always remember to back up your data before formatting, and test the drive on both systems after the process to ensure smooth operation.
Related Articles
- Nov 25, 2024How to Clean Install macOS Monterey [Step-by-step Guide]
- Feb 11, 2025How to Show Hidden Files on a USB Flash Drive?
- Mar 26, 2025How to Repair a Disk with PowerShell?
- Nov 12, 2024How to Manage iCloud Drive on Mac?
- Nov 27, 2024Clean Install macOS Ventura: A Comprehensive Guide
- Mar 01, 2025How to Safely Eject/Remove an SD Card from Windows PC, Mac, and Mobile Phone?

Christina
Christina is the senior editor of Donemax software who has worked in the company for 4+ years. She mainly writes the guides and solutions about data erasure, data transferring, data recovery and disk cloning to help users get the most out of their Windows and Mac. She likes to travel, enjoy country music and play games in her spare time.

Gerhard Chou
In order to effectively solve the problems for our customers, every article and troubleshooting solution published on our website has been strictly tested and practiced. Our editors love researching and using computers and testing software, and are willing to help computer users with their problems
