PAGE CONTENT:
Are you getting ready to say goodbye to your trusty iMac machine and sell it or give it to someone else? You might enjoy selling your iMac, whether to get a better model or just get rid of a device you don't need anymore. But before you hand over the device, it's important to ensure that all your personal information stored on the iMac internal disk is safely erased and ready to go to its new home.
In this detailed guide, we will show you all the important steps you need to take to get your iMac ready to sell. There's nothing we can't do to help you, from canceling or moving AppleCare to wiping your hard drive and reinstalling macOS. They will also protect your privacy and give you peace of mind.

Why You Need to Delete Data Before Selling It?
Before deleting, you must know the risks of properly wiping your iMac's data. You might not be as safe as you think after deleting files or reformatting the hard drive because advanced data recovery tools can easily get back private data.
People can still use your documents, passwords, financial records, and other private information if you don't delete them correctly. Also, not erasing your data opens you to threats like identity theft, scams, or people getting into your accounts without your permission.
Knowing about these risks makes it even more important to follow thorough data-wiping steps to protect your privacy and avoid harm. By taking the initiative to delete your iMac's data safely, you lower the chances of someone else getting it back without your permission and protect your private data.
Wipe All Data Before Selling or Donating Your iMac
Here are the steps you need to take to get your Mac ready to sell:
1. Change or Cancel Coverage for AppleCare.
Knowing if an AppleCare plan covers your Mac is important before you sell it. You can either cancel the plan or give it to the new owner. Before you call Apple, ensure you have your agreement number, serial number, and original sales receipt if you've already paid in full. For regular payments, all you have to do is change how you pay with your Apple ID.
2. Backup Data.
It is very important to back up your data so you don't lose any important files during restart. People often use Time Machine and Migration Assistant, but you can also use iCloud or offline storage. iCloud makes it easy to view your files on all your Apple devices, and external storage adds an extra layer of security.
Here is a method to create a full bootable clone backup for your iMac machine before you wipe it:
Step 1. Download and install Donemax Disk Clone to the iMac, then connect an external hard drive to the iMac.
Step 2. Open Donemax Disk Clone, then choose OS Clone mode. This mode will clone everything (including macOS system, apps, settings, user files) from the iMac to the external hard drive. Select the external hard drive as the destination drive, then click on Clone Now button.

3. Log out of iCloud and iTunes.
Sign out of iTunes and iCloud to remove your accounts on your Mac. Select "Deauthorize This Computer" from the iTunes permissions list. You must take steps specific to your macOS version to sign out of iCloud. This step protects your privacy and stops people from entering your accounts without your permission. Doing these things can protect your personal information and ensure the new owner has an easy time.
4. Sign out of iMessage.
Make sure you sign out of iMessage, so there is no misunderstanding. Go to Preferences in the Messages app and click "Sign Out" under the "iMessage" tab. This step separates your iMac from iMessage, protecting your privacy and stopping unwanted texts or alerts from getting to the new owner.
5. Disconnect the Bluetooth Devices.
Even though it's not required, unpairing Bluetooth devices can make the setup process easier for the new owner. Go to System Preferences > Bluetooth and unpair or remove any linked devices.
This step ensures that the next user starts from scratch, making setup easier and avoiding any problems or confusion from devices that have already been paired. Even though it's not required, it's a nice thing to do to make sure the new owner has a smooth transfer and the best possible user experience.
6. Erase Startup Disk and Reinstall macOS.
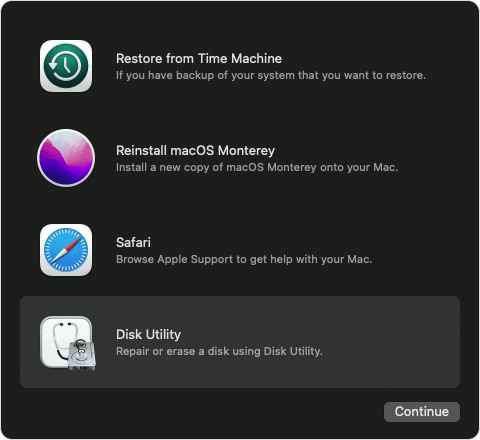
To ensure all your personal information is gone, erase your hard drive and reinstall macOS. Please turn off your computer first, then restart it in macOS Recovery mode. First, use Disk Utility to erase the hard drive.
Step 1. Press and hold Power button (If your iMac is an Intel-based Mac, press and hold Command+R) until the iMac boots into macOS Recovery mode. Choose Options, then click on Continue button.

Step 2. In the Recovery app, choose Disk Utility, then click on Continue button.

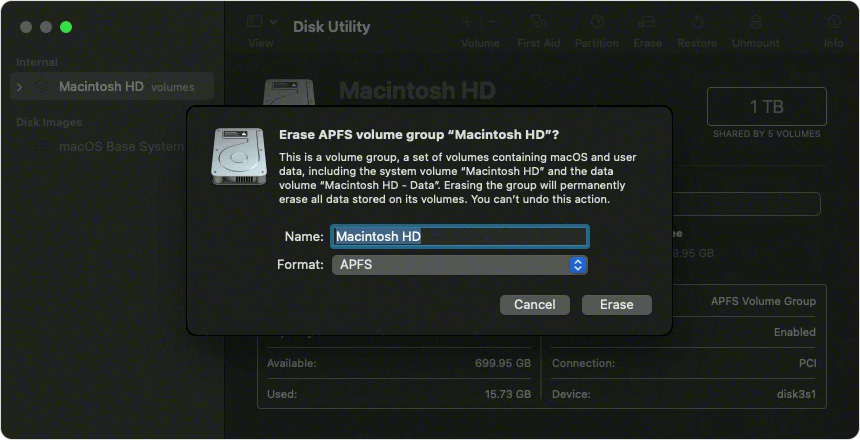
Step 3. Select the startup disk, click on Erase button. Choose a file system, then click on Erase button again to erase the startup disk.

Step 4. Once the erasing process gets finished, get back to Recovery app, choose Reinstall macOS to install macOS again.
Carefully follow the steps shown on the screen to finish the erasing-reinstalling process. This thorough process ensures that all your personal information is erased from your iMac, giving it a fresh start for the next person who uses it and protecting your privacy.
7. Wipe Deleted/Lost Data Using Data Eraser.
To prevent the deleted/lost data on the iMac from being recovered by data recovery software, you should use a data erasure tool to help you permanently wipe the deleted/lost data. Donemax Data Eraser for Mac is a powerful data erasure application and it offers certified data erasure standards including Peter Gutmann, U.S. Army AR380-19, DoD 5220.22-M ECE to help you securely and permanently erase on Mac.
Follow the steps below to wipe all deleted/lost data from your iMac:
Step 1. Download and install Donemax Data Eraser for Mac, then open it from Launchpad.
Step 2. Open Donemax Data Eraser for Mac, then choose Erase Free Space mode. This mode will securely wipe free disk space of iMac internal drive and permanently erase all deleted/lost data from the drive, making data recovery be impossible.
Just select the iMac’s internal disk, then click on Erase Now button.

8. Verify Data Deletion
After wiping your iMac's data, it's important to ensure that the data was deleted. This means carefully going through different parts of your device, like files, apps, and system settings, to ensure that no personal information is left behind. Take the time to carefully check every part of your iMac to ensure that all the data has been erased.
Use data recovery tools to check your device fully and ensure no recoverable data is left on it. This step gives you extra protection and peace of mind and ensures your privacy is completely safe.
By carefully checking that the data has been deleted, you can sell or give away your iMac without worrying it will contain any private data. This step keeps your personal information safe and ensures the new owner can trust that the device is clean and ready to use.
Conclusion:
In conclusion, getting your iMac ready to sell requires several important steps to help the process go smoothly and keep your information safe. Whether you stop AppleCare, delete your data safely, or erase deleted/lost data, each step helps protect your information and gives the new owner a fresh start.
If you follow these steps, you can give your iMac to someone else, knowing it is ready for its next adventure. It will also protect your privacy and give you peace. If you do your research, selling your iMac can go smoothly, ensuring everyone is happy with the deal.
Related Articles
- Nov 25, 2024How to Permanently Erase Data on macOS Monterey – A Comprehensive Guide
- Aug 21, 2023How to Erase An External Storage Device on Mac?
- Nov 27, 2024Factory Reset macOS 13 Ventura: A Comprehensive Guide
- Nov 11, 2024How to Reset Apple Silicon Chip - M1/M2/M3/M4 Mac to Factory Settings?
- Nov 09, 2024How to Factory Reset macOS Sierra?
- Aug 25, 2023How to Permanently Wipe Old Intel Mac Data before Selling or Donating?

Lucien
Lucien is a writer and a chief programmer of Donemax software who has worked in the company for 5+ years. He has written much of the content on the site and devotes to providing troubleshooting and solution for Windows and Mac users including disk cloning, data recovery, migration, eraser, error fixes.

Gerhard Chou
In order to effectively solve the problems for our customers, every article and troubleshooting solution published on our website has been strictly tested and practiced. Our editors love researching and using computers and testing software, and are willing to help computer users with their problems