Before we start: If your APFS drive has APFS snapshot error, you can use data recovery software - such as Donemax Data Recovery for Mac to completely recover all data from it, then use Disk Utility or other tools to fix the damaged APFS drive.
PAGE CONTENT:
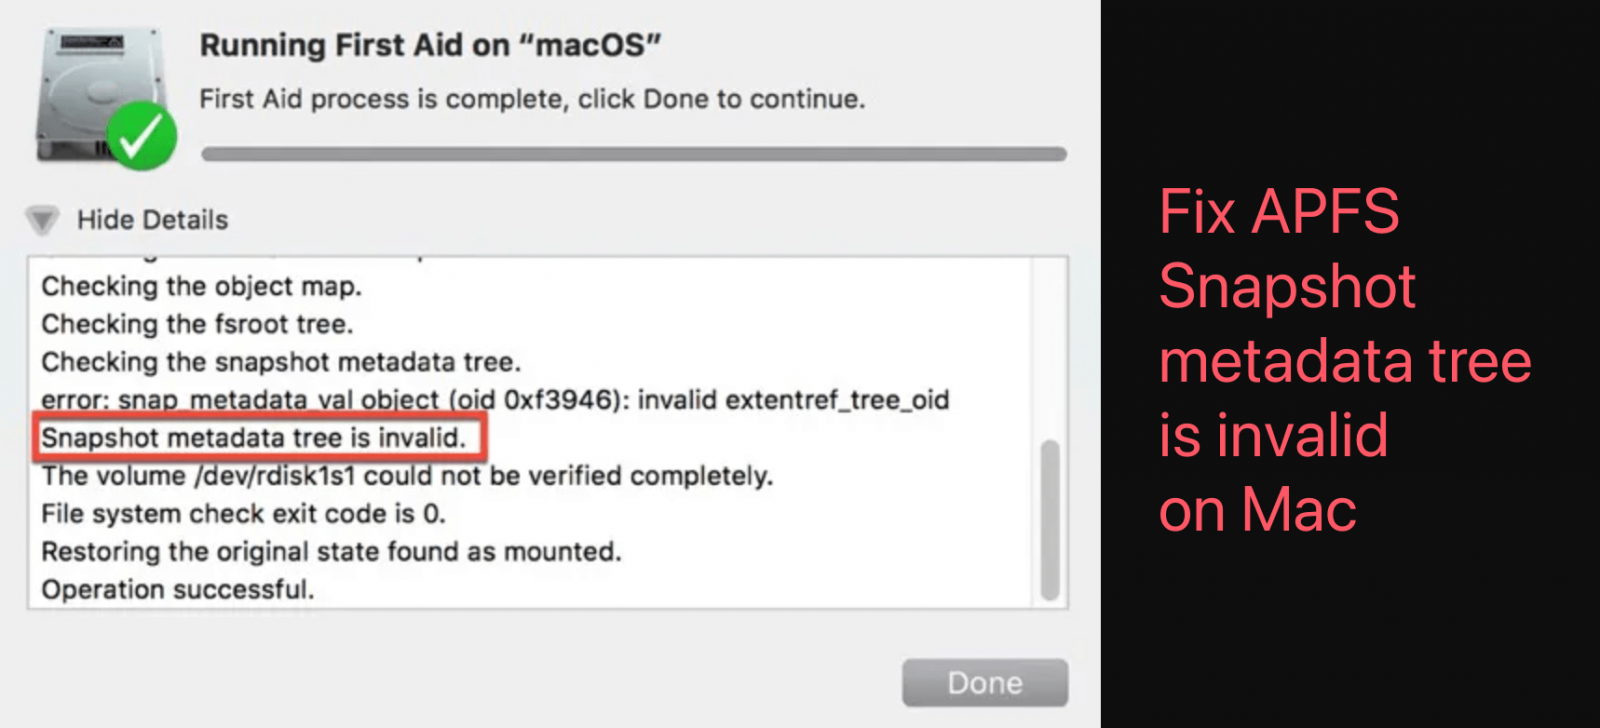
The Apple File System (APFS) has revolutionized how macOS handles data storage, ensuring efficiency, reliability, and speed. One of its standout features is APFS snapshots, which provide a read-only copy of the file system state at a particular point in time. These snapshots are indispensable for Time Machine backups and system restoration. However, encountering the error "APFS snapshot metadata tree is invalid" can disrupt your workflow, leading to failed backups and potential data loss. This guide will help you understand, troubleshoot, and resolve this issue effectively.
Understanding APFS Snapshots Error on Mac
APFS snapshots act as time capsules of your system, capturing its state at a specific moment. These are used primarily for creating backups or recovering from errors. Metadata in APFS snapshots is the structural information that helps your system locate, manage, and interpret the stored data.
When the metadata is invalid, your Mac struggles to access or process the snapshot, leading to error messages. Common causes include disk errors, sudden shutdowns, outdated software, or hardware issues.
Symptoms of the Issue:
Identifying the symptoms early can prevent the problem from escalating. You might notice:
- Backup Failures: Time Machine struggles to complete backups or repeatedly shows errors.
- Disk Utility Errors: Running Disk Utility reveals metadata-related issues.
- Performance Issues: The system becomes sluggish when accessing files linked to snapshots.
- System Logs: Checking Console logs may show warnings or errors related to snapshot metadata.
Precautions Before Attempting Fixes:
Before diving into solutions, it's essential to safeguard your data and prepare your system.
- Back Up Your Data
- Check Disk Health
- Update macOS: Step-by-Step Fixes
When dealing with the "APFS Snapshot Metadata Tree Is Invalid" or "APFS Snapshot is invalid" error on a Mac, it's important to approach the issue methodically. There are several potential fixes, ranging from simple repairs using built-in tools to more advanced troubleshooting. In this section, we will guide you through these fixes, detailing the steps for each one.
Data Recovery from the APFS Drive:
Before fixing APFS Snapshot error, you can use Mac data recovery software to recover data from the AOFS drive which has APFS Snapshot error.
Step 1. Download and install Donemax Data Recovery for Mac on your Mac.
Step 2. Open Donemax Data Recovery for Mac, select the APFS drive to start data recovery.

Step 3. Click on Scan button to deeply scan the APFS drive and find all recoverable files including existing files, inaccessible files, deleted/erased/lost files, etc.

Step 4. Once the scan is completed, you can preview all recoverable files. Then select the wanted files, click on Recover button to save them.

5 Methods to Fix APFS Snapshot Error on Mac
Fix 1: Run Disk Utility First Aid
Disk Utility is one of the most straightforward tools available on macOS for diagnosing and repairing disk-related issues. It's a reliable first step when dealing with any file system corruption, including invalid APFS snapshot metadata. Here's how to use it:
1. Open Disk Utility:
- Click on the Apple Menu in the upper-left corner of your screen.
- Select Applications and then open Utilities. From there, find and launch Disk Utility.
- Alternatively, use Spotlight by pressing Command (⌘) + Space, typing “Disk Utility,” and pressing Enter.
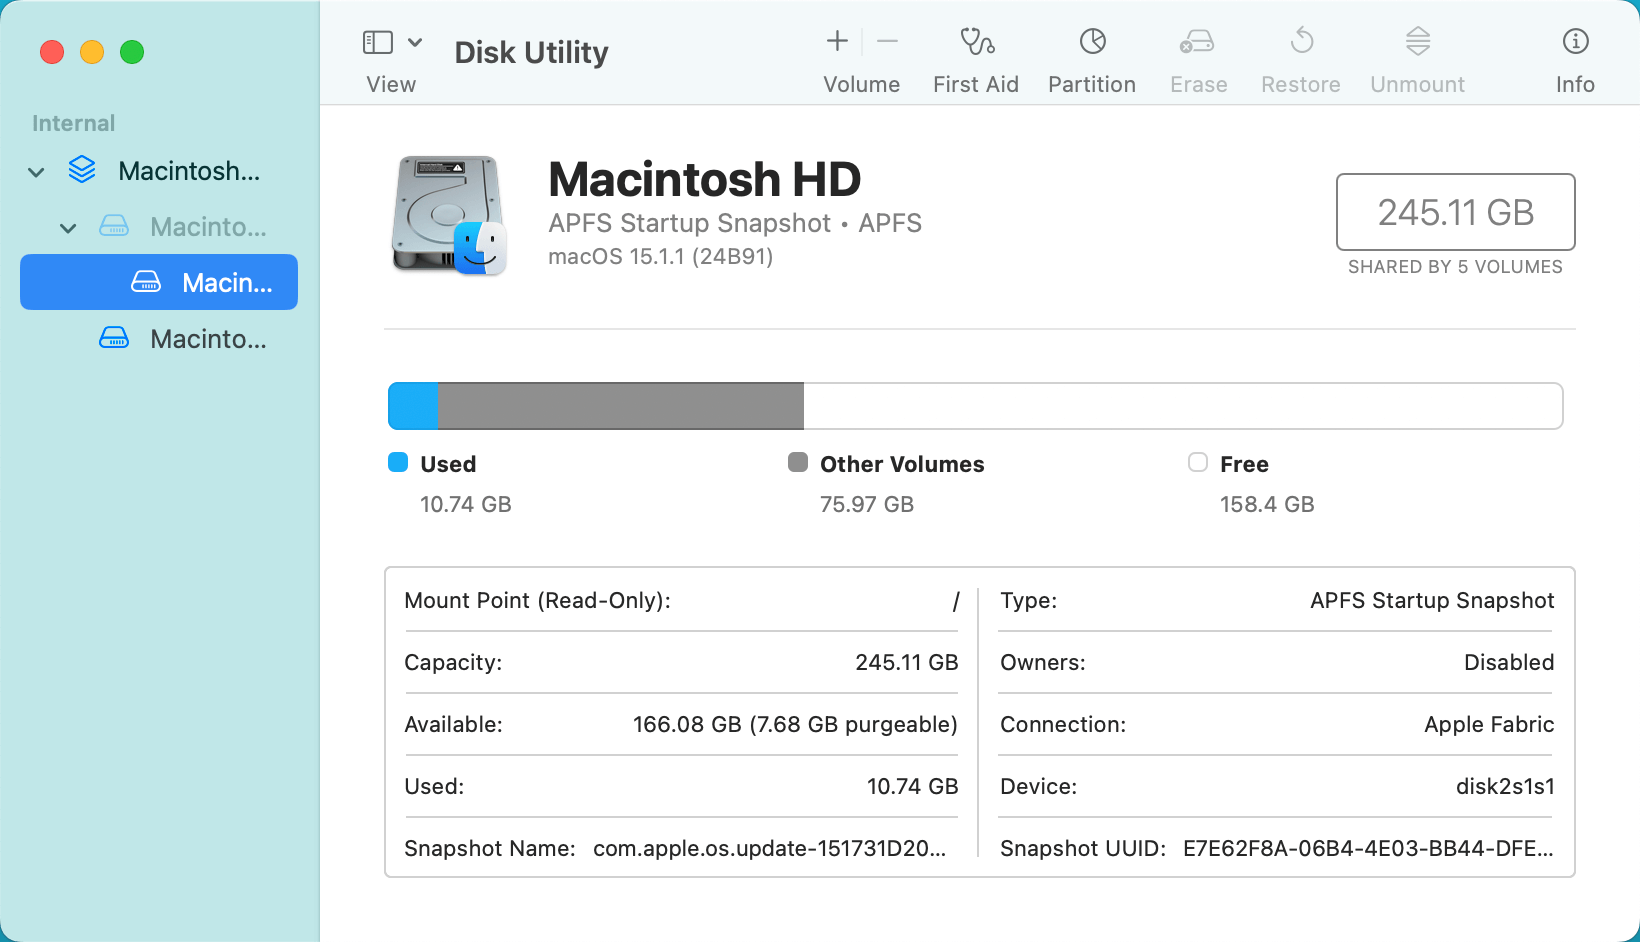
2. Select the Affected Disk:
- In the Disk Utility sidebar, find and select the drive or volume that's experiencing the problem. This is usually labeled Macintosh HD or whatever you've named your startup drive.
![APFS snapshot metadata tree is invalid]()
- Make sure you're selecting the correct drive, as Disk Utility will list all available drives and partitions on your Mac.
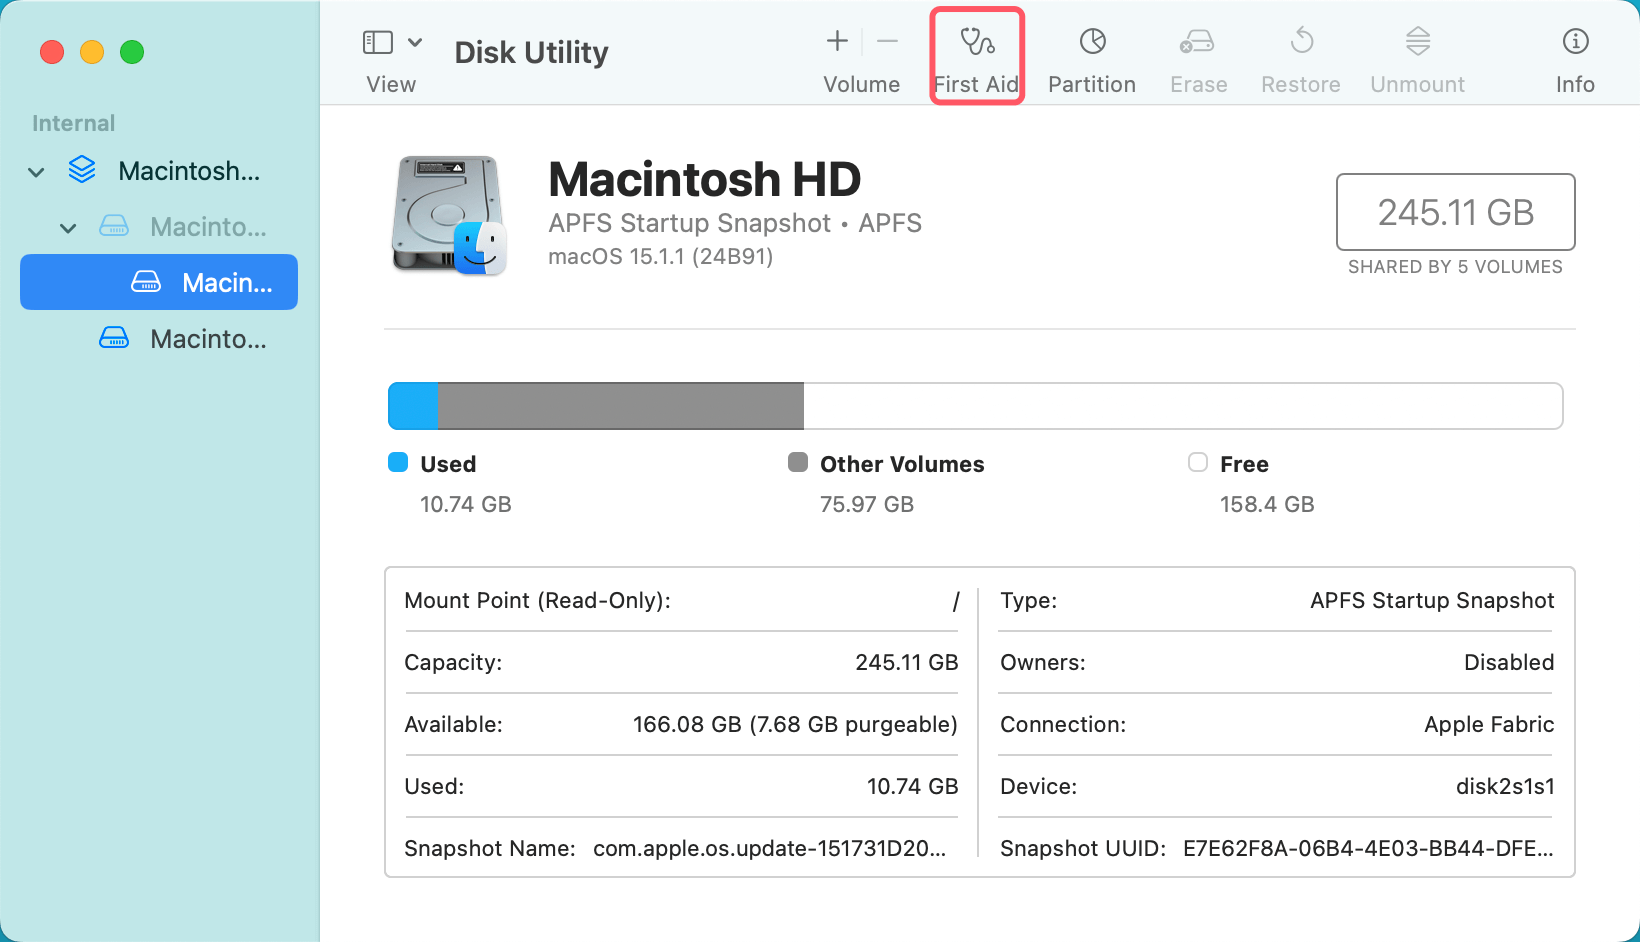
3. Run First Aid:
- In the toolbar, you'll see a button labeled First Aid. Click this button to begin the repair process.
![APFS snapshot metadata tree is invalid]()
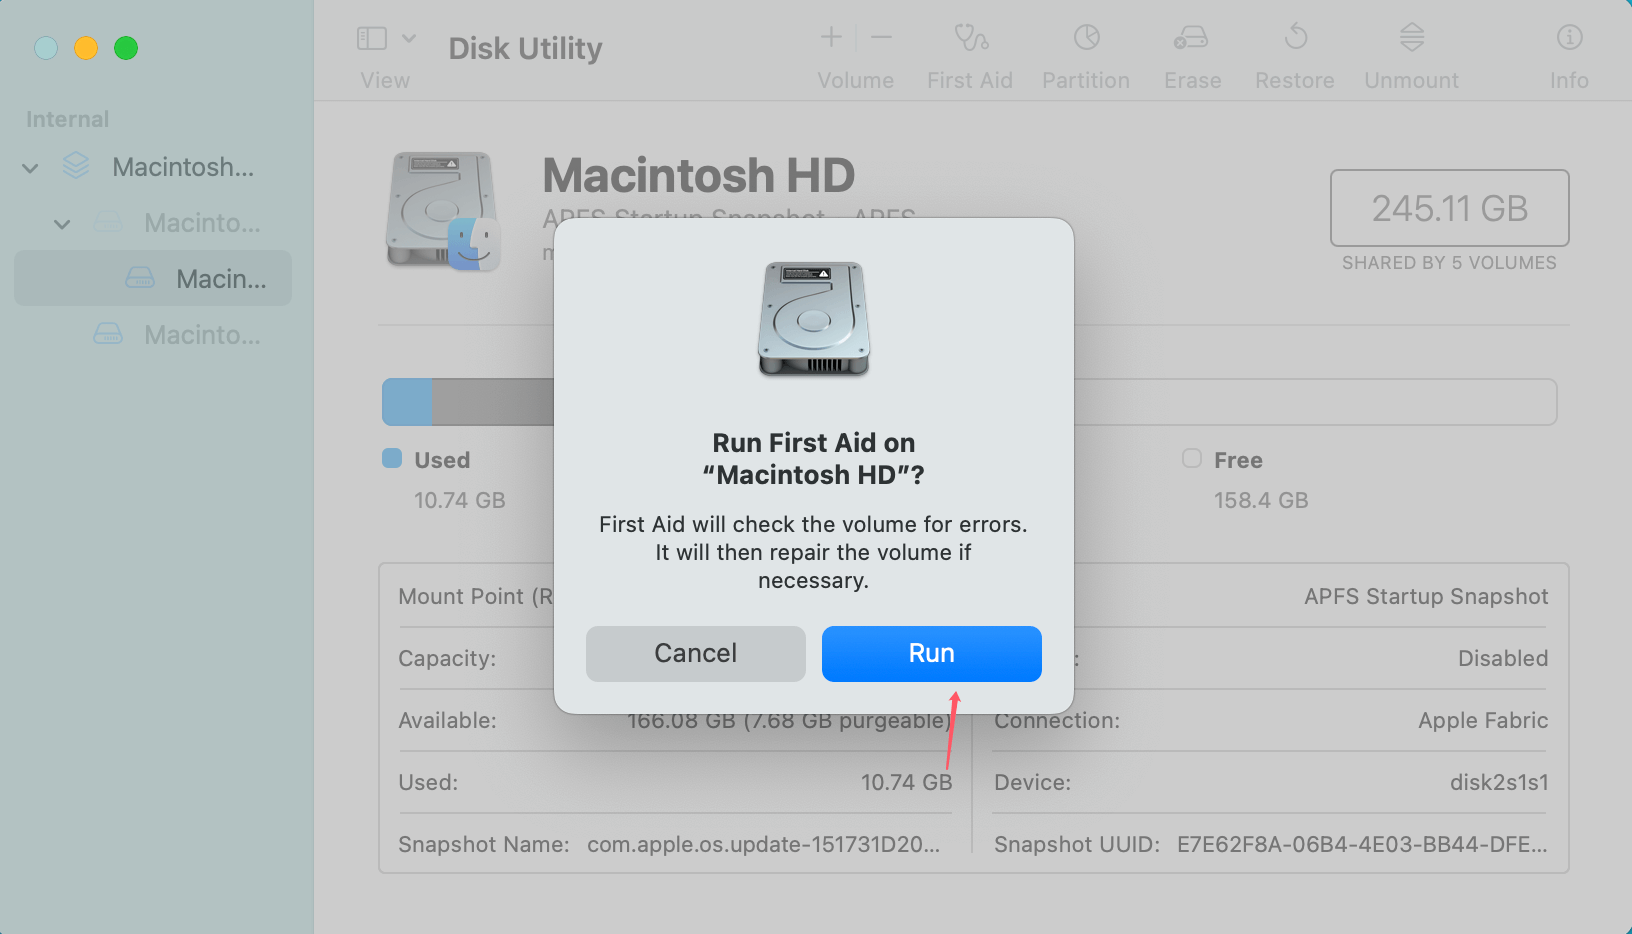
- A dialog box will appear asking for confirmation. Click Run to start the repair.
![APFS snapshot metadata tree is invalid]()
- Disk Utility will now scan the selected disk for any issues, including problems with metadata, file system errors, or disk structure inconsistencies.
- If Disk Utility finds and resolves any problems, it will display a success message. If it finds problems but cannot fix them, it will suggest further steps or recommend you back up your data and reformat the drive.
4. Review the Results:
- Once Disk Utility finishes running, review the results in the First Aid tab. If any issues were found, they should be listed here.
- If First Aid reports that it couldn't repair the disk, or if you continue to see the error message, you may need to try additional steps.
Running Disk Utility is the first line of defense because it addresses common file system errors that could be causing invalid snapshot metadata. However, if it doesn't solve the issue, you'll need to dive deeper with the following steps.
Fix 2: Use Terminal to Identify and Delete Corrupt Snapshots
When Disk Utility doesn't resolve the issue, using the Terminal can offer more advanced, precise control over the snapshots. This method involves identifying the problematic snapshots and removing them manually.
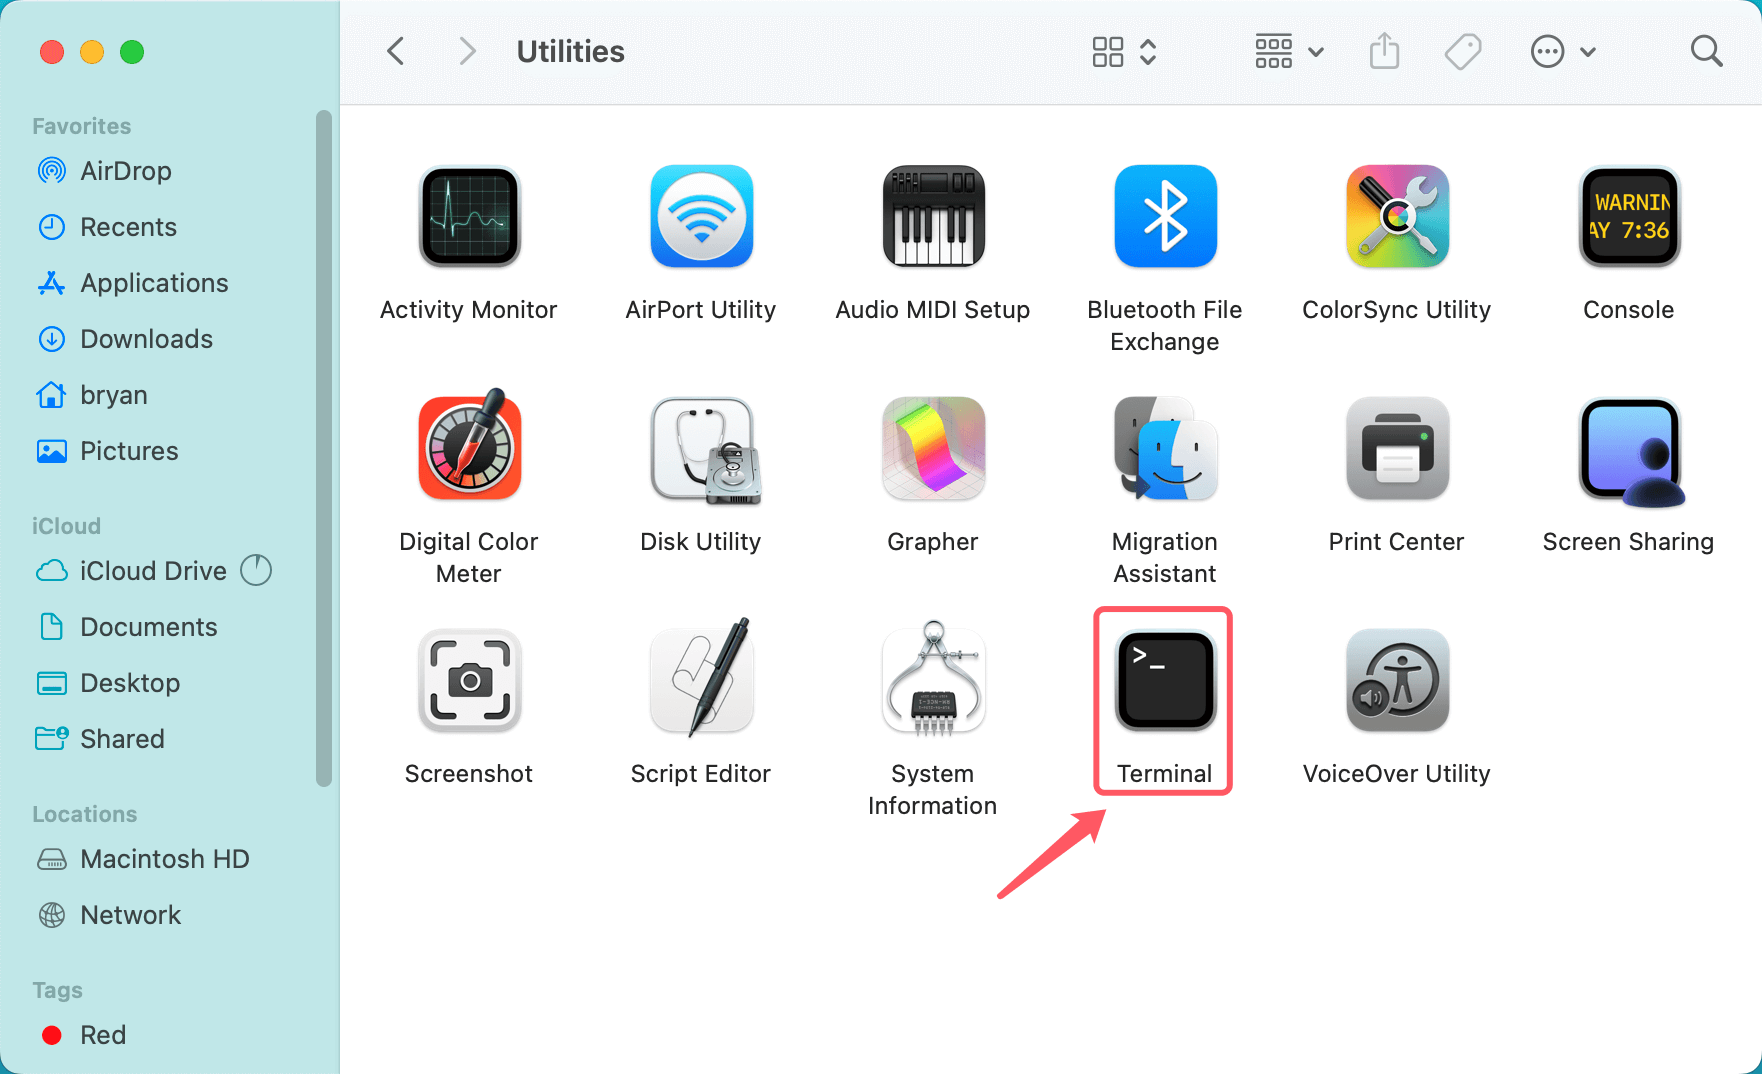
1. Open Terminal
- From the Applications > Utilities folder, open Terminal.
![APFS snapshot metadata tree is invalid]()
- Alternatively, you can use Spotlight by pressing Command (⌘) + Space, typing "Terminal," and hitting Enter.
2. List the Existing Snapshots
- Type the following command in Terminal and press Enter:
sudo tmutil listlocalsnapshots /
![APFS snapshot metadata tree is invalid]()
- This command will show all Time Machine snapshots on your Mac, including the ones that may be causing the issue.
- You will be prompted for your administrator password, which is required for running commands with elevated privileges. Type it in and press Enter.
3. Identify the Invalid Snapshots
- Review the list of snapshots returned by the command. Each snapshot will be listed with a timestamp and other details.
- Invalid snapshots may have strange timestamps, be unresponsive, or fail to mount. If you find any snapshots that seem problematic, you can remove them.
4. Delete the Invalid Snapshots
- To delete a problematic snapshot, use the following command:
sudo tmutil deletelocalsnapshots <snapshot name>
- Replace <snapshot name> with the exact name of the snapshot you want to remove.
- Repeat the command for each invalid snapshot.
5. Confirm Snapshot Deletion
- After running the delete command, you can check if the snapshot was successfully removed by listing the snapshots again:
sudo tmutil listlocalsnapshots /
- If the invalid snapshots are no longer listed, the issue should be resolved.
This process directly addresses corrupt snapshots, which may be causing the metadata error. If the problem persists, or if the snapshots are still present after deletion, the next fix may be necessary.
Fix 3: Repair the APFS Volume
If you suspect that the APFS volume itself is corrupted beyond simple snapshot issues, you can try repairing it using the built-in fsck_apfs tool. This is a more advanced solution, as it involves using macOS's command-line utilities in Recovery Mode.
1. Restart in macOS Recovery Mode
- For Intel-based Mac: Restart your Mac and immediately hold down Command (⌘) + R during startup until the Apple logo or the macOS Utilities screen appears.
- For Apple silicon Mac: Restart your Mac, press and hold Power button until Loading startup options appears. Then choose Options, click on Continue button.
2. Open Terminal in Recovery Mode
- From the macOS Utilities screen, choose Utilities from the menu bar and select Terminal.
![APFS snapshot metadata tree is invalid]()
3. Identify the APFS Volume
- Type the following command to list all disks and volumes on your Mac:
diskutil list
- Find the disk identifier for your APFS volume. It will look something like /dev/disk1s1.
4. Run the fsck_apfs Command
- Use the fsck_apfs tool to attempt to repair the APFS volume. Type the following command:
fsck_apfs -y /dev/disk1s1
- Replace /dev/disk1s1 with the identifier for your APFS volume.
- The -y option automatically answers “yes” to any prompts asking for permission to fix errors.
5. Reboot and Test
- Once the command finishes running, close Terminal and restart your Mac.
- Check if the error persists or if the snapshots are now accessible.
The fsck_apfs tool is designed to repair deeper file system issues that other tools like Disk Utility cannot handle. If this fix doesn't work or the metadata issue is still unresolved, you can try the next step.
Fix 4: Recreate or Disable Time Machine Backups
Sometimes, Time Machine itself may be responsible for the invalid snapshot metadata. If this is the case, you can reset or disable Time Machine backups and potentially fix the issue.
1. Turn Off Time Machine
- Go to System Preferences > Time Machine or System Settings > General > Time Machine (for macOS Ventura or later).
- Uncheck the box next to Back Up Automatically to disable Time Machine backups temporarily.
2. Delete Old Snapshots
- As we did in Fix 2, use Terminal to list and delete old Time Machine snapshots that might be causing problems:
sudo tmutil listlocalsnapshots /
sudo tmutil deletelocalsnapshots <snapshot name>
3. Re-enable Time Machine
- Once the snapshots have been cleared, go back to System Preferences > Time Machine or System Settings > General > Time Machine (for macOS Ventura or later).
- Turn Time Machine back on and initiate a fresh backup to ensure everything is working correctly.
- Test whether the issue with invalid metadata is resolved by creating a new snapshot.
4. Consider Disabling Time Machine
- If Time Machine backups are not crucial for your setup, you may opt to disable Time Machine entirely. This will prevent any future snapshot issues tied to the backup process.
Fix 5: Reformat the Drive as a Last Resort
If none of the above methods resolve the issue and the APFS snapshot metadata problem persists, reformatting the drive might be necessary. This is a more drastic solution and should only be considered as a last resort.
1. Back Up Your Data
- Before you reformat your drive, make a backup of all your crucial data to the cloud or an external disk.
2. Reboot into macOS Recovery Mode
- To enter Recovery Mode, restart your Mac and press and hold Command (⌘) + R (for Intel-based Mac) or power button (for Apple silicon Mac).
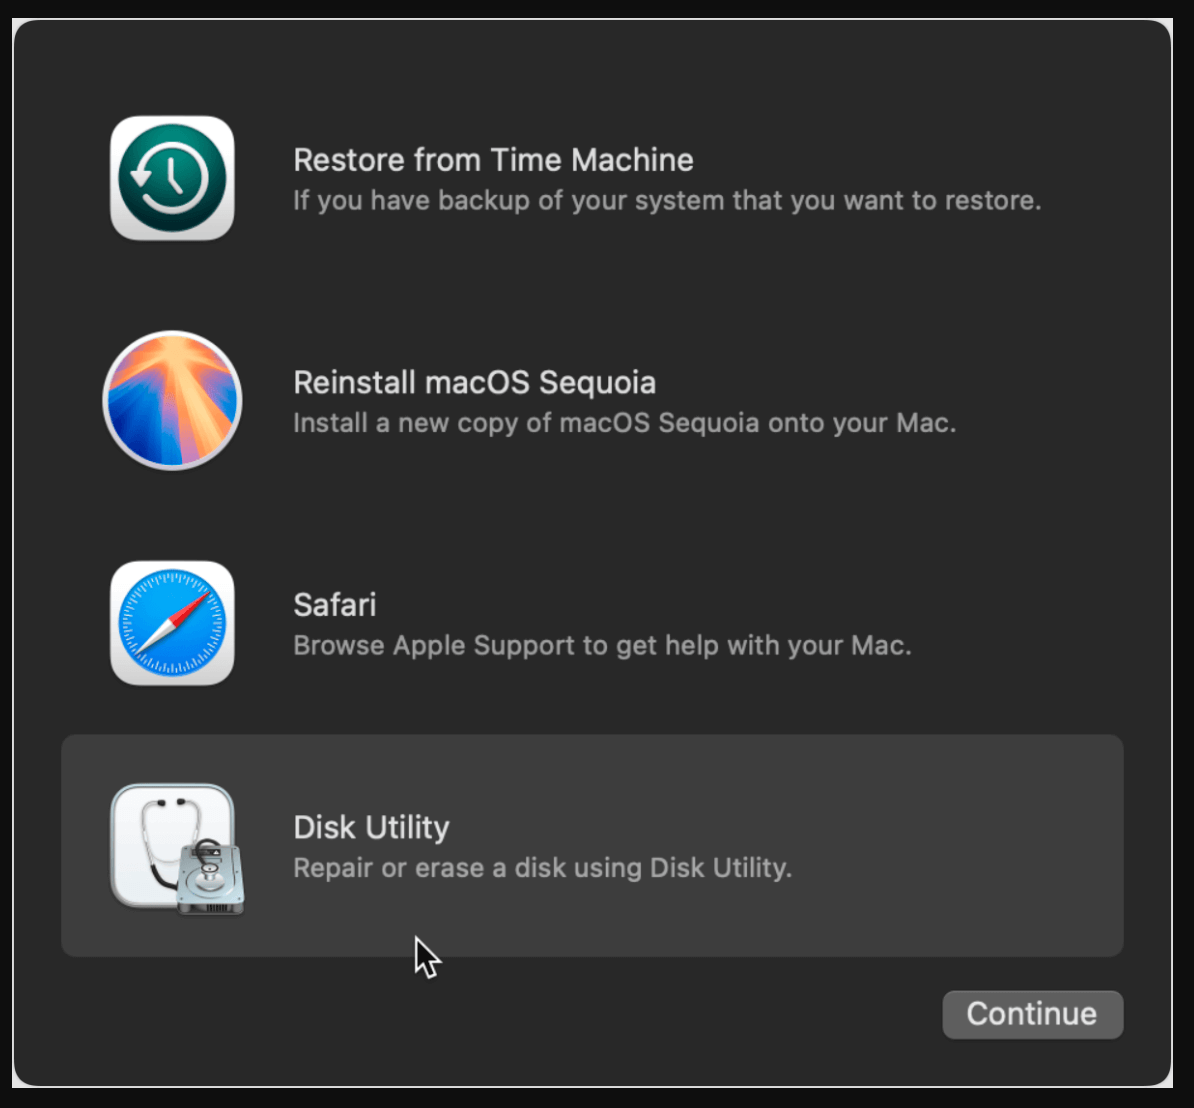
3. Open Disk Utility and Erase the Drive
- From the macOS Utilities window, select Disk Utility.
![APFS snapshot metadata tree is invalid]()
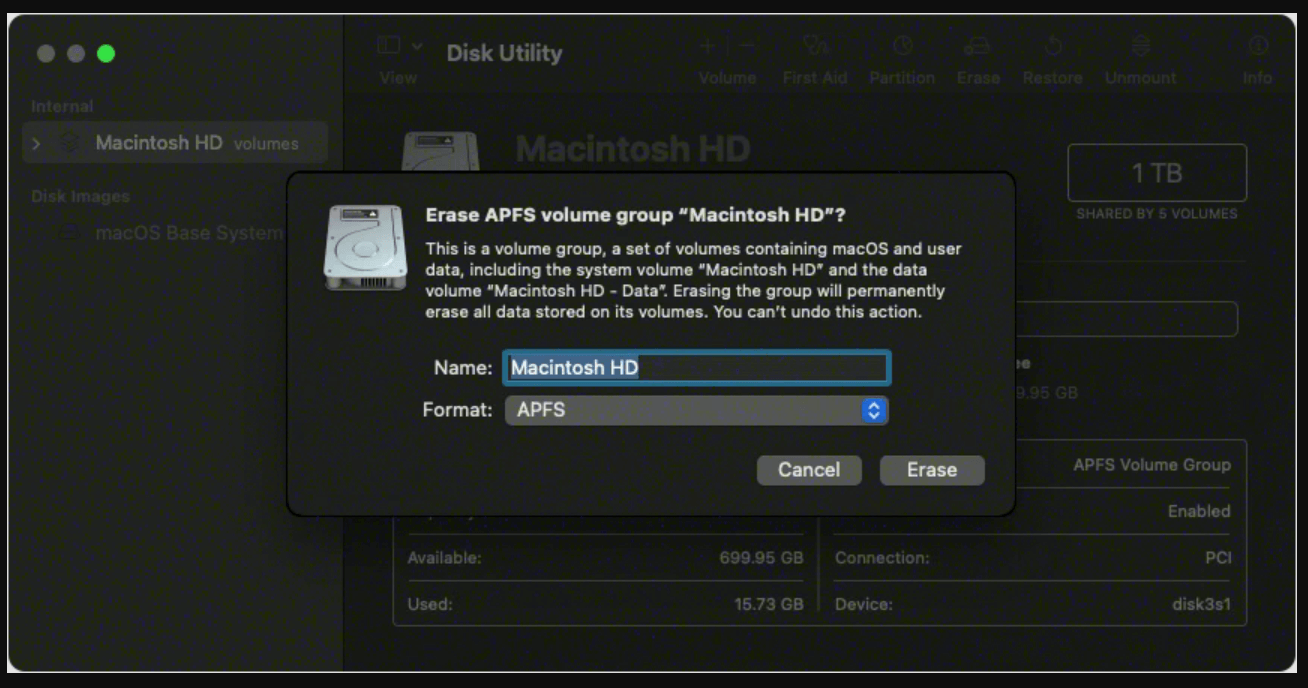
- In the sidebar, select the drive (not the volume) you wish to erase.
- Click the Erase button in the toolbar and choose APFS as the format.
![APFS snapshot metadata tree is invalid]()
- Give the drive a new name, and confirm by clicking Erase again.
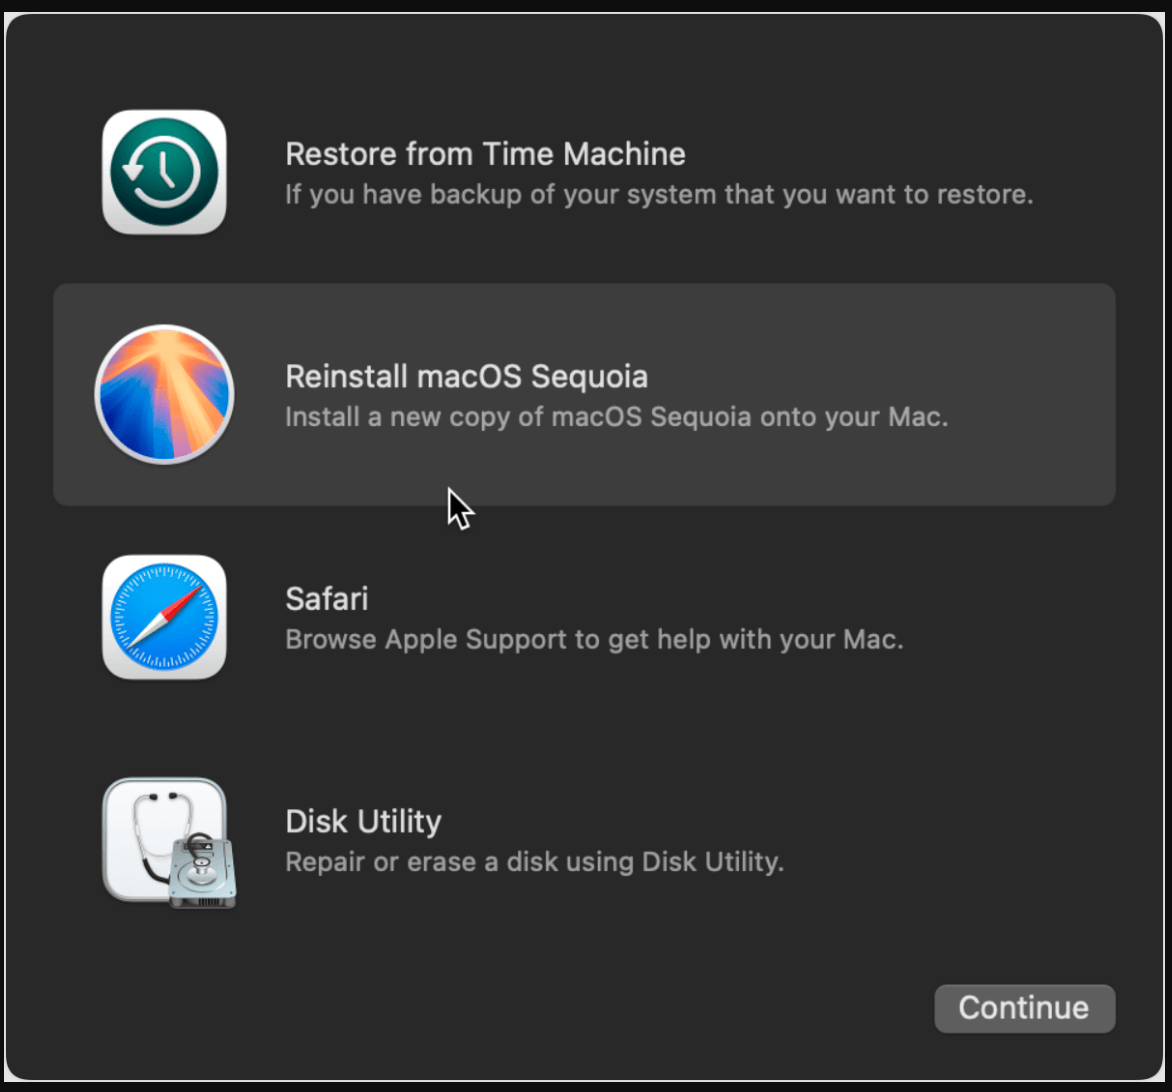
4. Reinstall macOS
- Once the drive is erased, close Disk Utility and return to the macOS Utilities window.
- Select Reinstall macOS, then follow the on-screen instructions to reinstall the operating system.
![APFS snapshot metadata tree is invalid]()
5. Restore from Backup
- After the installation is complete, you can restore your files from the backup you created earlier.
Reformatting your Mac will erase all the data on the drive, so it should be done carefully and only after you've backed up everything important. This will completely resolve any underlying file system or snapshot metadata corruption issues.
Advanced Troubleshooting
If the above fixes don't work, consider these advanced options:
- Third-Party Tools: Applications like DiskWarrior or Donemax Disk Clone for Mac can repair or clone APFS volumes, bypassing snapshot issues.
- Hardware Diagnostics: Run Apple's hardware diagnostics to rule out disk failures. To do this, restart your Mac and press D during startup.
- Professional Help: If the problem persists, visit an Apple Store or authorized repair center for expert assistance.
Preventing Future APFS Snapshot Metadata Tree Errors
Prevention is always better than cure. Following these best practices can minimize the risk of encountering invalid snapshot metadata errors:
- Regular Backups: Maintain regular backups using external drives or cloud services.
- Disk Maintenance: Run Disk Utility's First Aid periodically to detect and resolve potential issues early.
- Avoid Sudden Shutdowns: Always shut down your Mac properly to prevent file system corruption.
- Update Software: Keep macOS and all applications updated to benefit from bug fixes and improvements.
- Monitor Disk Health: Use tools like SMART Utility to monitor your drive's health and replace it if it shows signs of failure.
Conclusion
Encountering the "APFS snapshot metadata tree is invalid" error can be frustrating, but it is not insurmountable. By understanding what causes the issue and following the step-by-step solutions provided, you can restore your Mac's functionality and ensure your data remains safe.
Maintaining a regular backup routine and performing periodic disk maintenance are vital for preventing such issues in the future. If you've found success with any of these methods or have additional tips, feel free to share them in the comments.


Donemax Data Recovery for Mac
Donemax Data Recovery for Mac is one of the best Mac data recovery software. It is easy-to-use and can help in recovering deleted, formatted, inaccessible or lost data from Mac HDD/SSD, external disk, USB drive, SD card, camera or other storage devices.
Related Articles
- Mar 31, 2025How to Fix The Disk Macintosh HD Can't Be Unlocked?
- Feb 05, 2025Fix GoPro SD Card Error: A Complete Troubleshooting Guide
- Nov 29, 2024Disk Utility Partition Tab Greyed Out: Fix It Now
- May 30, 2025Samsung 990 Pro SSD Not Showing Up, Fix It Now!
- Feb 09, 20256 Solutions to Fix Mac Says the SD Card Is Full, but Nothing Is on It
- Dec 18, 2024Unable to Write Data to USB Drive or SD Card on Mac? Here's How to Fix It

Christina
Christina is the senior editor of Donemax software who has worked in the company for 4+ years. She mainly writes the guides and solutions about data erasure, data transferring, data recovery and disk cloning to help users get the most out of their Windows and Mac. She likes to travel, enjoy country music and play games in her spare time.

Gerhard Chou
In order to effectively solve the problems for our customers, every article and troubleshooting solution published on our website has been strictly tested and practiced. Our editors love researching and using computers and testing software, and are willing to help computer users with their problems
Hot Donemax Products

Clone hard drive with advanced clone technology or create bootable clone for Windows/Mac OS.

Completely and easily recover deleted, formatted, hidden or lost files from hard drive and external storage device.

Certified data erasure software - permanently erase data before selling or donating your disk or any digital device.
