Written byStevenUpdated on Mar 04, 2025
How to Format a Drive with PowerShell: A Complete Guide
Approved byGerhard Chou
PAGE CONTENT:
Formatting a drive is a common task when preparing a new hard drive or USB storage device for use. It removes all existing data, configures the file system, and sets up the drive for storage. Traditionally, users format drives using the graphical interface in Windows, but PowerShell provides a faster and more automated way to accomplish the task.
PowerShell is a command-line and scripting language developed by Microsoft, enabling users to manage system settings, automate administrative tasks, and control various Windows components - including disk management. In this article, we will walk through the process of formatting a drive using PowerShell, from identifying the correct disk to executing advanced formatting options.
Before proceeding with formatting a drive using PowerShell, ensure the following:
- Administrator Privileges – PowerShell commands that modify disk partitions require administrative access. You must run PowerShell as an administrator to execute the necessary commands.
- Identify the Correct Drive – Formatting erases all data on the selected drive, so it's critical to double-check the drive you are formatting.
- Backup Important Data – If the drive contains important files, back them up to another location before proceeding with formatting.
Steps to Format a HDD/SSD/USB Drive or SD Card by Using PowerShell
#1 Check Available Drives Using PowerShell
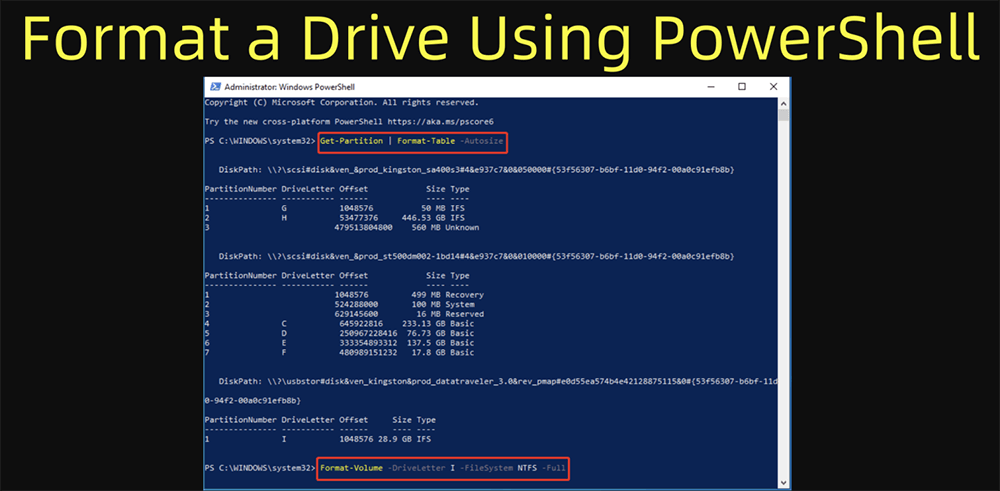
Before formatting a drive, you need to identify the disk number assigned to it. PowerShell allows you to list all connected storage devices using the Get-Disk command.
Step 1: List Available Drives
Open PowerShell as an administrator and enter the following command:
Get-Disk
This will display all available storage devices, showing their status, size, and disk number.

Step 2: Identify the Target Drive
Look for the disk you want to format based on its size and status. The Get-Disk command provides essential details such as:
- Disk Number – The numerical identifier assigned to the drive.
- Size – The total storage capacity of the drive.
- Status – Whether the drive is online or offline.
For example, if you are formatting a 32GB USB drive, locate the disk number that corresponds to that size.
#2 Format a Drive Using PowerShell
Once you have identified the correct disk, you can proceed with formatting. Below are the steps to clear the disk, create a new partition, and format it properly.
Step 1: Clear Existing Partitions (Optional but Recommended)
To completely wipe a disk before formatting, use the Clear-Disk command. This ensures no previous partitions or data interfere with the formatting process.
Clear-Disk -Number 1 -RemoveData -Confirm:$false
Replace 1 with your actual disk number. This command erases all partitions on the selected disk without asking for confirmation.

Step 2: Create a New Partition
Now that the disk is cleared, create a new partition using the New-Partition command:
New-Partition -DiskNumber 1 -UseMaximumSize -AssignDriveLetter
This command creates a new partition using the entire available space on the disk and automatically assigns a drive letter.

Step 3: Format the Drive
To format the newly created partition, use this command:
Format-Volume -DriveLetter H -FileSystem NTFS -NewFileSystemLabel "MyDrive" -Confirm:$false

Replace H with the correct drive letter assigned to your partition. The parameters used in this command:
- -FileSystem NTFS – Specifies the file system.
- -NewFileSystemLabel "MyDrive" – Sets the volume label (you can name it anything you want).
- -Confirm:$false – Prevents PowerShell from asking for confirmation.
After running this command, PowerShell will format the drive, and it will be ready for use.
Advanced Formatting Options
PowerShell allows greater control over the formatting process. Below are some advanced options you can use based on your requirements.
1. Choosing the File System
Different file systems are available depending on how you plan to use the drive:
- NTFS
- exFAT
- FAT32
To specify a different file system, modify the Format-Volume command:
Format-Volume -DriveLetter F -FileSystem exFAT -NewFileSystemLabel "USBDrive" -Confirm:$false
2. Performing a Quick Format
By default, PowerShell performs a full format, which checks for bad sectors. If you want to perform a quick format instead, use:
Format-Volume -DriveLetter F -FileSystem NTFS -NewFileSystemLabel "FastDrive" -Confirm:$false -Full:$false
3. Setting the Allocation Unit Size
The allocation unit size, sometimes referred to as the cluster size, determines how data is physically stored on the drive. The default allocation size is typically chosen by Windows based on the drive size and file system, but you can specify a different size to optimize performance for certain workloads.
When to Customize Allocation Unit Size
- Performance Tuning:
- Smaller allocation units can improve space efficiency, especially on drives that store many small files.
- Larger allocation units might improve performance when working with large files because there is less overhead in managing clusters.
- Usage Example:
Format-Volume -DriveLetter F -FileSystem NTFS -NewFileSystemLabel "OptimizedDrive" -AllocationUnitSize 4096 -Confirm:$false
In this example, 4096 bytes is chosen as the allocation unit size, which is often a good balance for many workloads. However, if you're formatting a drive for a specific application (e.g., a video editing workstation that handles very large files), you might choose a larger size.
4. Additional Parameters and Considerations
PowerShell commands offer a variety of parameters that allow you to fine-tune the drive formatting process even further. Below are some additional options you might find useful:
Specifying the Volume Label
- Purpose:
- The volume label is the friendly name assigned to the drive. It can help you easily identify the drive in File Explorer and other system tools.
- Usage Example:
Format-Volume -DriveLetter F -FileSystem NTFS -NewFileSystemLabel "ProjectData" -Confirm:$false
Confirming the Format Automatically
- Purpose:
- The -Confirm:$false parameter prevents PowerShell from prompting you for confirmation before proceeding. This is especially useful in scripts or automated environments.
- Usage Example:
Format-Volume -DriveLetter F -FileSystem exFAT -NewFileSystemLabel "AutoUSB" -Confirm:$false
Using Other Optional Parameters
- -Force:
- In some cases, you might need to force a command to run even if PowerShell raises a warning or error. Use this parameter with caution.
Format-Volume -DriveLetter F -FileSystem NTFS -NewFileSystemLabel "ForceFormat" -Force -Confirm:$false
- In some cases, you might need to force a command to run even if PowerShell raises a warning or error. Use this parameter with caution.
- Scripting and Automation Considerations:
- When using PowerShell scripts to format multiple drives or automate the process, always include error handling. Use try/catch blocks to handle potential exceptions, ensuring your script can log errors and proceed safely.
![Scripting and Automation Considerations]()
- When using PowerShell scripts to format multiple drives or automate the process, always include error handling. Use try/catch blocks to handle potential exceptions, ensuring your script can log errors and proceed safely.

5. Best Practices When Using Advanced Formatting Options
As you become more comfortable with PowerShell for drive formatting, here are some best practices to ensure you use these advanced options safely and effectively:
- Double-Check the Target Drive:
- Always verify the disk number and drive letter before executing formatting commands. Using Get-Disk and Get-Volume ensures that you’re working with the correct hardware.
- Backup Critical Data:
- Before formatting any drive, especially when experimenting with advanced options, make sure to back up all important data. A single misstep can lead to irreversible data loss.
- Test Commands on Non-Critical Drives:
- If you're new to using these advanced parameters, try them out on a non-critical drive first to see how they affect performance and storage.
- Document Your Script:
- When automating the formatting process, include comments in your PowerShell scripts. This documentation helps you or other team members understand the purpose of each parameter and makes troubleshooting easier.
- Stay Updated:
- Microsoft periodically updates PowerShell and its modules. Keeping your system and scripts up to date ensures compatibility with the latest features and best practices.
6. Combining Options for Customized Workflows
You can combine several advanced options in one command to customize the formatting process perfectly for your workflow. Here's an example that brings together file system choice, allocation unit size, and automatic confirmation:
Format-Volume -DriveLetter H -FileSystem NTFS -NewFileSystemLabel "BackupDrive" -AllocationUnitSize 4096 -Confirm:$false
This single command formats drive H: as an NTFS drive, sets the volume label to "BackupDrive", uses a 4096-byte allocation unit size, and bypasses confirmation prompts—all in one streamlined operation.
Verifying the Format
After formatting the drive, verify that it has been formatted correctly using PowerShell:
Get-Volume
This command lists all drives and their current status, allowing you to confirm that the new drive is correctly formatted and labeled.
Automating the Formatting Process
If you frequently format drives, you can create a PowerShell script to automate the process. Save the following script as FormatDrive.ps1:

Run this script in PowerShell, and it will automatically format the first non-bootable drive detected.
Troubleshooting Common Issues
1. Drive Not Detected
- Ensure the drive is properly connected.
- Run Get-Disk to check if the disk appears in the list.
- Try reconnecting the drive and refreshing the PowerShell session.
2. Access Denied Errors
- Run PowerShell as an administrator.
- Ensure the drive is not in use by another process.
3. Formatting Errors
- If Format-Volume fails, try running Clear-Disk first.
- Use Diskpart as an alternative by running:
diskpart
select disk 1
clean
Exit
Related link: How to format a drive with Command Prompt's diskpart tool?
How to Recover Lost Data from a Drive Which Is Formatted by PowerShell?
The formatted data is not lost for good and it can be recovered by data recovery software - such as Donemax Data Recovery. It can completely recover lost data from a drive which is formatted by Windows PowerShell.
Step 1. Download and install Donemax Data Recovery on your computer. (Don't install it on the formatted drive.)
Step 2. Open Donemax Data Recovery, select the drive which has been formatted by PowerShell.

Step 3. Click on Scan button to deeply scan the formatted drive and find all deleted/erased files.
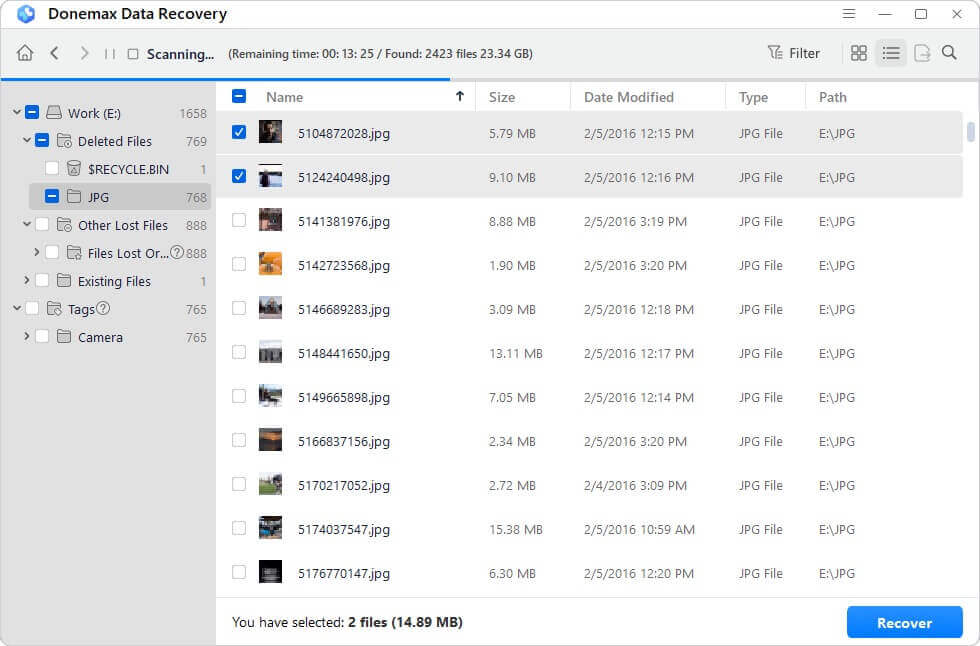
Step 4. Once the scan is completed, you can preview all recoverable files. Then select the wanted files, click on Recover button to save them.

Conclusion
Formatting a drive with Windows PowerShell is a powerful and efficient way to manage storage devices. Whether you need to format a single drive, automate the process for multiple drives, or troubleshoot disk issues, PowerShell provides robust commands to accomplish the task.
By following the steps outlined in this guide, you can safely format a drive, choose the appropriate file system, and verify the results - all using PowerShell. This method is especially useful for IT professionals, system administrators, and power users who need to streamline disk management tasks.
For further learning, explore PowerShell's disk management capabilities and automation techniques to enhance your workflow.
Related Articles
- Feb 18, 20257 Solutions to Fix Internal Drive Not Showing Up on Windows Without Losing Data
- Feb 11, 202511 Solutions to Fix Can't Open an External Hard Drive on My Computer
- Feb 20, 2025Convert RAW to NTFS with CMD (Command Prompt) – A Complete Guide
- Feb 24, 2025How to Format a USB Flash Drive with CMD (Command Prompt) – A Complete Guide
- Feb 07, 2025Fix Windows 10 Not Detecting My Seagate External Hard Drive
- Nov 01, 2024CHKDSK is Not Available for RAW Drives: How to Fix It?

Contributing Writer
Steven
Steven has been a senior writer & editor of Donemax software since 2020. He's a super nerd and can't imagine the life without a computer. Over 6 years of experience of writing technical solutions and software tesing, he is passionate about providing solutions and tips for Windows and Mac users.

Editor in chief
Gerhard Chou
In order to effectively solve the problems for our customers, every article and troubleshooting solution published on our website has been strictly tested and practiced. Our editors love researching and using computers and testing software, and are willing to help computer users with their problems