Before we start: Donemax NTFS for Mac is fully compatible with macOS Catalina. After installing this NTFS driver on your Mac, run it to enable writable for NTFS drive, then you can use any NTFS external disk, volume, SD card or USB flash drive on your Mac without any limitation.
PAGE CONTENT:
Overview: Use NTFS Drive on macOS Catalina
If you are someone who frequently uses both macOS and Windows, you've likely encountered the NTFS (New Technology File System) format, which is commonly used by Windows computers. While macOS does support NTFS drives for reading, it does not allow full access to write files to an NTFS drive by default. This can be a frustrating limitation when you need to transfer files back and forth between a macOS and Windows system.
Luckily, there are ways to overcome this restriction on macOS Catalina, whether you prefer third-party software, using a built-in macOS feature, or reformatting the drive for better compatibility. In this article, we will explore several methods to use an NTFS drive on macOS Catalina, including detailed steps on how to install third-party drivers, enabling experimental NTFS write access using macOS Terminal, and understanding the best file systems for cross-platform compatibility. Let's dive in!
Understanding NTFS and macOS Compatibility
What is NTFS?
NTFS is a file system developed by Microsoft for its Windows operating systems. It is the standard file system for most modern Windows computers due to its enhanced features, such as support for large files and volumes, file compression, encryption, and more efficient storage management. NTFS is robust, secure, and optimized for performance, but it's designed primarily for Windows environments.
However, macOS, while compatible with many file systems, does not offer native support for writing to NTFS drives. macOS can only read NTFS-formatted drives, meaning you can view and access files, but cannot modify or add new files to the drive. This can create issues when you need to move large amounts of data between a macOS and a Windows PC.
Why macOS Catalina Only Supports NTFS in Read-Only Mode?
The read-only limitation for NTFS drives in macOS is intentional and based on several factors. Apple has not integrated full NTFS support due to licensing and technical constraints. Enabling read-write functionality for NTFS would require either reverse engineering or licensing agreements with Microsoft, both of which Apple has historically avoided. Therefore, macOS allows for basic read access, but writing and modifying data on NTFS drives requires additional software or methods.
That said, many users prefer full access to NTFS drives for ease of use and the ability to interact with both macOS and Windows filesystems without restrictions. Thankfully, this is possible, and several solutions exist to enable write access on macOS Catalina.
Methods to Use NTFS Drives on macOS Catalina
1. Using Third-Party NTFS Drivers [The Best Method]
The most straightforward and reliable method to gain full read-write access to NTFS drives on macOS Catalina is by using third-party NTFS drivers. These drivers are specially designed to enable macOS Catalina to read, write, and modify files on NTFS-formatted drives.
Donemax NTFS for Mac is one of the best-known tools for enabling NTFS write access on macOS. This paid solution offers seamless integration with macOS, providing a fast and stable way to interact with NTFS drives.
It is fully compatible with macOS Catalina and can quickly add NTFS read-write support.
Donemax NTFS for Mac
- Quickly enable NTFS read-write on macOS Catalina.
- Support mount or unmount APFS, NTFS, ExFAT, HFS+ drives on macOS Catalina.
- Repair damaged disks on macOS Catalina.
Follow the steps below to enable writable for NTFS drive on macOS Catalina:
Step 1. Download and install Donemax NTFS for Mac, then run it from Launchpad.
Step 2. Connect the NTFS drive to your Mac, open Donemax NTFS for Mac. Select the NTFS drive, click on Enable Writable button.

2. Enabling Native macOS NTFS Write Support [Not Always Working]
For users who prefer not to install third-party software, macOS does have a hidden, experimental feature that allows you to enable write support for NTFS drives. This method requires the use of Terminal, and it’s important to note that it’s not officially supported by Apple, meaning it could lead to potential system issues, such as data corruption, and is not recommended for critical files.
Steps to Enable NTFS Write Support on macOS Catalina (Experimental):
- Open Terminal:
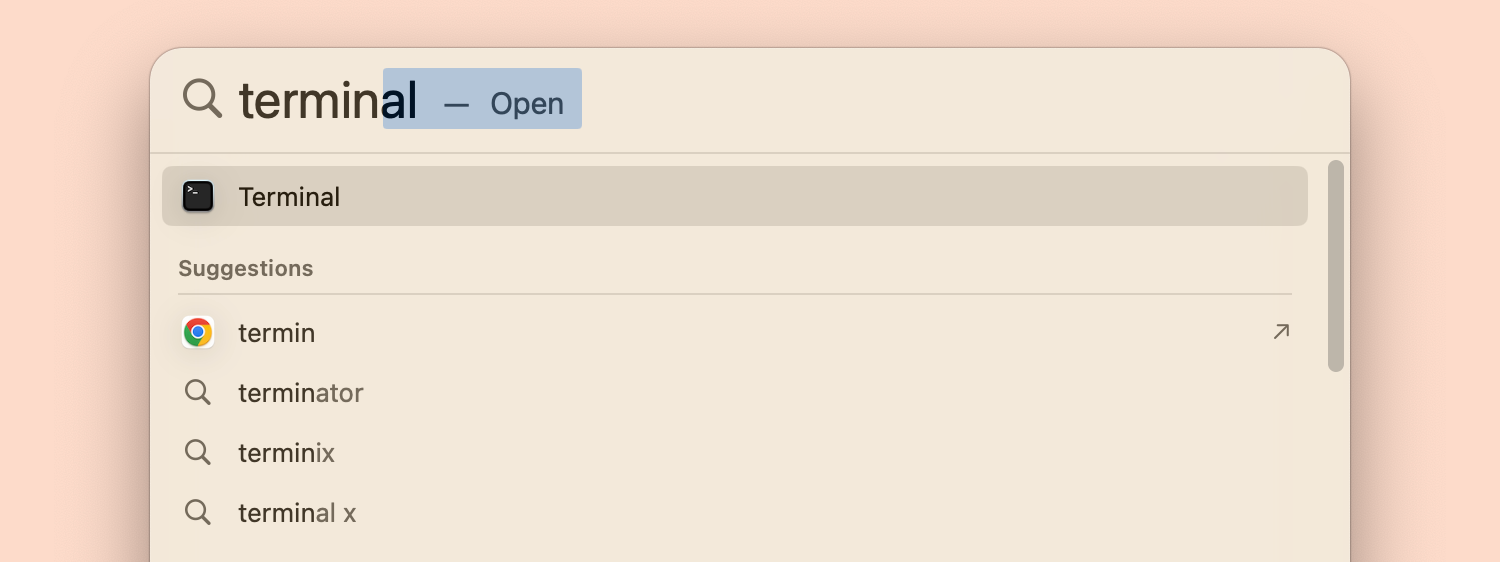
- Navigate to Applications > Utilities > Terminal or use Spotlight to search for "Terminal."
![Use NTFS Drive on macOS Catalina]()
- Navigate to Applications > Utilities > Terminal or use Spotlight to search for "Terminal."
- Enter the Command:
- In Terminal, type the following command:
sudo nano /etc/fstab
This will open the fstab file, which contains information on how drives are mounted.
- In Terminal, type the following command:
- Modify the fstab File:
LABEL=YourDriveName none ntfs rw,auto,nobrowse
Replace "YourDriveName" with the actual name of your NTFS drive. This line enables read-write access for the drive.
- In the Terminal editor, enter the following line at the end of the file:
- Save and Exit:
- Press Ctrl + O to save the file, and Ctrl + X to exit the editor.
- Restart Your Mac:
- After restarting your Mac, the NTFS drive will be mounted with write access.
Limitations and Risks:
- Risks: This method is unsupported and may cause data loss or file system errors. It is not recommended for critical drives.
- Limitations: This method works only for specific drives, and it is not as reliable or robust as third-party drivers.
3. Formatting the Drive to a macOS-Compatible File System
If you consistently use your NTFS drive on both macOS and Windows, it might be a good idea to reformat the drive to a more compatible file system, such as ExFAT. This file system supports both macOS and Windows and allows for read-write access on both platforms.
Steps to Format the Drive to exFAT Using Disk Utility:
- Backup Your Data:
- Before proceeding with formatting, make sure you back up all the data on the NTFS drive because formatting will erase everything.
- Open Disk Utility:
- Go to Applications > Utilities > Disk Utility or use Spotlight to search for it.
- Select the NTFS Drive:
- In Disk Utility, select the NTFS drive from the list of drives on the left.
- Erase and Format the Drive:
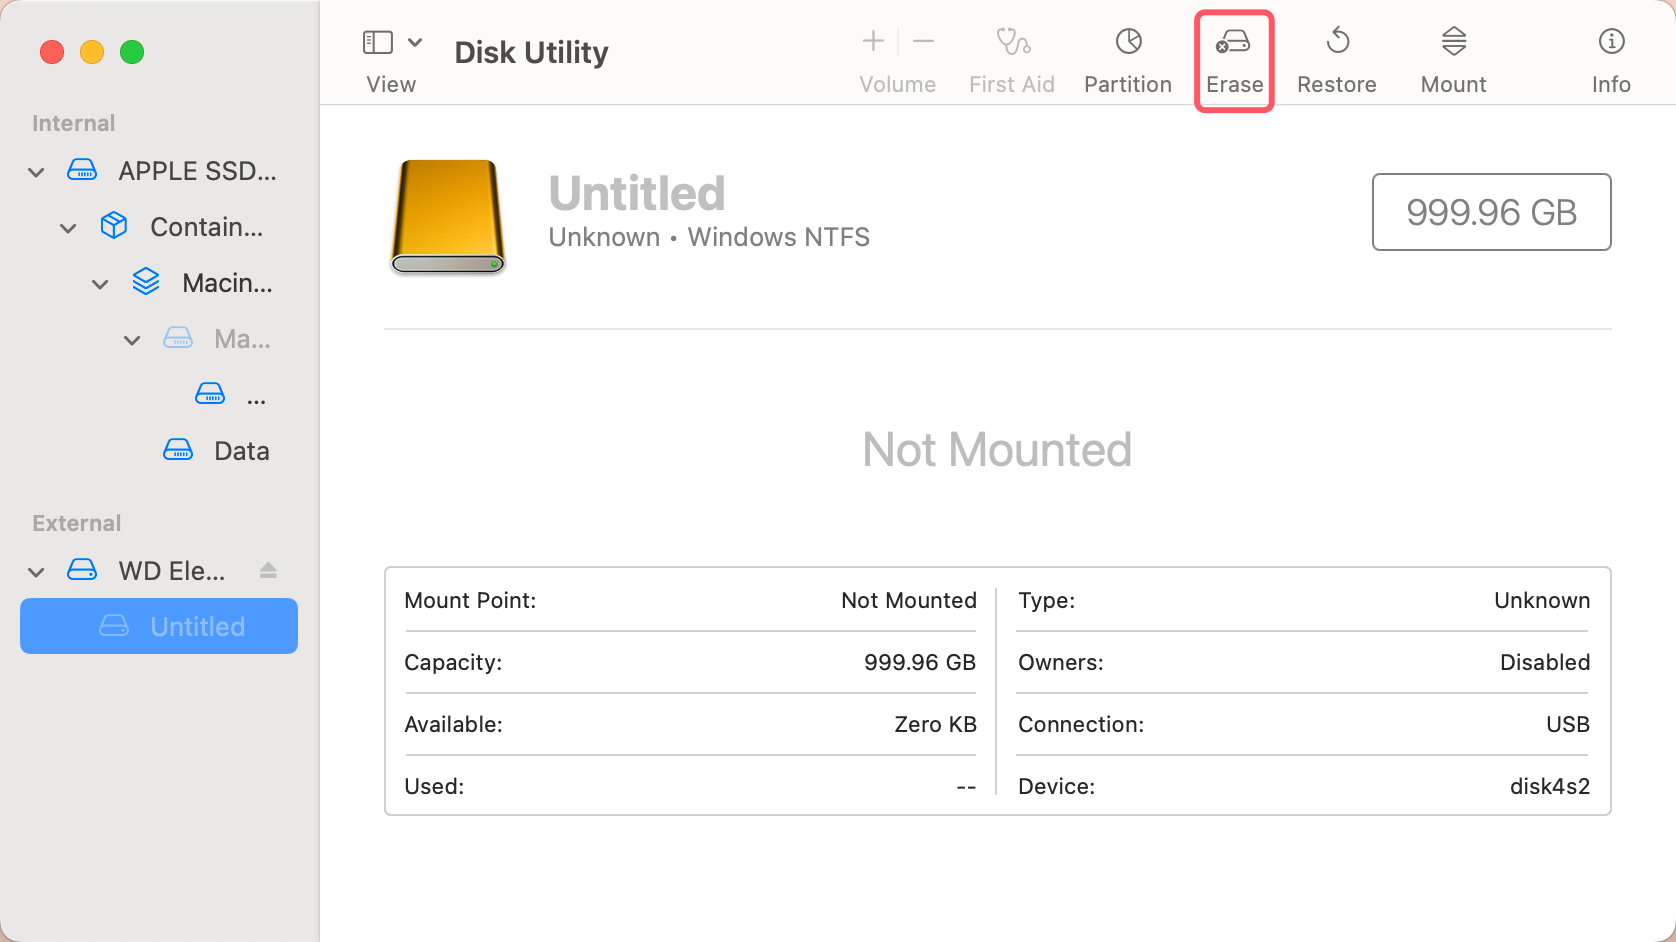
- Click on the "Erase" button at the top of the window.
![Use NTFS Drive on macOS Catalina]()
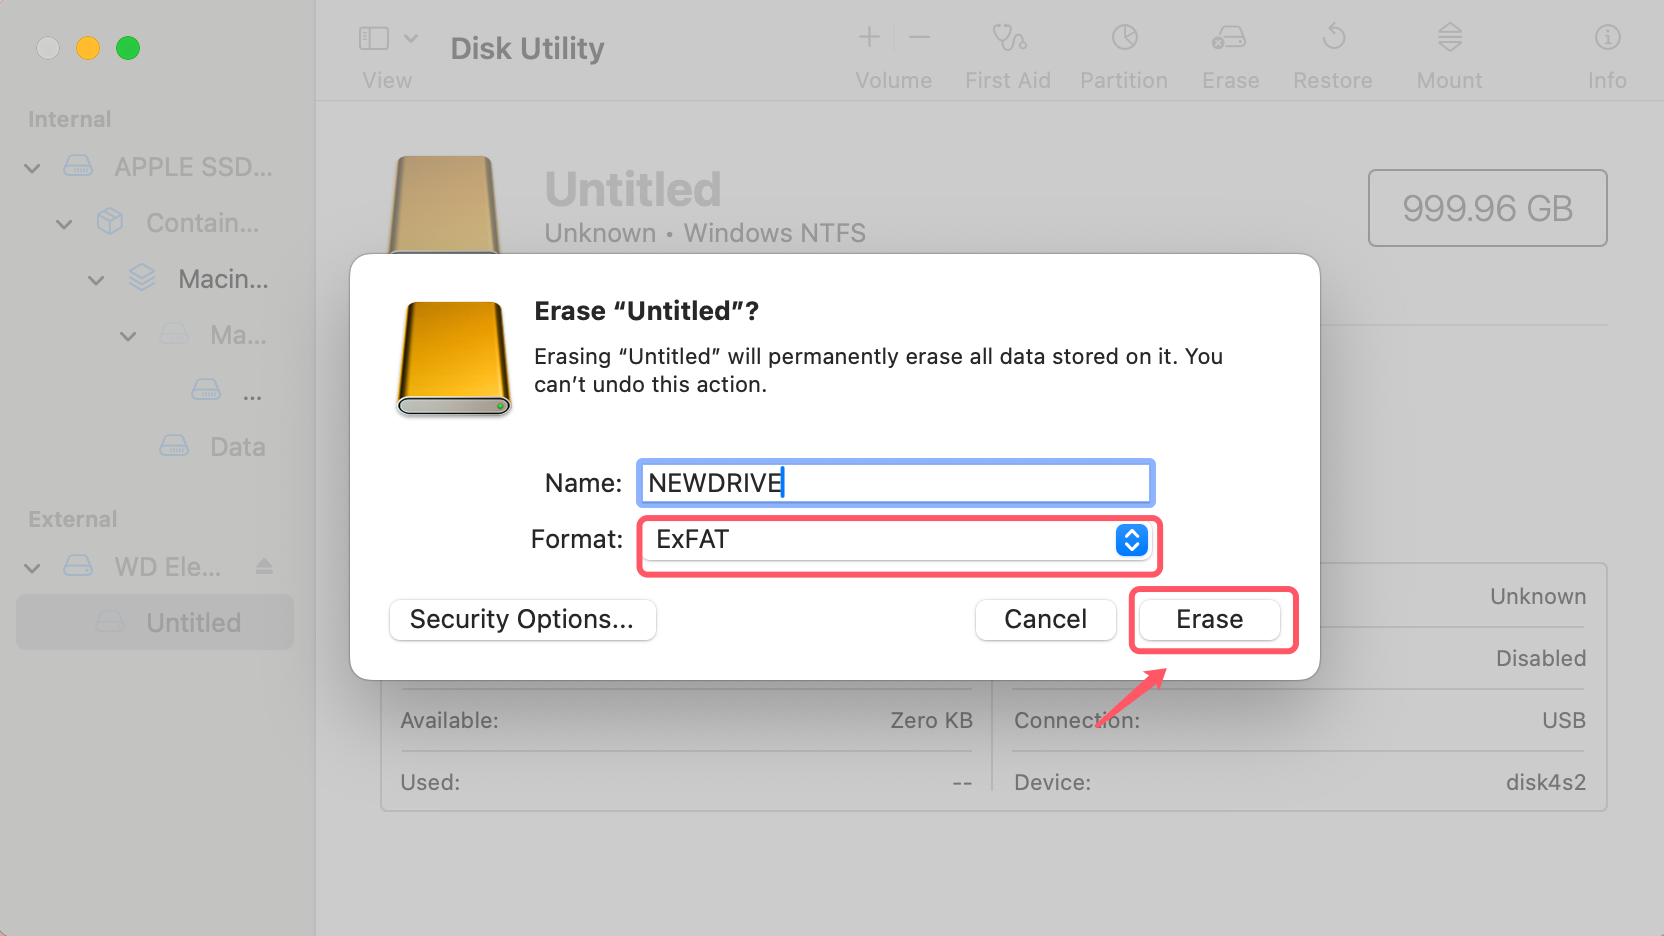
- In the format dropdown menu, select ExFAT as the file system.
![Use NTFS Drive on macOS Catalina]()
- Name your drive and click Erase to start the formatting process.
- Click on the "Erase" button at the top of the window.
- Use the Drive on Both macOS and Windows:
- oAfter formatting, your drive will be accessible with full read-write support on both macOS and Windows.
Pros of Using ExFAT:
- Fully compatible with both macOS and Windows.
- Ideal for transferring large files between different operating systems.
Cons of Using ExFAT:
- It might not be suitable for all types of data storage needs (e.g., for large-scale backup drives).
- Formatting the drive erases all existing data, so backups are necessary.
💡 Note: If you have lost data due to erasing the NTFS drive to ExFAT and don't have a backup, run data recovery software to scan the formatted drive and recover all lost files.

Recover Erased or Formatted Drive on Mac
Recover lost data from an erased or formatted drive on Mac by using Mac data recovery software - Donemax Data Recovery for Mac.
Troubleshooting Common Issues
NTFS Drive Not Detected on macOS Catalina:
If your NTFS drive isn't showing up on macOS, try the following:
- Ensure that the drive is properly connected and powered (if applicable).
- Try plugging the drive into a different USB port or using a different cable.
- Restart your Mac and reconnect the drive.
- If using a third-party driver, reinstall it to ensure compatibility with macOS Catalina.
Errors During NTFS Driver Installation:
If you encounter issues during the installation of third-party NTFS drivers:
- Ensure that the driver is compatible with macOS Catalina.
- Check for any macOS updates that might conflict with the driver.
- Try disabling Gatekeeper (System Preferences > Security & Privacy > General) to allow the installation of third-party software.
Files Disappearing After Enabling Write Access:
Sometimes files might disappear or fail to appear when using write access with NTFS drives. This can happen due to system glitches or the method of enabling write access (especially with the Terminal method). Ensure you have a backup before enabling write access, and try using third-party drivers for more stability.
Best Practices for Using NTFS Drives on macOS
- Regularly Backup Data:
- Always keep a backup of your important files, especially when using unsupported methods like enabling NTFS write access in Terminal.
- Keep Software Updated:
- Whether you're using third-party NTFS drivers or built-in methods, keeping everything up-to-date is crucial for ensuring stability and security.
- Avoid Unsupported Methods for Critical Drives:
- For critical data storage, it's best to use supported third-party NTFS drivers instead of experimental Terminal commands.
Conclusion
Using an NTFS drive on macOS Catalina doesn't have to be a challenge. Whether you choose to install third-party NTFS for Mac software, enable experimental write access through Terminal, or reformat your drive for broader compatibility, there are several solutions available to meet your needs. Make sure to carefully consider your options based on your requirements for stability, file safety, and ease of use. By following the guidelines in this article, you can effectively manage NTFS drives on your macOS Catalina system.


Donemax NTFS for Mac
An easy-to-use NTFS for Mac tool to help you enable writable for NTFS drives on Mac so that you can read-write NTFS drives on Mac without any limitation. It also can help you mount, format, repair, rename, open drive on your Mac.
Related Articles
- Nov 20, 2024Fix NTFS Drive is Read-Only on macOS Big Sur
- Dec 23, 2024Best 5 Toshiba NTFS Driver for Mac
- Feb 27, 2024External Hard Drive Is Read-Only on M3-Chip Mac, Fix It
- Dec 02, 2024How to Read-Write NTFS Drive on macOS Sequoia?
- Dec 25, 2024How to Fix External Hard Drive Read-Only on macOS Catalina [7 Solutions]
- Jan 30, 2024How to Fix Toshiba External Hard Drive Read-Only on Mac?

Christina
Christina is the senior editor of Donemax software who has worked in the company for 4+ years. She mainly writes the guides and solutions about data erasure, data transferring, data recovery and disk cloning to help users get the most out of their Windows and Mac. She likes to travel, enjoy country music and play games in her spare time.

Gerhard Chou
In order to effectively solve the problems for our customers, every article and troubleshooting solution published on our website has been strictly tested and practiced. Our editors love researching and using computers and testing software, and are willing to help computer users with their problems


