Before we start: Donemax NTFS for Mac is fully compatible with macOS Big Sur. It can quickly enable writable for NTFS drives. To fix NTFS drive read-only on macOS Big Sur, just install it on your Mac, run it to enable writable for your NTFS drive.
PAGE CONTENT:
NTFS (New Technology File System) is a widely used file system developed by Microsoft for Windows operating systems. It's common to use external drives formatted with NTFS for file transfers between Windows and other systems. However, macOS, by default, only offers read-only support for NTFS drives. This can be frustrating, especially when you need to write or modify files on an NTFS-formatted drive using macOS Big Sur.

If you've encountered the "NTFS drive is read-only" issue on macOS Big Sur, you're not alone. Fortunately, there are several methods you can use to resolve this problem. In this article, we'll explore why macOS treats NTFS drives as read-only, how to check if your NTFS drive is in read-only mode, and provide various solutions to enable write access to your NTFS drive. Let's dive into how you can fix this issue and fully utilize your NTFS drives on macOS Big Sur.
Understanding the Read-Only NTFS Problem on macOS Big Sur
Why macOS Supports NTFS Only in Read-Only Mode:
macOS including macOS Big Sur does not natively support writing to NTFS drives. This is primarily because NTFS is a proprietary file system developed by Microsoft, and macOS was not designed to write to it. When you connect an NTFS drive to a Mac, macOS recognizes the drive and can read files from it. However, the system is set to read-only mode for NTFS volumes, meaning you can view and copy files, but not modify or delete them.
macOS uses its native file system, APFS (Apple File System), for its own drives, which is optimized for Apple hardware. While macOS supports various file systems like HFS+ and FAT32, NTFS is not one of them, except for read operations. Consequently, any NTFS-formatted drive is mounted as a read-only volume by default, unless additional software is installed to enable write support.
How Does macOS Handle NTFS in Read-Only Mode:
When you plug in an NTFS-formatted drive, macOS including macOS Big Sur will detect it, but you'll quickly notice that attempts to write files to the drive or make changes will result in an error. This is because macOS does not allow you to modify the NTFS volume unless you take specific actions to enable write access.
The reasons behind this read-only limitation include:
- Licensing and compatibility issues: Apple and Microsoft have different philosophies when it comes to file systems, and NTFS is proprietary to Microsoft.
- Lack of native support for writing to NTFS: macOS was never designed to modify NTFS drives, so there are no built-in tools to enable write functionality.
- File system risks: Modifying NTFS file systems from macOS can sometimes lead to corruption, which is another reason Apple doesn’t natively support writing to NTFS volumes.
How to Check If an NTFS Drive is Read-Only:
Before attempting to fix the issue, you should first confirm that your NTFS drive is, indeed, in read-only mode. Here's how you can do this:
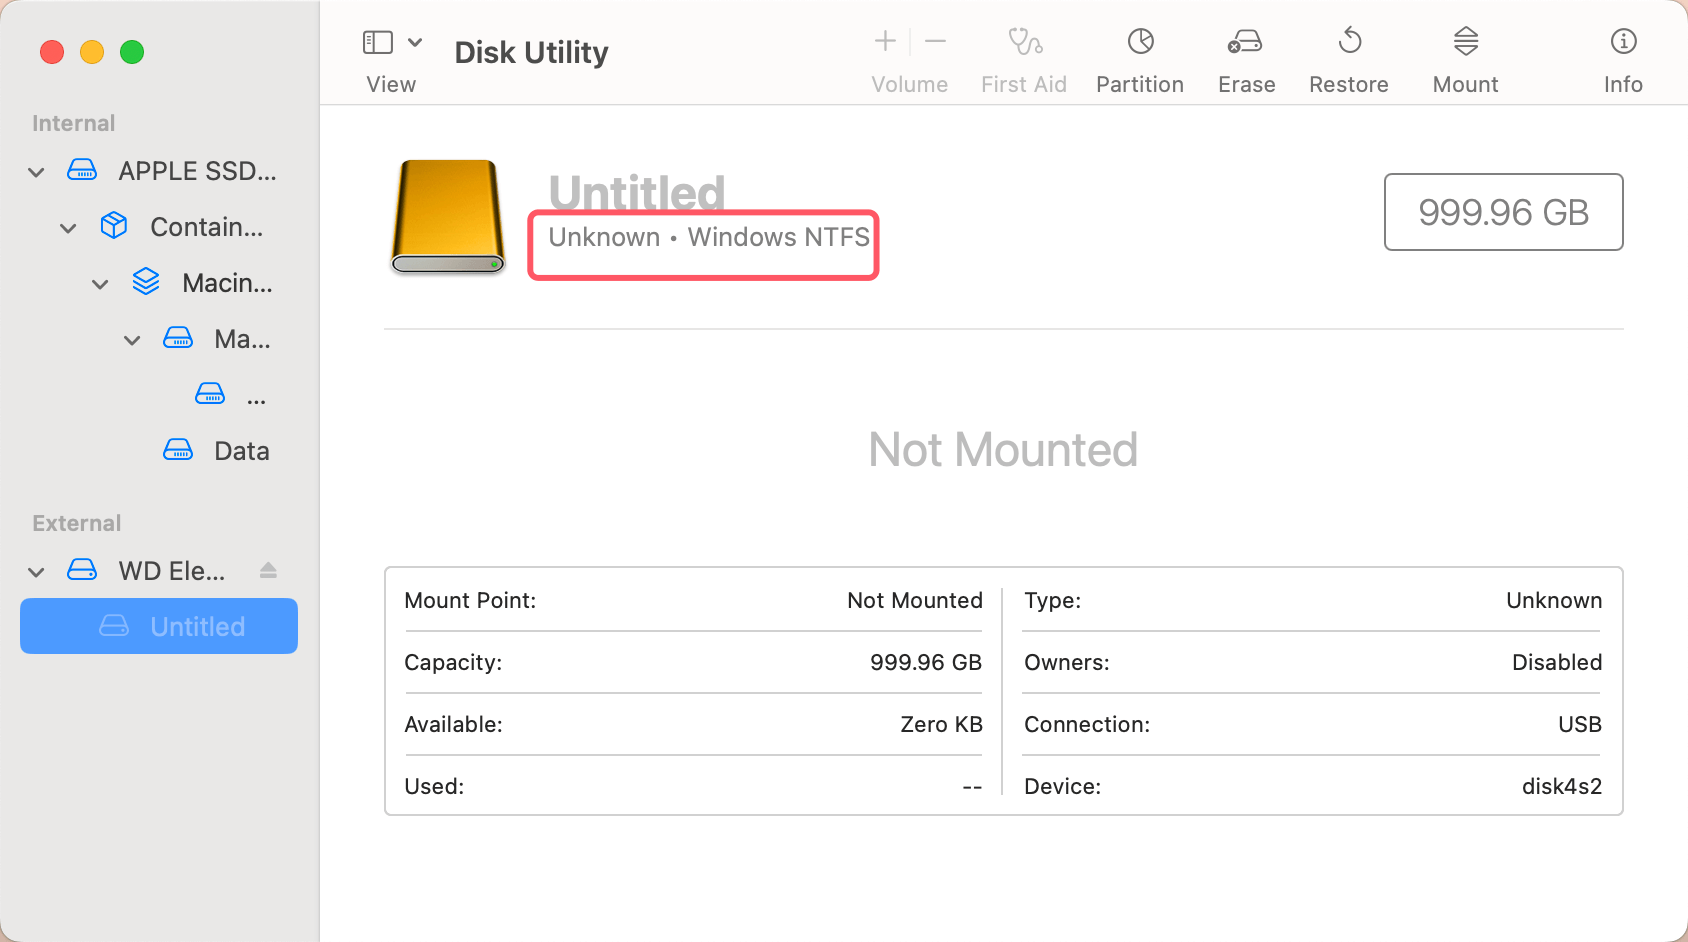
1. Using Disk Utility
- Open Disk Utility: Go to Applications > Utilities > Disk Utility.
- Select the NTFS Drive: On the left-hand side, you will see a list of all connected drives. Locate the NTFS drive and select it.
- Check the File System: In the main window, you should see the file system listed under the "Format" section or under the name of the drive. If it says "NTFS," the drive is indeed using the NTFS file system.
![Fix NTFS Drive is Read-Only on macOS Big Sur]()
- Permissions: If the drive is in read-only mode, you will be unable to modify files. Any attempts to do so will trigger an error.
2. Using Terminal
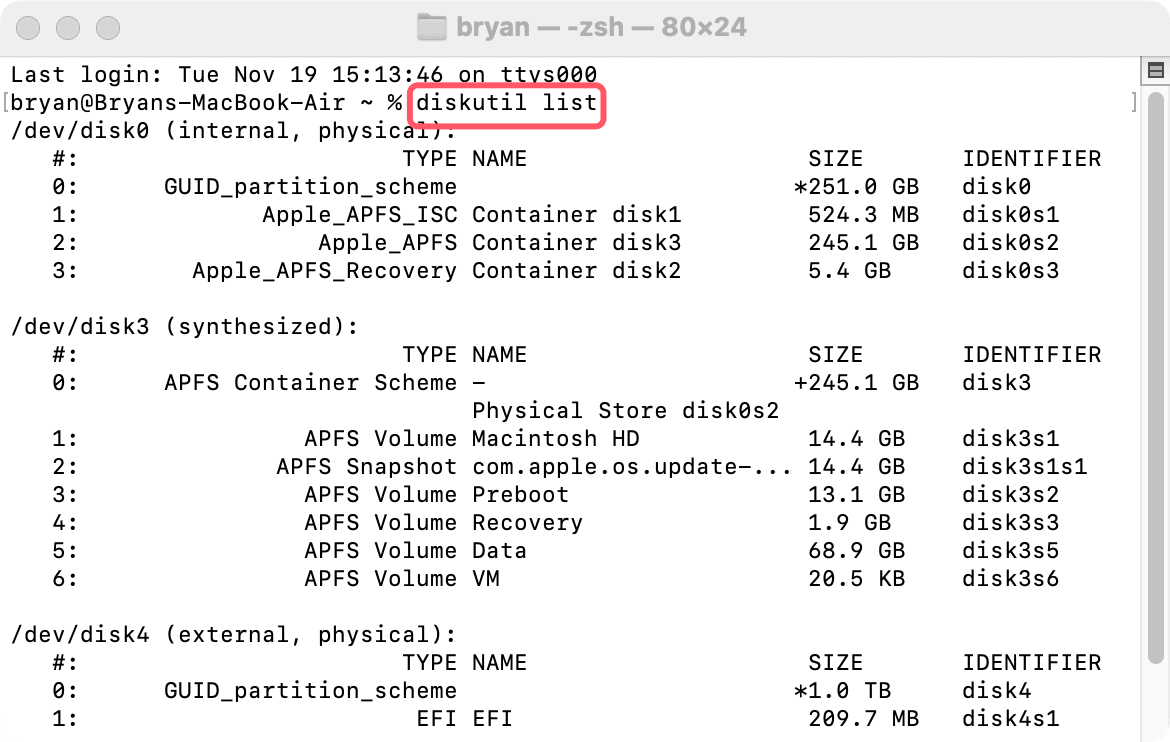
If you're comfortable with command-line tools, you can use Terminal to verify whether the NTFS drive is read-only.
- Open Terminal: Go to Applications > Utilities > Terminal.
- List Mounted Volumes: Type the following command:
diskutil list
![Fix NTFS Drive is Read-Only on macOS Big Sur]()
- Check Mount Status: Look for the NTFS volume in the list and check if it's mounted as read-only. If it says "Read-Only," then the drive is in read-only mode.
3. Signs of Read-Only Mode
If the NTFS drive is in read-only mode, you'll notice the following signs:
- You cannot copy or move files to the drive.
- You cannot delete or modify existing files on the drive.
- Any attempts to write to the drive will result in an error message, such as "The operation can't be completed because the item is read-only."
Solutions to Fix NTFS Drive Read-Only on macOS Big Sur
Now that you know your NTFS drive is read-only on macOS Big Sur, there are several methods you can use to fix this issue. Let's explore both simple and advanced solutions.
1. Enable Write Support Using Third-Party Software
The easiest and most reliable method to enable write access to NTFS drives on macOS Big Sur is to use third-party NTFS for Mac software. There are several tools available that can enable full read-write access to NTFS volumes.
1. Donemax NTFS for Mac
Donemax NTFS for Mac is fully compatible with macOS Big Sur. It can quickly add NTFS read-write support on your Mac. With advanced technology, it can quickly enable writable for NTFS drive on macOS Big Sur by only 1 click.
Step 1: Download and install Donemax NTFS for Mac, open it from Launchpad and connect the NTFS drive to your Mac.
Step 2: If the NTFS drive is not mounted, click on Mount button.

Step 3: To add NTFS read-write support on macOS Big Sur, click on Enable Writable button.

2. Paragon NTFS for Mac
Paragon NTFS for Mac is one of the most popular and reliable tools for enabling write access to NTFS-formatted drives. It’s user-friendly and offers fast and seamless file transfer between macOS and NTFS drives. Here's how to install and use it:
Step 1: Download and install Paragon NTFS for Mac from the official website.
Step 2: After installation, restart your Mac.
Step 3: Connect your NTFS drive. Paragon NTFS will automatically enable read-write access.
Step 4: You can now modify, delete, and copy files to and from your NTFS drive without any restrictions.
3. Tuxera NTFS for Mac
Tuxera NTFS for Mac is another excellent option for writing to NTFS drives. It provides a reliable and easy way to manage NTFS volumes on macOS. Here’s how to use Tuxera:
Step 1: Download Tuxera NTFS from the official website.
Step 2: Install the application and restart your Mac.
Step 3: Once the drive is connected, Tuxera will provide full access to the NTFS drive, allowing you to write and modify files freely.
4. NTFS-3G (Open-Source Solution)
If you prefer an open-source solution, NTFS-3G is a free tool that enables write access to NTFS drives. However, this method requires some technical know-how and the installation of additional software like Homebrew.
Step 1: Install Homebrew by following instructions at brew.sh.
Step 2: Open Terminal and type the following command to install NTFS-3G:
brew install ntfs-3g
Step 3: Once installed, use the following command to mount the NTFS drive with write access:
sudo mount -t ntfs-3g /dev/diskXsY /Volumes/YourNTFSDrive
Replace /dev/diskXsY with your actual disk identifier (you can find it using diskutil list), and /Volumes/YourNTFSDrive with the mount point.
With this solution, you’ll be able to use the NTFS drive with full read-write capabilities.
2. Using Terminal to Enable Write Access (May Not Work)
If you prefer not to rely on third-party software, you can use Terminal to enable write access to the NTFS drive. This is an advanced solution, and it involves using the mount command to mount the drive with write access.
Step 1: Open Terminal and type the following command to find your NTFS drive:
diskutil list
Note the identifier for your NTFS drive (e.g., /dev/disk2s1).
Step 2: Mount the drive with write access using the following command:
sudo mount -t ntfs -o rw /dev/disk2s1 /Volumes/YourNTFSDrive
Replace /dev/disk2s1 with the correct disk identifier and /Volumes/YourNTFSDrive with the desired mount point.
This method allows you to temporarily enable write access to the NTFS drive. However, it may not work consistently across reboots, and you’ll need to remount the drive each time.
3. Reformat the NTFS Drive to a macOS-Compatible File System
If you don't need to use the NTFS drive on Windows anymore or can back up its contents, you can reformat the drive to a macOS-compatible file system. Reformatting the drive will erase all its data, so be sure to back up your files before proceeding.
macOS supports file systems like ExFAT and APFS, Mac OS Extended that allow read and write access on both Mac and Windows (ExFAT) or exclusively on macOS (APFS or Mac OS Extended).
Step 1: Open Disk Utility (Applications > Utilities > Disk Utility).
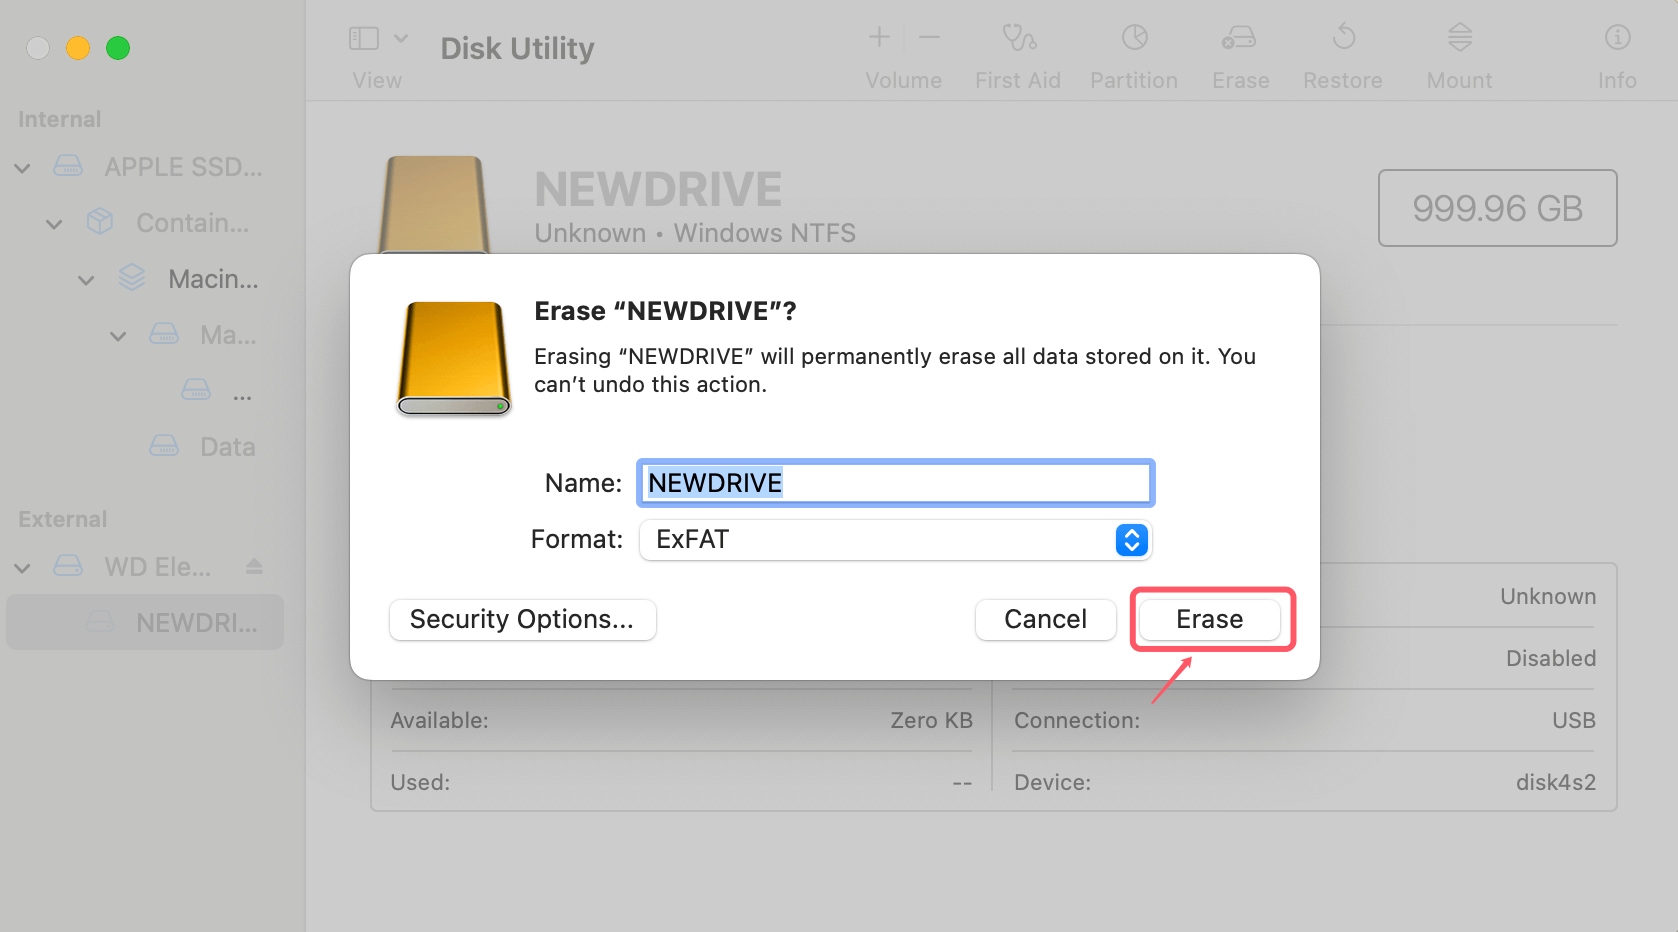
Step 2: Select the NTFS drive and click on the "Erase" button.
Step 3: Choose a new format like ExFAT or APFS/Mac OS Extended.

Step 4: Confirm and erase the drive.
This method ensures full read and write access to your drive on macOS but removes any data currently stored on the NTFS drive.
💡 Note: If you have not backed up the drive and have erased it, don't worry, use Mac data recovery software to help you get the lost data back.
Other Troubleshooting Tips
If you’re still having trouble with your NTFS drive, here are some additional troubleshooting steps you can try:
● Check Drive Permissions and File System Integrity
Sometimes, incorrect permissions or file system corruption can cause issues with writing to NTFS drives. To fix this, try the following:
- Permissions Check: Open Disk Utility and select the NTFS drive. Click "First Aid" to check for and fix any file system errors.
- Reset Permissions: If you suspect a permissions issue, reset the drive’s permissions by using the following command in Terminal:
sudo diskutil resetUserPermissions / `id -u`
● Ensure macOS Big Sur is Up to Date
Make sure your macOS Big Sur is updated to the latest version. Sometimes, software updates may include bug fixes for external drive compatibility.
● Reconnect the Drive
If the issue is temporary, unplugging and reconnecting the drive might resolve it. Try restarting your Mac and reconnecting the drive.
Prevention: How to Avoid Future NTFS Read-Only Issues
To avoid encountering the "NTFS drive is read-only" issue in the future, consider the following best practices:
- Format drives with ExFAT: ExFAT is compatible with both Windows and macOS, making it a more versatile choice for external drives.
- Use third-party software: If you must work with NTFS drives regularly, investing in third-party software like Donemax NTFS for Mac or Tuxera NTFS can simplify the process.
- Backup your data: Always keep a backup of your important files before attempting any disk formatting or modifications.
Conclusion
The "NTFS drive is read-only" issue on macOS Big Sur can be a hassle, but it's relatively easy to fix with the right tools and techniques. By using third-party software, Terminal commands, or reformatting your drive to a macOS-compatible file system, you can enable full read-write access to your NTFS drives. Whether you prefer a simple solution or an advanced command-line approach, there's a fix that will suit your needs. Always remember to back up your data before making significant changes to your drive. With these solutions, you can effectively manage your NTFS drives and avoid future issues.
Related Articles
- Dec 06, 2024Seagate NTFS Driver for Mac: Unlock Seamless Compatibility
- Oct 23, 2025Best NTFS for Mac Software for M5 Mac
- Dec 05, 20242025 Best WD NTFS Driver for Mac: A Comprehensive Guide
- Dec 03, 2024Can I Run First Aid on NTFS Drive on Mac? How to Fix Crashed NTFS Drive on Mac?
- Jun 20, 2025How to Format an SD Card to NTFS on Mac?
- Dec 05, 2024Can't Mount NTFS Volume on Mac? Fix It Now

Christina
Christina is the senior editor of Donemax software who has worked in the company for 4+ years. She mainly writes the guides and solutions about data erasure, data transferring, data recovery and disk cloning to help users get the most out of their Windows and Mac. She likes to travel, enjoy country music and play games in her spare time.

Gerhard Chou
In order to effectively solve the problems for our customers, every article and troubleshooting solution published on our website has been strictly tested and practiced. Our editors love researching and using computers and testing software, and are willing to help computer users with their problems


