Written byCoco LinUpdated on Dec 02, 2024
How to Read-Write NTFS Drive on macOS Sequoia?
Approved byGerhard Chou
Before we start: Donemax NTFS for Mac is fully compatible with macOS Sequoia and Apple silicon Macs. It can help you quickly grant full read-write access to NTFS drives on macOS Sequoia and support to mount NTFS drives, fix damaged NTFS drives, reformat NTFS drives on macOS Sequoia or other Mac operating systems.
PAGE CONTENT:
Apple's latest release, macOS 15 Sequoia, continues to provide a powerful and user-friendly environment. However, working with NTFS (New Technology File System) devices continues to be a problem for macOS users. NTFS, the primary file system for Windows, is natively readable but not writable on macOS Sequoia.
This article explains enabling read and write access to NTFS disks on macOS Sequoia. We'll look at various techniques, including third-party NTFS for Mac software, open-source tools, and built-in macOS applications, each with advantages and disadvantages.
Whether you're a casual user searching for simplicity or a skilled user looking for a free solution, this detailed article will show you how to manage NTFS drives on your Mac.
#1 Use Open-Source Tools to Allow to Use NTFS Drive on macOS Sequoia
Free programs can add NTFS write support to macOS Sequoia if you don't want to pay for software. Many choose ntfs-3g, part of the FUSE project (Filesystem in Userspace).
1. NTFS-3G with FUSE for macOS
NTFS-3G is an open-source driver for NTFS file systems that lets you read and write to them. People often use it with FUSE for macOS, which lets file systems be set up in user space instead of kernel space.
Installation and Usage:
1. Install Homebrew:
Homebrew for macOS that makes setting up apps easier. To set up Homebrew, open Terminal and type the following:
/bin/bash-d"$(curl-fsSLhttps://raw.githubusercontent.com/Homebrew/install/HEAD/install.sh)"
2. Install FUSE for macOS:
Type the following instructions in Terminal to find out how to install Homebrew on macOS:
Brew install macfuse
3. Install NTFS-3G:
Type the following code in Terminal to use Homebrew to install NTFS-3G:
brew install ntfs-3g
4. Mount NTFS Drives:
Use the following command in Terminal to mount an NTFS drive that can be read and written to:
sudo ntfs-3g /dev/diskXsY /Volumes/NTFS -olocal -oallow_other /usr/local/bin
Change /dev/diskXsY to the disk number for your NTFS drive and /Volumes/NTFS to the mount point you want to use.
Advantages:
- It's free and open source.
- Performing well every time.
Disadvantages:
- Needs command-line access
- Setting up and installing things can be hard for people who aren't tech-savvy.
#2 Use macOS Sequoia NTFS Driver - Donemax NTFS for Mac
Donemax NTFS for Mac is an easy-to-use, 100% safe and powerful NTFS for Mac tool. It is fully compatible with macOS Sequoia and other operating systems. If you want to use an NTFS drive on Mac after upgrading to macOS Sequoia, just download and install this macOS Sequoia NTFS driver. Then run it to quickly enable writable for NTFS drives. It is much easier to use than NTFS-3G.
Step 1. Download and install Donemax NTFS for Mac, then connect an external hard drive (NTFS) to your Mac.
Step 2. Open Donemax NTFS for Mac, then select the NTFS drive, click on Enable Writable button so that you can read-write any NTFS drive on macOS Sequoia.

If the external hard drive is not mounting on macOS Sequoia, click on Mount button.

#3 Format the NTFS Drive for macOS Sequoia
Because NTFS doesn't work perfectly with macOS Sequoia, you can change it to a file system that does. These include APFS, Mac OS Extended, exFAT, and FAT32. To reformat an NTFS hard drive, delete all the files and give a new file system. So, to keep your data from being lost, you need to back up your files ahead of time.
But if your NTFS drive has a lot of files on it, it will take a long time to back up the files and erase the disk. Also, NTFS drive erasure failure is possible because disk erasure is difficult. If you want to rebuild the NTFS drive so that macOS Sequoia can write to it, here's what you need to do:
Step 1: Link your NTFS drive to your Mac.
Step 2: Click on the Applications folder on the left, then the Utilities folder, and finally, Disk Utility.
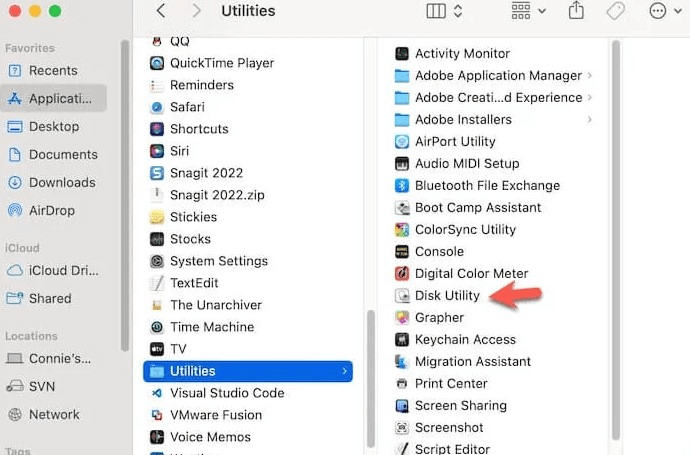
Step 3: Choose the NTFS drive from the list on the left.
Step 4: Pick "Erase" from the list of tools.
Step 5: Change the NTFS drive's name, pick a file type that works with macOS, and click "Erase."
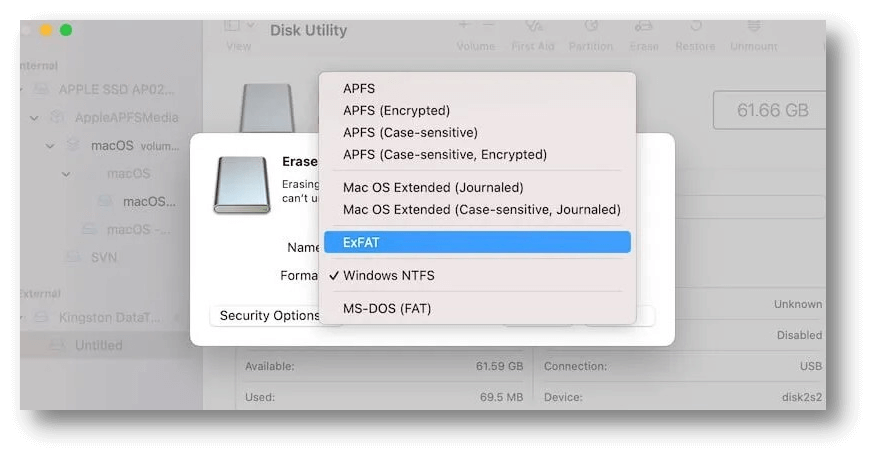
Step 6: If you only plan to use this drive on your Mac, you can set it up to APFS or Mac OS Extended. You need to format the drive to exFAT or FAT32 if you want to use it on multiple computers (both Windows and macOS).
Note: If you have lost data due to formatting NTFS drive on Mac, just use a data recovery app to scan the drive, find all lost files and recover them.
Conclusion:
There are different ways to enable NTFS to write support on macOS Sequoia, and each is best for a different type of user. Third-party NTFS programs for Mac are great for most people because they are easy to use and work well. If you know how to use the command line, open-source tools like NTFS-3G with FUSE for macOS are free. If you are not an IT Pro, just try NTFS for Mac tool. Donemax NTFS for Mac is pretty to use. You can easily read-write NTFS drives on macOS Sequoia with this tool.
If you're feeling brave, the built-in tools in macOS offer a risky but free choice. Before moving on, always make a copy of your data and pick the best method that fits your needs and level of expert skill.

How to Create Bootable Clone for macOS Sequoia
Clone all data from Mac which is running macOS Sequoia to an external HDD/SSD and create a full bootable clone backup.
FAQs About Adding NTFS Read-Write Support on macOS Sequoia
1. How to read-write NTFS drive on macOS Sequoia without any limitation?
- Download and install Donemax NTFS for Mac.
- Connect the NTFS drive to your Mac.
- Open Donemax NTFS for Mac.
- Select the NTFS drive, click on Enable Writable button.
2. What is the best NTFS driver for macOS Sequoia?
Here is the list of best 5 NTFS driver for macOS Sequoia:
- NTFS-3G
- Donemax NTFS for Mac
- Paragon NTFS for Mac
- Fuse
- DoYourData NTFS for Mac
3. Can I use NTFS drive on macOS Sequoia without formatting?
Yes, you just need to download and install an NTFS driver - such as Donemax NTFS for Mac on macOS Sequoia, then run it to enable writable for the NTFS drive.
4. How to format an external hard drive for macOS Sequoia?
If you want to use the external hard drive on your Mac, just format it to APFS, Mac OS Extended or ExFAT, etc.
- Open Disk Utility.
- Select the external hard drive, click Erase.
- Select a file system, click Erase again.
- Erase the external hard drive.
Donemax NTFS for Mac
An easy-to-use NTFS for Mac tool to help you enable writable for NTFS drives on Mac so that you can read-write NTFS drives on Mac without any limitation. It also can help you mount, format, repair, rename, open drive on your Mac.
Related Articles
- Jun 30, 2023How to Write Data to NTFS Drive on Mac?
- Dec 17, 2024Read-Write NTFS Drive on Mac: A Complete Guide
- Nov 12, 2024Best 3 NTFS Driver for macOS Mojave
- Jan 17, 2025How to Delete Files from NTFS Drive on Mac?
- Jul 12, 2024EaseUS NTFS For Mac Review And Best Alternatives
- Dec 05, 2024Kingshiper NTFS for Mac Review, How to Use It, Best Alternative

Contributing Writer
Coco Lin
Coco has been a writer and a chief programmer at Donemax software since 2018. Over 10 years of experience of writing troubleshooting articles in the software industry, she is passionate about programming and loves to providing solutions to Windows and Mac users. Also she enjoys music and palying tennis in her free time.

Editor in chief
Gerhard Chou
In order to effectively solve the problems for our customers, every article and troubleshooting solution published on our website has been strictly tested and practiced. Our editors love researching and using computers and testing software, and are willing to help computer users with their problems