PAGE CONTENT:
In today's multi-platform world, it's not uncommon for people to switch between macOS and Windows. One of the major issues they face is file system incompatibility between the two operating systems. Apple's APFS (Apple File System) is optimized for macOS, while Windows uses the NTFS (New Technology File System) format. If you find yourself needing to use a Mac-formatted drive on a Windows machine, you might wonder how to format an APFS drive to NTFS on Mac.
This tutorial will walk us through the full process of converting an APFS disk to NTFS format, detailing various methods, key considerations, and steps to ensure a smooth transition.
About File System Compatibility: APFS vs. NTFS
Before formatting an APFS drive to NTFS, it's important to understand the differences between APFS and NTFS and why you might need to convert one file system to another.
Overview of APFS (Apple File System):
APFS was introduced by Apple in 2017, specifically designed to improve performance on SSDs, although it works on HDDs and other storage devices as well. APFS offers several key benefits:
- Efficient Storage Management: APFS uses space-saving features like copy-on-write, which allows the system to copy data only when it’s modified.
- Faster Operations: APFS is optimized for flash storage, making it faster for read/write operations.
- Snapshots and Encryption: It supports snapshots (for Time Machine backups) and better encryption methods for data protection.
However, APFS is primarily designed for macOS, meaning it's not natively compatible with Windows.
Overview of NTFS (New Technology File System):
NTFS is the file system used by Microsoft Windows, and it offers its own set of features:
- Security and Permissions: NTFS allows you to set file-level security permissions, making it a more secure file system.
- Support for Large Volumes: It supports large volumes and files (up to 16 EB), making it ideal for use with modern storage devices.
- Robust Data Recovery: NTFS has a journaling system that helps in data recovery in case of a crash.
The problem? While macOS can read NTFS-formatted drives, it cannot natively write to them, meaning you can’t edit or delete files without the help of third-party tools.
Why Convert an Mac APFS Drive to NTFS?
You may need to convert an APFS drive to NTFS if:
- You want to share files between macOS and Windows systems.
- You are migrating from macOS to Windows and need to repurpose your storage.
- You are using the drive with a Windows machine that doesn't support macOS formats.
Formatting the drive will allow it to function properly on Windows, but this will erase all data on the drive. That’s why backing up data is essential.
Before Formatting APFS Drive to NTFS on Mac
Before you start formatting your APFS drive to NTFS, there are some preparatory steps you must take to ensure a smooth process without data loss.
Backup Your Data:
Why is backup important? Formatting a drive will erase all the data on it, so backing up any important information is critical. Here are some options for backup:
- Time Machine Backup: If you're using a Mac, Time Machine offers an easy, reliable way to back up your APFS drive. It can save a copy of all your files, allowing you to restore them later.
- External Backup Drive: Copy your important files to an external drive that won't be affected by the formatting process.
- Cloud Storage: As an alternative, you may save your data on cloud storage platforms like iCloud, Dropbox, and Google Drive.
Check Drive Compatibility:
Make sure the drive you intend to format is suitable for NTFS formatting. For example:
- Drive Size: Large drives (over 32GB) are ideal for NTFS formatting. However, for drives under this size, FAT32 might be a better option.
- Check Partition Map: In some cases, drives may need to be repartitioned using the GUID Partition Table (GPT) to format them successfully for NTFS.
Methods to Format an APFS Drive to NTFS on Mac
There are several ways to format an APFS drive to NTFS on a Mac, depending on your preferences and resources. Let's explore the most common methods.
Method 1: Using Third-Party Software [100% Effective]
Mac does not natively support NTFS formatting, but you can use third-party NTFS for Mac software to bridge the gap. Popular options include Donemax NTFS for Mac and Tuxera NTFS for Mac. Here's how to use them:
Step-by-Step Guide Using Donemax NTFS for Mac:
Step 1. Download and install Donemax NTFS for Mac and connect the NTFS drive to your Mac. (Note: You can format the external HDD/SSD/USB/SD card to NTFS, but you can't format the Mac's internal SSD to NTFS.)
Step 2. Open Donemax NTFS for Mac, select the APFS drive, click on Format button.
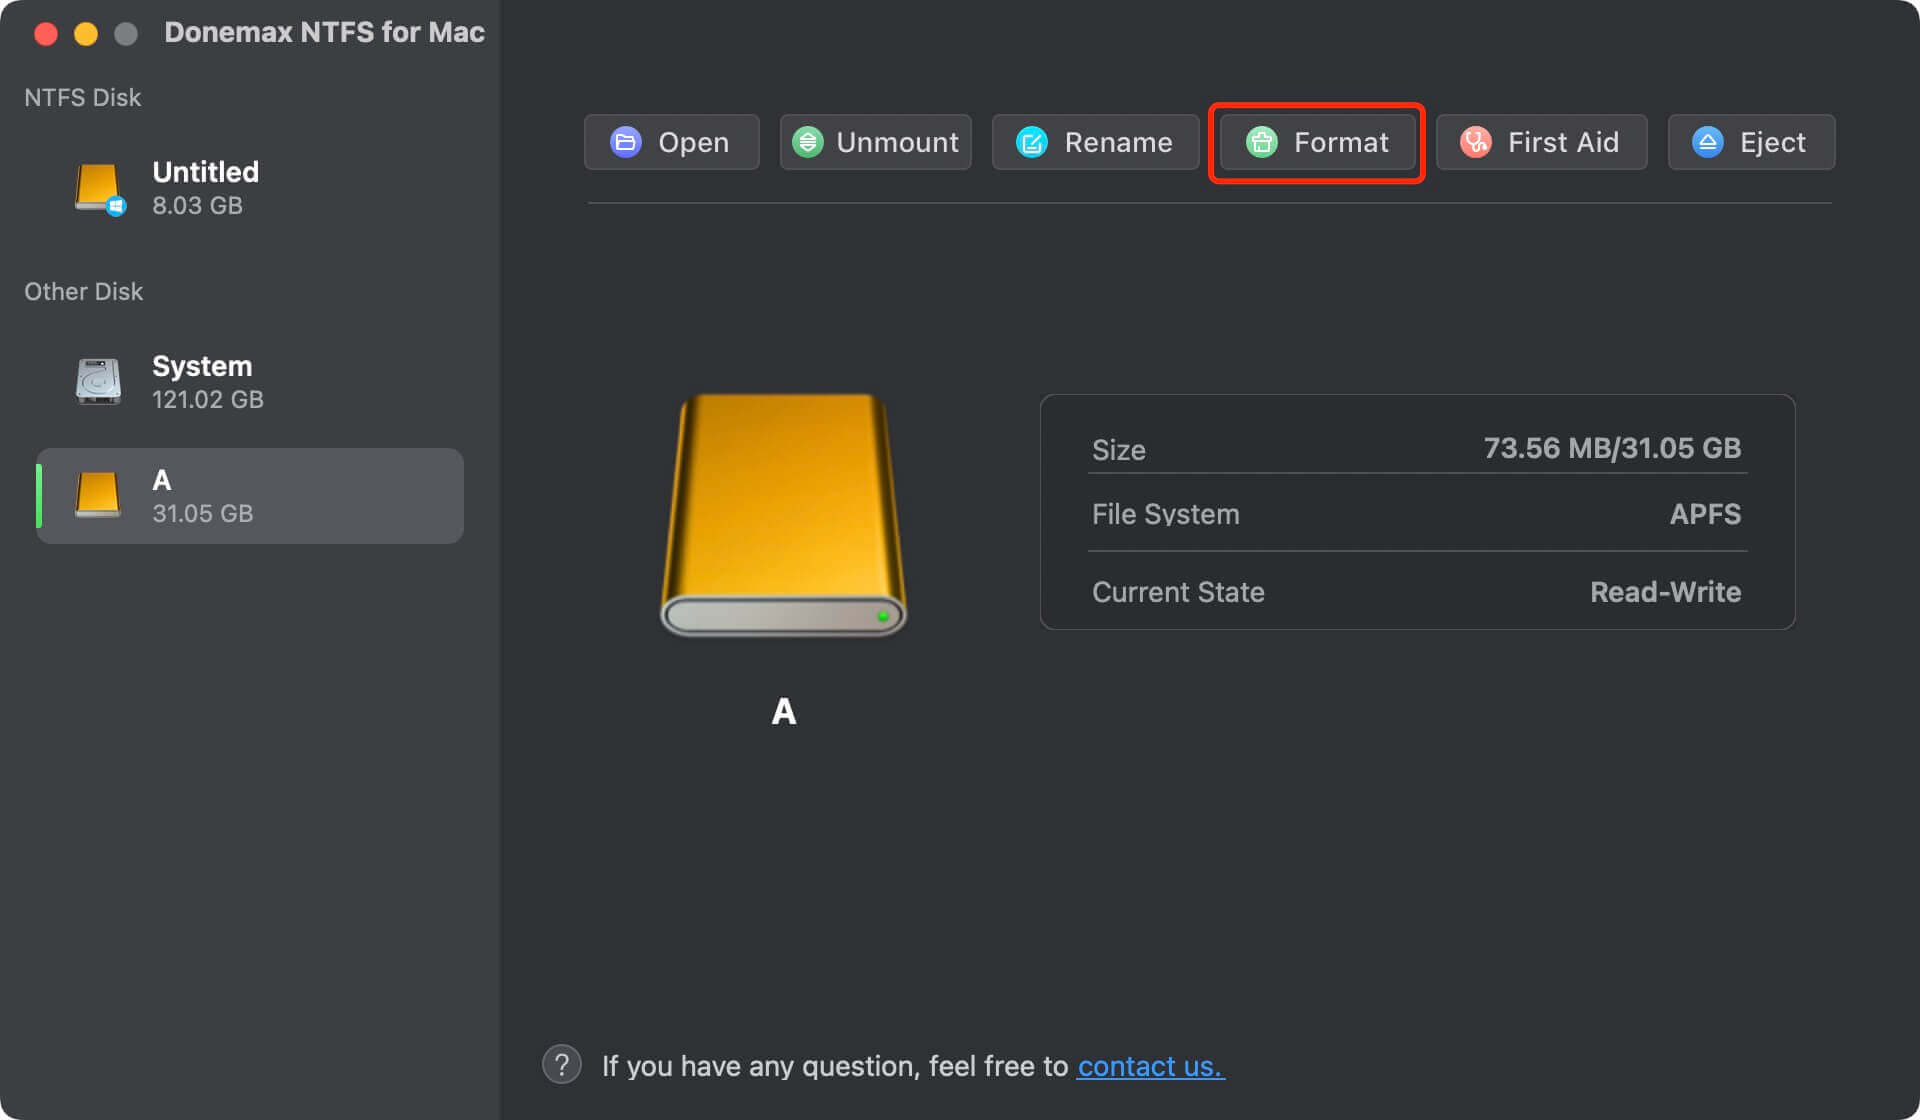
Step 3. Select the NTFS as the format (file system), click on Continue button to format the APFS drive to NTFS.
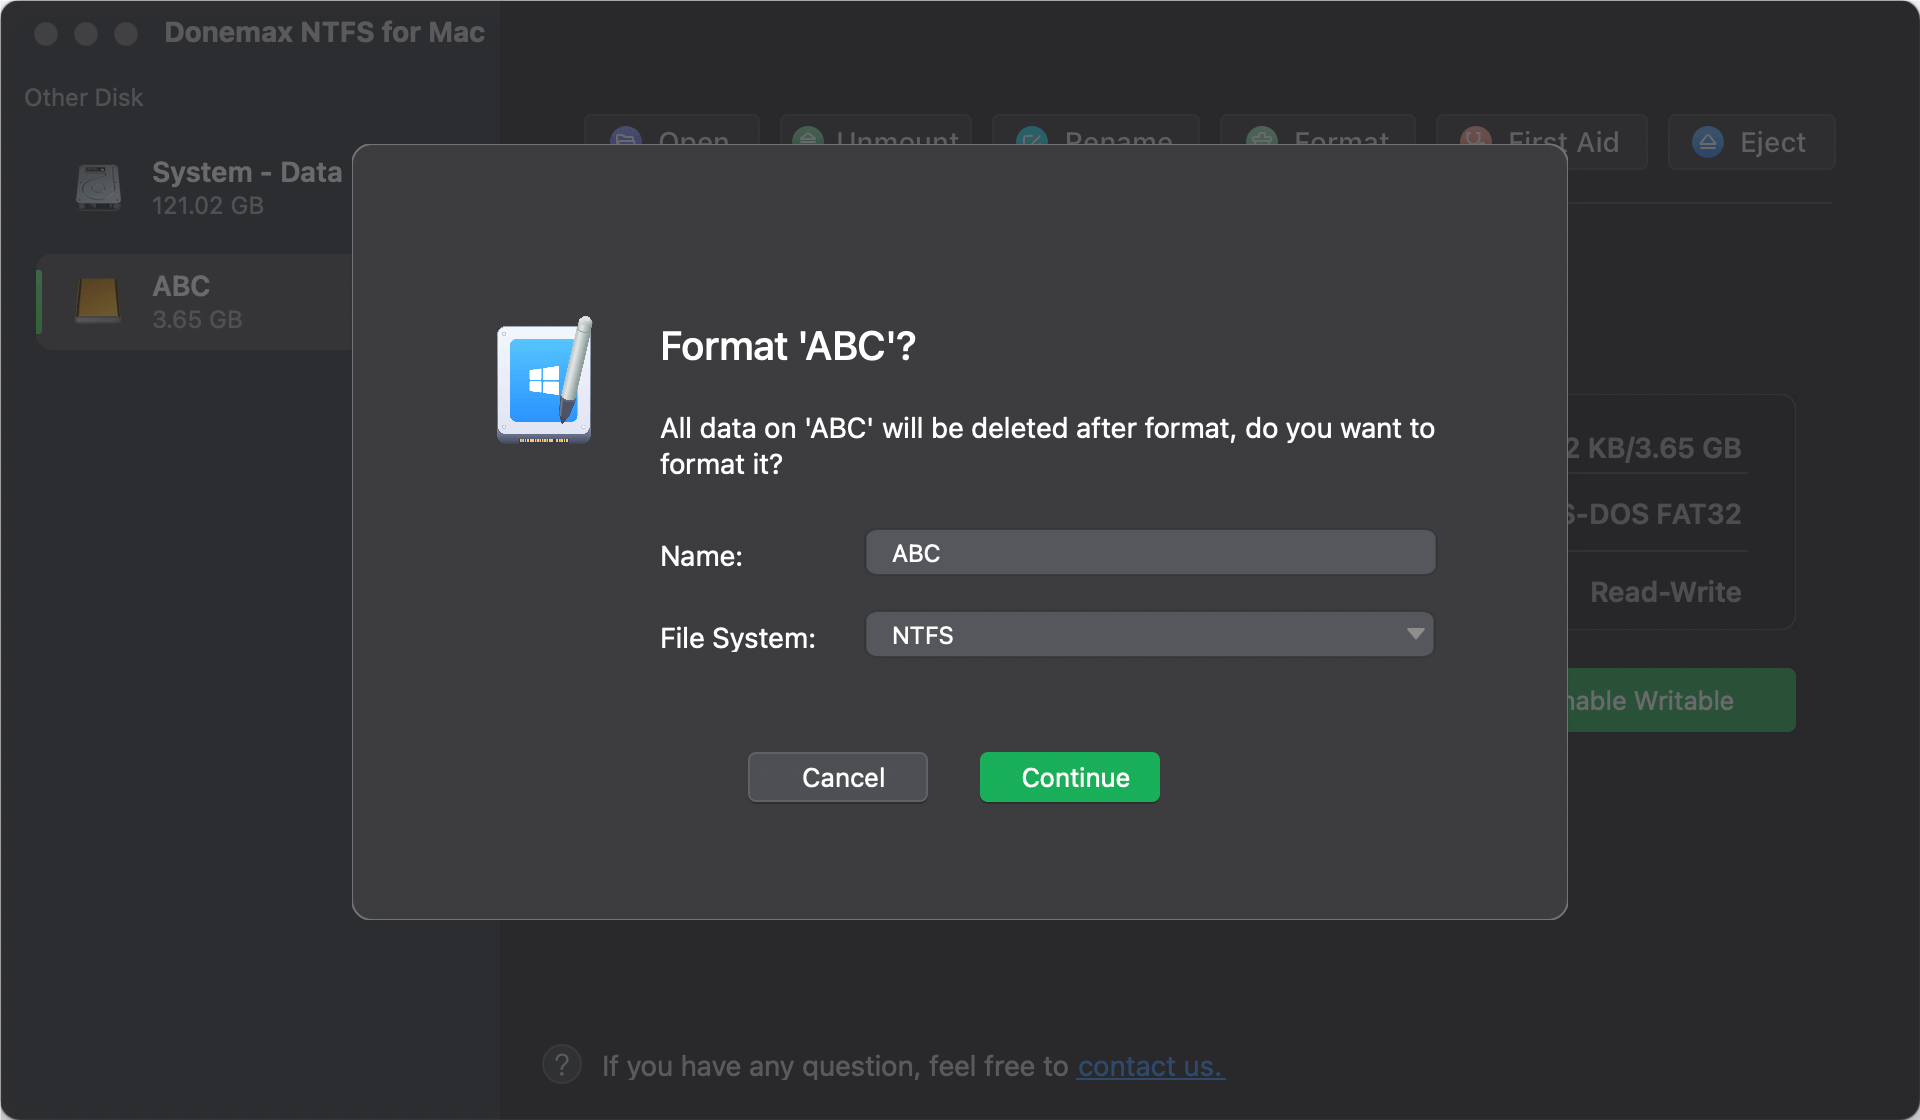
If you want to write data to an NTFS drive on your Mac, just click on Enable Writable button to all your Mac to read-write NTFS drives.

Method 2: Using Disk Utility [Low Success Rate]
Step 1. Go to Launchpad > Other > Disk Utility, open Disk Utility.
Step 2. Select the APFS drive, click on Erase button.
Step 3. Select the Windows NTFS as the Format if it is available in Format drop-down menu.
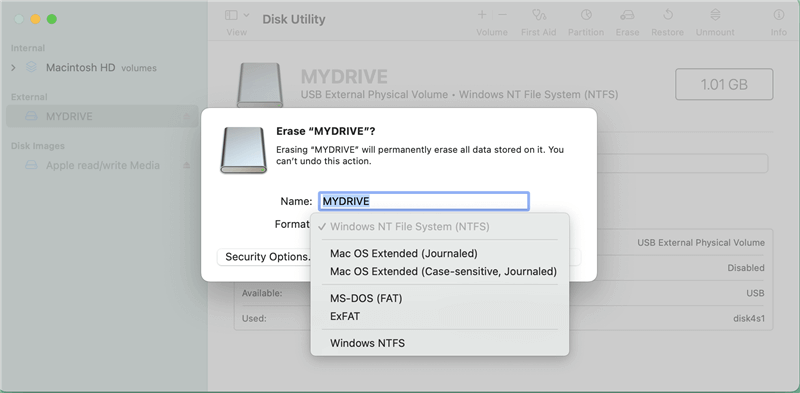
Step 4. Click Erase again to format the APFS drive to NTFS. Once the process gets finished, click on Done button.
Method 3: Using Terminal [Low Success Rate]
Step 1. Go to Launchpad > Other > Terminal, open Terminal.
Step 2. Type diskutil list, press Enter. Find the APFS drive and its disk identifier.
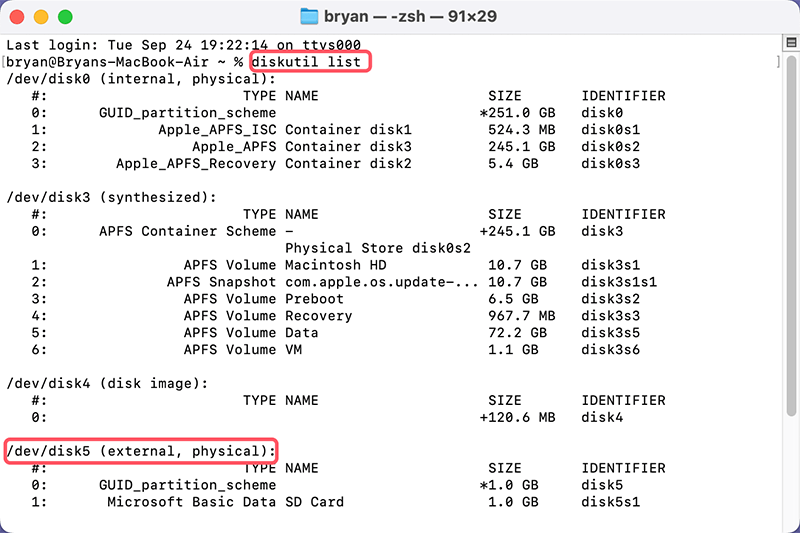
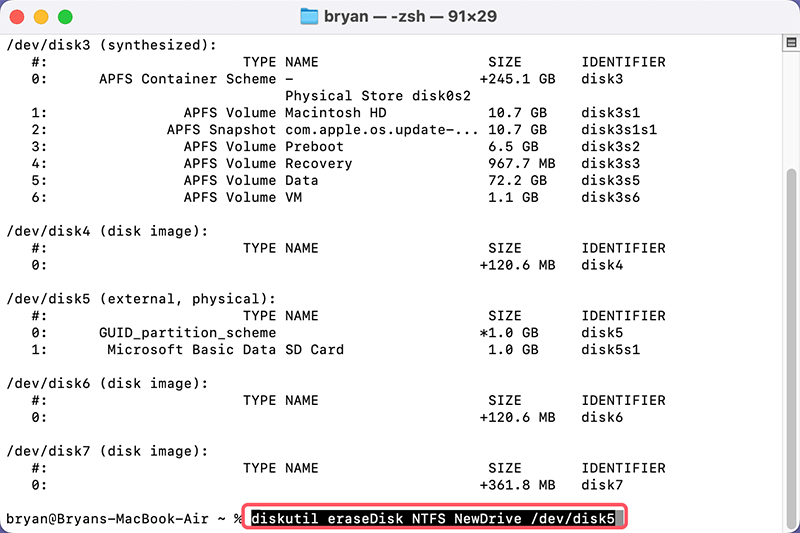
Step 3. Type diskutil eraseDisk NTFS Disk_Name Disk_Identifier. For example, type diskutil eraseDisk NTFS MyDrive /dev/disk5, press Enter to format the APFS drive to NTFS.
Other Methods to Format an APFS drive to NTFS
1. Using a Windows Computer
If you don't want to use third-party software or don't mind working with a Windows machine, you can format the APFS drive on a Windows computer. Here's how:
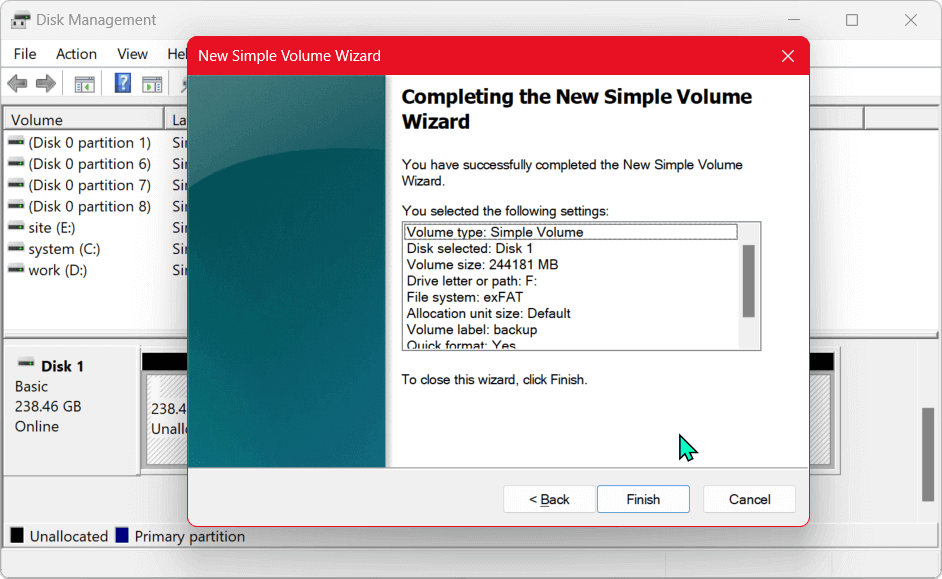
Step 1. Connect the APFS drive to your Windows computer, then press Windows + X and select Disk Management from the menu.
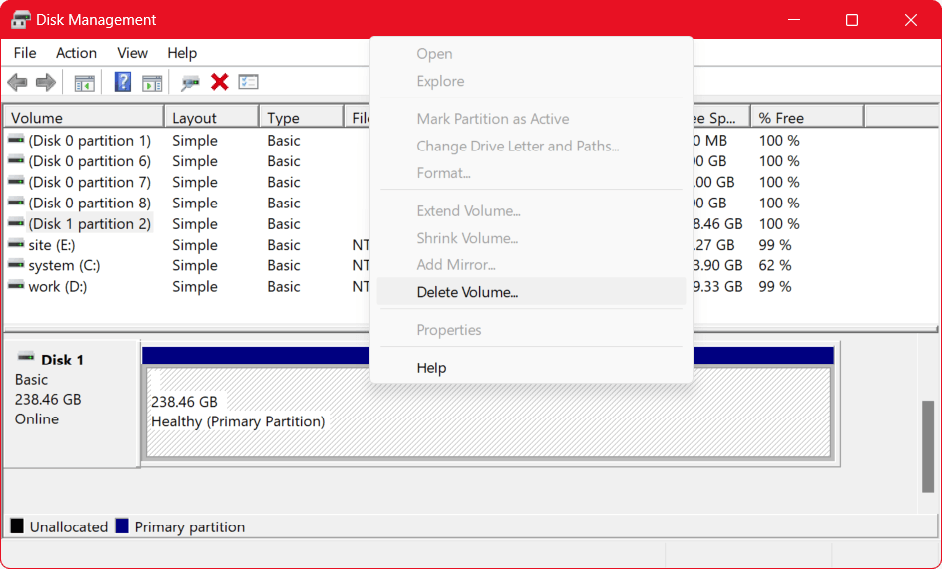
Step 2. Right-click the APFS drive, choose Delete Volume. It will clean the drive, making it ready for NTFS formatting.
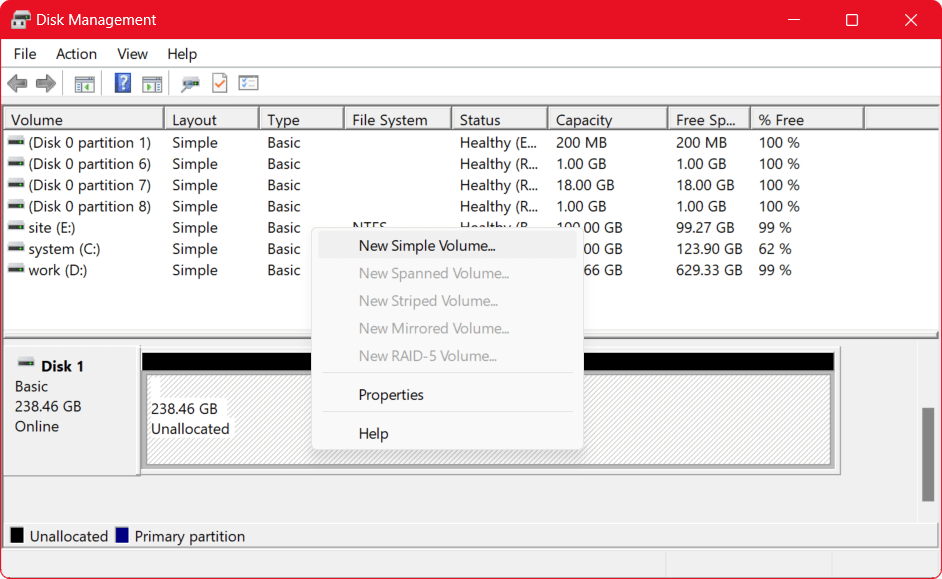
Step 3. Create a New NTFS Partition: Right-click the unallocated space and select New Simple Volume. Follow the prompts, choosing NTFS as the file system format.
Step 4. Finish the Process: Complete the process by assigning the drive a letter and formatting it as NTFS.
2. Using Command-Line Tools (Advanced Users)
For advanced users comfortable with Terminal and command-line interfaces, you can format drives using the Terminal app. However, macOS does not natively support NTFS formatting in Terminal, so you will still need a third-party tool like NTFS-3G (an open-source NTFS driver).
3. Use a Virtual Machine
If you're hesitant to use third-party drivers on your Mac, you can run Windows on a virtual machine (VM) and use Windows tools to format the drive. Software like Parallels Desktop, VMware Fusion, or VirtualBox allows you to run a virtual Windows environment on your Mac.
Once Windows is set up in the VM, you can:
- Connect your APFS drive to the virtual Windows environment.
- Use Disk Management in Windows to format the drive to NTFS.
While this method works, it can be more time-consuming and requires enough resources to run both macOS and Windows simultaneously.
🔖Post-Formatting Considerations
Once the drive is formatted from APFS to NTFS, there are a few things to keep in mind to ensure smooth usage across platforms.
Checking the Drive:
Once the process is complete, double-check that the formatting was successful:
- For macOS: Even though macOS cannot write to NTFS drives natively, it should still be able to read the drive.
- For Windows: The drive should now be fully operational, allowing both read and write access.
🔖Pros and Cons of Formatting to NTFS
Before you proceed, it's helpful to consider the advantages and disadvantages of NTFS, particularly if you're converting from APFS.
Pros of NTFS:
- Cross-Platform Compatibility: With the right drivers, you can use NTFS on both macOS and Windows, making it ideal for external drives shared between systems.
- Large File Support: NTFS supports large files and drives, making it ideal for media files, backups, and more.
- Efficient Disk Space Usage: NTFS allocates disk space more efficiently than FAT32 or ExFAT, especially on larger drives.
Cons of NTFS:
- Lack of Native Mac Support: You’ll need third-party drivers to write to NTFS drives on macOS, which can be a drawback for some users.
- Complexity in Formatting: Formatting to NTFS on macOS requires third-party software, virtual machines, or access to a Windows PC, making it more complicated than using ExFAT or APFS.
- Performance Issues: Depending on the third-party drivers, you may experience slower read/write speeds on NTFS-formatted drives compared to native file systems like APFS or HFS+ on macOS.
Recover Lost Data After Formatting APFS to NTFS on Mac
It is easy to unformat any hard drive on Mac and recover all deleted/erased files. Donemax Data Recovery for Mac is an easy-to-use & powerful Mac data recovery application. It can help you completely recover lost data from a hard drive which has been formatted from APFS to NTFS.
Step 1. Click Download button below to download Donemax Data Recovery for Mac, then install it on your Mac.
Step 2. Open Donemax Data Recovery for Mac, select the formatted drive to start data recovery. It fully supports to recover lost data from APFS, NTFS, HFS+, ExFAT, FAT32 drive.

Step 3. Click on Scan button. Donemax Data Recovery for Mac will deeply scan the formatted drive and find all lost files.

Step 4. Once the scan is completed, you can preview all recoverable files. Select the wanted files, click on Recover button to save them.

Conclusion
Formatting an APFS drive to NTFS on a Mac is not a straightforward task, as macOS doesn't support NTFS natively. However, with the help of third-party software like Donemax NTFS for Mac or by using a Windows machine, you can easily format your drive and ensure compatibility between macOS and Windows.
By following the steps outlined in this guide, you can safely format your drive without data loss, making it fully operational for use on both platforms. Remember to back up your data, verify drive compatibility, and use the right tools to streamline the formatting process.
Related Articles
- Dec 05, 2024Can't Mount NTFS Volume on Mac? Fix It Now
- Aug 15, 2023How to Use Seagate External Hard Drive on Mac without Formatting?
- Dec 25, 2024How to Fix External Hard Drive Read-Only on macOS Catalina [7 Solutions]
- Sep 18, 2025Tuxera NTFS for Mac Review and Best Alternative
- Jul 05, 2023How to Enable NTFS Support on Mac?
- Aug 28, 2023Fix Cannot Write Data to WD Elements on Mac | Fix WD Elements Read-only on Mac

Christina
Christina is the senior editor of Donemax software who has worked in the company for 4+ years. She mainly writes the guides and solutions about data erasure, data transferring, data recovery and disk cloning to help users get the most out of their Windows and Mac. She likes to travel, enjoy country music and play games in her spare time.

Gerhard Chou
In order to effectively solve the problems for our customers, every article and troubleshooting solution published on our website has been strictly tested and practiced. Our editors love researching and using computers and testing software, and are willing to help computer users with their problems
