Before we start: Donemax Data Recovery for Mac is a powerful and easy-to-use Mac data recovery application. It supports to recover any type of file including screen recordings from Mac internal HDD/SSD and external storage device. Download it and free try.
PAGE CONTENT:
Whether it's an important presentation, a gaming highlight, or a complex tutorial, screen recordings capture essential digital moments. However, the dread of losing a valuable screen recording on a Mac is real, especially when you can't find it or it seems accidentally deleted. Luckily, there are practical steps and tools available to help you recover lost recordings. Here's a comprehensive guide on how to tackle the situation and prevent it from happening in the future.

Recover Lost Screen Recordings on Mac with Built-in Tools
Picture this: you've just wrapped up recording a detailed tutorial or a crucial Zoom call, only to find the screen recording is missing or deleted. That immediate moment of panic and frustration is something many Mac users know too well. Although it's a stressful situation, macOS provides various ways to recover lost recordings. By taking a systematic approach, you can often retrieve the missing file quickly and get back to work without too much hassle.
Quick Check: Are You Sure It’s Missing?
Before diving into deeper recovery techniques, it's essential to rule out the possibility of simple misplacement. Sometimes, files seem lost due to changes in save locations or even because they’re hiding in plain sight. Here are a few quick steps to confirm whether the file is truly missing:
- Check the Desktop and Downloads Folder: By default, Mac screen recordings are often saved to the Desktop or Downloads folder. Open Finder and navigate to these folders, scanning for any recent files that might be the recording you need.
- Use Spotlight Search: Spotlight Search on Mac is a powerful tool that can quickly locate files based on names, types, or even content keywords. Press Command + Space, then type in either the recording’s name or the keyword "Screen Recording" to see if Spotlight pulls up the file from an unexpected location.
- QuickTime's Recent File List: If you used QuickTime for recording, open the QuickTime app and check under the "File" menu for the "Open Recent" option. This menu will show a list of recently accessed files, which might include your missing recording.
Common Places Screen Recordings Hide
If you've ruled out simple misplacement, it's time to look at other locations on your Mac where screen recordings could be stored. macOS has a few common directories that screen recordings might be saved to by default, depending on your settings and recording software.
- Movies Folder: Many screen recording applications, including some versions of macOS's native screen capture tools, default to saving files in the "Movies" folder. To find this, go to Finder > Go > Home > Movies and check if your screen recording is there.
- Screenshots Folder: Depending on user customizations, screen recordings might end up in a designated "Screenshots" folder. You can check if a custom folder exists by going to System Preferences > Keyboard > Shortcuts > Screenshots and seeing where the save location is set.
- QuickTime Player Location: If you're using QuickTime Player to record, the save location may vary depending on user settings. When starting a QuickTime recording, you're sometimes prompted to choose where to save the file, but if not, QuickTime may default to saving the recording in the last-used folder.
Checking these common locations often yields the recording you thought was missing, saving you time and potential frustration.
Retrieving from the Trash
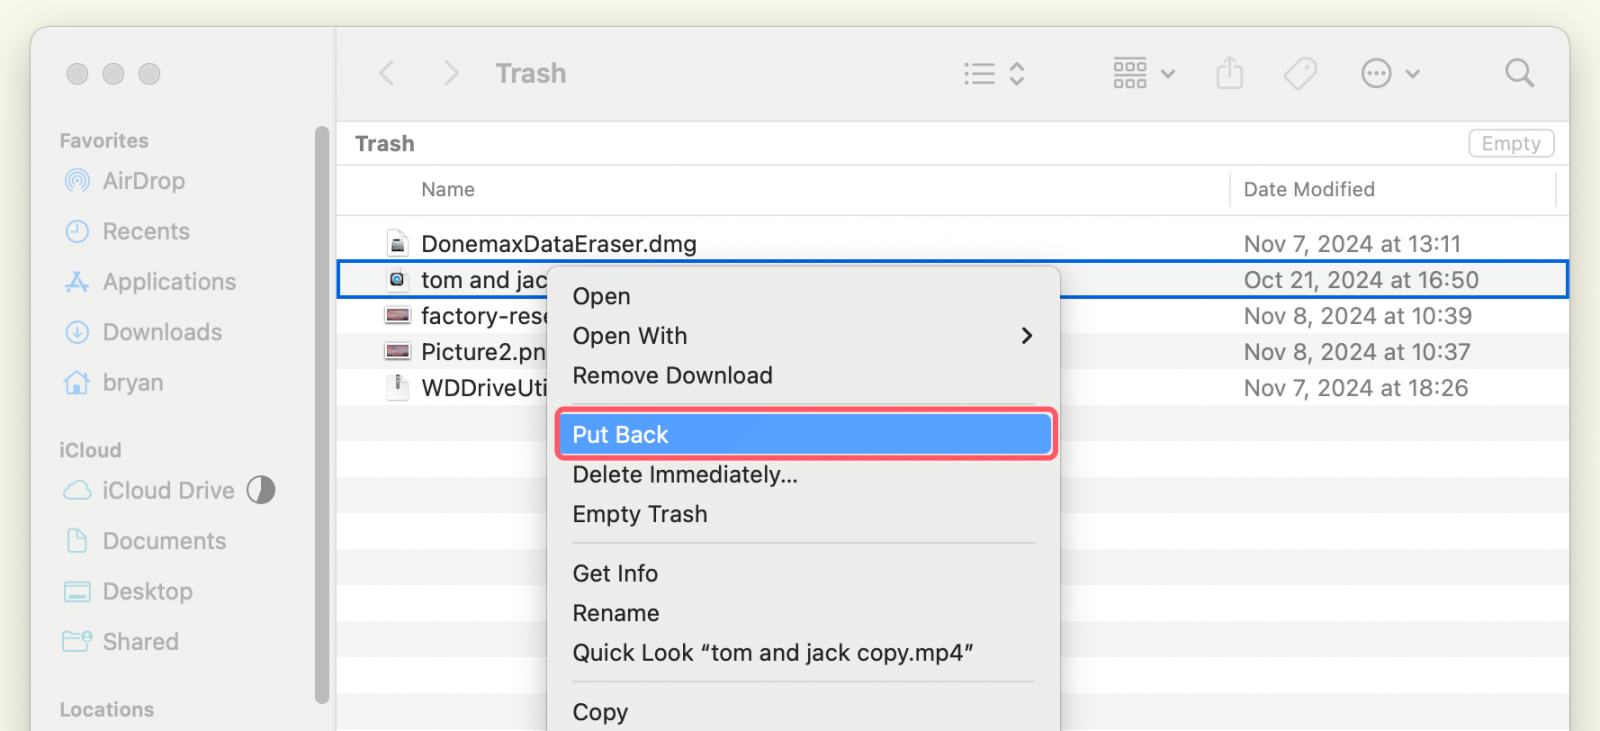
In cases where a screen recording was accidentally deleted, the first place to check is the Trash. Files moved to the Trash aren’t permanently deleted right away, so it’s easy to restore them. Here’s how to retrieve your recording from the Trash:
- Open the Trash: Click on the Trash icon in your Dock to open it.
- Locate Your File: Browse through the items in the Trash, and look for the screen recording. If you recently deleted it, it should appear near the top.
- Restore the File: Once you’ve found your recording, right-click on it and select "Put Back." This action will restore the file to its original location.
![Recover Lost Screen Recordings on Mac]()
By regularly checking the Trash before emptying it, you can avoid permanently losing accidentally deleted recordings in the future.
Utilizing Time Machine for Recovery
For those who back up their data regularly, Time Machine can be a lifesaver when it comes to recovering lost files. Time Machine, macOS’s built-in backup solution, allows users to restore their system to previous states, retrieving specific files that may have been lost along the way.
To use Time Machine to recover a screen recording:
- Check if Time Machine Backups are Enabled: Open System Preferences or System Settings > General, select Time Machine, and ensure it's set to "On." If you've already set up backups, Time Machine will have created snapshots that include your recent files.
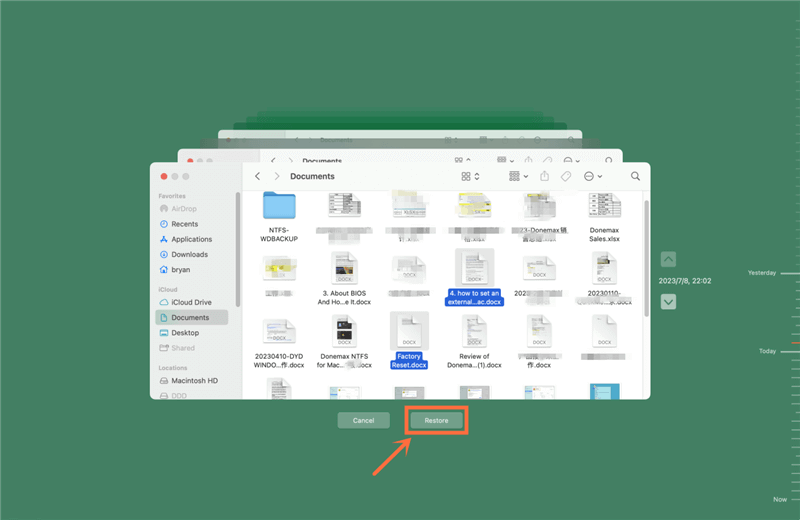
- Enter Time Machine: Open the folder where the recording was originally saved, then click the Time Machine icon in the menu bar and select Enter Time Machine or Browser Time Machine Backups.
- Navigate Through Backups: Use the timeline on the right side of the screen to navigate through recent backups. Look for the folder you were in and check each version to find your missing recording.
- Restore the File: Once you find the recording, click on it, and select "Restore." Time Machine will place the recovered file in its original location.
![Recover Lost Screen Recordings on Mac]()
This method is incredibly effective but requires you to have had Time Machine set up before the file was lost. It's a good reminder to enable Time Machine if you haven't done so already to prevent future losses.
Recover Lost Screen Recordings on Mac with Third-party Software
If you've exhausted the native Mac recovery methods with no success, it might be time to consider third-party recovery tools. These tools can dig deeper into your system, scanning for files even if they've been accidentally deleted or removed from the Trash.
Donemax Data Data Recovery for Mac is one of the best Mac data recovery software. It can help you recover all file formats including all screen recordings from Mac's internal HDD/SSD or external USB storage device/SD card.
Donemax Data Data Recovery for Mac
- Recover permanently deleted or lost screen recordings on Mac.
- Recover lost screen recordings from erased or formatted drive.
- Export screen recordings from inaccessible device to your Mac.
Follow the steps below to recover lost screen recordings on Mac:
Step 1. After installing Donemax Data Recovery for Mac, run it. Then select the drive where you delete or lose the screen recording files.

Step 2. Click on Scan button to deeply scan the drive and find all recoverable files including screen recordings.

Step 3. Once the scan is completed, it lists all recoverable files. Then select the wanted files, click on Recover button to save them.

More data recovery tools for data recovery on Mac:
- Disk Drill: Disk Drill is a popular file recovery tool for Mac, known for its user-friendly interface and comprehensive scanning options. It can help recover deleted files, including screen recordings, by scanning your drive's memory. Disk Drill offers a free version with limited functionality, so you can test it out before committing to the paid version.
- EaseUS Data Recovery Wizard: Another highly-rated tool, EaseUS Data Recovery Wizard, specializes in recovering deleted files from hard drives, SSDs, and external drives. It's especially useful for complex recovery cases, such as files lost due to accidental formatting or other severe data loss scenarios.
All of Donemax Data Recovery, Disk Drill and EaseUS are effective, but they do come with associated costs, especially if you need to recover large files. It’s also essential to avoid writing new data to the drive where the file was lost, as doing so can overwrite the recording, making recovery impossible.
Tips to Prevent Future Loss of Screen Recordings
Now that you know how to recover recordings, it's a good idea to set up preventive measures to ensure you don't lose files in the future. Here are some strategies to help:
- Create a Dedicated Folder for Recordings: By creating a specific folder for screen recordings and setting it as the default save location, you can reduce the chance of misplaced files. You can rename it "Screen Recordings" and place it on your Desktop or in your Documents folder for easy access.
- Enable Automatic Cloud Syncing: Syncing files to a cloud storage solution like iCloud, Google Drive, or Dropbox is a great way to protect your recordings. With cloud backup, files are stored remotely, so even if your computer fails, the recordings remain accessible. Most cloud services have options to auto-sync files from specified folders, which can automate the backup process. Beyond just storage, cloud syncing enables easy access across devices, so you can retrieve your files from any device or location. For users who switch between multiple devices (e.g., a desktop and a laptop), cloud sync can ensure recordings are available wherever they are needed. Plus, cloud storage typically offers version history, which lets you restore previous versions of files if they’re accidentally altered.
- Regularly Back Up with Time Machine: As mentioned, Time Machine is an incredibly useful tool that can provide peace of mind for Mac users. Enabling regular backups with Time Machine means that, in the event of file loss, you can easily restore your system to an earlier state and retrieve missing recordings.
- Turn on Auto-Save Features in Recording Software: Some screen recording applications offer an auto-save feature, which periodically saves your recording in progress. This way, even if something unexpected happens during recording, you’ll have at least part of the file saved. Look for auto-save options in your software’s preferences or settings.
Conclusion
While losing a screen recording on a Mac can be a frustrating experience, there are effective ways to retrieve lost files and set up preventative measures. By checking common locations, leveraging Mac's native tools like Spotlight Search, Time Machine, and the Trash, and using third-party software when needed, most users can recover their recordings without too much hassle.
Preventative steps, such as creating dedicated folders, enabling cloud sync, and regularly backing up with Time Machine, will further minimize the risk of future losses. Ultimately, the key to recovering lost recordings lies in knowing where to look, understanding your Mac's file management options, and preparing for the unexpected. By following these tips, you can navigate through lost file situations with ease and confidence.


Donemax Data Recovery for Mac
Donemax Data Recovery for Mac is one of the best Mac data recovery software. It is easy-to-use and can help in recovering deleted, formatted, inaccessible or lost data from Mac HDD/SSD, external disk, USB drive, SD card, camera or other storage devices.
Related Articles
- Nov 13, 2024How to Recover Lost Data from Apple M4 Chip Mac [4 Methods]
- Nov 18, 2024How to Recover Lost Data After Reinstalling macOS? [4 Methods]
- Nov 12, 2024Top 5 Free APFS File Recovery Software for Mac in 2025
- Mar 26, 2025How to Recover Deleted .dmg File on Mac? [7 Methods]
- Nov 18, 20247 Methods to Undo Deleting Files on Mac
- Jun 16, 2023How to Recover Lost Data from SSD on Mac? 2 Solutions to Try

Christina
Christina is the senior editor of Donemax software who has worked in the company for 4+ years. She mainly writes the guides and solutions about data erasure, data transferring, data recovery and disk cloning to help users get the most out of their Windows and Mac. She likes to travel, enjoy country music and play games in her spare time.

Gerhard Chou
In order to effectively solve the problems for our customers, every article and troubleshooting solution published on our website has been strictly tested and practiced. Our editors love researching and using computers and testing software, and are willing to help computer users with their problems

