PAGE CONTENT:
Finder is the heart of file management on macOS, acting as the gateway to your files, folders, and everything else stored on your Mac. It's the primary tool that helps you navigate through your documents, applications, and other important data, making it essential for both new and experienced Mac users. In this article, we will explore the fundamentals and advanced features of Finder, helping you become more efficient and comfortable in managing your Mac files.
Getting Started with Finder
How to Open Finder:
Finder is always running on your Mac as it is an integral part of the operating system. You can open a Finder window in a few different ways:
- From the Dock: Click on the Finder icon, which looks like a blue and white face, typically located on the left side of your Dock.

- Spotlight Search: Press Command + Space to bring up Spotlight, then type "Finder" and hit Enter.
![Open Finder From Spotlight Search]()
- Keyboard Shortcut: You can also press Command + N when the Finder is active, which will open a new Finder window.
![Open Finder From Keyboard Shortcut]()
Overview of Finder Window Components:
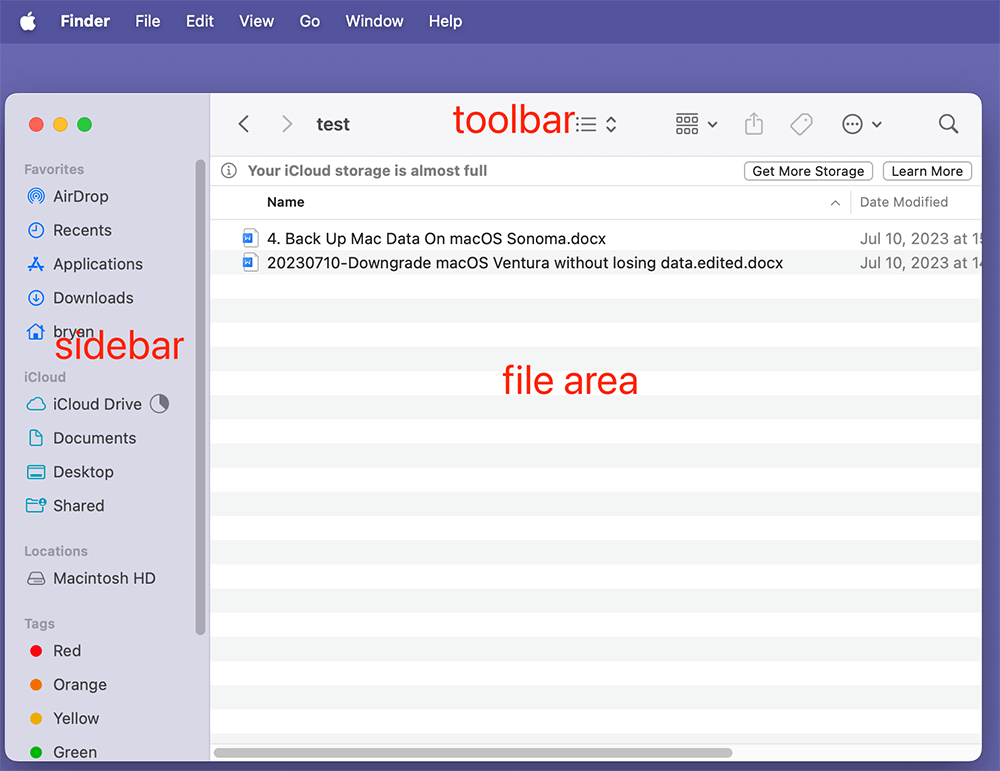
The Finder window is made up of several components that help you navigate your files:
- Sidebar: This vertical column on the left side provides quick access to your favorite folders, iCloud Drive, and connected devices.
- Toolbar: Located at the top of the window, the Toolbar gives you options to customize your view, search for files, and perform various tasks.
- File Area: This is where your files and folders are displayed based on your navigation.
![Overview of Finder Window Components]()
Understanding these components is key to using Finder efficiently.
Navigating the Finder Window
Sidebar
The Sidebar is an important navigation tool in Finder, providing shortcuts to your commonly used items. By default, it includes Favorites, iCloud Drive, Locations, and Tags.
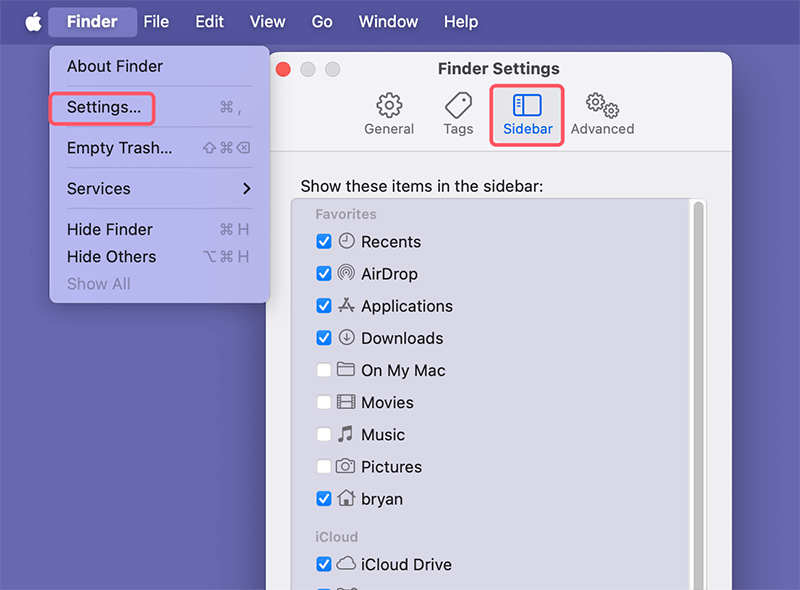
- Customizing the Sidebar: To add or remove items from the Sidebar, go to Finder > Settings (or Preferences in older versions) > Sidebar, and select or deselect the items you want visible.
![Sidebar]()
Toolbar
The Toolbar at the top of the Finder window provides various tools for managing your files.
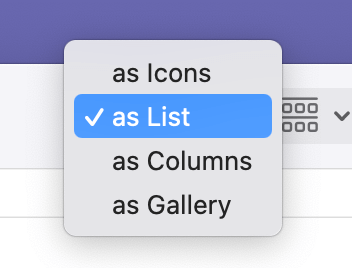
- View Options: Change how your files are displayed by clicking on the view icons (Icon, List, Column, or Gallery).
- Share and Action Buttons: Use these buttons to share files via email, AirDrop, or to perform quick actions like tagging, duplicating, or compressing files.
![Toolbar]()
Path Bar and Status Bar
These bars give you additional information:
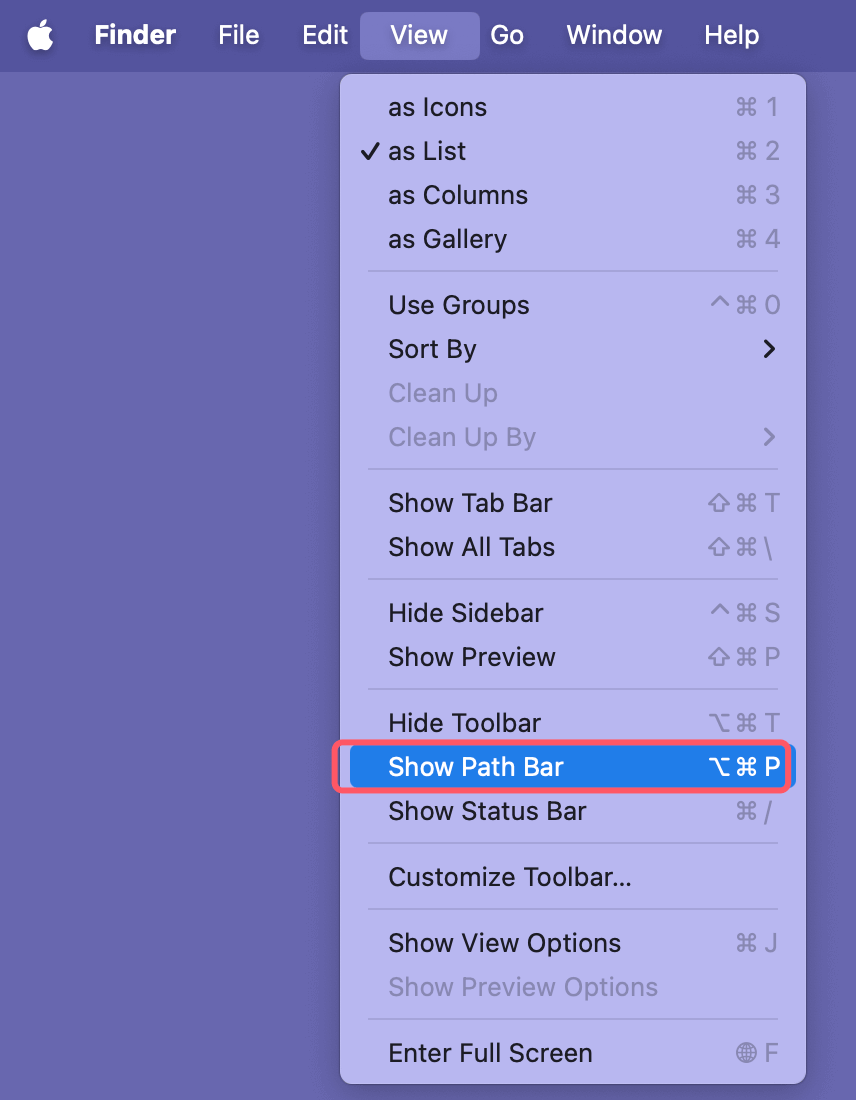
- Path Bar: Shows the full path of the folder you are currently viewing. To enable it, go to View > Show Path Bar.
![Path Bar]()
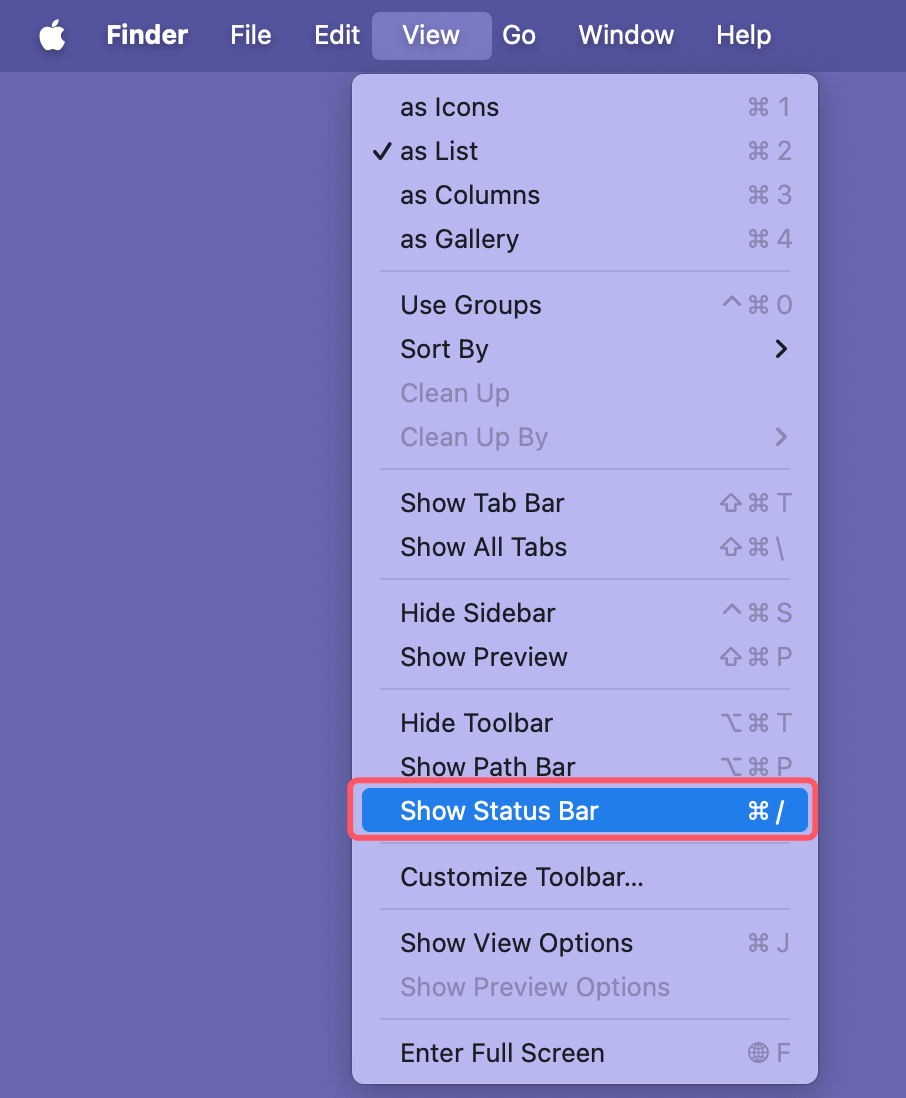
- Status Bar: Displays information about the number of items in a folder and the available disk space. To enable it, go to View > Show Status Bar.
![Status Bar]()
Basic Finder Operations
Opening, Copying, Moving, and Renaming Files
- Opening Files: Simply double-click a file to open it with its default application.
- Copying Files: Select a file, then press Command + C to copy. Navigate to the desired location and press Command + V to paste it.
- Moving Files: Drag and drop a file to move it to a different folder. You can also press Command + C to copy and Command + Option + V to move it.
- Renaming Files: Click once on the file name or press Enter after selecting the file to rename it.
Creating New Folders
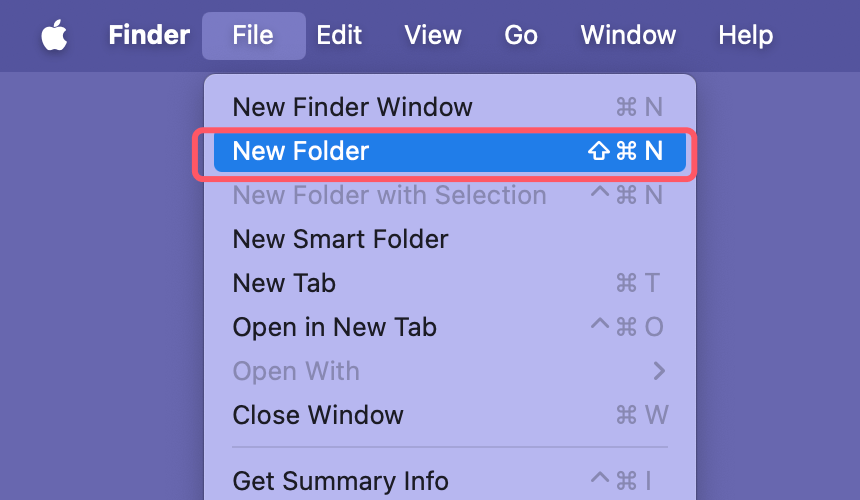
To create a new folder, go to File > New Folder or press Shift + Command + N. You can create folders to keep your files organized, and even use tags to add more context to your files.
Using Quick Look to Preview Files
Quick Look is a handy feature that lets you preview files without opening them. Simply select a file and press the Spacebar to see a preview. You can also zoom in, scroll through multi-page documents, or even play media files directly from the preview.
Using Finder Views
Icon, List, Column, and Gallery Views
Finder provides different view options to cater to various preferences and needs:
- Icon View: Displays your files and folders as icons, ideal for visual content like images.
- List View: Displays items in a detailed list, providing information such as file size and date modified.
- Column View: Shows your files in a column-based layout, great for navigating through nested folders.
- Gallery View: Displays a large preview of the selected file, ideal for browsing through images or PDFs.
![Using Finder Views]()
When to Use Each View
- Use Icon View if you prefer a visual representation of your files.
- List View is useful when you need to sort files by name, size, or date.
- Column View is excellent for seeing the folder structure.
- Gallery View is perfect for viewing images, videos, or documents that you want to preview quickly.
Organizing Files and Folders
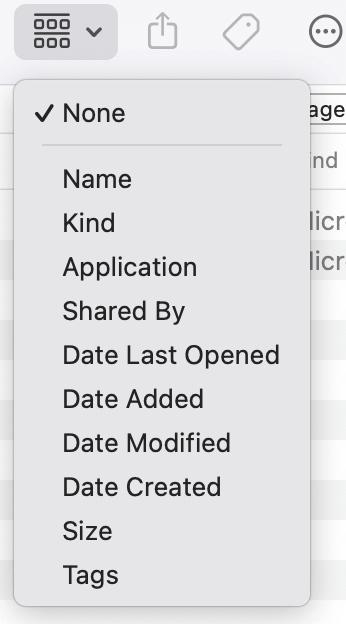
Sorting and Grouping Items
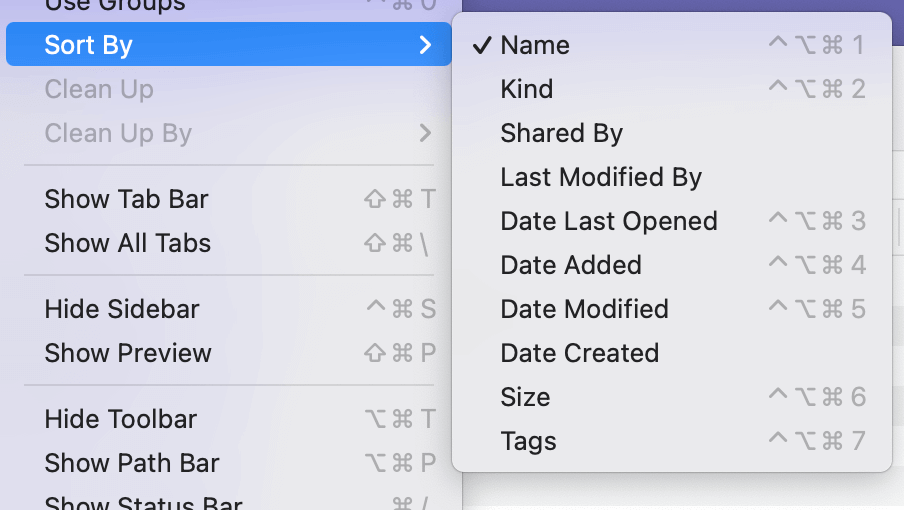
Finder allows you to sort and group items to make organization easier.
- Sorting: Click the View menu and choose Sort By to sort your files by name, kind, date, size, etc.
![Sorting]()
- Grouping: Go to View > Group By to group files by criteria like date, type, or tags.
![Grouping]()
Using Tags to Organize Files
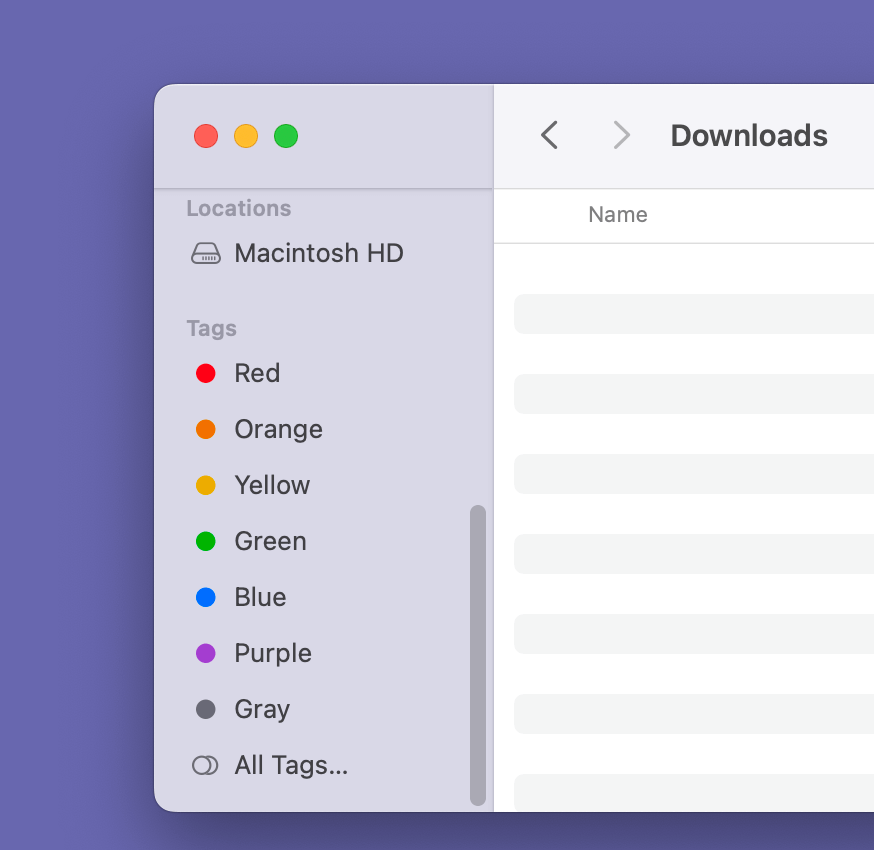
Tags provide a way to organize files beyond just placing them in folders. You can add one or more colored tags to any file or folder by right-clicking it and choosing Tags. Later, you can click on a tag in the Sidebar to see all the items with that tag, regardless of their location.
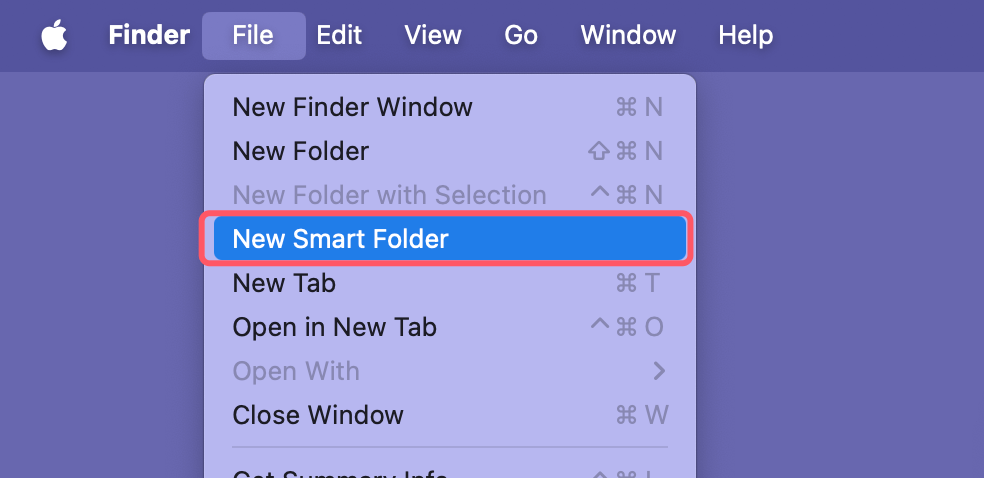
Creating Smart Folders
Smart Folders are dynamic folders that automatically gather files based on set criteria.
- To create a Smart Folder, go to File > New Smart Folder. Set the search criteria, such as file type or date modified, and click Save.
![Creating Smart Folders]()
- Smart Folders are helpful for grouping similar files, like recently edited documents or all images on your Mac.
Finder Search and Spotlight
Using the Finder Search Bar
The search bar in Finder is a powerful tool to locate files.
- Start typing in the Search field in any Finder window, and it will show you suggestions.
![Using the Finder Search Bar]()
- You can filter the results by type, location, or date.
Creating Saved Searches
If you frequently search for the same type of files, you can create a Saved Search:
Perform your search, click the Save button below the search bar, and give it a name. It will then appear in your Sidebar for easy access.

Integrating Spotlight for Better Search
Spotlight (Command + Space) is another powerful search tool that integrates well with Finder. It allows you to search for files, applications, and even perform calculations or get definitions. You can also access Spotlight results directly from Finder's search bar to broaden your search beyond your local folders.
Working with External Drives and Network Locations
Accessing and Managing External Drives
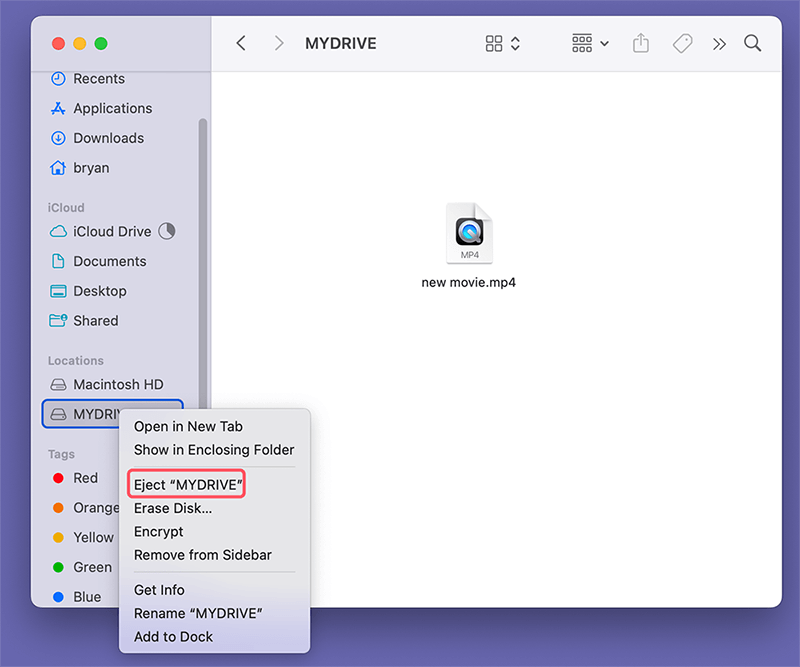
When you connect an external drive (such as a USB stick or external HDD) to your Mac, it appears in the Sidebar under Locations.
- Mounting and Unmounting Drives: If a drive isn't mounted automatically, you can open Disk Utility, select the drive, and click Mount. To safely remove it, right-click and select Eject.
![Mounting and Unmounting Drives]()
Network Volumes
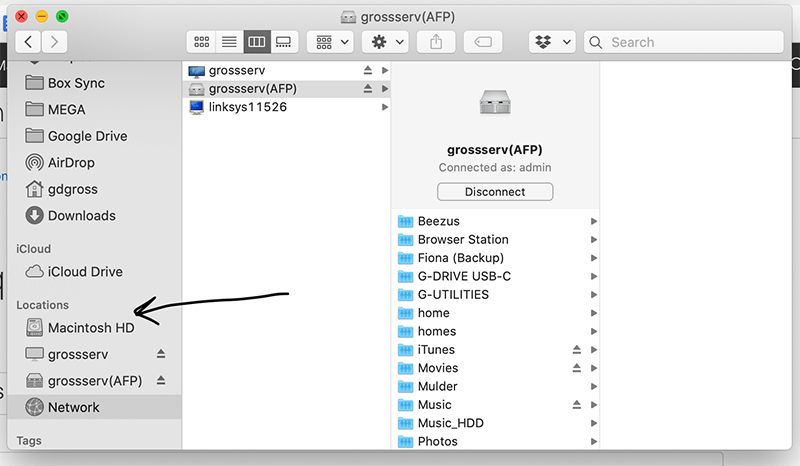
If your Mac is connected to a network, you can also access shared drives and folders through Finder.
- Click on Network in the Sidebar to see available network devices and shared resources.
- You may need to enter a username and password to access some network volumes.
![Network Volumes]()
Using Finder Shortcuts for Efficiency
Finder has several keyboard shortcuts to make navigation faster:
- Command + Up Arrow: Move up one folder level.
- Command + Down Arrow: Open the selected folder.
- Command + Delete: Move the selected item to the Trash.
- Spacebar: Use Quick Look to preview the selected file.
- Cmd + T: Open a new Finder tab.
Learning these shortcuts can help you navigate through Finder and manage your files more efficiently.
Advanced Finder Features
Using AirDrop to Share Files
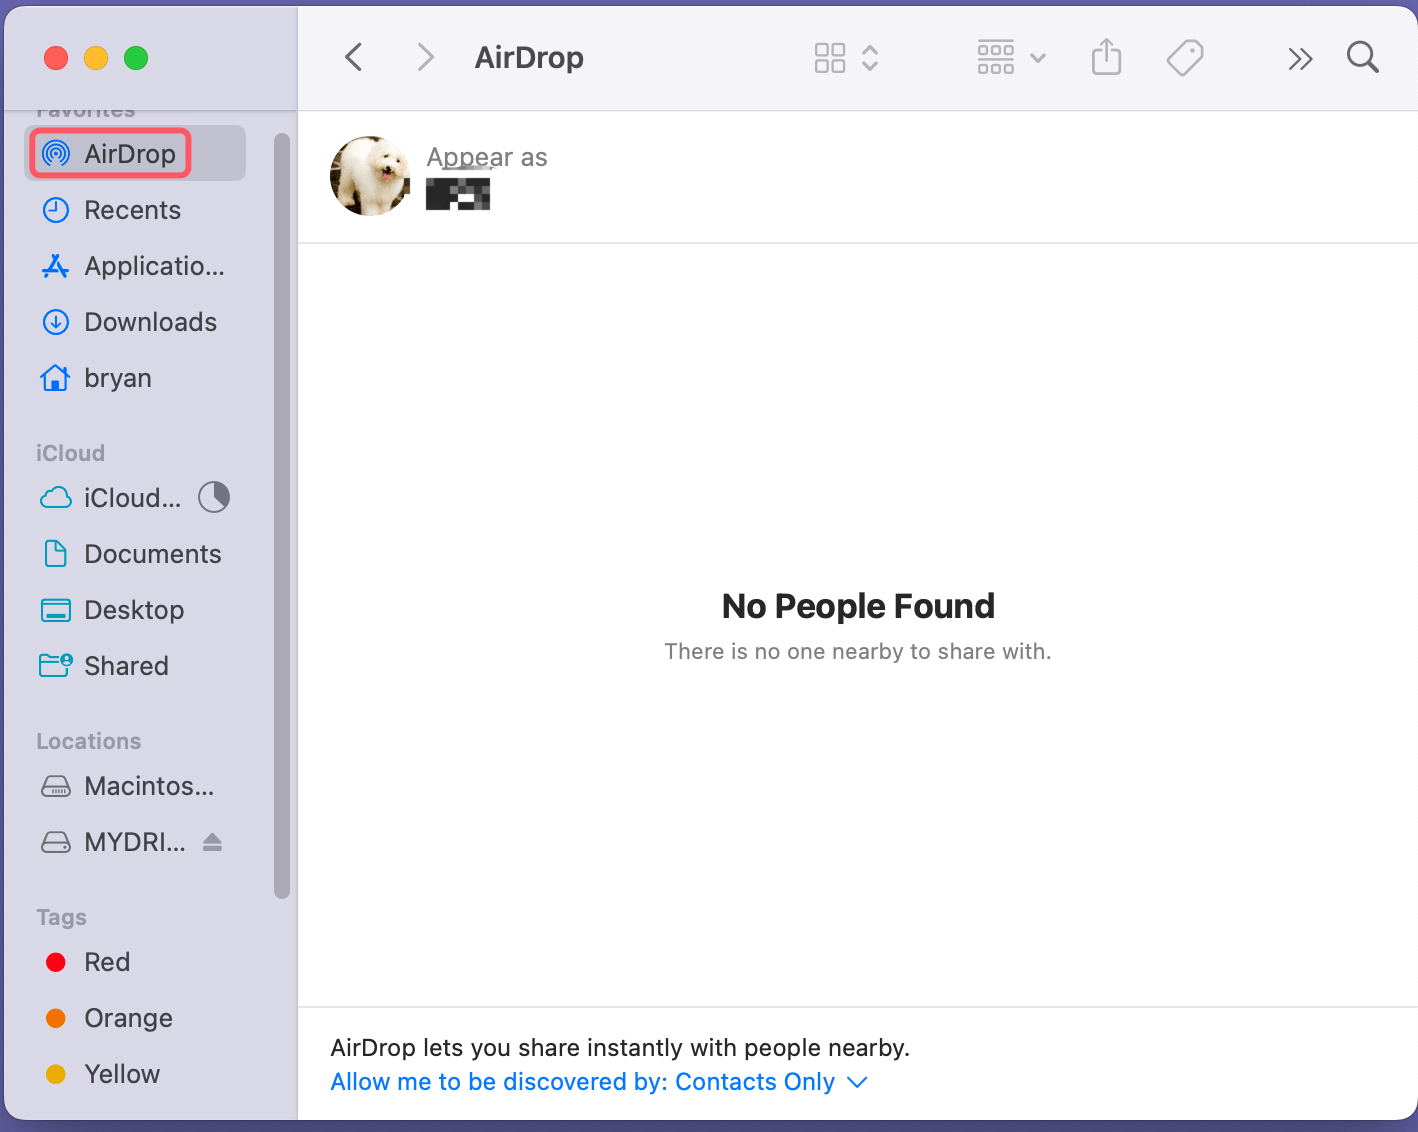
AirDrop is a convenient feature for sharing files with nearby Apple devices.
- To use AirDrop, open Finder and click on AirDrop in the Sidebar. Ensure that both Wi-Fi and Bluetooth are enabled.
![Using AirDrop to Share Files]()
- Drag the files you want to share into the AirDrop window, and select the recipient.
Accessing iCloud Drive
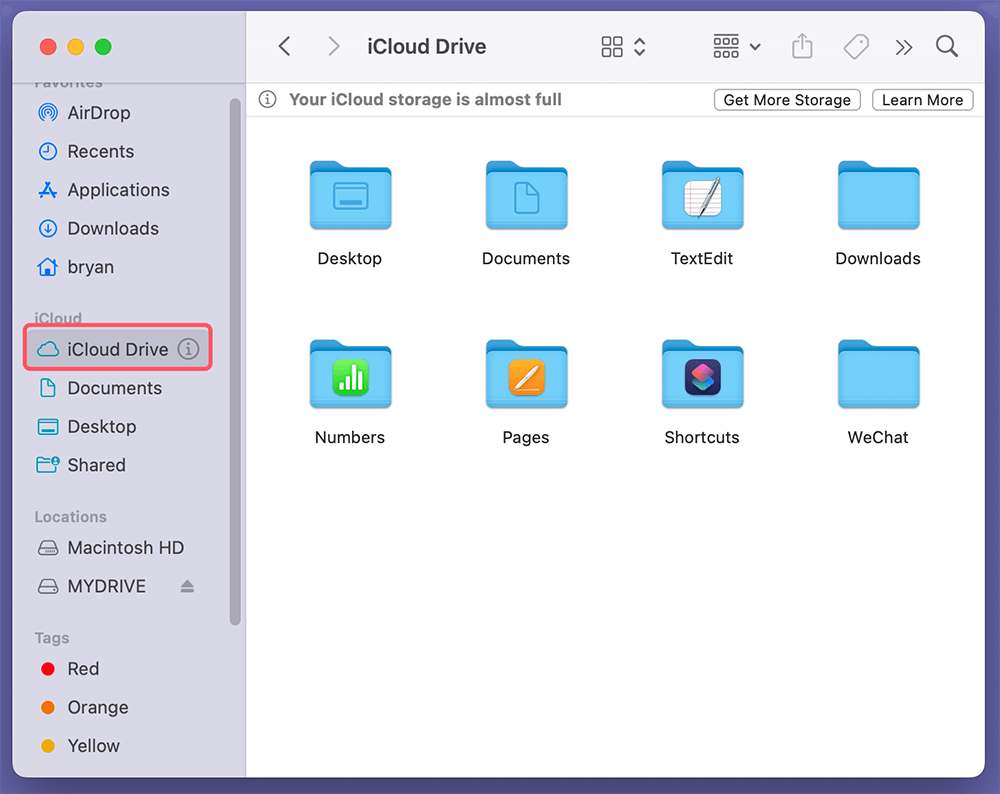
iCloud Drive integrates seamlessly with Finder, allowing you to access your cloud-stored files.
- You can find iCloud Drive in the Sidebar, where you can drag and drop files to sync them across your Apple devices.
![Accessing iCloud Drive]()
Customizing Finder Preferences
Finder can be customized to better suit your workflow.
- Go to Finder > Settings to adjust options like which items appear on the Desktop, which folders open by default, and Sidebar preferences.
![Customizing Finder Preferences]()
Troubleshooting Common Finder Issues
Finder Not Responding
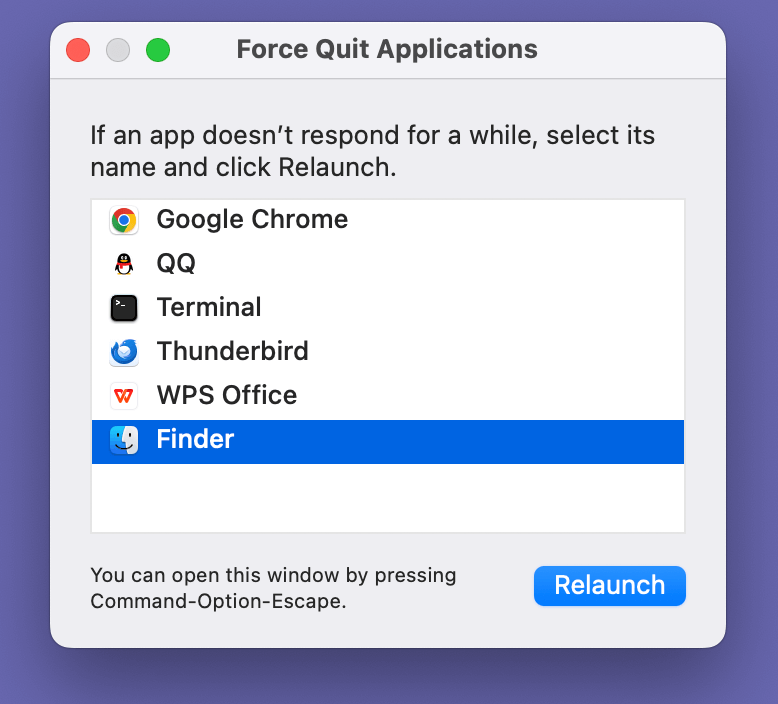
If Finder becomes unresponsive, you can force quit and restart it:
- Press Command + Option + Esc, select Finder, and click Relaunch.
![Finder Not Responding]()
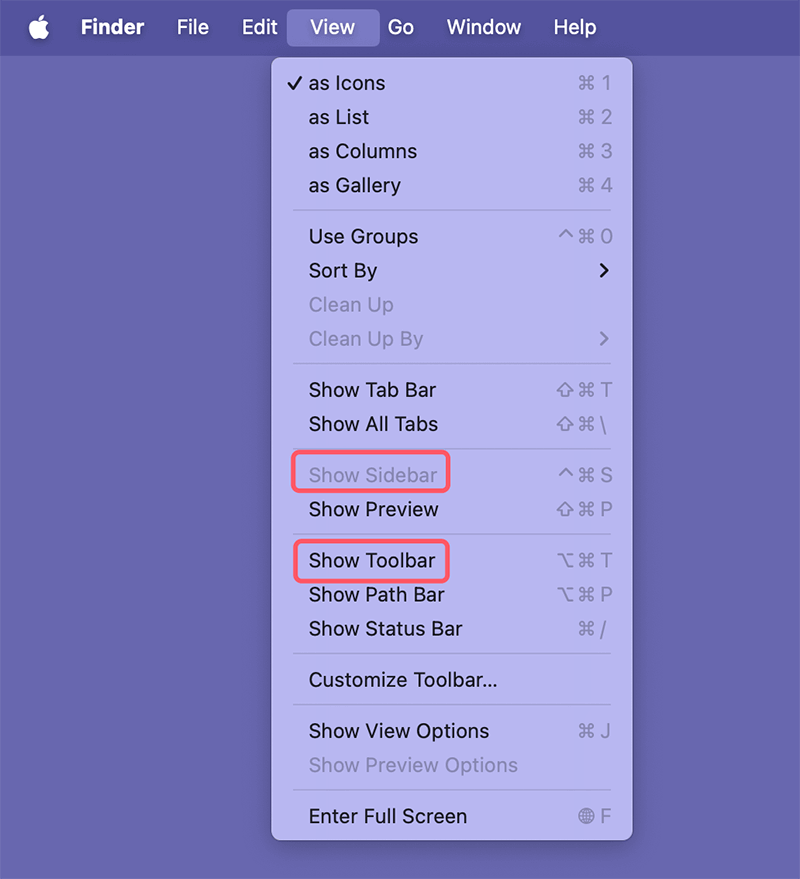
Solutions for Missing Sidebar or Toolbar
Sometimes, the Sidebar or Toolbar may disappear:
- To restore the Sidebar, go to View > Show Sidebar.
- For the Toolbar, click View > Show Toolbar.
![Solutions for Missing Sidebar or Toolbar]()
Conclusion
Finder is a versatile and powerful tool that helps you manage your files and folders on macOS efficiently. By understanding the basics, exploring the various views, using tags, creating Smart Folders, and employing shortcuts, you can significantly enhance your productivity. Whether you're new to macOS or a seasoned user, mastering Finder will make your file management tasks more intuitive and streamlined. Don't hesitate to explore and customize Finder's features to fit your needs, and you'll find navigating your Mac more enjoyable and efficient.
Related Articles
- Sep 02, 2025MacBook Pro Not Charging? Fix It with Easy Solutions
- Aug 10, 2025How to Set Default Browser on Mac?
- Jul 15, 2025How to Enter and Exit Full Screen on a Mac?
- Jul 13, 2024How to Repair An External Hard Drive on Mac?
- Jul 22, 2025Troubleshoot and Fix common macOS Tahoe 26 Beta Issues
- Dec 25, 2024How to Resize and Partition SSD on Mac?

Coco Lin
Coco has been a writer and a chief programmer at Donemax software since 2018. Over 10 years of experience of writing troubleshooting articles in the software industry, she is passionate about programming and loves to providing solutions to Windows and Mac users. Also she enjoys music and palying tennis in her free time.

Gerhard Chou
In order to effectively solve the problems for our customers, every article and troubleshooting solution published on our website has been strictly tested and practiced. Our editors love researching and using computers and testing software, and are willing to help computer users with their problems


