PAGE CONTENT:
Whether you're a photographer, designer, or simply someone who keeps important files on their Mac, losing images - especially important ones like PNG or JPG files - can be a distressing experience. Fortunately, there are several ways to recover deleted images on Mac, depending on how they were lost and the tools at your disposal.
In this guide, we will discover several methods to restore deleted PNG and JPG images on your Mac, from checking the Trash to using third-party recovery software, and even utilizing cloud backups. We will also discuss preventative measures to avoid accidental image deletion in the future.
5 Proven Ways to Recover Deleted/Lost PNG/JPG Images on Mac
1. Check the Trash
The first and simplest step to recover deleted PNG or JPG images is to check the Trash. When you delete a file on a Mac, it doesn't immediately disappear. Instead, it is moved to the Trash folder, giving you the chance to recover it if you change your mind.
How to Open the Trash:
To access the Trash, click on the Trash icon in the Dock. This will open a Finder window that displays all the files and folders currently in your Trash. Look for the PNG or JPG images that you want to recover.
Steps to Recover Files from the Trash:
- From the Dock, open the Trash.
- Locate the deleted PNG or JPG image(s) you wish to recover.
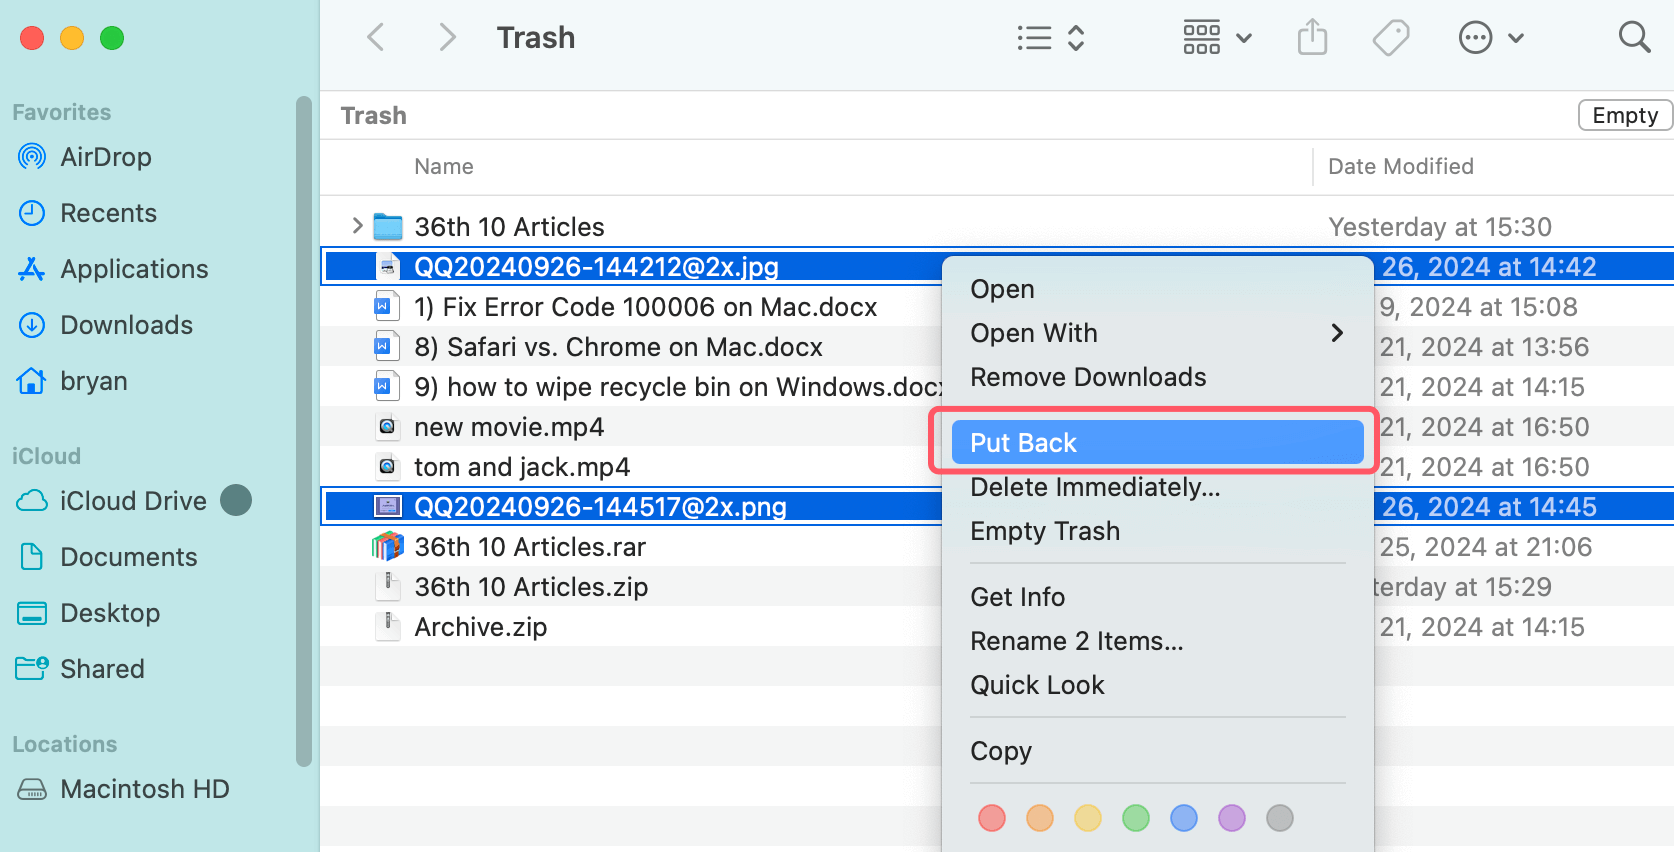
- Right-click on the image and select Put Back. This will restore the image to its original location on your Mac.
![Steps to Recover Files from the Trash]()
Alternatively, you can drag and drop the image back to your Desktop or another folder.
When the Trash Is Empty:
If the Trash has already been emptied, don't panic - there are still other recovery options available. However, the sooner you attempt to recover the deleted files, the better, as macOS may overwrite the deleted files with new data.
2. Use Time Machine Backup
If you have Time Machine set up, recovering deleted PNG or JPG images becomes a much easier task. Time Machine is macOS's built-in backup solution, which automatically backs up files and system data, allowing you to recover files from previous versions of your Mac.
How to Use Time Machine to Recover Deleted Images
- If it isn't already connected, connect your Mac to your Time Machine backup disk.
- Navigate to the folder containing the original image by opening Finder.
- Choose Enter Time Machine after clicking on the Time Machine symbol in the menu bar.
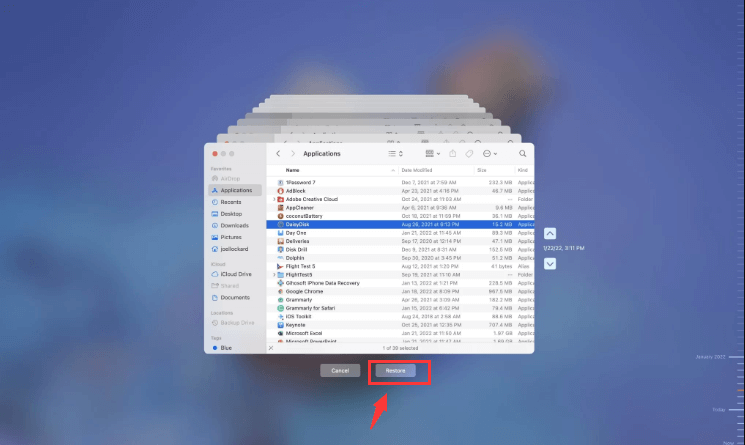
- You'll be taken back in time, viewing the contents of that folder as it was during different backup points. Use the timeline or arrows to navigate to a point before the image was deleted.
- Once you've found the deleted image, select it and click Restore.
![Use Time Machine to Recover Deleted Images]()
Limitations of Time Machine:
While Time Machine is an excellent tool for file recovery, it has some limitations:
- If you didn't have Time Machine set up prior to the file deletion, you won't be able to recover the image using this method.
- Time Machine will only store backups of images and files on the Mac that were present during the backup process. If the image was added after the last backup, it won’t be recoverable through Time Machine.
Use macOS File Recovery Tools:
In certain cases, you may be able to recover deleted images using macOS's built-in tools, although the process can be more advanced and isn't always guaranteed to work.
3. Using Terminal to Recover Deleted Files
You can attempt to recover deleted files using Terminal, the command-line interface in macOS. This method works if the files have been recently deleted and haven't been overwritten by new data. Here's how to attempt it:
- Open Terminal (found in Applications > Utilities).
- Type the following command:
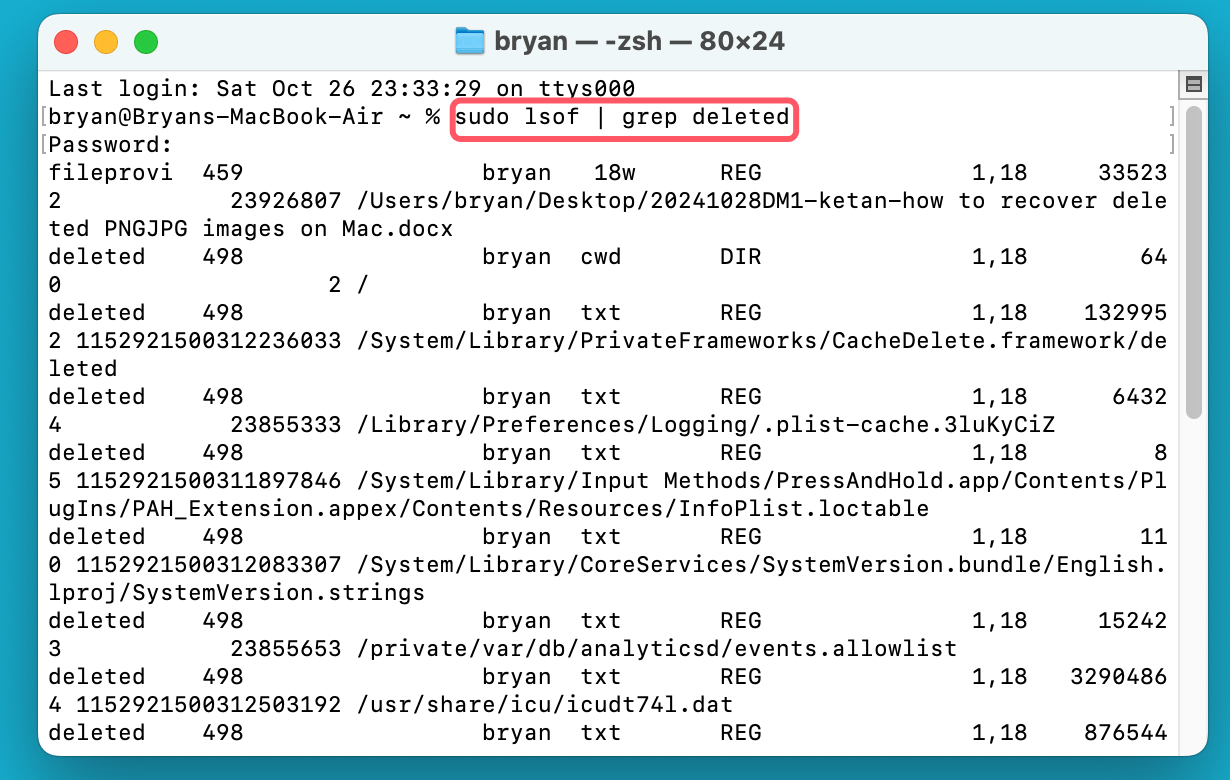
sudo lsof | grep deleted
This will list files that have been marked for deletion but are still open.
![Using Terminal to Recover Deleted Files]()
If your PNG or JPG image is in the list, there's a good chance it can be recovered.
- Look for the path where the file was stored, and note the file descriptor.
- Type the following command to copy the deleted file to a different location (replace "file_descriptor" and "path" with the actual values):
sudo cp /proc/self/fd/file_descriptor /path/to/restore
Limitations:
- Complexity: Using Terminal for file recovery is an advanced procedure that may be difficult for most users.
- Not Always Effective: This method may not work if the file was permanently deleted or overwritten by other data.
- Possible Risks: Mistakes while using Terminal can have unintended consequences, such as data corruption or system issues.
4. Use Third-Party Data Recovery Software
If the above methods don't work or are too complex, third-party data recovery software can be a more effective solution. These tools are specifically designed to recover lost or deleted files, including images like PNG and JPG, and are usually easy to use with a simple interface.
Donemax Data Recovery for Mac is one of the best Mac recovery tools. It supports to recover 2000+ file formats including PNG and JPG.
Donemax Data Recovery for Mac
- Recover permanently deleted PNG and JPG images on Mac.
- Recover lost PNG/JPG images from erased or formatted drive.
- Recover PNG/JPG images from inaccessible or damaged drive.
Steps for Using Third-Party Data Recovery Software
- Download and Install the Software: Install your chosen data recovery software on your Mac. It's best to install it on a different drive than the one from which you are recovering images, to avoid overwriting the deleted files.
- Launch the Program and Select the Drive: Open the recovery software (Donemax Data Recovery for Mac) and select the drive or partition where the deleted images were stored.
![Donemax Data Recovery for Mac]()
- Scan for Deleted Files: The software will scan the selected drive for recoverable files. Depending on the size of the disk and the quantity of data, this might take a while.
![Donemax Data Recovery for Mac]()
- Preview and Recover the Images: Upon scan completion, the software will show a list of recoverable files. Choose the PNG and JPG files you want to restore after previewing them. To move them back to a secure area, adhere to the instructions.
![Donemax Data Recovery for Mac]()
Limitations of Third-Party Software:
- Cost: Some data recovery tools are free, but many premium ones charge a fee for full functionality.
- Overwritten Data: If new data has overwritten the deleted images, recovery may not be possible.
- File Integrity: In some cases, recovered files may be corrupted or incomplete.
5. Check Cloud Backups or Synced Services
If you use cloud storage services or apps like iCloud, Google Photos, or Dropbox, your deleted images may still be recoverable from there.
Recovering Images from iCloud:
- Go to iCloud.com and log in with your Apple ID.
- Open iCloud Photos (if you use iCloud Photos to sync your images).
- Check the Recently Deleted album, which stores deleted photos and videos for 30 days before they are permanently deleted.
- If you find the deleted PNG or JPG images, you can restore them by selecting the images and clicking Recover.
![Recovering Images from iCloud]()
Recovering Images from Google Photos:
- Open Google Photos in your browser or app.
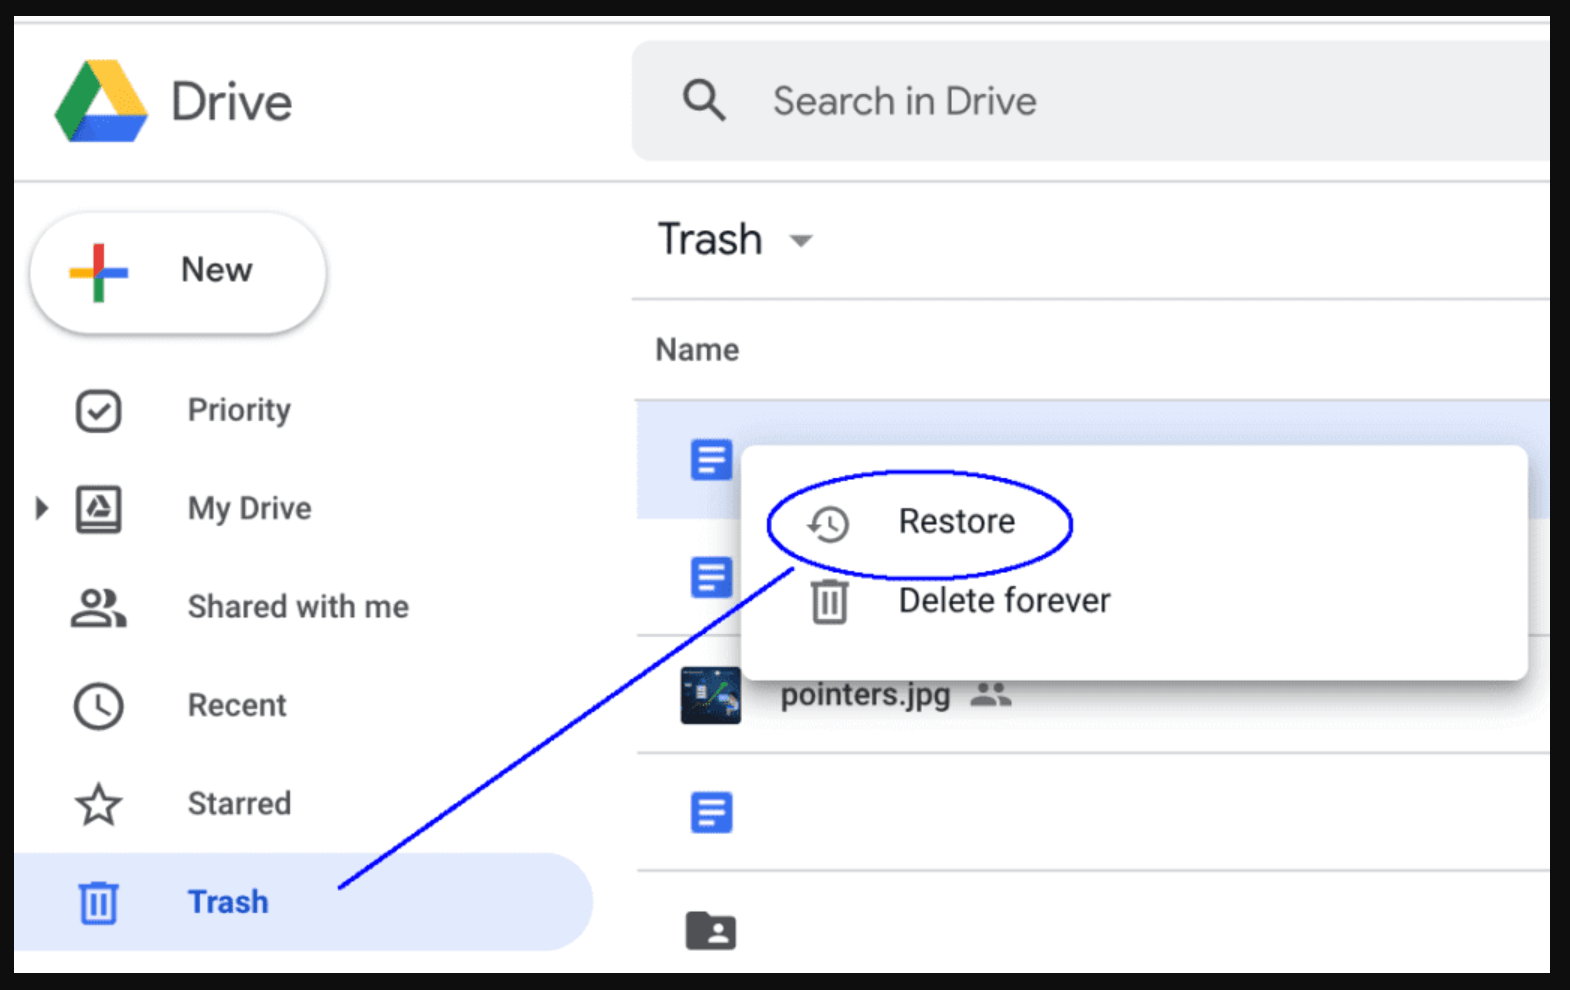
- Go to the Trash folder (or Bin on Android) and look for the deleted images.
- If you find them, select the images and choose Restore.
![Recovering Images from Google Photos]()
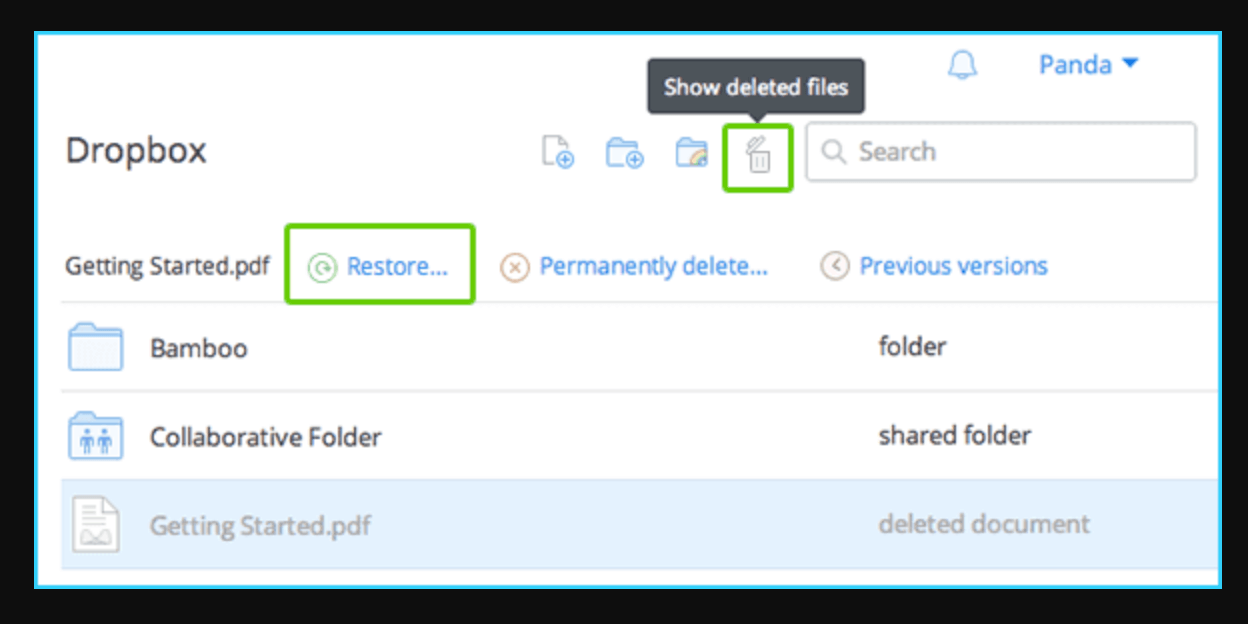
Recovering Images from Dropbox:
- Log in to Dropbox in your browser.
- Navigate to Deleted Files under the account settings.
- Find the deleted PNG or JPG images, and click Restore.
![Recovering Images from Dropbox]()
Precautions to Avoid Image Loss in the Future
To minimize the risk of losing important images in the future, it’s crucial to adopt some good file management and backup practices:
- Enable Time Machine: Set up and use Time Machine to automatically back up your images and files regularly.
- Use Cloud Storage: Use cloud storage services like iCloud, Google Photos, or Dropbox to back up important files. These services provide extra protection against data loss.
- Organize and Label Files: Regularly organize your image files into clearly labeled folders, making it easier to find them when needed and reducing the risk of accidental deletion.
- Use External Drives: Regularly back up your images to external hard drives or SSDs. An additional backup layer can protect you from data loss due to system failures.
Conclusion
While losing PNG and JPG images on your Mac can be stressful, there are many methods available for recovery. Whether you use the Trash, Time Machine, built-in tools, third-party recovery software, or cloud backups, chances are good that you can recover your deleted images.
However, it's important to act quickly before new data overwrites the deleted files. And most importantly, make regular backups to ensure that future data loss doesn't lead to further headaches. With these steps, you can ensure your images are safe and recoverable in the event of accidental deletion.
FAQs About PNG/JPG Image Recovery on Mac
1. How to recover deleted PNG/JPG images after emptying trash bin?
Donemax Data Recovery for Mac is a powerful Mac data recovery program. It can deeply scan the Mac internal drive and find all recoverable files including the deleted PNG/JPG images:
- Download and install Donemax Data Recovery for Mac, run it.
- Select the drive where you delete the PNG/JPG images.
- Click on Scan button.
- Preview and save the PNG/JPG images after scanning.
2. What is the best data recovery software for PNG/JPG recovery on Mac?
Recommended Data Recovery Tools for Mac PNG/JPG recovery:
- Donemax Data Recovery for Mac: Donemax Data Recovery for mac is a powerful data recovery software for Mac, known for its ease of use and effectiveness in recovering various types of files, including PNG and JPG images. It supports multiple file formats and has a built-in preview feature, allowing you to check the recoverable images before restoring them.
- EaseUS Data Recovery Wizard: Another well-known data recovery program is EaseUS, which can retrieve files from formatted volumes as well as external and internal hard disks. It offers a simple step-by-step process for recovering deleted files and can also restore lost data from a Time Machine backup.
- PhotoRec: A free, open-source recovery tool that specializes in recovering lost photos, including PNG and JPG. While it has a more basic interface, it is effective for users with technical expertise.
3. The recovered PNG/JPG images can't be opened, how to fix them?
You can rescan the hard drive and find more lost files, save all PNG/JPG images. You also can use third-party image repair tool such as Wondershare Repairit to fix corrupted PNG/JPG images.


Donemax Data Recovery for Mac
Donemax Data Recovery for Mac is one of the best Mac data recovery software. It is easy-to-use and can help in recovering deleted, formatted, inaccessible or lost data from Mac HDD/SSD, external disk, USB drive, SD card, camera or other storage devices.
Related Articles
- Mar 21, 2025Recover Deleted/Erased or Lost AutoCAD's DWG Files on Mac
- Feb 22, 2024How to Recover Lost Data from External Hard Drive, USB Drive, SD Card on macOS Sonoma?
- Feb 17, 2025Recover Lost Data from XQD Card on Mac: A Complete Guide
- Feb 05, 2025How to Unformat an SD Card on Mac?
- Jul 11, 20235 Methods to Recover Lost Data after Upgrading to macOS Sonoma
- Feb 12, 2025[2025 Updated] Top 4 Seagate File Recovery Solutions for Mac

Christina
Christina is the senior editor of Donemax software who has worked in the company for 4+ years. She mainly writes the guides and solutions about data erasure, data transferring, data recovery and disk cloning to help users get the most out of their Windows and Mac. She likes to travel, enjoy country music and play games in her spare time.

Gerhard Chou
In order to effectively solve the problems for our customers, every article and troubleshooting solution published on our website has been strictly tested and practiced. Our editors love researching and using computers and testing software, and are willing to help computer users with their problems
