Written byStevenUpdated on Apr 15, 2025
[4 Methods] Recover RAID Drive on Mac: A Complete Guide
Approved byGerhard Chou
Before we start: If you want to recover lost data from RAID disks on Mac, you can try Donemax Data Recovery for Mac. It offers deep scan mode and can find deleted/erased and inaccessible data from any RAID disk on Mac.
PAGE CONTENT:
RAID (Redundant Array of Independent Disks) is a storage technology that combines multiple hard drives into a single logical unit to provide data redundancy, performance improvement, or both. Mac users often configure RAID arrays to boost read/write speeds or to safeguard sensitive data against hardware failures. However, like any system, RAID arrays are not immune to failure. When a RAID drive on your Mac becomes inaccessible or crashes, recovering the data can seem daunting.
This comprehensive guide will walk you through everything you need to know about recovering a RAID drive on a Mac - covering causes of RAID failure, signs of malfunction, recovery methods (manual and software-based), and preventive measures to avoid data loss in the future.
About RAID on Mac
RAID is a storage technique that distributes or replicates data across multiple drives. There are several RAID levels, each offering different balances of performance, redundancy, and fault tolerance.
Common RAID Levels Used on Mac:
- RAID 0 (Striping): Offers high performance by splitting data across drives. No fault tolerance.
- RAID 1 (Mirroring): Duplicates data on two or more drives for redundancy.
- RAID 5: Distributes data and parity information across three or more drives. Can tolerate the failure of one drive.
- RAID 10 (1+0): Combines mirroring and striping for both speed and redundancy.
macOS supports RAID configurations through Disk Utility, Terminal, and third-party tools. However, RAID management isn't always straightforward - especially when dealing with a failed or degraded array.
Common Causes of RAID Failure on Mac
RAID systems are vulnerable to a variety of hardware and software issues. Here are the most frequent causes of RAID failure on Mac:
- Disk Failure: When one or more drives in the array physically fail.
- RAID Controller Issues: A malfunctioning RAID controller can corrupt the array.
- File System Corruption: Software bugs, virus infections, or improper shutdowns can corrupt the RAID volume.
- macOS Updates: System upgrades or kernel changes might interfere with RAID recognition.
- Human Error: Accidental reformatting, deletion of partitions, or improper configuration.
- Power Surges: Sudden power cuts can damage drives or corrupt data.
Signs Your RAID Drive Might Be Failing:
Spotting RAID issues early can make recovery more successful. Look out for these warning signs:
- The RAID set no longer mounts or appears in Finder.
- Disk Utility shows the RAID set as "Degraded" or "Failed."
- Slow or unresponsive read/write operations.
- Missing or inaccessible files.
- One or more drives in the array appear uninitialized.
- Boot issues if RAID is used as the startup disk.
If you notice any of these symptoms, it's crucial to stop using the RAID array immediately to avoid further data loss or overwriting.
Preliminary Steps Before Recovery:
Before diving into RAID recovery, you should take a few preparatory steps:
1. Stop Using the RAID Array
The more you use a failing RAID system, the higher the risk of overwriting recoverable data.
2. Check Physical Connections
Ensure all cables, power sources, and RAID enclosures are properly connected and functional.
3. Attempt a Safe Rebuild
In Disk Utility, macOS might prompt you to rebuild the RAID if only one disk has failed (depending on the RAID level).
4. Backup Accessible Data
If the RAID is still partially accessible, copy all readable files to a separate external drive immediately.
If none of these steps work, it's time to attempt more advanced recovery methods.
Best 4 Methods to Recover RAID Drive on Mac
There are several ways to recover a RAID drive on Mac - ranging from built-in tools and Terminal commands to advanced software solutions and professional services.
Method 1: Manual Recovery Using Disk Utility
Disk Utility can sometimes help in cases where the RAID set is only mildly corrupted.
Steps:
- Open Disk Utility from Utilities via Applications.
- Select your RAID set from the left panel.
- Click First Aid and run it on each volume.
![recovering a RAID drive on a Mac]()
- If prompted to rebuild the RAID, proceed as instructed.
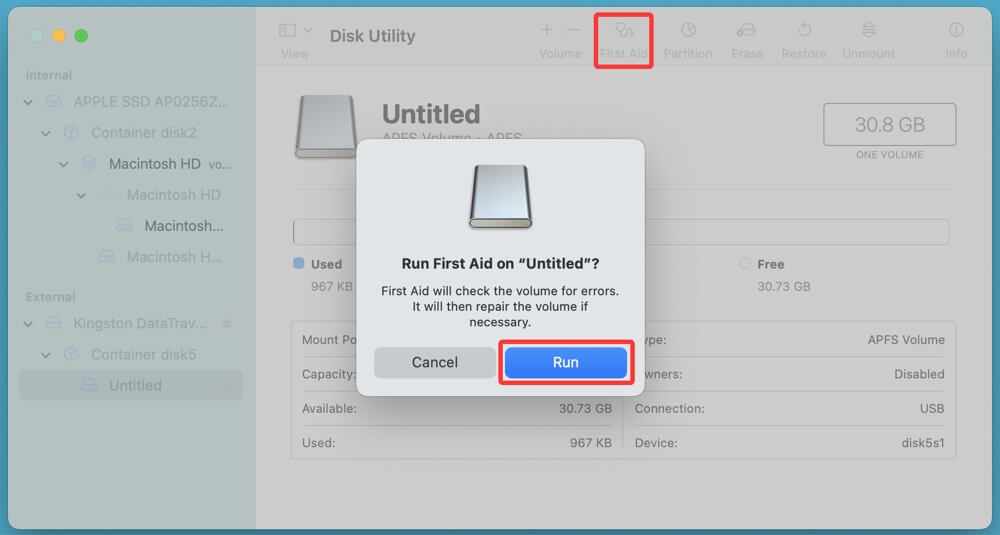
💡 Note: This method may not work if multiple disks are damaged or if the RAID metadata is corrupted.
Method 2: Use Terminal for RAID Diagnostics
If Disk Utility doesn't work, Terminal gives you access to more detailed RAID management.
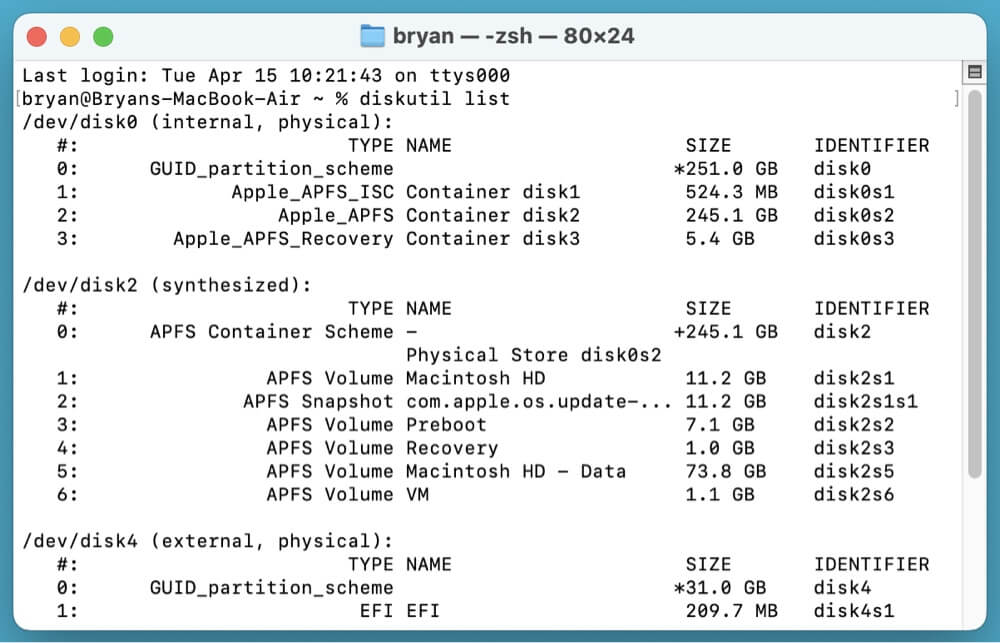
Key Terminal Commands:
- diskutil list: Lists all connected drives and partitions.
- diskutil appleRAID list: Displays all AppleRAID volumes and their status.
- diskutil appleRAID repair <RAIDSetUUID>: Attempts to repair the RAID set.
💡 Caution: Terminal is powerful—use it carefully to avoid unintentional damage.
Method 3: Recover RAID Drive Using Third-Party Software
If native macOS tools like Disk Utility or Terminal fail to recover your RAID drive, the next best step is to use specialized RAID recovery software. These tools are engineered to identify broken RAID configurations, rebuild the array structure virtually, and extract inaccessible data even from severely corrupted drives.
Why Use RAID Recovery Software?
RAID recovery tools offer advanced algorithms to:
- Automatically detect RAID parameters (strip size, disk order, parity rotation).
- Emulate the RAID array virtually, without making changes to the original drives.
- Recover lost partitions, files, and folders from a non-functional or degraded RAID set.
- Provide secure recovery using a read-only mechanism to prevent data overwriting.
These tools are especially useful if:
- You're not sure of your original RAID configuration.
- One or more drives are offline but physically accessible.
- The file system is corrupted (e.g., HFS+, APFS, or exFAT).
- You need to preview files before committing to a recovery process.
Top RAID Recovery Software for Mac: A Deeper Look
1. Donemax Data Recovery for Mac
- Supported RAID Levels: RAID 0, 1, 5, and 6.
- Key Features:
- Virtual RAID reconstruction if parameters are unknown.
- Deep scan mode to recover severely fragmented or deleted data.
- Supports HFS+, APFS, FAT32, NTFS, and ExFAT file systems.
- Ideal For: Users who need a balance of power and simplicity.
2. Disk Drill Pro with RAID Support
- Supported RAID Levels: RAID 0 and 1 (basic RAID levels).
- Key Features:
- User-friendly interface for beginners.
- File signature-based recovery (can recover photos, docs, etc. without file system metadata).
- Preview mode before recovery.
- Ideal For: Beginners or users with relatively simple RAID setups.
3. R-Studio for Mac
- Supported RAID Levels: RAID 0, 1, 4, 5, 6, and custom configurations.
- Key Features:
- Manual input of RAID parameters for advanced users.
- Rebuilds RAID arrays with damaged or missing disks using parity data.
- Supports remote recovery over LAN.
- Hexadecimal disk editor and SMART monitoring tools.
- Ideal For: IT professionals, data recovery technicians, and power users.
4. UFS Explorer RAID Recovery
- Supported RAID Levels: Almost all, including nested RAID (RAID 10, 50, JBOD).
- Key Features:
- Automatic and manual RAID assembly.
- Disk-on-disk recovery for macOS Fusion Drives.
- Extensive compatibility with macOS file systems and virtual drives.
- Ideal For: Users dealing with complex or custom RAID environments.
General Steps to Use RAID Recovery Software:
Step 1. Download and install the reliable RAID data recovery software - such as Donemax Data Recovery for Mac.
Step 2. Open Donemax Data Recovery for Mac, select the RAID disk to start data recovery.

Step 3. Click on Scan button to deeply scan the RAID disk and find all recoverable files.

Step 4. After deep scan, it finds all deleted/erased or inaccessible files. Select the wanted files, click on Recover button to save them.

Tips for Better Software-Based RAID Recovery:
- Label Each Disk: Physically label your drives so you remember their original order in the RAID array.
- Document RAID Specs: If possible, find or recall the original settings (RAID level, block size, etc.) used during setup.
- Clone Disks Before Recovery: To avoid any risks, create disk images of each drive and perform recovery operations on the clones.
- Use Read-Only Mode: Ensure the software doesn't alter the source drives during scanning.
Limitations of Software Recovery:
While third-party tools are highly effective, they can’t recover from:
- Physically failed drives (clicking sounds, not spinning up).
- RAID controller encryption without a matching controller or firmware.
- Encrypted APFS volumes without the password or key.
If you're unsure whether your situation is recoverable via software, most tools offer a free scan preview so you can test before purchasing a license.
Method 4: Contact a Professional RAID Recovery Service
When DIY solutions fail, or if the RAID involves mission-critical data, it’s best to consult professionals.
When to Consider Professional Help:
- Physical damage to drives (e.g., clicking sounds).
- Multiple drive failures in a RAID 5 or 10 array.
- Corrupted RAID metadata that software can’t interpret.
- macOS fails to detect the RAID set entirely.
What to Expect:
- Evaluation of the RAID system (sometimes free).
- Non-invasive imaging of the drives to avoid further damage.
- Use of proprietary tools to rebuild the array and extract data.
Tips to Prevent RAID Data Loss on Mac
RAID is not a substitute for a proper backup. Always combine RAID with a good backup strategy.
Prevention Tips:
- Regular Backups: Use Time Machine or third-party tools to back up data outside of the RAID array.
- Monitor Disk Health: Use SMART monitoring tools to track disk status.
- Use UPS (Uninterruptible Power Supply): Prevents damage from power outages.
- Label and Document RAID Configuration: Keep a written or digital record of your RAID setup.
- Perform Routine Checks: Periodically verify RAID integrity using Disk Utility or Terminal.
- Update Firmware and macOS: Maintain up-to-date software to prevent compatibility issues.
Conclusion
Recovering a RAID drive on Mac can be complex, but it's not impossible. Whether your RAID system suffered a minor glitch or a severe failure, there are multiple ways to regain access to your valuable data. Start with basic checks and manual tools like Disk Utility and Terminal. If those don't work, turn to specialized RAID recovery software - such as Donemax Data Recovery for Mac. For the most critical cases, don't hesitate to seek professional help.
Most importantly, remember that RAID is a redundancy measure, not a backup. Always maintain separate backups to truly safeguard your data against future failures.
With the right tools and a proactive approach, you can navigate RAID disasters and keep your Mac systems running smoothly.
Donemax Data Recovery for Mac
Donemax Data Recovery for Mac is one of the best Mac data recovery software. It is easy-to-use and can help in recovering deleted, formatted, inaccessible or lost data from Mac HDD/SSD, external disk, USB drive, SD card, camera or other storage devices.
Related Articles
- Feb 29, 2024SDHC Card Recovery on Mac: Completely Recover Deleted/Formatted Data
- Dec 31, 2024Can't Find a File on Mac? Get It Back By Searching or Recovering
- Mar 26, 2025How to Recover Replaced Files or Folders on Mac?
- Mar 26, 2025How to Recover Deleted Audio Files on Mac? Here Are 7 Proven Methods
- Feb 12, 2025[2025 Updated] Top 4 Seagate File Recovery Solutions for Mac
- Mar 04, 2025[5 Methods] Recover Deleted or Unsaved TextEdit Files on Mac

Contributing Writer
Steven
Steven has been a senior writer & editor of Donemax software since 2020. He's a super nerd and can't imagine the life without a computer. Over 6 years of experience of writing technical solutions and software tesing, he is passionate about providing solutions and tips for Windows and Mac users.

Editor in chief
Gerhard Chou
In order to effectively solve the problems for our customers, every article and troubleshooting solution published on our website has been strictly tested and practiced. Our editors love researching and using computers and testing software, and are willing to help computer users with their problems